Most 3D printers use leadscrews for at least one axis. These are simple devices that are essentially a steel screw thread and a brass nut that travels on it. However, for maximum precision, you’d like to use a ball screw. These are usually very expensive but have many advantages over a leadscrew. [MirageC] found cheaper ball screws but, since they were inexpensive, they had certain limitations. He designed a simple device that improves the performance of these cheap ball screws.
Superficially, a ball screw looks like a leadscrew with an odd-looking thread. However, the nut is very different. Inside the nut are ball bearings that fit in the grooves and allows the nut to spin around with much less friction. A special path collects the ball bearings and recirculates them to the other side of the nut. In general, ball screws are very durable, can handle higher loads and higher speeds, and require less maintenance. Unlike leadscrews, they are more expensive and are usually quite rigid. They are also a bit noisier, though.
Ball screws are rated C0 to C10 precision where C10 is the least accurate and the price goes up — way up — with accuracy. [MirageC] shows how cheaper ball screws can be rolled instead of precision ground. These screws are cheaper and harder, but exhibit more runout than a precision screw.
This runout caused wobble during 3D printing that was immediately obvious on the prints. Using a machinist’s dial gauge, [MirageC] found the screws were not straight at all and that even a relatively poor C7 ball screw would be more precise.
The solution? A clever arrangement of 3D printed parts. ball bearings, and magnets. The device allows the nut to move laterally without transmitting it to the print bed. It is a clever design and seems to work well.
It was around the year 1590 when mankind figured out how to use optical lenses to bring into sight things smaller than the natural eye can observe. With the invention of the microscope, a new and unexplored world was discovered. It will likely be of great surprise to the reader that scientists of the time did not believe that within this new microscopic realm lay the source of sickness and disease. Most would still hold on to a belief of what was known as Miasma theory, which dates back to the Roman Empire. This theory states that the source of disease was contaminated air through decomposing organic materials. It wouldn’t be until the 1850’s that a man by the name of Louis Pasteur, from whom we get “pasteurization”, would promote Germ Theory into the spotlight of the sciences.
Pasteur, considered by many as the father of microbiology, would go on to assist fellow biologist Charles Chameberland in the invention of the aptly named Pasteur Chamberland filter — a porcelain filter with a pore size between 100 and 1000 nanometers. This was small enough to filter out the microscopic bacteria and cells known at that time from a liquid suspension, leaving behind a supply of uncontaminated water. But like so many other early scientific instrumentation inventions it would lead to the discovery of something unexpected. In this case, a world far smaller than 100 nanometers… and add yet another dimension to the ever-shrinking world of the microscopic.
This is when we began to learn about viruses.
Discovery of the Virus and the Vaccine
The word “virus” stems from the Latin phrase “slimy fluid“. In 1898, a man by the name of Martinus Beijerinck passed a solution containing a still unknown infectious agent that targeted tobacco plants through a Pasteur Chamberland filter. The purified solution was applied to a healthy tobacco plant and to his great surprise the plant became infected. He concluded that the infectious agent was unfilterable, and took an even further leap to describe the infectious agent as a “living liquid”.
The Brome Mosaic virus easily passed through filters. Source
In that same year, a pair of German scientists, Friedrich Loeffler and Paul Frosch, performed the same experiment which returned the same results with what we now know as Foot-and-Mouth Disease (FMDV) in livestock. They, however, did not agree with Beijerinck’s conclusion of the infectious agent being a living liquid. But instead believed it to be a particulate that was smaller than the porcelain filter pore size. They pushed forward with their belief by heating the filter element to “destroy the agent’s infectivity”, though it was not clear to them as to how heat destroyed it. Nevertheless, they were successful in creating an FMDV vaccine for cows and sheep from the infectious solution that was passed through the heated filter, which put more precedence on understanding a virus as an ultrascopic living particulate, and not a living liquid.
It should be noted that the smallpox vaccine was widely used at this time, though no one had any understanding of how it worked or what it even was. Indeed, the term vaccine is derived from the Latin word vacca, which translates directly to cow. This odd relationship owes its history to the somewhat accidental discovery that milkmaids who often contracted a very mild disease called cowpox did not get infected with the much more severe smallpox disease. In 1796, a cruel experiment was performed by a man named Edward Jenner. He took puss from a cowpox blister and purposely infected a young boy. Once the boy recovered, he repeated the process with smallpox and found that the boy did not get the disease. Jenner’s vaccination technique would not only go on to save millions of lives from smallpox; it would be used to vaccinate people from several other diseases, including polio and yellow fever.
The Birth of Molecular Biology
A molecular view of the COVID-19 protein “spikes”. Source
The next few decades would identify hundreds of viruses of all shapes and sizes, and along with them various types of vaccines. But it was the study of exactly what these viruses were and how the vaccines actually worked that would give rise to a revolutionary new science — molecular biology.
Understanding viruses at the molecular level presents a very real modern day challenge. Despite the full power, wealth, and knowledge of our modern civilization, a tiny packet of RNA enclosed in a fatty drop continues to wreak havoc on our world. The COVID-19 virus has in some shape, form, or fashion effected every single human being on earth. Those viruses once invisible to us now stand before our very eyes in full view, and yet we have suffered terrible losses to this one. Our best tool is a breakthrough barely 30 years old — our ability to tailor messenger RNA (mRNA) a targeted purpose — has very quickly led to a viable vaccine. There is no doubt in my mind that eventually this virus will succumb to the might of human ingenuity that has been unlocked by more than a century of cumulative scientific knowledge.
It was around the year 1590 when mankind figured out how to use optical lenses to bring into sight things smaller than the natural eye can observe. With the invention of the microscope, a new and unexplored world was discovered. It will likely be of great surprise to the reader that scientists of the time did not believe that within this new microscopic realm lay the source of sickness and disease. Most would still hold on to a belief of what was known as Miasma theory, which dates back to the Roman Empire. This theory states that the source of disease was contaminated air through decomposing organic materials. It wouldn’t be until the 1850’s that a man by the name of Louis Pasteur, from whom we get “pasteurization”, would promote Germ Theory into the spotlight of the sciences.
Pasteur, considered by many as the father of microbiology, would go on to assist fellow biologist Charles Chameberland in the invention of the aptly named Pasteur Chamberland filter — a porcelain filter with a pore size between 100 and 1000 nanometers. This was small enough to filter out the microscopic bacteria and cells known at that time from a liquid suspension, leaving behind a supply of uncontaminated water. But like so many other early scientific instrumentation inventions it would lead to the discovery of something unexpected. In this case, a world far smaller than 100 nanometers… and add yet another dimension to the ever-shrinking world of the microscopic.
This is when we began to learn about viruses.
Discovery of the Virus and the Vaccine
The word “virus” stems from the Latin phrase “slimy fluid“. In 1898, a man by the name of Martinus Beijerinck passed a solution containing a still unknown infectious agent that targeted tobacco plants through a Pasteur Chamberland filter. The purified solution was applied to a healthy tobacco plant and to his great surprise the plant became infected. He concluded that the infectious agent was unfilterable, and took an even further leap to describe the infectious agent as a “living liquid”.
The Brome Mosaic virus easily passed through filters. Source
In that same year, a pair of German scientists, Friedrich Loeffler and Paul Frosch, performed the same experiment which returned the same results with what we now know as Foot-and-Mouth Disease (FMDV) in livestock. They, however, did not agree with Beijerinck’s conclusion of the infectious agent being a living liquid. But instead believed it to be a particulate that was smaller than the porcelain filter pore size. They pushed forward with their belief by heating the filter element to “destroy the agent’s infectivity”, though it was not clear to them as to how heat destroyed it. Nevertheless, they were successful in creating an FMDV vaccine for cows and sheep from the infectious solution that was passed through the heated filter, which put more precedence on understanding a virus as an ultrascopic living particulate, and not a living liquid.
It should be noted that the smallpox vaccine was widely used at this time, though no one had any understanding of how it worked or what it even was. Indeed, the term vaccine is derived from the Latin word vacca, which translates directly to cow. This odd relationship owes its history to the somewhat accidental discovery that milkmaids who often contracted a very mild disease called cowpox did not get infected with the much more severe smallpox disease. In 1796, a cruel experiment was performed by a man named Edward Jenner. He took puss from a cowpox blister and purposely infected a young boy. Once the boy recovered, he repeated the process with smallpox and found that the boy did not get the disease. Jenner’s vaccination technique would not only go on to save millions of lives from smallpox; it would be used to vaccinate people from several other diseases, including polio and yellow fever.
The Birth of Molecular Biology
A molecular view of the COVID-19 protein “spikes”. Source
The next few decades would identify hundreds of viruses of all shapes and sizes, and along with them various types of vaccines. But it was the study of exactly what these viruses were and how the vaccines actually worked that would give rise to a revolutionary new science — molecular biology.
Understanding viruses at the molecular level presents a very real modern day challenge. Despite the full power, wealth, and knowledge of our modern civilization, a tiny packet of RNA enclosed in a fatty drop continues to wreak havoc on our world. The COVID-19 virus has in some shape, form, or fashion effected every single human being on earth. Those viruses once invisible to us now stand before our very eyes in full view, and yet we have suffered terrible losses to this one. Our best tool is a breakthrough barely 30 years old — our ability to tailor messenger RNA (mRNA) a targeted purpose — has very quickly led to a viable vaccine. There is no doubt in my mind that eventually this virus will succumb to the might of human ingenuity that has been unlocked by more than a century of cumulative scientific knowledge.
It was around the year 1590 when mankind figured out how to use optical lenses to bring into sight things smaller than the natural eye can observe. With the invention of the microscope, a new and unexplored world was discovered. It will likely be of great surprise to the reader that scientists of the time did not believe that within this new microscopic realm lay the source of sickness and disease. Most would still hold on to a belief of what was known as Miasma theory, which dates back to the Roman Empire. This theory states that the source of disease was contaminated air through decomposing organic materials. It wouldn’t be until the 1850’s that a man by the name of Louis Pasteur, from whom we get “pasteurization”, would promote Germ Theory into the spotlight of the sciences.
Pasteur, considered by many as the father of microbiology, would go on to assist fellow biologist Charles Chameberland in the invention of the aptly named Pasteur Chamberland filter — a porcelain filter with a pore size between 100 and 1000 nanometers. This was small enough to filter out the microscopic bacteria and cells known at that time from a liquid suspension, leaving behind a supply of uncontaminated water. But like so many other early scientific instrumentation inventions it would lead to the discovery of something unexpected. In this case, a world far smaller than 100 nanometers… and add yet another dimension to the ever-shrinking world of the microscopic.
This is when we began to learn about viruses.
Discovery of the Virus and the Vaccine
The word “virus” stems from the Latin phrase “slimy fluid“. In 1898, a man by the name of Martinus Beijerinck passed a solution containing a still unknown infectious agent that targeted tobacco plants through a Pasteur Chamberland filter. The purified solution was applied to a healthy tobacco plant and to his great surprise the plant became infected. He concluded that the infectious agent was unfilterable, and took an even further leap to describe the infectious agent as a “living liquid”.
The Brome Mosaic virus easily passed through filters. Source
In that same year, a pair of German scientists, Friedrich Loeffler and Paul Frosch, performed the same experiment which returned the same results with what we now know as Foot-and-Mouth Disease (FMDV) in livestock. They, however, did not agree with Beijerinck’s conclusion of the infectious agent being a living liquid. But instead believed it to be a particulate that was smaller than the porcelain filter pore size. They pushed forward with their belief by heating the filter element to “destroy the agent’s infectivity”, though it was not clear to them as to how heat destroyed it. Nevertheless, they were successful in creating an FMDV vaccine for cows and sheep from the infectious solution that was passed through the heated filter, which put more precedence on understanding a virus as an ultrascopic living particulate, and not a living liquid.
It should be noted that the smallpox vaccine was widely used at this time, though no one had any understanding of how it worked or what it even was. Indeed, the term vaccine is derived from the Latin word vacca, which translates directly to cow. This odd relationship owes its history to the somewhat accidental discovery that milkmaids who often contracted a very mild disease called cowpox did not get infected with the much more severe smallpox disease. In 1796, a cruel experiment was performed by a man named Edward Jenner. He took puss from a cowpox blister and purposely infected a young boy. Once the boy recovered, he repeated the process with smallpox and found that the boy did not get the disease. Jenner’s vaccination technique would not only go on to save millions of lives from smallpox; it would be used to vaccinate people from several other diseases, including polio and yellow fever.
The Birth of Molecular Biology
A molecular view of the COVID-19 protein “spikes”. Source
The next few decades would identify hundreds of viruses of all shapes and sizes, and along with them various types of vaccines. But it was the study of exactly what these viruses were and how the vaccines actually worked that would give rise to a revolutionary new science — molecular biology.
Understanding viruses at the molecular level presents a very real modern day challenge. Despite the full power, wealth, and knowledge of our modern civilization, a tiny packet of RNA enclosed in a fatty drop continues to wreak havoc on our world. The COVID-19 virus has in some shape, form, or fashion effected every single human being on earth. Those viruses once invisible to us now stand before our very eyes in full view, and yet we have suffered terrible losses to this one. Our best tool is a breakthrough barely 30 years old — our ability to tailor messenger RNA (mRNA) a targeted purpose — has very quickly led to a viable vaccine. There is no doubt in my mind that eventually this virus will succumb to the might of human ingenuity that has been unlocked by more than a century of cumulative scientific knowledge.
A bench oscilloscope is one of the most invaluable tools in the hardware hacker’s arsenal, but even the slimmest digital models are a bit large to be part of your everyday electronic carry. Sure you could throw one of those cheap pocket scopes in your bag, but what if there was an even easier way to take a peek at a few signals while you’re on the go?
For those who roam, the Arduino-web-oscilloscope project created by [David Buezas] is worth a close look. Using the Web Serial API built into recent versions of Google’s Chrome browser, this project allows you to pop open a software oscilloscope without installing anything locally. Whether it’s a public computer or that cheap Chromebook you keep around for emergencies, a valuable tool is just a few clicks away.
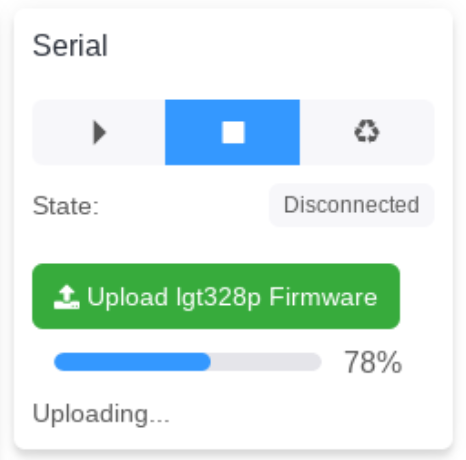
Flashing the MCU from the web interface.
Of course, there has to be some hardware involved. Despite what you might think given the name of the project, the code currently only supports the Logic Green LGT8F328P microcontroller. This cheap ATmega328P clone not only runs at 32 Mhz but according to [David], many operations can be done in fewer clock cycles than on the original 328P. In short it’s fast, and fast is good if you want more samples.
One of the best parts about this project is that a function to flash the firmware to the LGT8F328P is built right in the web interface. With the oscilloscope running in the browser, you just need to plug in a blank board, click the button to flash it, and start taking measurements. You could outfit a whole classroom or hackerspace with basic oscilloscopes in minutes, with a per-seat cost of just a few bucks.
Of course, there are some pretty hard limits on what you can realistically measure with this setup. For one thing, the board can’t handle anything higher than 5 volts. Even the cheapest oscilloscope kit is still going to be an upgrade, but the fact you can spin this up almost anywhere for the cost of a cheap MCU board makes it hard to complain about the results.
A bench oscilloscope is one of the most invaluable tools in the hardware hacker’s arsenal, but even the slimmest digital models are a bit large to be part of your everyday electronic carry. Sure you could throw one of those cheap pocket scopes in your bag, but what if there was an even easier way to take a peek at a few signals while you’re on the go?
For those who roam, the Arduino-web-oscilloscope project created by [David Buezas] is worth a close look. Using the Web Serial API built into recent versions of Google’s Chrome browser, this project allows you to pop open a software oscilloscope without installing anything locally. Whether it’s a public computer or that cheap Chromebook you keep around for emergencies, a valuable tool is just a few clicks away.
Flashing the MCU from the web interface.
Of course, there has to be some hardware involved. Despite what you might think given the name of the project, the code currently only supports the Logic Green LGT8F328P microcontroller. This cheap ATmega328P clone not only runs at 32 Mhz but according to [David], many operations can be done in fewer clock cycles than on the original 328P. In short it’s fast, and fast is good if you want more samples.
One of the best parts about this project is that a function to flash the firmware to the LGT8F328P is built right in the web interface. With the oscilloscope running in the browser, you just need to plug in a blank board, click the button to flash it, and start taking measurements. You could outfit a whole classroom or hackerspace with basic oscilloscopes in minutes, with a per-seat cost of just a few bucks.
Of course, there are some pretty hard limits on what you can realistically measure with this setup. For one thing, the board can’t handle anything higher than 5 volts. Even the cheapest oscilloscope kit is still going to be an upgrade, but the fact you can spin this up almost anywhere for the cost of a cheap MCU board makes it hard to complain about the results.
There’s a satisfaction in watching someone else at work, particularly when they are demonstrating a solution to a soldering problem you have encountered in the past. SMA panel sockets have a particularly tiny solder bucket on their reverse, and since they often need to be soldered onto brass rod as part of microwave antenna construction they present a soldering challenge. [Andrew McNeil] is here to help, with a foolproof method of achieving a joint that is both electrically and mechanically sound.
The best connections to a solder bucket come when the wire connected to it nestles within its circular center. If this doesn’t happen and a blob of solder merely encapsulates both wire and bucket, the mechanical strength of the solder blob alone is not usually sufficient. The brass rod is wider than the bucket, so he takes us through carefully grinding it down to the right diameter for the bucket so it sits in place and can have the solder sweated into the gap. The result is very quick and simple, but has that essential satisfaction we mentioned earlier. It’s a small hack, but if you’ve ever soldered to a too-small RF connector you’ll understand. For more fun and games with RF connectors, take a look at our overview.
With innumerable microcontroller boards on the market it’s sure that there will be one for every conceivable application or user. Among them are some seriously tiny ones, but this wasn’t enough for [Alun Morris]. Wanting to see how small he could make an ATtiny board without a custom PCB, he took a SOIC-8 version of the popular minimalist processor and mated it to a 6mm by 8mm piece of 0.05″ prototyping board to create a device that is dwarfed by its connectors.
It’s an extremely simple circuit and hardly something that hasn’t been done before, but the value here is in the tricky soldering to make it rather than its novelty. The ATtiny402 and three passive SMD components are fitted on the smallest possible sliver of prototyping board to contain them, and the female headers and set of programming pins contribute far more to the volume of the device than the board itself. He also tried a side-on design with two smaller slivers of board before settling on the more conventional layout. The demonstration of the system in action seen in the video below the break is a magnetic flux detector, dwarfed by the 40-pin DIP Z80 it is sitting on.
A lot of boards claim to be tiny, but few are this small. This ESP32 is a more usual contender.
Well, that was quite a show! The Perseverance rover arrived on Mars Thursday. Don’t tell the boss, but we spent the afternoon watching the coverage in the house on the big TV rather than slaving away in the office. It was worth it; for someone who grew up watching Jules Bergman and Frank Reynolds cover the Apollo program and the sometimes cheesy animations provided by NASA, the current coverage is pretty intense. A replay of the coverage is available – skip to about the 1:15:00 mark to avoid all the filler and fluff preceding the “Seven Minutes of Terror” main event. And not only did they safely deliver the package, but they absolutely nailed the landing. Perseverance is only about 2 km away from the ancient river delta it was sent to explore for signs of life. Nice shooting!
We’re also being treated to early images from Jezero crater. The first lowish-rez shots, from the fore and after hazard cameras, popped up just a few seconds after landing — the dust hadn’t even settled yet! Some wags complained about the image quality, apparently without thinking that the really good camera gear was stowed away and a couple of quick check images with engineering cameras would be a good idea while the rover still had contact with the Mars Reconnaissance Orbiter. Speaking of which, the HiRISE camera on the MRO managed to catch a stunning view of Perseverance’s descent under its parachute; the taking of that photo is an engineering feat all by itself. But all of this pales in comparison to a shot from one of the down-looking cameras in the descent stage, show Perseverance dangling from the skycrane just before touchdown. It was a really good day for engineering.
Would that our Earthly supply chains were as well-engineered as our Martian delivery systems. We’ve been hearing of issues all along the electronics supply chain, impacting a wide range of industries. Some of the problems are related to COVID-19, which has sickened workers staffing production and shipping lines. Some, though, like a fire at the AKM semiconductor plant in Japan, have introduced another pinch point in an already strained system. The fire was in October, but the impact on the manufacturer depending on the plant’s large-scale integration (LSI) and temperature-compensated crystal oscillators (TCXO) products is only just now being felt in the amateur radio market. The impact is likely not limited to that market, though — TCXOs pop up lots of gear, and the AKM plant made LSI chips for all kinds of applications.
What do you get when you combine a 3D-printer, a laser cutter, a CNC router, and a pick-and-place robot? Drones that fly right off the build plate, apparently. Aptly enough, it’s called LaserFactory, and it comes from MITs Computer Science and Artificial Intelligence Lab. By making different “bolt-on” tools for a laser cutter, the CSAIL team has combined multiple next-generation manufacturing methods in one platform. The video below shows a drone frame being laser-cut from acrylic, to which conductive silver paste is added by an extruder. A pick-and-place head puts components on the silver goo, solders everything together with a laser, and away it goes. They also show off ways of building up 3D structures, both by stacking up flat pieces of acrylic and by cutting and bending acrylic in situ. It’s obviously still just a proof of concept, but we really like the ideas presented here.
And finally, as proof that astronomers can both admit when they’re wrong and have fun while doing so, the most remote object in the Solar System has finally received a name. The object, a 400-km diameter object in a highly elliptical orbit that takes it from inside the orbit of Neptune to as far as 175 astronomical units (AU) from the Sun, is officially known as 2018 AG37. Having whimsically dubbed the previous furthest-known object “Farout,” astronomers kept with the theme and named its wayward sister “Farfarout.” Given the rapid gains in technology, chances are good that Farfarout won’t stay the Sun’s remotest outpost for long, and we fear the (Far)nout trend will eventually collapse under its own weight. We therefore modestly propose a more sensible naming scheme, perhaps something along the lines of “Farthest McFaraway.” It may not scale well, but at least it’s stupid.
Well, that was quite a show! The Perseverance rover arrived on Mars Thursday. Don’t tell the boss, but we spent the afternoon watching the coverage in the house on the big TV rather than slaving away in the office. It was worth it; for someone who grew up watching Jules Bergman and Frank Reynolds cover the Apollo program and the sometimes cheesy animations provided by NASA, the current coverage is pretty intense. A replay of the coverage is available – skip to about the 1:15:00 mark to avoid all the filler and fluff preceding the “Seven Minutes of Terror” main event. And not only did they safely deliver the package, but they absolutely nailed the landing. Perseverance is only about 2 km away from the ancient river delta it was sent to explore for signs of life. Nice shooting!
We’re also being treated to early images from Jezero crater. The first lowish-rez shots, from the fore and after hazard cameras, popped up just a few seconds after landing — the dust hadn’t even settled yet! Some wags complained about the image quality, apparently without thinking that the really good camera gear was stowed away and a couple of quick check images with engineering cameras would be a good idea while the rover still had contact with the Mars Reconnaissance Orbiter. Speaking of which, the HiRISE camera on the MRO managed to catch a stunning view of Perseverance’s descent under its parachute; the taking of that photo is an engineering feat all by itself. But all of this pales in comparison to a shot from one of the down-looking cameras in the descent stage, show Perseverance dangling from the skycrane just before touchdown. It was a really good day for engineering.
Would that our Earthly supply chains were as well-engineered as our Martian delivery systems. We’ve been hearing of issues all along the electronics supply chain, impacting a wide range of industries. Some of the problems are related to COVID-19, which has sickened workers staffing production and shipping lines. Some, though, like a fire at the AKM semiconductor plant in Japan, have introduced another pinch point in an already strained system. The fire was in October, but the impact on the manufacturer depending on the plant’s large-scale integration (LSI) and temperature-compensated crystal oscillators (TCXO) products is only just now being felt in the amateur radio market. The impact is likely not limited to that market, though — TCXOs pop up lots of gear, and the AKM plant made LSI chips for all kinds of applications.
What do you get when you combine a 3D-printer, a laser cutter, a CNC router, and a pick-and-place robot? Drones that fly right off the build plate, apparently. Aptly enough, it’s called LaserFactory, and it comes from MITs Computer Science and Artificial Intelligence Lab. By making different “bolt-on” tools for a laser cutter, the CSAIL team has combined multiple next-generation manufacturing methods in one platform. The video below shows a drone frame being laser-cut from acrylic, to which conductive silver paste is added by an extruder. A pick-and-place head puts components on the silver goo, solders everything together with a laser, and away it goes. They also show off ways of building up 3D structures, both by stacking up flat pieces of acrylic and by cutting and bending acrylic in situ. It’s obviously still just a proof of concept, but we really like the ideas presented here.
And finally, as proof that astronomers can both admit when they’re wrong and have fun while doing so, the most remote object in the Solar System has finally received a name. The object, a 400-km diameter object in a highly elliptical orbit that takes it from inside the orbit of Neptune to as far as 175 astronomical units (AU) from the Sun, is officially known as 2018 AG37. Having whimsically dubbed the previous furthest-known object “Farout,” astronomers kept with the theme and named its wayward sister “Farfarout.” Given the rapid gains in technology, chances are good that Farfarout won’t stay the Sun’s remotest outpost for long, and we fear the (Far)nout trend will eventually collapse under its own weight. We therefore modestly propose a more sensible naming scheme, perhaps something along the lines of “Farthest McFaraway.” It may not scale well, but at least it’s stupid.
[Everett]’s 5-year-old loves a simple game called Hoot Owl Hoot! in which players cooperatively work to move owls along a track to the safety of a nest. Player pieces move on spaces according to the matching colors drawn from a deck of cards. If a space is already occupied, a piece may jump ahead to the next available spot. The game has a bit more to it than that, but those are the important parts. After a few games, the adults in the room found themselves disagreeing about which strategy was optimal in this simple game.
It seemed to [Everett] that it was best to move pieces in the rear, keeping player pieces grouped together and maximizing the chance of free moves gained by jumping over occupied spaces. [Everett]’s wife countered that a “longest move” strategy was best, and one should always select whichever piece would benefit the most (i.e. move the furthest distance) from any given move. Which approach wins games in the fewest moves? This small Python script simulates the game enough to iteratively determine that the two strategies are quite close in results, but the “longest move” strategy does ultimately come out on top.
As far as simulations go, it’s no Tamagotchi Singularity and [Everett] admits that the simulation isn’t a completely accurate one. But since its only purpose is to compare whether “no stragglers” or “longest move” wins in fewer moves, shortcuts like using random color generation in place of drawing the colors from a deck shouldn’t make a big difference. Or would it? Regardless, we can agree that board games can be fitting metaphors for the human condition.
We are always glad to see [Ken Shirriff] tear into something new and this month he’s looking inside a quartz oscillator module. Offhand, you’d think there’s not much to these. A slab of quartz and some sort of inverter, right? But as [Ken] mentions, “There’s more happening in the module than I expected…”
If you’ve ever wanted to decap devices, big hybrid modules like these are a good way to get started since you don’t need exotic chemicals to get at the insides. [Ken] managed to break the fragile crystal wafer on the way in. Inside was also a small CMOS IC die. Time to get out the microscope.
If you follow [Ken’s] blog, you know he’s no stranger to analyzing IC dice. The oscillator IC is a pretty standard Colpitts oscillator but it also provides a programmable divider and output drive.
The circuit uses some unusually configured capacitors. [Ken] takes the time to point out CMOS logic structures throughout. If you haven’t seen one of [Ken’s] deep dives before, before, it’s a great introduction.
Volumetric 3D displays that allow the viewing of full 3D images without special glasses are not unknown in our community, usually taking the form of either a 3D LED matrix or a spinning rotor either with an image projected onto it or holding an LED array. They are impressive projects, but they are often limited in what they can display. Pretty patterns and simple 3D models are all very well, but they are hardly 3D television. Thus we’re quite impressed with [Evlmnkey]’s bachelor’s degree project, which combines motion capture and a volumetric display for a genuine volumetric 3D closed-circuit television system.
Finding the details takes a bit of dredging through the Reddit thread, but the display is an off-the-shelf Adafruit single-sided LED matrix driven by an ESP32, all mounted on a motor with a pair of slip rings for power. Data is fed to the ESP via WiFi, with the PC responsible for grabbing the image sending it as uncompressed frames. There’s little detail on the 3D capture, but since he mentions a Kinect library we suspect that may be the source.
This is perhaps not the highest resolution TV you’ll ever have seen, indeed we’d liken it to the flickering 30 lines of 1930s mechanical TV, but it’s still a functioning volumetric 3D live CCTV system. If you’re interested by 3D displays, you might like to see our examination of the subject.
Controlling most desktop 3D printers is as easy as sending them G-code commands over a serial connection. As you might expect, it takes a relatively quick machine to fire off the commands fast enough for a good-quality print. But what if you weren’t so picky? If speed isn’t a concern, what’s the practical limit on the type of computer you could use?
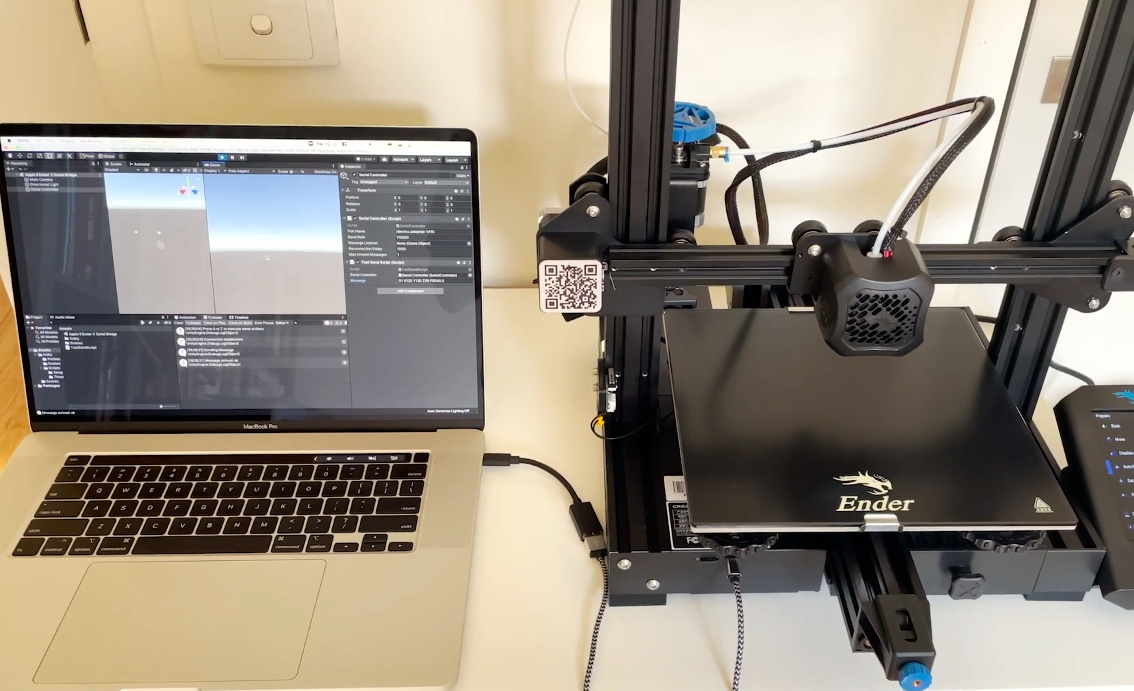
In an effort to answer that question, [Max Piantoni] set out to control his Ender 3 printer with an authentic Apple IIc. Things were made a bit easier by the fact that he really only wanted to use the printer as a 2D plotter, so he could ignore the third dimension in his code. All he needed to do was come up with a BASIC program that let him create some simple geometric artwork on the Apple and convert it into commands that could be sent out over the computer’s serial port.
Unity controlling the Ender 3
Unfortunately, [Max] ran into something of a language barrier. While the Apple had no problem generating G-code the Ender’s controller would understand, both devices couldn’t agree on a data rate that worked for both of them. The 3D printer likes to zip along at 115,200 baud, while the Apple was plodding ahead at 300. Clearly, something would have to stand in as an interpreter.
The solution [Max] came up with certainly wouldn’t be our first choice, but there’s something to be said for working with what you know. He quickly whipped up a program in Unity on his Macbook that would accept incoming commands from the Apple II at 300 baud, build up a healthy buffer, and then send them off to the Ender 3. As you can see in the video after the break, this Mac-in-the-middle approach got these unlikely friends talking at last.
We’re reminded of a project from a few years back that aimed to build a fully functional 3D printer with 1980s technology. It was to be controlled by a Commodore PET from the 1980s, which also struggled to communicate quickly enough with the printer’s electronics. Bringing a modern laptop into the mix is probably cheating a bit, but at least it shows the concept is sound.
Judging by the tips we get, it seems like the popularity of word clocks has perhaps started falling off lately. But back at peak word clock, we were seeing dozens of designs, some better than others. This simple but classy word clock seems to benefit from all that prior art, making the design just about as simple as it can get while still looking great.
The main tool for [t0mg]’s build is a laser cutter, which is a great choice for keeping the design simple. The tricky part of word clocks is getting the “word search” matrix executed cleanly, and we’ve seen everything from laser-cut wood to inkjet prints, and even commercially produced PCBs, used for the job. [t0mg] opted instead to spray paint a piece of glass and etch away the characters with the laser, which results in superb text quality. Etching the underside of the glass also has the advantage of protecting the paint layer while giving the finished clock a glossy face that really looks nice. Under the template lie layers of MDF that hold the Neopixel strips and act as light guides, while an ESP32 and RTC perform timekeeping and LED-driving duties. [t0mg] finished off the clock with a nice web interface to set the clock, change the colors, and perform maintenance functions. The video below shows the software in use.
We really think this clock looks great, and for those with access to a laser cutter, it seems like a great way to go about building your own.
While ramen support might sound like a help desk for soup, it is actually a technique [GeoDroidJohn] uses to get easy-to-remove support structures on 3D prints. We saw the video below and we have to admit that it did remind us of a brick of uncooked ramen noodles.
We had to dig a little further to find out how he did it. We finally found a Reddit post that gives the recipe for Simplify 3D:
Nozzle diameter/2= layer height
Support material every other layer, 15% crossing at -45, and 45
5 dense layers at 90% 0 gap layers top or bottom.
We have to admit, we try to avoid support where we can, and where we can’t we just pick one of the stock Cura settings. It wasn’t entirely clear how — or even if — you could replicate this in slicers other than Simplify 3D. The layer height, of course, is a given. We think 15% support density with [-45, 45] in the “line directions” box might get partially there. Maybe someone who is an expert in Simplify and some other slicers can help translate.
In any event, it did make us think about experimenting with different support structures. We’ve played with Cura’s tree supports before this and liked them. So maybe the defaults aren’t always the best.
What do you know about the Nintendo Virtual Boy? Everybody knows that it was the console giant’s mid-90s foray into 3D graphics and VR, and that it was a commercial flop. Sickness and headache-inducing graphics are probably first to mind, and that’s it. But since most of us will never have handled one in real life, all we have on this legendary console is this Received Opinion. What was it Really like? [Rodrigo Copetti] has put up a detailed technical examination, and it reveals a machine well ahead of its time in more than just the market it was trying to create.
The first surprise is that this machine eschews the expected LCD screens that were the norm on handheld consoles of the day, instead using a persistence-of-vision display with a single vertical bar of LEDs facing a vibrating mirror through a lens system. He goes into significant detail on how this system worked, and in doing so gives us a new respect for the console.
The meat of this article lies though in a detailed look at the console’s architecture. The NEC V810 CPU was significantly more powerful than those in other portable consoles of the day, and we get a peek of how it and the custom silicon handled the graphics. The GPU had dual framebuffers for each display to ensure each frame could be delivered smoothly while the next one was being created.
Everything that can be said about the Virtual Boy in the marketplace has been done to death, leading to the received opinion we mentioned at the start of the article. This write-up provides new information on one of Nintendo’s rarer machines and casts it in an entirely new light.
There have been understandably few Virtual Boy projects that have made it to these pages. One that has, was a VGA interface for the console.
[Amen]’s Rockwell 920 calculator from the 70s was a very impressive piece of hardware for its time. It sported a 16-digit display, a printer, and it could run programs. It even had a magnetic card reader/writer that could be used to store programs and data externally. Seen through today’s eyes, it was less like a calculator and more like what we would call a single-board computer. They are also a window into another era, a time when many of the electrical design assumptions we take for granted hadn’t happened yet. When the time came to dig into what made the calculator tick, [Amen] had a lot of work to do just to get basic tools running.
For example, [amen]’s Blue Pill (an open-source, multipurpose test and measurement tool) is, on one hand, the perfect tool to snoop on the inner workings. However, those inner workings happen to use negative logic at -17 Volts, which means a logical zero is -17 V and a one is 0 V. Oh, and it uses an oddball clock rate, to boot. Since the Blue Pill doesn’t support -17 V negative logic (does anything?) a bit of custom work was needed to craft an interface. Once that was working, the Blue Pill was off to the races.
The unfamiliar elements didn’t end there. The pins on each IC, for example, are in a staggered layout quite unlike the DIP pattern most of us (and our tools, breadboards, and IC clips) are familiar with. As for the processor itself, [amen] has access to low-level documentation on Rockwell processors and instruction sets, but the timing diagrams are puzzling until one realizes the processor has two clock inputs at two different frequencies, resulting in what [amen] describes as four separate “clock phases”.
These design decisions were certainly made for good reasons at the time, and they even have a certain internal harmony to them, but it’s still a window into an era when the elements underpinning much of what we now have and work with had not yet happened.
Check out the video embedded below to see [amen] explain what it took to hook the Blue Pill up to a Rockwell 920. Also, if you’d like to see one of these vintage machines demonstrated in all its functioning glory, here’s a video of one being put through its paces.
On February 18th, the Perseverance rover safely touched down on the Martian surface. In the coming days and weeks, the wide array of instruments and scientific payloads tucked aboard the robotic explorer will spring to life; allowing us to learn more about the Red Planet. With a little luck, it may even bring us closer to determining if Mars once harbored life as we know it.
Among all of the pieces of equipment aboard the rover, one of the most intriguing must certainly be Ingenuity. This small helicopter will become the first true aircraft to take off and fly on another planet, and in a recent interview with IEEE Spectrum, operations lead [Tim Canham] shared some fascinating details about the vehicle and some of the unorthodox decisions that went into its design.
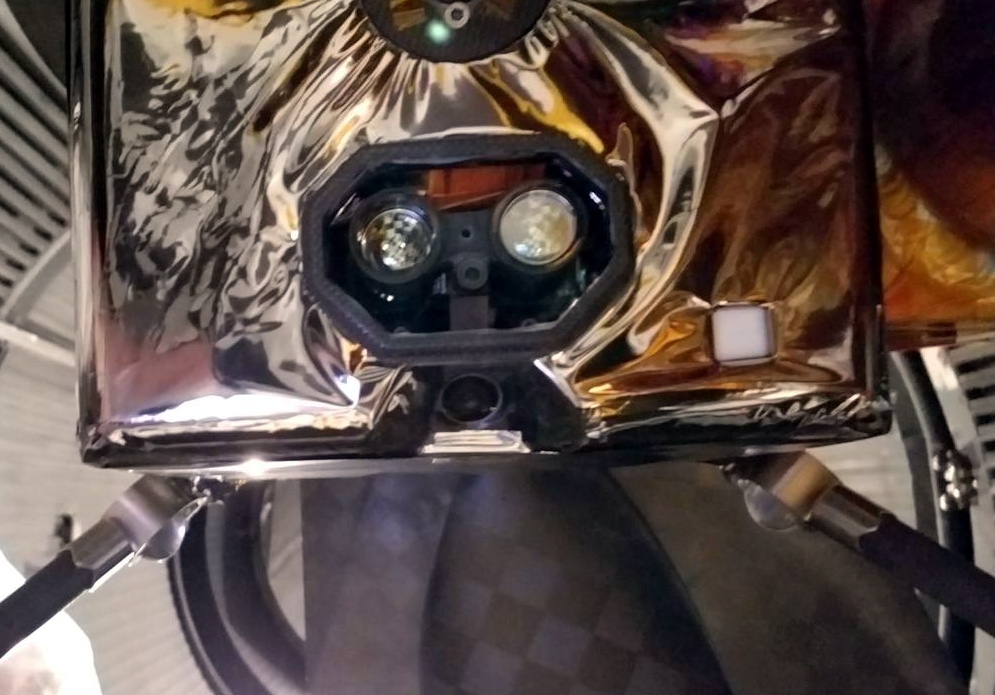
Ingenuity’s downward facing sensors.
[Tim] explains that, as a technology demonstrator, the team was allowed to take far more risks in developing Ingenuity than they would have been able to otherwise. Rather than sticking with legacy hardware and software, they were free to explore newer and less proven technology.
That included off-the-shelf consumer components, such as a laser altimeter purchased from SparkFun. It also means that the computational power packed into Ingenuity far exceeds that of Perseverance itself, though how well the helicopter’s smartphone-class Snapdragon 801 processor will handle the harsh Martian environment is yet to be seen.
On the software side, we also learn that Ingenuity is making extensive use of open source code. Not only is the onboard computer running Linux, but the vehicle is being controlled by an Apache 2.0 licensed framework developed by NASA’s Jet Propulsion Laboratory for CubeSats and other small spacecraft. The project is available on GitHub for anyone who wants it, and according to the changelog, the fixes and improvements required for the “Mars Helicopter Project” were merged in a few releases ago.
The fact that code currently ticking away on the surface of Mars can be downloaded and implemented into your own DIY project is a revelation that’s not lost on [Tim]. “It’s kind of an open-source victory because we’re flying an open-source operating system and an open-source flight software framework and flying commercial parts that you can buy off the shelf if you wanted to do this yourself someday.”
Of course, it took a whole lot more than some Python libraries and a handful of sensors from SparkFun to design and build the first space-going helicopter. But the fact that even a small slice of the technology inside of a project like Ingenuity is now available to the average hacker and maker is a huge step towards democratizing scientific research here on Earth.
On February 18th, the Perseverance rover safely touched down on the Martian surface. In the coming days and weeks, the wide array of instruments and scientific payloads tucked aboard the robotic explorer will spring to life; allowing us to learn more about the Red Planet. With a little luck, it may even bring us closer to determining if Mars once harbored life as we know it.
Among all of the pieces of equipment aboard the rover, one of the most intriguing must certainly be Ingenuity. This small helicopter will become the first true aircraft to take off and fly on another planet, and in a recent interview with IEEE Spectrum, operations lead [Tim Canham] shared some fascinating details about the vehicle and some of the unorthodox decisions that went into its design.
Ingenuity’s downward facing sensors.
[Tim] explains that, as a technology demonstrator, the team was allowed to take far more risks in developing Ingenuity than they would have been able to otherwise. Rather than sticking with legacy hardware and software, they were free to explore newer and less proven technology.
That included off-the-shelf consumer components, such as a laser altimeter purchased from SparkFun. It also means that the computational power packed into Ingenuity far exceeds that of Perseverance itself, though how well the helicopter’s smartphone-class Snapdragon 801 processor will handle the harsh Martian environment is yet to be seen.
On the software side, we also learn that Ingenuity is making extensive use of open source code. Not only is the onboard computer running Linux, but the vehicle is being controlled by an Apache 2.0 licensed framework developed by NASA’s Jet Propulsion Laboratory for CubeSats and other small spacecraft. The project is available on GitHub for anyone who wants it, and according to the changelog, the fixes and improvements required for the “Mars Helicopter Project” were merged in a few releases ago.
The fact that code currently ticking away on the surface of Mars can be downloaded and implemented into your own DIY project is a revelation that’s not lost on [Tim]. “It’s kind of an open-source victory because we’re flying an open-source operating system and an open-source flight software framework and flying commercial parts that you can buy off the shelf if you wanted to do this yourself someday.”
Of course, it took a whole lot more than some Python libraries and a handful of sensors from SparkFun to design and build the first space-going helicopter. But the fact that even a small slice of the technology inside of a project like Ingenuity is now available to the average hacker and maker is a huge step towards democratizing scientific research here on Earth.
On February 18th, the Perseverance rover safely touched down on the Martian surface. In the coming days and weeks, the wide array of instruments and scientific payloads tucked aboard the robotic explorer will spring to life; allowing us to learn more about the Red Planet. With a little luck, it may even bring us closer to determining if Mars once harbored life as we know it.
Among all of the pieces of equipment aboard the rover, one of the most intriguing must certainly be Ingenuity. This small helicopter will become the first true aircraft to take off and fly on another planet, and in a recent interview with IEEE Spectrum, operations lead [Tim Canham] shared some fascinating details about the vehicle and some of the unorthodox decisions that went into its design.
Ingenuity’s downward facing sensors.
[Tim] explains that, as a technology demonstrator, the team was allowed to take far more risks in developing Ingenuity than they would have been able to otherwise. Rather than sticking with legacy hardware and software, they were free to explore newer and less proven technology.
That included off-the-shelf consumer components, such as a laser altimeter purchased from SparkFun. It also means that the computational power packed into Ingenuity far exceeds that of Perseverance itself, though how well the helicopter’s smartphone-class Snapdragon 801 processor will handle the harsh Martian environment is yet to be seen.
On the software side, we also learn that Ingenuity is making extensive use of open source code. Not only is the onboard computer running Linux, but the vehicle is being controlled by an Apache 2.0 licensed framework developed by NASA’s Jet Propulsion Laboratory for CubeSats and other small spacecraft. The project is available on GitHub for anyone who wants it, and according to the changelog, the fixes and improvements required for the “Mars Helicopter Project” were merged in a few releases ago.
The fact that code currently ticking away on the surface of Mars can be downloaded and implemented into your own DIY project is a revelation that’s not lost on [Tim]. “It’s kind of an open-source victory because we’re flying an open-source operating system and an open-source flight software framework and flying commercial parts that you can buy off the shelf if you wanted to do this yourself someday.”
Of course, it took a whole lot more than some Python libraries and a handful of sensors from SparkFun to design and build the first space-going helicopter. But the fact that even a small slice of the technology inside of a project like Ingenuity is now available to the average hacker and maker is a huge step towards democratizing scientific research here on Earth.
If you want to hack around with the communication protocol that USB Power Delivery devices use to negotiate their power requirements with the upstream source, a tool like Google’s Twinkie really helps. With it you can sniff data off the line, analyze it, and even inject your own packets. Luckily for us, the search giant made the device open source so we can all have one of our own.
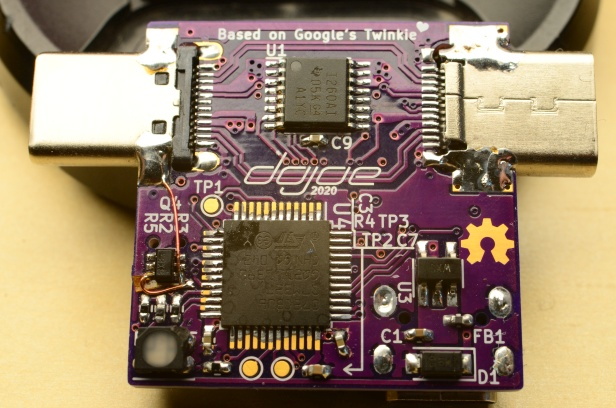
Unfortunately, as [dojoe] found out, the Twinkie isn’t particularly well suited for small-scale hobbyist manufacturing. So he came up with a revised design he calls Twonkie that replaces the six layer PCB with a much more reasonable four layer version that can be manufactured cheaply by OSHPark, and swaps out the BGA components with QFP alternatives you can hand solder.
That said, it’s still likely to be a challenging build for the home gamer. There’s quite a few 0402 passives on there, and while those are doable with an iron, it can certainly be tricky. To take some pressure off, [dojoe] says he tried to optimize the board layout as much as possible for hand assembly. He was even able to avoid needing hot air by straddling the PCB with USB-C mounts intended for vertical applications.
Given the current chip shortage, [dojoe] says the biggest problem might actually getting your hands on the STM32F072CB microcontroller at the Twonkie’s core. To that end, the board supports TQFP44 and QFN44 footprints, and you can even use a STM32F072C8 at the cost of some functionality. With a bit of luck, hopefully you can find a chip that will work in the parts bin.
Five years ago, I wrote a series on getting started with your own MQTT-based home information/automation network. Five years is a long while in Hackaday time. Back then, the ESP8266 was a lot newer, and the 8266 Arduino port wasn’t fully in shape yet, and the easiest software framework to get MQTT up and running was NodeMCU; so that’s what I used for the article series, and as a consequence a handful of devices around my house run minor modifications of that basic “hello world”, but doing useful stuff.
Since then, NodeMCU has changed a bunch of its libraries and the ESP32 has replaced the ESP8266 in my parts drawer. If you tried to run my code, you’d find that it won’t run on an ESP8266 without porting or compiling an old version of NodeMCU for yourself anyway, and it won’t run on an ESP32 at all. When [Chris Lott] tried to follow my guide, he discovered that Micropython is probably a better language choice in 2021. To minimize lines of code, I’d agree, although the Arduino and Espressif’s own native IDF have grown into the job just about as well. In short, anything but NodeMCU.
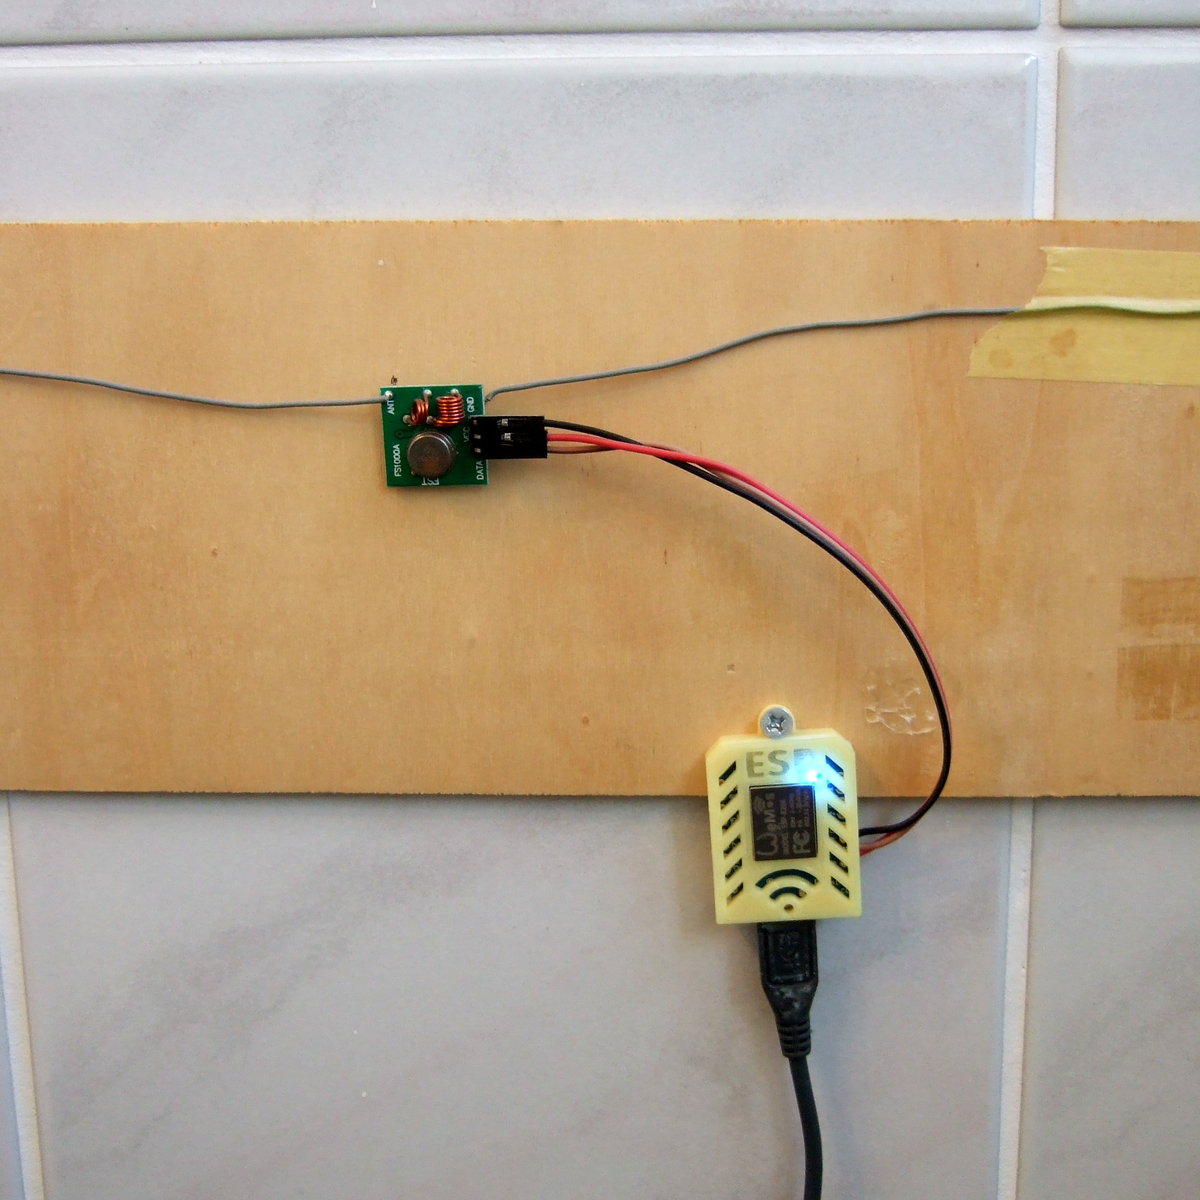
Built in an hour, survived for five years.
But my home automation system doesn’t care. Those little guys are running 24/7, flipping bits like it was still 2016. Thermometers, light sensors, and power meters haven’t changed much in five years, and although I’ve revamped the databasing, display, and user control a number of times since then, using a fixed communication transport protocol means that they’re still talking the same language. Indeed, even if NodeMCU is dead to me, the MQTT content of my original series is all still valid, and installing a broker on a Raspberry Pi has only become easier in the intervening five years.
So I’ve got a bunch of legacy code running within the walls of my own home, and it makes me nervous. If the devices fail, or maybe when they eventually fail, it’s not going to be “just flash another ESP8266 and replace it”, because even though I have some ancient NodeMCU binaries sitting around, I know when to throw in the towel. But there’s no good reason to pull them down and start reflashing either. Except that it makes me a little bit itchy, just knowing that there’s orphaned, dead-end code running all around me. Surrounding me. Staring deep into my hacker’s heart.
I know better than to tear down a running system, even though I could do it one device at a time, and each module would surely be a simple, independent fix; even though I’d love the excuse to play around with Micropython and its MQTT implementation on the ESP8266, or maybe even swap some of them out for ESP32s; even though these were all temporary quick hacks that have somehow served for five (5!) years. I certainly know better, right? (Right?)
This article is part of the Hackaday.com newsletter, delivered every seven days for each of the last 200+ weeks. It also includes our favorite articles from the last seven days that you can see on the web version of the newsletter.
Want this type of article to hit your inbox every Friday morning? You should sign up!
Five years ago, I wrote a series on getting started with your own MQTT-based home information/automation network. Five years is a long while in Hackaday time. Back then, the ESP8266 was a lot newer, and the 8266 Arduino port wasn’t fully in shape yet, and the easiest software framework to get MQTT up and running was NodeMCU; so that’s what I used for the article series, and as a consequence a handful of devices around my house run minor modifications of that basic “hello world”, but doing useful stuff.
Since then, NodeMCU has changed a bunch of its libraries and the ESP32 has replaced the ESP8266 in my parts drawer. If you tried to run my code, you’d find that it won’t run on an ESP8266 without porting or compiling an old version of NodeMCU for yourself anyway, and it won’t run on an ESP32 at all. When [Chris Lott] tried to follow my guide, he discovered that Micropython is probably a better language choice in 2021. To minimize lines of code, I’d agree, although the Arduino and Espressif’s own native IDF have grown into the job just about as well. In short, anything but NodeMCU.
Built in an hour, survived for five years.
But my home automation system doesn’t care. Those little guys are running 24/7, flipping bits like it was still 2016. Thermometers, light sensors, and power meters haven’t changed much in five years, and although I’ve revamped the databasing, display, and user control a number of times since then, using a fixed communication transport protocol means that they’re still talking the same language. Indeed, even if NodeMCU is dead to me, the MQTT content of my original series is all still valid, and installing a broker on a Raspberry Pi has only become easier in the intervening five years.
So I’ve got a bunch of legacy code running within the walls of my own home, and it makes me nervous. If the devices fail, or maybe when they eventually fail, it’s not going to be “just flash another ESP8266 and replace it”, because even though I have some ancient NodeMCU binaries sitting around, I know when to throw in the towel. But there’s no good reason to pull them down and start reflashing either. Except that it makes me a little bit itchy, just knowing that there’s orphaned, dead-end code running all around me. Surrounding me. Staring deep into my hacker’s heart.
I know better than to tear down a running system, even though I could do it one device at a time, and each module would surely be a simple, independent fix; even though I’d love the excuse to play around with Micropython and its MQTT implementation on the ESP8266, or maybe even swap some of them out for ESP32s; even though these were all temporary quick hacks that have somehow served for five (5!) years. I certainly know better, right? (Right?)
This article is part of the Hackaday.com newsletter, delivered every seven days for each of the last 200+ weeks. It also includes our favorite articles from the last seven days that you can see on the web version of the newsletter.
Want this type of article to hit your inbox every Friday morning? You should sign up!
Five years ago, I wrote a series on getting started with your own MQTT-based home information/automation network. Five years is a long while in Hackaday time. Back then, the ESP8266 was a lot newer, and the 8266 Arduino port wasn’t fully in shape yet, and the easiest software framework to get MQTT up and running was NodeMCU; so that’s what I used for the article series, and as a consequence a handful of devices around my house run minor modifications of that basic “hello world”, but doing useful stuff.
Since then, NodeMCU has changed a bunch of its libraries and the ESP32 has replaced the ESP8266 in my parts drawer. If you tried to run my code, you’d find that it won’t run on an ESP8266 without porting or compiling an old version of NodeMCU for yourself anyway, and it won’t run on an ESP32 at all. When [Chris Lott] tried to follow my guide, he discovered that Micropython is probably a better language choice in 2021. To minimize lines of code, I’d agree, although the Arduino and Espressif’s own native IDF have grown into the job just about as well. In short, anything but NodeMCU.
Built in an hour, survived for five years.
But my home automation system doesn’t care. Those little guys are running 24/7, flipping bits like it was still 2016. Thermometers, light sensors, and power meters haven’t changed much in five years, and although I’ve revamped the databasing, display, and user control a number of times since then, using a fixed communication transport protocol means that they’re still talking the same language. Indeed, even if NodeMCU is dead to me, the MQTT content of my original series is all still valid, and installing a broker on a Raspberry Pi has only become easier in the intervening five years.
So I’ve got a bunch of legacy code running within the walls of my own home, and it makes me nervous. If the devices fail, or maybe when they eventually fail, it’s not going to be “just flash another ESP8266 and replace it”, because even though I have some ancient NodeMCU binaries sitting around, I know when to throw in the towel. But there’s no good reason to pull them down and start reflashing either. Except that it makes me a little bit itchy, just knowing that there’s orphaned, dead-end code running all around me. Surrounding me. Staring deep into my hacker’s heart.
I know better than to tear down a running system, even though I could do it one device at a time, and each module would surely be a simple, independent fix; even though I’d love the excuse to play around with Micropython and its MQTT implementation on the ESP8266, or maybe even swap some of them out for ESP32s; even though these were all temporary quick hacks that have somehow served for five (5!) years. I certainly know better, right? (Right?)
This article is part of the Hackaday.com newsletter, delivered every seven days for each of the last 200+ weeks. It also includes our favorite articles from the last seven days that you can see on the web version of the newsletter.
Want this type of article to hit your inbox every Friday morning? You should sign up!