

Hardware
Updates on any hardware
Various types of hardware, be it pc, workshop or just interesting gadgety tools found around.
I do have a morbid curiosity about multitools and mini pc components
EcubMaker – 4in1 Multi Tool 3D Printer – Unbox & Setup
PCB making, PCB prototyping quickly and easy – STEP by STEP #youtubevids
Restoration of 1970s Seiko Bellmatic, Rusted Solid and broken – Lets get this watch working! #youtubevids
Opening a Defective $700 Ruixu 100ah 12v LiFePO4 Solar Battery! You won’t believe this.. #youtubevids
Fabriquer un CIRCUIT IMPRIME TRANSPARENT ! [ENG Sub] #youtubevids
Tesla Powerwall
Technical Specs

45.3″ / 1150 mm29.6″ / 753 mm5.75″ / 147 mm
- Usable Capacity13.5 kWh
- Depth of Discharge100%
- Efficiency90% round-trip
- Power7kW peak / 5kW continuous
- Supported ApplicationsSolar self-consumptionBack-up powerTime-Based controlOff-grid capabilities
- Warranty10 years
- ScalableUp to 10 Powerwalls
- Operating Temperature-4°F to 122°F / -20°C to 50°C
- DimensionsL x W x D: 45.3″ x 29.6″ x 5.75″(1150 mm x 753 mm x 147 mm)
- Weight251.3 lbs / 114 kg
- InstallationFloor or wall mountedIndoor or outdoor
- CertificationNorth American and InternationalStandardsGrid code compliant

Arduino RGB Color Mixer
A fun, interactive project for makers new to Arduino. Control the brightness of an RGB LED with Potentiometers, with on/off switch built in.
ABOUT THIS PROJECT
Who is this for?: This RGB LED color mixer project is perfect for the beginner Arduino user who is keen to try an build an interactive gadget this is not only fun and easy to make, but could be useful for anyone who uses RBG colors, such as artists, web developers and interactive lighting controllers.
What is does: This simple circuit combines three potentiometers to set the brightness for each of the red, green and blue LED’s inside an RGB LED.
A pushbutton switch is added an an extra feature to turn the circuit on and off.
How do I build it tho? Wire the diagram as shown in the schematics. The RGB Led is wired to PMW pins 9, 10 and 11 on the Arduino. The pushbutton is connected to pin 7 and the 3 potentiometers to A0, A1 and A2. Remember to add a 10K ohm pull up resistor to the ground connection on the pushbutton. For an explanation as to how this works, check out here https://playground.arduino.cc/CommonTopics/PullUpDownResistor
Also make sure to connect 3 220 ohm resistor’s between the LED and the output pins, this will ensure your LED does not burn out.
The value of each Potentiometer is printed to the serial monitor, so if you are fiddling with the LED and find a color you like, you can record the RGB value to use later.
Once you have the circuit wired up and the sketch uploaded, try turning the knobs on the potentiometers. Nothing should happen at first until you hit the button. Now try turning the knobs again. The led should now light up. Time to play with light! Remember RGB light is not like mixing paint. when all the potentiometers are on full, the light should be white. Try leaving one of the potentiometers off or very low, and varying the other two.
An extension to this project would be to hard code some RBG values for particular colours you like, and add some more push buttons which, when pressed, would set the RGB LED to those colours. Feel free to share the code if you try an extension like this!
Enjoy!
int blue = 9; // Define Digital Pins for each colour of the LED
int green = 10;
int red = 11;

int redPot = A0;
int greenPot = A1; //Define Analog Pins for the 3 potentiometers
int bluePot = A2;


int greenVal = 0; //Create a variable to store the state of each Potentiometer
int blueVal = 0;
int redVal = 0;

const int BUTTON = 7; //Define the button Pin
int state = 0;    //Create a variable to store wether button is on or off
int val = 0;      //Create a variable to store the momentary state of the button
int old_val = 0;  //create a variable to store the previous state of the button

void setup() {
  // put your setup code here, to run once:

  pinMode(green, OUTPUT);  //Set LED's as output's, button as input
  pinMode(blue, OUTPUT);
  pinMode(red, OUTPUT);
  pinMode(BUTTON, INPUT);
  Serial.begin(9600);
}

void loop() {
  // put your main code here, to run repeatedly:
  Serial.begin(9600);                       //Open the serial monitor at 9600 baud

  val = digitalRead(BUTTON);                // Check state of button

  if ((val == HIGH) && (old_val == LOW)) {  //Check to see if state of button has changed
    state = 1 - state;                      //Set the button as either on (1) or off (0)
    delay(10);
  }

  old_val = val;                            // Save the previous button reading to compare next time through loop

  greenVal = analogRead(greenPot);          //Read the position of the potentiometers
  blueVal = analogRead(bluePot);
  redVal = analogRead(redPot);

  if (state == 1) {                         //If button is on, set the state of each LED according to position
    analogWrite(green, greenVal / 4);       //of its correspoding potentiometer. Anolog inputs range from 0-1023,
    analogWrite(blue, blueVal / 4);         // while anolog outputs as PMW can be from 0-255. Therefore we must
    analogWrite(red, redVal / 4);           // divide the potentiometer readings by 4 to set the state correctly

    Serial.print("RGB(");
    Serial.print(redVal/4);
    Serial.print(",");
    Serial.print(greenVal/4);
    Serial.print(",");
    Serial.print(blueVal/4);                 //Print the RGB Code, resuable in any RGB application
    Serial.println(")");

    delay(50);
  } else {                                   // If button is off, set all LED's to LOW/off
    analogWrite(green, 0);
    analogWrite(blue, 0);
    analogWrite(red, 0);
    delay(50);
  }
}

Want more? Click here to see the other projects on the Arduino Projects hub

Holovect – Holographic Vector Display
The Holovect Mk II is a self-contained laser-based volumetric display system that fits on your lab bench or desktop. It is the perfect companion to a 3D printer and a stand-alone educational or promotional device. The Holovect Mk II is the first commercially available, laser-based desktop “holographic” display, capable of drawing 3D objects in air with light.

Holographic
Holovect images are NOT holograms but instead volumetric vector images projected onto modified air (i.e. projections in space). This distinction is due to the fact that a hologram is a recording of interference patterns on film or glass plates that contains three-dimensional information about an object (greek root “holo” means whole or complete, and “gram” means record). However, since Holovect images contain three dimensional information and are free-floating objects in air, they are most certainly holographic. They are real 3-D projections.
Mirage Technology
So how does it work? The principles are simple. When light travels between two different mediums in most cases you get three different effects to some degree: refraction (bending), reflection, and/or diffusion, depending on the different “refractive index” (RI) of the materials. An example of this are mirages, which occur when a portion of air has a different RI than its surroundings, causing light beams to bend and be reflected in unexpected ways. This can happen because of temperature or pressure differences from one region to the next.
With the holovect technology, we have invented how to control air within a box shaped section of space to precisely modify the RI within specific regions to refract and reflect a laser beam. This modification raises the “albedo” which is defined as the proportion of the incident light that is reflected by a surface, as well as the refractive properties at the boundary between the modified and unmodified air. Therefore by simultaneously controlling the aim of the laser and the position of a modified air column, a computer can place a volumetric pixel or voxel of light anywhere in 3D space. Then by keeping a laser beam on as it aims from point A to point B a line is drawn which is a 3D vector, and by joining many vectors in a sequence a holographic vector object can be generated. The Holovect Mk II is capable of drawing a complete image 50 times per second within
a 12cm by 12cm by 12cm cube we call the “drawbox”. Outside of this box things get messy, unpredictable and, in general, not useful.

VECTS
“Vect” objects are the data-structure developed for the Holovect. Put simply it is a list of 3D coordinates that result in lines drawn in a head-to-tail sequence in space, which are compiled into vect class objects. The files are straightforward and easy to create using a variety of online tools, spreadsheets, or good old pencil and graph paper. Once loaded, vects can be rotated in three axes and moved around within the cubic canvas. These objects can be manipulated using the control knob, preset functions such as spin and move, or used within your own applications.

3-D printing pre-visualizer and Applications
Holovect Mk II can be used to visualize CAD models in STL format before 3D printing. This can be done in two ways: importing STL files and convert them to vect format, or visualized directly. Depending on the desired visualization, converting the STL will result in a volumetric wireframe projection, whereas direct STL visualization slices the model into layers which is ideal to inspect for potential manufacturing errors and revise inner structure in hollow parts before printing. This volumetric pre-visualization ability increases design and manufacturing efficiency by saving time and printing material before committing to a long printing process.
Other applications include the visualization of 3D data acquired through a 3D scanner, or a computed tomography scan. Commercial applications could also include advertising and branding.

Beyond
As the community grows, our open source software philosophy will allow users to create applications that take advantage of Holovect’s glasses-free, touchable volumetric display. Games, tools and art applications are all in the works and should be available to users by shipping time. Moreover, the hardware will accommodate any advancements in 3D image capture and creation.
Risks and challenges
Our biggest challenge is producing enough units to keep costs low and maintain a large community of content creators. Your contributions will help our efforts and push this nascent technology further than even our imaginations can predict.
We have spent a year redesigning and streamlining the product and production line. We are ready to put considerable amount of units into the hands of developers, early adopters and enthusiasts. Help us make Holovect the standard of holographic volumetric displays.
DIY Electronics
https://www.diyelectronics.co.za/
DIYElectronics is commited as a company to provide you with the widest range of electronics to suit your professional or hobby needs. We understand that good electronics is important to any project, we also understand that every new project brings a host of new challenges. That is why we have created this WIKI for you, to help you in your projects, whether you are buying your first 3d printer or building a rocket to the moon, our aim is to make every step of your creative journey just a little bit easier.
Dealzer
Dealzer has some interesting items for sale that focuses on hydroponics and indoor plant growing.
As I have the scenario set up from many years of reading castaway type stories I have been on the lookout for plant growing systems that would work underground or in space. Mars here I come…
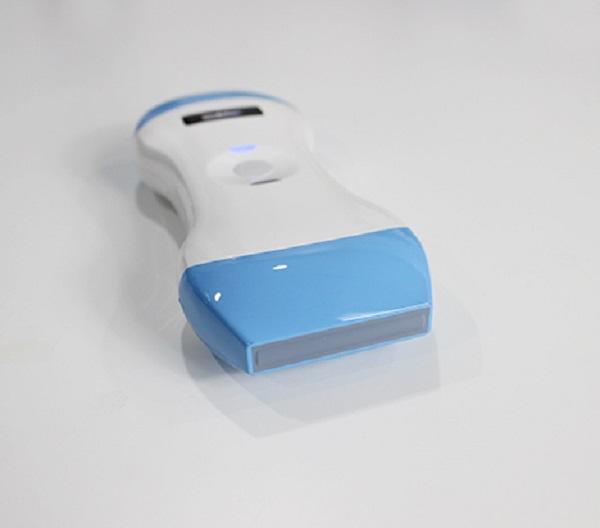
Wifi Ultrasound
Wifiultras provides state-of-the-art wireless ultrasound equipment.We have partnered up with some of the biggest manufacturers and dealers accross the globe like Sonostar, Qsono & Sifsof.All of our products backed with 2 years of warranty and FDA, CE and ISO certificates.
Wifiultras is committed to offer the best possible service at the most competitive price to our valuable customers.Our final goal is Customer happiness and Health for the end customer that consumes our products. We’re always looking for long term healthy relationship.
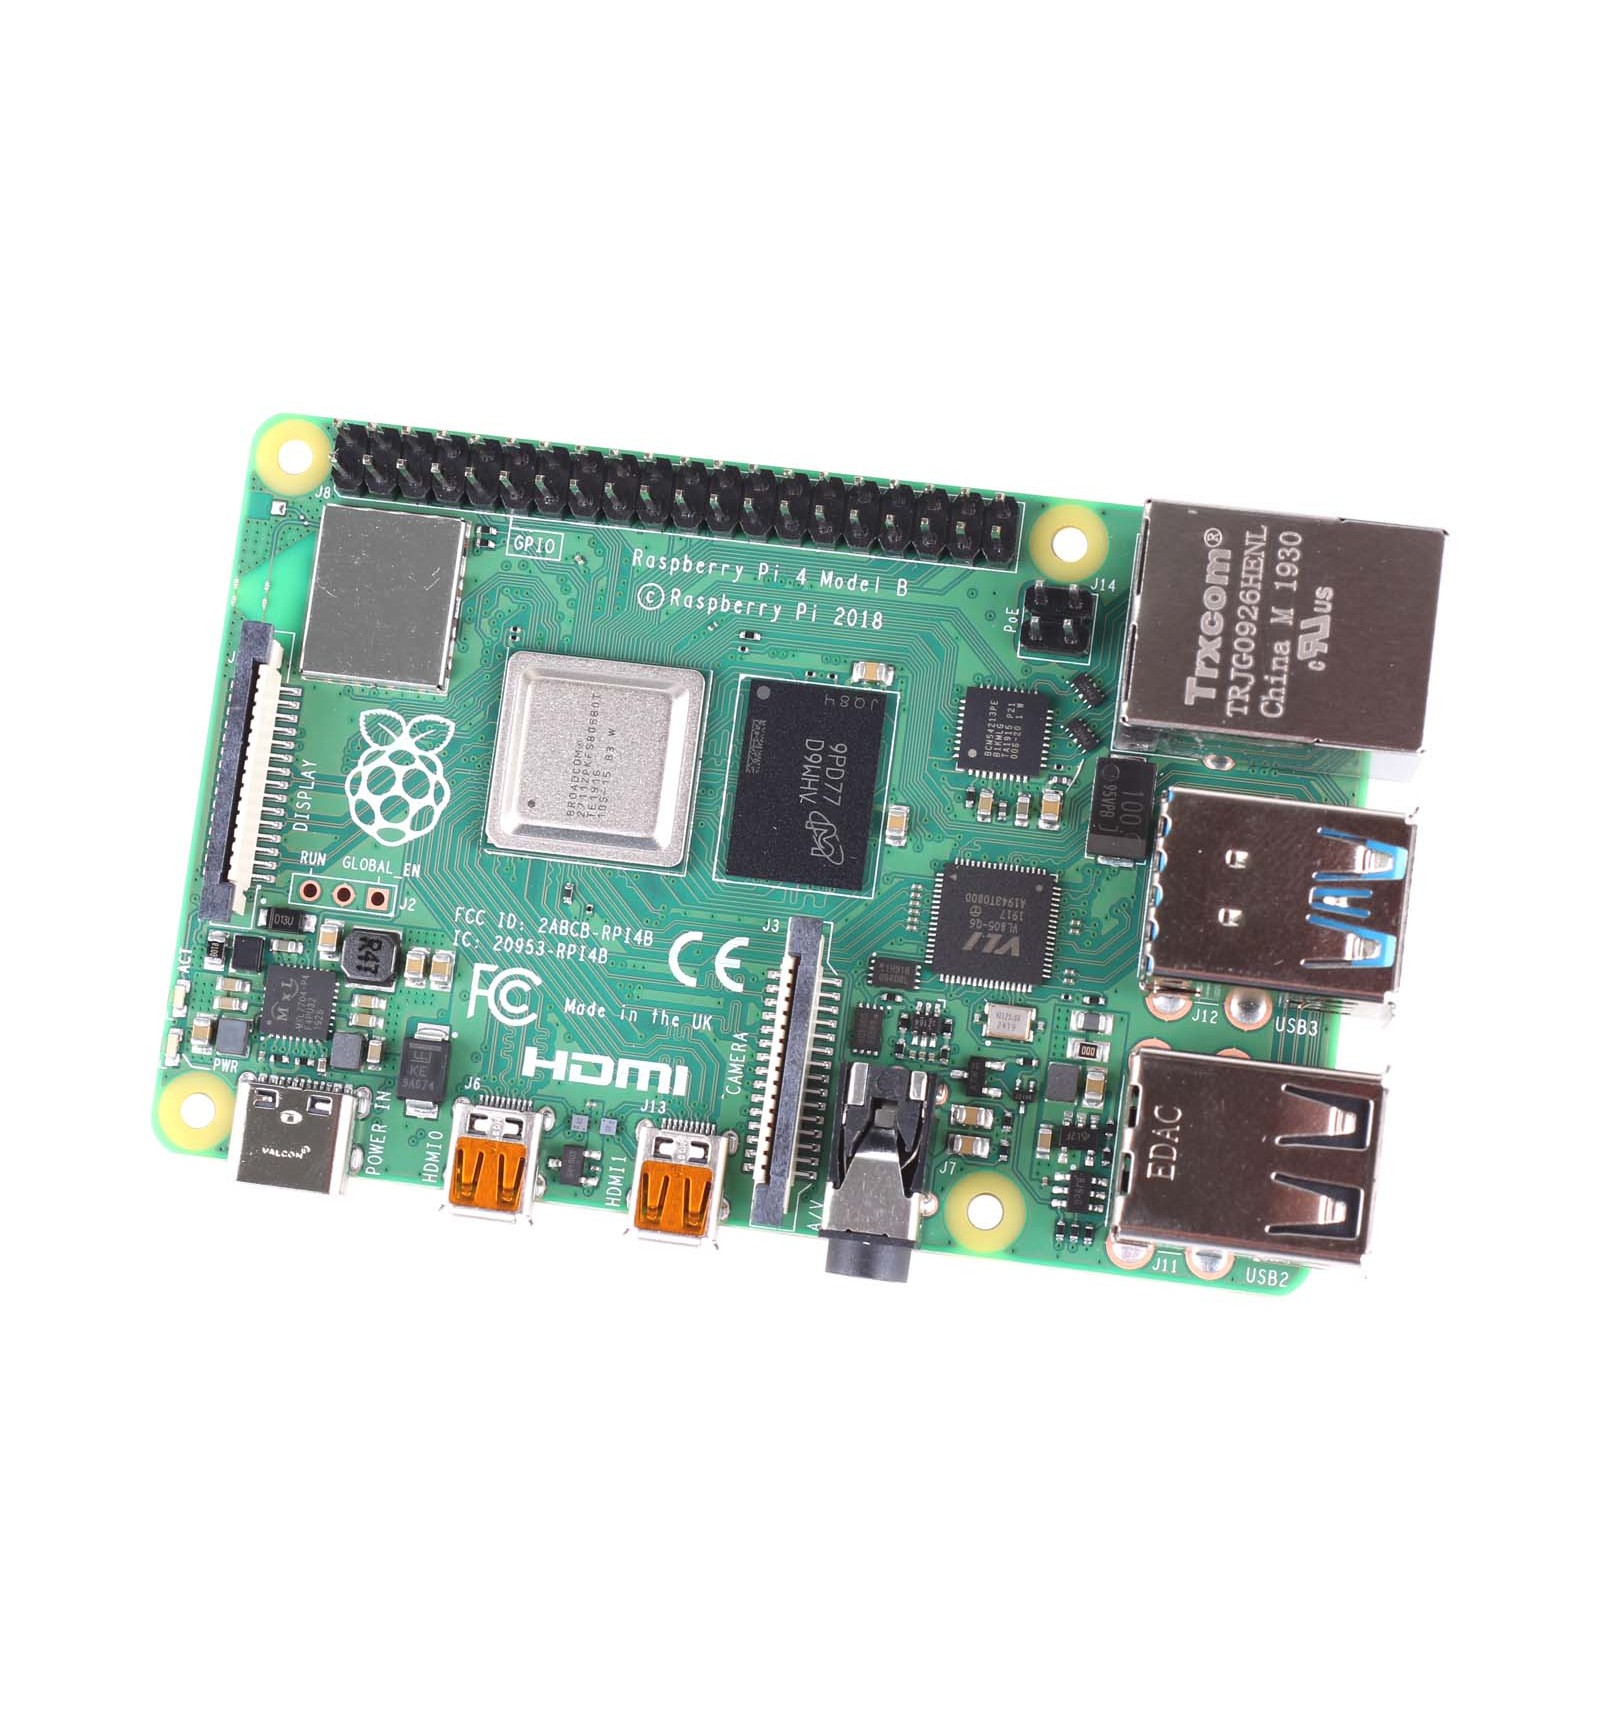
Raspberry Pi 4 Model B 4gb

The moment we’ve all been waiting for has finally arrived, and The Raspberry Pi 4 Model B 4G is now available from DIYElectronics!
The Raspberry Pi Foundation is a brand that just never seems to run out of steam, and after the release of the Raspberry Pi 3 Model B+, the brand dramatically grew in popularity due to the high level of functionality and incredibly low cost – two factors that are amazing for hobbyists like us. However, the recent release of the Raspberry Pi 4 has stepped up this offering even more, offering processing power and functionality that even rivals full-sized entry-level computers! This means that you, as a Pi Maker, have a lot more power to work with, opening up so many more opportunities for building awesome projects that blow the minds of your friends, family, colleagues, pets and even yourself!
SO HOW IS THE RASPBERRY PI 4 BETTER THAN THE RASPBERRY PI 3 B+?
This is the question in everyone’s minds right now, and we’re quite excited to tell you all about the many small and large improvements that the Pi 4 is ready to bring to the table. So, in terms of upgrades since the Pi 3 B+, the Raspberry Pi 4 Model B 4GB SBC has been improved in every single way, from a more powerful CPU, to more RAM, to more video outputs, and so much more. However, to just mention these upgrades without digging further into the juicy details would do the Pi 4 a great disservice, so let’s explore the fancy, functional and fantastic upgrades a little more – in a convenient and easy to read bullet point format:
Vastly More Powerful CPU – As the main brains behind these little single-board-computers, the Raspberry Pi 4 has been equipped with an extremely powerful Broadcom BCM2711B0 Cortex A-72processor. This is around 4 times more powerful than the Cortex-A53 on the Pi 3 B+, and achieves this power increase by catering to many of the small bottle-necking problems that were simply unavoidable with the previous chip architecture. This means that you can expect much more power from the Pi 4, without any drawbacks, allowing you to really step up your projects in terms of both processing speed, as well as complexity.
Higher Capacity AND Quality Memory – While a lot of people will initially look at the increased RAM and simply think that it’s a larger size, some may not realise that the new type of memory (LPDDR4 SDRAM) also makes a huge difference. Additionally, with a full 4GB of RAM on this model, you can expect not just 4 times the speed, but actually quite a lot more due to the more modern type of RAM that has been integrated. This makes the RAM both larger than previously, as well as faster with a higher frequency, which of course translates to reliable speed and a genuinely amazing benefit that anyone who worked with previous Pi Boards will appreciate.
More Serial Capabilities for Makers – As you will all know, Raspberry Pi Boards are designed for Makers and those interested in learning, and as such always featured convenient UART, I2C and SPI buses to communicate or interface with various low-level modules, sensors and other components. And as Makers, we can’t help but drool over the enhanced serial functionality of the Pi 4, with 4 UART Buses, 4 SPI Buses and 4 I2C Buses – allowing us to really take advantage of the processing power for our strange, wonderful and sometimes whacky Electronics projects.
A MAJOR Step Up for Audio/Video Output – Raspberry Pi has always been a great development platform to work with, offering an incredibly wide range of functionality from basic low-level peripheral projects all the way up to full computer capabilities. However, one area in which Pi boards have always left users wanting more is in the audio/video output. With the Raspberry Pi 4 and the integrated VideoCore VI (6), however, this is a thing of the past, and you can now enjoy Dual 4K30 HDMI Outputs or a Single 4K60 Output via the Micro HDMI ports. Additionally, the PWM functionality of the Pi 4 is no longer shared with the analogue audio output on the 3.5mm AV jack, as it was on previous models, allowing users to take full advantage of all of the different audio/video output options – without having to compromise or sacrifice functionality in other areas.
Now, don’t get us wrong, there are certainly many other awesome upgrades that have been made to the new Pi 4, but we felt that the above were the most exciting few that we as Makers can really take advantage of. As such, let’s take a look at a brief summary of all of the new features and specifications of the Pi 4, and then some of the awesome use cases that you can expect to enjoy when you finally get your hands on one of these beautiful boards.
| RASPBERRY PI 4 MODEL B 4GB – TECHNICAL SPECIFICATIONS: | |
| Processor | – Broadcom BCM2711B0 (Quad-Core Cortex A-72) |
| Clock Speed | – 1.5GHz |
| RAM | – 4GB (LPDDR4 SDRAM) |
| Storage | – Micro SD Card |
| GPIO Header | – Expanded 40-pin (2 x 20 strip) |
| USB Ports | – 2 x USB2.0 | 2 x USB3.0 |
| GFX Architecture | – VideoCore VI (6) 500MHz / 600MHz OC |
| Video/Audio Outputs | – 2 x Micro HDMI Ports– 3.5mm Analogue Audio-Video Jack– 2-Lane Display Serial Interface (MIPI DSI)– USB Ports |
| Video Input | – 2-Lane Camera Serial Interface (MIPI CSI) |
| Video Codec Support | – H.256 | MPEG2 | MPEG4 | H.263 |
| Ethernet | – True Gigabit Ethernet (1000Mbps) |
| WiFi | – IEEE 802.11b/g/n/ac (2.4GHz / 5GHz) |
| Bluetooth | – Bluetooth 5.0 | BLE |
| Power Requirements | – 5V DC @ 3A via USB-C– 5V DC via GPIO Header– Power Over Ethernet (PoE) via PoE HAT |
| Low-Level Peripherals | – 27 GPIO Pins (General Purpose Input/Output)– 4 x UART Serial Buses– 4 x SPI Buses– 4 x I2C Buses |
| Firmware Support | – Raspbian Buster / Stretch / Jessie– LibreELEC– Arch Linux– OSMC– More to Follow |
| Weight | – 46g |
| Dimensions | – 88 x 58 x 19.5mm |
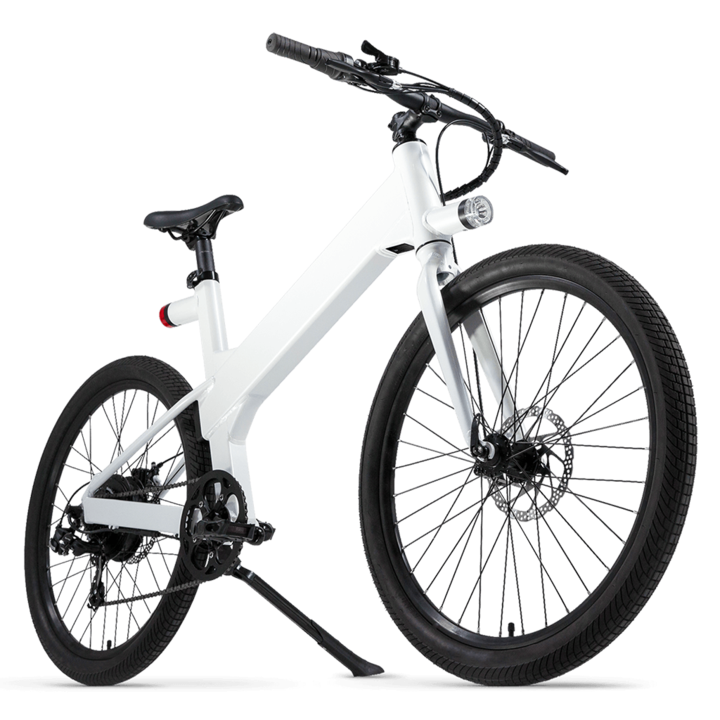
Flashbike
The Bike Evolved
We designed Flash from the ground up with one simple goal in mind: to deliver the safety, security and freedom you need to have fun riding.
I have a wish to own an Ebike guys. Hopefully I can afford one soon.
UK based E-bike company with some good reviews
Phone Deal Re-loved
Phonedeal.co.uk is part of Data2020 Ltd established on August 2014. Phonedeal.co.uk helps customers to save hundreds of pounds by offering pre owned iPhones in immaculate condition like new. Phonedeal.co.uk works with various partners in the mobile industry to make iPhones available much cheaper than usual high street and online retailers. We supply pre owned iPhones in immaculate condition that are as good as new and we work hard to keep our offers better than anyone else as well as consistency with our quality of products and services.Fayyaz Ahmed, Director of Phonedeal.co.uk explains: “My vision is to make latest gadgets available to everyone regardless of the high street price, I’ll bring it to consumers cheaper.”.
Phonedeal.co.uk – How it all started?
Our dedication and motivation continues to grow even everyday as we strive to maintain the level of service we have to our customers as well as our suppliers.
Our processes mean that we can offer our customers’ excellent prices as well as quick turnaround times. Our infrastructure is unique, allowing us to process an order and have it with a courier within 2 minutes of the order being completed. It is this level of service that has ensured we gain excellent customer feedback, as well as impressive customer retention.
We’re proud to be a one-stop shop for your iPhone, We work closely with a variety of suppliers to always ensure we have the latest iPhones available, continuously striving to be one step ahead to give our clients something new and exciting at affordable prices.
PhoneDeal is owned and operated by Data2020 Ltd, incorporated under England & Wales number 09190054
VAT
Our VAT Registration No is GB233 2391 33
We have displayed our VAT Number here for information purpose only. All products sold on “www.phonedeal.co.uk” are offered under 2nd hand VAT Margin Scheme.
OUR REGISTERED OFFICE ADDRESS IS :
Angerstein Business Park,
Unit 4,
12 Horn Lane,
London,
SE10 0RT
OUR TRADING ADDRESS IS:
Angerstein Business Park,
Unit 4, 12 Horn Lane,
London,
SE10 0RT