With many folks continuing to work from home for far longer than they ever thought, it’s no surprise that we’re seeing the rise of small DIY devices to make that video call or virtual presentation a little easier. [Dustin Watts] was interested in the functionality of the Elgato Stream Deck — a macro keyboard where each key is its own screen. But that kind of fancy hardware comes with a formidable price tag. So he built his own, and made it open source!
His first iteration — FreeTouchDeck — was built using commonly available modules but has since evolved into the ESP32 Touchdown which does it all with a single PCB. It’s a highly-customizable touchscreen macro keyboard which provide easy access shortcuts and macros for quick actions. Need a quick mute button, want to switch camera views on OBS, or maybe you want smarter shortcut keys for your CAD of choice. This will can get you there.
There a few key differences from the first version (FreeTouchDeck). The ESP32 dev board was ditched for a tidy PCB the directly integrates the module. This one has a capacitive touch controller (FT6236) rather than a resistive one as the capacitive screens deliver a far nicer user experience. A built-in battery and charger circuit (which the FreeTouchDesk didn’t have) allows for the extra bit of flexibility to stream from anywhere (within wireless range of course). Multiple case designs are available in STL form that allows it to be placed on a wall or desk with ease.
Datasheets, gerbers, kicad files, BOMs, and example firmware is provided on GitHub. The software is easily configurable so it can be set up to do any sort of macro, key combination, or action. This isn’t just limited to emulating a Bluetooth keyboard as there are examples showing how to connect to Home Assistant. All in all, this is a wonderful example of continued iteration on a project.
If you’re anything at all like this writer, you don’t spend a lot of time inspecting brownies past the initial object identification phase, preferring to insert them directly into the mouth post-haste. But those with more of an aesthetic focus take great care to produce brownies with a glossy, attractive skin. [Adam Ragusea] decided to find out what it takes to get a perfect brownie skin, time after time.
After many, many trays of brownies, [Adam], with the assistance of [Dr. Pia Sörensen], determined that the key seems to be making a brownie mixture with very finely dissolved sugar, in sucrose form, with a carefully controlled amount of water in the mixture. This produces a thick mixture which can hold together against the gases bubbling out during the cooking process, and produces a nice glossy skin. Too much water, and the mixture isn’t viscous enough to hold up, leading to brownies full of pock marks, while alternative sugars like fructose and glucose likely disrupt the ordered structure of sucrose molecules necessary for a shiny surface.
Together, [Adam] and [Pia] do a great job of exploring the molecular chemistry behind the process, as well as ruling out several myths that have been perpetuated in the viciously insular brownie subculture. All they’re missing is a set of standardised reflectivity tests executed with an Arduino and some photodiodes, but we’ll assume that was just cut for time. We’ve seen other hacks in the realm of molecular gastronomy before, like this homebrew kitchen centrifuge. Video after the break.
There are a lot of stray cats roaming around [Red Tie Projects’] neighborhood, and no one seems to care much about what happens to them. Fortunately for the cats, [Red Tie Projects] cares quite a lot, as evidenced by this colossal cat condo they built. The cats retain their freedom, but get food and a warm, sheltered bed whenever they decide to grace [Red Tie Projects] with their presence.
[Red Tie Projects] built this sturdy shelter from pallet wood and did a fine job of it, sealing all the seams and screws up with wood putty and waterproofing it with silicone. Inside there’s a heated pillow, a light, and a remote-controlled camera so RTP] can pan around and keep an eye on the cats. All the wires run out through a weatherproof junction box attached to the side and over to a control box made from an ATX power supply.
Most of the build is made from scrap, including the best part — an Arduino-driven motorized zip line for delivering food from the balcony to the cat porch. Details on the control box and the food delivery system are coming soon, as [Red Tie Projects] teases in the video after the break. We’re looking forward to seeing those. Oh, and don’t worry — there’s more than enough footage to cover the cat tax.
There are at least two kinds of 3D printer operators: those who work hard to make their prints look better after they come off the bed and those who settle for whatever comes off the printer. If you are in the latter camp, you probably envy people who have smooth prints with no visible layer lines. But the sanding and priming and multiple coats of paint can put you off.
[Teaching Tech] has a few tricks that might change your mind. He shares his technique for using different coatings for 3D prints that provide good quality with a lot less effort. The coatings in question are polyurethane used for coating pickup truck beds and bitumen rubber used for waterproofing. In the United States, bitumen is known as asphalt, and both materials are relatively cheap, available, and safe to use.
According to the video you can see below, there’s no need to sand or prime the print. In addition to covering imperfections and sealing gaps, it produces watertight prints that have UV resistance and some measure of protection against heating.
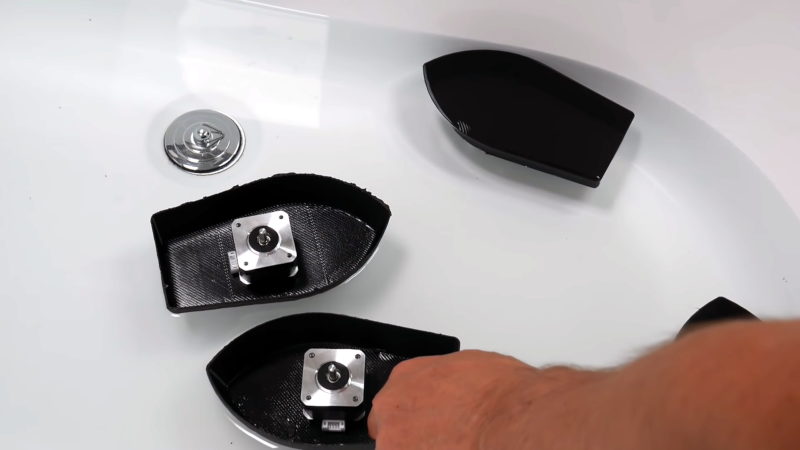
The waterproofing example was fun. Using vase mode, [Teaching Tech] printed a few boats. Having single-layer shells, the boats had a few imperfections. Untreated, the boats actually floated, because they didn’t weigh enough to break the surface tension. However, placing a payload — in this case, a stepper motor — into the boats caused them to sink. With the coatings, though, the boats would float with their motor cargo.
The outward appearance is good, although it isn’t as smooth as paint. You’ve probably seen truck beds and that’s what it looks like. Still, for many parts that’s not a bad look; it almost appears powder-coated. Painting the material on didn’t look very difficult, although the rubber sealant looked thin. On the other hand, it was cut with water, so it might work to use less water in the mixture.
We are anxious to try this out. We aren’t sure if the popular Flex Seal is asphalt rubber, but it might be a good thing to try and is easily available in the states.
We’ve looked at some coatings before. Paint doesn’t have to be hard, but we get why some people don’t want to bother.
[Dave Madison] came across some old digital photos, and in his quest to access them, he ran into quite a few challenges. The saga brings to mind both Murphy’s Law, and while [Dave] prevailed in the end, it required quite a few more steps than one might expect.
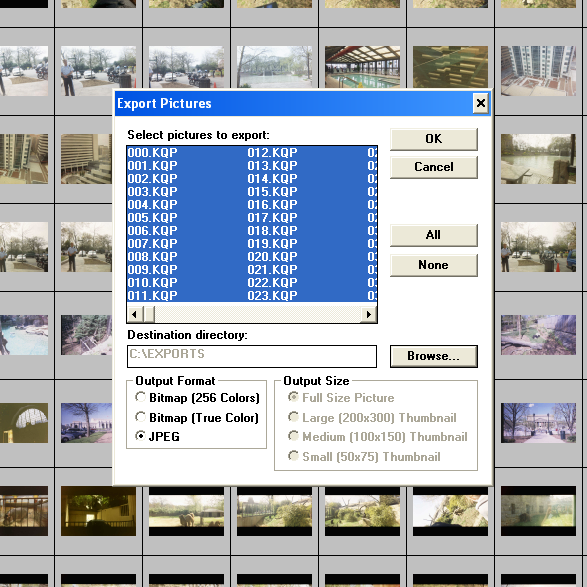
The one smooth part of the process was that Konica’s proprietary software had a handy JPEG export feature.
Here’s the scene: in the late 90s, Konica partnered with photo shops to provide a photo scanning service, delivering digital scans of film photos on 3.5″ floppy disks, and that’s exactly what [Dave] had to work with. The disks were in good condition, and since modern desktop computers still support floppy drives and the FAT filesystem, in theory all one needs to do is stick disks into the reader one at a time in order to access the photos.
Sadly, problems started early. A floppy drive is revoltingly slow compared to any modern storage device, so [Dave]’s first step was to copy all of the files to his machine’s local storage before working on them. This took a bit of wrangling to deal with 8.3 format file names and avoid naming collisions across disks while still preserving some metadata such as original creation date. It was nothing a quick python script couldn’t handle, but that soon led to the next hurdle.
The photos in question were in an obsolete and proprietary Konica .KQP format. [Dave] went through a number of photo viewing programs that claimed to support .KQP, but none of them actually recognized the images.
Fortunately, each disk contained a copy of Konica’s proprietary “PC PictureShow” viewer, but despite having a variety of versions dated between 1997 and 2001 (making them from the Windows 98 and Windows ME eras) [Dave] could not get any version of the program to run in Windows 10, even with compatibility mode for legacy programs enabled. The solution was to set up a Windows XP virtual machine using Oracle’s Virtualbox, and use that to ultimately run PC PictureShow and finally access the photos. After all that work, [Dave] finally had a stroke of luck: Konica’s software had a handy feature to export images in JPEG format, and it worked like a charm.
In the end, [Dave] was able to save 479 out of the 483 images on the old floppy disks, with a reminder that proprietary formats are a pain. The disks and images may have been over twenty years old, but the roots of digital imaging go considerably further back than that. Take a few minutes out your day to read a bit about Russell Kirsch and the first digitized image, that of his three-month old son in 1957.
[Dave Madison] came across some old digital photos, and in his quest to access them, he ran into quite a few challenges. The saga brings to mind both Murphy’s Law, and while [Dave] prevailed in the end, it required quite a few more steps than one might expect.
The one smooth part of the process was that Konica’s proprietary software had a handy JPEG export feature.
Here’s the scene: in the late 90s, Konica partnered with photo shops to provide a photo scanning service, delivering digital scans of film photos on 3.5″ floppy disks, and that’s exactly what [Dave] had to work with. The disks were in good condition, and since modern desktop computers still support floppy drives and the FAT filesystem, in theory all one needs to do is stick disks into the reader one at a time in order to access the photos.
Sadly, problems started early. A floppy drive is revoltingly slow compared to any modern storage device, so [Dave]’s first step was to copy all of the files to his machine’s local storage before working on them. This took a bit of wrangling to deal with 8.3 format file names and avoid naming collisions across disks while still preserving some metadata such as original creation date. It was nothing a quick python script couldn’t handle, but that soon led to the next hurdle.
The photos in question were in an obsolete and proprietary Konica .KQP format. [Dave] went through a number of photo viewing programs that claimed to support .KQP, but none of them actually recognized the images.
Fortunately, each disk contained a copy of Konica’s proprietary “PC PictureShow” viewer, but despite having a variety of versions dated between 1997 and 2001 (making them from the Windows 98 and Windows ME eras) [Dave] could not get any version of the program to run in Windows 10, even with compatibility mode for legacy programs enabled. The solution was to set up a Windows XP virtual machine using Oracle’s Virtualbox, and use that to ultimately run PC PictureShow and finally access the photos. After all that work, [Dave] finally had a stroke of luck: Konica’s software had a handy feature to export images in JPEG format, and it worked like a charm.
In the end, [Dave] was able to save 479 out of the 483 images on the old floppy disks, with a reminder that proprietary formats are a pain. The disks and images may have been over twenty years old, but the roots of digital imaging go considerably further back than that. Take a few minutes out your day to read a bit about Russell Kirsch and the first digitized image, that of his three-month old son in 1957.
The build is based on a Raspberry Pi Zero, secreted away underneath a table with a USB RFID reader attached. Atop the table are a series of RFID cards upon which [hoveeman] printed the artwork from his favorite albums using a special caddy in an inkjet printer. Through some Python code and shell scripts, when scanning a card, the Pi Zero is able to trigger all the Google Home compatible devices in the house to play the album selected at the same time.
It’s a visually enjoyable way to cue up some music, and likely more reliable than most voice assistants, too. We can see this being particularly useful for Weezer fans; with the band’s many self-titled releases, Siri and the Google Assistant typically fail to play the right album on request. We’ve seen other beautiful RFID jukeboxes before, but one player that really sticks out ditched the RF and just uses computer vision with vinyl albums as the ID.
Imagine for a moment that something has taken out your phone line, cell, and fibre connection so you have no internet. For some of you this may even be reality, but go with it and imagine yourself deciding to use your unexpectedly disconnected lockdown time pursuing that code project you always promised yourself. You pull out your laptop and fire up a code editor. Can you write code that works, without the Internet as a handy crib sheet? [Austin Z. Henley] couldn’t, when he tried writing a straightforward web app. He uses it as a hook to muse on the nature of learning, and it’s certainly a thought-provoking subject.
It has become an indispensable tool for the engineer and the coder alike, to constantly refer to online knowledge. This makes absolute sense, as it provides a reference library that will be many orders of magnitude in excess of anything an individual can possibly hold personally.
This holds true whether the resource takes the form of code snippets from StackOverflow or GitHub, or data sheets from TI or Microchip. Even our calculations have moved online, as it’s often much quicker to use an online calculator on a web page to derive for example an impedance calculation. This is not necessarily a bad thing, instead it’s an enabler; skills that used to take months to master due to slow information access can now be acquired in an afternoon. But it does pose the interesting question, in the Internet age what is the measure of an expert coder? Is it the ability to produce the code effectively with whatever help is available, or is it a guru-like mastery of the code? Maybe it’s both. If you have the Internet, give us your views in the comments.
Some people like spinach in their salads. Others would prefer it if it never gets near their fork. Still, other folks, like [Almudena Romero], use it for printing pictures, and they’re the folks we’ll focus on today.
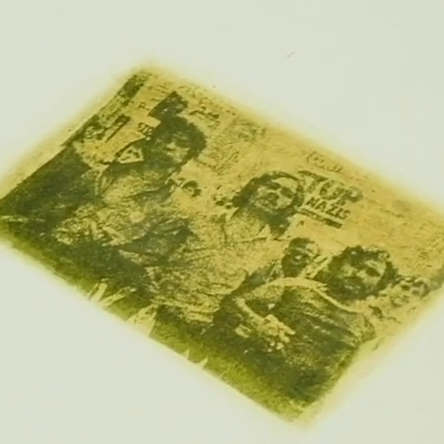
Anthotypes are positive images made from plant dyes that fade from light exposure. Imagine you stain your shirt at a picnic and leave it in the sun with a fork covering part of the stain. When you come back, the stain not sheltered by cutlery is gone, but now you have a permanent fork shape logo made from aunt Bev’s BBQ sauce. The science behind this type of printmaking is beautifully covered in the video below the break. You see, some plant dyes are not suitable for light bleaching, and fewer still if you are not patient since stains like blueberry can take a month in the sun.
The video shows how to make your own plant dye, which has possibilities outside of anthotype printing. Since the dye fades in sunlight, it can be a temporary paint, or you could use samples all over your garden to find which parts get lots of sunlight since the most exposed swatches will be faded the most. Think of a low-tech UV meter with logging, but it runs on spinach.
If the science doesn’t intrigue you, the artistic possibilities are equally cool. All the pictures have a one-of-a-kind, wabi-sabi flare. You take your favorite photo, make it monochrome, print it on a transparent plastic sheet, and the ink will shield the dye and expose the rest. We just gave you a tip about finding the sunniest spot outdoors, so get staining.
Some people like spinach in their salads. Others would prefer it if it never gets near their fork. Still, other folks, like [Almudena Romero], use it for printing pictures, and they’re the folks we’ll focus on today.
Anthotypes are positive images made from plant dyes that fade from light exposure. Imagine you stain your shirt at a picnic and leave it in the sun with a fork covering part of the stain. When you come back, the stain not sheltered by cutlery is gone, but now you have a permanent fork shape logo made from aunt Bev’s BBQ sauce. The science behind this type of printmaking is beautifully covered in the video below the break. You see, some plant dyes are not suitable for light bleaching, and fewer still if you are not patient since stains like blueberry can take a month in the sun.
The video shows how to make your own plant dye, which has possibilities outside of anthotype printing. Since the dye fades in sunlight, it can be a temporary paint, or you could use samples all over your garden to find which parts get lots of sunlight since the most exposed swatches will be faded the most. Think of a low-tech UV meter with logging, but it runs on spinach.
If the science doesn’t intrigue you, the artistic possibilities are equally cool. All the pictures have a one-of-a-kind, wabi-sabi flare. You take your favorite photo, make it monochrome, print it on a transparent plastic sheet, and the ink will shield the dye and expose the rest. We just gave you a tip about finding the sunniest spot outdoors, so get staining.
Still don’t have anything for Valentine’s Day? We wholeheartedly suggest that you fire up that printer and get ready to fall in love with engineering all over again, because [JBV Creative] has designed a super-sweet piece of machinery that would turn the gears of anyone’s heart. He calls this the most overly-engineered candy dispenser ever, and we have to agree. It’s certainly one of the most beautiful we’ve ever seen.
There’s no electronics at all in this elegant design, just purely mechanical, hand-cranked fun. Turning the crank does two things at once — it moves a little access panel back and forth underneath the chute that governs the number of candies given, and at the same time, moves the conveyor belt along to deliver the goods to the receiving area.
This entire design is absolute genius, especially the decoupling mechanism that shuts off the flow of candy but allows the belt to keep moving. Be sure to watch the build video where [JBV Creative] effortlessly snap-fits the machine together without a single tool, and stay for the follow-up video where he discusses the engineering challenges and shows just how much work went into it.
Of course, there’s more than one way to overly-engineer a candy dispenser. Here’s one that finds the holy grail of peanut M&Ms — the ones that didn’t get a peanut.
Most foods when pureed become pretty unappetizing to look at. For that reason, patients who have trouble swallowing are often given pureed food that’s been molded into fun shapes to make it more appealing. The problem with molding food is that it’s labor-intensive, time-consuming, and the resulting edible toys require a lot of storage space.
When 3D printing came along, it was poised to solve the problem, but in the quest to make foods printable, they became even worse. Printable food paste typically starts with dehydrated and/or freeze-dried vegetables, and then hydrocolloids like xanthan gum and locust bean gum are added so the paste holds together after extrusion. Unfortunately, these additives are a big step backward; they change the texture for the worse, and make the food smell and taste bad, too.
The solution is one of those things that sounds obvious in hindsight: some researchers in Singapore tried using fresh and frozen foods instead of freeze-dried, and figured out the minimum amount of hydrocolloids they could get away with for a given food. In their research they categorized all the feasible foods this way. Some vegetables like garden peas which have higher starch and lower water percentages don’t need any hydrocolloids to be printable. As the starch level falls and water rises, more hydrocolloids are needed. So carrots can get away with using just one type of hydrocolloid, while things like bok choy need two types to print effectively. Even so, results of the study show that fresh vegetable printing calls for far less than their powdered counterparts to the extent that it no longer affects the taste of the end product.
The researchers envision a future where every hospital and elder care facility has a food printer to churn out carrot boats and spinach skylines on demand. We think this tasty development is totally awesome — it’s just too bad the carrot boats don’t look more like Benchy.
I use open source software almost exclusively; at least on the desktop — the phone is another matter, sadly. And I do a lot of stuff with and on computers. Folks outside of the free software scene are still a little surprised when small programs are free to use and modify, but they’re downright skeptical when it comes to the big works of professional software. It’s one thing to write xeyes, but how about something to rival Photoshop, or Altium?
Of course, we all know the answer — mostly. None of the “big” software packages work exactly the same as their closed-source counterparts, often missing a few features here and gaining a few there, or following a different workflow. That’s OK, different closed-source programs work differently as well. I’m not here to argue that GIMP is better than Photoshop, but rather to point out what I really love about open software: it caters to the little guys and gals, the niche users, and the specialists. Or rather, it lets them cater to themselves.
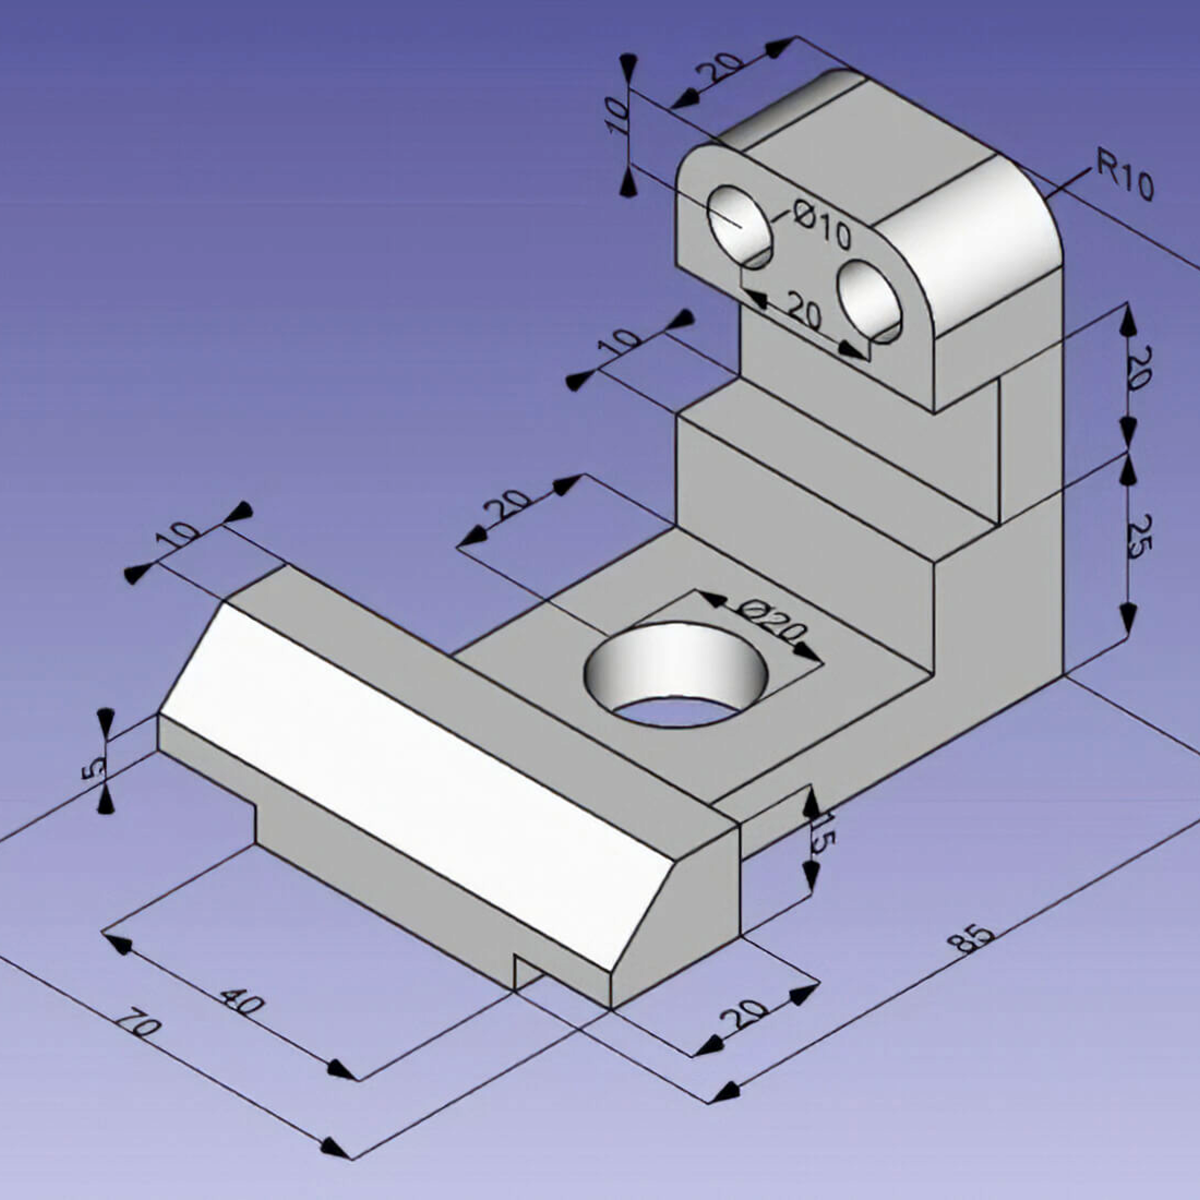
I just started learning FreeCAD for a CNC milling project, and it’s awesome. I’ve used Fusion 360, and although FreeCAD isn’t “the same” as Fusion 360, it has most of the features that I need. But it’s the quirky features that set it apart.
The central workflow is to pick a “workbench” where specific tasks are carried out, and then you take your part to each bench, operate on it, and then move to the next one you need. But the critical bit here is that a good number of the workbenches are contributed to the open project by people who have had particular niche needs. For me, for instance, I’ve done most of my 3D modelling for 3D printing using OpenSCAD, which is kinda niche, but also the language that underpins Thingiverse’s customizer functionality. Does Fusion 360 seamlessly import my OpenSCAD work? Nope. Does FreeCAD? Yup, because some other nerd was in my shoes.
And then I started thinking of the other big free projects. Inkscape has plugins that let you create Gcode to drive CNC mills or strange plotters. Why? Because nerds love eggbots. GIMP has plugins for every imaginable image transformation — things that 99% of graphic artists will never use, and so Adobe has no incentive to incorporate.
Open source lets you scratch your own itch, and share your solution with others. The features of for-pay, closed-source software are driven by the masses: “is this a feature that enough of our customers want?” The features of open-source software are driven by the freaky ideas of nerds just like me. Vive la différence!
This article is part of the Hackaday.com newsletter, delivered every seven days for each of the last 200+ weeks. It also includes our favorite articles from the last seven days that you can see on the web version of the newsletter.
Want this type of article to hit your inbox every Friday morning? You should sign up!
I use open source software almost exclusively; at least on the desktop — the phone is another matter, sadly. And I do a lot of stuff with and on computers. Folks outside of the free software scene are still a little surprised when small programs are free to use and modify, but they’re downright skeptical when it comes to the big works of professional software. It’s one thing to write xeyes, but how about something to rival Photoshop, or Altium?
Of course, we all know the answer — mostly. None of the “big” software packages work exactly the same as their closed-source counterparts, often missing a few features here and gaining a few there, or following a different workflow. That’s OK, different closed-source programs work differently as well. I’m not here to argue that GIMP is better than Photoshop, but rather to point out what I really love about open software: it caters to the little guys and gals, the niche users, and the specialists. Or rather, it lets them cater to themselves.
I just started learning FreeCAD for a CNC milling project, and it’s awesome. I’ve used Fusion 360, and although FreeCAD isn’t “the same” as Fusion 360, it has most of the features that I need. But it’s the quirky features that set it apart.
The central workflow is to pick a “workbench” where specific tasks are carried out, and then you take your part to each bench, operate on it, and then move to the next one you need. But the critical bit here is that a good number of the workbenches are contributed to the open project by people who have had particular niche needs. For me, for instance, I’ve done most of my 3D modelling for 3D printing using OpenSCAD, which is kinda niche, but also the language that underpins Thingiverse’s customizer functionality. Does Fusion 360 seamlessly import my OpenSCAD work? Nope. Does FreeCAD? Yup, because some other nerd was in my shoes.
And then I started thinking of the other big free projects. Inkscape has plugins that let you create Gcode to drive CNC mills or strange plotters. Why? Because nerds love eggbots. GIMP has plugins for every imaginable image transformation — things that 99% of graphic artists will never use, and so Adobe has no incentive to incorporate.
Open source lets you scratch your own itch, and share your solution with others. The features of for-pay, closed-source software are driven by the masses: “is this a feature that enough of our customers want?” The features of open-source software are driven by the freaky ideas of nerds just like me. Vive la différence!
This article is part of the Hackaday.com newsletter, delivered every seven days for each of the last 200+ weeks. It also includes our favorite articles from the last seven days that you can see on the web version of the newsletter.
Want this type of article to hit your inbox every Friday morning? You should sign up!
I use open source software almost exclusively; at least on the desktop — the phone is another matter, sadly. And I do a lot of stuff with and on computers. Folks outside of the free software scene are still a little surprised when small programs are free to use and modify, but they’re downright skeptical when it comes to the big works of professional software. It’s one thing to write xeyes, but how about something to rival Photoshop, or Altium?
Of course, we all know the answer — mostly. None of the “big” software packages work exactly the same as their closed-source counterparts, often missing a few features here and gaining a few there, or following a different workflow. That’s OK, different closed-source programs work differently as well. I’m not here to argue that GIMP is better than Photoshop, but rather to point out what I really love about open software: it caters to the little guys and gals, the niche users, and the specialists. Or rather, it lets them cater to themselves.
I just started learning FreeCAD for a CNC milling project, and it’s awesome. I’ve used Fusion 360, and although FreeCAD isn’t “the same” as Fusion 360, it has most of the features that I need. But it’s the quirky features that set it apart.
The central workflow is to pick a “workbench” where specific tasks are carried out, and then you take your part to each bench, operate on it, and then move to the next one you need. But the critical bit here is that a good number of the workbenches are contributed to the open project by people who have had particular niche needs. For me, for instance, I’ve done most of my 3D modelling for 3D printing using OpenSCAD, which is kinda niche, but also the language that underpins Thingiverse’s customizer functionality. Does Fusion 360 seamlessly import my OpenSCAD work? Nope. Does FreeCAD? Yup, because some other nerd was in my shoes.
And then I started thinking of the other big free projects. Inkscape has plugins that let you create Gcode to drive CNC mills or strange plotters. Why? Because nerds love eggbots. GIMP has plugins for every imaginable image transformation — things that 99% of graphic artists will never use, and so Adobe has no incentive to incorporate.
Open source lets you scratch your own itch, and share your solution with others. The features of for-pay, closed-source software are driven by the masses: “is this a feature that enough of our customers want?” The features of open-source software are driven by the freaky ideas of nerds just like me. Vive la différence!
This article is part of the Hackaday.com newsletter, delivered every seven days for each of the last 200+ weeks. It also includes our favorite articles from the last seven days that you can see on the web version of the newsletter.
Want this type of article to hit your inbox every Friday morning? You should sign up!
While most home networking hardware comes with network ports baked in from the factory, industrial grade gear is typically more versatile. Using standards like Small Form-factor Pluggable, or SFP, network switches can be used with a variety of transport mediums by simply swapping tranceivers in and out. These network devices typically handle the nitty gritty of transmitting Ethernet over fiber optics, and for those keen to experiment, this breakout may come in handy.
The board design comes complete with an SFP receptacle, allowing a variety of compatible receivers to be plugged in for experimentation. With the standard using differential signalling, the board carries hardware to allow the transceiver to be fed with single-ended signals instead, though a differential version is available too. The board can be used for transmitting different signals over fiber, outside just Ethernet, or used as a simple way to reprogram SFP modules via I2C. The latter can be useful to get around DRM in network switches that attempt to lock out generic transceiver modules.
Whatever kind of clock you’re interested in building, you’re going to need to build an oscillator of some sort. Whether it be a pendulum, a balance wheel, or the atomic transitions of cesium or rubidium, something needs to go back and forth in a predictable way to form the timebase of the clock. And while it might not make the best timepiece in the world, a tuning fork certainly fits the bill and makes for a pretty interesting clock build.
One of the nice things about this build is that [Kris Slyka] got his inspiration from a tuning fork clock that we covered a while back — we love it when someone takes a cool concept and makes it their own. While both clocks use a 440 Hz tuning fork — that’s an A above middle C for the musically inclined — [Kris] changed up the excitation method for his build. He used a pair of off-the-shelf inductors, placed near the ends of each arm and bridged by a strong neodymium magnet to both sense the 440-Hz vibrations and to provide the kick needed to keep the fork vibrating.
As for the aesthetic of the build, we think [Kris] really nailed it. Using through-hole components, old-school seven-segment displays, and a home-etched PCB, he was able to capture a retro look that really works. The RS-232 port and the bell jar enclosure complete the feel, although we’re not sure about the custom character set [Kris] designed — it’s cool and all, but makes it hard for anyone else to read without a little practice. Regardless, this is a fun build, and we’d imagine the continuous tone coming from the clock is pretty pleasing.
[Jeff] says that designing your own 6502 computer is a rite of passage, and he wanted the experience. His board can accept a real 6502 or the newer CMOS variant that is still available. There are a few modern conveniences such as USB power and provisions for using a USB serial port.
We are spoiled today with microcontrollers having everything in one package, but with this class of CPU you need your own memory, I/O devices, and other support chips. [Jeff] took a traditional approach, but picked components that are still easy to obtain. Some designs now push all the support functions to a more modern processor like an Arduino, which is very simple to do, but doesn’t feel as authentic, somehow.
For software, there are several versions of BASIC, one based on Ohio Scientific’s variant. There’s also a monitor image. With 32K of RAM, this would have been a respectable machine in its day. The BASIC interpreter dates from 1977. There are plenty of old BASIC games from those days and [Jeff] shows a famous version of poker running on the board. The 6502’s assembly language isn’t that bad, either.
We love these old retro builds. If you don’t fancy all the support chips you can, as we mentioned, use another processor. Or, try an FPGA.
MIT’s Computer Science and Artificial Intelligence Lab (CSAIL) wants to convert laser cutters into something more. By attaching a head to a commercial laser cutter and adding software, they combine the functions of a cutter, a conductive printer, and a pick and place system. The idea is to enable construction of entire devices such as robots and drones.
The concept, called LaserFactory, sounds like a Star Trek-style replicator, but it doesn’t create things like circuit elements and motors. It simply picks them up, places them, and connects them using silver conductive ink. You can get a good idea of how it works by watching the video below.
While it is true that all of this technology exists today, there’s some synergy in having them all together. For example, the video shows etching grooves into acrylic with the laser, filling the grooves with silver ink, and then using the laser to set the silver forming a sort of printed circuit board. Then the pick and place can put components down which the machine can laser solder into place.
Of course, it remains to be seen how durable this construction is. Also, it is obvious that you are going to have a limited palette of options depending on what components are available. That is, you can’t build a tank with quadcopter parts.
We’ve seen laser soldering rigs before. Homebrew pick and place machines are around, too. It doesn’t seem too far a stretch that you could fabricate your own version of this with a laser module, a paste extruder, and a few other odds and ends.
Modern life has its conveniences. Often, those conveniences lead to easier hacks. A great example of that is the rise of satellite television and the impact it has had on amateur radio telescopes. There was a time when building a dish and a suitable low noise amplifier was a big deal. Now they are commodity parts you can get anywhere.
The antenna in use is a 1.2-meter prime focus dish. Some TV dishes use an offset feed, but that makes it harder to aim for use in a radio telescope. In addition to off-the-shelf antenna and RF components, an AirSpy software-defined radio picks up the frequency-shifted output from the antenna. There is more about the software side of the build in a follow-up post. We liked that this was a pretty meaty example of using GNU Radio.
A little math predicts that the telescope will see about 1.45 degrees of sky in the half-power bandwidth. Since coax is very lossy at 11.2 GHz, a converter sits right at the feed point and shifts the incoming signal down to about 1.4 GHz. The signal then goes through a bandpass filter, an amplifier, and on to the AirSpy.
As radio telescopes go, 1.2 meters isn’t huge, though you can easily see the sun and the moon transit. The post says you should be able to hear the Milky Way, but that other stellar radio sources may be too faint for the modest equipment.
These days, NASA deciding to launch one of their future missions on a commercial rocket is hardly a surprise. After all, the agency is now willing to fly their astronauts on boosters and spacecraft built and operated by SpaceX. Increased competition has made getting to space cheaper and easier than ever before, so it’s only logical that NASA would reap the benefits of a market they helped create.
So the recent announcement that NASA’s Europa Clipper mission will officially fly on a commercial launch vehicle might seem like more of the same. But this isn’t just any mission. It’s a flagship interplanetary probe designed to study and map Jupiter’s moon Europa in unprecedented detail, and will serve as a pathfinder for a future mission that will actually touch down on the moon’s frigid surface. Due to the extreme distance from Earth and the intense radiation of the Jovian system, it’s considered one of the most ambitious missions NASA has ever attempted.
With no margin for error and a total cost of more than $4 billion, the fact that NASA trusts a commercially operated booster to carry this exceptionally valuable payload is significant in itself. But perhaps even more importantly, up until now, Europa Clipper was mandated by Congress to fly on NASA’s Space Launch System (SLS). This was at least partly due to the incredible power of the SLS, which would have put the Clipper on the fastest route towards Jupiter. But more pragmatically, it was also seen as a way to ensure that work on the Shuttle-derived super heavy-lift rocket would continue at a swift enough pace to be ready for the mission’s 2024 launch window.
But with that deadline fast approaching, and engineers feeling the pressure to put the final touches on the spacecraft before it gets mated to the launch vehicle, NASA appealed to Congress for the flexibility to fly Europa Clipper on a commercial rocket. The agency’s official line is that they can’t spare an SLS launch for the Europa mission while simultaneously supporting the Artemis Moon program, but by allowing the Clipper to fly on another rocket in the 2021 Consolidated Appropriations Act, Congress effectively removed one of the only justifications that still existed for the troubled Space Launch System.
To Europa, Eventually
There’s no question that the SLS, at least on paper, would have been the ideal vehicle to carry the Europa Clipper on its epic journey. The megarocket would have enough energy to send the roughly 6,065 kg (13,371 lb) probe on a direct trajectory towards Jupiter during its closest pass in 2024, which would bring the planet within 611 million kilometers (380 million miles) of Earth. On this flight path, it would take a little less than three years for the Clipper to enter orbit around Jupiter and begin its scientific mission.
Europa as seen by the Galileo spacecraft.
Unfortunately, there’s simply no replacement for the SLS in terms of raw power. While future vehicles from SpaceX, Blue Origin, and United Launch Alliance could be compelling options, they simply won’t be ready in time for the 2024 launch window. Even if they’re operational by then, which is by no means a guarantee, they certainly won’t have enough flights logged to prove their reliability. NASA could conceivably wait until one of the later launch windows in 2025 or 2026 to give commercial operators more time to bring their next-generation heavy lift vehicles online, but at least for now, that’s not in the cards.
So how do you get to Europa without the massive boost provided by the SLS? In a word, slowly. While there was some previous speculation that the spacecraft could be fitted with a small “kick stage” to make up for the reduced initial velocity, the preliminary launch contract information provided by NASA specifies that the spacecraft will make use of gravity assist maneuvers by flying what’s known as a Mars-Earth-Gravity-Assist (MEGA) trajectory. This will allow the Europa Clipper to reach its destination without any hardware modifications, but the downside of this complex orbital dance is that the journey will take more than twice as long to complete, with the probe not reaching Europa until 2030 at the earliest.
No determination has yet been made as to which rocket will ultimately launch the Clipper, and the decision isn’t likely to come until next year after the completion of a formal selection process. That said, as it has the highest payload capacity of any currently operational rocket in the world, the SpaceX Falcon Heavy is far and away the most likely choice. Even still, it will potentially have to launch in the as of yet unused fully expendable mode.
While few would complain about politicians taking an active interest in space exploration, and keeping hundreds of high-paying aerospace jobs in his district was a commendable achievement, Shelby’s support of NASA came at a cost. He has been vehemently opposed to NASA’s partnerships with commercial launch providers, going so far as to call the agency’s early contracts with companies like SpaceX a “faith-based initiative” and “a welfare program for the commercial space industry” as the fledgling aerospace firms had yet to demonstrate they could actually build a booster capable of reaching orbit.
It’s a safe bet that Senator Shelby’s replacement will take a similarly bullish approach to Marshall Space Flight Center, but it’s difficult to imagine they will be able to ignore the leaps and bounds made by commercial launch providers in the last few years. As private industry rapidly iterates through cutting-edge engine and booster technology, the Space Launch System’s reliance on Shuttle-derived hardware conceived in the 1970s only becomes harder to defend.
Difficult Decisions Ahead
Between the embarrassing “Green Run” failure in January, the loss of the Europa Clipper mission, and the retirement of Senator Shelby, the future of the Space Launch System has never been more uncertain. Add in a White House that’s far more concerned with fighting a deadly pandemic than leaving new boot prints on Mars or the Moon, and it’s not hard to see how the oft-delayed and incredibly expensive program might finally be running out of road.
To be sure, the SLS will fly at least once. NASA and Boeing are getting ready to repeat the failed engine test in the next few weeks, and too much time and money has been invested to not go ahead with the Artemis I mission. Even if NASA ultimately decides to wind down the SLS program in favor of further commercial cooperation, the shakedown flight is just as much a test of the Orion crew vehicle. With several more Orion capsules already under construction for future Artemis missions, development of the Apollo-like capsule is almost certainly going to continue with or without the SLS.
These days, NASA deciding to launch one of their future missions on a commercial rocket is hardly a surprise. After all, the agency is now willing to fly their astronauts on boosters and spacecraft built and operated by SpaceX. Increased competition has made getting to space cheaper and easier than ever before, so it’s only logical that NASA would reap the benefits of a market they helped create.
So the recent announcement that NASA’s Europa Clipper mission will officially fly on a commercial launch vehicle might seem like more of the same. But this isn’t just any mission. It’s a flagship interplanetary probe designed to study and map Jupiter’s moon Europa in unprecedented detail, and will serve as a pathfinder for a future mission that will actually touch down on the moon’s frigid surface. Due to the extreme distance from Earth and the intense radiation of the Jovian system, it’s considered one of the most ambitious missions NASA has ever attempted.
With no margin for error and a total cost of more than $4 billion, the fact that NASA trusts a commercially operated booster to carry this exceptionally valuable payload is significant in itself. But perhaps even more importantly, up until now, Europa Clipper was mandated by Congress to fly on NASA’s Space Launch System (SLS). This was at least partly due to the incredible power of the SLS, which would have put the Clipper on the fastest route towards Jupiter. But more pragmatically, it was also seen as a way to ensure that work on the Shuttle-derived super heavy-lift rocket would continue at a swift enough pace to be ready for the mission’s 2024 launch window.
But with that deadline fast approaching, and engineers feeling the pressure to put the final touches on the spacecraft before it gets mated to the launch vehicle, NASA appealed to Congress for the flexibility to fly Europa Clipper on a commercial rocket. The agency’s official line is that they can’t spare an SLS launch for the Europa mission while simultaneously supporting the Artemis Moon program, but by allowing the Clipper to fly on another rocket in the 2021 Consolidated Appropriations Act, Congress effectively removed one of the only justifications that still existed for the troubled Space Launch System.
To Europa, Eventually
There’s no question that the SLS, at least on paper, would have been the ideal vehicle to carry the Europa Clipper on its epic journey. The megarocket would have enough energy to send the roughly 6,065 kg (13,371 lb) probe on a direct trajectory towards Jupiter during its closest pass in 2024, which would bring the planet within 611 million kilometers (380 million miles) of Earth. On this flight path, it would take a little less than three years for the Clipper to enter orbit around Jupiter and begin its scientific mission.
Europa as seen by the Galileo spacecraft.
Unfortunately, there’s simply no replacement for the SLS in terms of raw power. While future vehicles from SpaceX, Blue Origin, and United Launch Alliance could be compelling options, they simply won’t be ready in time for the 2024 launch window. Even if they’re operational by then, which is by no means a guarantee, they certainly won’t have enough flights logged to prove their reliability. NASA could conceivably wait until one of the later launch windows in 2025 or 2026 to give commercial operators more time to bring their next-generation heavy lift vehicles online, but at least for now, that’s not in the cards.
So how do you get to Europa without the massive boost provided by the SLS? In a word, slowly. While there was some previous speculation that the spacecraft could be fitted with a small “kick stage” to make up for the reduced initial velocity, the preliminary launch contract information provided by NASA specifies that the spacecraft will make use of gravity assist maneuvers by flying what’s known as a Mars-Earth-Gravity-Assist (MEGA) trajectory. This will allow the Europa Clipper to reach its destination without any hardware modifications, but the downside of this complex orbital dance is that the journey will take more than twice as long to complete, with the probe not reaching Europa until 2030 at the earliest.
No determination has yet been made as to which rocket will ultimately launch the Clipper, and the decision isn’t likely to come until next year after the completion of a formal selection process. That said, as it has the highest payload capacity of any currently operational rocket in the world, the SpaceX Falcon Heavy is far and away the most likely choice. Even still, it will potentially have to launch in the as of yet unused fully expendable mode.
While few would complain about politicians taking an active interest in space exploration, and keeping hundreds of high-paying aerospace jobs in his district was a commendable achievement, Shelby’s support of NASA came at a cost. He has been vehemently opposed to NASA’s partnerships with commercial launch providers, going so far as to call the agency’s early contracts with companies like SpaceX a “faith-based initiative” and “a welfare program for the commercial space industry” as the fledgling aerospace firms had yet to demonstrate they could actually build a booster capable of reaching orbit.
It’s a safe bet that Senator Shelby’s replacement will take a similarly bullish approach to Marshall Space Flight Center, but it’s difficult to imagine they will be able to ignore the leaps and bounds made by commercial launch providers in the last few years. As private industry rapidly iterates through cutting-edge engine and booster technology, the Space Launch System’s reliance on Shuttle-derived hardware conceived in the 1970s only becomes harder to defend.
Difficult Decisions Ahead
Between the embarrassing “Green Run” failure in January, the loss of the Europa Clipper mission, and the retirement of Senator Shelby, the future of the Space Launch System has never been more uncertain. Add in a White House that’s far more concerned with fighting a deadly pandemic than leaving new boot prints on Mars or the Moon, and it’s not hard to see how the oft-delayed and incredibly expensive program might finally be running out of road.
To be sure, the SLS will fly at least once. NASA and Boeing are getting ready to repeat the failed engine test in the next few weeks, and too much time and money has been invested to not go ahead with the Artemis I mission. Even if NASA ultimately decides to wind down the SLS program in favor of further commercial cooperation, the shakedown flight is just as much a test of the Orion crew vehicle. With several more Orion capsules already under construction for future Artemis missions, development of the Apollo-like capsule is almost certainly going to continue with or without the SLS.
Hackaday editors Mike Szczys and Elliot Williams unpack great hacks of the past week. We loves seeing the TIL311 — a retro display in a DIP package — exquisitely recreated with SMD electronics and resin casting. You might never need to continuously measure the diameter of your 3D printer filament, but just in case there’s a clever hall-effect sensor mechanism for that. Both of us admire the work being done in the FPGA realm and this week we saw a RISC-V core plumbed into quite the FPGA stack to run a version of Doom originally played on 486 computers. And we’re getting excited for the three ring circus of engineering acrobatics that will land NASA’s Perseverance rover on the surface of Mars next week.
Take a look at the links below if you want to follow along, and as always, tell us what you think about this episode in the comments!
Hackaday editors Mike Szczys and Elliot Williams unpack great hacks of the past week. We loves seeing the TIL311 — a retro display in a DIP package — exquisitely recreated with SMD electronics and resin casting. You might never need to continuously measure the diameter of your 3D printer filament, but just in case there’s a clever hall-effect sensor mechanism for that. Both of us admire the work being done in the FPGA realm and this week we saw a RISC-V core plumbed into quite the FPGA stack to run a version of Doom originally played on 486 computers. And we’re getting excited for the three ring circus of engineering acrobatics that will land NASA’s Perseverance rover on the surface of Mars next week.
Take a look at the links below if you want to follow along, and as always, tell us what you think about this episode in the comments!
For some, the idea of several hours of painting and designing intricate models with minute details and features sounds like a delightful afternoon spent. Some of us would much rather just have it come already painted with motors so that it can move. [Cory Collins] sought to combine these two hobbies by building a highly detailed motorized tank dubbed Tankbot 2.3. (Video, embedded below.)
It’s based on a simple hexapod kit ordered online that includes a built-in Arduino compatible board (it’s based on the Arduino 2560 Mega). The legs were redesigned to match the aesthetic that [Cory] was going for. The redesign allows for an extra pivot in the leg mechanism. The turret section was designed and built on top of the base with support for a servo to turn it (though the firmware isn’t quite there yet). After all the parts were 3d printed, the laborious process of painting began. With some delicate airbrushing and some quick stencils cut for the decals, it was complete.
We are amazed by the types of kits and parts that you can find online and the fact that they’re usually inexpensive to boot. We’ve come a long way since 2013 when we covered a much simpler Arduino based tank.

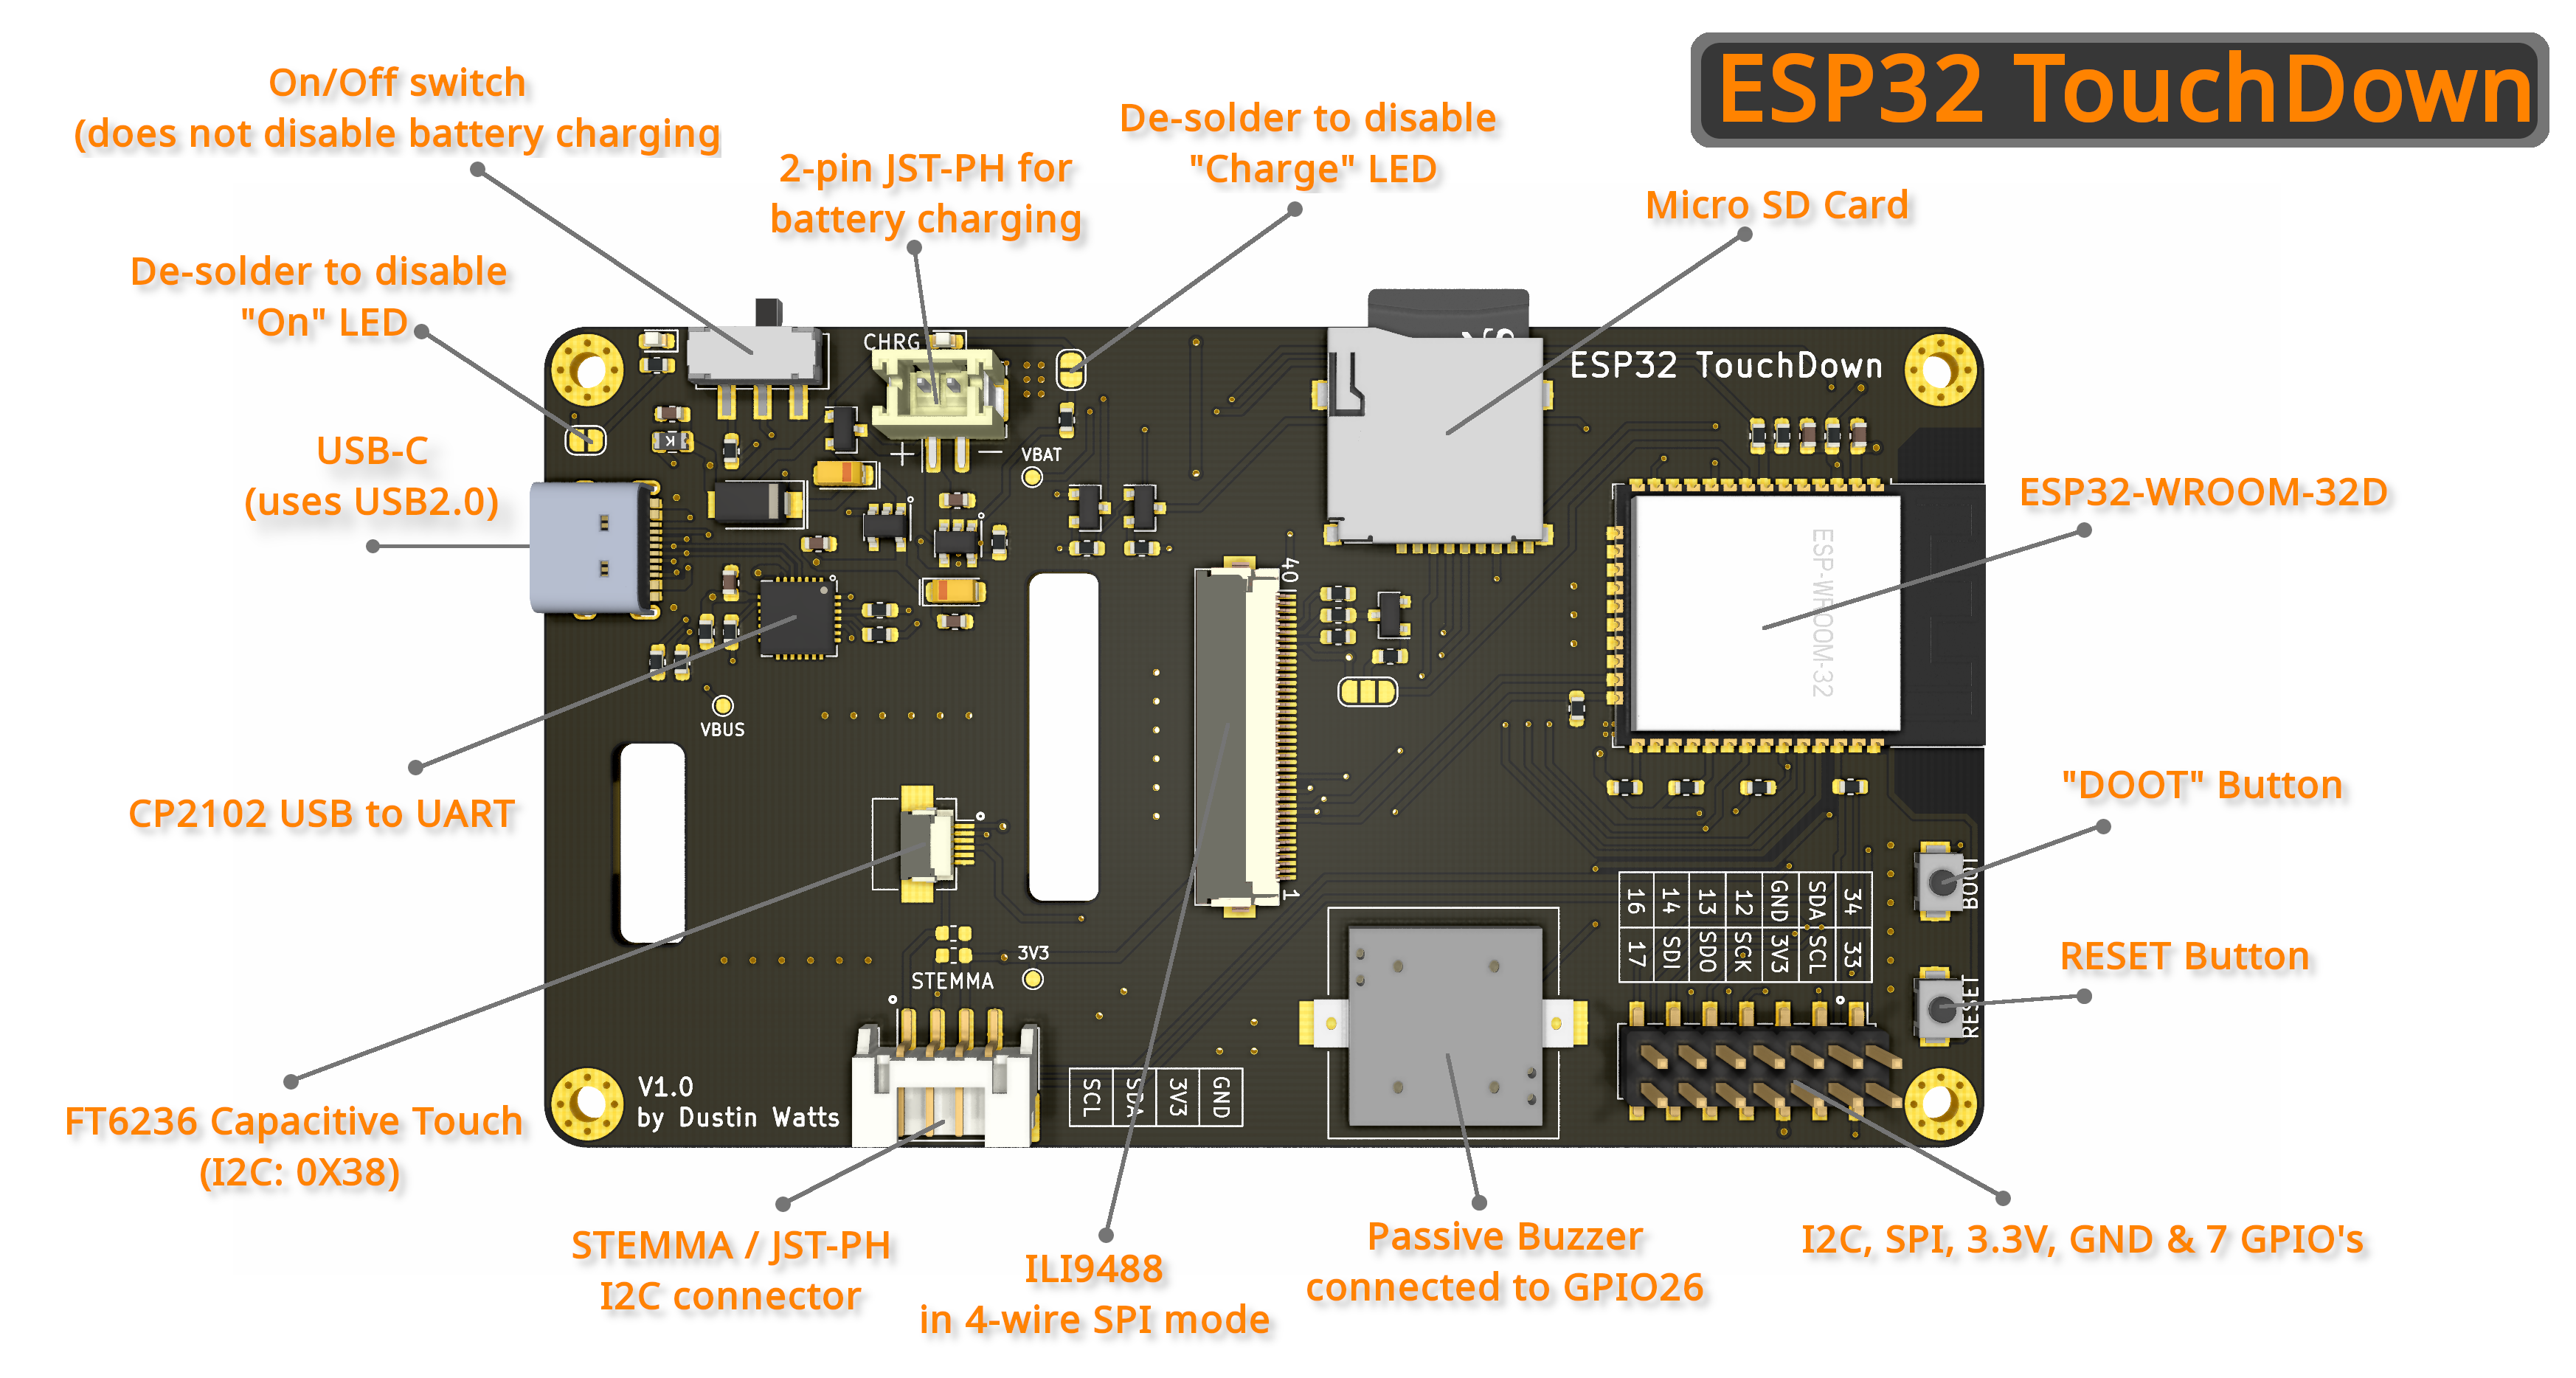 There a few key differences from the first version (FreeTouchDeck). The ESP32 dev board was ditched for a tidy PCB the directly integrates the module. This one has a capacitive touch controller (FT6236) rather than a resistive one as the capacitive screens deliver a far nicer user experience. A built-in battery and charger circuit (which the FreeTouchDesk didn’t have) allows for the extra bit of flexibility to stream from anywhere (within wireless range of course). Multiple case designs are available in STL form that allows it to be placed on a wall or desk with ease.