These days, having a little computer in your pocket is par for the course. But forty years ago, this was a new and high tech idea. [The 8-Bit Guy] has a great video covering the state of the art in pocket computers and personal digital assistants from the 1980s and 1990s. You can see the video below.
There are a lot of familiar faces on the video including the Radio Shack pocket computers, Palm Pilots, and some more obscure machines of varying quality.
It might impress you to know that the Radio Shack TRS-80 PC-1 pocket computer actually had two CPUs. Of course, each CPU was a 4-bit processor running at 256 kHz, so maybe not as impressive as it sounds. Still, what a marvel in its day, programming BASIC on a 24-character LCD.
The Casio PB-700 from 1983. For under $200, you got a 4-line display, with each line having 20 characters. But it also had some graphic capabilities. You could even get an optional docking station that provided a color plotter and a microcassette recorder. Unfortunately, they were not widely available, at least in the United States.
If you want ultra-portable, the Seiko UC-2000 was actually a wristwatch that could dock with a keyboard and printer. Unfortunately, [Guy] couldn’t get a battery for it, but we did enjoy seeing him take it apart to pull out the dead battery.
I suspect the personal anecdote at the end will be somewhat familiar to many people who were school-aged in the 1970s and 1980s. Times have certainly changed.
You can fit a lot more computing power in your pocket today, of course. This video isn’t the only nostalgic love letter we’ve seen for computers of that era.
These days, having a little computer in your pocket is par for the course. But forty years ago, this was a new and high tech idea. [The 8-Bit Guy] has a great video covering the state of the art in pocket computers and personal digital assistants from the 1980s and 1990s. You can see the video below.
There are a lot of familiar faces on the video including the Radio Shack pocket computers, Palm Pilots, and some more obscure machines of varying quality.
It might impress you to know that the Radio Shack TRS-80 PC-1 pocket computer actually had two CPUs. Of course, each CPU was a 4-bit processor running at 256 kHz, so maybe not as impressive as it sounds. Still, what a marvel in its day, programming BASIC on a 24-character LCD.
The Casio PB-700 from 1983. For under $200, you got a 4-line display, with each line having 20 characters. But it also had some graphic capabilities. You could even get an optional docking station that provided a color plotter and a microcassette recorder. Unfortunately, they were not widely available, at least in the United States.
If you want ultra-portable, the Seiko UC-2000 was actually a wristwatch that could dock with a keyboard and printer. Unfortunately, [Guy] couldn’t get a battery for it, but we did enjoy seeing him take it apart to pull out the dead battery.
I suspect the personal anecdote at the end will be somewhat familiar to many people who were school-aged in the 1970s and 1980s. Times have certainly changed.
You can fit a lot more computing power in your pocket today, of course. This video isn’t the only nostalgic love letter we’ve seen for computers of that era.
We always like citizen science projects, so we were very interested in DECO, the Distributed Electronic Cosmic-ray Observatory. That sounds like a physical location, but it is actually a network of cell phones that can detect cosmic rays using an ordinary Android phone’s camera sensor.
There may be some privacy concerns as the phone camera will take a picture and upload it every so often, and it probably also taxes the battery a bit. However, if you really want to do citizen science, maybe dedicate an old phone, put electrical tape over the lens and keep it plugged in. In fact, they encourage you to cover the lens to reduce background light and keep the phone plugged in.
According to the project website:
Cosmic rays are energetic subatomic particles produced by powerful cosmic accelerators, such as black holes and exploding stars. When they hit the top of the atmosphere, they produce showers of secondary particles, including electrons, photons, neutrinos, and muons. Many of these muons, which are similar to electrons but heavier, reach the ground at sea level and are a great tool for studying cosmic rays because they are easy to detect.
In practice, the app takes a photo every 1-2 seconds and looks for bright pixels. If it finds enough, the image becomes a candidate and receives further processing. Only a small number of frames are candidates and even fewer are actual events. They mention that it typically takes about 24 hours to get a few events on your phone. We aren’t sure how much data is sent to the server for processing and how much is done locally, but we suspect almost all the analysis is on the server. The app records your location but does degrade it somewhat for privacy.
You can see your results and the results of others on a public data page. There’s a map and you can narrow data by location, altitude, time, or even check in on a specific device or model.
Citizen and crowd-sourced science is all the rage lately, even NASA’s in. Citizen science even located a lost moon lander.
The Casio F-91W is easily one of the most iconic and popular watches worldwide. But what’s cool about having the same exact thing as millions of other people? Not much, unless of course you modify it to make it your own. That’s exactly what [Gautchh] did to their beloved watch. Between permanent dark mode, stereo blue LED backlights, and a new strap, this timepiece really stands out from the crowd.
Once [Gautchh] got the watch open, the first order of business was to re-polarize the LCD with a different film so the digits are light and the background is dark. This watch ships with a single green backlight LED that’s fairly faint, so [Gautchh] upgraded it to bright blue and added a second 1206 LED in parallel on the other side of the readout. Finally, they replaced the rubber strap with something less likely to chafe.
We think dark mode looks great, though [Gautchh] says it requires a little bit of training to hold your wrist just right to make it readable. They make these mods look easy, but they likely aren’t for the faint of heart. If you want to give it a shot, there are good step-by-step instructions and several pictures to help out.
Over the years, we’ve seen plenty of hackers repurpose their Kindle or similar e-reader to reap the benefits of its electronic paper display. Usually this takes the form of some software running on the reader itself, since cracking the firmware is a lot easier than pulling out the panel and figuring out how to operate it independently. But what if somebody had already done that hard work for you?
Enter the Inkplate. By pairing a recycled Kindle display with an ESP32, Croatian electronics company e-radionica says they’ve not only created an open hardware e-paper display that’s easy for hackers and makers to use, but keeps electronic waste out of the landfill. Last year the $99 USD 6 inch version of the Inkplate ended its CrowdSupply campaign at over 920% of its original goal. The new 9.7 inch model is priced at $129, and so far managed to blow past its own funding goal just hours after the campaign went live. Clearly, the demand is there.
The new model’s e-paper display isn’t just larger, it also features a higher 1200 x 825 resolution and reduced refresh time. Outside of the screen improvements, you’ll also find more GPIO pins, an RTC module to keep more accurate time, and a USB Type-C port for both programming and power. You also get a choice of languages to use, with both Arduino and MicroPython libraries available for interfacing with the display. Interestingly, the Inkplate also features a so-called “Peripheral Mode” that allows you to draw graphics primitives on the screen using commands sent over UART.
While we’ve recently seen some very promising efforts to repurpose old e-paper displays, the turn-key solution offered by the Inkplate is admittedly very compelling. If you’re looking for an easy way to jump on the electronic paper bandwagon that works out of the box, this might be your chance.
Folks who like the take the old Amiga out for the occasional Sunday drive usually do it because they have wistful memories of the simpler times. Back when you could edit documents or view spreadsheets on a machine that had RAM measured in kilobytes instead of gigabytes. But even the most ardent retro computer aficionado usually allows for a bit of modern convenience.
Enter the mouSTer. This tiny device converts a common USB HID mouse into something older computers can understand. It even supports using Sony’s PlayStation 4 controller as a generic game pad. While the firmware is still getting tweaked, the team has confirmed its working on several classic machines and believe it should work on many more. Considering the prices that some of these old peripherals command on the second hand market, using a USB mouse or controller on your vintage computer isn’t just more convenient, but will likely be a lot cheaper.
Confirmed retrocomputing superfan [Drygol] is a member of the team working on mouSTer, and in a recent post to his retrohax blog, he talks a bit about what’s happened since his last update over the summer. He also talks a bit about the challenges they’ve faced to get it into production. Even if you’re not into poking around on vintage computers, there are lessons to be learned here about what it takes to move from a handful of prototypes to something you can actually sell to the public.
We especially liked the details about the mouSTer enclosure, or lack thereof. Originally [Drygol] says they were going to have the cases injection molded, but despite initial interest from a few companies they talked to, nobody ended up biting because it needed to be done with relatively uncommon low pressure injection. While 3D printing is still an option, the team ended up using clear heatshrink tubing to create a simple conformal protective shell over the electronics. Personally we think it looks great like this, but it sounds like this is only a temporary solution until something a bit more robust can be implemented.
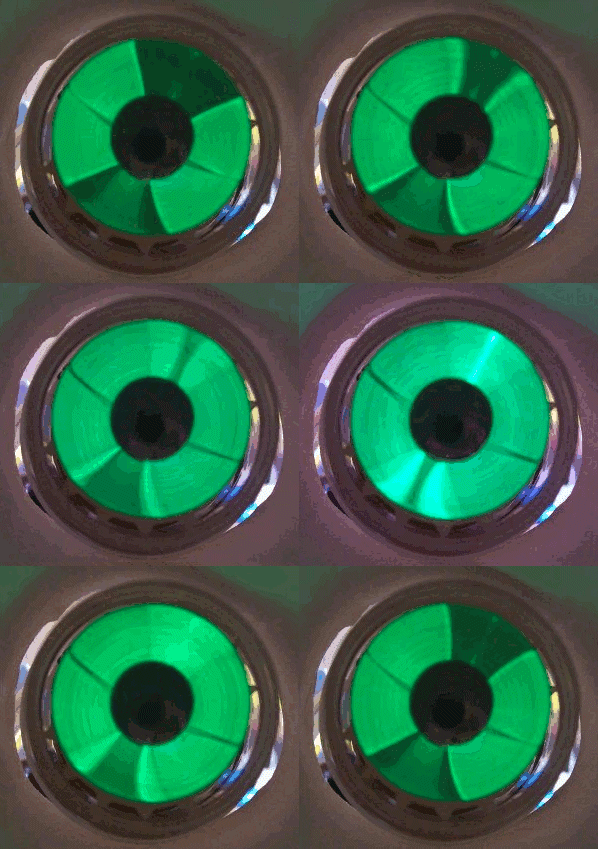
Vacuum tubes ruled electronics for several decades and while you might think of them as simple devices analogous to a transistor or FET, there were many special types. We’re all familiar with nixie tubes that act as numeric displays, and there are other specialty tubes that work as a photomultiplier, to detect radiation, or even generate microwaves. But one of the most peculiar and distinctive specialty tubes has an intriguing name: a magic eye tube. When viewed from the top, you see a visual indication that rotates around a central point, the out ring glowing while the inner is dark, like an iris and pupil.
By [Quark48] – CC BY-SA 2.0
These tubes date back to the RCA 6E5 in 1935. At the time, test equipment that used needles was expensive to make, so there was always a push to replace them with something cheaper. They were something like a stunted cathode ray tube. In fact, the inventor, Allen DuMont, was well known for innovations in television. An anode held a coating that would glow when hit with electrons — usually green, but sometimes other colors. Later tubes would show a stripe going up and down the tube instead of a circle, but you still call them magic eyes.
The indicator part of this virtual meter took the form of a shadow. Based on the applied signal, the shadow would be larger or smaller. Many tubes also contained a triode which would drive the tube from a signal.
The magic eye actually replaced an even older technology: neon bulbs. Modified neon bulbs appeared in the early 1930s as Tune-A-Lite produced by a company named Duovac. You can read more about them at the Radio Museum. Interestingly, some of these had a mute output that could turn off the radio’s speaker when there was no signal present, like a modern-day squelch circuit.
The operation of the bulb is like a thermometer in that the tube is long and narrow and the glow rises in the tube as the voltage applied increases.
See One on a Monitor Near You
There’s nothing like seeing one of these old gems with your own eyes, but the video below will give you an idea of how a 6E5C eye appeared. The green glow reminds you of a 1950s science fiction film or what Hollywood thinks a nuclear reactor gives off. Some magic eyes like the EM80 had a different shape, check out this teardown video for a closer look.
Get One
Like most old stuff, these are available if you know where to look. eBay and Amazon both have quite a few at various prices. There are even a few kits for things like preamps that use magic eyes as VU meters. Even if you have a magic eye that appears burned out, you might try increasing the supply voltage as [M Caldira] does in this video about reviving weak magic eye tubes .
OpenWRT is one of my absolute favorite projects, but it’s had a rough week. First off, the official OpenWRT forums is carrying a notice that one of the administrator accounts was accessed, and the userlist was downloaded by an unknown malicious actor. That list is known to include email addresses and usernames. It does not appear that password hashes were exposed, but just to be sure, a password expiration has been triggered for all users.
The second OpenWRT problem is a set of recently discovered vulnerabilities in Dnsmasq, a package installed by default in OpenWRT images. Of those vulnerabilities, four are buffer overflows, and three are weaknesses in how DNS responses are checked — potentially allowing cache poisoning. These seven vulnerabilities are collectively known as DNSpooq (Whitepaper PDF).
Favicon Fingerprints
One of the frustrating-yet-impressive areas of research is browser fingerprinting. You may not have an account, and may clear your cookies, but if an advertiser wants to track you badly enough, there have been a stream of techniques to make it possible. A new technique was added to that list, Favicon caching (PDF). The big problem here is that the favicon cache is generally not sandboxed even in incognito mode (though thankfully not *saved* in incognito mode), as well as not cleared with the rest of browser data. To understand why that’s a problem, ask a simple question. How hard is it to determine if a browser has a cached copy of a favicon?
The exact scheme the authors suggest is to use multiple domains with discrete favicons, each one representing a single bit. Each user can then be assigned a different value by sending them through each domain through a redirect chain. As the favicons are loaded, that bit is set to true. You may wonder, how does that data get read back by the server? The client is handled in a read-only mode, where each of those favicon requests return a 404. By watching the requests come in, the server can rebuild the unique identifier based on which favicons were requested.
When I first read about this technique, a potential catch-22 stood out as a problem. How would the server know whether to put a new connection into a read mode, or a write mode? It seems, at first glance, like this would defeat the whole scheme. The researchers behind favicon fingerprinting have an elegant solution for this. The favicon for a single fixed domain works as a single bit flag, indicating whether this is a new or returning user. If the browser requests that favicon, it is new, and can be funneled through the identifier writing process. If the initial favicon isn’t requested, then it should be treated as a return visit, and the ID can be read. Overall, it’s a fiendishly clever way to track users, particularly since it can even work across incognito mode. Expect browsers to address this quickly. The first step will be to sandbox cached favicons in incognito mode, but the paper calls out a few other possible solutions.
Orbit Fox
The long-standing pattern in WordPress security is that WordPress itself is fairly bulletproof, but many of the popular plugins have serious security problems just waiting to be found. The plugin of the week this time is Orbit Fox, with over 400,000 active installs. This plugin provides multiple features, one being a user registration form. The problem is a lack of server-side validation of the form response. On a site with such a form, all it takes is to tweak the response data so user_role is now set to “administrator”. Thankfully, this vulnerability is only exposed when using a combination of plugins, and the problem was disclosed and patched back in December.
Patch Tuesday
Another patch Tuesday has come and gone, and the Zero Day Initiative has us covered with an overview of what got fixed. There are two patched vulnerabilities that are noteworthy this month. The first is CVE-2021-1647, a flaw in Microsoft Defender. This one has been observed in-the-wild, and is a RCE exploit. If your machine is always online, you probably got this patch automatically, since Windows Defender has its own automatic update system.
The second interesting problem is CVE-2021-1648. This vulnerability is the result of a flubbed fix for an earlier problem. From Google’s Project Zero: “The only difference between CVE-2020-0986 is that for CVE-2020-0986 the attacker sent a pointer and now the attacker sends an offset.” Thankfully this is just an elevation of privilege flaw, and has now been properly fixed, as far as we can tell.
Hacking Linux, Hollywood Style
Hacking Hollywood style occasionally works. You know the movies, where an “elite hacker” frantickly mashes on a keyboard while blathering nonsense about firewalls and reconfiguring the retro-encabulator. Sometimes, though, keyboard mashing actually finds security problems. In this case, a screensaver lock can be broken by typing rapidly on a physical keyboard and the virtual on-screen keyboard at the same time. The text from the bug report is golden: “A few weeks ago, my kids wanted to hack my linux desktop, so they typed and clicked everywhere, while I was standing behind them looking at them play… when the screensaver core dumped and they actually hacked their way in! wow, those little hackers…”
Zoom Unmasking
Imagine with me for a moment, that you work for Evilcorp. You’re on a Zoom call, and the evil master plan is being spelled out. You’re a decent human being, so you start a screen recorder to get a copy of the evidence. You’ve got the proof, now to send it off to the right people. But first, take a moment to think about anonymity. When your recording hits the nightly news, will Evilcorp be able to figure out that it was you that leaked the meeting? Yes, most likely.
There is a whole field of study around the embedding, detecting, and mitigating of identifying information in audio, video, and still images. This discipline is known as steganography, and fun fact, it’s named after the trio of books, “Steganographia“. The first written in 1499, Steganographia appears to be mystical texts about how to communicate over the distances via supernatural spirits. In a very satisfying twist, the books are actually a guide to hiding encrypted messages in written texts, the whole thing hidden using the techniques described in the hidden text. For our purposes, we could divide the field of steganography into two broad categories. Intentionally hidden data, and unintentionally included indicators.
At the top of the list of intentional data is Zoom’s watermarking feature. The call administrator can enable these, which includes unique identifiers in the the call audio, video, or both. The video watermarks are pretty easy to spot, your username overlayed onto the image. There’s no guarantee that there isn’t also sneakier watermarking being done. Next to consider is metadata. Particularly if you pulled out a cellphone to make the recording, that file almost certainly has time and location data baked into it. A GPS coordinate makes for quite the easy identifier, when it points right at your house.
Unintentional steganography could be as simple as having your self-view camera highlighted at the top of the call. There are more subtle ways to pull data out of a recording, like looking at the latency of individual call members. If speaker B is a few milliseconds ahead in the leaked version, compared to all the others, then the leaker must be physically close to that call member. It’s extremely hard to cover all your bases when it comes to anonymizing media, and we’ve just scratched the surface here.
OpenWRT is one of my absolute favorite projects, but it’s had a rough week. First off, the official OpenWRT forums is carrying a notice that one of the administrator accounts was accessed, and the userlist was downloaded by an unknown malicious actor. That list is known to include email addresses and usernames. It does not appear that password hashes were exposed, but just to be sure, a password expiration has been triggered for all users.
The second OpenWRT problem is a set of recently discovered vulnerabilities in Dnsmasq, a package installed by default in OpenWRT images. Of those vulnerabilities, four are buffer overflows, and three are weaknesses in how DNS responses are checked — potentially allowing cache poisoning. These seven vulnerabilities are collectively known as DNSpooq (Whitepaper PDF).
Favicon Fingerprints
One of the frustrating-yet-impressive areas of research is browser fingerprinting. You may not have an account, and may clear your cookies, but if an advertiser wants to track you badly enough, there have been a stream of techniques to make it possible. A new technique was added to that list, Favicon caching (PDF). The big problem here is that the favicon cache is generally not sandboxed even in incognito mode (though thankfully not *saved* in incognito mode), as well as not cleared with the rest of browser data. To understand why that’s a problem, ask a simple question. How hard is it to determine if a browser has a cached copy of a favicon?
The exact scheme the authors suggest is to use multiple domains with discrete favicons, each one representing a single bit. Each user can then be assigned a different value by sending them through each domain through a redirect chain. As the favicons are loaded, that bit is set to true. You may wonder, how does that data get read back by the server? The client is handled in a read-only mode, where each of those favicon requests return a 404. By watching the requests come in, the server can rebuild the unique identifier based on which favicons were requested.
When I first read about this technique, a potential catch-22 stood out as a problem. How would the server know whether to put a new connection into a read mode, or a write mode? It seems, at first glance, like this would defeat the whole scheme. The researchers behind favicon fingerprinting have an elegant solution for this. The favicon for a single fixed domain works as a single bit flag, indicating whether this is a new or returning user. If the browser requests that favicon, it is new, and can be funneled through the identifier writing process. If the initial favicon isn’t requested, then it should be treated as a return visit, and the ID can be read. Overall, it’s a fiendishly clever way to track users, particularly since it can even work across incognito mode. Expect browsers to address this quickly. The first step will be to sandbox cached favicons in incognito mode, but the paper calls out a few other possible solutions.
Orbit Fox
The long-standing pattern in WordPress security is that WordPress itself is fairly bulletproof, but many of the popular plugins have serious security problems just waiting to be found. The plugin of the week this time is Orbit Fox, with over 400,000 active installs. This plugin provides multiple features, one being a user registration form. The problem is a lack of server-side validation of the form response. On a site with such a form, all it takes is to tweak the response data so user_role is now set to “administrator”. Thankfully, this vulnerability is only exposed when using a combination of plugins, and the problem was disclosed and patched back in December.
Patch Tuesday
Another patch Tuesday has come and gone, and the Zero Day Initiative has us covered with an overview of what got fixed. There are two patched vulnerabilities that are noteworthy this month. The first is CVE-2021-1647, a flaw in Microsoft Defender. This one has been observed in-the-wild, and is a RCE exploit. If your machine is always online, you probably got this patch automatically, since Windows Defender has its own automatic update system.
The second interesting problem is CVE-2021-1648. This vulnerability is the result of a flubbed fix for an earlier problem. From Google’s Project Zero: “The only difference between CVE-2020-0986 is that for CVE-2020-0986 the attacker sent a pointer and now the attacker sends an offset.” Thankfully this is just an elevation of privilege flaw, and has now been properly fixed, as far as we can tell.
Hacking Linux, Hollywood Style
Hacking Hollywood style occasionally works. You know the movies, where an “elite hacker” frantickly mashes on a keyboard while blathering nonsense about firewalls and reconfiguring the retro-encabulator. Sometimes, though, keyboard mashing actually finds security problems. In this case, a screensaver lock can be broken by typing rapidly on a physical keyboard and the virtual on-screen keyboard at the same time. The text from the bug report is golden: “A few weeks ago, my kids wanted to hack my linux desktop, so they typed and clicked everywhere, while I was standing behind them looking at them play… when the screensaver core dumped and they actually hacked their way in! wow, those little hackers…”
Zoom Unmasking
Imagine with me for a moment, that you work for Evilcorp. You’re on a Zoom call, and the evil master plan is being spelled out. You’re a decent human being, so you start a screen recorder to get a copy of the evidence. You’ve got the proof, now to send it off to the right people. But first, take a moment to think about anonymity. When your recording hits the nightly news, will Evilcorp be able to figure out that it was you that leaked the meeting? Yes, most likely.
There is a whole field of study around the embedding, detecting, and mitigating of identifying information in audio, video, and still images. This discipline is known as steganography, and fun fact, it’s named after the trio of books, “Steganographia“. The first written in 1499, Steganographia appears to be mystical texts about how to communicate over the distances via supernatural spirits. In a very satisfying twist, the books are actually a guide to hiding encrypted messages in written texts, the whole thing hidden using the techniques described in the hidden text. For our purposes, we could divide the field of steganography into two broad categories. Intentionally hidden data, and unintentionally included indicators.
At the top of the list of intentional data is Zoom’s watermarking feature. The call administrator can enable these, which includes unique identifiers in the the call audio, video, or both. The video watermarks are pretty easy to spot, your username overlayed onto the image. There’s no guarantee that there isn’t also sneakier watermarking being done. Next to consider is metadata. Particularly if you pulled out a cellphone to make the recording, that file almost certainly has time and location data baked into it. A GPS coordinate makes for quite the easy identifier, when it points right at your house.
Unintentional steganography could be as simple as having your self-view camera highlighted at the top of the call. There are more subtle ways to pull data out of a recording, like looking at the latency of individual call members. If speaker B is a few milliseconds ahead in the leaked version, compared to all the others, then the leaker must be physically close to that call member. It’s extremely hard to cover all your bases when it comes to anonymizing media, and we’ve just scratched the surface here.
OpenWRT is one of my absolute favorite projects, but it’s had a rough week. First off, the official OpenWRT forums is carrying a notice that one of the administrator accounts was accessed, and the userlist was downloaded by an unknown malicious actor. That list is known to include email addresses and usernames. It does not appear that password hashes were exposed, but just to be sure, a password expiration has been triggered for all users.
The second OpenWRT problem is a set of recently discovered vulnerabilities in Dnsmasq, a package installed by default in OpenWRT images. Of those vulnerabilities, four are buffer overflows, and three are weaknesses in how DNS responses are checked — potentially allowing cache poisoning. These seven vulnerabilities are collectively known as DNSpooq (Whitepaper PDF).
Favicon Fingerprints
One of the frustrating-yet-impressive areas of research is browser fingerprinting. You may not have an account, and may clear your cookies, but if an advertiser wants to track you badly enough, there have been a stream of techniques to make it possible. A new technique was added to that list, Favicon caching (PDF). The big problem here is that the favicon cache is generally not sandboxed even in incognito mode (though thankfully not *saved* in incognito mode), as well as not cleared with the rest of browser data. To understand why that’s a problem, ask a simple question. How hard is it to determine if a browser has a cached copy of a favicon?
The exact scheme the authors suggest is to use multiple domains with discrete favicons, each one representing a single bit. Each user can then be assigned a different value by sending them through each domain through a redirect chain. As the favicons are loaded, that bit is set to true. You may wonder, how does that data get read back by the server? The client is handled in a read-only mode, where each of those favicon requests return a 404. By watching the requests come in, the server can rebuild the unique identifier based on which favicons were requested.
When I first read about this technique, a potential catch-22 stood out as a problem. How would the server know whether to put a new connection into a read mode, or a write mode? It seems, at first glance, like this would defeat the whole scheme. The researchers behind favicon fingerprinting have an elegant solution for this. The favicon for a single fixed domain works as a single bit flag, indicating whether this is a new or returning user. If the browser requests that favicon, it is new, and can be funneled through the identifier writing process. If the initial favicon isn’t requested, then it should be treated as a return visit, and the ID can be read. Overall, it’s a fiendishly clever way to track users, particularly since it can even work across incognito mode. Expect browsers to address this quickly. The first step will be to sandbox cached favicons in incognito mode, but the paper calls out a few other possible solutions.
Orbit Fox
The long-standing pattern in WordPress security is that WordPress itself is fairly bulletproof, but many of the popular plugins have serious security problems just waiting to be found. The plugin of the week this time is Orbit Fox, with over 400,000 active installs. This plugin provides multiple features, one being a user registration form. The problem is a lack of server-side validation of the form response. On a site with such a form, all it takes is to tweak the response data so user_role is now set to “administrator”. Thankfully, this vulnerability is only exposed when using a combination of plugins, and the problem was disclosed and patched back in December.
Patch Tuesday
Another patch Tuesday has come and gone, and the Zero Day Initiative has us covered with an overview of what got fixed. There are two patched vulnerabilities that are noteworthy this month. The first is CVE-2021-1647, a flaw in Microsoft Defender. This one has been observed in-the-wild, and is a RCE exploit. If your machine is always online, you probably got this patch automatically, since Windows Defender has its own automatic update system.
The second interesting problem is CVE-2021-1648. This vulnerability is the result of a flubbed fix for an earlier problem. From Google’s Project Zero: “The only difference between CVE-2020-0986 is that for CVE-2020-0986 the attacker sent a pointer and now the attacker sends an offset.” Thankfully this is just an elevation of privilege flaw, and has now been properly fixed, as far as we can tell.
Hacking Linux, Hollywood Style
Hacking Hollywood style occasionally works. You know the movies, where an “elite hacker” frantickly mashes on a keyboard while blathering nonsense about firewalls and reconfiguring the retro-encabulator. Sometimes, though, keyboard mashing actually finds security problems. In this case, a screensaver lock can be broken by typing rapidly on a physical keyboard and the virtual on-screen keyboard at the same time. The text from the bug report is golden: “A few weeks ago, my kids wanted to hack my linux desktop, so they typed and clicked everywhere, while I was standing behind them looking at them play… when the screensaver core dumped and they actually hacked their way in! wow, those little hackers…”
Zoom Unmasking
Imagine with me for a moment, that you work for Evilcorp. You’re on a Zoom call, and the evil master plan is being spelled out. You’re a decent human being, so you start a screen recorder to get a copy of the evidence. You’ve got the proof, now to send it off to the right people. But first, take a moment to think about anonymity. When your recording hits the nightly news, will Evilcorp be able to figure out that it was you that leaked the meeting? Yes, most likely.
There is a whole field of study around the embedding, detecting, and mitigating of identifying information in audio, video, and still images. This discipline is known as steganography, and fun fact, it’s named after the trio of books, “Steganographia“. The first written in 1499, Steganographia appears to be mystical texts about how to communicate over the distances via supernatural spirits. In a very satisfying twist, the books are actually a guide to hiding encrypted messages in written texts, the whole thing hidden using the techniques described in the hidden text. For our purposes, we could divide the field of steganography into two broad categories. Intentionally hidden data, and unintentionally included indicators.
At the top of the list of intentional data is Zoom’s watermarking feature. The call administrator can enable these, which includes unique identifiers in the the call audio, video, or both. The video watermarks are pretty easy to spot, your username overlayed onto the image. There’s no guarantee that there isn’t also sneakier watermarking being done. Next to consider is metadata. Particularly if you pulled out a cellphone to make the recording, that file almost certainly has time and location data baked into it. A GPS coordinate makes for quite the easy identifier, when it points right at your house.
Unintentional steganography could be as simple as having your self-view camera highlighted at the top of the call. There are more subtle ways to pull data out of a recording, like looking at the latency of individual call members. If speaker B is a few milliseconds ahead in the leaked version, compared to all the others, then the leaker must be physically close to that call member. It’s extremely hard to cover all your bases when it comes to anonymizing media, and we’ve just scratched the surface here.
There are plenty of powerful, “desktop-replacement” laptops out on the market if you’ve got the money to spend. Sometimes, though, that just doesn’t scratch that crazy itch in the back of your head for true, unbridled computing power. When you’ve got an insatiable thirst for FLOPS, you’ve got to strike out on your own, as [Jeff] did with this Threadripper laptop.
The aim was to pack an AMD Threadripper processor into a nominally portable laptop format. For this build, the AMD 1950X was chosen for its affordability and huge computing power, as well as a TDP of 180W. This high heat output has stopped the chips ending up in portable builds until now, but [Jeff] didn’t see this as a problem, but a challenge.
What results is a wild, lashed together build of high-power parts into what could charitably be called a laptop – though we’d recommend against putting it on your lap. With a 4K 18″ screen, keyboard, touchpad, and many Dell Powerbanks kludged together into an HP Media Center case, it fits the usual form factor, albeit with more exposed heatpipes and cables than the typical consumer may be used to.
[Jeff] claims this is the current most powerful laptop in the world, as builds that use the 3950X throttle it back in their applications. We don’t have the data to compare, but we certainly wouldn’t be stacking our own portable rig up against it in a fight. DIY laptops have a long history at Hackaday, going all the way back to 2007. If you’ve got your own wild build, be sure to drop us a line. Video after the break.
There are plenty of powerful, “desktop-replacement” laptops out on the market if you’ve got the money to spend. Sometimes, though, that just doesn’t scratch that crazy itch in the back of your head for true, unbridled computing power. When you’ve got an insatiable thirst for FLOPS, you’ve got to strike out on your own, as [Jeff] did with this Threadripper laptop.
The aim was to pack an AMD Threadripper processor into a nominally portable laptop format. For this build, the AMD 1950X was chosen for its affordability and huge computing power, as well as a TDP of 180W. This high heat output has stopped the chips ending up in portable builds until now, but [Jeff] didn’t see this as a problem, but a challenge.
What results is a wild, lashed together build of high-power parts into what could charitably be called a laptop – though we’d recommend against putting it on your lap. With a 4K 18″ screen, keyboard, touchpad, and many Dell Powerbanks kludged together into an HP Media Center case, it fits the usual form factor, albeit with more exposed heatpipes and cables than the typical consumer may be used to.
[Jeff] claims this is the current most powerful laptop in the world, as builds that use the 3950X throttle it back in their applications. We don’t have the data to compare, but we certainly wouldn’t be stacking our own portable rig up against it in a fight. DIY laptops have a long history at Hackaday, going all the way back to 2007. If you’ve got your own wild build, be sure to drop us a line. Video after the break.
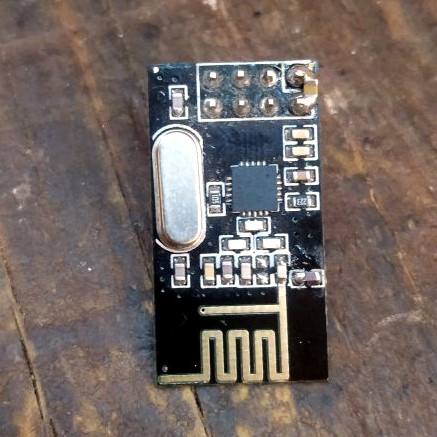
nRF24L01+ module fixed about as well as it can be, by adding an appropriate capacitor on the PCB antenna, and a 1.0 uF capacitor across the power pins for good measure.
Good old nRF24L01+ wireless modules are inexpensive and effective. Well, they are as long as they work correctly, anyway. The devices themselves are mature and well-understood, but that doesn’t mean bad batches from suppliers can’t cause hair-pulling problems straight from the factory.
[nekromant] recently got a whole batch of units that simply refused to perform as they should, but not because they were counterfeits. The problem was that the antenna and PCB design had been “optimized” by the supplier to the point where the devices simply couldn’t work properly. Fortunately, [nekromant] leveraged an understanding of the problem into a way to fix them without going insane in the process. The test setup is shown in the image above, and the process is explained below.
This issue wasn’t new to [nekromant], as previous batches had suffered from a “magic finger problem”, where bad performance is magically solved by placing one’s finger on the antenna. This had been fixed in the past by soldering in a missing 1.0 pF capacitor, but the newest batch of nRF24L01+ units was so bad that something more needed to be done. Simply adding a 1.0 pF capacitor was no longer enough, and it’s unclear exactly why.
For reasons likely related to the PCB antenna, each radio required adding a capacitor in a value usually somewhere between 1.0 pF and 2.2 pF. But there was no way to tell which value any particular board would need. To solve this, [nekromant] made a small test rig to profile each device in turn by sending packets and measuring how many failures were recorded. After profiling each device, fixing them was a matter of informed trial-and-error. Once putting a finger on the PCB antenna begins to worsen a device’s performance rather than improve it, that module (along with whatever value of capacitor was last soldered onto it) could be dropped into the “OK” bin, and the process repeats until the pile is gone.
[nekromant] points out that the obvious lesson here is to be careful about picking suppliers, but that’s increasingly difficult to do with modules like these. An annoying manual board rework process is one thing for a small hobby project, but would be quite another issue entirely if several hundred or thousand units were involved.
Nintendo’s Game Boy is legendary for being the meat in the handheld gaming revolution, as well as being nigh-on indestructible whether in the custody of children or soldiers in the Gulf War. However, [Jiri] decided to see if he could whip up a tribute of his own, in brass instead of plastic.
The hardware is based on the Odroid GO emulator firmware for the ESP32, running on a 2.2″ color TFT screen. It’s a great base for a custom build, which avoids gutting any precious classic hardware. It’s then assembled behind front plate milled out of brass, with delicate point-to-point brass wires giving it an artistic circuit sculpture look. The brass did prove difficult to work with at times, acting as a heat sink which prevented easy soldering of the standoffs in place. To get around this, [Jiri] used a hotplate to heat the plate from below, keeping it warm enough so that a hand iron could do the job.
The final result is a fun Game Boy emulator in a stylish case – though one you shouldn’t throw in a back pack lest it short out the exposed conductors. It would make a great gift for any lifelong Nintendo fan. [Jiri] is no strange to circuit sculpture, as we well know – we’ve featured his tools and methods before. Video after the break.
Nintendo’s Game Boy is legendary for being the meat in the handheld gaming revolution, as well as being nigh-on indestructible whether in the custody of children or soldiers in the Gulf War. However, [Jiri] decided to see if he could whip up a tribute of his own, in brass instead of plastic.
The hardware is based on the Odroid GO emulator firmware for the ESP32, running on a 2.2″ color TFT screen. It’s a great base for a custom build, which avoids gutting any precious classic hardware. It’s then assembled behind front plate milled out of brass, with delicate point-to-point brass wires giving it an artistic circuit sculpture look. The brass did prove difficult to work with at times, acting as a heat sink which prevented easy soldering of the standoffs in place. To get around this, [Jiri] used a hotplate to heat the plate from below, keeping it warm enough so that a hand iron could do the job.
The final result is a fun Game Boy emulator in a stylish case – though one you shouldn’t throw in a back pack lest it short out the exposed conductors. It would make a great gift for any lifelong Nintendo fan. [Jiri] is no strange to circuit sculpture, as we well know – we’ve featured his tools and methods before. Video after the break.
One key piece of technology from Star Trek is the replicator, a machine that 3D prints up almost anything using some hazily-defined high technology. You have to wonder though, how did the patterns for Earl Grey tea or a spare part for a shuttlecraft intercooler come to exist in the first place. Maybe someone designed them, or perhaps they scanned the real articles. The US Air Force is betting on the latter, and they’ve asked for white papers and proposals for innovative methods to scan objects for 3D printing.
It isn’t surprising military planners would like to have effective 3D printing. After all, you can’t carry every spare part you might need into a theater of operation. Not to mention spares for your friends in joint operations or for enemy gear you might happen to capture. Having a truck that could turn out whatever your troops need is an attractive proposition.
We’re curious though, a printer you are likely to haul out to a forward operating base will probably print using filament, and while that is great, we all know there are limitations to parts you create with these machines.
Still, maybe they envision giant industrial metal or ceramic printers that would airdrop parts anywhere in the world in a day or two. The objectives are ambitious:
Demonstrate a cutting edge automated 3-D scanning system capable of quickly and accurately scanning complex Additive Manufacturing candidate parts to produce 3-D models. The solution should address any anticipated hardware and software tools necessary to scan parts with complex geometry, various surface color and reflectivity, and provide a means to address part geometry that cannot typically be scanned; e.g. blind holes and internal/hidden geometry.
The innovative solution sought will be able to process scan data quickly and efficiently and require minimal human interaction during the scanning, modeling and data processing. The proposed solution should address its ability to fully operate and be able to be updated while not connected to an internet source. Additionally, it should be sized to accept, manipulate and process parts of at least 500mm in diameter, height of 1000mm
and weight of at least 50 kilograms
So automated, high-resolution scanning for very large and heavy parts. You can deduce a little about the printer they imagine, after all, 50 kilos of PLA is probably bigger than the specified build volume.
If you want to get in on the action, you had better hurry. White papers are due soon. We don’t see much 3D printing for jet fighters, but we do see a lot for RC aircraft. Some of them are quite advanced.
[WJCarpenter]’s gas water heater uses a small pilot light that needs to stay burning permanently to ignite the main burners as required. Four or five times a year, the pilot light goes out and needs to be manually lit. This involves an expedition from the upstairs bathroom to the basement, always in the early morning, after having spent a few fruitless minutes waiting for hot water. Having grown tired of this exercise, [WJCarpenter] built Water Watcher, a pilot light monitoring system with some ESPs and a light sensor.
Water Watcher consists of an ESP8266 connected to a light sensor taped to the inspection window of the water heater. It reports the status of the pilot light over MQTT to an ESP32-based M5 Atom Matrix in the main bedroom, which displays it using a 5×5 RGB matrix, as demonstrated after the break. Both ESPs run ESPHome, so programming is as easy as giving it a YAML config file. [WJCarpenter] tested a few different light sensors, until he found the TSL2591, which is sensitive to the right wavelengths and has enough dynamic range for watching a pilot light.
This might not be a complicated hack, but we do not doubt that it reduces frustration a bit on those fateful mornings. Be sure to check out the Water Watcher project page, it’s an entertaining read!
The overarching process is simple, but followed properly, it produces great results. [Eric] starts by building a mold box out of wood, coated in shellac to ensure it doesn’t stick to the silicone. The master part is then stuck to the base, surrounded by a lasercut cardboard strip which acts as a seal and key. Once properly degassed silicone is poured in and cured, the second half can be made. The mold is flipped in the mold box, the seal key removed, and release agent applied to the silicone surfaces. With another pour and cure, the mold is ready for casting new parts.
While simple, if the correct equipment isn’t used or steps skipped, you’ll end up with a useless mold full of air bubbles or surface irregularities. It’s useful to see just what it takes to get a mold of such scale (13″ x 19″!) completed without flaws. We’ve featured [Eric]’s work before, such as his fine detail improvements on the Apple Pencil. Video after the break.
Hackaday has among its staff a significant number of writers who also hold amateur radio licenses. We’re hardware folks at heart, so we like our radios homebrew, and we’re never happier than when we’re working at high frequencies.
Amateur radio is a multi-faceted hobby, there’s just so much that’s incredibly interesting about it. It’s a shame then that as a community we sometimes get bogged down with negativity when debating the minutia. So today let’s talk about a few of my favourite things about the hobby of amateur radio. I hope that you’ll find them interesting and entertaining, and in turn share your own favorite things in the comments below.
Homebrew Radios Of The Minimal Kind
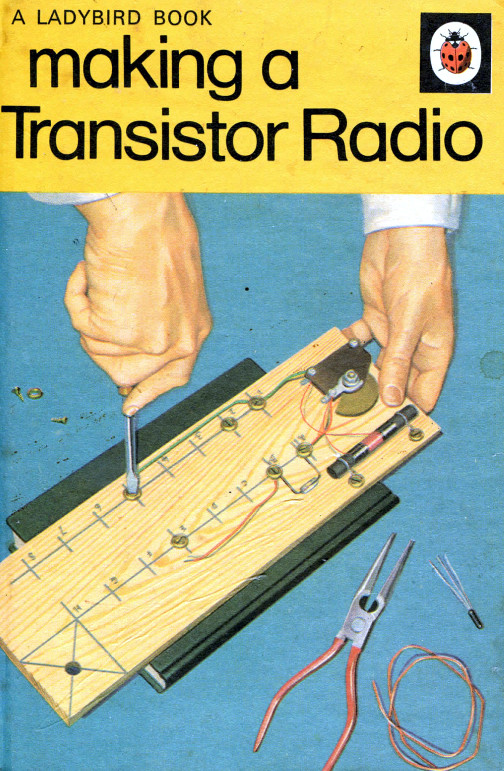
This book was where it all started for me.
Contesting and disaster preparedness may leave me cold, but there’s magic in the minimal when it comes to radio. My introduction to electronics sometime in the 1970s came in the form of the simplest of radios, when my dad bought me a copy of George Dobbs’ Making A Transistor Radio, and showed me how to build a crystal set. That so few parts could form a working radio that pulled a signal from the air and into my headphones without the need for batteries was enough magic to get a 9-year-old me hooked.
Upgrading it to a germanium transistor regenerative receiver set me on the path that led me through university to an electronic engineering degree, and ultimately to writing here at Hackaday. There is in a very literal sense a whole world out there to be unlocked using radios made with relatively small bills-of-material, and though I’ve at times fumed about the tendency for such designs to be a little stuck-in-the-mud there is no reason why minimalist radios can not move with the times. That a quadrature front end for a sound-card SDR can be made from little more than a pile of 74-series chips is a particularly appealing example.
Scrap Televisions As The Gateway To RF Design
A UHF construction kit in every dumpster
I got my amateur radio licence back in the mists of time, when the UK’s Department of Trade and Industry only handed out two types of document. There was the class A licence or the Class B, with the difference being that for the former you had to pass a Morse test but got access to the HF bands while for the latter you had no Morse but were restricted to 144MHz and above. Thus the old men could talk in peace about The War on 80 metres, and the 2 metre band was a lively place.
I had zero interest in Morse so I had a Class B licence, and since radio construction was my passion then as now I set about building for the VHF and UHF bands. I didn’t have a grown-up’s budget so my component supply was limited to what I could pull from scrap consumer electronics, which meant abundant 1970s PAL TV sets and the occasional earlier-model video recorder. There were plentiful VHF-capable inductors and transistors, and every TV tuner and VCR modulator had a set of UHF-capable transistors, so both the 2 metre and 70 cm bands were within my grasp.
There’s a sensible point among all this reminiscing, and it came in a thorough grounding in RF design techniques. RF is seen as a Dark Art by many engineers, and while there are certainly elements of design at these frequencies that edge into the complex it remains true that once you have a feel for the basics it’s something that’s easily possible to master. When you learn about stripline circuits by assembling them from copper wire and tinplate you learn a lot about shielding, impedances, routing, and interactions between neighbouring circuitry. Sure, it’s easy to make mistakes, but in that medium with a soldering iron it’s equally easy to try alternative designs until performance improves. So much UHF and higher RF circuitry is now packed into the silicon that the type of transistor circuits I was messing about with has become rather obsolete and your UHF work is much more likely to be on a PCB than a piece of tinplate, but the same principles apply. I miss those BF180 RF amplifier transistors from scrap 1970s TV sets.
The SDR As A Digital Playground
The age of the homebrew RF tinkerer may be at a close, at least in the manner in which I started it. Nobody at the cutting edge of radio is likely to be messing around with discrete transistor circuits in the 2020s, unless perhaps they are working with extremely exotic devices up in the millimetre wavelengths.It’s all software-defined radios, opaque black plastic boxes that deliver a useful radio experience on a computer but that’s it. No more homebrew, no more tinkering.
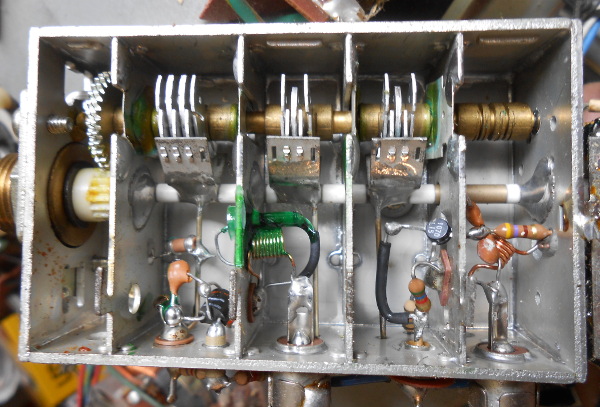
This would have taken a long time to build and get right as physical components.
You might well agree with the previous paragraph, but SDRs provide me with another of my favourite things about radio, namely that using GNU Radio I now have a general purpose digital signal processing playground. Coupled with a dirt-cheap RTL-SDR stick it gives me the ability to play with all the same building blocks I used to with my soldering iron and many more, at lightning speed in my computer. I can make a radio in no time, and change its parameters at will! The best part is though that it’s not simply restricted to radio. GNU radio works at whatever frequency can be digitised by its input device, and if that happens to be an audio card then it can work with audio too. Most readers last April Fools’ day probably spotted my fake gold USB cable a mile away, but perhaps fewer understood that the simple audio analyser in GNU Radio was completely real. It was inspired by a Supercon talk from Mike Ossmann and Kate Temkin, and if you didn’t see that talk I suggest you give it a watch.
So yes, there’s plenty in amateur radio that interests other radio amateurs but has never interested me, and there are still some aspects of the hobby that can be justifiably criticised. But amateur radio is a very broad church indeed, and above you’ve seen some of the things that keep me interested in it. Now it’s your turn, tell us in the comments: what radios do it for you?
Hackaday has among its staff a significant number of writers who also hold amateur radio licenses. We’re hardware folks at heart, so we like our radios homebrew, and we’re never happier than when we’re working at high frequencies.
Amateur radio is a multi-faceted hobby, there’s just so much that’s incredibly interesting about it. It’s a shame then that as a community we sometimes get bogged down with negativity when debating the minutia. So today let’s talk about a few of my favourite things about the hobby of amateur radio. I hope that you’ll find them interesting and entertaining, and in turn share your own favorite things in the comments below.
Homebrew Radios Of The Minimal Kind
This book was where it all started for me.
Contesting and disaster preparedness may leave me cold, but there’s magic in the minimal when it comes to radio. My introduction to electronics sometime in the 1970s came in the form of the simplest of radios, when my dad bought me a copy of George Dobbs’ Making A Transistor Radio, and showed me how to build a crystal set. That so few parts could form a working radio that pulled a signal from the air and into my headphones without the need for batteries was enough magic to get a 9-year-old me hooked.
Upgrading it to a germanium transistor regenerative receiver set me on the path that led me through university to an electronic engineering degree, and ultimately to writing here at Hackaday. There is in a very literal sense a whole world out there to be unlocked using radios made with relatively small bills-of-material, and though I’ve at times fumed about the tendency for such designs to be a little stuck-in-the-mud there is no reason why minimalist radios can not move with the times. That a quadrature front end for a sound-card SDR can be made from little more than a pile of 74-series chips is a particularly appealing example.
Scrap Televisions As The Gateway To RF Design
A UHF construction kit in every dumpster
I got my amateur radio licence back in the mists of time, when the UK’s Department of Trade and Industry only handed out two types of document. There was the class A licence or the Class B, with the difference being that for the former you had to pass a Morse test but got access to the HF bands while for the latter you had no Morse but were restricted to 144MHz and above. Thus the old men could talk in peace about The War on 80 metres, and the 2 metre band was a lively place.
I had zero interest in Morse so I had a Class B licence, and since radio construction was my passion then as now I set about building for the VHF and UHF bands. I didn’t have a grown-up’s budget so my component supply was limited to what I could pull from scrap consumer electronics, which meant abundant 1970s PAL TV sets and the occasional earlier-model video recorder. There were plentiful VHF-capable inductors and transistors, and every TV tuner and VCR modulator had a set of UHF-capable transistors, so both the 2 metre and 70 cm bands were within my grasp.
There’s a sensible point among all this reminiscing, and it came in a thorough grounding in RF design techniques. RF is seen as a Dark Art by many engineers, and while there are certainly elements of design at these frequencies that edge into the complex it remains true that once you have a feel for the basics it’s something that’s easily possible to master. When you learn about stripline circuits by assembling them from copper wire and tinplate you learn a lot about shielding, impedances, routing, and interactions between neighbouring circuitry. Sure, it’s easy to make mistakes, but in that medium with a soldering iron it’s equally easy to try alternative designs until performance improves. So much UHF and higher RF circuitry is now packed into the silicon that the type of transistor circuits I was messing about with has become rather obsolete and your UHF work is much more likely to be on a PCB than a piece of tinplate, but the same principles apply. I miss those BF180 RF amplifier transistors from scrap 1970s TV sets.
The SDR As A Digital Playground
The age of the homebrew RF tinkerer may be at a close, at least in the manner in which I started it. Nobody at the cutting edge of radio is likely to be messing around with discrete transistor circuits in the 2020s, unless perhaps they are working with extremely exotic devices up in the millimetre wavelengths.It’s all software-defined radios, opaque black plastic boxes that deliver a useful radio experience on a computer but that’s it. No more homebrew, no more tinkering.
This would have taken a long time to build and get right as physical components.
You might well agree with the previous paragraph, but SDRs provide me with another of my favourite things about radio, namely that using GNU Radio I now have a general purpose digital signal processing playground. Coupled with a dirt-cheap RTL-SDR stick it gives me the ability to play with all the same building blocks I used to with my soldering iron and many more, at lightning speed in my computer. I can make a radio in no time, and change its parameters at will! The best part is though that it’s not simply restricted to radio. GNU radio works at whatever frequency can be digitised by its input device, and if that happens to be an audio card then it can work with audio too. Most readers last April Fools’ day probably spotted my fake gold USB cable a mile away, but perhaps fewer understood that the simple audio analyser in GNU Radio was completely real. It was inspired by a Supercon talk from Mike Ossmann and Kate Temkin, and if you didn’t see that talk I suggest you give it a watch.
So yes, there’s plenty in amateur radio that interests other radio amateurs but has never interested me, and there are still some aspects of the hobby that can be justifiably criticised. But amateur radio is a very broad church indeed, and above you’ve seen some of the things that keep me interested in it. Now it’s your turn, tell us in the comments: what radios do it for you?
Hackaday has among its staff a significant number of writers who also hold amateur radio licenses. We’re hardware folks at heart, so we like our radios homebrew, and we’re never happier than when we’re working at high frequencies.
Amateur radio is a multi-faceted hobby, there’s just so much that’s incredibly interesting about it. It’s a shame then that as a community we sometimes get bogged down with negativity when debating the minutia. So today let’s talk about a few of my favourite things about the hobby of amateur radio. I hope that you’ll find them interesting and entertaining, and in turn share your own favorite things in the comments below.
Homebrew Radios Of The Minimal Kind
This book was where it all started for me.
Contesting and disaster preparedness may leave me cold, but there’s magic in the minimal when it comes to radio. My introduction to electronics sometime in the 1970s came in the form of the simplest of radios, when my dad bought me a copy of George Dobbs’ Making A Transistor Radio, and showed me how to build a crystal set. That so few parts could form a working radio that pulled a signal from the air and into my headphones without the need for batteries was enough magic to get a 9-year-old me hooked.
Upgrading it to a germanium transistor regenerative receiver set me on the path that led me through university to an electronic engineering degree, and ultimately to writing here at Hackaday. There is in a very literal sense a whole world out there to be unlocked using radios made with relatively small bills-of-material, and though I’ve at times fumed about the tendency for such designs to be a little stuck-in-the-mud there is no reason why minimalist radios can not move with the times. That a quadrature front end for a sound-card SDR can be made from little more than a pile of 74-series chips is a particularly appealing example.
Scrap Televisions As The Gateway To RF Design
A UHF construction kit in every dumpster
I got my amateur radio licence back in the mists of time, when the UK’s Department of Trade and Industry only handed out two types of document. There was the class A licence or the Class B, with the difference being that for the former you had to pass a Morse test but got access to the HF bands while for the latter you had no Morse but were restricted to 144MHz and above. Thus the old men could talk in peace about The War on 80 metres, and the 2 metre band was a lively place.
I had zero interest in Morse so I had a Class B licence, and since radio construction was my passion then as now I set about building for the VHF and UHF bands. I didn’t have a grown-up’s budget so my component supply was limited to what I could pull from scrap consumer electronics, which meant abundant 1970s PAL TV sets and the occasional earlier-model video recorder. There were plentiful VHF-capable inductors and transistors, and every TV tuner and VCR modulator had a set of UHF-capable transistors, so both the 2 metre and 70 cm bands were within my grasp.
There’s a sensible point among all this reminiscing, and it came in a thorough grounding in RF design techniques. RF is seen as a Dark Art by many engineers, and while there are certainly elements of design at these frequencies that edge into the complex it remains true that once you have a feel for the basics it’s something that’s easily possible to master. When you learn about stripline circuits by assembling them from copper wire and tinplate you learn a lot about shielding, impedances, routing, and interactions between neighbouring circuitry. Sure, it’s easy to make mistakes, but in that medium with a soldering iron it’s equally easy to try alternative designs until performance improves. So much UHF and higher RF circuitry is now packed into the silicon that the type of transistor circuits I was messing about with has become rather obsolete and your UHF work is much more likely to be on a PCB than a piece of tinplate, but the same principles apply. I miss those BF180 RF amplifier transistors from scrap 1970s TV sets.
The SDR As A Digital Playground
The age of the homebrew RF tinkerer may be at a close, at least in the manner in which I started it. Nobody at the cutting edge of radio is likely to be messing around with discrete transistor circuits in the 2020s, unless perhaps they are working with extremely exotic devices up in the millimetre wavelengths.It’s all software-defined radios, opaque black plastic boxes that deliver a useful radio experience on a computer but that’s it. No more homebrew, no more tinkering.
This would have taken a long time to build and get right as physical components.
You might well agree with the previous paragraph, but SDRs provide me with another of my favourite things about radio, namely that using GNU Radio I now have a general purpose digital signal processing playground. Coupled with a dirt-cheap RTL-SDR stick it gives me the ability to play with all the same building blocks I used to with my soldering iron and many more, at lightning speed in my computer. I can make a radio in no time, and change its parameters at will! The best part is though that it’s not simply restricted to radio. GNU radio works at whatever frequency can be digitised by its input device, and if that happens to be an audio card then it can work with audio too. Most readers last April Fools’ day probably spotted my fake gold USB cable a mile away, but perhaps fewer understood that the simple audio analyser in GNU Radio was completely real. It was inspired by a Supercon talk from Mike Ossmann and Kate Temkin, and if you didn’t see that talk I suggest you give it a watch.
So yes, there’s plenty in amateur radio that interests other radio amateurs but has never interested me, and there are still some aspects of the hobby that can be justifiably criticised. But amateur radio is a very broad church indeed, and above you’ve seen some of the things that keep me interested in it. Now it’s your turn, tell us in the comments: what radios do it for you?
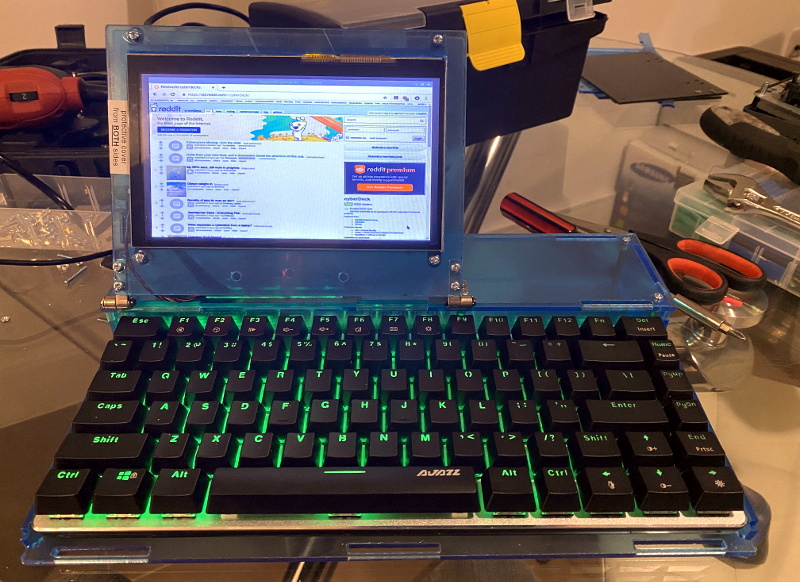
For those who decide to build their own personal cyberdeck, it’s often as much about the journey as it is the final product. The recent write-up that [mickwheelz] put together about the process that lead him to build his own bespoke mobile computer is a perfect example. He went through three distinct design phases to create something that had what he describes as a “retro-futuristic, hand-built, utilitarian aesthetic”, and we think you’ll agree the final product is right on target.
At Hackaday we’re strong believers that you can learn just as much from a failed attempt as you will from a rousing success, which is why we especially appreciate the way [mickwheelz] has documented this project. The basic layout and general bill of materials for his hypothetical cyberdeck had been sorted out in his head for about a year, but it took a few attempts until everything came together in a way he was happy with. Rather than pretend those early missteps never happened, he’s decided to present each one and explain why it didn’t quite work out.
This laser-cut acrylic design was difficult to assemble.
Frankly both of his earlier attempts look pretty slick to us, but of course the only person who’s opinion really counts when it comes to a good cyberdeck is the one who’s building it. The original acrylic design was a bit too fiddly, and while his first attempt at 3D printing the computer’s frame and enclosure went much better, it still left something to be desired.
The final result is a clean and straightforward design that has plenty of room inside for a Raspberry Pi 4, UPSPack V3 power management board, 10,000 mAh battery, internal USB hub, and a AK33 mechanical keyboard. Topside there’s a 7” 1024×600 IPS LCD with touch overlay that’s naturally been offset in the traditional cyberdeck style, and on the right side of the enclosure there’s a bay that holds a KKMoon RTL-SDR. Though that could certainly be swapped out for something else should you decide to print out your own version of this Creative Commons licensed design.
Most of our 3D printers lay down molten plastic or use photosensitive resin. But professional printers often use metal powder, laying out a pattern and then sintering it with a laser. [Metal Matters] is trying to homebrew a similar system (video, embedded below). And while not entirely successful, the handful of detailed progress videos are interesting to watch. We particularly enjoyed the latest installment (the second video, below) which showed solutions to some of the problems.
Because of the complexity of the system, there are small tidbits of interest even if you don’t want to build a metal printer. For example, in the most recent video, a CCD camera gives up its sensor to detect the laser’s focus.
Before you get the idea to try this with your cheap Chinese laser cutter, you should know that you’re going to have to splash out for some more lasers — the NUBM31 laser array from a laser projector has 20 diodes, each producing about 4.75 watts output.
Not that we haven’t seen laser cutters used as 3D printers, though. We hear a 5 W laser is good enough to work with nylon. We realize [Metal Matters] has some work left to do, but we have a feeling it is going to work out in the end and we can’t wait to see the success video.
Raspberry Pi was synonymous with single-board Linux computers. No longer. The $4 Raspberry Pi Pico board is their attempt to break into the crowded microcontroller module market.
The microcontroller in question, the RP2040, is also Raspberry Pi’s first foray into custom silicon, and it’s got a dual-core Cortex M0+ with luxurious amounts of SRAM and some very interesting custom I/O peripheral hardware that will likely mean that you never have to bit-bang again. But a bare microcontroller is no fun without a dev board, and the Raspberry Pi Pico adds 2 MB of flash, USB connectivity, and nice power management.
As with the Raspberry Pi Linux machines, the emphasis is on getting you up and running quickly, and there is copious documentation: from “Getting Started” type guides for both the C/C++ and MicroPython SDKs with code examples, to serious datasheets for the Pico and the RP2040 itself, to hardware design notes and KiCAD breakout boards, and even the contents of the on-board Boot ROM. The Pico seems designed to make a friendly introduction to microcontrollers using MicroPython, but there’s enough guidance available for you to go as deep down the rabbit hole as you’d like.
Our quick take: the RP2040 is a very well thought-out microcontroller, with myriad nice design touches throughout, enough power to get most jobs done, and an innovative and very hacker-friendly software-defined hardware I/O peripheral. It’s backed by good documentation and many working examples, and at the end of the day it runs a pair of familiar ARM MO+ CPU cores. If this hits the shelves at the proposed $4 price, we can see it becoming the go-to board for many projects that don’t require wireless connectivity.
But you want more detail, right? Read on.
The Specs and the Luxuries
In many ways, the Pico is a well-appointed “normal” microcontroller board. It has 26 3.3 V GPIOs, a standard ARM Serial Wire Debug (SWD) port, USB host or device capabilities, two UARTs, two I2Cs, two SPIs, and 16 PWM channels in eight groups. (The PWM unit can also measure incoming PWM signals, both their frequency and duty cycle.) The Pico has a 12-bit ADC, although it’s connected to only four pins, so you’ve got to be a little careful there.
The twin ARM M0+ cores run off of PLLs, and are specced up to 133 MHz, which is pretty fast. There are separate clock dividers for nearly every peripheral, and they can be turned on and off individually for power savings, as with most other ARM microcontrollers. It runs full-out at around 100 mA @ 5 V, and has full-memory-retention sleep modes under 1 mA.
As the ESP8266 and ESP32 modules do, it uses external flash ROM to store programs, and can run code directly from the flash as if it were internal memory. The Pico board comes with a decent 2 MB QSPI flash chip, but if you’re handy with a soldering iron, you can fit up to 16 MB. It has 264 kB of SRAM, which is certainly comfy. The RAM is divided up internally into four striped 64 kB banks for fast parallel access, but they’re also accessible singly if you’d like. Two additional 4 kB banks are non-striped and suggest using themselves as per-core stack memory, but nothing forces you to use them that way either.
There are numerous minor hardware-level conveniences. All of the configuration registers are 32 bits wide, and so you might not want to have to specify all of them, or maybe you want to avoid the read-modify-write dance. Like many of the STM32 chips, there is a special memory map that lets you set, clear, or XOR any bit in any of the config registers in a single atomic command. There are also 30 GPIOs, so they all fit inside a single 32-bit register — none of this Port B, Pin 7 stuff. This also means that you can read or write them all at once, while setting individual pins is easy through the above atomic access.
An internal mask ROM contains the UF2 bootloader, which means that you can always get the chip back under control. When you plug the Pico in holding down the BOOTSEL button, it shows up as a USB mass storage device, and you can just copy your code across, with no programmer, and Raspberry even provides an all-zeros file that you can copy across to completely clean-slate the machine. If you copy the Pico’s MicroPython binary across, however, you’ll never need the bootloader again. The mask ROM also contains some fast routines that support integer and floating point math, and all of the contents are open source as mentioned above.
The power regulation onboard is a boost-buck configuration that takes an input from 1.8 V to 5 V. This is a good range for lithium batteries, for instance, which can be a hassle because they run both above and below the IC’s 3.3 V, so it’s nice to have a boost-buck regulator to squeeze out the last few milliamp-hours. Or you could run your project on two AAs. That’s nice.
So the Pico/RP2040 is a competent modern dev board with some thoughtful touches. But it gets better.
The PIO: Never Bitbang Again
The real standout peripheral on the RP2040 and the Pico is the Programmable I/O (PIO) hardware, which allows you to define your own digital communication peripheral. There are two of these PIO units, and each one has four programmable state machines that run sequential programs written in a special PIO assembly language. Each of the state machines has its own clock divider, register memory, IRQ flags, DMA interface, and GPIO mapping. These allow essentially arbitrary cycle-accurate I/O, doing the heavy lifting so that the CPU doesn’t have to.
If you want to program another UART, for instance, it’s trivial. But so is Manchester-encoded UART, or a grey code encoder/decoder, or even fancier tricks. One of the example applications is a DPI video example, with one state machine handling the scanline timing and pixel clock, while another pushes out the pixel data and run-length encodes it. These are the sort of simple-but-fast duties that can bog down a CPU, leading to timing glitches, so dedicated hardware is the right solution.
The PIOs are meant to have a lot of the flexibility of a CPLD or FPGA, but be easier to program. Each state machine can only take a “program” that is 32 instructions long, but the “pioasm” language is very dense. For instance, the command to set pin states also has an argument that says how long to wait after the pins are set, and additional “side-set” pins can be twiddled in the same instruction. So with one instruction you can raise a clock line, set up your data, and hold this state for a defined time. A basic SPI master TX implementation is two lines.
Or take the example of the WS2812 LED protocol. To send a logical 1, you hold the self-clocked data line high for a long period and low for a short period. To send a logical 0, the data line is held high for a short period and low for a long one. Creating the routines to do this with reasonable speed in the CPU, without glitches, required a non-trivial shedding of hacker tears. With the PIO peripheral, writing a routine to shift out these bits with absolute cycle accuracy is simple, and once that’s done your code can simply write RGB values to the PIO and the rest is taken care of.
To run PIO code from C, the assembler is called at compile time, the program is turned into machine language and stored as a matrix in a header file, and then this can be written to the PIO device from within main() to initialize it. In Python, it’s even easier — the @asm_pio decorator turns a function into PIO code. You just have to write the “Python” function using the nine PIO assembly instructions and then hook it up to GPIO pins. After that, you can call it from your code as if it were a normal peripheral.
Having played around with it only a little bit, the PIO is the coolest feature of the Pico/RP2040. It’s just a little bit of cycle-correct programmable logic, but most of the time, that’s all you need. And if you don’t feel like learning a new assembly language — although it’s only nine instructions — there are a heaping handful of examples already, and surely folks will develop more once the boards hit the streets.
IDEs and SDKs: C and MicroPython
The Raspberry Pi single-board computers (SBCs), when combined with their documentation and examples, usually manage a nice blend of being simple enough for the newbie while at the same time not hiding too much. The result is that, rather than having the underlying system’s Linuxiness abstracted away, you get introduced to it in a friendly way. That seems to be what the Raspberries are aiming at with the Pico — an introduction to microcontrollers that’s made friendly through documentation and MicroPython’s ease of use, but that’s also not pulling any punches when you turn to look at the C/C++ code.
USB for power, UART for communication, and SWD for programming and debugging.
And having a Raspberry Pi SBC on hand makes a lot of the most hardcore microcontrollering simpler. For instance, if you want to do debugging on-chip, you’ll need to connect over the SWD interface, and for that you usually need a programmer. But of course, you can also bit-bang a SWD controller with the GPIOs of a Raspberry Pi SBC, but you’ll have to configure OpenOCD just right to do so.
If that all sounded like gibberish, don’t worry — all of this is taken care of by a simple pico_setup.sh script. It not only installs all of the compilation and debugging environment, it also (optionally) pulls down VScode for you. Nice.
And you will want to program it over the SWD eventually. The cycle of unplugging USB, holding down a button, and re-plugging USB gets old real fast.
If you’re a command-line junkie, the C SDK’s build system is based on CMake and runs just fine from the command line if you’ve already got the ARM toolchain installed. And as with all SDKs, there’s a certain amount of boilerplate necessary to start up a new coding session. This is taken care of by the pico project generator, so you don’t have to.
In the “Getting started” guides, you’ll find instructions for setting up your environment on a Raspberry Pi SBC, Windows, Mac, or desktop Linux machine. If you prefer Eclipse as an IDE, there are integration instructions as well.
Two Cores: Here be Dragons
If there’s one area that strikes me as not yet fully developed, it’s the dual-core aspect of the system. Right now, if you write either C or Python code, it’s running on Core 0, while Core 1 is simply sitting idle. Both the C and Python SDK documentation tell you how to start up a thread on the other core, and there’s example code available as well, but the instructions are sparse. In C, there’s a pico/multicore.h and even mutex, semaphore, and queue libs for you to include, but the documentation warns that most of the stdlib functions aren’t thread-safe. In Python you import _thread and call the start_new_thread() method, but I don’t know how much fine-grained control you have.
If all of the above sounds scary, well, it is a little. The truth about coding for multiprocessor systems is that it opens up new ways for things to go wrong, as one CPU changes values out from under the other, or they both try to write out to the UART at the same time. We wrote the Raspberries and asked if they were planning to port over an RTOS, which provides a little more structure to the problem, and they replied that that was actually first on their plate after they get through the release. So unless you know what you’re doing, you might not get the full benefit of the dual-core chip just yet. But we’re honestly looking forward to an RTOS getting the Raspberry Pi documentation-and-tutorial treatment when it happens.
Deep Thoughts
It’s not every day that you see a new player enter the microcontroller market, let alone one with the hacker-friendly qualifications of Raspberry Pi. For that alone, this board is notable. But the feature set is also solid, there are many creature comforts in both the silicon and the support, and it brings one truly new capability to the table in the form of the PIO units. Add to all this a price tag of $4, and you can imagine it becoming folks’ go-to board — for those times when you don’t need wireless connectivity.
Indeed, the only real competitor for this board in terms of price/performance ratio are the various ESP32 boards. But they’re also very different animals — one offers fewer GPIOs but has extensive wireless features, and the other has more (and more flexible) GPIO, device and host USB, but no radio. Power consumption while running full-out, with wireless turned off, is a slight advantage for the ESP32, but the sleep modes of the Pico are slightly thriftier. Both SDKs get the job done in C, and both run MicroPython. ESP32’s dual cores run FreeRTOS, but we imagine it won’t be very long before that playing field is levelled. So basically it’s down to WiFi vs USB.
Of course, for slightly less money, one can pick up one of the STM32-based “Black Pill” boards, with yet another set of pros and cons. Choices, choices!
With the Pico, Raspberry Pi is entering a crowded field. They’ve got the name recognition, a cool hardware trick, a great value proposition, and a track record of solid documentation. If I were coding up a GPIO-heavy application without the need for wireless, the Pico would be a solid choice, especially if I could make use of the extra core.
I’ll leave you with a teaser: On page 9 of the RP2040 datasheet, they lay out what “2040” stands for: two cores, type M0+, more than 256 kB RAM, and zero kB flash. Does that mean we’ll eventually see models with more RAM, onboard flash, or different ARM cores? RP2050? RP2048? Speculate wildly in the comments.
Let’s be honest, building a home arcade cabinet isn’t exactly the challenge it once was. There’s plenty of kits out there that do all the hard work for you, and they even sell some pretty passable turn-key units at Walmart now. If you want to put a traditional arcade cabinet in your home, it’s not hard to get one.
Which is why this wild build by [Rafael Rubio] is so interesting. The entirely 3D printed enclosure looks like some kind of art piece from the 1970s, and is a perfect example of the kind of unconventional designs made possible by low-cost additive manufacturing. Building something like this out of wood or metal would be nightmare, especially for the novice; but with even a relatively meager desktop 3D printer you’re only a few clicks away from running off your own copy.
Removable side panels allow access to the electronics.
Inside the nautilus-like enclosure is a Raspberry Pi running Retropie, a 10″ LCD panel from Pimoroni, and a GeeekPi interface board that connects up to the 8-way joystick and arcade buttons. [Rafael] has included a Bill of Materials and an assembly overview that you can follow along with, though the cavernous internal dimensions of the enclosure certainly give you ample of room for improvisation if you’d rather blaze your own path.
Like the retro-futuristic computer terminals created by [Oriol Ferrer Mesià], this arcade machine completely reinvents a traditional design that most people take for granted. Is this layout actually better than the standard arcade cabinet? It’s not really our place to say. But it’s certainly a new and unconventional approach to “solved” problem, and that’s what we’re all about.