Repairing 200+ Raspberry Pis for a Good Cause

If somebody told you they recently purchased over 200 Raspberry Pis, you might think they were working on some kind of large-scale clustering project. But in this case, [James Dawson] purchased the collection of broken single-board computers with the intention of repairing them so they could be sent to developing countries for use in schools. It sounds like the logistics of that are proving to be a bit tricky, but we’re happy to report he’s at least made good progress on getting the Pis back up and running.

He secured this trove of what he believes to be customer returned Raspberries or the princely sum of £61 ($83 USD). At that price, even if only a fraction ended up being repairable, you’d still come out ahead. Granted all of these appear to be the original Model B, but that’s still a phenomenal deal in our book. Assuming of course you can find some reasonable way to triage them to sort out what’s worth keeping.

To that end, [James] came up with a Bash script that allowed him to check several hardware components including the USB, Ethernet, I2C, and GPIO. With the script on an SD card and a 3.5″ TFT plugged into the Pi’s header for output, he was able to quickly go through the box to get an idea of what sort of trouble he’d gotten himself into. He was only about half way through the process when he wrote his blog post, but by that point, had only found 40 Pis which wouldn’t start at all. He suspects these might be victims of some common issue in the power circuitry that he’ll investigate at a later date.


The majority of Pis he checked were suffering from nothing worse than some bent GPIO pins or broken SD card slots. Some of the more abused examples had their USB ports ripped off entirely, but were otherwise fine. Another 10 had dead Ethernet, and 4 appear to have damaged traces leading to their HDMI ports. While we’re interested in hearing if [James] can get those 40 dark Pis to fire back up, so far the results are quite promising.

Donating hardware is always a tricky thing, so for now [James] says he’ll be selling the repaired Pis on eBay and donating the proceeds to the Raspberry Pi Foundation so they can continue to develop hardware that will (potentially) accomplish their goal of giving students all over the world a functional computer.

source https://hackaday.com/2021/01/25/repairing-200-raspberry-pis-for-a-good-cause/
Hide and Seek AI Shows Emergent Tool Use

Machine learning has come a long way in the last decade, as it turned out throwing huge wads of computing power at piles of linear algebra actually turned out to make creating artificial intelligence relatively easy. OpenAI have been working in the field for a while now, and recently observed some exciting behaviour in a hide-and-seek game they built.

The game itself is simple; two teams of AI bots play a game of hide-and-seek, with the red bots being rewarded for spotting the blue ones, and the blue ones being rewarded for avoiding their gaze. Initially, nothing of note happens, but as the bots randomly run around, they slowly learn. Over millions of trials, the seekers first learn to find the hiders, while the hiders respond by building barriers to hide behind. The seekers then learn to use ramps to loft over them, while the blue bots learn to bend the game’s physics and throw them out of the playfield. It ends with the seekers learning to skate around on blocks and the hiders building tight little barriers. It’s a continual arms race of techniques between the two sides, organically developed as the bots play against each other over time.

It’s a great study, and particularly interesting to note how much longer it takes behaviours to develop when the team switches from a basic fixed scenario to an changable world with more variables. We’ve seen other interesting gaming efforts with machine learning, too – like teaching an AI to play Trackmania. Video after the break.

source https://hackaday.com/2021/01/25/hide-and-seek-ai-shows-emergent-tool-use/

Hide and Seek AI Shows Emergent Tool Use

Machine learning has come a long way in the last decade, as it turned out throwing huge wads of computing power at piles of linear algebra actually turned out to make creating artificial intelligence relatively easy. OpenAI have been working in the field for a while now, and recently observed some exciting behaviour in a hide-and-seek game they built.

The game itself is simple; two teams of AI bots play a game of hide-and-seek, with the red bots being rewarded for spotting the blue ones, and the blue ones being rewarded for avoiding their gaze. Initially, nothing of note happens, but as the bots randomly run around, they slowly learn. Over millions of trials, the seekers first learn to find the hiders, while the hiders respond by building barriers to hide behind. The seekers then learn to use ramps to loft over them, while the blue bots learn to bend the game’s physics and throw them out of the playfield. It ends with the seekers learning to skate around on blocks and the hiders building tight little barriers. It’s a continual arms race of techniques between the two sides, organically developed as the bots play against each other over time.

It’s a great study, and particularly interesting to note how much longer it takes behaviours to develop when the team switches from a basic fixed scenario to an changable world with more variables. We’ve seen other interesting gaming efforts with machine learning, too – like teaching an AI to play Trackmania. Video after the break.

source https://hackaday.com/2021/01/25/hide-and-seek-ai-shows-emergent-tool-use/

Hide and Seek AI Shows Emergent Tool Use

Machine learning has come a long way in the last decade, as it turned out throwing huge wads of computing power at piles of linear algebra actually turned out to make creating artificial intelligence relatively easy. OpenAI have been working in the field for a while now, and recently observed some exciting behaviour in a hide-and-seek game they built.

The game itself is simple; two teams of AI bots play a game of hide-and-seek, with the red bots being rewarded for spotting the blue ones, and the blue ones being rewarded for avoiding their gaze. Initially, nothing of note happens, but as the bots randomly run around, they slowly learn. Over millions of trials, the seekers first learn to find the hiders, while the hiders respond by building barriers to hide behind. The seekers then learn to use ramps to loft over them, while the blue bots learn to bend the game’s physics and throw them out of the playfield. It ends with the seekers learning to skate around on blocks and the hiders building tight little barriers. It’s a continual arms race of techniques between the two sides, organically developed as the bots play against each other over time.

It’s a great study, and particularly interesting to note how much longer it takes behaviours to develop when the team switches from a basic fixed scenario to an changable world with more variables. We’ve seen other interesting gaming efforts with machine learning, too – like teaching an AI to play Trackmania. Video after the break.

source https://hackaday.com/2021/01/25/hide-and-seek-ai-shows-emergent-tool-use/

No More Cows: Iconic 1990s Download Site Finally Shuttered By Tucows

In the early and mid 1990s there were a host of big players in the nascent public Internet that played their part in guiding the adventurous early Web users on their way. Many of them such as Netscape or Altavista have fallen by the wayside, while players such as Lycos and Yahoo are still in existence but shadows of their former selves. Some other companies broadened their businesses to become profitable and still exist quietly getting on with whatever they do. An example is Tucows, now a major domain name registrar, who have finally announced the closure of their software library that was such an essential destination in those times.

The company name was originally an acronym: “The Ultimate Collection Of Winsock Software”, started in 1993 by a library employee in Flint, Michigan. As its name suggests it was a collection of mostly shareware Windows software, and the “Winsock” refers to Windows Sockets, the API used by Windows versions of the day for accessing network resources. It seems odd to modern eyes, but connecting a 486 PC running Windows 3.1 to the Internet was something of a complex process without any of the built-in software we take for granted today. Meanwhile the fledgling Linux distributions were only for the extremely tech-savvy or adventurous, so the world of open-source software had yet to make a significant impact on consumer-level devices.

The passing of a Windows shareware library would not normally be a story of interest, but it is the part that Tucows played in providing a reliable software source on the early Web  that makes it worthy of note. It’s something of a shock to discover that it had survived into the 2020s, it’s been so long since it was relevant, but if you sat bathed in the glow of a CRT monitor as you waited interminably for your CuteFTP download over your 28.8k modem to finish then you probably have a space for Tucows somewhere in your heart. If you fancy a trip down memory lane, the Internet Archive have a very period-ugly-looking version of the site from 1996.

You may no longer have a 486 on your desk, but if you want to you can still build one.

source https://hackaday.com/2021/01/24/no-more-cows-iconic-1990s-download-site-finally-shuttered-by-tucows/

What Makes A Good Antenna?

It sometimes seems as though antennas and RF design are portrayed as something of a Black Art, the exclusive preserve of an initiated group of RF mystics and beyond the reach of mere mortals. In fact though they have their difficult moments it’s possible to gain an understanding of the topic, and making that start is the subject of a video from [Andreas Speiss]. Entitled “How To Build A Good Antenna”, it uses the design and set-up of a simple quarter-wave groundplane antenna as a handle to introduce the viewer to the key topics.

What makes this video a good one is its focus on the practical rather than the theoretical. We get advice on connectors and antenna materials, and we’re introduced to the maths through online calculators rather than extensive formulae. Of course the full calculations are there to be learned by those with an interest, but for many constructors they can be somewhat daunting. We’re shown a NanoVNA as a useful tool in the antenna builder’s arsenal, one which gives a revolutionary window on performance compared to the trial-and-error of previous times. Even the ground plane gets the treatment, with its effect on impedance and gain explored and the emergence of its angle as a crucial factor in performance. We think this approach does an effective job of breaking the mystique surrounding antennas, and we hope it will encourage viewers to experiment further.

If your appetite has been whetted, how about taking a look at a Nano VNA in action?

source https://hackaday.com/2021/01/24/what-makes-a-good-antenna/

Hackaday Links: January 24, 2021

Code can be beautiful, and good code can be a work of art. As it so happens, artful code can also result in art, if you know what you’re doing. That’s the idea behind Programming Posters, a project that Michael Fields undertook to meld computer graphics with the code behind the images. It starts with a simple C program to generate an image. The program needs to be short enough to fit legibly into the sidebar of an A2 sheet, and as if that weren’t enough of a challenge, Michael constrained himself to the standard C libraries to generate his graphics. A second program formats the code and the image together and prints out a copy suitable for display. We found the combination of code and art beautiful, and the challenge intriguing.

It always warms our hearts when we get positive feedback from the hacker community when something we’ve written has helped advance a project or inspire a build. It’s not often, however, that we learn that Hackaday is required reading. Educators at the Magellan International School in Austin, Texas, recently reached out to Managing Editor Elliot Williams to let him know that all their middle school students are required to read Hackaday as part of their STEM training. Looks like the kids are paying attention to what they read, too, judging by KittyWumpus, their ongoing mechatronics/coding project that’s unbearably adorable. We’re honored to be included in their education, and everyone in the Hackaday community should humbled to realize that we’ve got an amazing platform for inspiring the next generation of hardware hackers.

Hackers seem to fall into two broad categories: those who have built a CNC router, and those who want to build one. For those in the latter camp, the roadblock to starting a CNC build is often “analysis paralysis” — with so many choices to make, it’s hard to know where to start. To ease that pain and get you closer to starting your build, Matt Ferraro has penned a great guide to planning a CNC router build. The encyclopedic guide covers everything from frame material choice to spindle selection and software options. If Matt has a bias toward any particular options it’s hard to find; he lists the pros and cons of everything so you can make up your own mind. Read it at your own risk, though; while it lowers one hurdle to starting a CNC build, it does nothing to address the next one: financing.

Like pretty much every conference last year and probably every one this year, the Open Hardware Summit is going to be virtual. But they’re still looking for speakers for the April conference, and just issued a Call for Proposals. We love it when we see people from the Hackaday community pop up as speakers at conferences like these, so if you’ve got something to say to the open hardware world, get a talk together. Proposals are due by February 11, so get moving.

And finally, everyone will no doubt recall the Boston Dynamics robots that made a splash a few weeks back with their dance floor moves. We loved the video, mainly for the incredible display of robotic agility and control but also for the choice of music. We suppose it was inevitable, though, that someone would object to the Boomer music and replace it with something else, like in the video below, which seems to sum up the feelings of those who dread our future dancing overlords. We regret the need to proffer a Tumblr link, but the Internet is a dark and wild place sometimes, and only the brave survive.

https://commiemartyrshighschool.tumblr.com/post/640760882224414720/i-fixed-the-audio-for-that-boston-dynamics-video

source https://hackaday.com/2021/01/24/hackaday-links-january-24-2021/

Physically Huge SD Card Technically Has Some Benefits

SD cards were developed and released just before the turn of the millenium. Since then, we’ve seen smaller formats, miniSD and microSD, become popular for portable devices. However, sometimes bigger is better. [Useless Mod] dared to dream that dream, and put together a (physically) gigantic SD card.

In card is a full 10x scale reproduction of a SanDisk Extreme Pro SD card,  complete with packaging, too. Built out of layers of laser cut MDF, it’s spray painted and given a high-quality label to complete the effect. The write protect slider instead serves in this case as a latch to open the assembly. Inside, there’s a simple regular SD card slot, wired up to the bigger card’s giant contacts made with copper tape. These interface with an huge 10x scale SD card slot, which acts as an adapter, allowing the giant SD to be used with regular hardware like cameras.

The giant SD might seem silly, but it has plenty of useful features. There’s flashing LEDs behind the label that make it easy to find if you drop it, along with an Apple Watch hidden inside that means it can be located using the Find My iPhone service. We’d have loved if it featured a RAID array full of 10 or more SD cards, as well, just to justify its enormous size. That said, [Useless Mod] points out that it’s big enough to keep a DSLR dry in a rainstorm when fitted to the hotshoe, so there’s that.

It’s a fun build, not a serious one, but one that we enjoyed on its merits. We suspect that, regardless of the card inside, you’ll have little luck recording at 4K with such long wire lengths in play. If you’ve ever had more normal compatability problems with the format, consider that it could be size causing your issues. Video after the break.

source https://hackaday.com/2021/01/24/physically-huge-sd-card-technically-has-some-benefits/

Collapsible Pattern Projector is a Bright Idea

It’s fantastic that we’re living in the age of downloadable PDF patterns, it really is. But printing out a bunch of sheets of paper and taping them together is a tedious and tiresome process that can introduce error right from the start. This goes for any type of pattern, from sewing to R/C planes.

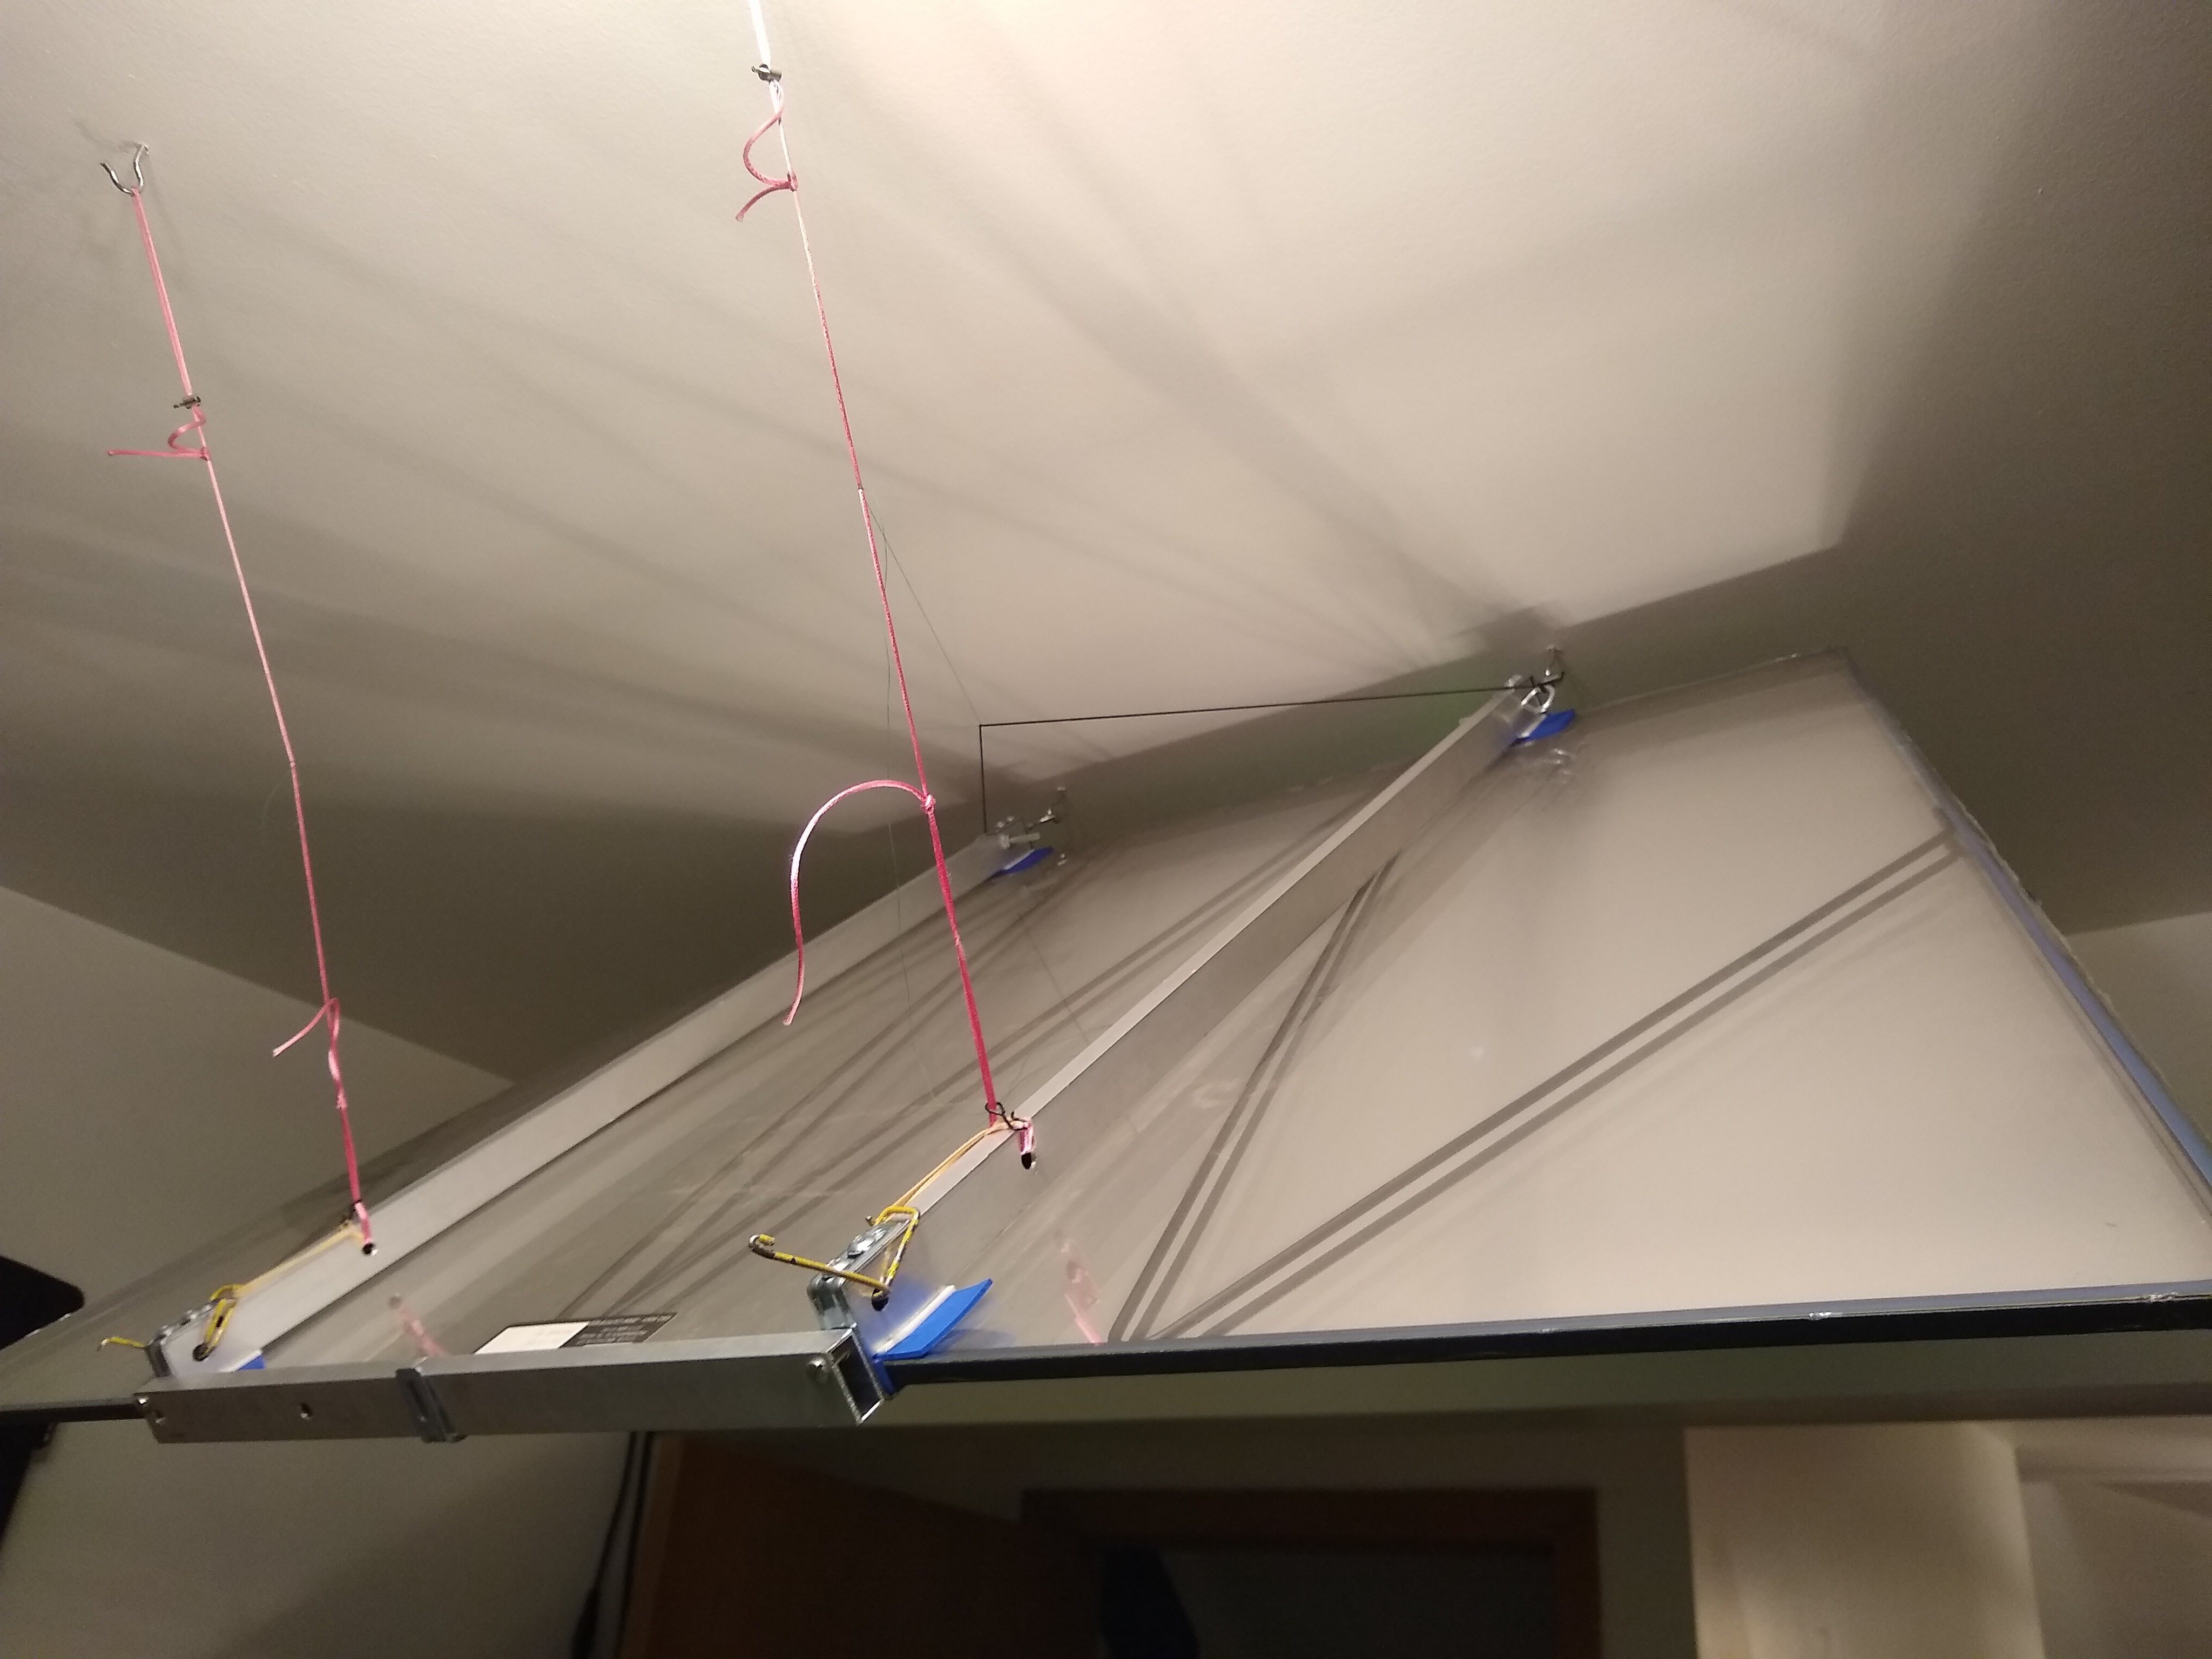
[Quinn]’s quarantine project is designed to cover both of those and everything in between. It’s a pattern projector made from stuff already on hand — a couple of offset projectors to scavenge parts from, and a large, trapezoidal mylar mirror from an old rear projection TV. At maximum zoom it projects a 4′ x 3′ image onto the tabletop, which sounds perfect for a whole lot of sewing patterns. At minimum zoom, the projected image fits on a foam core board.

We love that this dreamy setup can be stowed away so easily on hooks in the ceiling. [Quinn] had to perform a few hacks to make it all work together, including fabricating a bracket and some adjustable ties to hold the mirror aloft at just the right correct angle.

Need something smaller? Check out this Pi-powered pocket projector. Want a cinema-quality setup? You just have to find the right auctions.

source https://hackaday.com/2021/01/24/collapsible-pattern-projector-is-a-bright-idea/

Collapsible Pattern Projector is a Bright Idea

It’s fantastic that we’re living in the age of downloadable PDF patterns, it really is. But printing out a bunch of sheets of paper and taping them together is a tedious and tiresome process that can introduce error right from the start. This goes for any type of pattern, from sewing to R/C planes.

[Quinn]’s quarantine project is designed to cover both of those and everything in between. It’s a pattern projector made from stuff already on hand — a couple of offset projectors to scavenge parts from, and a large, trapezoidal mylar mirror from an old rear projection TV. At maximum zoom it projects a 4′ x 3′ image onto the tabletop, which sounds perfect for a whole lot of sewing patterns. At minimum zoom, the projected image fits on a foam core board.

We love that this dreamy setup can be stowed away so easily on hooks in the ceiling. [Quinn] had to perform a few hacks to make it all work together, including fabricating a bracket and some adjustable ties to hold the mirror aloft at just the right correct angle.

Need something smaller? Check out this Pi-powered pocket projector. Want a cinema-quality setup? You just have to find the right auctions.

source https://hackaday.com/2021/01/24/collapsible-pattern-projector-is-a-bright-idea/

Collapsible Pattern Projector is a Bright Idea

It’s fantastic that we’re living in the age of downloadable PDF patterns, it really is. But printing out a bunch of sheets of paper and taping them together is a tedious and tiresome process that can introduce error right from the start. This goes for any type of pattern, from sewing to R/C planes.

[Quinn]’s quarantine project is designed to cover both of those and everything in between. It’s a pattern projector made from stuff already on hand — a couple of offset projectors to scavenge parts from, and a large, trapezoidal mylar mirror from an old rear projection TV. At maximum zoom it projects a 4′ x 3′ image onto the tabletop, which sounds perfect for a whole lot of sewing patterns. At minimum zoom, the projected image fits on a foam core board.

We love that this dreamy setup can be stowed away so easily on hooks in the ceiling. [Quinn] had to perform a few hacks to make it all work together, including fabricating a bracket and some adjustable ties to hold the mirror aloft at just the right correct angle.

Need something smaller? Check out this Pi-powered pocket projector. Want a cinema-quality setup? You just have to find the right auctions.

source https://hackaday.com/2021/01/24/collapsible-pattern-projector-is-a-bright-idea/

Your NES Classic Mini Controller, On Your Desktop Computer

The NES Classic Mini was one of the earlier releases in what became a wider trend for tiny versions of classic retro consoles to be released. Everybody wanted one but numbers were limited, so only the lucky few gained this chance to relive their childhood through the medium of Donkey Kong or Mario Brothers on real Nintendo hardware. Evidently [Albert Gonzalez] was one of them, because he’s produced a USB adapter for the Mini controller to allow it to be used as a PC peripheral.

On the small protoboard is the Nintendo connector at one end, an ATtiny85 microcontroller, and a micro-USB connector at the other. The I2C interface from the controller is mapped to USB on the ATtiny through the magic of the V-USB library, appearing to the latter as a generic gamepad. It’s thought that the same interface is likely to also work with the later SNES Classic Mini controller. For the curious all the code and other resources can be found in a GitHub repository, so should you have been lucky enough to lay your hands on a NES Classic Mini then you too can join the PC fun.

The mini consoles were popular, but didn’t excite our community as much as could be expected. Our colleague Lewin Day tool a look at the phenomenon last summer.

source https://hackaday.com/2021/01/24/your-nes-classic-mini-controller-on-your-desktop-computer/

A Big Set Of Logic Gates For Teaching The Basics

Teaching students about logic gates is often done in two parts, once on the whiteboard for the theory, and again on the breadboard for the practice. [shurik179] wasn’t a fan of the abstraction between easy-to-understand symbols on the whiteboard, and small IC packages full of many gates in reality. Instead, he built a set of real-world logic gates that can be wired together as a teaching tool.

Each “gate’ consists of a PCB roughly the size of a business card that features LEDs to indicate the state of its inputs and outputs, and a silkscreen indicating the name and symbol of the gate in question. There’s also a master PCB, which features three seed values, A, B, and C, to feed into the system. Students can set these values to 1 or 0, and feed them into the gates, which are wired together with 3-conductor servo cables, and observe the input on the built-in LEDs.

It’s a great way to demonstrate logic gates in the classroom. The design also allows the PCBs to be flipped over to show the actual electronic components responsible for implementing the logic, serving as a great bridge towards better understanding of real electronic design. Of course, it’s not the only way to learn – even Fallout 4 has a fully fledged logic toolkit these days!

source https://hackaday.com/2021/01/24/a-big-set-of-logic-gates-for-teaching-the-basics/

When Appliance Hackers Hit the Music Scene

The art-music-technology collective “Electronicos Fantasticos!” (commonly known as Nicos) is the brain child of artist/musician [Ei Wada] in Japan. They revive old, retired and out-dated electrical appliances as new “electro-magnetic musical instruments” creating not just new ways to play music, but one that also involves the listener as a musician, gradually forming an interactive orchestra. They do this by creatively using the original functions of appliances like televisions and fans, hacking them in interesting ways to produce sound. The project started in the beginning of 2015, leading to the creation of a collaborative team — Nicos Orchest-Lab — around the end of that year. They have since appeared in concerts, including a performance at “Ars Electronica”, the world’s largest media arts festival in 2019.

For us hackers, the interesting bits can be found in the repository of their Work, describing sketchy but tantalising details of the musical instruments. Here are a few of the more interesting ones, but do check out their website for more amazing instruments and a lot of entertaining videos.

CRT-TV Gamelan – A percussion instrument made from old CRT monitors. Coloured stripes projected on the screen cause changes in static-electricity picked up by the players hands, which then propagates to an electrical coil attached to their foot. This signal is then patched to a guitar amplifier.

Electric Fan Harp – They take out the fan blade, and replace it with a “coded disk” containing punched holes. Then they shine a bulb from under the rotating disk, and the interrupted light is picked up by an optical receiver held by the player. Controlling the fan speed and the location of the receiver pickup, they can coax the fan to produce music – based on the idea “What if Jimi Hendrix, the god of electric guitars, played electric fans as instruments?”

Barcoder – This one is quite simple but produces amazing results, especially when you pair up with another Barcoder musician. The output of the barcode reader is pretty much directly converted to sound – just wave the wand over printed barcode sheets. And it works amazingly well when pointed at striped shirts too. Check out the very entertaining videos of this gizmo. This led to the creation of the Barcodress – a coded dress which creates an interactive music and dance performance.


The Striped Shirtsizer

Striped Shirtsizer – This one is a great hack and a synth with a twist. A camera picks up video signals, which is then fed to the “Audio” input of an amplifier directly. In the video on the project page, [Ei Wada] explains how he accidentally discovered this effect when he wrongly plugged the “yellow” video out connector to the audio input of his guitar amplifier. At an outdoor location, a bunch of people wearing striped shirts then become an interactive musician-audience performance.

The Kankisenthizer

Kankisenthizer a.k.a Exhaust Fancillator  – This one consists of an array of industrial exhaust fans – although one could just as well use smaller instrument cooling fans. On one side is a bright light, and on the other a small solar cell. Light fluctuations picked up by the solar cell are then fed to the guitar amplifier. The array consists of fans with different numbers of blades. This, coupled with changing the fan speed, results in some amazing sound effects.

There’s a whole bunch more, and even though the “instructions” to replicate the instruments aren’t well documented, there’s enough for anyone who’s interested to start experimenting.

Thanks for a great tip, [danielbpm].

source https://hackaday.com/2021/01/23/when-appliance-hackers-hit-the-music-scene/

When Appliance Hackers Hit the Music Scene

The art-music-technology collective “Electronicos Fantasticos!” (commonly known as Nicos) is the brain child of artist/musician [Ei Wada] in Japan. They revive old, retired and out-dated electrical appliances as new “electro-magnetic musical instruments” creating not just new ways to play music, but one that also involves the listener as a musician, gradually forming an interactive orchestra. They do this by creatively using the original functions of appliances like televisions and fans, hacking them in interesting ways to produce sound. The project started in the beginning of 2015, leading to the creation of a collaborative team — Nicos Orchest-Lab — around the end of that year. They have since appeared in concerts, including a performance at “Ars Electronica”, the world’s largest media arts festival in 2019.

For us hackers, the interesting bits can be found in the repository of their Work, describing sketchy but tantalising details of the musical instruments. Here are a few of the more interesting ones, but do check out their website for more amazing instruments and a lot of entertaining videos.

CRT-TV Gamelan – A percussion instrument made from old CRT monitors. Coloured stripes projected on the screen cause changes in static-electricity picked up by the players hands, which then propagates to an electrical coil attached to their foot. This signal is then patched to a guitar amplifier.

Electric Fan Harp – They take out the fan blade, and replace it with a “coded disk” containing punched holes. Then they shine a bulb from under the rotating disk, and the interrupted light is picked up by an optical receiver held by the player. Controlling the fan speed and the location of the receiver pickup, they can coax the fan to produce music – based on the idea “What if Jimi Hendrix, the god of electric guitars, played electric fans as instruments?”

Barcoder – This one is quite simple but produces amazing results, especially when you pair up with another Barcoder musician. The output of the barcode reader is pretty much directly converted to sound – just wave the wand over printed barcode sheets. And it works amazingly well when pointed at striped shirts too. Check out the very entertaining videos of this gizmo. This led to the creation of the Barcodress – a coded dress which creates an interactive music and dance performance.


The Striped Shirtsizer

Striped Shirtsizer – This one is a great hack and a synth with a twist. A camera picks up video signals, which is then fed to the “Audio” input of an amplifier directly. In the video on the project page, [Ei Wada] explains how he accidentally discovered this effect when he wrongly plugged the “yellow” video out connector to the audio input of his guitar amplifier. At an outdoor location, a bunch of people wearing striped shirts then become an interactive musician-audience performance.

The Kankisenthizer

Kankisenthizer a.k.a Exhaust Fancillator  – This one consists of an array of industrial exhaust fans – although one could just as well use smaller instrument cooling fans. On one side is a bright light, and on the other a small solar cell. Light fluctuations picked up by the solar cell are then fed to the guitar amplifier. The array consists of fans with different numbers of blades. This, coupled with changing the fan speed, results in some amazing sound effects.

There’s a whole bunch more, and even though the “instructions” to replicate the instruments aren’t well documented, there’s enough for anyone who’s interested to start experimenting.

Thanks for a great tip, [danielbpm].

source https://hackaday.com/2021/01/23/when-appliance-hackers-hit-the-music-scene/

Naming Names

We have all heard that good variable names are important for creating readable programs — advice that will serve you well when you come back to your code two years later, or even twenty. Sometimes, when you are so deep in the zone and begin to question a variable name that you made three levels up the calling hierarchy, it can be helpful to take a step back and review your variable naming conventions. The wikipedia article on computer program naming conventions is a good starting point, where you can dig into the nitty gritty of Hungarian notation like bFlag, case separated names like camelCase, and so on. But sometimes you have to go meta, and need names to describe the names themselves.

For example, in everyday usage the terms parameter and argument are often used interchangeably. But strictly speaking, a parameter is a placeholder, the variables in a function declaration for example (see image above). An argument is the actual value itself, say the number 50.334 in the example.

We recommend that units of measure should always be clearly specified in your comments, perhaps even in the variable names if you’re mixing different systems in the same program. At Hackaday we prefer to use SI units, check out NIST SP 330 if you’re interested. But invariably, there are going to be exceptions for years to come. We like to deal with those at the edges during I/O if possible, thus keeping a consistent set of units in the core of the program.

What about the terms number and value? We like to think of a number as being a kind of value. For example, a function’s return value could be a number, say a velocity. Or it could return an enumeration or a boolean. Sometimes the perfect meta-name for something will collide with a reserved keyword in your programming language, names like string or data for example. In these cases you have to be creative and find suitable synonyms, perhaps text and payload.

Using consistent and precise language can be tedious, but it can be just as helpful as good commenting and variable naming practices. Do you have any examples where precise terminology such as this has been been helpful or perhaps tripped you up? If so, share in the comments section below.


source https://hackaday.com/2021/01/23/naming-names/

OpenSCAD Prints Woodworking Aid

Home-based 3D printing is getting pretty unremarkable. Sure, printers aren’t as ubiquitous as, say, PCs. But you wouldn’t be any more surprised if your neighbor had a 3D printer than if you found out they had a drill press. In fact, sometimes the real value of 3D printing something isn’t to make a working part, but to make up something that helps you create other things using methods other than printing. That’s exactly what [iqless] does when he uses his printer to make some jigs to help him easily build shelves. (Video, embedded below.)

The issue is making dowel joints for the shelve’s feet. Sure, you could just drill a piece of scrap wood as a template, but with a 3D printer you can do better. Using OpenSCAD, it is possible to create a parameterized jig that fits exactly the job at hand.

There are several advantages to this approach. First, you can iterate on the design without having to rebuild a new jig. Of course, if a jig gets worn or broken, you can simply print another one. Finally, because the script is parameterized, it is easy to create a new jig for similar circumstances that have different dimensions.

If you have done a lot of OpenSCAD, you probably won’t see much new here, but if you haven’t created parameterized scripts, the video can show you how easy that can be.

We’ve looked at woodworking gadgets from 3D printers before. Or you can — sort of — print in plywood, if you like.

source https://hackaday.com/2021/01/23/openscad-prints-woodworking-aid/

Obstacle Climbing Rover Built With The Power Of Lego

When we want to prototype a rover, we’ve developed a tendency to immediately reach for the 3D printer and Arduino or Raspberry Pi. It’s easy to forget the prototyping tool many of us grew up using: LEGO. The [Brick Experiment Channel] has not forgotten, and in the video after the break demonstrates how he used Lego Technic components to prototype an impressive little obstacle climbing robot.

The little Lego rover starts as a simple four-wheeled rover trying to climb on top of a book. Swap in a four-wheel-drive gearbox and grippy tires, and it clears the first obstacle. Add a few books to the stack causes the break-over angle to become an issue, so the rover gets an inverted-V chassis. As the obstacle height increases, batteries are moved around for better weight distribution, but the real improvement comes when an actuating middle joint is added, turning it into a wheeled inchworm. Clearing overhangs suspended beams, and gaps are all just a matter of finding the right technique.

Thanks to Lego’s modularity, all this is possible in an hour or two where a 3D printer and CAD might have stretched it into days. This robot does have the limitation of not being able to turn. Conventional car steering or Mecanum wheels are two options, but how would you do it?

The [Brick Experiment Channel] knows a thing or two about building Lego robots, even for stealing keys.

source https://hackaday.com/2021/01/23/obstacle-climbing-rover-built-with-the-power-of-lego/

A Deep Dive into the Chemistry of Retrobright

Considerable effort is often required to rejuvenate the yellowed and grungy plastic cases of retrocomputing gear. One generally does well to know their enemy in order to fight it, though, which is where this guide to the chemistry of plastic yellowing and whitening (PDF) comes in handy.

“The Retrobright Mystery” was written and sent in to us by a high school student who goes by the name [Saltypretzel]. The paper begins with an excellent description of the chemistry of plastic yellowing. We had always heard that the yellowing in ABS, or acrylonitrile-butadiene-styrene, the plastic most commonly used for cases back in the day, was primarily caused by brominated compounds added to the plastic as flame retardants. It turns out that’s only a minor contributor, with the bulk of yellowing occurring thanks to a complex chain of reactions starting with free radicals liberated from the butadiene copolymer through a reaction requiring oxygen and energy.

Reactive radicals from the decomposing synthetic rubber, added to ABS to increase its flexibility, unroll the benzene ring in styrene copolymers to form a conjugated compound called 2-hydroxymuconic acid. The alternating double and single bonds in this compound tend to absorb light towards the blue end of the spectrum strongly, so the accumulation of 2-HMA in the plastic over time thus makes it reflect more and more yellow and red wavelengths, giving aged ABS its unhealthy bronze glow.

Luckily, just as ketchup smears and grass stains, both rich in conjugated compounds like lycopene and chlorophyll, can be bleached out of existence, so too can yellowed plastics. [Saltypretzel] notes that Retrobright, which contains a powerful dose of hydrogen peroxide, does its whitening trick by breaking the UV-absorbing double bonds in 2-HMA. There’s little that can be done about the embrittlement of the ABS caused by the breakdown of butadiene copolymers, but at least it’ll look good.

We found this guide quite comprehensive and instructive, and it should only help retrocomputing fans in their restoration efforts. For those less interested in the chemistry, [Bob Baddeley] published an overview of the yellowing of plastic and manufacturing steps to avoid it, and we covered the more practical considerations of Retrobright treatment too.

source https://hackaday.com/2021/01/23/a-deep-dive-into-the-chemistry-of-retrobright/

New Parts, New Hacks

The biggest news this week is that Raspberry Pi is no longer synonymous with single-board Linux computers: they’re dipping their toes into the microcontroller business with their first chip: the RP2040, and the supporting breakout board, the Pico. It’s an affordable, capable microcontroller being made by a firm that’s never made microcontrollers before, so that’s newsy.

The Hackaday comments lit on fire about this chip, with some fraction of the commenters lamenting the lack of wireless radios onboard. It’s a glass-half-full thing, I guess, but the RP2040 isn’t an ESP32, folks. It’s something else. And it’s got a hardware trick up its sleeve that really tickles my fancy — the programmable input/output (PIO) units.

The other half of the commenters were, like me, salivating about getting to try out some of the new features. The PIO, of course, was high on that list, but this chip also caters to folks who are doing high-speed DSP, with fast multiplication routines burnt into ROM and a nice accumulator. (You know you’re a microcontroller nerd when you’re reading through a 663-page datasheet and thinking about all the funny ways you can use and/or abuse the hardware peripherals.)

All chip designs are compromises. Nothing can do everything. The new peripherals, novel combinations of old elements, and just pleasant design decisions, open up new opportunities if you’re willing to seek them out. When the ESP32 was new, I was looking at their oddball parallel-I2S hardware and thinking what kind of crazy hacks that would enable, and clever hackers have proven me right. I’d put my money on the PIO being similar.

New chips open up new possibilities for hacks. What are you going to do with them?

source https://hackaday.com/2021/01/23/new-parts-new-hacks/

New Parts, New Hacks

The biggest news this week is that Raspberry Pi is no longer synonymous with single-board Linux computers: they’re dipping their toes into the microcontroller business with their first chip: the RP2040, and the supporting breakout board, the Pico. It’s an affordable, capable microcontroller being made by a firm that’s never made microcontrollers before, so that’s newsy.

The Hackaday comments lit on fire about this chip, with some fraction of the commenters lamenting the lack of wireless radios onboard. It’s a glass-half-full thing, I guess, but the RP2040 isn’t an ESP32, folks. It’s something else. And it’s got a hardware trick up its sleeve that really tickles my fancy — the programmable input/output (PIO) units.

The other half of the commenters were, like me, salivating about getting to try out some of the new features. The PIO, of course, was high on that list, but this chip also caters to folks who are doing high-speed DSP, with fast multiplication routines burnt into ROM and a nice accumulator. (You know you’re a microcontroller nerd when you’re reading through a 663-page datasheet and thinking about all the funny ways you can use and/or abuse the hardware peripherals.)

All chip designs are compromises. Nothing can do everything. The new peripherals, novel combinations of old elements, and just pleasant design decisions, open up new opportunities if you’re willing to seek them out. When the ESP32 was new, I was looking at their oddball parallel-I2S hardware and thinking what kind of crazy hacks that would enable, and clever hackers have proven me right. I’d put my money on the PIO being similar.

New chips open up new possibilities for hacks. What are you going to do with them?

source https://hackaday.com/2021/01/23/new-parts-new-hacks/

New Parts, New Hacks

The biggest news this week is that Raspberry Pi is no longer synonymous with single-board Linux computers: they’re dipping their toes into the microcontroller business with their first chip: the RP2040, and the supporting breakout board, the Pico. It’s an affordable, capable microcontroller being made by a firm that’s never made microcontrollers before, so that’s newsy.

The Hackaday comments lit on fire about this chip, with some fraction of the commenters lamenting the lack of wireless radios onboard. It’s a glass-half-full thing, I guess, but the RP2040 isn’t an ESP32, folks. It’s something else. And it’s got a hardware trick up its sleeve that really tickles my fancy — the programmable input/output (PIO) units.

The other half of the commenters were, like me, salivating about getting to try out some of the new features. The PIO, of course, was high on that list, but this chip also caters to folks who are doing high-speed DSP, with fast multiplication routines burnt into ROM and a nice accumulator. (You know you’re a microcontroller nerd when you’re reading through a 663-page datasheet and thinking about all the funny ways you can use and/or abuse the hardware peripherals.)

All chip designs are compromises. Nothing can do everything. The new peripherals, novel combinations of old elements, and just pleasant design decisions, open up new opportunities if you’re willing to seek them out. When the ESP32 was new, I was looking at their oddball parallel-I2S hardware and thinking what kind of crazy hacks that would enable, and clever hackers have proven me right. I’d put my money on the PIO being similar.

New chips open up new possibilities for hacks. What are you going to do with them?

source https://hackaday.com/2021/01/23/new-parts-new-hacks/

Low Cost Metal 3D Printing by Electrochemistry

[Billy Wu] has been writing for a few years about electrochemical 3D printing systems that can handle metal. He’s recently produced a video that you can see below about the process. Usually, printing in metal means having a high-powered laser and great expense. [Wu’s] technique is an extension of electroplating.

Boiling down the gist of the process, the print head is a syringe full of electroplating solution. Instead of plating a large object, you essentially electroplate on tiny areas. The process is relatively slow and if you speed it up too much, the result will have undesirable properties. But there are some mind-bending options here. By using print heads with different electrolytes, you can print using different metals. For example, the video shows structures made of both copper and nickel. You can also reverse the current and remove metal instead of depositing it.

This looks like something you could pretty readily replicate in a garage. Electroplating is well-understood and the 3D motion parts could be a hacked 3D printer. Sure, the result is slow but, after all, slow is a relative term. You might not mind taking a few days to print a metal object compared to the cost and trouble of creating it in other ways. Of course, since this is copper, we also have visions of printing circuit board traces on a substrate. We imagine you’d have to coat the board with something to make it conductive and then remove that after all the copper was in place. When you build this, be sure to tell us about it.

We’ve seen electroplating pens before and that’s really similar to this idea. Of course, you can also make your 3D prints conductive and plate them which is probably faster but isn’t really fully metal.

source https://hackaday.com/2021/01/23/low-cost-metal-3d-printing-by-electrochemistry/

Two-Key Keyboard Build Log Starts Small, But Thinks Big

Interested in making a custom keyboard, but unsure where to start? Good news, because [Jared]’s build log for an adorable “2% Milk” two-key mini-keyboard covers everything you need to know about making a custom keyboard, including how to add optional RGB lighting. The only difference is that it gets done in a smaller and cheaper package than jumping directly in with a full-size DIY keyboard.

[Jared] is definitely no stranger to custom keyboard work, but when he saw parts for a two-key “2% Milk” keyboard for sale online, he simply couldn’t resist. Luckily for us, he took plenty of photos and his build log makes an excellent tutorial for anyone who wants to get into custom keyboards by starting small.

The hardware elements are clear by looking at photos, but what about the software? For that, [Jared] uses a Teensy board running QMK, an open source project for driving and configuring custom input devices. QMK drives tiny devices like the 2% Milk just as easily as it does larger ones, so following [Jared]’s build log therefore conveys exactly the same familiarity that would be needed to work on a bigger keyboard, which is part of what makes it such a great project to document.

Interestedin going a little deeper down the custom keyboard rabbit hole? You can go entirely DIY, but there’s also no need to roll everything from scratch. It’s possible to buy most of the parts and treat the project like a kit, and Hackaday’s own [Kristina Panos] is here to tell you all about what that was like.

source https://hackaday.com/2021/01/23/two-key-keyboard-build-log-starts-small-but-thinks-big/

Two-Key Keyboard Build Log Starts Small, But Thinks Big

Interested in making a custom keyboard, but unsure where to start? Good news, because [Jared]’s build log for an adorable “2% Milk” two-key mini-keyboard covers everything you need to know about making a custom keyboard, including how to add optional RGB lighting. The only difference is that it gets done in a smaller and cheaper package than jumping directly in with a full-size DIY keyboard.

[Jared] is definitely no stranger to custom keyboard work, but when he saw parts for a two-key “2% Milk” keyboard for sale online, he simply couldn’t resist. Luckily for us, he took plenty of photos and his build log makes an excellent tutorial for anyone who wants to get into custom keyboards by starting small.

The hardware elements are clear by looking at photos, but what about the software? For that, [Jared] uses a Teensy board running QMK, an open source project for driving and configuring custom input devices. QMK drives tiny devices like the 2% Milk just as easily as it does larger ones, so following [Jared]’s build log therefore conveys exactly the same familiarity that would be needed to work on a bigger keyboard, which is part of what makes it such a great project to document.

Interestedin going a little deeper down the custom keyboard rabbit hole? You can go entirely DIY, but there’s also no need to roll everything from scratch. It’s possible to buy most of the parts and treat the project like a kit, and Hackaday’s own [Kristina Panos] is here to tell you all about what that was like.

source https://hackaday.com/2021/01/23/two-key-keyboard-build-log-starts-small-but-thinks-big/