It’s the dead of winter here in the northern hemisphere, and between the pandemic and the polar vortex, we’re getting pretty tired of staring at the same four walls and eating incessantly. It’s the perfect recipe for trying something new and low-calorie, like baking a loaf of bread-shaped note paper from the stuff in the recycling bin.
[SusanLand] likes to make paper out of whatever discarded things she has on hand, including old jeans. When she tried making paper out of nothing but toilet paper tubes, it didn’t work so well, but it gave her an idea for cooking up some offbeat stationery. She beefed up the pulp with shredded office paper and corn starch, and dialed in the whole wheat hue with a pinch of yellow and orange paper. Once the pulp was ready, she poured it into bread-shaped molds made from a plastic milk jug.
This tidy introduction to making your own paper covers everything from pulping techniques to drying methods. Once the slices are dry, [SusanLand] embellishes them with a scoring tool, colored pencils, and a handful of seeds to complete the look. Check out that process in the videos after the break.
A few years back, the Andy Warhol Museum ran into an unusual problem. They wanted to display digital pieces the pop artist created on his Amiga 1000 back in the 1980s, but putting the vintage computers on the floor and letting the public poke around on them wasn’t really an option. So the team at [Iontank] were tasked with creating an interactive display that looked like a real Amiga, but used all modern technology under the hood.
The technical details on the electronics side are unfortunately a bit light, as the page on the [Iontank] site simply says all of the internals were replaced with “solid-state hardware” and an Amiga emulator. To us that sounds like a Raspberry Pi is now filling in for the Amiga’s original motherboard, but that’s just a guess. The page does note that they went through the trouble of making sure the original mouse and keyboard still worked, so it stands to reason a couple microcontrollers are also along for the ride doing translation duty.
Milling the curved display lens.
While we don’t know much about the computers, [Iontank] do provide some interesting insight into developing the faux CRTs sitting atop the non-Amigas. There were some promising rear-projection experiments conducted early on, but in the end, they decided to use a standard LCD behind a milled acrylic lens. This not only made for a perfect fit inside the original monitor enclosures, but gave the screen that convex depth that’s missing on modern flat panels.
The end result looks like the best of both worlds, combining the sharp bright image of an LCD with just a hint of retro distortion. With a scanline generator in the mix, this technique would be a great way to simulate the look of a CRT display in an arcade cabinet, though admittedly being able to mill down an acrylic lens of the appropriate size would be a tough job for most home gamers.
A few years back, the Andy Warhol Museum ran into an unusual problem. They wanted to display digital pieces the pop artist created on his Amiga 1000 back in the 1980s, but putting the vintage computers on the floor and letting the public poke around on them wasn’t really an option. So the team at [Iontank] were tasked with creating an interactive display that looked like a real Amiga, but used all modern technology under the hood.
The technical details on the electronics side are unfortunately a bit light, as the page on the [Iontank] site simply says all of the internals were replaced with “solid-state hardware” and an Amiga emulator. To us that sounds like a Raspberry Pi is now filling in for the Amiga’s original motherboard, but that’s just a guess. The page does note that they went through the trouble of making sure the original mouse and keyboard still worked, so it stands to reason a couple microcontrollers are also along for the ride doing translation duty.
Milling the curved display lens.
While we don’t know much about the computers, [Iontank] do provide some interesting insight into developing the faux CRTs sitting atop the non-Amigas. There were some promising rear-projection experiments conducted early on, but in the end, they decided to use a standard LCD behind a milled acrylic lens. This not only made for a perfect fit inside the original monitor enclosures, but gave the screen that convex depth that’s missing on modern flat panels.
The end result looks like the best of both worlds, combining the sharp bright image of an LCD with just a hint of retro distortion. With a scanline generator in the mix, this technique would be a great way to simulate the look of a CRT display in an arcade cabinet, though admittedly being able to mill down an acrylic lens of the appropriate size would be a tough job for most home gamers.
A few years back, the Andy Warhol Museum ran into an unusual problem. They wanted to display digital pieces the pop artist created on his Amiga 1000 back in the 1980s, but putting the vintage computers on the floor and letting the public poke around on them wasn’t really an option. So the team at [Iontank] were tasked with creating an interactive display that looked like a real Amiga, but used all modern technology under the hood.
The technical details on the electronics side are unfortunately a bit light, as the page on the [Iontank] site simply says all of the internals were replaced with “solid-state hardware” and an Amiga emulator. To us that sounds like a Raspberry Pi is now filling in for the Amiga’s original motherboard, but that’s just a guess. The page does note that they went through the trouble of making sure the original mouse and keyboard still worked, so it stands to reason a couple microcontrollers are also along for the ride doing translation duty.
Milling the curved display lens.
While we don’t know much about the computers, [Iontank] do provide some interesting insight into developing the faux CRTs sitting atop the non-Amigas. There were some promising rear-projection experiments conducted early on, but in the end, they decided to use a standard LCD behind a milled acrylic lens. This not only made for a perfect fit inside the original monitor enclosures, but gave the screen that convex depth that’s missing on modern flat panels.
The end result looks like the best of both worlds, combining the sharp bright image of an LCD with just a hint of retro distortion. With a scanline generator in the mix, this technique would be a great way to simulate the look of a CRT display in an arcade cabinet, though admittedly being able to mill down an acrylic lens of the appropriate size would be a tough job for most home gamers.
If you’re a maker that publishes projects online, you’ll be well across the production values arms race that’s been raging over the past decade. For those in the 3D printing space, this means that you’ll need to be producing slick timelapse videos of your prints. [BuildComics] is now doing just that, with a custom camera arm to help do the job.
The arm relies on a 3D-printed gear train that allows a stepper motor to turn it slowly throughout the print’s duration. It’s controlled by an Arduino that receives commands via Firmata. The arm is mounted on top of the printer, holding a webcam above the build plate for a good view. It’s setup via Octolapse to take images as each layer is finished, giving that haunting look of a model materialising on the print bed throughout the duration of the timelapse.
The flip happened to [DOTA_Teabag], who suddenly found Mario flying upward to a higher part of a level, completely unexpectedly. Testing by [pannenkoek12] seems to indicate that this may have been due to a single-bit change to Mario’s height value, from C5837800 to C4837800, leading to the plucky Italian plumber warping upwards through the level. The leading theory is that this bit flip was caused by a cosmic ray event, though the likelihood of such an event is exceedingly rare.
It’s possible that there remains another cause for the flip, though after much work from the community replicating the situation in emulation, none has been found. Other suggestions involve electrical noise or other malfunctions causing the flip, though one would rarely expect such an occurrence to change just one bit of RAM. For now, the jury remains out, but who knows – maybe in the future we’ll find out it was a hidden, undiscovered exploit all along. Of course, if Nintendo doesn’t get you going, try speedrunning Windows 95. Video after the break.
Released in early 2020, the Creality Ender V2 is a popular desktop 3D printer in the maker market. However, some users began having problems with machines ordered in the latter half of the year, with repeated layer shifts occuring during long prints. After much investigation, it appears a fix has been found.
After much experimentation by [Fountain_of_Wisdom], it was determined that layer shifts were occuring at the same time as loud thumps or knocks from the printer. This was often during long X or Y traversals, and when these noises occurred, the print head would shift slightly, perpendicular to the axis of travel. Further investigation led to suspicion of the drive signals to the stepper motors, and it was then determined that the driver chips were becoming excessively hot during long prints. The solution landed upon was to install a fan and improve venting to cool the driver electronics, which curtailed the layer shift problem entirely.
However, such problems aren’t the norm, and since then, owners of the affected units with version 4.2.2 motherboards have been advised to upgrade to version 4.2.7. The exact root cause of the problem is not clear, but we’ve seen earlier Ender models upgraded with newer stepper drivers before; perhaps a similar fix is what makes the later revision motherboard a winner in the V2. If you’ve got insight into the problem, sound off in the comments!
The proliferation of desktop 3D printing and powerful single-board computers like the Raspberry Pi has given rise to an absolute explosion of small bespoke computing devices. Whether or not you think these cobbled together devices are close enough to Gibson’s original vision to call them cyberdecks, it’s a remarkable shift from the norm that brings us closer to the “High Tech, Low Life” philosophy so prevalent in cyberpunk literature and films.
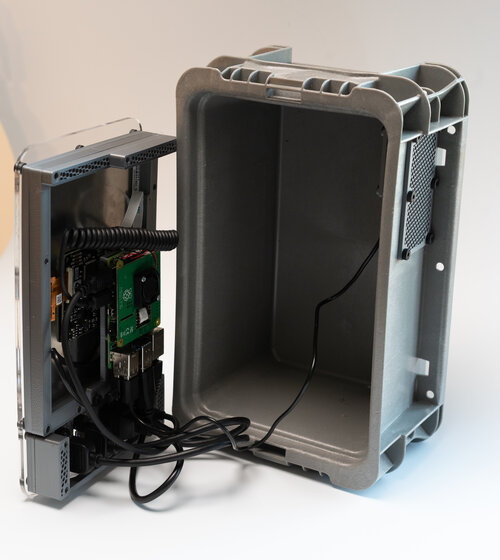
[Jay Doscher] has been on the front lines of this movement for some time now, producing several very popular designs. His latest creation leans hard into the more utilitarian aspects of the cyberpunk ethos, inspired more by the grit of The Expanse than the lusciously upholstered interiors of Star Trek’s Enterprise-D. The culmination of lessons learned over the last several years, the new Kuiper Deck is cheaper and easier to build than his previous designs, thanks at least in part to the fact that you no longer need to go out and get an expensive Pelican case.
Like his previous designs, the Kuiper Deck makes extensive use of 3D printed components. But this time around, [Jay] is using an array of smaller pieces that are bolted together on an acrylic front panel. This not only means the project is compatible with a wider array of machines, such as the Prusa Mini, but it’s also easier to print as larger parts have an annoying tendency to warp. The downside is that you’ll need some way to get the acrylic panel cut to shape, though you can buy one through him if you don’t have any way to get it made locally.
In place of the Pelican case his previous designs used as an enclosure, [Jay] has found a heavy-duty stackable plastic tote available from McMaster Carr for $12 USD. It’s not particularly nice looking, nor is it waterproof. But that’s also sort of the point. If you’re just trying to put together a small computer that you can toss around the shop and not have to worry about breaking, the Pelican case was always a bit overkill.
The electronics bill of materials is similarly sparse, comprising mainly of the Raspberry Pi 4, a cooling fan, and a 10 inch LCD from Pimoroni. Everything gets screwed to the rear of the panel and connected with pre-made cables, making assembly very simple. That said, there’s still plenty of room inside the case for custom hardware should you want to put something custom together such as a mobile software defined radio rig.
The proliferation of desktop 3D printing and powerful single-board computers like the Raspberry Pi has given rise to an absolute explosion of small bespoke computing devices. Whether or not you think these cobbled together devices are close enough to Gibson’s original vision to call them cyberdecks, it’s a remarkable shift from the norm that brings us closer to the “High Tech, Low Life” philosophy so prevalent in cyberpunk literature and films.
[Jay Doscher] has been on the front lines of this movement for some time now, producing several very popular designs. His latest creation leans hard into the more utilitarian aspects of the cyberpunk ethos, inspired more by the grit of The Expanse than the lusciously upholstered interiors of Star Trek’s Enterprise-D. The culmination of lessons learned over the last several years, the new Kuiper Deck is cheaper and easier to build than his previous designs, thanks at least in part to the fact that you no longer need to go out and get an expensive Pelican case.
Like his previous designs, the Kuiper Deck makes extensive use of 3D printed components. But this time around, [Jay] is using an array of smaller pieces that are bolted together on an acrylic front panel. This not only means the project is compatible with a wider array of machines, such as the Prusa Mini, but it’s also easier to print as larger parts have an annoying tendency to warp. The downside is that you’ll need some way to get the acrylic panel cut to shape, though you can buy one through him if you don’t have any way to get it made locally.
In place of the Pelican case his previous designs used as an enclosure, [Jay] has found a heavy-duty stackable plastic tote available from McMaster Carr for $12 USD. It’s not particularly nice looking, nor is it waterproof. But that’s also sort of the point. If you’re just trying to put together a small computer that you can toss around the shop and not have to worry about breaking, the Pelican case was always a bit overkill.
The electronics bill of materials is similarly sparse, comprising mainly of the Raspberry Pi 4, a cooling fan, and a 10 inch LCD from Pimoroni. Everything gets screwed to the rear of the panel and connected with pre-made cables, making assembly very simple. That said, there’s still plenty of room inside the case for custom hardware should you want to put something custom together such as a mobile software defined radio rig.
These days, home appliances are equally as likely to have soft buttons and rotary encoders as they are to have a simple old clunk/clunk power switch and an analog knob for controls. This is all well and good if the device aligns with your personal philosophy about how such controls should work; otherwise, it’s absolutely maddening. [j-zero] ran into this problem with their ORSALA lamp from IKEA, and set about rectifying the problem with some custom firmware.
The ORSALA lamp uses a rotary encoder for setting both brightness and color temperature, with a button to toggle modes. A long press is required to switch the lamp off. The custom firmware modifies this behaviour, such that the lamp can be switched on and off with a simple button press. Turning the encoder modifies brightness, and turning it to minimum switches the lamp off too. Meanwhile, the less commonly used color temperature setting can be modified by using the button while adjusting the encoder.
The hack was executed by reprogramming the ORSALA’s onboard microcontroller, the STM8S003F3P6, via its SWIM interface. The pads for the interface are easily located on the board, making the hack easy. Other than the inputs, the lamp packs separate TTP932 LED drivers for the warm white and cool white LEDs, making it easy to code a custom firmware to handle all the necessary functions.
It’s a great example of a hacker taking control of their own device and remaking it to suit their needs. Of course, if you want to go for another hacker trope, just stuff a Raspberry Pi in there instead!
These days, home appliances are equally as likely to have soft buttons and rotary encoders as they are to have a simple old clunk/clunk power switch and an analog knob for controls. This is all well and good if the device aligns with your personal philosophy about how such controls should work; otherwise, it’s absolutely maddening. [j-zero] ran into this problem with their ORSALA lamp from IKEA, and set about rectifying the problem with some custom firmware.
The ORSALA lamp uses a rotary encoder for setting both brightness and color temperature, with a button to toggle modes. A long press is required to switch the lamp off. The custom firmware modifies this behaviour, such that the lamp can be switched on and off with a simple button press. Turning the encoder modifies brightness, and turning it to minimum switches the lamp off too. Meanwhile, the less commonly used color temperature setting can be modified by using the button while adjusting the encoder.
The hack was executed by reprogramming the ORSALA’s onboard microcontroller, the STM8S003F3P6, via its SWIM interface. The pads for the interface are easily located on the board, making the hack easy. Other than the inputs, the lamp packs separate TTP932 LED drivers for the warm white and cool white LEDs, making it easy to code a custom firmware to handle all the necessary functions.
It’s a great example of a hacker taking control of their own device and remaking it to suit their needs. Of course, if you want to go for another hacker trope, just stuff a Raspberry Pi in there instead!
These days, home appliances are equally as likely to have soft buttons and rotary encoders as they are to have a simple old clunk/clunk power switch and an analog knob for controls. This is all well and good if the device aligns with your personal philosophy about how such controls should work; otherwise, it’s absolutely maddening. [j-zero] ran into this problem with their ORSALA lamp from IKEA, and set about rectifying the problem with some custom firmware.
The ORSALA lamp uses a rotary encoder for setting both brightness and color temperature, with a button to toggle modes. A long press is required to switch the lamp off. The custom firmware modifies this behaviour, such that the lamp can be switched on and off with a simple button press. Turning the encoder modifies brightness, and turning it to minimum switches the lamp off too. Meanwhile, the less commonly used color temperature setting can be modified by using the button while adjusting the encoder.
The hack was executed by reprogramming the ORSALA’s onboard microcontroller, the STM8S003F3P6, via its SWIM interface. The pads for the interface are easily located on the board, making the hack easy. Other than the inputs, the lamp packs separate TTP932 LED drivers for the warm white and cool white LEDs, making it easy to code a custom firmware to handle all the necessary functions.
It’s a great example of a hacker taking control of their own device and remaking it to suit their needs. Of course, if you want to go for another hacker trope, just stuff a Raspberry Pi in there instead!
The Raspberry Pi Pico burst onto the microcontroller scene last month with much fanfare, and is already popping up in projects left, right and center. Notable for its high clock speed and exciting IO features, it’s a breath of fresh air in a market slowly weaning itself onto ARM architectures and away from 8-bit staples. Not one to miss out on a slice of the action, Arduino have announced their own upcoming board based on the Pico’s RP2040 chip.
The board is named the Arduino Nano RP2040 Connect, a moniker that’s not just a mouthful but likely to be confused with existing Arduino Nano products. It sports several differences to the Raspberry Pi Pico, namely packing WiFi, Bluetooth, and an IMU on board which should make developing motion-sensitive and IoT projects easier, particularly in cases where the Pico’s flexible IO could be useful.
Naturally, Arduino IDE integration will be a major plus point that gets many makers on board, and we can imagine there will be swift development of libraries leveraging the RP2040’s PIO subsystem. If you still haven’t gotten the low down on the Raspberry Pi Pico yet, though, never fear – our own [Elliot Williams] can tell you everything you need to know!
[0xricksanchez] participated in a software reverse-engineering challenge and recently wrote up the solution, and in so doing also documented the process used to discover it. The challenge was called Devil’s Swapper, and consisted of a small binary blob that output a short message when executed. The goal of the challenge? Discover the secret key and the secret message within. [0xricksanchez]’s writeup, originally intended just as a personal record, ended up doing an excellent job of showing how a lot of reverse engineering tools and processes get applied to software in a practical way.
What’s also great about [0xricksanchez]’s writeup is that it uses standard tools and plenty of screenshots to show what is being done, while also explaining why those actions are being chosen and what is being learned. It’s easy to follow the thought process as things progress from gathering information, to chasing leads, and finally leveraging what’s been learned. It’s a fascinating look into the process of applying the reverse engineering mindset to software, and a good demonstration of the tools. Give it a read, and see how far you can follow along before learning something new. Want more? Make sure you have checked out the Hackaday 2020 Remoticon videos on reverse engineering firmware, and doing the same for PCBs.
This is it; after a relatively short transit time of eight months, the Mars 2020 mission carrying the Perseverance rover has almost reached the Red Planet. The passage has been pretty calm, but that’s all about to end on Thursday as the Entry Descent and Landing phase begins. The “Seven Minutes of Terror”, which includes a supersonic parachute deployment, machine-vision-assisted landing site navigation, and a “sky-crane” to touch the rover down gently in Jezero crater, will all transpire autonomously 480 million km away. We’ll only learn about how it goes after the eleven-minute propagation delay between Mars and Earth, but we’ll be glued to the NASA YouTube live stream nonetheless. Coverage starts on February 18, 2021 at 11:15 AM Pacific Standard Time (UTC-8). We’ve created a handy time zone converter and countdown so you don’t miss the show.
As amazing as the engineering on display Thursday will be, it looks like the US Navy has plans to unveil technology that will make NASA as relevant as a buggy-whip company was at the turn of the last century. That is, if you believe the “UFO Patents” are for real. The inventor listed on these patents, Dr. Salvatore Pais, apparently really exists; he’s had peer-reviewed papers published in mainstream journals as recently as 2019. Patents listed to Dr. Pais stretch back to 2004, when he invented a laser augmented turbojet propulsion system, which was assigned to defense contractor Northrup Grumman. The rest of the patents are more recent, all seemingly assigned to the US Navy, and cover things like a “high-frequency gravitational wave generator” and a “craft using an inertial mass-reduction device”. There’s also a patent that seems to cover a compact fusion generator. If any of this is remotely true, and we remain highly skeptical, the good news is that maybe we’ll get things like the Epstein Drive. Of course, that didn’t end well for Solomon Epstein. Or for Manéo Jung-Espinoza.
Of course, if you’re going to capitalize on all these alien patents, you’re going to need some funding. If you missed out on the GME short squeeze megabucks, fret not — there’s still plenty of speculative froth to go around. You might want to try your hand at cryptocurrency mining, but with GPUs becoming near-unobtainium, you’ll have to get creative, like throwing together a crypto mining farm with a bunch of laptops. It looks like the Weibo user who posted the photos has laptops propped up on every available surface of their apartment, and there’s also a short video showing a more industrial setup with rack after rack of laptops. These aren’t exactly throw-aways from some grade school, either — they appear to be brand new laptops that retail for like $1,300 a pop. The ironic part is that the miner says this is better than the sweatshop he used to work in. Pretty sure with all that power being dissipated in his house, it’ll still be a sweatshop come summer.
A lot of people have recently learned the hard lesson that when the service is free, you’re the product, and that what Google giveth, Google can taketh away in a heartbeat, and for no discernable reason. Indie game studio Re-Logic and its lead developer Andrew Spinks found that out last week when a vaguely worded terms-of-service violation notice arrived from Google. The developer of the popular game Terraria was at a loss to understand the TOS violation, which resulted in a loss of access to all the company’s Google services. He spent three weeks going down the hell hole of Google’s automated support system, getting nothing but canned messages that were either irrelevant to his case or technically impossible; kinda hard to check your Gmail account when Google has shut it down. The lesson here is that building a business around services that can be taken away on a whim is perhaps not the best business plan.
And finally, we watched with great interest Big Clive’s secrets to getting those crisp, clean macro shots that he uses to reverse-engineer PCBs. We’ve always wondered how he accomplished that, and figured it involved some fancy ring-lights around the camera lens or a specialized lightbox. Either way, we figured Clive had to plow a bunch of that sweet YouTube cash into the setup, but we were surprised to learn that in true hacker fashion, it’s really just a translucent food container ringed with an LED strip, with a hole cut in the top for his cellphone camera. It may be simple, but you can’t argue with the results.
This is it; after a relatively short transit time of eight months, the Mars 2020 mission carrying the Perseverance rover has almost reached the Red Planet. The passage has been pretty calm, but that’s all about to end on Thursday as the Entry Descent and Landing phase begins. The “Seven Minutes of Terror”, which includes a supersonic parachute deployment, machine-vision-assisted landing site navigation, and a “sky-crane” to touch the rover down gently in Jezero crater, will all transpire autonomously 480 million km away. We’ll only learn about how it goes after the eleven-minute propagation delay between Mars and Earth, but we’ll be glued to the NASA YouTube live stream nonetheless. Coverage starts on February 18, 2021 at 11:15 AM Pacific Standard Time (UTC-8). We’ve created a handy time zone converter and countdown so you don’t miss the show.
As amazing as the engineering on display Thursday will be, it looks like the US Navy has plans to unveil technology that will make NASA as relevant as a buggy-whip company was at the turn of the last century. That is, if you believe the “UFO Patents” are for real. The inventor listed on these patents, Dr. Salvatore Pais, apparently really exists; he’s had peer-reviewed papers published in mainstream journals as recently as 2019. Patents listed to Dr. Pais stretch back to 2004, when he invented a laser augmented turbojet propulsion system, which was assigned to defense contractor Northrup Grumman. The rest of the patents are more recent, all seemingly assigned to the US Navy, and cover things like a “high-frequency gravitational wave generator” and a “craft using an inertial mass-reduction device”. There’s also a patent that seems to cover a compact fusion generator. If any of this is remotely true, and we remain highly skeptical, the good news is that maybe we’ll get things like the Epstein Drive. Of course, that didn’t end well for Solomon Epstein. Or for Manéo Jung-Espinoza.
Of course, if you’re going to capitalize on all these alien patents, you’re going to need some funding. If you missed out on the GME short squeeze megabucks, fret not — there’s still plenty of speculative froth to go around. You might want to try your hand at cryptocurrency mining, but with GPUs becoming near-unobtainium, you’ll have to get creative, like throwing together a crypto mining farm with a bunch of laptops. It looks like the Weibo user who posted the photos has laptops propped up on every available surface of their apartment, and there’s also a short video showing a more industrial setup with rack after rack of laptops. These aren’t exactly throw-aways from some grade school, either — they appear to be brand new laptops that retail for like $1,300 a pop. The ironic part is that the miner says this is better than the sweatshop he used to work in. Pretty sure with all that power being dissipated in his house, it’ll still be a sweatshop come summer.
A lot of people have recently learned the hard lesson that when the service is free, you’re the product, and that what Google giveth, Google can taketh away in a heartbeat, and for no discernable reason. Indie game studio Re-Logic and its lead developer Andrew Spinks found that out last week when a vaguely worded terms-of-service violation notice arrived from Google. The developer of the popular game Terraria was at a loss to understand the TOS violation, which resulted in a loss of access to all the company’s Google services. He spent three weeks going down the hell hole of Google’s automated support system, getting nothing but canned messages that were either irrelevant to his case or technically impossible; kinda hard to check your Gmail account when Google has shut it down. The lesson here is that building a business around services that can be taken away on a whim is perhaps not the best business plan.
And finally, we watched with great interest Big Clive’s secrets to getting those crisp, clean macro shots that he uses to reverse-engineer PCBs. We’ve always wondered how he accomplished that, and figured it involved some fancy ring-lights around the camera lens or a specialized lightbox. Either way, we figured Clive had to plow a bunch of that sweet YouTube cash into the setup, but we were surprised to learn that in true hacker fashion, it’s really just a translucent food container ringed with an LED strip, with a hole cut in the top for his cellphone camera. It may be simple, but you can’t argue with the results.
Most of us probably get by with a toothbrush costing a couple dollars at most, made of injection-moulded plastic for delicate, tender mouths. Maybe if you’re a real cleantooth, you have a fancy buzzy electric one. We’d wager few are machining their own bespoke toothbrushes from scratch, but if you want some inspiration, [W&M Levsha] is doing just that.
Much of the work will be familiar to die hard machining enthusiasts. There’s careful crafting of the wood handle, involving a stackup of multiple stained and varnished woods – in this case, hornbeam being the paler of the two, and amaranth providing that rich red color. The stem is a stylish stainless steel piece, elegantly bent to a tasteful curve. Finally, the assembly of the brush head alone is worth the watch. It’s custom made – with a steel backing plate and fishing wire bristles custom cut with an automated jig using stepper motors. We’re suspect fishing wire is not rated for dental use, but the nylon strands are at least in the ballpark of what regular toothbrushes use.
While we probably wouldn’t slide this one betwixt our lips without consulting a dental professional first, it’s a great video for learning about what it takes to make beautiful bespoke objects in the workshop. We’ve seen elegant work from [W&M Levsha] before, too – in the form of a delightfully eclectic cap gun lighter. Video after the break.
Were you to mention Texas to a European, they’d maybe think of cowboys, oil, the hit TV show Dallas, and if they were European Hackaday readers, probably the semiconductor giant Texas Instruments. The only state of the USA with a secession clause also turns out to to have their own power grid independent of neighboring states.
An accurate and contemporary portrait of a typical Texan, as understood by Europeans. Carol M. Highsmith, Public domain.
Surely America is a place of such resourcefulness that this would be impossible, we cry as we watch from afar the red squares proliferating across the outage map. It turns out that for once the independent streak that we’re told defines Texas may be its undoing. We’re used to our European countries being tied into the rest of the continental grid, but because the Texan grid stands alone it’s unable to sip power from its neighbours in times of need.
Let’s dive into the mechanics of maintaining an electricity grid, with the unfortunate Texans for the moment standing in as the test subject.
Combination of Coal, Natural Gas, Nuclear, and Wind Power Generators Knocked Out by Cold
If a power grid was as simple as a collection of generating stations connected full-time to a constant load, its running would be a relatively straightforward affair of shoveling some sort of fuel in at one end and receiving the benefit of the electricity at the other. Sadly the reality of powering a human population is never so predictable, and the grid utility plays a constant game of anticipating variable demand in order to match it with generating capacity. Entire power stations exist with the specific application of providing near instantaneous extra power — you may remember our reporting on UK’s Electric Mountain. Grid strategists make it their business to predict our actions as they relate to power use down to the minute.
Since Texas has blistering hot summers they are used to their periods of peak load happening as Texans turn on their air conditioning en masse, with the relatively mild winters in a state bordering the Gulf of Mexico providing little stress to the system. But here we have a perfect storm of energy facilities closed by the weather being unable to cope with the extra demand has Texas turn to electric heat to keep them warm.
North America, in power grid terms. Fjbfour, Public domain.
In times of need, can you borrow a cup of energy from a neighbor? Continental North America has two large power grids, one on each side of the Rockies, and a few smaller grids of which the Texas Interconnect is one. The reason for its existence is historical, and in part its continuation is because as a single-state entity it is not subject to some Federal or international (with Canada) regulations. It has some relatively modest DC interconnects with its neighbours, but they are not of sufficient capacity to allow generators in warmer states to take up the slack. There is an ambitious plan for a much larger DC interconnect project to link both the Eastern and Western grids with the Texan one, which in turn gives us a chance for a look at how grids are synchronised.
Phase Sync Makes Connecting AC Grids Tricky
Huge thyristors used in the converter plants of the DC link between North and South Islands, New Zwaland. Marshelec, CC BY-SA 3.0.
Connecting two AC electricity grids is not simply a case of wiring them together, as their AC frequency and phase must both match exactly in order for a connection to work. The Texas grid has the same nominal frequency of 60Hz as its neighbours, but in practice there will be a slight difference in frequency and phase that can not be reconciled without the impractical step of powering down the entire state and restarting all its generators in synchronisation. The solution when transferring power between grids is therefore to convert it to DC for the intermediate stage, then back to AC at the correct grid frequency and phase. Many undersea cables such as those linking the UK, Scandinavia, and continental Europe take this approach, meaning that those grids are linked for the purpose of trading power but not synchronised. Thus when in 2018 a political stand-off in Kosovo caused a load imbalance that sent Europe’s grid frequency into a downward spiral, the British grid was unaffected. This is how the ambitious American grid interconnect mentioned earlier is slated to work, with DC links from all three grids meeting in New Mexico with a superconducting cable interconnect for an extra efficiency boost.
Electricity at the scale in which most Hackaday readers encounter it is a cinch to manage with a switching regulator here and there or maybe even a breaker or two in low-power mains circuits. At the scale of a grid, a country, or a continent though it enters an order of magnitude in which a single semiconductor switching device can be the size of a small house, and engineers must concern themselves with not only the matters of power handling but also human behaviours and geopolitics. If you’re a Texan Hackaday reader hunkering down for a cold spell then you have our sympathy and best wishes for a speedy thaw, and meanwhile for the rest of us it’s worth remembering that it could just as easily happen anywhere else.
Header image including USA map, Wapcaplet, CC BY-SA 3.0.
Were you to mention Texas to a European, they’d maybe think of cowboys, oil, the hit TV show Dallas, and if they were European Hackaday readers, probably the semiconductor giant Texas Instruments. The only state of the USA with a secession clause also turns out to to have their own power grid independent of neighboring states.
An accurate and contemporary portrait of a typical Texan, as understood by Europeans. Carol M. Highsmith, Public domain.
Surely America is a place of such resourcefulness that this would be impossible, we cry as we watch from afar the red squares proliferating across the outage map. It turns out that for once the independent streak that we’re told defines Texas may be its undoing. We’re used to our European countries being tied into the rest of the continental grid, but because the Texan grid stands alone it’s unable to sip power from its neighbours in times of need.
Let’s dive into the mechanics of maintaining an electricity grid, with the unfortunate Texans for the moment standing in as the test subject.
Combination of Coal, Natural Gas, Nuclear, and Wind Power Generators Knocked Out by Cold
If a power grid was as simple as a collection of generating stations connected full-time to a constant load, its running would be a relatively straightforward affair of shoveling some sort of fuel in at one end and receiving the benefit of the electricity at the other. Sadly the reality of powering a human population is never so predictable, and the grid utility plays a constant game of anticipating variable demand in order to match it with generating capacity. Entire power stations exist with the specific application of providing near instantaneous extra power — you may remember our reporting on UK’s Electric Mountain. Grid strategists make it their business to predict our actions as they relate to power use down to the minute.
Since Texas has blistering hot summers they are used to their periods of peak load happening as Texans turn on their air conditioning en masse, with the relatively mild winters in a state bordering the Gulf of Mexico providing little stress to the system. But here we have a perfect storm of energy facilities closed by the weather being unable to cope with the extra demand has Texas turn to electric heat to keep them warm.
North America, in power grid terms. Fjbfour, Public domain.
In times of need, can you borrow a cup of energy from a neighbor? Continental North America has two large power grids, one on each side of the Rockies, and a few smaller grids of which the Texas Interconnect is one. The reason for its existence is historical, and in part its continuation is because as a single-state entity it is not subject to some Federal or international (with Canada) regulations. It has some relatively modest DC interconnects with its neighbours, but they are not of sufficient capacity to allow generators in warmer states to take up the slack. There is an ambitious plan for a much larger DC interconnect project to link both the Eastern and Western grids with the Texan one, which in turn gives us a chance for a look at how grids are synchronised.
Phase Sync Makes Connecting AC Grids Tricky
Huge thyristors used in the converter plants of the DC link between North and South Islands, New Zwaland. Marshelec, CC BY-SA 3.0.
Connecting two AC electricity grids is not simply a case of wiring them together, as their AC frequency and phase must both match exactly in order for a connection to work. The Texas grid has the same nominal frequency of 60Hz as its neighbours, but in practice there will be a slight difference in frequency and phase that can not be reconciled without the impractical step of powering down the entire state and restarting all its generators in synchronisation. The solution when transferring power between grids is therefore to convert it to DC for the intermediate stage, then back to AC at the correct grid frequency and phase. Many undersea cables such as those linking the UK, Scandinavia, and continental Europe take this approach, meaning that those grids are linked for the purpose of trading power but not synchronised. Thus when in 2018 a political stand-off in Kosovo caused a load imbalance that sent Europe’s grid frequency into a downward spiral, the British grid was unaffected. This is how the ambitious American grid interconnect mentioned earlier is slated to work, with DC links from all three grids meeting in New Mexico with a superconducting cable interconnect for an extra efficiency boost.
Electricity at the scale in which most Hackaday readers encounter it is a cinch to manage with a switching regulator here and there or maybe even a breaker or two in low-power mains circuits. At the scale of a grid, a country, or a continent though it enters an order of magnitude in which a single semiconductor switching device can be the size of a small house, and engineers must concern themselves with not only the matters of power handling but also human behaviours and geopolitics. If you’re a Texan Hackaday reader hunkering down for a cold spell then you have our sympathy and best wishes for a speedy thaw, and meanwhile for the rest of us it’s worth remembering that it could just as easily happen anywhere else.
Header image including USA map, Wapcaplet, CC BY-SA 3.0.
Were you to mention Texas to a European, they’d maybe think of cowboys, oil, the hit TV show Dallas, and if they were European Hackaday readers, probably the semiconductor giant Texas Instruments. The only state of the USA with a secession clause also turns out to to have their own power grid independent of neighboring states.
An accurate and contemporary portrait of a typical Texan, as understood by Europeans. Carol M. Highsmith, Public domain.
Surely America is a place of such resourcefulness that this would be impossible, we cry as we watch from afar the red squares proliferating across the outage map. It turns out that for once the independent streak that we’re told defines Texas may be its undoing. We’re used to our European countries being tied into the rest of the continental grid, but because the Texan grid stands alone it’s unable to sip power from its neighbours in times of need.
Let’s dive into the mechanics of maintaining an electricity grid, with the unfortunate Texans for the moment standing in as the test subject.
Combination of Coal, Natural Gas, Nuclear, and Wind Power Generators Knocked Out by Cold
If a power grid was as simple as a collection of generating stations connected full-time to a constant load, its running would be a relatively straightforward affair of shoveling some sort of fuel in at one end and receiving the benefit of the electricity at the other. Sadly the reality of powering a human population is never so predictable, and the grid utility plays a constant game of anticipating variable demand in order to match it with generating capacity. Entire power stations exist with the specific application of providing near instantaneous extra power — you may remember our reporting on UK’s Electric Mountain. Grid strategists make it their business to predict our actions as they relate to power use down to the minute.
Since Texas has blistering hot summers they are used to their periods of peak load happening as Texans turn on their air conditioning en masse, with the relatively mild winters in a state bordering the Gulf of Mexico providing little stress to the system. But here we have a perfect storm of energy facilities closed by the weather being unable to cope with the extra demand has Texas turn to electric heat to keep them warm.
North America, in power grid terms. Fjbfour, Public domain.
In times of need, can you borrow a cup of energy from a neighbor? Continental North America has two large power grids, one on each side of the Rockies, and a few smaller grids of which the Texas Interconnect is one. The reason for its existence is historical, and in part its continuation is because as a single-state entity it is not subject to some Federal or international (with Canada) regulations. It has some relatively modest DC interconnects with its neighbours, but they are not of sufficient capacity to allow generators in warmer states to take up the slack. There is an ambitious plan for a much larger DC interconnect project to link both the Eastern and Western grids with the Texan one, which in turn gives us a chance for a look at how grids are synchronised.
Phase Sync Makes Connecting AC Grids Tricky
Huge thyristors used in the converter plants of the DC link between North and South Islands, New Zwaland. Marshelec, CC BY-SA 3.0.
Connecting two AC electricity grids is not simply a case of wiring them together, as their AC frequency and phase must both match exactly in order for a connection to work. The Texas grid has the same nominal frequency of 60Hz as its neighbours, but in practice there will be a slight difference in frequency and phase that can not be reconciled without the impractical step of powering down the entire state and restarting all its generators in synchronisation. The solution when transferring power between grids is therefore to convert it to DC for the intermediate stage, then back to AC at the correct grid frequency and phase. Many undersea cables such as those linking the UK, Scandinavia, and continental Europe take this approach, meaning that those grids are linked for the purpose of trading power but not synchronised. Thus when in 2018 a political stand-off in Kosovo caused a load imbalance that sent Europe’s grid frequency into a downward spiral, the British grid was unaffected. This is how the ambitious American grid interconnect mentioned earlier is slated to work, with DC links from all three grids meeting in New Mexico with a superconducting cable interconnect for an extra efficiency boost.
Electricity at the scale in which most Hackaday readers encounter it is a cinch to manage with a switching regulator here and there or maybe even a breaker or two in low-power mains circuits. At the scale of a grid, a country, or a continent though it enters an order of magnitude in which a single semiconductor switching device can be the size of a small house, and engineers must concern themselves with not only the matters of power handling but also human behaviours and geopolitics. If you’re a Texan Hackaday reader hunkering down for a cold spell then you have our sympathy and best wishes for a speedy thaw, and meanwhile for the rest of us it’s worth remembering that it could just as easily happen anywhere else.
Header image including USA map, Wapcaplet, CC BY-SA 3.0.
The Earth Day Challenge is now under way! Spin up your take on an Earth-Day-themed electronics project and you’ll be in the running for one of the three $200 shopping sprees at Digi-Key, who are sponsoring this contest.
Gutters to Gardens is a great project example; using a rain barrel and solar panel for off-grid automation.
This is all about raising awareness for environmental projection. You might considered something as direct as measuring and plotting air quality data, or as abstract as weighing your home’s recycling bin and garbage bin and making a game out of generating less waste in general, and boosting your recycling-to-landfill ratio. Find an application that can be moved from grid-power to solar power, or build a carbon-savings counter that calculates the impact you have when choosing your bike over a car. The coolest projects are the ones that make us all think in new ways.
In addition to those $200 prizes for the top three projects, there are $50 Tindie gift cards for the twelve most artistically presented projects. Digi-Key is looking for great images to include in a wall calendar for 2022.
Pop over to Hackaday.io to start your entry today. Don’t forget to use the “Submit project to:” drop-down box on the left sidebar of your project page to make sure it’s considered in the contest. You must have your entry in by April 19th!
When we sit down to a build video and see that it’s from [Workshop From Scratch], we know it’ll be a good one, full of plenty of gratuitous metal-wrangling with the promise of an ingenious and useful take on a workshop essential at the end. The home made hydraulic bench vice is the latest from that particular workshop, so settle down with the video below the break for a treat.
Unlike the lead screw we’d expect from a more conventional vice, this one uses a hydraulic pull cylinder and its associated compressor which is powered by compressed air. A substantial vice frame is constructed around the cylinder from thick steel plate, with some careful welding and grinding to ensure a smooth finish. The result is substantial clamping force with a very smooth and quick action, which doesn’t overhang the edge of the bench in the way a more traditional one does. The hydraulic tube is tucked away through a hole in the bench, and the foot-operated pump lies out of sight on the floor.
Looking at this vice with blacksmith-trained eyes, it raises the question of how it might perform were something in it to be hammered. Overhanging vices are vulnerable to splitting when hammered, so there’s the possibility that this one with its flat mounting might fare a little better. Either way it would be an asset to any workshop.
Surely BASIC is properly obsolete by now, right? Perhaps not. In addition to inspiring a large part of home computing today, BASIC is still very much alive today, even outside of retro computing.
There was a time, not even that long ago, when the lingua franca of the home computer world was BASIC. This wasn’t necessarily always the exact same BASIC; the commands and syntax differed between whatever BASIC dialect came with any given model of home computer (Commodore, Atari, Texas Instruments, Sinclair or any of the countless others). Fortunately most of these licensed or were derived from the most popular microcomputer implementation of BASIC: Microsoft BASIC.
BASIC has its roots in academics, where it was intended to be an easy to use programming language for every student, even those outside the traditional STEM fields. Taking its cues from popular 1960s languages like FORTRAN and ALGOL, it saw widespread use on time-sharing systems at schools, with even IBM joining the party in 1973 with VS-BASIC. When the 1970s saw the arrival of microcomputers, small and cheap enough to be bought by anyone and used at home, it seemed only natural that they too would run BASIC.
The advantage of having BASIC integrated into these systems was obvious: not only were most people who bought such a home computer already familiar with BASIC, it allows programs to be run without first being compiled. This was good, because compiling a program takes a lot of RAM and storage, neither of which were plentiful in microcomputers. Instead of compiling BASIC source code, BASIC interpreters would interpret and run the code one line at a time, trading execution speed for flexibility and low resource use.
After turning on one’s microcomputer, the BASIC interpreter would usually be loaded straight from an onboard ROM in lieu of a full-blown operating system. In this interpreter shell, one could use the hardware, write and load BASIC programs and save them to tape or disk. Running existing BASIC code as well as compiled programs on one’s computer, or even typing them in from a listing in a magazine all belonged to the options. As BASIC implementations between different home computers were relatively consistent, this provided for a lot of portability.
That was then, and this is now. Are people actually still using the Basic language?
BASIC Joystick Fun
To start off with, let’s see a bit of what BASIC is about. For an extremely simple but fun example of how BASIC can be used, let’s take a look at an application for the Commodore 64 (courtesy of C64-Wiki) that moves an arrow around the screen while printing its screen coordinates using a joystick connected to the second joystick port. The C64 runs Commodore BASIC 2.0, which is based on Microsoft BASIC.
 10 S=2: X=150: Y=150: V=53248: GOTO 100
 15 J=PEEK(56320): IF J=127 THEN 15
 20 IF J=111 THEN POKE 56322,255:END
 25 IF J=123 THEN X=X-S
 30 IF J=119 THEN X=X+S
 35 IF J=125 THEN Y=Y+S
 40 IF J=126 THEN Y=Y-S
 45 IF J=122 THEN Y=Y-S
 50 IF J=118 THEN Y=Y-S
 55 IF J=117 THEN Y=Y-S
 60 IF J=121 THEN Y=Y-S
 65 IF X=>252 THEN X=10
 70 IF X=<10 THEN X=252 75 IF Y>254 THEN Y=44
 80 IF Y<44 THEN Y=254
 85 PRINT CHR$(147);CHR$(158);CHR$(17);"X-POS:";X;" Y-POS";Y
 90 POKE V,X:POKE V+1,Y: GOTO 15
100 FOR Z=832 TO 853 : POKE Z,0: NEXT Z
105 FOR Z=832 TO 853 STEP 3: READ J: POKE Z,J: NEXT Z
110 POKE V+21,1: POKE  V+39,7: POKE V+33,0: POKE V+29,1
115 POKE 56322,224: POKE 2040,13: GOTO 85
120 DATA 240, 224, 224, 144, 8, 4, 2, 1
Each of the lines above are entered as-is, including the line number. On the next line after the code we enter RUN and hit ‘Return’ (or ‘Enter’, depending on one’s keyboard). Assuming we didn’t mistype anything, the code will now execute to show the following screen:
In this exciting game, we move the arrow around the screen using the joystick.
So what does this code do? As with any BASIC program, it starts at the first line which here is 10. It defines a few variables here, before jumping to line 100 (using GOTO). In a FOR loop, we POKE (i.e. write a hardware register) and repeat this in a few more addresses, which updates the display to its initial configuration. Here the READ command is used to read constants which are defined by DATA.
Many of these memory addresses directly address the video adapter (VIC-II in the C64). When we use PEEK at line 15, it reads the contents of the memory address 56322, which corresponds to the current input values on the second joystick port. After that we can check the state of each input using the bit values and adjust our on-screen arrow accordingly (line 90), along with the coordinates (line 85).
The C64 Wiki page for this program includes a bitwise comparison version. That should run marginally faster, as it has fewer lines of code. For moving an arrow around the screen, the difference would be unlikely to be noticed, however.
Important to note here is that BASIC implementations on different microcomputers would have to POKE and PEEK different memory addresses to get the same effect due to the different system layout of each computer. Some implementations would also provide commands tailored specifically to that microcomputer system, which became more relevant as graphics and audio capabilities grew.
Interpreted Versus Compiled
A familiar sight for some people: the QuickBasic IDE.
The interpreted nature of BASIC on most microcomputers was both a benefit and a disadvantage. On one hand, it’s very flexible, and you can simply run your latest program and quickly modify it without having to deal with lengthy compile cycles (on a <10 MHz Z80 or 6502 MPU, no less). On the other hand, because any errors in the code will not become apparent until the program is run by the interpreter, this leads to the same joyful experience as with modern-day JavaScript and Python scripts, where the code will run fine until the interpreter suddenly keels over with an error message (if one is lucky).
With BASIC this usually comes in the form of a ‘Syntax error on line <line>’ error. Running the same code through a compiler would however have found those errors. This feature of interpreted code means that the easy distribution method of code as listings in computer magazines and reference books would only be as good as the quality of the printed code and one’s own typing skills. Fortunately, on the C64 and similar systems, fixing a mistyped line would be as easy as retyping it, hitting ‘Return’ and the interpreter shell would update the line in question.
BASIC Today
The PureBasic Visual Designer.
All good and well, you may say at this point, but nobody is dragging out that C64 to do some BASIC programming today. Aside from folks who like to play with old computers, of course. Here it should be noted that BASIC didn’t live and die with Commodore and Atari. Over at Microsoft, BASIC spawned Visual Basic, Visual Basic for Applications (VBA) and VB .NET. The latter allows writing VB code for the .NET runtime.
Microsoft also released Small Basic in 2008, which it says targets novice programmers, for example students who used a visual programming language like Scratch previously. This is not to be confused with SmallBASIC, which is an open source (GPL) BASIC dialect with accompanying interpreters for modern platforms.
BASIC dialects can also be found in many graphing and programmable calculators from Ti, HP, Casio and others, although many of these dialects are not directly compatible with the original BASIC standard (ISO/IEC 10279:1991). Since the 1980s, BASIC evolved to no longer require line numbers, instead using labels which it can jump to, along with adopting new programming paradigms. This was introduced with QuickBasic in 1985 and is a common sight today.
Also on the commercial side of the fence is PureBasic by Fantaisie Software, which provides an IDE and compiler for a number of target platforms. True BASIC is a modern BASIC toolchain and IDE which moves closer to FORTRAN in its syntax, and is developed by the original developers of BASIC (Darthmouth BASIC).
Clearly, BASIC is not dead then. It sees daily use in its commercial forms, the myriad of open source projects and in the vibrant retrocomputing community. Aside from still being a (arguably) good language to teach programming with, it’s also a nice option for embedded applications, especially where many use MicroPython or kin today, as the system requirements are much lower. We reported on an ARM MCU which came with a BASIC interpreter a number of years ago, for example.
There are also projects like UBASIC PLUS on GitHub, targeting STM32F0 MCUs and requiring as little as 8 kB of RAM and 64 kB of Flash. Another project for ARM and PIC32 (as well as DOS and Windows) is MMBasic, which lists its requirements as 94 kB of Flash and at least 16 kB of RAM.
With BASIC having evolved in an era when home computers had less memory and storage than a $5 microcontroller has today, it makes for an excellent, low-resource language for situations which call for the use of interpreted scripts rather than precompiled binaries, without having to shell out for MCUs with more Flash and RAM.
Are any of our readers regular users of BASIC in some form today? If so, be sure to leave a comment with your experiences and tips for those who might be interested in giving BASIC a shot, whether on desktop, retro systems or embedded 🙂
[Header Image: The HP 2000 system, mainly used for running time-shared BASIC, CC-BY 3.0]
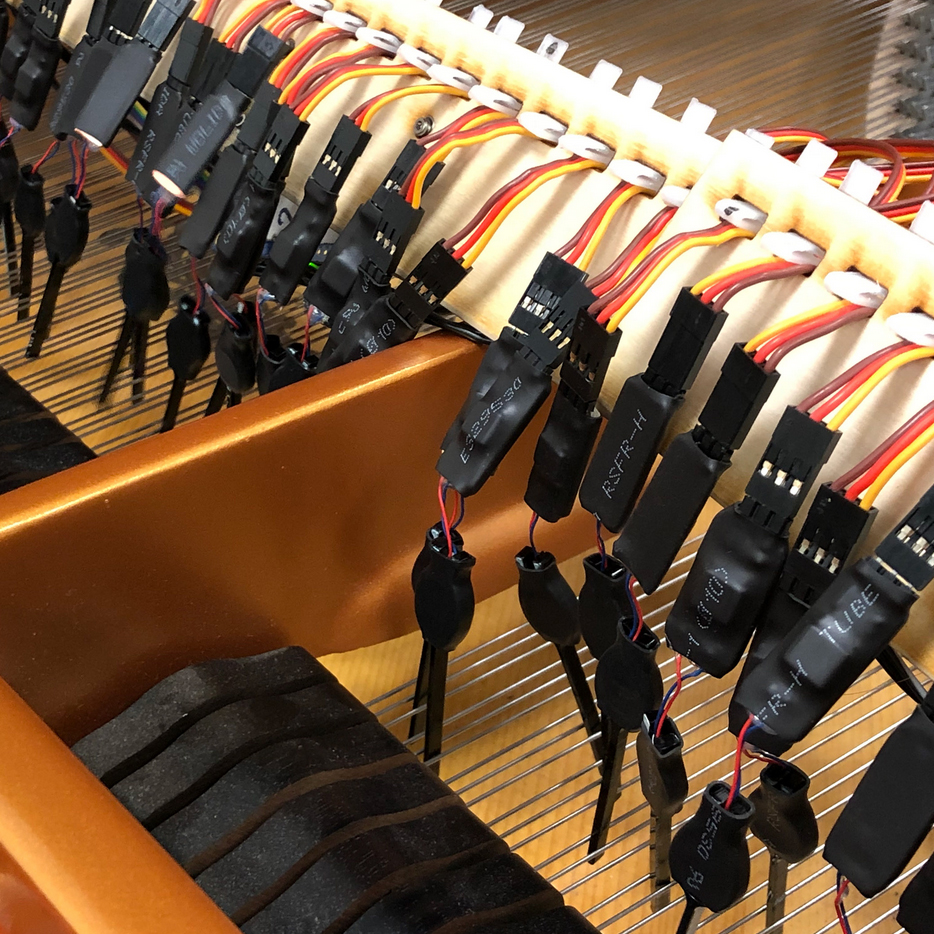
It’s not every day we see a grand piano with a Raspberry Pi inside, let alone one with 96 motors, but sometimes we get lucky. The contraption in question is one developed by [Konstantin Leonenko], as part of a collaboration with composer [Patricia Alessandrini] for a piece she created inspired by Ada Lovelace. Specifically, [Patricia] was inspired by Ada’s idea that an “analytical machine” would, someday, be able to create music on its own. [Konstantin] and [Patricia] worked together to make a machine that would learn from it’s human co-performers and create music with them.
Their creation, rather than just one tricked-out keyboard, is actually a portable attachment that can be easily fitted to any grand piano. Each of the device’s 96 motors drives a plastic “finger” that excites the piano’s strings. The result is a sound unlike any other — and you really need to experience it so click through that link at the top for the demo video.
Rather cleverly, the fingers are designed such that their dynamics help to mask the sound of the motor (a must for performances) while simultaneously enhancing the string’s timbre. Like any project, this one went through a number of iterations over the two-year design process, and even spun off into an entirely new, glove-based version.
We’ve seen some awesome music tech hacks, and this one fits right in with the rest. It’s always exciting to see an instrument as ubiquitous as the piano be used in new and refreshing ways. Be sure to check out the link at the top for a video of this incredible instrument in action!
It’s not every day we see a grand piano with a Raspberry Pi inside, let alone one with 96 motors, but sometimes we get lucky. The contraption in question is one developed by [Konstantin Leonenko], as part of a collaboration with composer [Patricia Alessandrini] for a piece she created inspired by Ada Lovelace. Specifically, [Patricia] was inspired by Ada’s idea that an “analytical machine” would, someday, be able to create music on its own. [Konstantin] and [Patricia] worked together to make a machine that would learn from it’s human co-performers and create music with them.
Their creation, rather than just one tricked-out keyboard, is actually a portable attachment that can be easily fitted to any grand piano. Each of the device’s 96 motors drives a plastic “finger” that excites the piano’s strings. The result is a sound unlike any other — and you really need to experience it so click through that link at the top for the demo video.
Rather cleverly, the fingers are designed such that their dynamics help to mask the sound of the motor (a must for performances) while simultaneously enhancing the string’s timbre. Like any project, this one went through a number of iterations over the two-year design process, and even spun off into an entirely new, glove-based version.
We’ve seen some awesome music tech hacks, and this one fits right in with the rest. It’s always exciting to see an instrument as ubiquitous as the piano be used in new and refreshing ways. Be sure to check out the link at the top for a video of this incredible instrument in action!