Manned Electric Helicopter With 7 Tail Rotors

One of the best things to come from the growing drone industry is the development of compact and powerful brushless motors. We’ve seen several multi-rotors capable of carrying a human, but electric helicopters are rare. [OskarRDA] decided to experiment with this, converting his single-seat ultralight helicopter to electric power and giving it seven tail rotors in the process. Flight footage after the break.

The helicopter in question started life as a Mosquito Air, a bare-bones kit helicopter originally powered by a two-stroke engine. The engine and gearbox were replaced with an EMRAX 228 109 kW brushless motor. Initially, he used the conventional drive-shaft powered tail rotor but wanted to experiment with multiple smaller rotors powered by separate motors, which has several advantages. He only really needed four of the 5008 or 5010 size motors with 18″ props to get comparable thrust, but he added more for redundancy. The new setup was also lighter, even with its independent batteries, at 7.5 kg compared to the 8.1 kg of the old tail rotor assembly.

One of the major advantages of a conventional helicopter over a multirotor is the ability to autorotate safely to the ground if the engine fails. A coupled tail rotor bleeds some energy from the main rotor while autorotating, but since the tail rotor has independent power in this case, it allows all the energy to be used by the main rotor, theoretically decreasing decent speed by 120 feet per second. [OskarRDA] did some engine failure and autorotation test flights, and the results were positive. He likes his new tail rotors enough that he doesn’t plan on going back to a single large rotor.

Power for the main motor is provided by a 7.8 kW, 40 kg LiPo battery pack mounted beneath the seat. Theoretically, this would allow flight times of up to 27 minutes, but [OskarRDA] has kept most of his flights to 10 minutes or less. He didn’t add any electronic gyro for stabilization, but he did add some electronic coupling between the main motor and tail motors, to reduce the torque correction required by the pilot. Even so, it is clear from the flight footage that [OskarRDA] is a skilled helicopter pilot.

While being able to lift a human is cool, this would also make an excellent unmanned platform for a heavy lift applications. Besides manned multi-rotors, we’ve also seen electric powered paragliders, and of course [Peter Sripol]’s scratch built electric planes.

Thanks [smerrett79] for the tip!

source https://hackaday.com/2021/02/16/manned-electric-helicopter-with-7-tail-rotors/

Listening In On Muscles With The BioAmp EMG Pill

Ever felt like what your MCU of choice misses is a way to read the electrical signals from your muscles? In that case [Deepak Khatri] over at Upside Down Labs has got your back with the BioAmp EMG Pill. Described as an affordable, open source electromyography (EMG) module, based around a TL074 quad low-noise JFET-input opamp. At just over 32×10 millimeters, it’s pretty compact as well.

The onboard opamp ensures that the weak electrical signals captured from the muscles when they move are amplified sufficiently that the ADC of any microcontroller or similar can capture the signal for further processing. Some knowledge of how to set up an EMG is required to use the module, of course, and the TL074 opamp prefers an input voltage between 7-30 V. Even so, it has all the basics onboard, and the KiCad project is freely available via the above linked GitHub project.

In addition, [Deepak] also tweeted about working on an affordable, open source active prosthetics controller (and human augmentation device), which has us very much interested in what other projects may come out of Upside Down Labs before long. After, all we’re no strangers to hacking with biosignals.

source https://hackaday.com/2021/02/15/listening-in-on-muscles-with-the-bioamp-emg-pill/

Listening In On Muscles With The BioAmp EMG Pill

Ever felt like what your MCU of choice misses is a way to read the electrical signals from your muscles? In that case [Deepak Khatri] over at Upside Down Labs has got your back with the BioAmp EMG Pill. Described as an affordable, open source electromyography (EMG) module, based around a TL074 quad low-noise JFET-input opamp. At just over 32×10 millimeters, it’s pretty compact as well.

The onboard opamp ensures that the weak electrical signals captured from the muscles when they move are amplified sufficiently that the ADC of any microcontroller or similar can capture the signal for further processing. Some knowledge of how to set up an EMG is required to use the module, of course, and the TL074 opamp prefers an input voltage between 7-30 V. Even so, it has all the basics onboard, and the KiCad project is freely available via the above linked GitHub project.

In addition, [Deepak] also tweeted about working on an affordable, open source active prosthetics controller (and human augmentation device), which has us very much interested in what other projects may come out of Upside Down Labs before long. After, all we’re no strangers to hacking with biosignals.

source https://hackaday.com/2021/02/15/listening-in-on-muscles-with-the-bioamp-emg-pill/

Listening In On Muscles With The BioAmp EMG Pill

Ever felt like what your MCU of choice misses is a way to read the electrical signals from your muscles? In that case [Deepak Khatri] over at Upside Down Labs has got your back with the BioAmp EMG Pill. Described as an affordable, open source electromyography (EMG) module, based around a TL074 quad low-noise JFET-input opamp. At just over 32×10 millimeters, it’s pretty compact as well.

The onboard opamp ensures that the weak electrical signals captured from the muscles when they move are amplified sufficiently that the ADC of any microcontroller or similar can capture the signal for further processing. Some knowledge of how to set up an EMG is required to use the module, of course, and the TL074 opamp prefers an input voltage between 7-30 V. Even so, it has all the basics onboard, and the KiCad project is freely available via the above linked GitHub project.

In addition, [Deepak] also tweeted about working on an affordable, open source active prosthetics controller (and human augmentation device), which has us very much interested in what other projects may come out of Upside Down Labs before long. After, all we’re no strangers to hacking with biosignals.

source https://hackaday.com/2021/02/15/listening-in-on-muscles-with-the-bioamp-emg-pill/

The Tube Map, In Glorious 8-Bit!

There was a time when visitors to London would carry an A to Z map to navigate the city’s Undergound railway system, referring to the iconic London Transport map printed on its back as they did so. Now it’s likely they’ll do the same with their smartphones, with apps ranging from simple analogues of the printed version through to fully annotated route planners with up to the minute train information. Is this a new technology, something only possible in the last decade? Serial British rail YouTuber [Geoff Marshall] thinks otherwise, and has programmed a Tube map on a vintage BBC Micro.

We don’t expect anyone to heft a pile of vintage hardware onto the Central Line at rush hour even though in reality he’s running it on an emulator due to his real BBC Micro being kaput. Perhaps someone should drop him a line about capacitor replacement in that power supply. But it does provide an entertaining jaunt back into afternoons in a 1980s school computer lab, with MOVE, DRAW, and PLOT commands as he wrestles with the limited colour palette of MODE 2.  The result only covers Tube Zone 1, or the very centre of London, so to visit London Hackspace you’ll have to remember to take the Bakerloo line northbound out to Zone 4 and disembark at Wembley Central.

Happily as you can see in the video below the break he enlists the help of a friend to run it on real hardware. He posted the code as a comment to the video but it’s really hard to find. Try this direct link and scroll down, it should be the first comment but you need to click “Read more” to unfold the code. We think the Tube Map would make a great test for any retrocomputer, so we look forward to this feat being repeated.

source https://hackaday.com/2021/02/15/the-tube-map-in-glorious-8-bit/

dRehmFlight: Customizable Flight Stabilisation For Your Weird Flying Contraptions

The availability of cheap and powerful RC motors and electronics has made it possible for almost anyone to build an RC flying machine. Software is usually the bigger challenge, which has led to the development of open-source packages like BetaFlight and Ardupilot. These packages are very powerful, but not easy to modify if you have unconventional requirements. [Nichola Rehm] faced this challenge while doing his master’s degree, so he created dRehmFlight, a customizable flight controller for VTOL aircraft. Overview video after the break.

dRehmFlight runs on Teensy 4.0 with a MPU6050 or MPU9250 IMU

[Nichola] has been building unique VTOL aircraft for close to a decade, and he specifically wanted flight stabilization software that is easy to modify and experiment with. Looking at the dRehmFlight code, we think he was successful. The main flight controller package is a single file of fewer than 1600 lines. It’s well commented and easy to figure out, even for an inexperienced programmer. A detailed PDF manual is also available, with full descriptions for all the functions and important variables, and a couple of tutorials to get you started. Libraries for interfacing with accelerometers and RC gear is also included. It runs on a 600 Mhz Teensy 4.0, and all the programming can be done from the Arduino IDE.

[Nichalo] has repeatedly demonstrated the capabilities of dRehmFlight with several unique aircraft, like the belly flopping RC Starship we covered a while ago, a VTOL quad rotor biplane, VTOL F35, and the cyclocopter seen in the header image. dRehmFlight might not have the racing drone performance of BetaFlight, or advanced autopilot features of Ardupilot, but it’s perfect for getting unconventional aircraft off the ground.

source https://hackaday.com/2021/02/15/drehmflight-customizable-flight-stabilisation-for-your-weird-flying-contraptions/

A Volume Control From A VCR Drum

The VHS VCR has now passed from widespread use, and can thus be found as a ready supply of interesting parts for the curious hardware hacker. [Clewsy] has a novel use for a VCR head scanning drum, the part that is supposed to be tasked with reading information off of magnetic tape. Instead, it’s reading information from fingers as the knob for a USB volume control. Underneath the drum is an optical encoder disk which is read by an ATmega32U4 for USB interfacing with a host computer.

The helical-scan video recorder was a mechanically complex solution to the problem of recording a high-bandwidth video signal onto a tape that could be made slow-moving enough to be practical. By recording the video in diagonal stripes across the tape from a fast-moving spinning head they avoided the need for huge reels of tape, enabling hours of video to be fitted into a roughly book-size cassette.

While over time the mechanics of a VCR mechanism were simplified and cheapened to a great extent, the heads and drum were the one area that could not be compromised. Thus the VCR head was for a time the most high-precision mechanical device owned by most consumers, and the drums usually have exceptionally nice bearings. All of this makes one a particularly good choice for a volume knob or indeed any other large rotational control, so much so that we’re surprised it hasn’t become a more frequent occurrence. So scour the electronic junk, and you might just find the ultimate in free high quality control hardware.

Of course, this isn’t the only thing a VCR head drum can do.  How about a centrifuge?

source https://hackaday.com/2021/02/15/a-volume-control-from-a-vcr-drum/

Print-in-Place Connectors Aim to Make Wiring Easier

One thing some of us here in the United States have always been jealous of is the WAGO connectors that seem so common in electrical wiring everywhere else in the world. We often wonder why the electrical trades here haven’t adopted them more widely — after all, they’re faster to use than traditional wire nuts, and time is money on the job site.

Wago 221 compact lever connector via the Wago YouTube channel

This print-in-place electrical connector is inspired by the WAGO connectors, specifically their Lever Nut series. We’ll be clear right up front that [Tomáš “Harvie” Mudruňka’s] connector is more of an homage to the commercially available units, and should not be used for critical applications. Plus, as a 3D-printed part, it would be hard to compete with something optimized to be manufactured in the millions. But the idea is pretty slick. The print-in-place part has a vaguely heart-shaped cage with a lever arm trapped inside it.

After printing and freeing the lever arm, a small piece of 1.3-mm (16 AWG) solid copper wire is inserted into a groove. The wire acts as a busbar against which the lever arm squeezes conductors. The lever cams into a groove on the opposite wall of the cage, making a strong physical and electrical connection. The video below shows the connectors being built and tested.

We love the combination of print-in-place, compliant mechanisms, and composite construction on display here. It reminds us a bit of these printable SMD tape tamers, or this print-in-place engine benchmark.

source https://hackaday.com/2021/02/15/print-in-place-connectors-aim-to-make-wiring-easier/

Ghidra Used to Patch Fahrenheit Into An Air Quality Meter

Even though most of the world population couldn’t tell you what room or body temperature is in Fahrenheit, there are some places on this globe where this unit is still in common use. For people in those areas, it’s therefore a real hassle when, say, a cheap Chinese air quality measurement systems only reports in degrees Celsius. Fortunately, [BSilverEagle] managed to patch such a unit to make it display temperature in Fahrenheit.

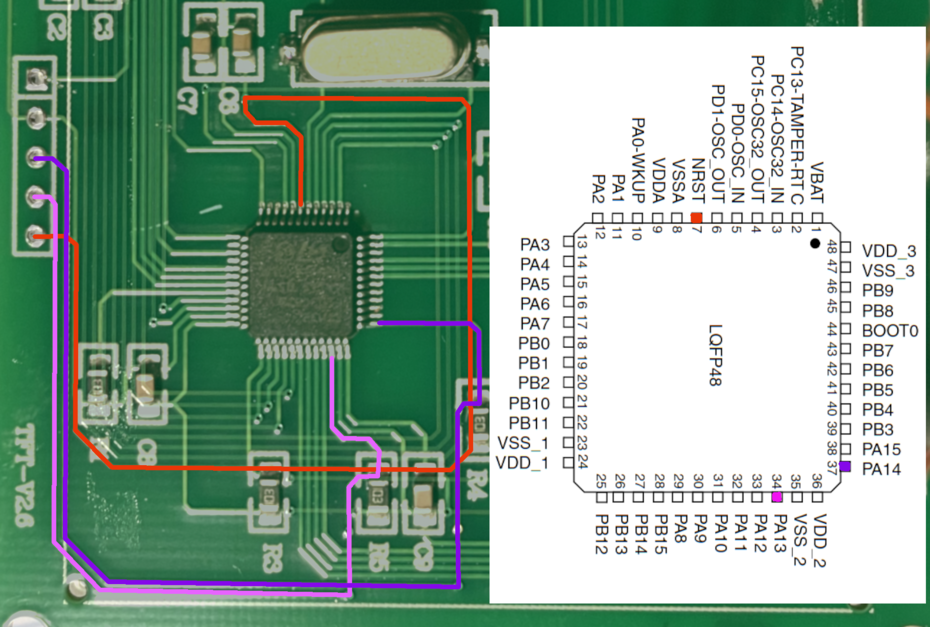
The reverse engineering begins by finding a way to dump the firmware. It’s nice to hear that [BSilverEagle] used some the skills demonstrated in [Eric Shlaepfer’s] PCB reverse engineering workshop from Hackaday Remoticon last November to trace out the debug header and the SWD pins of STM32F103C8 MCU. After that, OpenOCD could be used to dump the firmware image, with no read protection encountered. The firmware was then reverse-engineered using Ghidra, so that [BSilverEagle] could figure out where the temperature was being calculated and where the glyph for the Celsius symbol was stored. From there this it was a straight-forward rewrite of those two parts of the original firmware to calculate the temperature value in Fahrenheit, change the glyph and reflash the MCU.

So why buy this thing in the first place if it didn’t spit out units useful for your current locale? Cost. Buying this consumer(ish) device was about the same cost as buying the individual parts, designing and manufacturing the PCB, and writing the firmware for it. The only downside for their use case was the lack of Fahrenheit. Not a problem for those who demand full control of the hardware they own.

Need a boot camp for using Ghidra? Matthew Alt put together a spectacular video series on Reverse Engineering with Ghidra.

source https://hackaday.com/2021/02/15/ghidra-used-to-patch-fahrenheit-into-an-air-quality-meter/

Ghidra Used to Patch Fahrenheit Into An Air Quality Meter

Even though most of the world population couldn’t tell you what room or body temperature is in Fahrenheit, there are some places on this globe where this unit is still in common use. For people in those areas, it’s therefore a real hassle when, say, a cheap Chinese air quality measurement systems only reports in degrees Celsius. Fortunately, [BSilverEagle] managed to patch such a unit to make it display temperature in Fahrenheit.

The reverse engineering begins by finding a way to dump the firmware. It’s nice to hear that [BSilverEagle] used some the skills demonstrated in [Eric Shlaepfer’s] PCB reverse engineering workshop from Hackaday Remoticon last November to trace out the debug header and the SWD pins of STM32F103C8 MCU. After that, OpenOCD could be used to dump the firmware image, with no read protection encountered. The firmware was then reverse-engineered using Ghidra, so that [BSilverEagle] could figure out where the temperature was being calculated and where the glyph for the Celsius symbol was stored. From there this it was a straight-forward rewrite of those two parts of the original firmware to calculate the temperature value in Fahrenheit, change the glyph and reflash the MCU.

So why buy this thing in the first place if it didn’t spit out units useful for your current locale? Cost. Buying this consumer(ish) device was about the same cost as buying the individual parts, designing and manufacturing the PCB, and writing the firmware for it. The only downside for their use case was the lack of Fahrenheit. Not a problem for those who demand full control of the hardware they own.

Need a boot camp for using Ghidra? Matthew Alt put together a spectacular video series on Reverse Engineering with Ghidra.

source https://hackaday.com/2021/02/15/ghidra-used-to-patch-fahrenheit-into-an-air-quality-meter/

Machine Learning Helps You Track Your Internet Misery Index

We all seem to intuitively know that a lot of what we do online is not great for our mental health. Hang out on enough social media platforms and you can practically feel the changes your mind inflicts on your body as a result of what you see — the racing heart, the tight facial expression, the clenched fists raised in seething rage. Not on Hackaday, of course — nothing but sweetness and light here.

That’s all highly subjective, of course. If you’d like to quantify your online misery more objectively, take a look at the aptly named BrowZen, a machine learning application by [Nick Bild]. Built around an NVIDIA Jetson Xavier NX and a web camera, BrowZen captures images of the user’s face periodically. The expression on the user’s face is classified using a facial recognition model that has been trained to recognize facial postures related to emotions like anger, surprise, fear, and happiness. The app captures your mood and which website you’re currently looking at and stores the results in a database. Handy charts let you know which sites are best for your state of mind; it’s not much of a surprise that Twitter induces rage while Hackaday pushes [Nick]’s happiness button. See? Sweetness and light.

Seriously, we could see something like this being very useful for psychological testing, marketing research, or even medical assessments. This adds to [Nick]’s array of AI apps, which range from tracking which surfaces you touch in a room to preventing you from committing a fireable offense on a video conference.

source https://hackaday.com/2021/02/14/machine-learning-helps-you-track-your-internet-misery-index/

The First Hacker Camp To Show up on Google Maps

Our summer gatherings at hacker camps are fleeting and ephemeral, anticipated for months but over far too quickly. Afterwards we have only our memories, and perhaps the occasional Hackaday write-up. We think BornHack 2020 in Denmark was the only hacker camp that wasn’t forced to go online-only by the pandemic last year, and now as far as we know it has also become the only one ever that has left its mark for the wider world by being captured for posterity by Google Earth.

Visible in the forest is the sparsely populated and socially distanced main field of what was a considerably smaller camp than normal, as well as in separate clearings the speakers tent and the loud field. Perhaps it doesn’t help as much in explaining to outsiders what a hacker camp is as might a picture of one of the larger ones, but it does at least serve as a visible reminder that we weren’t quite snuffed out last year.

It’s a moment of nostalgia to see BornHack 2020 on Google Maps for those of us who were there, but perhaps the point of all this is to take a moment to consider the likely prospects for similar events in 2021 given the pandemic. Both the British EMF Camp and American Toorcamp had to cancel their events last year and should return in 2022, there’s no word as yet about 2021 from the Serbian BalCCon or the Italian IHC,  our latest update on Luxembourg’s HaxoGreen is that it’s still slated to go ahead with its move to 2021, and currently both BornHack and the Dutch MCH are expecting to run as normal this summer.

In the grip of a savage third wave of the pandemic where this is being written, it’s by no means a foregone conclusion that 2020’s cancellations may not repeat themselves. International borders remain difficult to cross without exacting quarantine requirements. If you make it to a camp this year you may be one of the lucky few, and in the increasingly likely event that we don’t, we’ll be suitably envious. Don’t loose hope, we shall all meet again… eventually.

If you fancy a closer look at BornHack 2020, have a read of our write-up.

source https://hackaday.com/2021/02/14/the-first-hacker-camp-to-show-up-on-google-maps/

FreeTouchDeck Upgrades Its Hardware and Its Name: ESP32 Touchdown

With many folks continuing to work from home for far longer than they ever thought, it’s no surprise that we’re seeing the rise of small DIY devices to make that video call or virtual presentation a little easier. [Dustin Watts] was interested in the functionality of the Elgato Stream Deck — a macro keyboard where each key is its own screen. But that kind of fancy hardware comes with a formidable price tag. So he built his own, and made it open source!

His first iteration — FreeTouchDeck — was built using commonly available modules but has since evolved into the ESP32 Touchdown which does it all with a single PCB. It’s a highly-customizable touchscreen macro keyboard which provide easy access shortcuts and macros for quick actions. Need a quick mute button, want to switch camera views on OBS, or maybe you want smarter shortcut keys for your CAD of choice. This will can get you there.

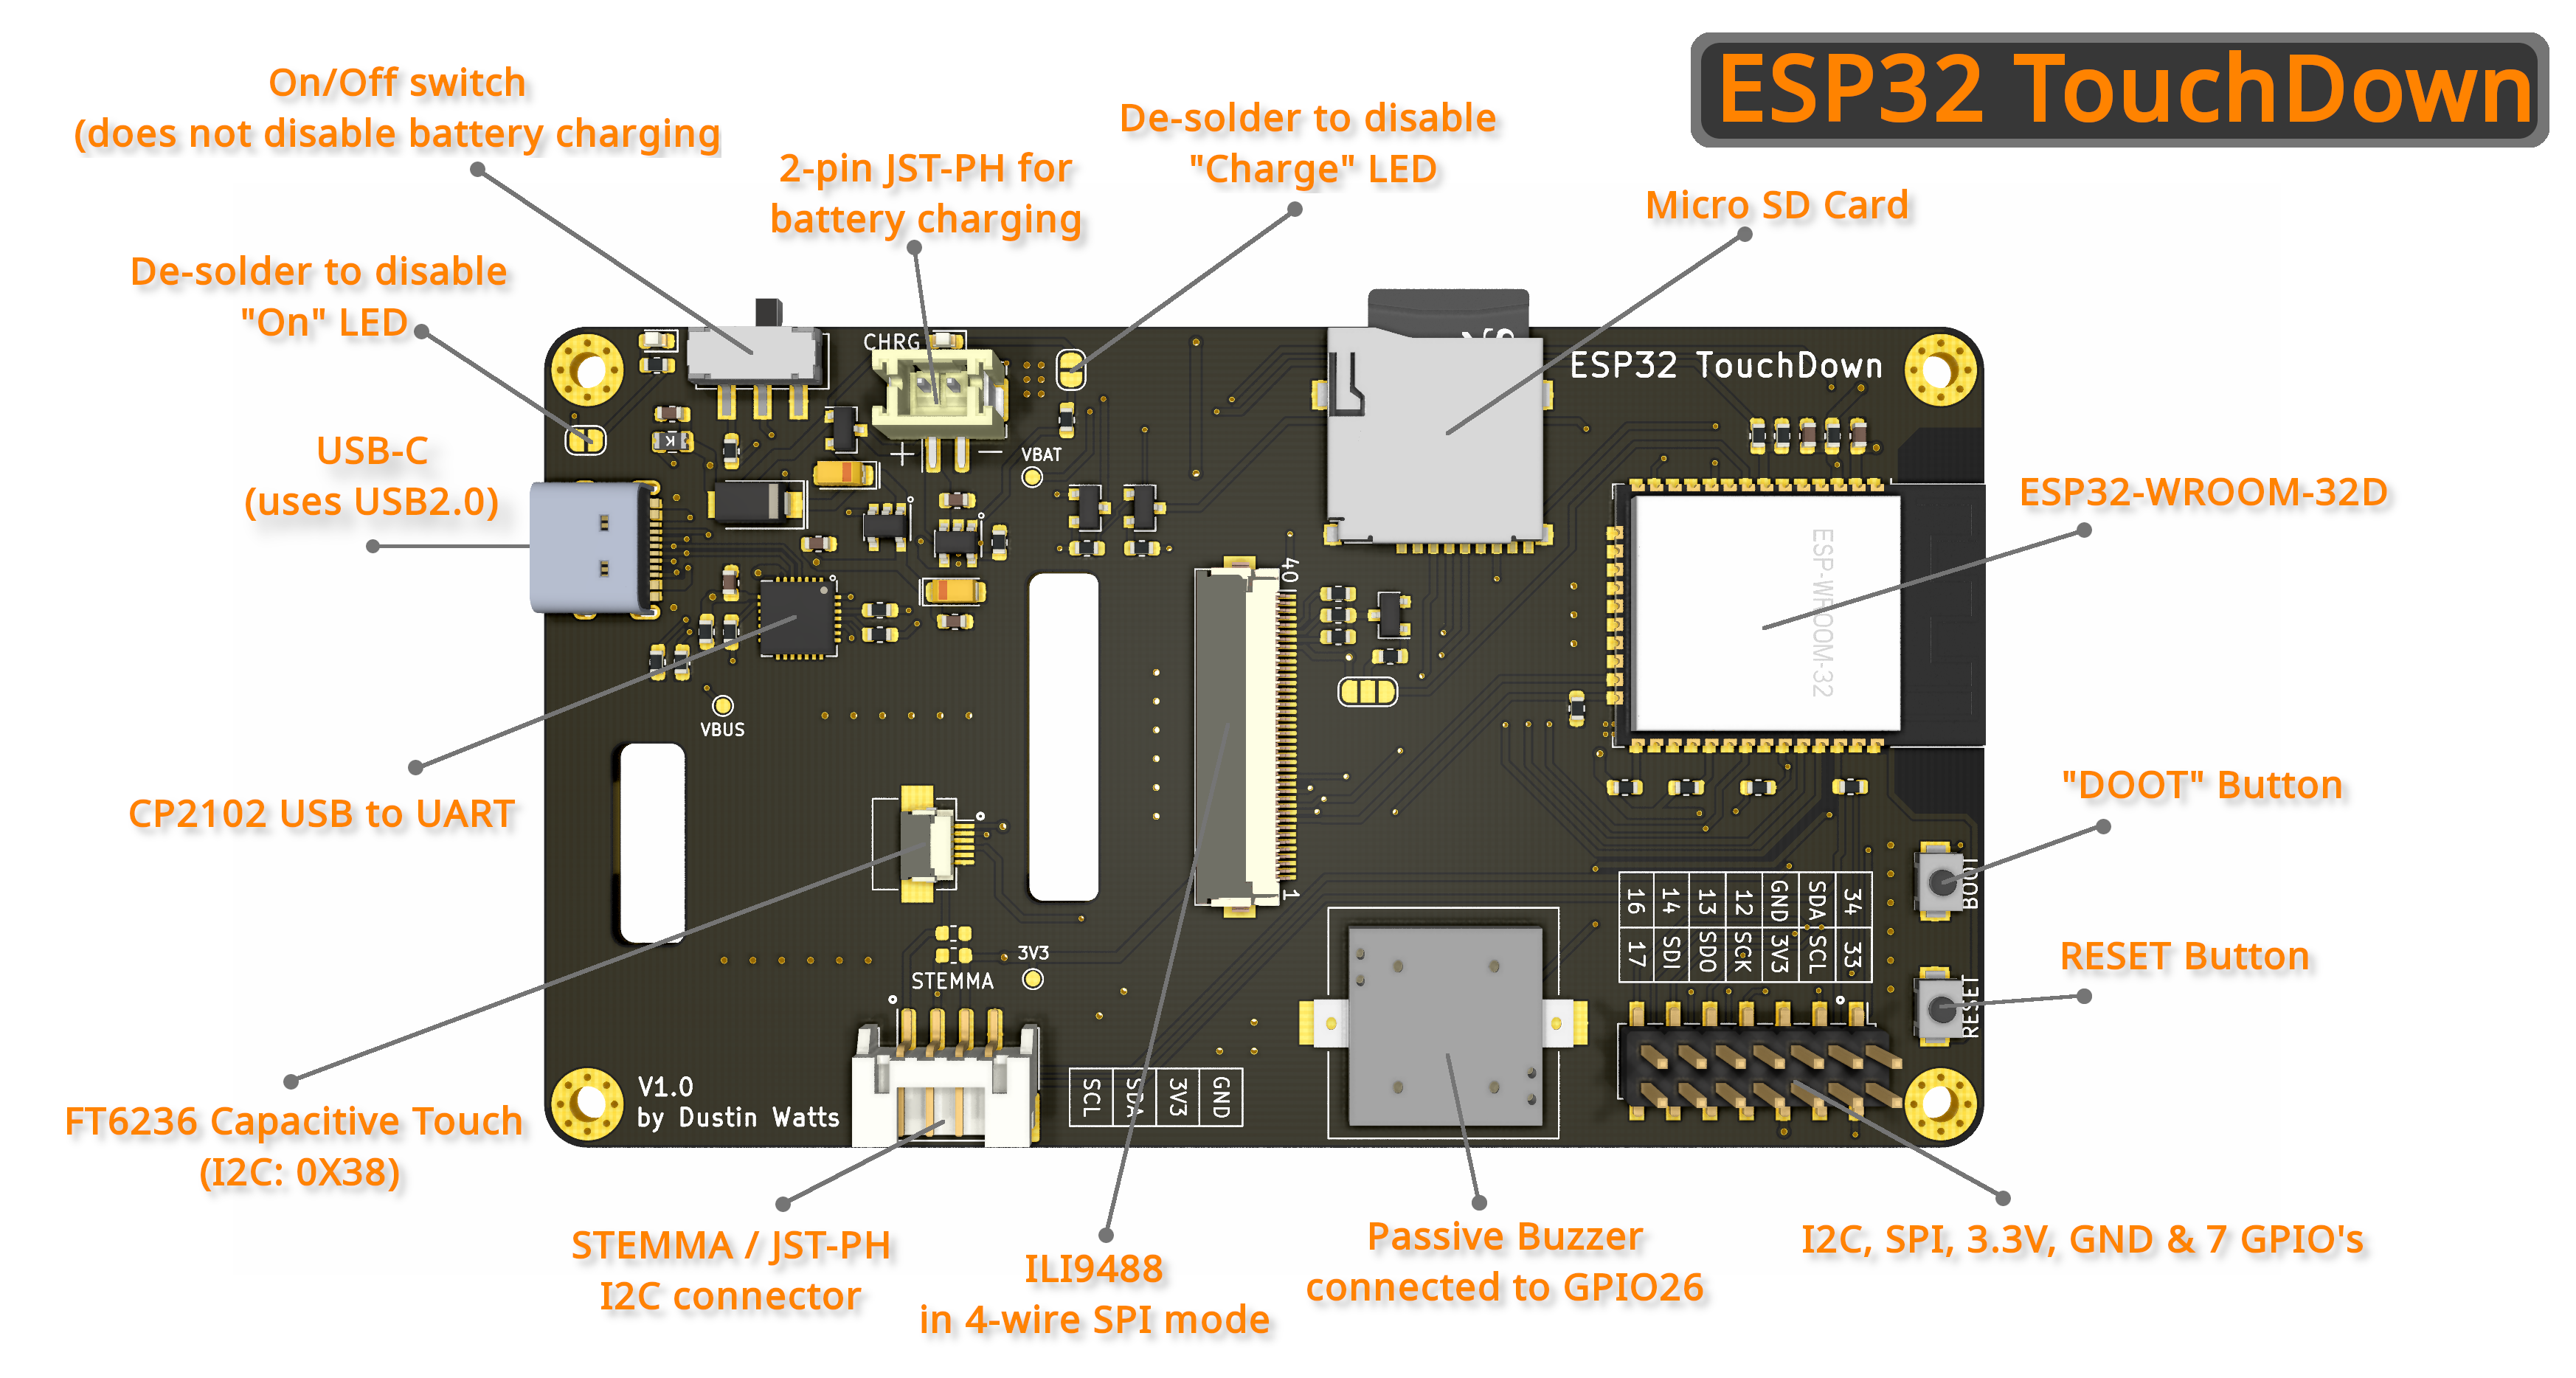
There a few key differences from the first version (FreeTouchDeck). The ESP32 dev board was ditched for a tidy PCB the directly integrates the module. This one has a capacitive touch controller (FT6236) rather than a resistive one as the capacitive screens deliver a far nicer user experience. A built-in battery and charger circuit (which the FreeTouchDesk didn’t have) allows for the extra bit of flexibility to stream from anywhere (within wireless range of course). Multiple case designs are available in STL form that allows it to be placed on a wall or desk with ease.

Datasheets, gerbers, kicad files, BOMs, and example firmware is provided on GitHub. The software is easily configurable so it can be set up to do any sort of macro, key combination, or action. This isn’t just limited to emulating a Bluetooth keyboard as there are examples showing how to connect to Home Assistant. All in all, this is a wonderful example of continued iteration on a project.

Thanks [Timothy Gregory] for sending this one in!

source https://hackaday.com/2021/02/14/freetouchdeck-upgrades-its-hardware-and-its-name-esp32-touchdown/

FreeTouchDeck Upgrades Its Hardware and Its Name: ESP32 Touchdown

With many folks continuing to work from home for far longer than they ever thought, it’s no surprise that we’re seeing the rise of small DIY devices to make that video call or virtual presentation a little easier. [Dustin Watts] was interested in the functionality of the Elgato Stream Deck — a macro keyboard where each key is its own screen. But that kind of fancy hardware comes with a formidable price tag. So he built his own, and made it open source!

His first iteration — FreeTouchDeck — was built using commonly available modules but has since evolved into the ESP32 Touchdown which does it all with a single PCB. It’s a highly-customizable touchscreen macro keyboard which provide easy access shortcuts and macros for quick actions. Need a quick mute button, want to switch camera views on OBS, or maybe you want smarter shortcut keys for your CAD of choice. This will can get you there.

There a few key differences from the first version (FreeTouchDeck). The ESP32 dev board was ditched for a tidy PCB the directly integrates the module. This one has a capacitive touch controller (FT6236) rather than a resistive one as the capacitive screens deliver a far nicer user experience. A built-in battery and charger circuit (which the FreeTouchDesk didn’t have) allows for the extra bit of flexibility to stream from anywhere (within wireless range of course). Multiple case designs are available in STL form that allows it to be placed on a wall or desk with ease.

Datasheets, gerbers, kicad files, BOMs, and example firmware is provided on GitHub. The software is easily configurable so it can be set up to do any sort of macro, key combination, or action. This isn’t just limited to emulating a Bluetooth keyboard as there are examples showing how to connect to Home Assistant. All in all, this is a wonderful example of continued iteration on a project.

Thanks [Timothy Gregory] for sending this one in!

source https://hackaday.com/2021/02/14/freetouchdeck-upgrades-its-hardware-and-its-name-esp32-touchdown/

FreeTouchDeck Upgrades Its Hardware and Its Name: ESP32 Touchdown

With many folks continuing to work from home for far longer than they ever thought, it’s no surprise that we’re seeing the rise of small DIY devices to make that video call or virtual presentation a little easier. [Dustin Watts] was interested in the functionality of the Elgato Stream Deck — a macro keyboard where each key is its own screen. But that kind of fancy hardware comes with a formidable price tag. So he built his own, and made it open source!

His first iteration — FreeTouchDeck — was built using commonly available modules but has since evolved into the ESP32 Touchdown which does it all with a single PCB. It’s a highly-customizable touchscreen macro keyboard which provide easy access shortcuts and macros for quick actions. Need a quick mute button, want to switch camera views on OBS, or maybe you want smarter shortcut keys for your CAD of choice. This will can get you there.

There a few key differences from the first version (FreeTouchDeck). The ESP32 dev board was ditched for a tidy PCB the directly integrates the module. This one has a capacitive touch controller (FT6236) rather than a resistive one as the capacitive screens deliver a far nicer user experience. A built-in battery and charger circuit (which the FreeTouchDesk didn’t have) allows for the extra bit of flexibility to stream from anywhere (within wireless range of course). Multiple case designs are available in STL form that allows it to be placed on a wall or desk with ease.

Datasheets, gerbers, kicad files, BOMs, and example firmware is provided on GitHub. The software is easily configurable so it can be set up to do any sort of macro, key combination, or action. This isn’t just limited to emulating a Bluetooth keyboard as there are examples showing how to connect to Home Assistant. All in all, this is a wonderful example of continued iteration on a project.

Thanks [Timothy Gregory] for sending this one in!

source https://hackaday.com/2021/02/14/freetouchdeck-upgrades-its-hardware-and-its-name-esp32-touchdown/

How to Bake Brownies With A Perfect Glossy Skin

If you’re anything at all like this writer, you don’t spend a lot of time inspecting brownies past the initial object identification phase, preferring to insert them directly into the mouth post-haste. But those with more of an aesthetic focus take great care to produce brownies with a glossy, attractive skin. [Adam Ragusea] decided to find out what it takes to get a perfect brownie skin, time after time.

After many, many trays of brownies, [Adam], with the assistance of [Dr. Pia Sörensen], determined that the key seems to be making a brownie mixture with very finely dissolved sugar, in sucrose form, with a carefully controlled amount of water in the mixture. This produces a thick mixture which can hold together against the gases bubbling out during the cooking process, and produces a nice glossy skin. Too much water, and the mixture isn’t viscous enough to hold up, leading to brownies full of pock marks, while alternative sugars like fructose and glucose likely disrupt the ordered structure of sucrose molecules necessary for a shiny surface.

Together, [Adam] and [Pia] do a great job of exploring the molecular chemistry behind the process, as well as ruling out several myths that have been perpetuated in the viciously insular brownie subculture. All they’re missing is a set of standardised reflectivity tests executed with an Arduino and some photodiodes, but we’ll assume that was just cut for time. We’ve seen other hacks in the realm of molecular gastronomy before, like this homebrew kitchen centrifuge. Video after the break.

[Thanks to dkt01 for the tip!]

source https://hackaday.com/2021/02/14/how-to-bake-brownies-with-a-perfect-glossy-skin/

Stray Cat Shelter is Nicer Than Our First Apartment

There are a lot of stray cats roaming around [Red Tie Projects’] neighborhood, and no one seems to care much about what happens to them. Fortunately for the cats, [Red Tie Projects] cares quite a lot, as evidenced by this colossal cat condo they built. The cats retain their freedom, but get food and a warm, sheltered bed whenever they decide to grace [Red Tie Projects] with their presence.

[Red Tie Projects] built this sturdy shelter from pallet wood and did a fine job of it, sealing all the seams and screws up with wood putty and waterproofing it with silicone. Inside there’s a heated pillow, a light, and a remote-controlled camera so RTP] can pan around and keep an eye on the cats. All the wires run out through a weatherproof junction box attached to the side and over to a control box made from an ATX power supply.

Most of the build is made from scrap, including the best part — an Arduino-driven motorized zip line for delivering food from the balcony to the cat porch. Details on the control box and the food delivery system are coming soon, as [Red Tie Projects] teases in the video after the break. We’re looking forward to seeing those. Oh, and don’t worry — there’s more than enough footage to cover the cat tax.

If [Red Tie Projects] ever takes any of those cats in, their demands will only increase. Maybe they can handle the sound of a motorized chair that follows the sun, since they’re tough street cats and all.

source https://hackaday.com/2021/02/14/stray-cat-shelter-is-nicer-than-our-first-apartment/

Truck Bed Liners Improve 3D Prints

There are at least two kinds of 3D printer operators: those who work hard to make their prints look better after they come off the bed and those who settle for whatever comes off the printer. If you are in the latter camp, you probably envy people who have smooth prints with no visible layer lines. But the sanding and priming and multiple coats of paint can put you off.

[Teaching Tech] has a few tricks that might change your mind. He shares his technique for using different coatings for 3D prints that provide good quality with a lot less effort. The coatings in question are polyurethane used for coating pickup truck beds and bitumen rubber used for waterproofing. In the United States, bitumen is known as asphalt, and both materials are relatively cheap, available, and safe to use.

According to the video you can see below, there’s no need to sand or prime the print. In addition to covering imperfections and sealing gaps, it produces watertight prints that have UV resistance and some measure of protection against heating.

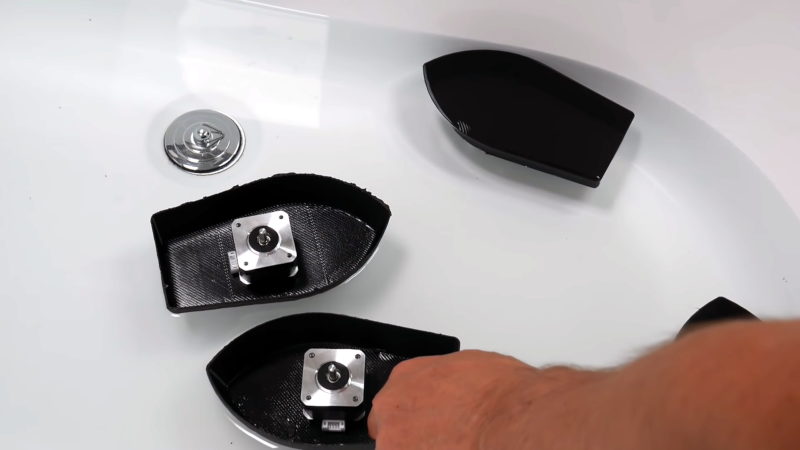
The waterproofing example was fun. Using vase mode, [Teaching Tech] printed a few boats. Having single-layer shells, the boats had a few imperfections. Untreated, the boats actually floated, because they didn’t weigh enough to break the surface tension. However, placing a payload — in this case, a stepper motor — into the boats caused them to sink. With the coatings, though, the boats would float with their motor cargo.

The outward appearance is good, although it isn’t as smooth as paint. You’ve probably seen truck beds and that’s what it looks like. Still, for many parts that’s not a bad look; it almost appears powder-coated. Painting the material on didn’t look very difficult, although the rubber sealant looked thin. On the other hand, it was cut with water, so it might work to use less water in the mixture.

We are anxious to try this out. We aren’t sure if the popular Flex Seal is asphalt rubber, but it might be a good thing to try and is easily available in the states.

We’ve looked at some coatings before. Paint doesn’t have to be hard, but we get why some people don’t want to bother.

source https://hackaday.com/2021/02/14/truck-bed-liners-improve-3d-prints/

Legacy Digital Photos, With a Side of Murphy’s Law

[Dave Madison] came across some old digital photos, and in his quest to access them, he ran into quite a few challenges. The saga brings to mind both Murphy’s Law, and while [Dave] prevailed in the end, it required quite a few more steps than one might expect.

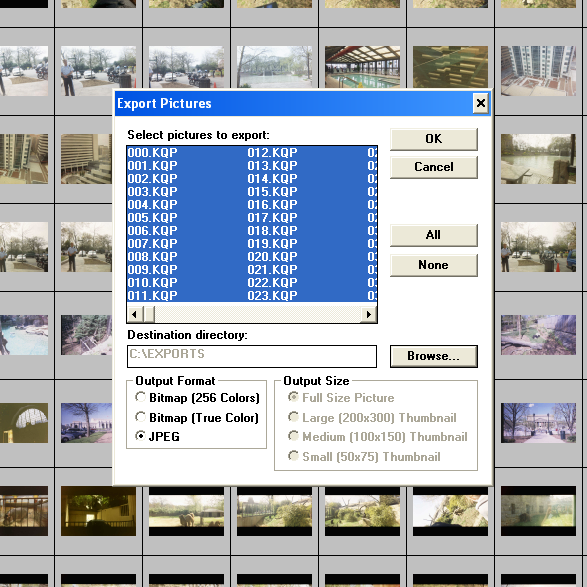
The one smooth part of the process was that Konica’s proprietary software had a handy JPEG export feature.

Here’s the scene: in the late 90s, Konica partnered with photo shops to provide a photo scanning service, delivering digital scans of film photos on 3.5″ floppy disks, and that’s exactly what [Dave] had to work with. The disks were in good condition, and since modern desktop computers still support floppy drives and the FAT filesystem, in theory all one needs to do is stick disks into the reader one at a time in order to access the photos.

Sadly, problems started early. A floppy drive is revoltingly slow compared to any modern storage device, so [Dave]’s first step was to copy all of the files to his machine’s local storage before working on them. This took a bit of wrangling to deal with 8.3 format file names and avoid naming collisions across disks while still preserving some metadata such as original creation date. It was nothing a quick python script couldn’t handle, but that soon led to the next hurdle.

The photos in question were in an obsolete and proprietary Konica .KQP format. [Dave] went through a number of photo viewing programs that claimed to support .KQP, but none of them actually recognized the images.

Fortunately, each disk contained a copy of Konica’s proprietary “PC PictureShow” viewer, but despite having a variety of versions dated between 1997 and 2001 (making them from the Windows 98 and Windows ME eras) [Dave] could not get any version of the program to run in Windows 10, even with compatibility mode for legacy programs enabled. The solution was to set up a Windows XP virtual machine using Oracle’s Virtualbox, and use that to ultimately run PC PictureShow and finally access the photos. After all that work, [Dave] finally had a stroke of luck: Konica’s software had a handy feature to export images in JPEG format, and it worked like a charm.

In the end, [Dave] was able to save 479 out of the 483 images on the old floppy disks, with a reminder that proprietary formats are a pain. The disks and images may have been over twenty years old, but the roots of digital imaging go considerably further back than that. Take a few minutes out your day to read a bit about Russell Kirsch and the first digitized image, that of his three-month old son in 1957.

source https://hackaday.com/2021/02/14/accessing-legacy-digital-photos-turns-out-tougher-than-expected/

Legacy Digital Photos, With a Side of Murphy’s Law

[Dave Madison] came across some old digital photos, and in his quest to access them, he ran into quite a few challenges. The saga brings to mind both Murphy’s Law, and while [Dave] prevailed in the end, it required quite a few more steps than one might expect.

The one smooth part of the process was that Konica’s proprietary software had a handy JPEG export feature.

Here’s the scene: in the late 90s, Konica partnered with photo shops to provide a photo scanning service, delivering digital scans of film photos on 3.5″ floppy disks, and that’s exactly what [Dave] had to work with. The disks were in good condition, and since modern desktop computers still support floppy drives and the FAT filesystem, in theory all one needs to do is stick disks into the reader one at a time in order to access the photos.

Sadly, problems started early. A floppy drive is revoltingly slow compared to any modern storage device, so [Dave]’s first step was to copy all of the files to his machine’s local storage before working on them. This took a bit of wrangling to deal with 8.3 format file names and avoid naming collisions across disks while still preserving some metadata such as original creation date. It was nothing a quick python script couldn’t handle, but that soon led to the next hurdle.

The photos in question were in an obsolete and proprietary Konica .KQP format. [Dave] went through a number of photo viewing programs that claimed to support .KQP, but none of them actually recognized the images.

Fortunately, each disk contained a copy of Konica’s proprietary “PC PictureShow” viewer, but despite having a variety of versions dated between 1997 and 2001 (making them from the Windows 98 and Windows ME eras) [Dave] could not get any version of the program to run in Windows 10, even with compatibility mode for legacy programs enabled. The solution was to set up a Windows XP virtual machine using Oracle’s Virtualbox, and use that to ultimately run PC PictureShow and finally access the photos. After all that work, [Dave] finally had a stroke of luck: Konica’s software had a handy feature to export images in JPEG format, and it worked like a charm.

In the end, [Dave] was able to save 479 out of the 483 images on the old floppy disks, with a reminder that proprietary formats are a pain. The disks and images may have been over twenty years old, but the roots of digital imaging go considerably further back than that. Take a few minutes out your day to read a bit about Russell Kirsch and the first digitized image, that of his three-month old son in 1957.

source https://hackaday.com/2021/02/14/accessing-legacy-digital-photos-turns-out-tougher-than-expected/

RFID Music Player Gets The Whole House Pumping

RFID tags are normally used for pedestrian tasks like tracking shipping crates or opening doors to workplaces we’d rather be absent from, but they can also be cool and fun. [hoveeman] demonstrates this ably with a tidy jukebox project.

The build is based on a Raspberry Pi Zero, secreted away underneath a table with a USB RFID reader attached. Atop the table are a series of RFID cards upon which [hoveeman] printed the artwork from his favorite albums using a special caddy in an inkjet printer. Through some Python code and shell scripts, when scanning a card, the Pi Zero is able to trigger all the Google Home compatible devices in the house to play the album selected at the same time.

It’s a visually enjoyable way to cue up some music, and likely more reliable than most voice assistants, too. We can see this being particularly useful for Weezer fans; with the band’s many self-titled releases, Siri and the Google Assistant typically fail to play the right album on request. We’ve seen other beautiful RFID jukeboxes before, but one player that really sticks out ditched the RF and just uses computer vision with vinyl albums as the ID.

source https://hackaday.com/2021/02/13/rfid-music-player-gets-the-whole-house-pumping/

Can You Code Without Google?

Imagine for a moment that something has taken out your phone line, cell, and fibre connection so you have no internet. For some of you this may even be reality, but go with it and imagine yourself deciding to use your unexpectedly disconnected lockdown time pursuing that code project you always promised yourself. You pull out your laptop and fire up a code editor. Can you write code that works, without the Internet as a handy crib sheet? [Austin Z. Henley] couldn’t, when he tried writing a straightforward web app. He uses it as a hook to muse on the nature of learning, and it’s certainly a thought-provoking subject.

It has become an indispensable tool for the engineer and the coder alike, to constantly refer to online knowledge. This makes absolute sense, as it provides a reference library that will be many orders of magnitude in excess of anything an individual can possibly hold personally.

This holds true whether the resource takes the form of code snippets from StackOverflow or GitHub, or data sheets from TI or Microchip. Even our calculations have moved online, as it’s often much quicker to use an online calculator on a web page to derive for example an impedance calculation. This is not necessarily a bad thing, instead it’s an enabler; skills that used to take months to master due to slow information access can now be acquired in an afternoon. But it does pose the interesting question, in the Internet age what is the measure of an expert coder? Is it the ability to produce the code effectively with whatever help is available, or is it a guru-like mastery of the code? Maybe it’s both. If you have the Internet, give us your views in the comments.

source https://hackaday.com/2021/02/13/can-you-code-without-google/

Spinach Photo Prints

Some people like spinach in their salads. Others would prefer it if it never gets near their fork. Still, other folks, like [Almudena Romero], use it for printing pictures, and they’re the folks we’ll focus on today.

Anthotypes are positive images made from plant dyes that fade from light exposure. Imagine you stain your shirt at a picnic and leave it in the sun with a fork covering part of the stain. When you come back, the stain not sheltered by cutlery is gone, but now you have a permanent fork shape logo made from aunt Bev’s BBQ sauce. The science behind this type of printmaking is beautifully covered in the video below the break. You see, some plant dyes are not suitable for light bleaching, and fewer still if you are not patient since stains like blueberry can take a month in the sun.

The video shows how to make your own plant dye, which has possibilities outside of anthotype printing. Since the dye fades in sunlight, it can be a temporary paint, or you could use samples all over your garden to find which parts get lots of sunlight since the most exposed swatches will be faded the most. Think of a low-tech UV meter with logging, but it runs on spinach.

If the science doesn’t intrigue you, the artistic possibilities are equally cool. All the pictures have a one-of-a-kind, wabi-sabi flare. You take your favorite photo, make it monochrome, print it on a transparent plastic sheet, and the ink will shield the dye and expose the rest. We just gave you a tip about finding the sunniest spot outdoors, so get staining.

Anthotype printing shares some similarities with etch-resist in circuit board printing processes, but maybe someone can remix spinach prints with laser exposure!

source https://hackaday.com/2021/02/13/spinach-photo-prints/

Spinach Photo Prints

Some people like spinach in their salads. Others would prefer it if it never gets near their fork. Still, other folks, like [Almudena Romero], use it for printing pictures, and they’re the folks we’ll focus on today.

Anthotypes are positive images made from plant dyes that fade from light exposure. Imagine you stain your shirt at a picnic and leave it in the sun with a fork covering part of the stain. When you come back, the stain not sheltered by cutlery is gone, but now you have a permanent fork shape logo made from aunt Bev’s BBQ sauce. The science behind this type of printmaking is beautifully covered in the video below the break. You see, some plant dyes are not suitable for light bleaching, and fewer still if you are not patient since stains like blueberry can take a month in the sun.

The video shows how to make your own plant dye, which has possibilities outside of anthotype printing. Since the dye fades in sunlight, it can be a temporary paint, or you could use samples all over your garden to find which parts get lots of sunlight since the most exposed swatches will be faded the most. Think of a low-tech UV meter with logging, but it runs on spinach.

If the science doesn’t intrigue you, the artistic possibilities are equally cool. All the pictures have a one-of-a-kind, wabi-sabi flare. You take your favorite photo, make it monochrome, print it on a transparent plastic sheet, and the ink will shield the dye and expose the rest. We just gave you a tip about finding the sunniest spot outdoors, so get staining.

Anthotype printing shares some similarities with etch-resist in circuit board printing processes, but maybe someone can remix spinach prints with laser exposure!

source https://hackaday.com/2021/02/13/spinach-photo-prints/

Express Your Love with Candy and Engineering

Still don’t have anything for Valentine’s Day? We wholeheartedly suggest that you fire up that printer and get ready to fall in love with engineering all over again, because [JBV Creative] has designed a super-sweet piece of machinery that would turn the gears of anyone’s heart. He calls this the most overly-engineered candy dispenser ever, and we have to agree. It’s certainly one of the most beautiful we’ve ever seen.

There’s no electronics at all in this elegant design, just purely mechanical, hand-cranked fun. Turning the crank does two things at once — it moves a little access panel back and forth underneath the chute that governs the number of candies given, and at the same time, moves the conveyor belt along to deliver the goods to the receiving area.

This entire design is absolute genius, especially the decoupling mechanism that shuts off the flow of candy but allows the belt to keep moving. Be sure to watch the build video where [JBV Creative] effortlessly snap-fits the machine together without a single tool, and stay for the follow-up video where he discusses the engineering challenges and shows just how much work went into it.

Of course, there’s more than one way to overly-engineer a candy dispenser. Here’s one that finds the holy grail of peanut M&Ms — the ones that didn’t get a peanut.

source https://hackaday.com/2021/02/13/express-your-love-with-candy-and-engineering/