I’m Sorry Dave, You Shouldn’t Write Verilog

We were always envious of Star Trek, for its computers. No programming needed. Just tell the computer what you want and it does it. Of course, HAL-9000 had the same interface and that didn’t work out so well. Some researchers at NYU have taken a natural language machine learning system — GPT-2 — and taught it to generate Verilog code for use in FPGA systems. Ironically, they called it DAVE (Deriving Automatically Verilog from English). Sounds great, but we have to wonder if it is more than a parlor trick. You can try it yourself if you like.

For example, DAVE can take input like “Given inputs a and b, take the nor of these and return the result in c.” Fine. A more complex example from the paper isn’t quite so easy to puzzle out:

Write a 6-bit register ‘ar’ with input
defined as ‘gv’ modulo ‘lj’, enable ‘q’, synchronous
reset ‘r’ defined as ‘yxo’ greater than or equal to ‘m’,
and clock ‘p’. A vault door has three active-low secret
switch pressed sensors ‘et’, ‘lz’, ‘l’. Write combinatorial
logic for a active-high lock ‘s’ which opens when all of
the switches are pressed. Write a 6-bit register ‘w’ with
input ‘se’ and ‘md’, enable ‘mmx’, synchronous reset
‘nc’ defined as ‘tfs’ greater than ‘w’, and clock ‘xx’.

That last example shows the problem with this. Human language is really not so great for describing things like this. Now you not only have to define the problem but also figure out the correct way to say it so that DAVE will spill out the right Verilog code. Normal programming languages might not be so verbose, but you know exactly what some sequence of characters ought to do.

We’ve been here before. COBOL promised to bring programming to everyone by allowing things like “Multiply Rate times Hours giving Pay.” As it turns out, ordinary people still don’t know how to program in COBOL, and people who program want to type “Pay=Rate*Hours” anyway.

Don’t get us wrong. It is an interesting use of GPT-2 and we appreciate the effort. But the reason languages like Verilog and VHDL exist is because they are a compact way to specify what you want with a minimum of ambiguity. We’d rather focus on some of the efforts to convert conventional programming code into Verilog or VHDL. That seems a lot more useful.

We spend enough time yelling at Google Maps to tell it we want to go to Loch Hallow and not Vahalla. Then again, you may disagree. The comments will tell.

source https://hackaday.com/2020/09/04/im-sorry-dave-you-shouldnt-write-verilog/

Automatic Arduino Bicycle Shifter

One of the keys to efficient cycling performance is a consistent pedalling cadence. To achieve this the cyclist must always be in the correct gear, which can be tricky when your legs are burning and you’re sucking air. To aid in this task, [Jan Oelbrandt] created Shift4Me, an open-source Arduino powered electronic shifter.

The system consists of a hall effect sensor at the pedals to measure cadence, an Arduino controller, and a servo mechanism to replace the manual shifter. Everything is mounted in a small enclosure on the frame. The only way to get one is to build your own, so a forum is available for Shift4Me builders, where the BOM, instructions, code and other documentation is available for download. Most bikes should be easy to convert, and [Jan] invites builders to post their modifications and improvements.

Since the only input is the cadence sensor, we wonder if the system will interfere more than help when the rider has to break cadence. It does however include allowance to hold on the current gear, or reset to a starting gear by pushing a button. One major downside is that you will be stuck in a single gear if the battery dies since the manual shifter is completely removed.

As one of the oldest continuously used forms of mechanical transport, there is no shortage of bicycle-related hacks. Some of the more recent ones we’ve seen on Hackaday include e-bike with a washing machine motor, and a beautifully engineered steam-powered bicycle.

source https://hackaday.com/2020/09/04/automatic-arduino-bicycle-shifter/

See This Casio? Watch It Unlock My Tesla!

The whole point of gaining the remote unlock ability for our cars was to keep us from suffering the indignity of standing there in the rain, working a key into the lock while the groceries get soaked. [Mattia Dal Ben] reports that even Teslas get the blues and don’t unlock reliably all the time, in spite of the price tag.

[Mattia] decided that a spare key card might be good to have around, and that building it into his Casio F-91W watch would put the key as close at hand as it could be without getting an implant.

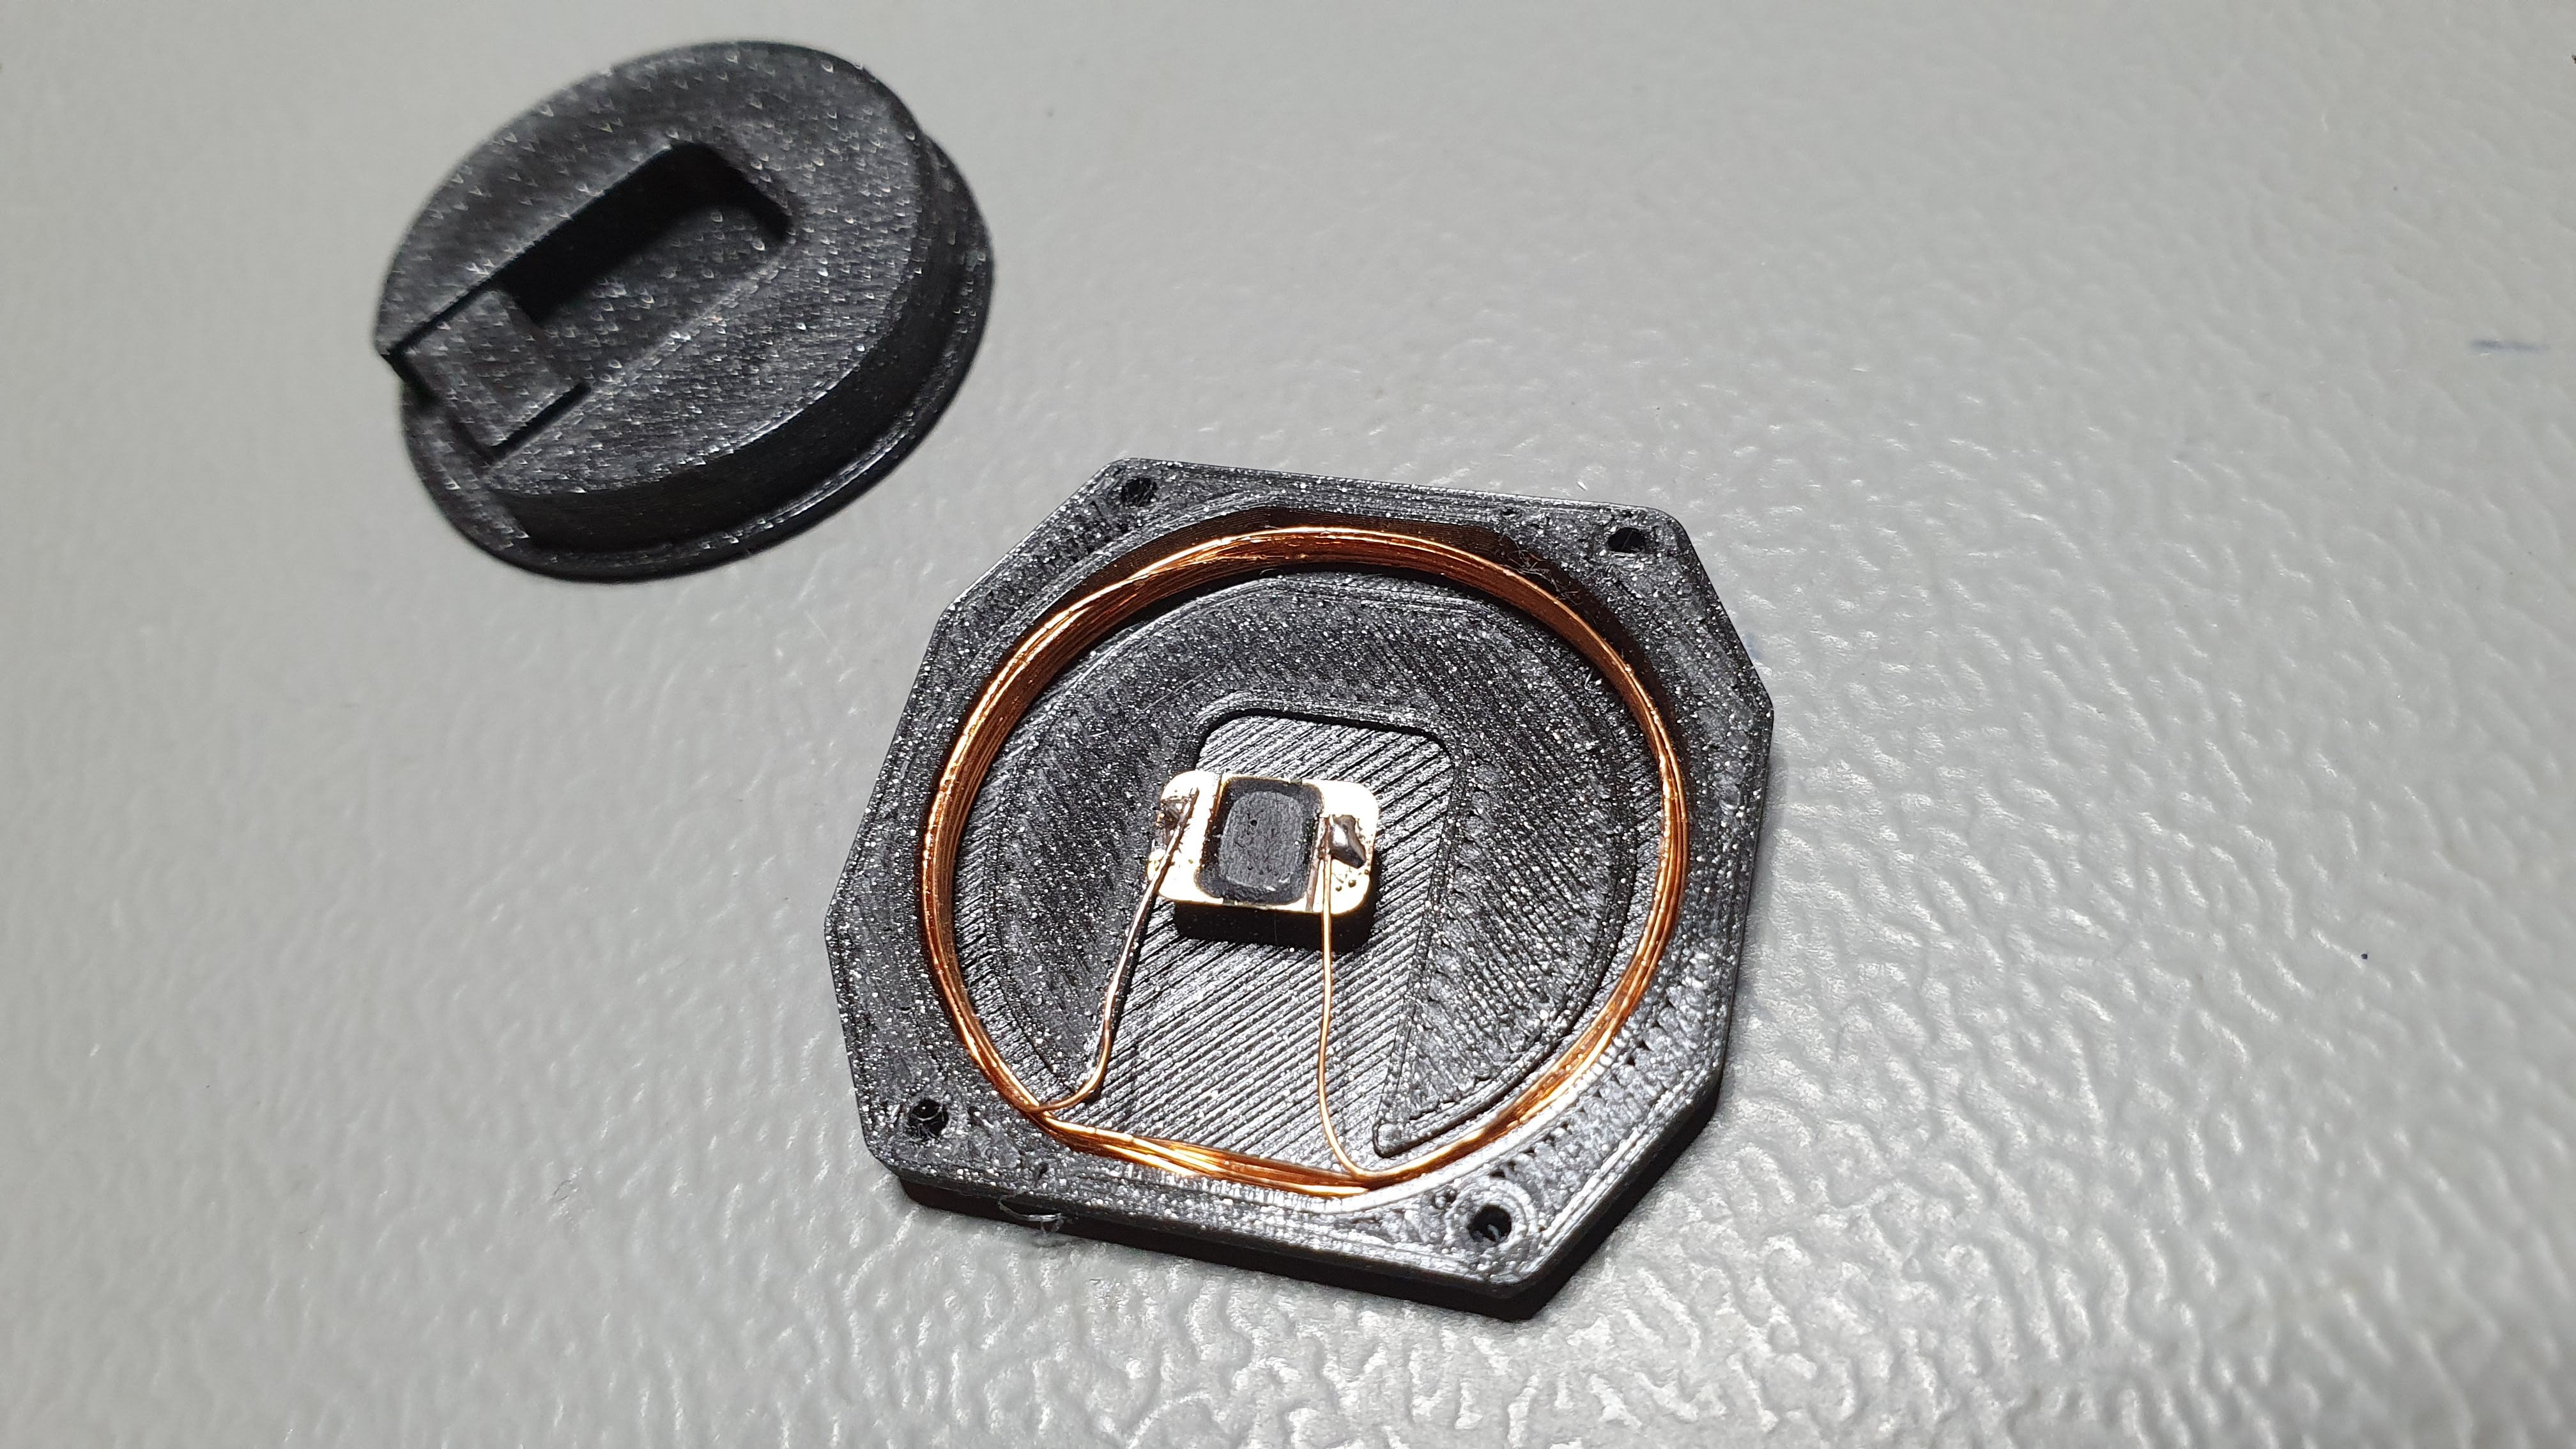
After programming a new J3A040-CL key card to match the car, getting the chip out was the easy part — just soak it in acetone until you can peel the layers apart. Then [Mattia] built a fresh antenna for it and wound it around the inside of a 3D printed back plate.

The hardest part seems to be the tuning the watch antenna to the resonant frequency expected by the car-side antenna. [Mattia] found that a lot of things mess with the resonant frequency — the watch PCB, casing, and even the tiny screws holding the thing together each threw it off a little bit.

Since the watch is less comfortable now, [Mattia] thought about making a new back from transparent resin, which sounds lovely to us. It looks as though the new plan is to move it to the front of the watch, with a resin window to show off the chip. That sounds pretty good, too. Check out the secret unlocking power after the break.

Casio watches are great, though we are more into the calculator models. Someone out there loves their F-91W so much that they made a giant wall clock version.

source https://hackaday.com/2020/09/04/see-this-casio-watch-it-unlock-my-tesla/

Approaching the Drop Location: Seeds Away!

Arbor Day is a holiday many countries dedicate to planting trees, but with the steady encroachment of climate change, we need to maximize our time. Dronecoria doesn’t just plant a tree; it sows “hectares in minutes.” A hectare is 10,000 square meters or 2.471 acres. These aren’t the drones you’re looking for if you intend a weekend of gardening, this is in the scope of repopulating a forest with trees or reinvigorating a park with wildflowers. The seed balls in the hopper are 10kg of native seeds coupled with beneficial microorganisms to help the chances of each drop.

The drone’s body is laser cut from what looks like baltic birch plywood. The vector files are available in Illustrator (.ai) and CAD (.dxf) formats released under Creative Commons BY-SA, so give credit if you redistribute or remix it. In the 3D realm, you’ll need a SeedShutter and SeedDisperser, and both models are available in STL format.

We have other non-traditional seed spreading methods like canons, but it is a big job, and if you’ve build something to pitch in, drop us a tip!

source https://hackaday.com/2020/09/04/approaching-the-drop-location-seeds-away/

An Arduino Controller for Hot Air Handles

In general, the cost of electronic components and the tools used to fiddle with them have been dropping steadily over the last decade or so. But there will always be bargain-hunting hackers who are looking to get things even cheaper. Case in point, hot air rework stations. You can pick up one of the common 858D stations for as little as $40 USD, but that didn’t keep [MakerBR] from creating an Arduino controller that can be used with its spare handles.

Now to be fair, it doesn’t sound like price was the only factor here. After all, a spare 858D handle costs about half as much as the whole station, so there’s not a lot of room for improvement cost-wise. Rather, [MakerBR] says the Arduino version is designed to be more efficient and reliable than the stock hardware.

The seven wires in the handle connector have already been mapped out by previous efforts, though [MakerBR] does go over the need to verify everything matches the provided circuit diagrams as some vendors might have fiddled with the pinout. All the real magic happens in the handle itself, the controller just needs to keep an eye on the various sensors and provide the fan and heating element with appropriate control signals. An Arduino Pro Mini is more than up to the task, and a custom PCB makes for a fairly neat installation.

This isn’t the first time we’ve seen somebody replace the controller on one of these entry-level hot air stations, but because there are so many different versions floating around, you should do some careful research before cracking yours open and performing a brain transplant.

source https://hackaday.com/2020/09/04/an-arduino-controller-for-hot-air-handles/

An Arduino Controller for Hot Air Handles

In general, the cost of electronic components and the tools used to fiddle with them have been dropping steadily over the last decade or so. But there will always be bargain-hunting hackers who are looking to get things even cheaper. Case in point, hot air rework stations. You can pick up one of the common 858D stations for as little as $40 USD, but that didn’t keep [MakerBR] from creating an Arduino controller that can be used with its spare handles.

Now to be fair, it doesn’t sound like price was the only factor here. After all, a spare 858D handle costs about half as much as the whole station, so there’s not a lot of room for improvement cost-wise. Rather, [MakerBR] says the Arduino version is designed to be more efficient and reliable than the stock hardware.

The seven wires in the handle connector have already been mapped out by previous efforts, though [MakerBR] does go over the need to verify everything matches the provided circuit diagrams as some vendors might have fiddled with the pinout. All the real magic happens in the handle itself, the controller just needs to keep an eye on the various sensors and provide the fan and heating element with appropriate control signals. An Arduino Pro Mini is more than up to the task, and a custom PCB makes for a fairly neat installation.

This isn’t the first time we’ve seen somebody replace the controller on one of these entry-level hot air stations, but because there are so many different versions floating around, you should do some careful research before cracking yours open and performing a brain transplant.

source https://hackaday.com/2020/09/04/an-arduino-controller-for-hot-air-handles/

An Arduino Controller for Hot Air Handles

In general, the cost of electronic components and the tools used to fiddle with them have been dropping steadily over the last decade or so. But there will always be bargain-hunting hackers who are looking to get things even cheaper. Case in point, hot air rework stations. You can pick up one of the common 858D stations for as little as $40 USD, but that didn’t keep [MakerBR] from creating an Arduino controller that can be used with its spare handles.

Now to be fair, it doesn’t sound like price was the only factor here. After all, a spare 858D handle costs about half as much as the whole station, so there’s not a lot of room for improvement cost-wise. Rather, [MakerBR] says the Arduino version is designed to be more efficient and reliable than the stock hardware.

The seven wires in the handle connector have already been mapped out by previous efforts, though [MakerBR] does go over the need to verify everything matches the provided circuit diagrams as some vendors might have fiddled with the pinout. All the real magic happens in the handle itself, the controller just needs to keep an eye on the various sensors and provide the fan and heating element with appropriate control signals. An Arduino Pro Mini is more than up to the task, and a custom PCB makes for a fairly neat installation.

This isn’t the first time we’ve seen somebody replace the controller on one of these entry-level hot air stations, but because there are so many different versions floating around, you should do some careful research before cracking yours open and performing a brain transplant.

source https://hackaday.com/2020/09/04/an-arduino-controller-for-hot-air-handles/

This Week in Security: Zero Days, Notarized Malware, Jedi Mind Tricks, and more

Honeypots are an entertaining way to learn about new attacks. A simulated vulnerable system is exposed to the internet, inviting anyone to try to break into it. Rather than actually compromising a deployed device, and attacker just gives away information about how they would attack the real thing. A honeypot run by 360Netlab found something interesting back in April: an RCE attack against QNAP NAS devices. The vulnerability is found in the logout endpoint, which takes external values without properly sanitizing them. These values are used as part of an snprintf statement, and then executed with a system() call. Because there isn’t any sanitization, special characters like semicolons can be injected into the final command to be run, resulting in a trivial RCE.

QNAP has released new firmware that fixes the issue by replacing the system() call with execv(). This change means that the shell isn’t part of the execution process, and the command injection loses its bite. Version 4.3.3 was the first firmware release to contain this fix, so if you run a QNAP device, be sure to go check the firmware version. While this vulnerability was being used in the wild, there doesn’t seem to have been a widespread campaign exploiting it.

Notarized Malware

Once upon a time, it was reasonably accurate to say that Mac machines didn’t get viruses. Strictly speaking, that hasn’t been true since 1987, when nVIR was discovered traveling on floppy disks and infecting Macintosh machines. Regardless, as Macs have gotten more popular, and as Microsoft has slowly improved the security of Windows systems, it’s becoming less and less accurate to say that Macs don’t get viruses. In response, Apple has introduced Code Notarization for macOS, a system where developers submit their apps to Apple for review. After the app has been verified to be non-malicious, it’s signed with Apple’s key, and will run on a Mac machine without needing any special steps.

The problem is the inherent difficulty in determining whether a program is malicious, just through static analysis. Apple seems to be signing almost all requests, and simply revoking signatures of apps that prove to be malicious. [Patrick Wardle] from Objective-See brings us the report of an active Mac malware campaign that’s using notarized malware. The situation was reported to Apple, who quickly revoked the signatures. Within 48 hours, the malware campaign once again had notarized malicious binaries. It remains to be seen how the situation will resolve, but for now, it seems like notarized code isn’t a very good indicator of trustworthy code.

You Don’t Need to see My Identification

Contactless payments are impressive. Just wave a credit card over a payment terminal, and a cryptographic handshake confirms that you really have the credit card. In the case of high value transactions, a PIN is also required. The protocol that powers this is EMV, named for Eurocard, Mastercard, and Visa, the corporations that cooperated to develop the standard. Researchers at ETH Zurich took a look at that protocol, and published a paper about some flaws they found (pdf). The attack I found most interesting is the “Jedi Mind Trick” they pulled off using a pair of cell phones as intermediaries. The attack is a simple man-in-the-middle where a few bytes are changed in transit. These bytes instruct the payment terminal not to require a PIN entry, even for very large purchases.

Be Careful Compiling Secrets

The reason that security is so difficult is that there’s just so many ways to mess it up. This time, we’re talking about static keys that get compiled into released software. [Abss] got curious about Android security, and started working on a project. He grabbed as many APKs as he could get hands hands on, and decompiled them. From there, a clever grep search for variables and strings resulted in a bunch of interesting hits, like Google API keys.

That was all well and good, but it seemed like there should be something interesting that could be done with the harvested keys. The answer was the Firebase Cloud Messaging service, by Google. A valid key FCM server key and a bit of boolean trickery allows sending a message to every user of an app. It’s not hard to imagine that many applications are written with the assumption that the incoming FCM messages are trustworthy. Breaking that assumption leads to all sorts of problems, including RCE in four of Google’s official apps.

Cisco Jabber

Jabber is a messenger service, built on top of the XMPP. Cicso provides a proprietary jabber that was recently discovered to be vulnerable to a serious RCE attack. The vulnerability boils down to a cross-site-scripting filter that works in a blacklist mode, and doesn’t successfully block everything it should. The filter could be bypassed by sending an img element with the onanimationstart attribute.

Because the vulnerability can be triggered with a single message, it’s also considered a wormable vulnerability, and so scored a 9.9 severity. This issue was reported privately, and an updated version is now available with fixes, so if your organization uses Cisco Jabber, make sure it gets updated!

When The Code Stares Back

If there is a perverse pleasure in finding vulnerabilities in security products, then there must be doubly so for finding them in vulnerability scanners themselves. And that is exactly what [Gabor Mutuz] found himself doing — trying to break vulnerability scanners. As complex as modern containerized applications are, it’s not surprising that it’s possible to trip up a vulnerability scanner.

While it might seem like useless vulnerability research, consider that some projects have these scanners plugged into their continuous integration pipeline. I’ve seen some projects that even run the CI checks on every pull request. It’s not an attack vector that’s normally considered, but it’s extremely important that even these tools are hardened for security. [Gabor] reported the issues he found, and they’ve been fixed in subsequent updates. Be sure to go check out his post about it for all the details.

source https://hackaday.com/2020/09/04/this-week-in-security-zero-days-notarized-malware-jedi-mind-tricks-and-more/

Autonomous Off-Road Food Delivery with Pixhawk

It should come as no surprise that the COVID-19 pandemic has sparked renewed interest in robotic deliveries. Amazon saying they would some day land Prime orders in your backyard with a drone sounded pretty fanciful a few years ago, but now that traditional delivery services are under enormous strain and people are looking to avoid as much human contact as possible, it’s starting to make a lot more sense.

Pro Tip: Avoid drifting while towing seafood.

Now to be clear, we don’t think you’ll be seeing this modified RC truck rolling up your driveway with a pizza in tow anytime soon. But the experiments that [Sean] has been doing with it are certainly interesting, and show just how far autonomous rover technology has progressed at the hobbyist level. Whether you need to move some sushi or a sensor package, his build is a great starting point for anyone interested in DIY robotic ground vehicles.

Especially if you want to take things off the beaten path once and awhile. By combining the Pixhawk autopilot system with an off-road RC truck by Traxxas, [Sean] has created a delivery bot that’s not afraid of a little mud. Or even the occasional jump, should the need arise. Just don’t expect your shrimp cocktail and champagne to arrive in one piece after they’ve been given the Dukes of Hazzard treatment.

In the video after the break [Sean] goes over some of the lessons learned on this build, including how he managed to keep the electronics from cooking themselves in the Texas heat. He also goes over the realities of building an autonomous driving system that doesn’t actually have a camera onboard; sure you can plan a route for it in advance, but all bets are off if an unexpected obstacle blocks the path. It’s a pretty serious shortcoming he’s looking to address in the future, as well as upgrading to a far more accurate RTK-GPS receiver.

source https://hackaday.com/2020/09/04/autonomous-off-road-food-delivery-with-pixhawk/

The Screwdriver You Don’t Need, But Probably Want

Screwdrivers are simple devices with a simple purpose, and there is generally little fanfare involved with buying yourself a new set. We’ve never seen one marketed as an object of desire, but we have to admit that [Gaico] managed to do precisely that. He created the Kinetic Driver, a fidget spinner precision screwdriver designed to use its rotational momentum to loosen and tighten screws.

The main difference between the Kinetic Driver and other screwdrivers is a big brass mass at the front end for high rotational inertia and a high-quality ceramic bearing at the back end for minimal drag. It uses 4 mm precision bits, so its utility will be limited to small screws, which makes it perfect for working on small electronics.


[Gaico] says the idea came after running a successful Kickstarter campaign for a utility knife, where he found that his favorite screwdriver for the many small screws was one with a fat metal body which allowed it to spin easily. In the video after the break, he gives an excellent insight into the development process. He started by creating a series of 3D printed prototypes to figure out the basic shape, before making the first metal prototype. [Gaico] also shows the importance of figuring out the order of operation for machining, which is often glossed over in other machining videos. Be sure to check out the beautiful launch video at 17:52.

It’s difficult to pass judgment on how well the Kinetic Driver would work from [Gaico]’s videos alone, but it looks like it has potential. The friction experienced by any specific screw will be a factor. From the current status of the Kickstarter campaign at 70x the funding goal, we hope [Gaico] has the production and supply chain figured out, because he’ll be making a LOT of Kinetic Drivers.

For many applications, especially production, electric screwdrivers might be superior, if you remember to keep them charged of course. We’ve a few electric screwdrivers you can build yourself.

source https://hackaday.com/2020/09/04/the-screwdriver-you-dont-need-but-probably-want/

YARH.IO is the Hackable Pi Portable Of Our Dreams

Less than a decade ago, building a completely custom portable computer was more or less out of the question. Sure you could have cobbled something together with a Gumstix board and the dinky NTSC/PAL screen pulled from a portable DVD player, but it wouldn’t exactly have been a daily driver. But now we have cheap high definition LCD panels, desktop 3D printers, and of course, the Raspberry Pi.

We’ve seen these elements combined into bespoke personal computing devices too many times to count now, but very few of them can compare to the incredible YARH.IO. It’s been designed from the ground up for easy assembly and customization; you don’t have to worry about getting custom PCBs made or tracking down some piece of unubtanium hardware. Everything inside of the 3D printed enclosure is an off-the-shelf module, needing little more than the occasional scrap of protoboard to tie them all together.

YARH.IO in tablet mode.

One glance at the rugged design of the YARH.IO, and it’s clear this device wasn’t meant to live on a shelf. Whether it’s getting tossed around the workbench or thrown into a bag on the way to a hacker con, the militarized design of this portable is ready for action. Using appropriately strong materials such as PETG and ABS, we have no doubt the enclosure will survive whatever the on-the-go hacker can throw at it.

But what’s arguably the best feature of the YARH.IO also happens to be the least obvious: the modular design of the enclosure allows you to remove the lower keyboard section and use it as a battery powered Linux tablet (albeit a rather chunky one). Whether the keyboard is attached or not, you still have access to the Pi’s expansion header thanks to a clever pass-through.

Like with the Mil-Plastic that [Jay Doscher] released recently, we know these 3D printed kits will never be as strong as the real military gear they’re emulating. But let’s be realistic, none of us keyboard warriors will be taking them into an actual battlefield anytime soon. What’s more important is that their modular construction allows them to be easily modified for whatever the user’s needs might be. With as far as the state-of-the-art in DIY bespoke computing as come in the last decade, we can’t wait to see what the future holds.

source https://hackaday.com/2020/09/03/yarh-io-is-the-hackable-pi-portable-of-our-dreams/

YARH.IO is the Hackable Pi Portable Of Our Dreams

Less than a decade ago, building a completely custom portable computer was more or less out of the question. Sure you could have cobbled something together with a Gumstix board and the dinky NTSC/PAL screen pulled from a portable DVD player, but it wouldn’t exactly have been a daily driver. But now we have cheap high definition LCD panels, desktop 3D printers, and of course, the Raspberry Pi.

We’ve seen these elements combined into bespoke personal computing devices too many times to count now, but very few of them can compare to the incredible YARH.IO. It’s been designed from the ground up for easy assembly and customization; you don’t have to worry about getting custom PCBs made or tracking down some piece of unubtanium hardware. Everything inside of the 3D printed enclosure is an off-the-shelf module, needing little more than the occasional scrap of protoboard to tie them all together.

YARH.IO in tablet mode.

One glance at the rugged design of the YARH.IO, and it’s clear this device wasn’t meant to live on a shelf. Whether it’s getting tossed around the workbench or thrown into a bag on the way to a hacker con, the militarized design of this portable is ready for action. Using appropriately strong materials such as PETG and ABS, we have no doubt the enclosure will survive whatever the on-the-go hacker can throw at it.

But what’s arguably the best feature of the YARH.IO also happens to be the least obvious: the modular design of the enclosure allows you to remove the lower keyboard section and use it as a battery powered Linux tablet (albeit a rather chunky one). Whether the keyboard is attached or not, you still have access to the Pi’s expansion header thanks to a clever pass-through.

Like with the Mil-Plastic that [Jay Doscher] released recently, we know these 3D printed kits will never be as strong as the real military gear they’re emulating. But let’s be realistic, none of us keyboard warriors will be taking them into an actual battlefield anytime soon. What’s more important is that their modular construction allows them to be easily modified for whatever the user’s needs might be. With as far as the state-of-the-art in DIY bespoke computing as come in the last decade, we can’t wait to see what the future holds.

source https://hackaday.com/2020/09/03/yarh-io-is-the-hackable-pi-portable-of-our-dreams/

Choosing the Optimal Sampling Rate for your DIY Heart Rate Monitor

With wearables still trying to solidify themselves in the consumer health space, there are a number of factors to consider to improve the reliability of such devices in monitoring biometrics. One of the most critical such parameters is the sampling rate. By careful selection of this figure, developers can minimize errors in the measurement, preserve power, and reduce costs spent on data storage. For this reason, [Brinnae Bent] and [Dr. Jessilyn Dunn] wanted to determine the optimal sampling rate for wrist-worn optical heart rate monitors. We’ve shared their earlier paper on analyzing the accuracy of consumer health devices, so they’ve done a lot of work in this space.

The results of their paper probably don’t surprise anyone. The lower the sampling rate, the lower the accuracy of the measurement, and the higher the sampling rate the more accurate the measurement when compared to the gold standard electrocardiogram. They also found that metrics such as root mean square of successive differences (RMSSD), used for calculating heart rate variability, requires sampling rates greater than 64 Hz, the nominal sampling rate of the wearable they were investigating and of other similar devices. That might suggest why your wearable is a bit iffy when monitoring your sleeping habits. They even released the source code for their heart rate variability analysis, so there’s a nice afternoon read if you were looking for one.

What really stood out to us about their work is how they thoroughly backed up their claims with data. Something crowdfunding campaigns could really learn from.

source https://hackaday.com/2020/09/03/choosing-the-optimal-sampling-rate-for-your-diy-heart-rate-monitor/

World’s Only Flying Twin Mustang Goes On Sale

Given the incredible success of the P-51 Mustang during the Second World War, it’s perhaps no surprise that the United States entertained the idea of combining two of the iconic fighters on the same wing to create a long-range fighter that could escort bombers into Japan. But the war ended before the F-82 “Twin Mustang” became operational, and the advent of jet fighters ultimately made the idea obsolete. Just five examples of this unique piece of history are known to exist, and the only one in airworthy condition can now be yours.

Assuming you’ve got $12 million laying around, anyway. Even for a flyable WWII fighter, that’s a record setting price tag. But on the other hand, you’d certainly be getting your money’s worth. It took over a decade for legendary restoration expert [Tom Reilly] and his team to piece the plane, which is actually a prototype XP-82 variant, together from junkyard finds. Even then, many of the parts necessary to get this one-of-a-kind aircraft back in the sky simply no longer existed. The team had to turn to modern techniques like CNC machining and additive manufacturing to produce the necessary components, in some cases literally mirroring the design in software so it could be produced in left and right hand versions.

Recovering half of the Twin Mustang in 2008.

We first covered this incredible restoration project back in 2018, before the reborn XP-82 had actually taken its first flight. Since then the plane has gone on to delight crowds with the sound of two counter-rotating Merlin V-12 engines and win several awards at the Oshkosh airshow. The listing for the aircraft indicates it only has 25 hours on the clock, but given its rarity, we can’t blame [Tom] and his crew for keeping the joyrides to a minimum.

As important as it is to make sure these incredible pieces of engineering aren’t lost to history, the recent crash of the B-17G Nine-O-Nine was a heartbreaking reminder that there’s an inherent element of risk to flying these 70+ year old aircraft. A world-class restoration and newly manufactured parts doesn’t remove the possibility of human error or freak weather. While we’d love to see and hear this beauty taxiing around our local airport, it’s a warbird that should probably stay safely in the roost. Hopefully the $12 million price tag will insure whoever takes ownership of the world’s only flying F-82 treats it with the respect it’s due.

source https://hackaday.com/2020/09/03/worlds-only-flying-twin-mustang-goes-on-sale/

A 3D Printed Magnetic Stirrer For Your DIY Chemistry Projects

When mixing or agitating delicate solutions in the chemistry lab, a magnetic stirrer is often the tool of choice. They’re able to be easily sterilized and cleaned, while maintaining isolation between the mechanical parts and the solutions in question. While they can be purchased off the shelf, [Max Siebenschläfer] whipped up a design that can easily be built at home.

The build consists of a 3D printed base, containing a simple brushed motor. This is hooked up to a motor controller fitted with a simple potentiometer for adjusting the speed of rotation. The motor is then fitted with a small 3D printed spinner containing two magnets. A similar 3D printed part acts as a stirrer, and is fitted with a matching pair of magnets, and dropped into the solution. The magnets in the stirrer are attracted to the ones on the end of the motor, and so when the motor spins, the stirrer spins in the solution, with no physical contact required.

It’s a simple way to build a magnetic stirrer at home without having to shell out big money for a laboratory grade unit. We imagine this could be put to fun use for stirring coffee or cocktails, too – if built with a food-grade spinner. More advanced designs are also possible for the eager home scientist. Video after the break.

source https://hackaday.com/2020/09/03/a-3d-printed-magnetic-stirrer-for-your-diy-chemistry-projects/

COVID-tracing Framework Privacy Busted by Bluetooth

[Serge Vaudenay] and [Martin Vuagnoux] released a video yesterday documenting a privacy-breaking flaw in the Apple/Google COVID-tracing framework, and they’re calling the attack “Little Thumb” after a French children’s story in which a child drops pebbles to be able to retrace his steps. But unlike Hänsel and Gretl with the breadcrumbs, the goal of a privacy preserving framework is to prevent periodic waypoints from allowing you to follow anyone’s phone around. (Video embedded below.)

The Apple/Google framework is, in theory, quite sound. For instance, the system broadcasts hashed, rolling IDs that prevent tracing an individual phone for more than fifteen minutes. And since Bluetooth LE has a unique numeric address for each phone, like a MAC address in other networks, they even thought of changing the Bluetooth address in lock-step to foil would-be trackers. And there’s no difference between theory and practice, in theory.

In practice, [Serge] and [Martin] found that a slight difference in timing between changing the Bluetooth BD_ADDR and changing the COVID-tracing framework’s rolling proximity IDs can create what they are calling “pebbles”: an overlap where the rolling ID has updated but the Bluetooth ID hasn’t yet. Logging these allows one to associate rolling IDs over time. A large network of Bluetooth listeners could then trace people’s movements and possibly attach identities to chains of rolling IDs, breaking one of the framework’s privacy guarantees.

This timing issue only affects some phones, about half of the set that they tested. And of course, it’s only creating a problem for privacy within Bluetooth LE range. But for a system that’s otherwise so well thought out in principle, it’s a flaw that needs fixing.

Why didn’t the researchers submit a patch? They can’t. The Apple/Google code is mostly closed-source, in contrast to the open-source nature of most of the apps that are running on it. This remains troubling, precisely because the difference between the solid theory and the real practice lies exactly in those lines of uninspectable code, and leaves all apps that build upon them vulnerable without any recourse other than “trust us”. We encourage Apple and Google to make the entirety of their COVID framework code open. Bugs would then get found and fixed, faster.

source https://hackaday.com/2020/09/03/covid-tracing-framework-privacy-busted-by-bluetooth/

3D-Printed Flight Controls Use Magnets for Enhanced Flight Simulator 2020 Experience

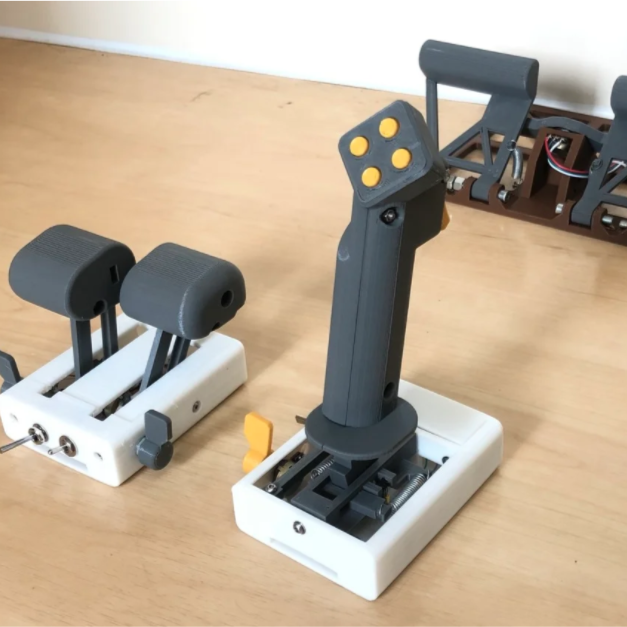
We have seen quite a few DIY joystick designs that use Hall effect sensors, but [Akaki]’s controller designs (YouTube video, embedded below) really make the most of 3D printing to avoid the need for any other type of fabrication. He’s been busy using them to enhance his Microsoft Flight Simulator 2020 experience, and shares not just his joystick design, but makes it a three-pack with designs for throttle and pedals as well.

Hall effect sensors output a voltage that varies in proportion to the presence of a magnetic field, which is typically provided by a nearby magnet. By mounting sensors and magnets in a way that varies the distance between them depending on how a control is moved, position can be sensed and communicated to a host computer. In [akaki]’s case, that communication is done with an Arduino Pro Micro (with ATmega32U4) whose built-in USB support allows it to be configured and recognized as a USB input device. The rest is just tweaking the physical layouts and getting spring or elastic tension right. You can see it all work in the video below.

Hall effect sensors have featured in DIY joystick builds, but for something as delightful as it is different, don’t miss this fantastic high-speed magnetic imager based on them.

source https://hackaday.com/2020/09/03/3d-printed-flight-controls-use-magnets-for-enhanced-flight-simulator-2020-experience/

3D-Printed Flight Controls Use Magnets for Enhanced Flight Simulator 2020 Experience

We have seen quite a few DIY joystick designs that use Hall effect sensors, but [Akaki]’s controller designs (YouTube video, embedded below) really make the most of 3D printing to avoid the need for any other type of fabrication. He’s been busy using them to enhance his Microsoft Flight Simulator 2020 experience, and shares not just his joystick design, but makes it a three-pack with designs for throttle and pedals as well.

Hall effect sensors output a voltage that varies in proportion to the presence of a magnetic field, which is typically provided by a nearby magnet. By mounting sensors and magnets in a way that varies the distance between them depending on how a control is moved, position can be sensed and communicated to a host computer. In [akaki]’s case, that communication is done with an Arduino Pro Micro (with ATmega32U4) whose built-in USB support allows it to be configured and recognized as a USB input device. The rest is just tweaking the physical layouts and getting spring or elastic tension right. You can see it all work in the video below.

Hall effect sensors have featured in DIY joystick builds, but for something as delightful as it is different, don’t miss this fantastic high-speed magnetic imager based on them.

source https://hackaday.com/2020/09/03/3d-printed-flight-controls-use-magnets-for-enhanced-flight-simulator-2020-experience/

Don’t Slack Off On Updating Your Status

Displaying an accurate status in Slack (or whatever other employer-provided collaboration program you may be forced to run) is crucial in 2020. If you need to make a sandwich or take the dog out real quick, but you don’t update your status to show yourself as away, you might come back to a string of increasingly concerned or frustrated messages with lots of annoying question marks and the occasional interrobang.

[Becky Stern] decided that a physical interface would be a far more fun way to keep tabs on her status, and an excellent visual reminder to actually do it. We totally agree. Inside the box is a NodeMCU which is using [Brian Lough]’s Slack API library for Arduino. This made it easy for [Becky] to create a switch/case selector of statuses, and in each of these she can set the presence token as auto or away, and show a custom message with an appropriate emoji. These of course match the emoji semi-circling the selector, which is a rotary switch with a really nice knob.

While we’re on the subject of Slack notifiers, how about a companion cat to wave when you’ve been mentioned?

source https://hackaday.com/2020/09/02/dont-slack-off-on-updating-your-status/

Fog-Free Mask Hack Solves Mask Versus Glasses Conundrum with Superb Seal

If you have worn a mask and glasses together for more than a quarter of a second, you are probably annoyed that we don’t have a magical solution for foggy lenses. Moisture-laden air is also a good indicator of where unfiltered air is escaping. Most masks have some flexible metal across the nose bridge that is supposed to seal the top, but it is woefully inadequate. The Badger Seal by [David Rothamer] and [Scott Sanders] from the University of Wisconsin-Madison College of Engineering is free to copy during the COVID-19 pandemic, even commercially. It works by running an elastic cord below the jaw and a formable wire over the nose to encourage contact all around both mouth and nose.

You can build your own in three ways. Each configuration is uniquely suited to a different situation. The first design is the easiest to make and should work for most people. The second is best for folks who need a better seal on the lower half of their face, like someone sporting a beard. It can also have ear loops, and that means your 3D printed ear savers have another use. The Madison campus of the University of Wisconsin also has fun with lock cracking and graphene experiments.


Badger Seal takes its name from [Bucky Badger], the school’s mascot. There was no animal testing for this project, but if you can fit a mask on a badger’s face, you can name it whatever you want.

Thank you for the tip, [cyberlass]

source https://hackaday.com/2020/09/02/fog-free-mask-hack-solves-mask-versus-glasses-conundrum-with-superb-seal/

Flipper Zero Blasts Past Funding Goal and Into Our Hearts

There’s never been a better time to be a hardware hacker: the tools are cheap, the information is free, and the possibilities are nearly endless. But that doesn’t mean there isn’t room for improvement. The Flipper One was developed to make the world of hardware hacking even more accessible, and as of this writing, has officially ended its Kickstarter campaign after raising a staggering $4.8 million. To say the community is excited about this little gadget is perhaps an understatement.

So what does the Flipper One do that’s gotten everyone so worked up? Well, for one, it’s not so much what it can do as how it does them. Taking inspiration from the already popular pwnagotchi project, the Flipper One gamifies the normally rather mundane tasks of sniffing for 433 MHz signals and flashing EEPROMs with the addition of an animated dolphin that’s sustained by your hacking. If you want the little fellow to grow and be happy, you need to keep poking and prodding around at any piece of hardware you come across.

If you’re looking for a comprehensive list of features, that’s a little harder to nail down. Partially because the device has picked up a number of new tricks (such as support for Bluetooth and NFC) thanks to the fact it made better than 8,000% of its original funding goal, but also because it can be expanded with additional hardware and software which obviously won’t get developed until the community gets their hands on the core device.

But even the core functionality, demonstrated in the video after the break, is quite compelling. The Flipper One’s CC1101 transceiver chip (anyone else thinking of the IM-ME right now?) allows it to record, analyze, and play back RF signals from 300 to 928 MHz, meaning you can instantly take over remote control systems that aren’t using a rolling code for authentication. It can also read and emulate many different RFID cards, record and transmit IR signals, emulate a USB HID device and run programmable payloads, and act as a USB to UART/SPI/I2C adapter. All contained in a sleek and pocket-sized enclosure that looks like a proper cyberpunk hacking gadget.

We’re extremely interested in seeing what the community can do with the Flipper One, especially now that the extra windfall has allowed the team to create a formal Developer Program for people who want to help work on the core platform or produce add-on modules. After banking nearly $5 million, this will be the yardstick by which all other crowd sourced hacking gadgets are measured for years to come; let’s hope they make it count.

source https://hackaday.com/2020/09/02/flipper-zero-blasts-past-funding-goal-and-into-our-hearts/

Building An Open Source ThinkPad Battery

If you own a laptop that’s got a few years on the clock, you’ve probably contemplated getting a replacement battery for it. Which means you also know how much legitimate OEM packs cost compared to the shady eBay clones. You can often get two or three of the knock-offs for the same price as a single real battery, but they never last as long as the originals. If they even work properly at all.

Which is why [Alexander Parent] decided to take the road less traveled and scratch built a custom battery for his ThinkPad T420. By reverse engineering how the battery pack communicated with the computer, he reasoned he would be able to come up with an open source firmware that worked at least as well as what the the third party ones are running. Which from the sounds of it, wasn’t a very high bar. From a more practical standpoint, it also meant he’d be able to create a higher capacity battery pack than what was commercially available should he chose to.

A logic analyzer wired in between one of the third party batteries and a spare T420 motherboard allowed [Alexander] to capture all the SMBus chatter between the two. From there he wrote some Arduino code that would mimic a battery as a proof of concept. He was slowed down a bit by an undocumented CRC check, but in the end he was able to come up with a fairly mature firmware that even allows you to provide a custom vendor name and model number for your pack.

The code was shifted over to an ATtiny85, with a voltage divider wired up to one of the pins so it can read the pack voltage. [Alexander] says his firmware still doesn’t do a great job of reporting the actual battery capacity remaining, but it’s close enough for his purposes. He came up with a simple PCB design to hold the MCU and support components,  which eventually he plans on putting inside of a 3D printed case that actually plugs into the back of his T420.

This project is obviously still in a relatively early stage, but we’re very interested to see [Alexander] take it all the way. The ThinkPad has long been the hacker’s favorite laptop, and we can think of no machine more worthy of a fully open hardware and software battery pack.

source https://hackaday.com/2020/09/02/building-an-open-source-thinkpad-battery/

Pause Your Tunes When it is Time to Listen Up!

“Sorry. I had music playing. Would you say that again?” If we had a money-unit every time someone tried talking to us while we were wearing headphones, we could afford a super-nice pair. For an Embedded C class, [extremerockets] built Listen Up!, a cutoff switch that pauses your music when someone wants your attention.

The idea was born while sheltering in place with his daughter, who likes loud music, but he does not want to holler to get her attention. Rather than deny her some auditory privacy, Listen Up! samples the ambient noise level, listens for a sustained rise in amplitude, like speech, and sends a pause signal to the phone. Someday, there may be an option to route the microphone’s audio into the headphones, but for now there is a text-to-speech module for verbalizing character strings. It might be a bit jarring to hear a call to dinner in the middle of a guitar riff, but we don’t like missing dinner either, so we’re with [extremerockets] on this one.

We don’t really need lots of money to get fun headphones, and we are not afraid of making our own.

source https://hackaday.com/2020/09/02/pause-your-tunes-when-it-is-time-to-listen-up/

Staged Train Wrecks: An Idea That Ran Out of Steam

Before there were demolition derbies, there were train totalings. That’s right, somebody had the idea to take a couple of worn-out train engines that were ready for the scrap heap, point them at each other, and drive them full steam ahead. And their boss said capital idea, let’s do it. This was the late 1890s.

Maybe it wasn’t the safest way to spend an evening, but a staged train wreck was surely an awesome spectacle to behold. Imagine being one of the brave engineers who had no choice but to get the train going as fast as possible and then jump out at the last second. A demolition derby seems like child’s play by comparison.

The largest and most widely-publicized wreck was put on by a man named William George Crush who was trying to find new ways to promote the Missouri-Kansas-Texas passenger railway. Once he got the okay, Crush found a large field surrounded by three hills that made for excellent viewing. He stood up a temporary town complete with a circus tent restaurant, a wooden jail cell, and 200 rent-a-constables.

On September 15th, 1896, forty thousand people gathered to watch two trains collide along a section of purpose-built track. They hit each other going 50 mph (80 km/h) and both engines exploded, sending hot iron projectiles every which way. Several people were injured, a few died, and a hired photographer lost an eye to shrapnel. Train totalings nevertheless continued until the Great Depression of the 1930s, when the practice was discarded as wasteful.

Thanks for the tip, [Martin]!

source https://hackaday.com/2020/09/02/staged-train-wrecks-an-idea-that-ran-out-of-steam/

WiiBoy Color Is Exactly What It Sounds Like

Anyone can go out and buy a handheld console, and if you want to be the cool kid on the school bus, you can always ask your parents to take you out to get one. But if you want real street cred that lasts through your adult years, you’ve gotta put something together yourself. [GingerOfMods] has done just that with the Wiiboy Color. 

Yes, it’s another home-console-turned-portable, and it’s perfomed with exquisite execution. The Wii motherboard is cut and sliced to the absolute bare minimum, as the aim was to build the entire system to the rough form factor of the original Game Boy Color. Custom PCBs were then used to link the chopped ‘board to peripherals, such as the USB drive used to load games and the circuitry from a Gamecube controller. The screen is a beautifuly looking 3.5″ IPS LCD, running at 480p and originally intended for use as an automotive backup camera. Battery life is around 2-3 hours, with a USB-C port included for easy charging. More details are included on the forum build log.

It’s a tidy build, and the 3D printed case, Switch joysticks and DS Lite buttons give it a near-production quality finish. [GingerOfMods] intends to build more for commissions, though expect a hefty price tag given the labor and custom work involved. We’ve seen other portable Wiis before too, like this tightly-packed Kapton-heavy build. Video after the break.

[Thanks to LG Dirk for the tip!]

source https://hackaday.com/2020/09/02/wiiboy-color-is-exactly-what-it-sounds-like/