As drone capability and flight time increase, the missions they will fly are getting more and more complex. [Justin] uses a service called ClimaCell which has real-time, forecast, and historical weather data available across the globe. The service isn’t totally free, but if you make fewer than 1,000 calls a day you might be able to use a developer account which doesn’t cost anything.
According to [Justin], weather data can help with pre-flight planning, in-flight operations, and post-flight analysis. The value of accurate forecasting is indisputable. However, a drone or its ground controller could certainly understand real-time weather in a variety of ways and record it for later use, so the other two use cases maybe a little less valuable.
While on the subject, it seems to us that accurate forecasting could be important for other kinds of projects. Will you have enough sun to catch a charge on your robot lawnmower tomorrow? If your beach kiosk is expecting rain, it could deploy an umbrella or close some doors and shutdown for a bit.
If you insist on using a free service, the ClimaCell blog actually lists their top 8 APIs. Naturally, their service is number one, but they do have an assessment of others that seems fair enough. Nearly all of these will have some cost if you use it enough, but many of them are pretty reasonable unless you’re making a huge number of calls.
How would you use accurate micro weather data? Let us know in the comments. Then again, sometimes you want to know the weather right from your couch. Or maybe you’d like your umbrella to tell you how long the storm is going to last.
Macro photography is the art of taking photos of things very close up, and ideally at great detail. Unfortunately cameras have poor depth of field at close ranges, so to get around this, many use focus stacking techniques. This involves taking many photos at different focal lengths and digitally compositing them together. To help achieve this, [gtoal] realized that garden variety CNC machines would be perfect for the job.
To focus stack effectively, it’s desirable to move the camera in very small increments of sub-mm precision, in order to get different parts of the subject in focus. For this, a CNC machine excels, as it’s designed to move tool heads in very tiny, precise movements.
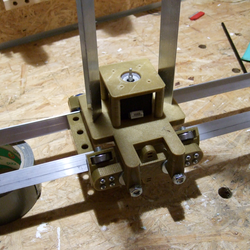
To achieve a bargain focus stacking rig, [gtoal] used a Dremel tool mount for cutting discs. It’s repurposed here, used as an easy way to fit a Raspberry Pi camera to a CNC tool head through its mounting holes. From there, it’s a simple manner of stepping the CNC a tiny amount at a time on the Z-axis, while taking photos with the Raspberry Pi along the way. [gtoal] notes that it would be simple for an experienced CNC user to whip up a program to automate the entire process.
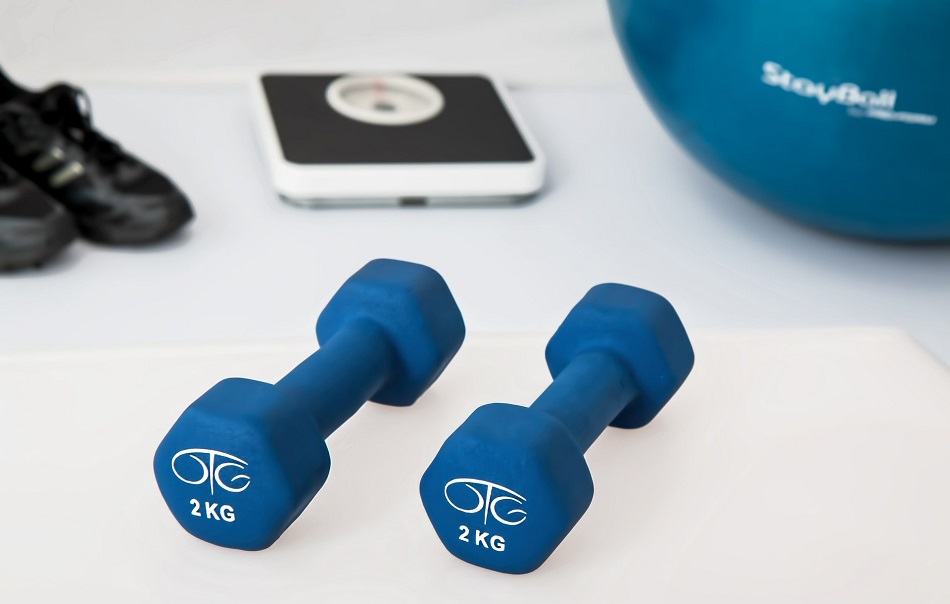
Set up an exercise routine and focus on proper nutrition to reach your fitness goals this year. By following the easy steps below, you can achieve your fitness and nutrition goals. Take your workout to new heights by finding sports equipment for sale on Junk Mail today.
Photo Source – www.pixabay.com
1. Set clear goals
Set
clear and attainable fitness
goals that are simple to achieve. Write down your specific goals and
stick them up in a place where you’ll see them often. When you’re clear about
what you want to achieve, it’s easier to stay motivated.
2. Create a plan
Once
you know what your fitness
goals are, develop a plan of how you’re going to achieve them. Write
down the specific steps you need to take with a timeline for each phase of your
fitness journey. Include periods of rest so that you enjoy some downtime along
the way.
3. Keep records
Take
note of what strategies work for you and those that don’t. By recording your
fitness journey, you can use the information to develop a schedule that works
well for you. Focus on the strategies that help you achieve your goals and
discard those that don’t.
4. Identify your motivation
Identifying
the reasons why you set specific fitness goals helps to keep you motivated. These reasons give
you the energy to keep working towards your goals. Write down these reasons and
revisit them when you’re finding it challenging to stay on track.
5. Avoid trends
Avoid
diets and fitness trends that are complicated and unobtainable. Focus on
creating a workout schedule that fits in with your lifestyle and personal needs
rather than going from one trend to the next. Likewise, it’s advisable to focus
on eating healthy and nutritious meals rather than participating in fad diets.
6. Be flexible
While
it’s helpful to set specific goals, it’s also beneficial to make adjustments
along the way. If a goal is no longer a good fit, change it so that it’s a
better match for your personal fitness journey. When a goal is too challenging
to achieve, it can leave you feeling demotivated. Rather than giving up
entirely, alter your fitness schedule so that it’s easier to maintain.
7. Don’t rush
As
you start working towards your fitness goals, it’s tempting to put pressure on yourself and go
all out. However, you’ll have a better chance of accomplishing your goals if
you pace yourself along the way. Not only does taking a gentler approach help
you to stay motivated, but it also protects you against injury and burnout.
Regular gentle exercise is more effective than an intense training session once
a week.
8. Invest in a health coach
Struggling
to reach your fitness
goals? Invest in a health coach or personal trainer. Professional
support helps to keep you on track when you’re facing challenges on your
fitness journey. These professionals have plenty of knowledge and advice that
allows you to get better and faster results.
9. Get support
Working
out with other people helps you to stay disciplined. Joining a community of
like-minded people makes it easier to be enthusiastic about working out. You’ll
be able to share knowledge within the group and support each other through
difficult times.
10. Listen to your body
Listen
to your body and don’t exercise if you’re feeling sick. Resting will help you
recover quicker so that you can return fully committed to your fitness
schedule.
11. Forgive yourself
Learning
to be gentle and love yourself is an important aspect of getting fit and healthy.
Don’t be hard on yourself if you miss a workout or eat an unhealthy meal every
once in a while. Forgive yourself and continue with your schedule the following
day.
12. Don’t give up
If
you’ve deviated from your fitness schedule and you feel like a failure, don’t
give up. Rather revisit your goals and recommit yourself to achieving them. The
most successful people have gone through difficult patches and made mistakes,
but they picked themselves up and kept going rather than admitting defeat.
We can sympathize with [Benjamin Cabé]. He has a lot of development boards and it has become painful to maintain the many toolchains for each board. We’ve also suffered from upgrading one tool breaks another tool in some obscure way. His solution? Use Github Codespaces which you can get early access for beta testers.
The idea is that you can spin off a container-specific to a GitHub repository that has all the proper versions and dependencies required to work with a project.
If you sign up for the beta, you’ll be on a waitlist, but it is interesting to see [Benjamin] go through the steps. The service is free during the beta and you get two codespaces. Presumably, you’ll eventually be able to pay for more capability.
The idea is good, but we’ll have to see about the implementation. A preconfigured container might move from machine to machine or even to deep storage for later reconstitution. Flashing the binary image to the device looked painful from the browser. We’ve seen it done nicely with, for example, the online Arduino IDE but it did take some installable software helpers to do that.
We’ll be curious about how many different platforms this will support. However, you can roll your own version of this and avoid the cloud using Docker or even a full-blown VM like VirtualBox. Sure, it is more work, but you control your destiny. Add something like Platform.IO and your choice of development tools and you can avoid having so many competing development tools all in your main computer.
There’s plenty of fun to be had with retrocomputers of yesteryear, but for modern users, it can be something of a culture shock. Going back to floppy disks after all these years is a reminder of just how far storage technology has come in terms of speed, reliability, and of course, capacity. Luckily, there are ways to combine the best of both worlds.
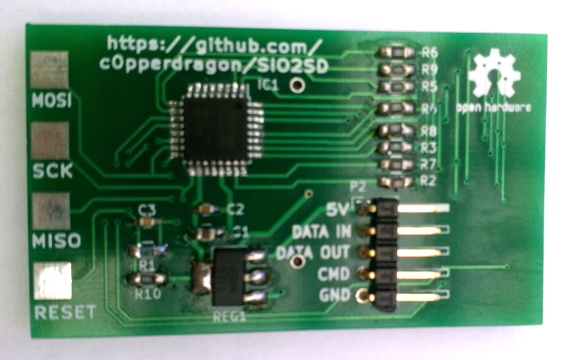
Floppy drive emulators for classic computers are of course nothing new, but we think this one [c0pperdragon] has put together is worthy of a closer look. Not only does the ATmega32U4 based emulator have an exceptionally low part count, but the code has been written in the Arduino IDE. Both features make it easy for new players to duplicate and revise the design should they feel so inclined. In a pinch you could even implement it on a breadboard with a garden variety Arduino.
The emulator is housed in a 3D printed enclosure designed to look like an era-appropriate Atari 1050 Disk Drive, except you’re using SD cards instead of floppies. The firmware can mimic two physical drives and supports up to 100 disk images on each SD card. The user interface is about as simple as it gets, with two push buttons and a pair of seven-segment LEDs to indicate which disk image is currently loaded up.
We’ve seen some very elaborate disk emulators over the years, but there’s something compelling about how straightforward this version is. If it helps a few more people experience the unique joys of retrocomputing, it’s a win in our book.
There’s plenty of fun to be had with retrocomputers of yesteryear, but for modern users, it can be something of a culture shock. Going back to floppy disks after all these years is a reminder of just how far storage technology has come in terms of speed, reliability, and of course, capacity. Luckily, there are ways to combine the best of both worlds.
Floppy drive emulators for classic computers are of course nothing new, but we think this one [c0pperdragon] has put together is worthy of a closer look. Not only does the ATmega32U4 based emulator have an exceptionally low part count, but the code has been written in the Arduino IDE. Both features make it easy for new players to duplicate and revise the design should they feel so inclined. In a pinch you could even implement it on a breadboard with a garden variety Arduino.
The emulator is housed in a 3D printed enclosure designed to look like an era-appropriate Atari 1050 Disk Drive, except you’re using SD cards instead of floppies. The firmware can mimic two physical drives and supports up to 100 disk images on each SD card. The user interface is about as simple as it gets, with two push buttons and a pair of seven-segment LEDs to indicate which disk image is currently loaded up.
We’ve seen some very elaborate disk emulators over the years, but there’s something compelling about how straightforward this version is. If it helps a few more people experience the unique joys of retrocomputing, it’s a win in our book.
Mechanical watches are triumphs of engineering on a tiny scale. Capable of keeping time by capturing the energy of the user’s own movements, they never need batteries changed. Unfortunately, they quickly lose time when not worn for a few days. To solve that problem, [sblantipodi] built a smart watch winder.
The overall build consists of six individual winder units. Each one has an ESP8266EX D1 Mini microcontroller, hooked up to a 28BYJ48 stepper motor with a ULN2003 motor driver. There’s also an OLED screen for status information. When commanded, the stepper motor turns, rotating a watch case to wind the timepieces. Control is via voice command, thanks to a Google Home Mini and a Raspberry Pi running Home Assistant. Watches can be wound individually, or all together, depending on the command given.
As any programmer could tell you, there’s significant value in automating a process that is performed often enough. The more times that process is used, the more it makes sense to automate it or at least improve its efficiency. This rule isn’t limited to software though; improvements to hardware design can also see improvements in efficiency as well. For that reason, [Hulk] designed a simple relay module in order to cut the amount of time he spends implementing this solution in his various other projects.
While driving a relay with a transistor is something fundamental, this project isn’t really about that per se. It’s about recognizing something that you do too much, and then designing that drudgery out of your projects. [Hulk] was able to design a PCB with 12 modules on it, presumably saving fabrication costs. He can then easily populate them with specific components as soon as he needs one. Another benefit of designing something like this yourself, rather than an off-the-shelf relay module, is that you can do away with any useless features you’ll never need (or add ones that aren’t available in commercial devices).
We can appreciate the efficiency gains this would make for our next project that needs a simple driver for a light, garage door opener, or any other binary electronic device. It can be a hassle to go find the correct transistor and relay, solder it all on the project board, and hope it all works. A pre-made solution solves all these issues, but we do wish the schematics were available to keep us from having to design our own. Driver boards are a pretty common project for all the different types of relays we see around here, so there is probably one available out there.
That was a close shave! On Tuesday, asteroid 2011 ES4 passed really close to the earth. JPL’s close approach data pegs its nominal distance from earth at about 0.00081083276352288 au! Yeah, we had to look it up too: that’s around 75,000 miles (120,000 kilometers), just ten times the diameter of the earth and only about one-third the distance from the earth the moon. It got within about 52,000 miles of the moon itself. Bookworms who made it all the way through Seveneves are surely sweating right now.
There’s a low current arms race when it comes to lighting up LEDs. The latest salvo in the field comes from [Christoph Tack] who boasts a current of 1.36 µA at 3 V for a green LED that is roughly 10x brighter than a phosphorescent watch dial. Of course, the TritiLED is the design being chased, which claims to run 17.6-20.2 years on a single CR2032 coin cell.
Proving once again that Hanna and Barbera were indeed future-tech prophets, flying cars are now a thing. Sky Drive Inc. made a four-minute test flight of a single passenger octo-rotor aircraft. Like a motorcycle of the sky (and those are a thing too) this thing is single-passenger and the cockpit is open air. The CNN article mentions that “The company hopes to make the flying car a part of normal life and not just a commodity”. Yeah, we’re sure they do, but in an age when electric cars are demonized for ranges in the low hundreds of miles, this is about as practical for widespread use as self-balancing electric unicycles.
Google and Apple built a COVID-19 contact tracing framework into their mobile platforms but stopped short of building the apps to actually do the work, anticipating that governments would want to control how the apps worked. So was the case with the European tracing app as Elliot Williams recently covered in this excellent overview. However, the United States has been slower to the game. Looks like the tech giants have become tired of waiting and have now made it possible for the framework itself to work as a contact tracing mechanism. To enable it, local governments need to upload a configuration file that sets parameters and URLs that redirect to informational pages from local health departments, and users must opt-in on their phone. All other tracing apps will continue to function, this is meant to add an option for places that have not yet adopted/developed their own app.
And finally, it’s time to take back responsibility for your poor spelling. Auto-correct has been giving us sardines instead of teaching how to fish for them ourselves. That ends now. The Autocorrect Remover is an extension for Google Docs that still tells you the word is wrong, but hides the correct spelling, gamifying it by having you guess the right spelling and rewarding you with points when you get it right.
Trawling classified ads or sites like Craigslist for interesting hardware is a pastime enjoyed by many a hacker. At a minimum, you can find good deals on used tools and equipment. But if you’re very lucky, you might just stumble upon something really special.
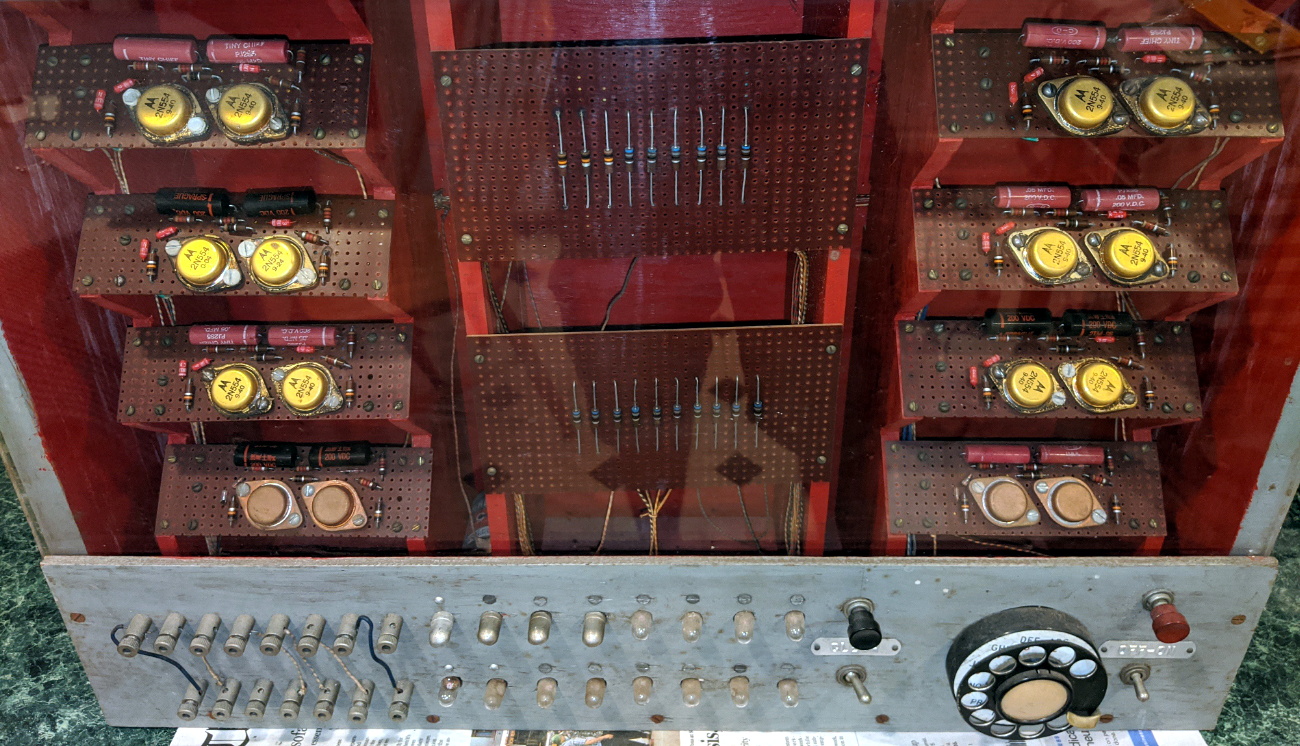
Which is exactly how [John] came into possession of the TRANSBINIAC. Included in a collection of gear that may have once belonged to a silent key, the device is a custom-built solid-state computer that appears to have been assembled in the early 1960s. Featuring a large see-through window not unlike what you might find on a modern gaming computer and a kickstand that tilts it back at a roughly 45° angle, it was obviously built to be shown off. Perhaps it was a teaching aid or even a science fair entry.
After some digging, it looks like the design of the TRANSBINIAC was based on plans published in the January 1960 issue of Electronics Illustrated. Though there are some significant differences. This computer uses eight bistable flip-flip modules instead of the original six, deletes the multiplication circuit, and employs somewhat simplified wiring. Whoever built this machine clearly knew what they were doing, which for the time, is really saying something. This truly unique machine may well have been one of the first privately owned digital computers in the world.
Which is why we’re glad to see [John] trying to restore the device to its former glory. Naturally it’s a little tricky since the computer came with no documentation and its design doesn’t exactly match anything out there. But with the help of other Hackaday.IO users, he’s hoping to get everything figured out. It sounds like the first step is to try and diagnose the 2N554 germanium transistor flip-flop modules, as they appear to be behaving erratically. If you have experience with this sort of hardware, feel free to chime in.
The realities of wearing a mask when you go out, from forgetting the thing in the car to dealing with fogged up glasses, have certainly taken some getting used to for most of us. But not every issue is immediately obvious. For example, experts say that as a mask gets damp from exhalation or perspiration it becomes less effective. Which is precisely why [Rick Pannen] has designed the Mask Moisture Meter.
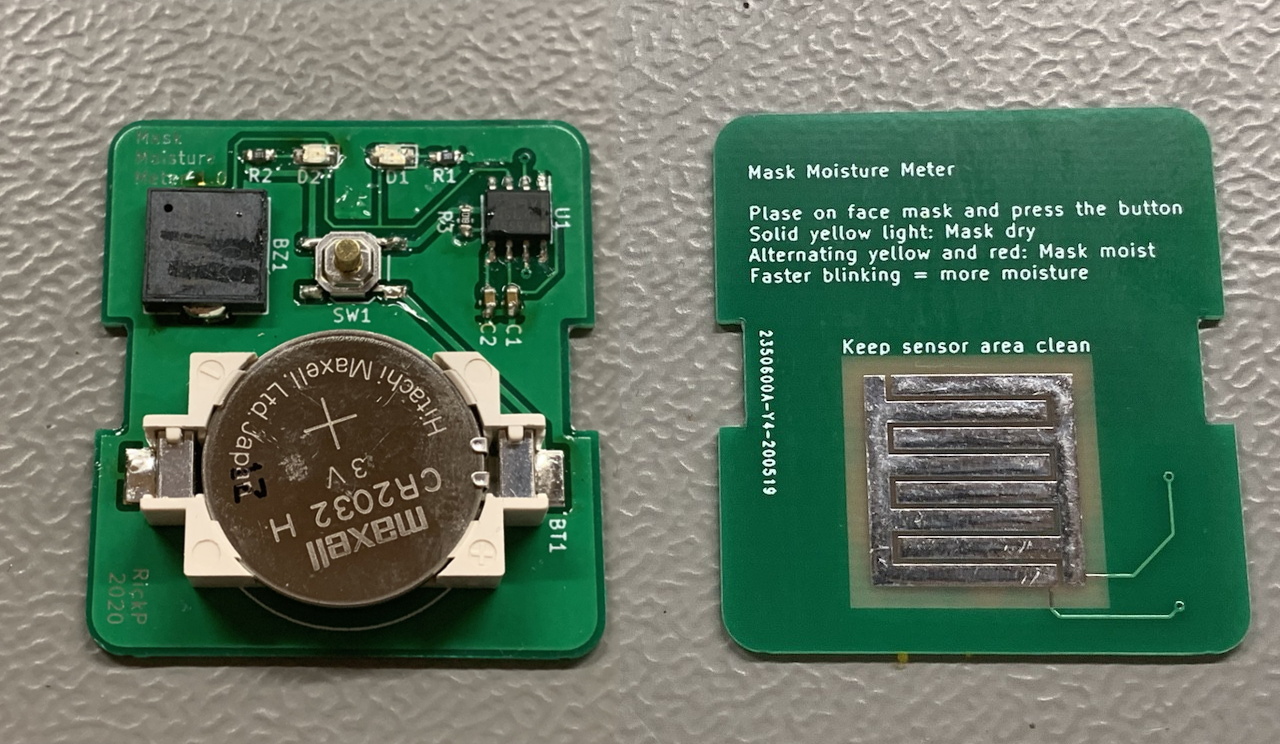
As deep as we are into the Microcontroller Era, we really appreciate the simplicity of this design. It’s just a 555 timer, a buzzer, some LEDs, and a handful of passive components to get them all talking to each other. There’s no firmware or programming required; just put a fresh battery in the holder and away you go. The traces of the PCB serve as a moisture detector, so when the board is pushed against something wet enough, the red LED and buzzer will go off to warn the user.
Now admittedly, there’s a point where you certainly won’t need an electronic gizmo to tell you a mask is wet. But as [Rick] demonstrates in the video after the break, the circuit is sensitive enough to indicate when there’s moisture in the material that might not be immediately obvious to the eye.
The realities of wearing a mask when you go out, from forgetting the thing in the car to dealing with fogged up glasses, have certainly taken some getting used to for most of us. But not every issue is immediately obvious. For example, experts say that as a mask gets damp from exhalation or perspiration it becomes less effective. Which is precisely why [Rick Pannen] has designed the Mask Moisture Meter.
As deep as we are into the Microcontroller Era, we really appreciate the simplicity of this design. It’s just a 555 timer, a buzzer, some LEDs, and a handful of passive components to get them all talking to each other. There’s no firmware or programming required; just put a fresh battery in the holder and away you go. The traces of the PCB serve as a moisture detector, so when the board is pushed against something wet enough, the red LED and buzzer will go off to warn the user.
Now admittedly, there’s a point where you certainly won’t need an electronic gizmo to tell you a mask is wet. But as [Rick] demonstrates in the video after the break, the circuit is sensitive enough to indicate when there’s moisture in the material that might not be immediately obvious to the eye.
Caring for the elderly and vulnerable people while preserving their privacy and independence is a challenging proposition. Reaching a panic button or calling for help may not be possible in an emergency, but constant supervision or camera surveillance is often neither practical nor considerate. Researchers from MIT CSAIL have been working on this problem for a few years and have come up with a possible solution called RF Diary. Using RF signals, a floor plan, and machine learning it can recognize activities and emergencies, through obstacles and in the dark. If this sounds familiar, it’s because it builds on previous research by CSAIL.
The RF system used is effectively frequency-modulated continuous-wave (FMCW) radar, which sweeps across the 5.4-7.2 GHz RF spectrum. The limited resolution of the RF system does not allow for the recognition of most objects, so a floor plan gives information on the size and location of specific features like rooms, beds, tables, sinks, etc. This information helps the machine learning model recognize activities within the context of the surroundings. Effectively training an activity captioning model requires thousands of training examples, which is currently not available for RF radar. However, there are massive video data sets available, so researchers employed a “multi-modal feature alignment training strategy” which allowed them to use video data sets to refine their RF activity captioning model.
There are still some privacy concerns with this solution, but the researchers did propose some improvements. One interesting idea is for the monitored person to give an “activation” signal by performing a specified set of activities in sequence.
Radar is a complex but fascinating topic, and we’ve seen a number of excellent projects in the field, including a bicycle mounted radar that can be used to generate aerial images and a Doppler radar module designed from first principles.
Thanks [Qes] and [Adam Conner-Simons] for the tip!
If you’re looking to rid your day to day life of dead trees, there’s a good chance you’ve already heard of the reMarkable tablet. The sleek device aims to replace the traditional notebook. To that end, remarkable was designed to mimic the feeling of writing on actual paper as closely as possible. But like so many modern gadgets, it’s unfortunately encumbered by proprietary code with a dash of vendor lock-in. Or at least, it was.
[Davis Remmel] has been hard at work porting Parabola, a completely free and open source GNU/Linux distribution, to the reMarkable. Developers will appreciate the opportunity to audit and modify the OS, but even from an end-user perspective, Parabola greatly opens up what you can do on the device. Before you were limited to a tablet UI and a select number of applications, but with this replacement OS installed, you’ll have a full-blown Linux desktop to play with.
You still won’t be watching videos or gaming on the reMarkable (though technically, you would be able to), but you could certainly use it to read and edit documents the original OS didn’t support. You could even use it for light software development. Since USB serial adapters are supported, microcontroller work isn’t out of the question either. All while reaping the considerable benefits of electronic paper.
The only downside is that the WiFi hardware is not currently supported as it requires proprietary firmware to operate. No word on whether or not [Davis] is willing to make some concession there for users who aren’t quite so strict about their software freedoms.
If you’re looking to rid your day to day life of dead trees, there’s a good chance you’ve already heard of the reMarkable tablet. The sleek device aims to replace the traditional notebook. To that end, remarkable was designed to mimic the feeling of writing on actual paper as closely as possible. But like so many modern gadgets, it’s unfortunately encumbered by proprietary code with a dash of vendor lock-in. Or at least, it was.
[Davis Remmel] has been hard at work porting Parabola, a completely free and open source GNU/Linux distribution, to the reMarkable. Developers will appreciate the opportunity to audit and modify the OS, but even from an end-user perspective, Parabola greatly opens up what you can do on the device. Before you were limited to a tablet UI and a select number of applications, but with this replacement OS installed, you’ll have a full-blown Linux desktop to play with.
You still won’t be watching videos or gaming on the reMarkable (though technically, you would be able to), but you could certainly use it to read and edit documents the original OS didn’t support. You could even use it for light software development. Since USB serial adapters are supported, microcontroller work isn’t out of the question either. All while reaping the considerable benefits of electronic paper.
The only downside is that the WiFi hardware is not currently supported as it requires proprietary firmware to operate. No word on whether or not [Davis] is willing to make some concession there for users who aren’t quite so strict about their software freedoms.
If we’re honest, our workshop isn’t as clean as it probably should be, and likely many makers out there will say the same. This can have knock-on effects, such as iron filings clogging motors, or in this case, dust affecting the quality of 3D prints. Aiming to tackle this, [3Demon] built a fun Spongebob-themed dust filter for their 3D printer.
The filter works in a simple way. The Spongebob shell is 3D printed in two halves, with a hinge joining both parts. Inside each half, a section of sponge is stuck inside. The two halves are then closed with a snap fit, with the filament passing through a hole in Spongebob’s head and out through the (square) pants. With the sponge packed in nice and tight, dust is wiped from the filament as it feeds through bob to the printer.
While it’s important to install carefully to avoid filament feed issues, it’s an easy way to automatically clean filament during the printing process. You may be surprised just how dirty your filament gets after sitting on the shelf for a few months. Getting rid of such contamination decreases the likelihood of annoying problems like delaminations and jams. Avid printers may also want to consider making their own filament, too. Happy printing!
Over the past few weeks, a new season of Mars fever kicked off with launches of three interplanetary missions. And since there’s a sizable overlap between fans of spaceflight and those of electronics and 3D printing, the European Space Agency released the ExoMy rover for those who want to experience a little bit of Mars from home.
ExoMy’s smiling face and cartoonish proportions are an adaptation of ESA’s Rosalind Franklin (formerly the ExoMars) rover which, if 2020 hadn’t turned out to be 2020, would have been on its way to Mars as well. While Rosalind Franklin must wait for the next Mars launch window, we can launch ExoMy missions to our homes now. Like the real ESA rover, ExoMy has a triple bogie suspension design distinctly different from the rocker-bogie design used by NASA JPL’s rover family. Steering all six wheels rather than just four, ExoMy has maneuvering chops visible in a short Instagram video clip (also embedded after the break).
ExoMy’s quoted price of admission is in the range of 250-500€. Perusing instructions posted on GitHub, we see an electronics nervous system built around a Raspberry Pi. Its published software stack is configured for human remote control, but as it is already running ROS (Robot Operating System), it should be an easy on-ramp for ExoMars builders with the ambition of adding autonomy.
Resin printers have a lot going for them – particularly in regards to quality surface finishes and excellent reproduction of fine details. However, the vast majority rely on UV light to cure prints. [douwe1230] had been using a resin printer for a while, and grew tired of having to wait for sunny days to cure parts outside. Thus, it was time to build a compact UV curing station to get the job done.
The build consists of a series of laser-cut panels, assembled into a box one would presume is large enough to match the build volume of [douwe1230’s] printer. UV LED strips are installed in the corners to provide plenty of light, and acrylic mirrors are placed on all the walls. The use of mirrors is key to evenly lighting the parts, helping to reduce the likelihood of any shadows or dead spots stopping part of the print from curing completely. In the base, a motor is installed with a turntable to slowly spin the part during curing.
[Douwe1230] notes that parts take around about 10 minutes to cure with this setup, and recommends a flip halfway through to make sure the part is cured nice and evenly. We’ve seen other similar DIY builds too, like this one created out of a device aimed at nail salons. If you’re struggling with curing outside, with the weather starting to turn, this might just be the time to get building!
Signals and systems theory is a tough topic. Terms like convolution and impulse response can be hard to understand on a visceral level and most books that talk about these things emphasize math over intuition. [Discretised] has a YouTube channel that already has several videos that promise to tackle these topics with “minimum maths, maximum intuition.” We particularly noticed the talks on convolution and impulse response.
We think that often math and intuition don’t always come together. It is one thing, for example, to know that E=I times R, and power is I times E, but it is another to realize that a half-watt transmitter delivers 5V into a 50Ω load and that one watt will take just over 7V into that same load.
The example used is computing how much smoke you can expect to create by setting off fireworks. We presume the math models are notional since we imagine a real model would be pretty complex and involve things like wind data. But it still makes a nice example.
If you don’t know anything about the topic, these might not be the right ones to try to learn the basics. But we do applaud people sharing their intuition on these complex subjects.
Convolution and impulse responses play a big part in digital signal processing and we’ve — of course — talked about them before. We’ve also followed some initiatives to merge math and intuition in the educational sphere.
“Keep it simple” sounds like such good advice, but what exactly is the “it”; what parts of a project should you try to keep simple? You can’t always make everything simple, can you? Are all kinds of “simplicity” equally valuable, or are there aspects of a design where simplicity has multiplier effects on the rest of the project?
I ran into two seemingly different, but surprisingly similar, design problems in the last couple weeks, and I realized that focusing on keeping one aspect of the project simple had a multiplier effect on the rest — simplifying the right part of the problem made everything drastically easier.
The first example was a scratch-built airplane design. I’d made a few planes over the summer, focusing on plans on the Interwebs that emphasize simplicity of the actual build. Consequently, the planes were a bit heavy, maybe not entirely aerodynamic, and probably underpowered. And this is because the effort you expend building the plane doesn’t fundamentally have anything to do with flight. Keeping the build simple doesn’t necessarily get you a good plane.
Weight, on the other hand, is central. Wings produce lift, whether measured in grams or ounces, and anything heavier just isn’t gonna fly. But reducing weight has a multiplier effect. Less weight means smaller and lighter motors and batteries. Structures don’t need to be as stiff if they’re not subject to heavier bending forces. And, important to the noob pilot, planes with less weight per wing area fly slower, giving me (ahem, the noob pilot) more reaction time when something goes sideways. Trying to simplify the design by trimming weight has knock-on effects all around.
My latest fully-DIY design threw out anything that brought weight along with it, including some parts I thought were necessary for stiffness or crash resistance. But with the significantly lowered weight, these problems evaporated without needing me to solve them — in a way, the complexity of design was creating the problems that the complexity of design was supposed to solve. Ditching it meant that I had a slow plane, with simple-to-build wings, that’s capable of carrying a lightweight FPV camera. Done and done! Simply.
Nope. Too complex.
At the same time, I’m building a four-axis CNC foam cutter. I’ve built many 3D printers, and played around with other folks’ DIY CNC machines, so I had a few design ideas in my head starting out. My first iteration of an XY axis for the machine runs on metal angle stock with a whopping eight skate bearings per axis. It’s strong and rigid, and clumsy and overkill, in a bad way for this machine.
3D printers want to move a relatively light tool head around a small volume, but relatively quickly. CNC mills need to be extremely rigid and shoulder heavy side loads, subject to some speed constraints. A foam cutter has none of these needs. The hot wire melts the foam by radiation, so there are no loads on the machine because it doesn’t even contact the workpiece. And because it cuts by melting, it has to go slow. These are the places in the design where simplification will bear the most fruit.
I write this in retrospect, or at least from the perspective of a second prototype. I wanted the first design to hold the cutting filament taut, hence the rigid frame. But separating the tension from the motion, by using a lightweight external bow to keep the filament tight, meant that the machine could be dead simple. I could use smaller plastic sliders instead of complex bearings, on thin rods instead of bulky rails. In a day after having this realization, I got twice as far as I had on the previous machine design in a week, and it takes up a lot less space in my basement.
So take your KISS to the next level. Brainstorm a while about the binding constraints on your design, and what relaxing any of them can do. Do any particular simplifications enable further simplifications? Those are the ones that you want to start with. Keep it simple, smartly. And because it’s not always easy to find these multiplier effects, tell your friends!
This article is part of the Hackaday.com newsletter, delivered every seven days for each of the last 200+ weeks. It also includes our favorite articles from the last seven days that you can see on the web version of the newsletter.
Want this type of article to hit your inbox every Friday morning? You should sign up!
If you’re developing a performant IP-KVM based on the Raspberry Pi, an HDMI capture device that plugs into the board’s CSI port would certainly be pretty high on your list of dream peripherals. Turns out such boards actually exist, and somewhat surprisingly, are being sold for reasonable prices. Unfortunately the documentation for the chipset they use is a bit lacking, which is a problem if you’re trying to wring as much performance out of them as possible.
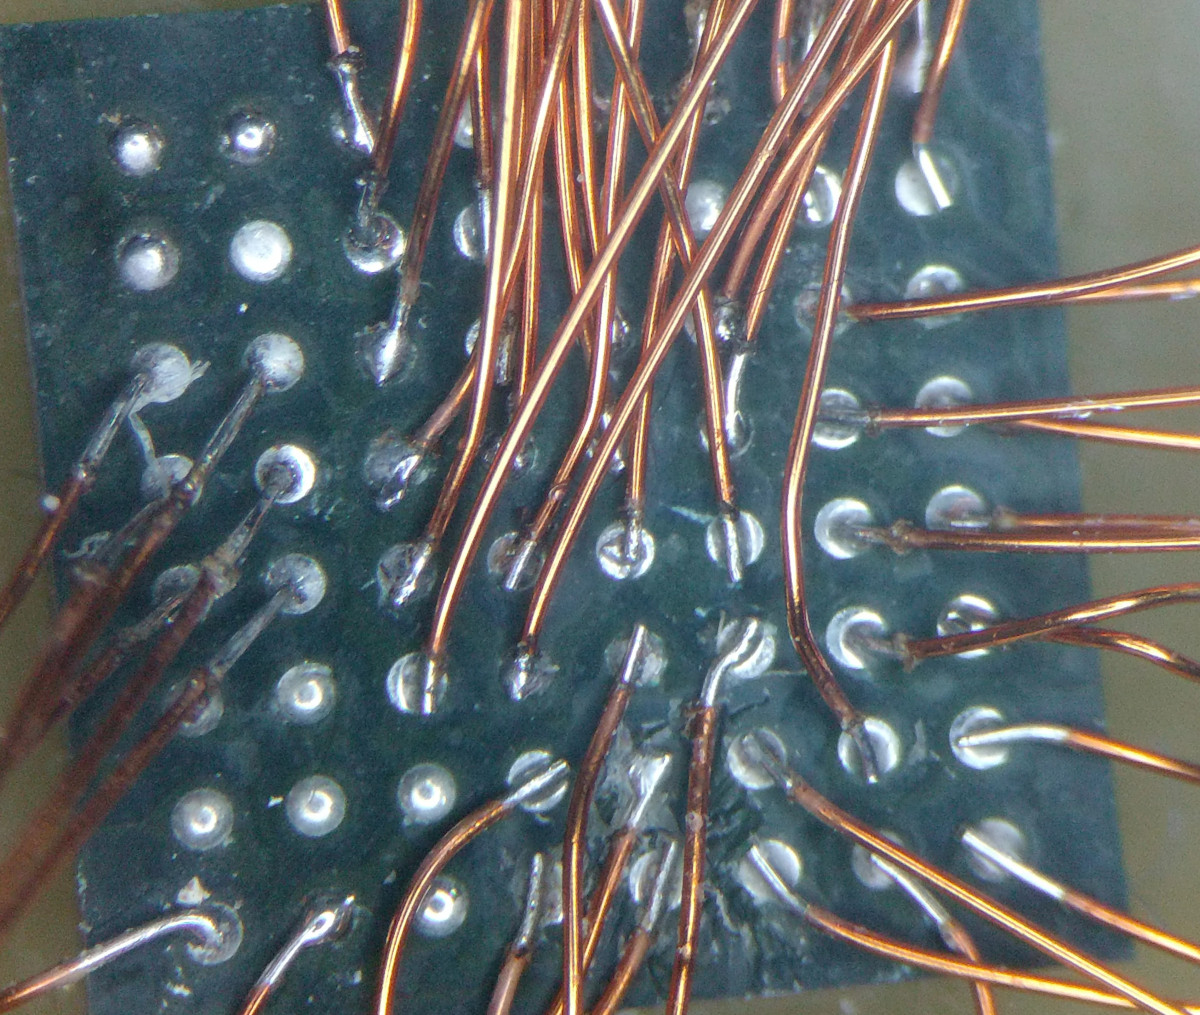
As the creator of Pi-KVM, [Maxim Devaev] needed to truly understand how the Toshiba TC358743 chip used in these capture devices worked, so he decided to build his own version from scratch. In the name of expediency, he didn’t have a proper breakout board made and instead decided to hand-solder the tiny BGA chip directly to some parts bin finds. The resulting perfboard capture device is equal parts art and madness, but more importantly, actually works as expected even with 1080p video signals.
Ultimately, the lessons learned during this experiment will lead to a dedicated KVM board that will plug into the Pi’s expansion header and provide all the necessary hardware in one shot. As [Maxim] explains in the Pi-KVM docs, the move to the CSI connected Toshiba TC358743 cuts latency in half compared to using a USB capture device. That said, USB capture devices will remain fully supported for anyone who just needs a quick way to get things working.
This DIY capture card is a perfect example of how the skills demonstrated while working on a project can be just as impressive as the end result. [Maxim] didn’t set out to hand-solder a BGA HDMI capture chip, it was merely one step in the process towards creating something better. Those intermediary achievements are often lost in the rush to document the final project, so we’re always glad when folks take the time to share them.
If you’re developing a performant IP-KVM based on the Raspberry Pi, an HDMI capture device that plugs into the board’s CSI port would certainly be pretty high on your list of dream peripherals. Turns out such boards actually exist, and somewhat surprisingly, are being sold for reasonable prices. Unfortunately the documentation for the chipset they use is a bit lacking, which is a problem if you’re trying to wring as much performance out of them as possible.
As the creator of Pi-KVM, [Maxim Devaev] needed to truly understand how the Toshiba TC358743 chip used in these capture devices worked, so he decided to build his own version from scratch. In the name of expediency, he didn’t have a proper breakout board made and instead decided to hand-solder the tiny BGA chip directly to some parts bin finds. The resulting perfboard capture device is equal parts art and madness, but more importantly, actually works as expected even with 1080p video signals.
Ultimately, the lessons learned during this experiment will lead to a dedicated KVM board that will plug into the Pi’s expansion header and provide all the necessary hardware in one shot. As [Maxim] explains in the Pi-KVM docs, the move to the CSI connected Toshiba TC358743 cuts latency in half compared to using a USB capture device. That said, USB capture devices will remain fully supported for anyone who just needs a quick way to get things working.
This DIY capture card is a perfect example of how the skills demonstrated while working on a project can be just as impressive as the end result. [Maxim] didn’t set out to hand-solder a BGA HDMI capture chip, it was merely one step in the process towards creating something better. Those intermediary achievements are often lost in the rush to document the final project, so we’re always glad when folks take the time to share them.
There are many different single board computers that are general purpose, but there’s another breed targeted at specific applications. One such is the Clockworkpi, a handheld Game Boy-style games console, which may be aimed at gamers but has just as much ability to do all the usual SBC stuff. It’s something [UncannyFlanigan] has demonstrated, by turning the Clockworkpi into a multimeter. And it’s not just a simple digital multimeter either, it’s one that sports graphing as well as instantaneous readings.
At its heart is an Arduino board that supplies the analogue to digital conversion, with opto-couplers for isolation between the two boards. A simple three-way switch selects voltage, current, and resistance ranges, and the ClockworkPi interface is written in Python. We can see that this could easily be extended using the power of the Arduino to deliver more functionality, for which all the code is handily available in a GitHub repository. It’s not a perfect multimeter yet because it lacks adequate input protection, but it shows a lot of promise.
Computer hardware is by and large compromised out of the box. Whether it’s sloppy factory code, or government-installed backdoors, it’s difficult to trust anything. A great example is that of color laser printers, the vast majority of which place hidden watermarks on printed pages. It’s a somewhat forgotten issue these days, but back in 2005, [bunnie] set out to modify a scanner to help better image and investigate these watermarks.
The watermarks in question have been investigated by the EFF, and often, but not always, consist of tiny yellow dots printed on the page. They can store data such as the name of the computer that printed the document, as well as the serial number and model of the printer used. With this functionality baked into the firmware, all prints made on such a printer are compromised.
The easiest way to see these watermarks is with blue light, which is reflected by the white paper, but causes yellow dots to show up as dark spots. To make scanning affected documents quick and easy, [bunnie] whipped up a linear LED light array, installing it in a spare slot in his scanner’s light assembly, next to the stock white CCFL. Usage is a little more complex, with the scanner’s automatic calibration getting confused if the blue LEDs are left on at the start of a scan. Instead, the LEDs must be turned off initially, and then powered up once the calibration is complete.