Minimal TinyAVR 0 Programming

When [Alain] wanted to use some of the new TinyAVR 0 chips — specifically, the Attiny406 — it seemed overkill to use the Windows IDE. There are plenty of sources of information on programming other AVR chips using simple command line tools, but not for these newer 0-series parts which use a new programming protocol known as UPDI. That led to a deep diving into how to program a TinyAVR 0 with a text editor, makefile, and USB-to-serial cable.

The Attiny406 has 4K of flash, 256 bytes of RAM and can run at 20 MHz with no external clock. You might think programming would be similar to a regular AVR part, but these tiny devices use UPDI (Unified Programming and Debug Interface) which uses 3 pins for programming. Older devices used different protocols.

It is very easy to create a UPDI programmer. A USB to logic-level serial cable and a 4.7K resistor is all it takes. There’s Python code that knows how to drive the protocol, too. You can also use the logic-level serial port on the Raspberry Pi with some device tree modifications explained in the code’s documentation.

[Alain] made a nice breakout board for the device. It fits a breadboard, allows for 5V or 3.3V operation, and has an LED and switch. Nothing fancy, but handy. Once you know how to ship a hex file to the chip, the rest is pretty standard. While the AVR version of gcc doesn’t cross-compile for the ATTiny out of the box, there is a device pack from Microchip that enables that feature.

The trend is to go to bigger processors, not smaller, but when you need to cram something in a small space, save a few pennies per unit, or draw very little power, these tiny processors can be just the ticket. The processors may be small, but if you work you can do some pretty big things with them.

source https://hackaday.com/2020/10/05/minimal-tinyavr-0-programming/

This Tabletop Lighthouse Will Get Your Attention

If you wear headphones around the house with any regularity, you’re probably missing out on a lot of audio cues like knocks at the door, people calling your name, or maybe even the smoke alarm. What if you had a visual indicator of sound that was smart enough to point it out for you?

That is the point of [Jake Ammons’] attention-getting lighthouse, designed and built in two weeks’ time for Architectural Robotics class. It detects ambient noise and responds to it by focusing light in the direction of the sound and changing the color of the light to a significant shade to indicate different events. Up inside the lighthouse is a Teensy 4.0 to read in the sound and spin a motor in response.

[Jake]’s original directive was to make something sound-reactive, and then to turn it into an assistive device. In the future [Jake] would like to add more microphones to do sound localization. We love how sleek and professional this looks — just goes to show you what the right t-shirt stretched over 3D prints can do. Check out the demo after the break.

Seaside lighthouses once used gas lights giant Fresnel lenses, but now they use LEDs. A company in Florida is using CNC machines to crank out acrylic Fresnels.

source https://hackaday.com/2020/10/04/this-tabletop-lighthouse-will-get-your-attention/

Hackaday Links: October 4, 2020

In case you hadn’t noticed, it was a bad week for system admins. Pennsylvania-based United Health Services, a company that owns and operates hospitals across the US and UK, was hit by a ransomware attack early in the week. The attack, which appears to be the Ryuk ransomware, shut down systems used by hospitals and health care providers to schedule patient visits, report lab results, and do the important job of charting. It’s not clear how much the ransomers want, but given that UHS is a Fortune 500 company, it’s likely a tidy sum.

And as if an entire hospital corporation’s IT infrastructure being taken down isn’t bad enough, how about the multi-state 911 outage that occurred around the same time? Most news reports seemed to blame the outage on an Office 365 outage happening at the same time, but Krebs on Security dug a little deeper and traced the issue back to two companies that provide 911 call routing services. Each of the companies is blaming the other, so nobody is talking about the root cause of the issue. There’s no indication that it was malware or ransomware, though, and the outage was mercifully brief. But it just goes to show how vulnerable our systems have become.

Our final “really bad day at work” story comes from Japan, where a single piece of failed hardware shut down a $6-trillion stock market. The Tokyo Stock Exchange, third-largest bourse in the world, had to be completely shut down early in the trading day Thursday when a shared disk array failed. The device was supposed to automatically failover to a backup unit, but apparently the handoff process failed. This led to cascading failures and blank terminals on the desks of thousands of traders. Exchange officials made the call to shut everything down for the day and bring everything back up carefully. We imagine there are some systems people sweating it out this weekend to figure out what went wrong and how to keep it from happening again.

With our systems apparently becoming increasingly brittle, it might be a good time to take a look at what goes into space-rated operating systems. Ars Technica has a fascinating overview of the real-time OSes used for space probes, where failure is not an option and a few milliseconds error can destroy billions of dollars of hardware. The article focuses on the RTOS VxWorks and goes into detail on the mysterious rebooting error that affected the Mars Pathfinder mission in 1997. Space travel isn’t the same as running a hospital or stock exchange, of course, but there are probably lessons to be learned here.

As if 2020 hasn’t dealt enough previews of various apocalyptic scenarios, here’s what surely must be a sign that the end is nigh: AI-generated PowerPoint slides. For anyone who has ever had to sit through an endless slide deck and wondered who the hell came up with such drivel, the answer may soon be: no one. DeckRobot, a startup company, is building an AI-powered extension to Microsoft Office to automate the production of “company compliant and visually appealing” slide decks. The extension will apparently be trained using “thousands and thousands of real PowerPoint slides”. So, great — AI no longer has to have the keys to the nukes to do us in. It’ll just bore us all to death.

And finally, if you need a bit of a palate-cleanser after all that, please do check out robotic curling. Yes, the sport that everyone loves to make fun of is actually way more complicated than it seems, and getting a robot to launch the stones on the icy playing field is a really complex and interesting problem. The robot — dubbed “Curly”, of course — looks like a souped-up Roomba. After sizing up the playing field with a camera on an extendable boom, it pushes the stone while giving it a gentle spin to ease it into exactly the right spot. Sadly, the wickedly energetic work of the sweepers and their trajectory-altering brooms has not yet been automated, but it’s still pretty cool to watch. But fair warning: you might soon find yourself with a curling habit to support.

source https://hackaday.com/2020/10/04/hackaday-links-october-4-2020/

Porting QMK to a Cheap Mechanical Keyboard

Over the last couple of years, we’ve seen an incredible number of DIY keyboard builds come our way. Some have had their switches nestled into laser-cut aluminum and others 3D printed plastic. They may be soldered together on a custom PCB, or meticulously hand-wired. But however they were built, they almost all shared one thing in common: they ran some variant of the open source QMK keyboard firmware.

But what if you just want to run an open firmware on the keyboard you picked up for $50 bucks on Amazon? That’s exactly where [Stephen Peery] found himself nine months ago with this DK63 gaming keyboard. Since so many of these small RGB LED mechanical keyboards are very similar to existing open source designs, he wondered what it would take to blow out the original firmware and replace it with a build of QMK.

While [Stephen] doesn’t have everything working 100% yet, he’s nearly reached the end of his epic reverse engineering journey. The first step was tearing apart the keyboard and identifying all the components it used, then pulling the original firmware out of the updater. From there, between Ghidra and Serial Wire Debug, he was able to figure out most of what the stock firmware was doing so he could replicate it in QMK.

According to his README, the RGB LEDs and Bluetooth functionality don’t currently work, but other than that it seems QMK is up and running. If you’re OK with those concessions, he has information on the page about flashing his build of QMK to the stock DK63 with the ST-Link V2 so you can give it a shot. Though you do so at your own risk; we wouldn’t recommend doing this on your only keyboard.

We’ve seen commercially manufactured keyboards running QMK before, but it usually involves completely replacing the original controller with new electronics. That [Stephen] got this all working on stock hardware so other owners can follow in his footsteps is really a considerable accomplishment.

[Thanks to Baldpower for the tip.]

source https://hackaday.com/2020/10/04/porting-qmk-to-a-cheap-mechanical-keyboard/

Porting QMK to a Cheap Mechanical Keyboard

Over the last couple of years, we’ve seen an incredible number of DIY keyboard builds come our way. Some have had their switches nestled into laser-cut aluminum and others 3D printed plastic. They may be soldered together on a custom PCB, or meticulously hand-wired. But however they were built, they almost all shared one thing in common: they ran some variant of the open source QMK keyboard firmware.

But what if you just want to run an open firmware on the keyboard you picked up for $50 bucks on Amazon? That’s exactly where [Stephen Peery] found himself nine months ago with this DK63 gaming keyboard. Since so many of these small RGB LED mechanical keyboards are very similar to existing open source designs, he wondered what it would take to blow out the original firmware and replace it with a build of QMK.

While [Stephen] doesn’t have everything working 100% yet, he’s nearly reached the end of his epic reverse engineering journey. The first step was tearing apart the keyboard and identifying all the components it used, then pulling the original firmware out of the updater. From there, between Ghidra and Serial Wire Debug, he was able to figure out most of what the stock firmware was doing so he could replicate it in QMK.

According to his README, the RGB LEDs and Bluetooth functionality don’t currently work, but other than that it seems QMK is up and running. If you’re OK with those concessions, he has information on the page about flashing his build of QMK to the stock DK63 with the ST-Link V2 so you can give it a shot. Though you do so at your own risk; we wouldn’t recommend doing this on your only keyboard.

We’ve seen commercially manufactured keyboards running QMK before, but it usually involves completely replacing the original controller with new electronics. That [Stephen] got this all working on stock hardware so other owners can follow in his footsteps is really a considerable accomplishment.

[Thanks to Baldpower for the tip.]

source https://hackaday.com/2020/10/04/porting-qmk-to-a-cheap-mechanical-keyboard/

An LED Cube To Display CPU Vitals

LED cubes are all the rage right now. High-end hardware capable of driving large arrays keeps getting cheaper in price, and 3D printers and pre-built boards can make assembly a snap. After attending a major hacker con and seeing the builds on display, [Sebastian] wanted a piece of the action, so set out to build his own.

While many elect to build an LED cube you can hold in your hand, [Sebastian] preferred a stationary tabletop design. This would reduce costs, allowing him to only use 3 LED boards, as the base and remaining two sides would face away from him and not be visible when placed on his desk. The 64×64 arrays are driven by an Adafruit LED matrix bonnet on top of a Raspberry Pi 2. The Pi was a tactical choice, as [Sebastian] had one lying around, and it packed enough processing power to run an OpenGL shader that creates an image for the cube that varies with the CPU load and temperature on his main desktop. As a nice final touch, the Raspberry Pi is set up to have a read-only filesystem. This allows the project to be turned off suddenly without risk of corrupting the SD card.

It’s a tidy build, and one which gives [Sebastian] useful information at a glance. We’ve featured a few stylish cubes before, and even a LED D20 that really breaks the bank. Video after the break.

source https://hackaday.com/2020/10/04/an-led-cube-to-display-cpu-vitals/

Cleaning Up the Yard with AI — Avian Intelligence

Despite epithets like “bird-brain,” our feathered friends are actually pretty smart. Being able to maneuver in three dimensions at high speed must have something to do with it, and the cognitive abilities of birds are well-documented and still being researched. So it naturally makes sense to harness avian brainpower to keep one’s yard clean, right?

For the record, the magpies that [Hans] is training are very intelligent and strikingly beautiful birds who delight in swooping down to harass people, and who will gladly steal food from other birds and then poop on it and fly away. So they’re jerks, but that doesn’t mean they can’t be useful jerks. The goal with his BirdBox system is to use classic operant conditioning, where a desired voluntary behavior is reinforced by a reward. In this case, the reward is a treat dispensed by a 3D-printed vibratory dispenser when the bird collects a bottlecap from the yard and deposits it in the proper slot. The video below shows the birds doing exactly what they’re supposed to do.

[Hans] tells us that the trick is getting the birds to accept the BirdBox and to have them integrate it into their “patrol schematic” of their territory. Once that’s done, it’s a simpler matter to have them associate the bottlecaps with the reward. The other challenge is making everything bulletproof, or in this case magpie-proof. Did we mention that magpies are jerks?

The possibilities for trading peanuts for yardwork are endless; [Hans] mentions plans he has for fallen fruit clean-up, and mentions a persistent garden slug problem that the birds might be employed to remediate. If you want to try this, it might be a good idea to brush up on the work of [B.F. Skinner] and his pigeons of war.

source https://hackaday.com/2020/10/04/cleaning-up-the-yard-with-ai-avian-intelligence/

Cleaning Up the Yard with AI — Avian Intelligence

Despite epithets like “bird-brain,” our feathered friends are actually pretty smart. Being able to maneuver in three dimensions at high speed must have something to do with it, and the cognitive abilities of birds are well-documented and still being researched. So it naturally makes sense to harness avian brainpower to keep one’s yard clean, right?

For the record, the magpies that [Hans] is training are very intelligent and strikingly beautiful birds who delight in swooping down to harass people, and who will gladly steal food from other birds and then poop on it and fly away. So they’re jerks, but that doesn’t mean they can’t be useful jerks. The goal with his BirdBox system is to use classic operant conditioning, where a desired voluntary behavior is reinforced by a reward. In this case, the reward is a treat dispensed by a 3D-printed vibratory dispenser when the bird collects a bottlecap from the yard and deposits it in the proper slot. The video below shows the birds doing exactly what they’re supposed to do.

[Hans] tells us that the trick is getting the birds to accept the BirdBox and to have them integrate it into their “patrol schematic” of their territory. Once that’s done, it’s a simpler matter to have them associate the bottlecaps with the reward. The other challenge is making everything bulletproof, or in this case magpie-proof. Did we mention that magpies are jerks?

The possibilities for trading peanuts for yardwork are endless; [Hans] mentions plans he has for fallen fruit clean-up, and mentions a persistent garden slug problem that the birds might be employed to remediate. If you want to try this, it might be a good idea to brush up on the work of [B.F. Skinner] and his pigeons of war.

source https://hackaday.com/2020/10/04/cleaning-up-the-yard-with-ai-avian-intelligence/

Indian RISC-V Chip is Team’s Third Successful Chip

There was a time when creating a new IC was a very expensive proposition. While it still isn’t pocket change, custom chips are within reach of sophisticated experimenters and groups. As evidence, look at the Moushik CPU from the SHAKTI group. This is the group’s third successful tapeout and is an open source RISC-V system on chip.

The chip uses a 180 nm process and has 103 I/O pins. The CPU runs around 100 MHz and the system includes an SDRAM controller, analog to digital conversion, and the usual peripherals. The roughly 25 square mm die houses almost 650 thousand gates.

This is the same group that built a home-grown chip based on RISC-V in 2018 and is associated with the Indian Institute of Technology Madras. We aren’t clear if everything you’d need to duplicate the design is in the git repository, but since the project is open source, we presume it is.

If you think about it, radios went from highly-specialized equipment to a near-disposable consumer item. So did calculators and computers. Developing with FPGAs is cheaper and easier every year. At this rate it’s not unreasonable to think It won’t be long before creating a custom chip will be as simple as ordering a PCB — something else that used to be a big hairy deal.

Of course, we see FPGA-based RISC-V often enough. While we admire [Sam Zeloof’s] work, we don’t think he’s packing 650k gates into that size. Not yet, anyway.

source https://hackaday.com/2020/10/03/indian-risc-v-chip-is-teams-third-successful-chip/

Receipt Printers End It All In Moving Art Piece

Art is something that is always hard to classify, but by and large is most celebrated when it stimulates an emotional response for the intended audience. We’d say [Alexander Miller] achieved that in spades, with his elegant piece The Emergence and Decay of Computation.

An installation piece done for The School for Poetic Computation’s 2019 spring showcase, it consists of a series of receipt printers suspended from a height by their own paper. The thermal printers output a pattern from a cellular automata — a mathematical simulation that generates patterns that emerge from initial conditions, of which Conway’s Game of Life is perhaps the most popular. Fed data by an attached Raspberry Pi, as printing continues, the printers gradually lower themselves into a tank of water, permanently killing the hardware.

Watching a proud, brave printer slowly work itself into a watery grave is a sobering experience to any lover of stout commercial hardware, and one we won’t soon forget. What a shame to see them sacrificed so. We love a good art piece around these parts, after all. Especially when the hardware can be used in another project once the excitement of this one has waned. Video after the break.

source https://hackaday.com/2020/10/03/receipt-printers-end-it-all-in-moving-art-piece/

Sunshine in a Bag

Ultraviolet (UV) curing lamps are crucial if you have a resin 3D printer or work with UV adhesives. Some folks line an old Amazon shipping box with foil and drop a spotlight somewhere inside. Other folks toss their work under the all-natural light source, Sol. Both options have portability and reliability problems, but [AudreyObscura] has it covered with a reflective mat lined with UV strip lights. This HackadayPrize2020 finalist exemplifies the ideal that good ideas are often simple, and this has a remarkably short bill of materials.

Foil bubble insulation is the medium because it provides structure and reflectivity, but it doesn’t cooperate with the LED strip’s adhesive. [AudreyObscura] demonstrates that masking tape as an interfacing layer makes everyone play nicely. A fine example of an experienced maker, their design covers bundling wires and insulating connections to keep everything tidy and isolated. With different arrangements, this can form a tunnel lit from above, a chimney lit from the walls, or you can drape it over some scaffolding.

If you need something a little less portable for your own shop you might consider a mirror-filled chamber. One nice touch to add is a turntable to help make sure the entire part is cured without any missing areas.

source https://hackaday.com/2020/10/03/sunshine-in-a-bag/

Sunshine in a Bag

Ultraviolet (UV) curing lamps are crucial if you have a resin 3D printer or work with UV adhesives. Some folks line an old Amazon shipping box with foil and drop a spotlight somewhere inside. Other folks toss their work under the all-natural light source, Sol. Both options have portability and reliability problems, but [AudreyObscura] has it covered with a reflective mat lined with UV strip lights. This HackadayPrize2020 finalist exemplifies the ideal that good ideas are often simple, and this has a remarkably short bill of materials.

Foil bubble insulation is the medium because it provides structure and reflectivity, but it doesn’t cooperate with the LED strip’s adhesive. [AudreyObscura] demonstrates that masking tape as an interfacing layer makes everyone play nicely. A fine example of an experienced maker, their design covers bundling wires and insulating connections to keep everything tidy and isolated. With different arrangements, this can form a tunnel lit from above, a chimney lit from the walls, or you can drape it over some scaffolding.

If you need something a little less portable for your own shop you might consider a mirror-filled chamber. One nice touch to add is a turntable to help make sure the entire part is cured without any missing areas.

source https://hackaday.com/2020/10/03/sunshine-in-a-bag/

Sunshine in a Bag

Ultraviolet (UV) curing lamps are crucial if you have a resin 3D printer or work with UV adhesives. Some folks line an old Amazon shipping box with foil and drop a spotlight somewhere inside. Other folks toss their work under the all-natural light source, Sol. Both options have portability and reliability problems, but [AudreyObscura] has it covered with a reflective mat lined with UV strip lights. This HackadayPrize2020 finalist exemplifies the ideal that good ideas are often simple, and this has a remarkably short bill of materials.

Foil bubble insulation is the medium because it provides structure and reflectivity, but it doesn’t cooperate with the LED strip’s adhesive. [AudreyObscura] demonstrates that masking tape as an interfacing layer makes everyone play nicely. A fine example of an experienced maker, their design covers bundling wires and insulating connections to keep everything tidy and isolated. With different arrangements, this can form a tunnel lit from above, a chimney lit from the walls, or you can drape it over some scaffolding.

If you need something a little less portable for your own shop you might consider a mirror-filled chamber. One nice touch to add is a turntable to help make sure the entire part is cured without any missing areas.

source https://hackaday.com/2020/10/03/sunshine-in-a-bag/

A Digital Magic 8-Ball? Signs Point to Yes

[FacelessTech] was recently charmed by one of our prized possessions as a kid — the Magic 8-Ball — and decided to have a go at making a digital version. Though there is no icosahedron or mysterious fluid inside, the end result is still without a doubt quite cool, especially for a project made on a whim with parts on hand.

It’s not just an 8-ball, it also functions as a 6-sided die and a direct decider of yes/no questions. Underneath that Nokia 5110 screen there’s an Arduino Pro Mini and a 3-axis gyro. Almost everything is done through the gyro, including setting the screen contrast when the eight ball is first powered on. As much we as love that aspect, we really like that [FacelessTech] included a GX-12 connector for easy FTDI programming. It’s a tidy, completely open-source build, and there’s even a PCB. What’s not to like? Be sure to check out the video after the break to see it in action.

Believe it or not, this isn’t the smallest Magic 8-Ball build we’ve seen. Have you met the business card version?

[via adafruit]

source https://hackaday.com/2020/10/03/a-digital-magic-8-ball-signs-point-to-yes/

Paying it Forward

It’s all those little things. A month ago, I was working on the axes for a foam-cutting machine. (Project stalled, will pick back up soon!) A week ago, somewhere else on the Internet, people were working on sliders that would ride directly on aluminum rails, a problem I was personally experiencing, and recommended using drawer-glide tape — a strip of PTFE or UHMW PE with adhesive backing on one side. Slippery plastic tape solves the metal-on-metal problem. It’s brilliant, it’s cheap, and it’s just a quick trip to the hardware store.

Just a few days ago, we covered another awesome linear-motion mechanical build in the form of a DIY camera rig that uses a very similar linear motion system to the one I had built as well: a printed trolley that slides on skate bearings over two rails of square-profile extruded aluminum. He had a very nice system of anchoring the spacers that hold the two rails apart, one of the sticking points in my build. I thought I’d glue things together, but his internal triangle nut holders are a much better solution because epoxy doesn’t like to stick to anodized aluminum. (And Alexandre, if you’re reading, that UHMW PE tape is just what you need to prevent bearing wear on your aluminum axes.)

Between these events, I got a message thanking me for an article that I wrote four years ago on debugging SPI busses. Apparently, it helped a small company to debug a problem and get their product out the door. Hooray!

So in one week, I got help from two different random strangers on a project that neither of them knew I was working on, and I somehow saved a startup. What kind of crazy marvelous world is this? It’s become so normal to share our ideas and experience, at least in our little corner of the Internet, that I sometimes fail to be amazed. But it’s entirely amazing. I know we’ve said it before, but we are living in the golden era of sharing ideas.

Thanks to all of you out there, and Read More Hackaday!

source https://hackaday.com/2020/10/03/paying-it-forward/

Paying it Forward

It’s all those little things. A month ago, I was working on the axes for a foam-cutting machine. (Project stalled, will pick back up soon!) A week ago, somewhere else on the Internet, people were working on sliders that would ride directly on aluminum rails, a problem I was personally experiencing, and recommended using drawer-glide tape — a strip of PTFE or UHMW PE with adhesive backing on one side. Slippery plastic tape solves the metal-on-metal problem. It’s brilliant, it’s cheap, and it’s just a quick trip to the hardware store.

Just a few days ago, we covered another awesome linear-motion mechanical build in the form of a DIY camera rig that uses a very similar linear motion system to the one I had built as well: a printed trolley that slides on skate bearings over two rails of square-profile extruded aluminum. He had a very nice system of anchoring the spacers that hold the two rails apart, one of the sticking points in my build. I thought I’d glue things together, but his internal triangle nut holders are a much better solution because epoxy doesn’t like to stick to anodized aluminum. (And Alexandre, if you’re reading, that UHMW PE tape is just what you need to prevent bearing wear on your aluminum axes.)

Between these events, I got a message thanking me for an article that I wrote four years ago on debugging SPI busses. Apparently, it helped a small company to debug a problem and get their product out the door. Hooray!

So in one week, I got help from two different random strangers on a project that neither of them knew I was working on, and I somehow saved a startup. What kind of crazy marvelous world is this? It’s become so normal to share our ideas and experience, at least in our little corner of the Internet, that I sometimes fail to be amazed. But it’s entirely amazing. I know we’ve said it before, but we are living in the golden era of sharing ideas.

Thanks to all of you out there, and Read More Hackaday!

source https://hackaday.com/2020/10/03/paying-it-forward/

Paying it Forward

It’s all those little things. A month ago, I was working on the axes for a foam-cutting machine. (Project stalled, will pick back up soon!) A week ago, somewhere else on the Internet, people were working on sliders that would ride directly on aluminum rails, a problem I was personally experiencing, and recommended using drawer-glide tape — a strip of PTFE or UHMW PE with adhesive backing on one side. Slippery plastic tape solves the metal-on-metal problem. It’s brilliant, it’s cheap, and it’s just a quick trip to the hardware store.

Just a few days ago, we covered another awesome linear-motion mechanical build in the form of a DIY camera rig that uses a very similar linear motion system to the one I had built as well: a printed trolley that slides on skate bearings over two rails of square-profile extruded aluminum. He had a very nice system of anchoring the spacers that hold the two rails apart, one of the sticking points in my build. I thought I’d glue things together, but his internal triangle nut holders are a much better solution because epoxy doesn’t like to stick to anodized aluminum. (And Alexandre, if you’re reading, that UHMW PE tape is just what you need to prevent bearing wear on your aluminum axes.)

Between these events, I got a message thanking me for an article that I wrote four years ago on debugging SPI busses. Apparently, it helped a small company to debug a problem and get their product out the door. Hooray!

So in one week, I got help from two different random strangers on a project that neither of them knew I was working on, and I somehow saved a startup. What kind of crazy marvelous world is this? It’s become so normal to share our ideas and experience, at least in our little corner of the Internet, that I sometimes fail to be amazed. But it’s entirely amazing. I know we’ve said it before, but we are living in the golden era of sharing ideas.

Thanks to all of you out there, and Read More Hackaday!

source https://hackaday.com/2020/10/03/paying-it-forward/

Electric Volkspod Takes You On An Eco-friendly Beetle Cruise

The Volkswagen Beetle is a true automobile icon, and while it may not be the fastest or most breathtaking looking car ever built, its unmistakable shape with those elegant curvy fenders and bulgy lights holds a special place in many people’s hearts. And then it inspires them to build minibikes from those same parts.

[Brent Walter] is well know as an originator of the hobby, starting a little while ago with his Volkspod. Inspired by [Brent’s] work, [Jonah Mikesell] decided to give it his own try, but unlike the original design that uses an actual minibike under the hood, he built an electric version of it, and painstakingly documented every step along the way.

The idea of the Volkspod is to take the Beetle’s two front fenders, weld them together to one symmetric body, and turn it into a small motorcycle. [Jonah]’s version does all that, but instead of taking a whole minibike as core of the project, he only uses a minibike frame and substitutes the engine with a 2000 Watt e-bike motor along with an e-bike battery pack. Fitting the frame within the dimensions of the fender construct required some extra welding work, but in the end, it all came nicely together, and with its red paint job, it kinda looks like something from a vintage post-apocalyptic sci-fi cross-genre movie. Watch him taking it for a spin in the video after the break.

Unfortunately, neither the original Volkspod nor this one has the roaring engine sound of an actual Beetle — which is akin to what the wings of a real-life beetle of similar size would probably sound like. But well, it’s always an option to fake that. And if [Jonah] ever feels the urge of a bigger engine, maybe a washing machine can help.

source https://hackaday.com/2020/10/03/electric-volkspod-takes-you-on-an-eco-friendly-beetle-cruise/

The Amazing Technicolor Parts Organizer

It wouldn’t be much of an exaggeration to say that anyone reading these words has struggled at one time or another to keep an ever growing collection of electronic bits and bobs from descending into absolute chaos. Tossing them all into plastic bins is at least a start down the road to long-term organization, but they still needed to be sorted and inventoried if you want to avoid the wasted time and money of buying parts you forgot you already had.

For his latest project, [Zack Freedman] decided to finally tackle the personal parts collection that he’s ended up lugging around for the last several years. The first half of the battle was just figuring out what he actually had, what he was likely to need down the line, and getting it all sorted out so he didn’t have to keep rummaging through a big pile to find what he needed. But it’s not enough to get organized, you also need to stay organized.

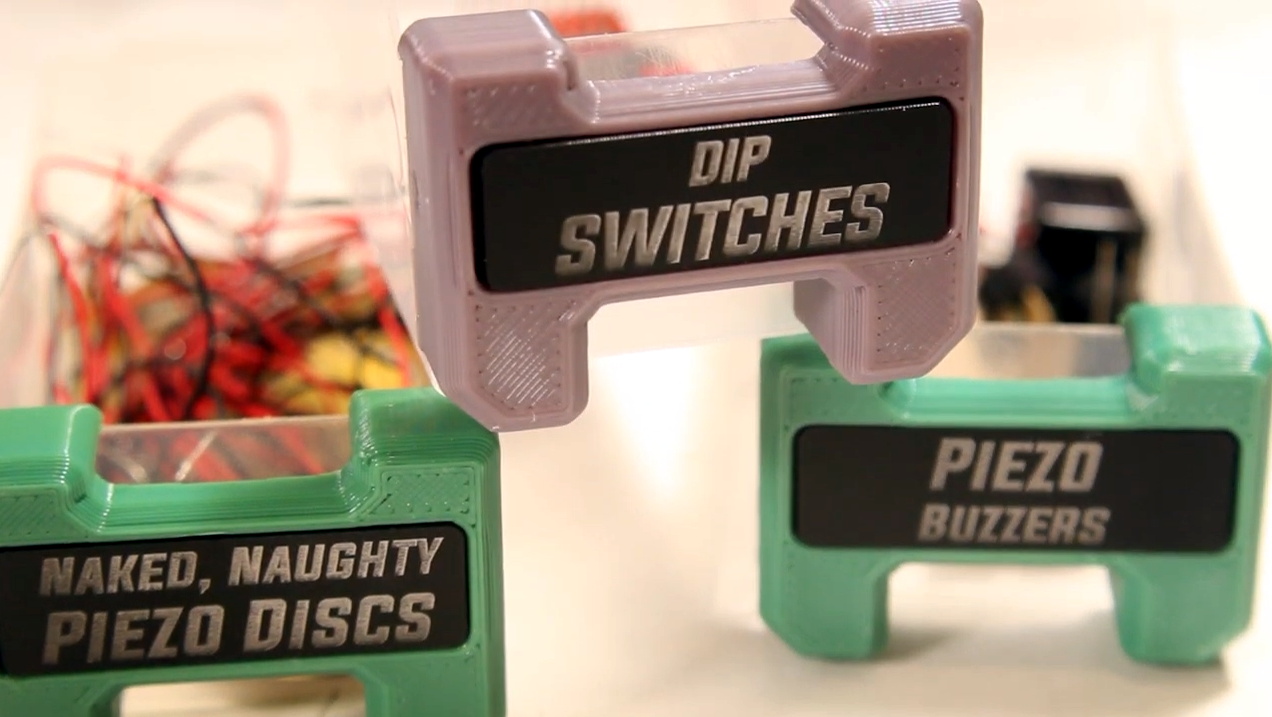
Which is why he then turned his attention to how all these newly sorted components would actually be stored going forward. He already had a trio of Harbor Freight bin organizers, but as one expects from that fine retailer, they were only marginally suitable for the task at hand. So [Zack] designed a 3D printed faceplate that could snap onto the original plastic bin. The new fronts made them easier to grab and featured an opening to accept a laser-etched plastic label.

To give them a little visual flair, he decided to print the faceplates using rainbow gradient filament. To prevent them from being random colors, he used the relatively obscure sequential slicing option so his Prusa i3 would print each faceplate in its entirety before moving over to the next one on the bed. This took far longer than doing them in parallel (especially since he had access to multiple printers), but makes for a much nicer aesthetic as the color smoothly transitions between each bin on the wall. It also has a practical benefit, as you can tell at a glance if any of the bins have found themselves in the wrong spot.

If you really want to go off the deep end, we’ve seen hackers light individual bins with RGB LEDs tied into a searchable inventory system. But for most hobbyists, simply learning when to purge would be more practical.

source https://hackaday.com/2020/10/03/the-amazing-technicolor-parts-organizer/

The Amazing Technicolor Parts Organizer

It wouldn’t be much of an exaggeration to say that anyone reading these words has struggled at one time or another to keep an ever growing collection of electronic bits and bobs from descending into absolute chaos. Tossing them all into plastic bins is at least a start down the road to long-term organization, but they still needed to be sorted and inventoried if you want to avoid the wasted time and money of buying parts you forgot you already had.

For his latest project, [Zack Freedman] decided to finally tackle the personal parts collection that he’s ended up lugging around for the last several years. The first half of the battle was just figuring out what he actually had, what he was likely to need down the line, and getting it all sorted out so he didn’t have to keep rummaging through a big pile to find what he needed. But it’s not enough to get organized, you also need to stay organized.

Which is why he then turned his attention to how all these newly sorted components would actually be stored going forward. He already had a trio of Harbor Freight bin organizers, but as one expects from that fine retailer, they were only marginally suitable for the task at hand. So [Zack] designed a 3D printed faceplate that could snap onto the original plastic bin. The new fronts made them easier to grab and featured an opening to accept a laser-etched plastic label.

To give them a little visual flair, he decided to print the faceplates using rainbow gradient filament. To prevent them from being random colors, he used the relatively obscure sequential slicing option so his Prusa i3 would print each faceplate in its entirety before moving over to the next one on the bed. This took far longer than doing them in parallel (especially since he had access to multiple printers), but makes for a much nicer aesthetic as the color smoothly transitions between each bin on the wall. It also has a practical benefit, as you can tell at a glance if any of the bins have found themselves in the wrong spot.

If you really want to go off the deep end, we’ve seen hackers light individual bins with RGB LEDs tied into a searchable inventory system. But for most hobbyists, simply learning when to purge would be more practical.

source https://hackaday.com/2020/10/03/the-amazing-technicolor-parts-organizer/

Retrotechtacular: The $5,000 40 Pound HP Classroom Computer

See if you can talk your local school district into buying a computer that costs about $5,000 and weighs 40 pounds. That was HP’s proposition to schools back in 1968 so really it is more like $35,000 today. The calculator had a CRT display for the RPN stack that you could mirror on a big screen. You could also get a printer or plotter add-on. Pretty hot stuff for the ’60s.

The 1970 videos promoting the HP 9100, posted by the [Computer History Archive Project], shows something we’d think of as a clunky calculator, although by the standards of the day it was a pretty good one with trig functions and a crude programming capability.

You could save your program on a magnetic card that looked more like a credit card than HP’s later magnetic cards for calculators. It also had an optical mark sense reader so students could program cards at home using a pencil, presumably running test programs or submitting homework answers.

Honestly, this seems hokey today, but back then this was pretty amazing stuff. Graphing calculators did take over the classroom, but not until the students could have their own for a bit more reasonable price.

Apparently, Bill Hewlett said that they would have called the 9100 a computer, but it would have confused their customers because it didn’t look like an IBM computer. Naming it a calculator cued customers that it was something different. The device had no integrated circuits and was similar enough architecturally to an Olivetti Programma 101, that HP was forced to pay about $900,000 in royalties to Olivetti.

If you watch the video to the end, you’ll see a 1970s-era physics instructor show how to use the 9100 to explain a body in motion. Not exactly a Zoom class, but pretty close for five decades ago. If you want to check out the slick marketing brochure for the machine, it lives as a PDF file. There’s even an example of plotting the frequency response of an LC network. You can even read some electronics and other types of programs for the beast in the HP Computer Museum.

It is a long way from an HP 9100 to the HP Prime. But probably no further than the 9100 was from a CURTA.

source https://hackaday.com/2020/10/02/retrotechtacular-the-5000-40-pound-hp-classroom-computer/

M17 Aims to Replace Proprietary Ham Radio Protocols

While M17 might sound like a new kind of automatic rifle (as actually, it is), we were referring to an open source project to create a ham radio transceiver. Instead of paraphrasing the project’s goals, we’ll simply quote them:

The goal here should be to kick the proprietary protocols off the airwaves, replace DMR, Fusion, D-Star, etc. To do that, it’s not just good enough to be open, it has to be legitimately competitive.

Like some other commercial protocols, M17 uses 4FSK along with error correction. The protocol allows for encryption, streaming, and the encoding of callsigns in messages. There are also provisions for framing IP packets to carry data. The protocol can handle voice and data in a point-to-point or broadcast topology.

On the hardware side, the TR-9 is a UHF handheld that can do FM voice or M17 with up to 3 watts out. The RF portion uses an ADF7021 chip which is specifically made to do 4FSK. There’s also an Arm CPU to handle the digital work.

We were struck by the similarity of the TR-9 to a cell phone since it has an LCD display, an SD card slot, and a 9DOF sensor.  Maybe some open hardware cell phones and open hardware ham radios could find common ground.

This is quite ambitious, but generally, small ham rigs are having a resurgence. Having high-quality RF components available as chips makes a lot of difference.

source https://hackaday.com/2020/10/02/m17-aims-to-replace-proprietary-ham-radio-protocols/

Flywheel Trebuchet Spins Right Round

Most of us gained a familiarity with siege weapons from Age of Empires, and the march of technology has meant these relics aren’t typically seen on modern battlefields. However, development continues apace in the enthusiast community, and [Tom Stanton]’s latest trebuchet design puts a different spin on launching projectiles at speed.

The design takes advantage of the flywheel as an energy storage device. The flywheel is spun up to speed using a hand crank, through a timing belt and a set of hybrid 3D printed and CNC aluminium gears. Once spun up to sufficient angular velocity, a trigger releases the tennis ball payload from a sling, flinging it forth at speeds over 180 miles per hour.

Moving on from classical materials such as wood and nails, [Tom]’s latest design relies on aluminium in an effort to build something that won’t rot when left outside in the rain. The use of aluminium profiles also makes adjustment and redesigns easy, while providing the necessary adjustments to dial in things like release point and belt tension. We’ve featured a few different designs over the years; the walking-arm trebuchet is perhaps the most oddball of all. Video after the break.

source https://hackaday.com/2020/10/02/flywheel-trebuchet-spins-right-round/

Voice Controlled RGB LEDs Go Big

When we see RGB LEDs used in a project, they’re often used more for aesthetic purposes than as a practical source of light. It’s an easy way to throw some color around, but certainly not the sort of thing you’d try to light up anything larger than a desk with. Apparently nobody explained the rules to [Brian Harms] before he built Light[s]well.

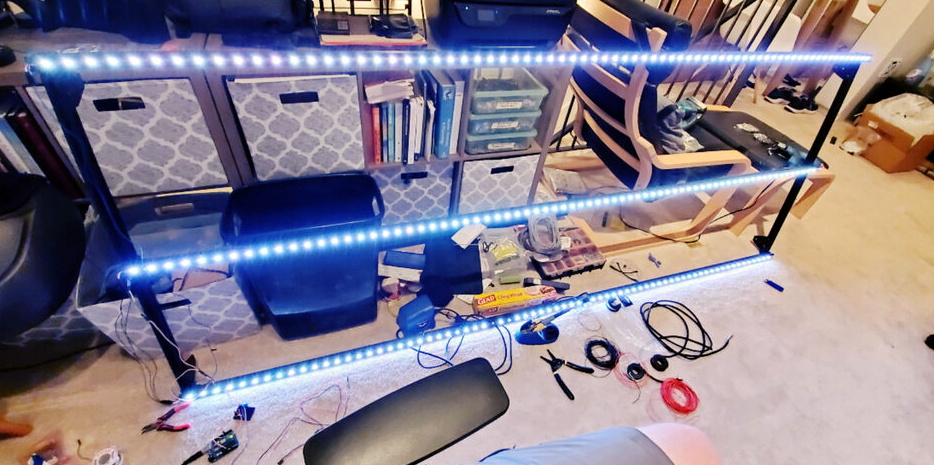
Believe it or not, this supersized light installation doesn’t use any exotic hardware you aren’t already familiar with. Fundamentally, what we’re looking at is a WiFi enabled Arduino MKR1000 driving strips of NeoPixel LEDs. It’s just on a far larger scale than we’re used to, with a massive 4 x 8 aluminum extrusion frame suspended over the living room.

Onto that frame, [Brian] has mounted an undulating diffuser made of 74 pieces of laser-cut cardstock. Invoking ideas of waves or clouds, the light looks like its of natural or even biological origin while at the same time having a distinctively otherworldly quality to it.

The effect is even more pronounced when the RGB LEDs kick in, thanks to the smooth transitions between colors. In the video after the break, you can see Light[s]well work its way from bright white to an animated rainbow. As an added touch, he added Alexa voice control through Arduino’s IoT Cloud service.

While LED home lighting is increasingly becoming the norm, projects like Light[s]well remind us that we aren’t really embracing the possibilities offered by the technology. The industry has tried so hard to make LEDs fit into the traditional role of incandescent bulbs, but perhaps its time to rethink things.

source https://hackaday.com/2020/10/02/voice-controlled-rgb-leds-go-big/