One of the side effects of the rise of 3D printers has been the increased availability and low cost of 3D printer components, which are use fill for range of applications. [How To Mechatronics] capitalized on this and built a SCARA robot arm using 3D-printed parts and common 3D-printer components.
The basic SCARA mechanism is a two-link arm, similar to a human arm. The end of the second joint can move through the XY-plane by rotating at the base and elbow of the mechanism. [How To Mechatronics] added Z-motion by moving the base of the first arm on four vertical linear rods with a lead screw. A combination of thrust bearings and ball bearings allow for smooth rotation of each of the joints, which are belt-driven with NEMA17 stepper motors. Each joint has a microswitch at a certain position in its rotation to give it a home position. The jaws of the gripper slide on two parallel linear rods, and are actuated with a servo. For controlling the motors, an Arduino Uno and CNC stepper shield was used.
The arm is operated from a computer with a GUI written in Processing, which sends instructions to the Arduino over serial. The GUI allows for both direct forward kinematic control of the joints, and inverse kinematic control, which will automatically move the gripper to a specified coordinate. The GUI can also save positions, and then string them together to do complete tasks autonomously.
The base joint is a bit wobbly due to the weight of the rest of the arm, but this could be fixed by using a frame to support it at the top as well. We really like the fact that commonly available components were used, and the link in the first paragraph has detailed instructions and source files for building your own. If the remaining backlash can be solved, it could be a decent light duty CNC platform, especially with the small footprint and large travel area. This is very similar to a wooden SCARA robots we’ve seen before, except that one put the Z-axis at the gripper. We’ve also seen a few 3D printers and pen plotters that used this layout.
Prolific maker and product designer [Eric Strebel] has years of experience making reusable mold boxes for silicone and resin casting. He’s always used 3/4″ plywood before, but it comes with some problems such as inaccuracy, screws that eventually slip out, and no room at all for expansion. Now [Eric] has decided to devise a modular mold box system that’s so awesome, it’s even stack-able. Check out the design and build process in the video after the break.
[Eric] took advantage of additive manufacturing and made fancy trapezoidal walls with recessed bits that allow for the magic that this modular system hinges on — a handful of M6 socket cap screws and matching nuts for tensioning. Once the prints were ready, [Eric] pounded the nuts captive into the walls and marked fill lines every 10mm. As usual, [Eric]’s video comes with bonus nuggets of knowledge, like his use of a simple card scraper to clean up prints, smooth the sides, and chamfer all the edges.
It’s a safe bet that most Hackaday reader’s interest in electronics started at a young age, and that their early forays into the world of hardware hacking likely involved some form of “playground” kit. As long as you didn’t lose any of the components, these kits promised the user that hundreds of possible projects were just a few jumper wires away. Extra points awarded for when you decide to toss away the manual and fly solo.
It’s still got the traditional layout: a center mounted breadboard surrounded by an array of LEDs, a handful of buttons, and a pair of potentiometers. But there’s also sockets for the Raspberry Pi, ESP8266, ESP32, and Arduino. Plus a few of their most popular friends to keep them company: a .96″ OLED, 2.4″ Touch TFT, and a BC05 Bluetooth module.
Originally [Josh] created this design to help clean up his own workspace, figuring he could just put his most used components on a single compact board. But as you might expect, others expressed interest in the concept. Now he’s producing them as kits, and even working his way towards a third hardware revision that adds features such as an integrated 18650 battery for portable use.
It’s a safe bet that most Hackaday reader’s interest in electronics started at a young age, and that their early forays into the world of hardware hacking likely involved some form of “playground” kit. As long as you didn’t lose any of the components, these kits promised the user that hundreds of possible projects were just a few jumper wires away. Extra points awarded for when you decide to toss away the manual and fly solo.
It’s still got the traditional layout: a center mounted breadboard surrounded by an array of LEDs, a handful of buttons, and a pair of potentiometers. But there’s also sockets for the Raspberry Pi, ESP8266, ESP32, and Arduino. Plus a few of their most popular friends to keep them company: a .96″ OLED, 2.4″ Touch TFT, and a BC05 Bluetooth module.
Originally [Josh] created this design to help clean up his own workspace, figuring he could just put his most used components on a single compact board. But as you might expect, others expressed interest in the concept. Now he’s producing them as kits, and even working his way towards a third hardware revision that adds features such as an integrated 18650 battery for portable use.
It’s a safe bet that most Hackaday reader’s interest in electronics started at a young age, and that their early forays into the world of hardware hacking likely involved some form of “playground” kit. As long as you didn’t lose any of the components, these kits promised the user that hundreds of possible projects were just a few jumper wires away. Extra points awarded for when you decide to toss away the manual and fly solo.
It’s still got the traditional layout: a center mounted breadboard surrounded by an array of LEDs, a handful of buttons, and a pair of potentiometers. But there’s also sockets for the Raspberry Pi, ESP8266, ESP32, and Arduino. Plus a few of their most popular friends to keep them company: a .96″ OLED, 2.4″ Touch TFT, and a BC05 Bluetooth module.
Originally [Josh] created this design to help clean up his own workspace, figuring he could just put his most used components on a single compact board. But as you might expect, others expressed interest in the concept. Now he’s producing them as kits, and even working his way towards a third hardware revision that adds features such as an integrated 18650 battery for portable use.
When we think 3D printers, we most commonly think of the fused-deposition modelling type that squirts molten plastic out of a hot nozzle. Typically, these are tabletop units designed to be set up and used in a workshop environment. [BingoFishy] dared to think outside the box however, and whipped up a compact, portable 3D printer for working out on the road.
The printer is almost entirely self-contained, running an OctoPrint controller with built-in hotspot which allows print files to be sent to the unit over a smartphone. The motion platform is built out of DVD drive stepper motors and rails, with dual motors used on the Z-axis to ensure there’s enough torque to move smoothly. Power is courtesy of 26650 cells, in a 2S3P configuration, which provides 3 hours of runtime. While this might not sound like much, for a compact printer with a small build volume, it’s a useful period of time to work with.
While such a build will never replace a solid desktop unit with a large build volume, it nevertheless could come in handy for producing small parts out in the field. We can imagine a college robotics team toting one of these to a regional contest, where it could prove invaluable for whipping up some bushings after something breaks unexpectedly. The finish of the project is great, too, though we’ve seen great results from less-polished builds in the past as well. Video after the break.
It’s a common problem: you’re at a party, there’s a guitar, and your plan to impress everyone with your Wonderwall playing skills is thwarted by the way too loud overall noise level. Well, [Muiota betarho] won’t have that issue ever again, and is going to steal the show anywhere he goes from now on with his Crazy Guitar Rig 2.0, an acoustic guitar turned electric — and so much more — that he shows off in three-part video series on his YouTube channel. For the impatient, here’s video 1, video 2, and video 3, but you’ll also find them embedded after the break.
To start off the series, [Muiota betarho] adds an electric guitar pickup, a set of speakers, and an amplifier board along with a battery pack into the body of a cheap acoustic guitar. He then dismantles a Zoom MS-50G multi-effect pedal and re-assembles it back into the guitar itself with a 3D-printed cover. Combining a guitar, effect pedal, amp and speaker into one standalone instrument would make this already an awesome project as it is, but this is only the beginning.
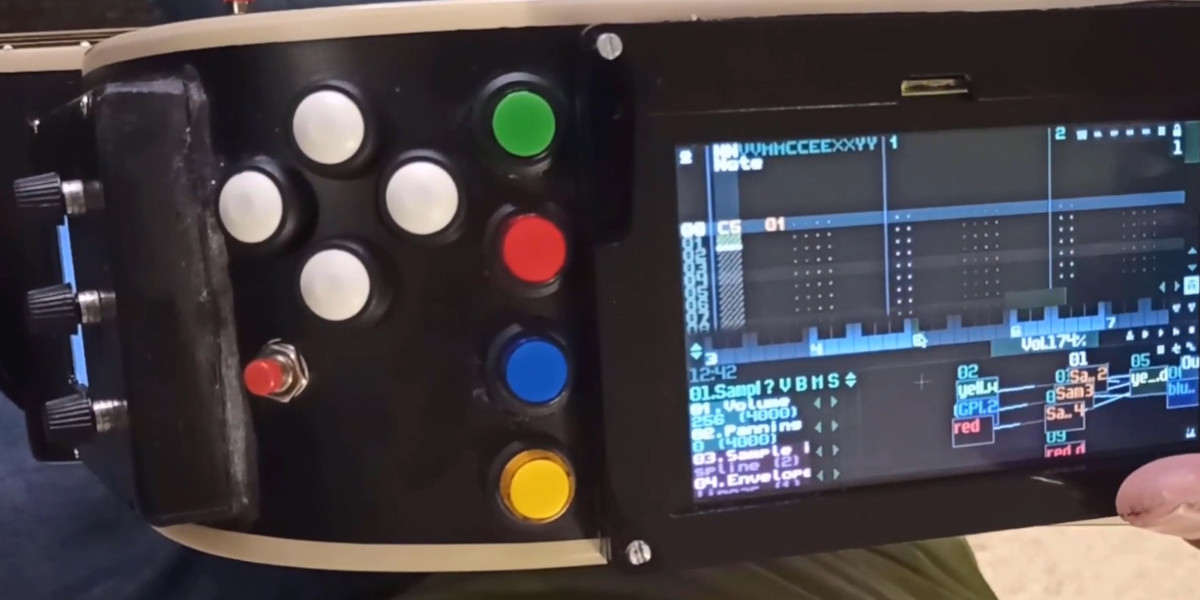
RPi touch screen running SunVox, plenty of buttons, and integrated multi-effect pedal on the left
So, time to add a Raspberry Pi running SunVox next, and throw in a touch screen to control it on the fly. SunVox itself is a free, but unfortunately not open source, cross-platform synthesizer and tracker that [Muiota betarho] uses to add drum tracks and some extra instruments and effects. He takes it even further in the final part when he hooks SunVox up to the Raspberry Pi’s GPIO pins. This allows him to automate things like switching effects on the Zoom pedal, but also provides I/O connection for external devices like a foot switch, or an entire light show to accompany his playing.
If your usual YouTube viewing selection covers a wild and random variety of music, tech subjects, cooking, history, and anything in-between, you will sooner or later be baffled by some of the “Recommended for you” videos showing up. When it features a ten-hour mix of Soviet propaganda choir music, you might start wondering what a world taken over by an artificial intelligence might actually look like, and realize that your browser’s incognito / private mode really isn’t just for shopping birthday presents in secret. Things get a bit tricky if you actually enjoy or even rely on the whole subscribing-to-channels concept though, which is naturally difficult to bring in line with privacy in today’s world of user-data-driven business models.
Entering the conversation: the FreeTube project, a cross-platform application whose mission is to regain privacy and put the control of one’s data back into the user’s hands. Bypassing YouTube and its player, the watch history and subscriptions — which are still possible — are kept only locally on your own computer, and you can import either of them from YouTube and export them to use within FreeTube on another device (or back to YouTube). Even better, it won’t load a video’s comments without explicitly telling it to, and of course it keeps out the ads as well.
Originally, the Invidious API was used to get the content, and is still supported as fallback option, but FreeTube comes with its own extractor API nowadays. All source code is available from the project’s GitHub repository, along with pre-built packages for Linux (including ARM), Windows, and Mac. The application itself is created using Electron, which might raise a few eyebrows as it packs an entire browser rendering engine and essentially just disguises a website as standalone application. But as the FAQ addresses, this allows easy cross-platform support and helps the project, which would have otherwise been Linux-only, to reach as many people as possible. That’s a valid point in our book.
Keep in mind though, FreeTube is only a player, and more of a wrapper around YouTube itself, so YouTube will still see your IP and interaction with the service. If you want to be fully anonymous, this isn’t a silver bullet and will require additional steps like using a VPN. Unlike other services that you could replace with a local alternative to avoid tracking and profiling, content services are just a bit trickier if you want to actually have a useful selection. So this is a great compromise that also just works out of the box for everyone regardless of their technical background. Let’s just hope it won’t break too much next time some API changes.
Have you ever wanted to watch someone reverse engineer a piece of hardware and pick up some tips? You can’t be there while [Jeremy] tears open a Netgear N300 router, but you can see his process step by step in some presentation charts, and you’ll get a few ideas for the next time you want to do something like this.
The first part of the presentation might be a little basic for most Hackaday readers, but presumably, the intended audience might not know much about soldering or multimeters. But we enjoyed the methodology used to work out the UART pins on the board. We would have read the baud rate with the scope, which [Jeremy] does, but he also mentions a script to work it out and create a minicom profile that looked interesting.
The router runs OpenWRT, so once you have access to the UART, you are in as root. Getting into the bootloader allowed access to the firmware. At first, [Jeremy] though he found a JTAG interface, but it didn’t work. He suspects the JTAG is disabled, but shows how he would dump the firmware from another device that does have JTAG. He also shows how you could dump the flash chip directly. Fair warning: it required removing the device from the PCB.
Once you have the firmware, there are tools to extract the root file system and even emulate the running system. Then you no longer have a hardware problem, you have a software problem, and that’s where [Jeremy] leaves it.
We were impressed with the completeness of the presentation and how each step provided multiple methods. Sometimes, as you can see, one method doesn’t work and you need to try an alternative.
The brain — a Raspberry Pi running RetroPie — should be familiar to most of our readers. [Mark] found the perfect crappy old monitor when they were upgrading at his office, and found some nice speakers to give it good bass. We love the details like the chrome edging, and especially the kick bar/footrest along the bottom. It can be difficult to decide how to decorate a multi-arcade cabinet, so [Mark] went the sticker bomb route with 700 of them randomly distributed and safe from toddler wear and tear under five coats of clear wood varnish.
We think this looks great, especially since [Mark] doesn’t have a workshop and cut all that MDF by hand on a jigsaw in the kitchen. Check out the happy train engineer after the break.
[Hugo Hadfield] wrote to let us know about an intriguing series of talks that took place in February of this year at GAME2020, on the many applications of geometric algebra. The video playlist of these talks can be found here along with the first video embedded after the break. For those of us who did not take advanced algebra during university, one can picture geometric algebra (GA) as an extension of vector algebra, adding more algebraic structures.
The essential difference is that GA adds a new vectors product, called the ‘geometric product’. The Cliff’s Notes version is that this is very useful for doing for example transformations, like in 3D spaces. For a quick algebraic introduction to GA for those familiar with vector algebra, the associated biVector website is helpful, from where one can also find additional information, software and other resources on getting started with GA.
These talks will take the viewer through the use of GA with robot kinematics (co-presented by [Hugo]), in astrophysics and AI. Definitely worth a watch, even algebra isn’t one’s strongest points.
All across the country, parents are wondering what to do about the upcoming Trick Or Treat season. Measures such as social distancing, contact free treats, or simply doing it at home are all being weighed as a balance of fun and safety. [BuildXYZ] has decided to lean into the challenges this year and incorporate a mask as part of the costume for his boys.
It started with a 3d printed mask, printed in two halves, and sealed with silicon caulk and N95 filter material in the inlet and outlet holes on the sides. The real magic of the mask is the small OLED screen mounted to the front that works along with a small electret microphone inside the mask. By sampling the microphone and applying a rolling average, the Arduino Nano determines if the mouth drawn on the display should be open or closed. A small battery pack on a belt clip (with a button to flash “Trick or Treat” on the screen) powers the whole setup and can be easily hidden under a cape or costume.
This isn’t the first hack we’ve seen for Halloween this year, such as this socially distant candy slide. We have a feeling that there will be many more as the month rolls on and people start to apply their ingenuity to the season.
Imagine traveling back in time about 2,200 years, to when nothing moves faster than the speed at which muscle or wind can move it. Think about how mind-shattering it would have been to see something like Hero’s Engine, the first known example of a steam turbine. To see a sphere whizzing about trailing plumes of steam while flames licked around it would likely have been a nearly mystical experience.
Of course we can’t go back in time like that, but seeing a modern replica of Hero’s Engine built and tested probably isn’t to far from such an experience. The engine, also known as an aeolopile, was made by the crew over at [Make It Extreme], whose metalworking videos are always a treat to watch. The rotor of the engine, which is fabricated from a pair of hemispherical bowls welded together, is supported by pipes penetrating the lid of a large kettle. [Make It Extreme] took great pains to make the engine safe, with relief valves and a pressure gauge that the original couldn’t have included. The aeolopile has a great look and bears a strong resemblance to descriptions of the device that may or may not have actually been invented by Greek mathemetician [Heron of Alexandria], and as the video below shows, when it spins up it puts on a great show.
One can’t help but wonder how something like this was invented without someone — anyone — taking the next logical step. That it was treated only as a curiosity and didn’t kick off the industrial revolution two millennia early boggles the mind. And while we’ve seen far, far simpler versions of Hero’s Engine before, this one really takes the cake on metalworking prowess.
Unless you have one large pile of cash to burn through, properly equipping a workshop can take years of burning through little piles of cash. Whether to save a bit of cash or simply for the challenge, [Workshop from Scratch] is doing exactly what his channel name suggests, and his latest project is a XY table. (Video, embedded below.)
A XY table, or cross table, allows a workpiece to be translated in two dimensions, usually on a drill press or milling machine. On a drill press they make repetitive task like drilling a series of holes simpler and quicker. [Workshop from Scratch] built most of the frame with steel flat bar, and the moving parts run on ground steel rods with linear bearings. Lead screws with hand wheels are used to translate the table.
A machine like this requires the opposing plates of each table to be perfectly aligned, which [Workshop from Scratch] achieved by spot welding the matching plates together and drilling them in one operation. He also added T-slot top surface, created by welding wide flat bar on top of narrower flat bar.
With the lack of dials, it doesn’t look like it’s meant for precision work, but we would still be interested to know how repeatable the lead screw positioning is. Regardless, it’s still a useful addition to the shop.
[Workshop from Scratch] is building a rather impressive collection of DIY tools, including a magnetic vise (that he already used with the XY table), magnetic drill press and a hydraulic lift table. We look forward to seeing what’s next on the list.
[Bertrand Fan] is not a fan of the tiny, hard-to-actuate button on the average Yubikey. Before all that is 2020 occurred, [Bert] had the little 2FA nano-donglette plugged into a spare USB port on the side of their laptop so that it was always available wherever the laptop traveled. Now that working from home is the norm, [Bert] has the laptop off to the side, far out of reach.
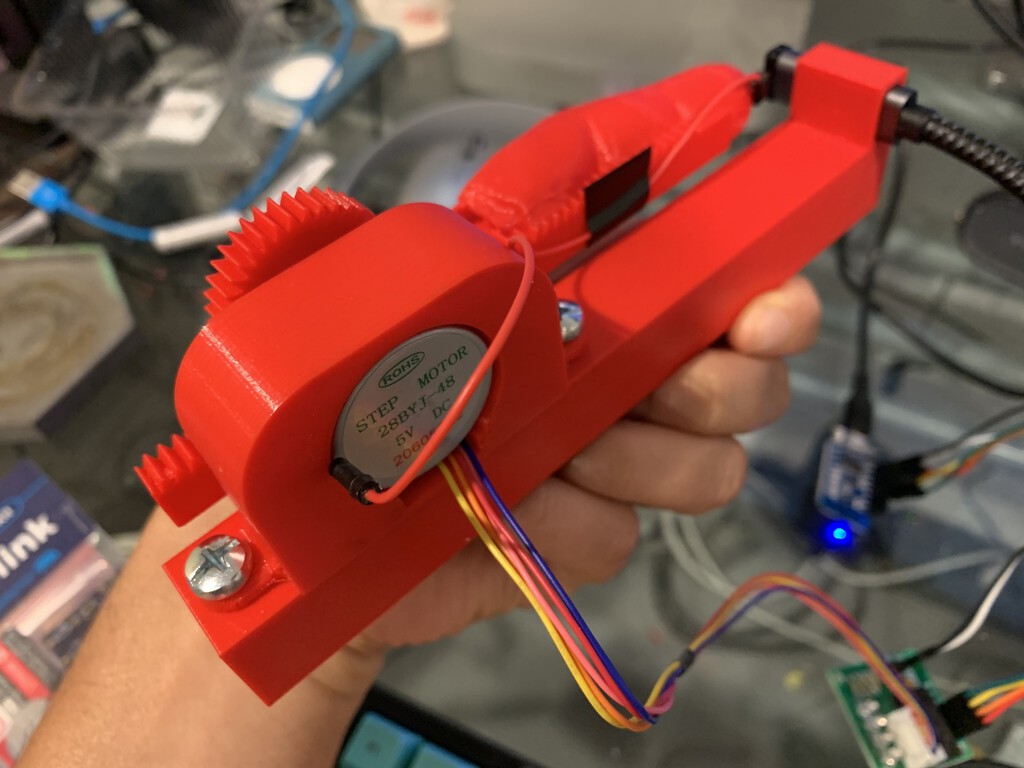
It runs on a Wemos D1 mini and uses a small stepper motor to push a 3D-printed finger along a rack-and-pinion actuator. Since the Yubikey requires capacitive touch, [Bert] added a screw to the finger tip that’s wired to ground. Now all [Bert] has to do is press a decidedly cooler key to make the finger press the button for him. Check out a brief demo after the break.
[Bertrand Fan] is not a fan of the tiny, hard-to-actuate button on the average Yubikey. Before all that is 2020 occurred, [Bert] had the little 2FA nano-donglette plugged into a spare USB port on the side of their laptop so that it was always available wherever the laptop traveled. Now that working from home is the norm, [Bert] has the laptop off to the side, far out of reach.
It runs on a Wemos D1 mini and uses a small stepper motor to push a 3D-printed finger along a rack-and-pinion actuator. Since the Yubikey requires capacitive touch, [Bert] added a screw to the finger tip that’s wired to ground. Now all [Bert] has to do is press a decidedly cooler key to make the finger press the button for him. Check out a brief demo after the break.
[Bertrand Fan] is not a fan of the tiny, hard-to-actuate button on the average Yubikey. Before all that is 2020 occurred, [Bert] had the little 2FA nano-donglette plugged into a spare USB port on the side of their laptop so that it was always available wherever the laptop traveled. Now that working from home is the norm, [Bert] has the laptop off to the side, far out of reach.
It runs on a Wemos D1 mini and uses a small stepper motor to push a 3D-printed finger along a rack-and-pinion actuator. Since the Yubikey requires capacitive touch, [Bert] added a screw to the finger tip that’s wired to ground. Now all [Bert] has to do is press a decidedly cooler key to make the finger press the button for him. Check out a brief demo after the break.
Not every build needs to be immediately useful or revolutionary. Plenty of builds are just for fun, for education, or even purposefully useless but still challenging. This clock, for example, might fit into all three categories. It’s a clock that displays time through a QR code, making it completely inscrutable unless you have a device which likely has its own readable clock on it already.
The QR Code clock comes to us from [Aaron] and is based on the now-ubiquitous ESP32 WiFi chip. The ESP32 is connected to a 64×64 LED matrix which is updated every second with a code for the current time. With single-second resolution that means that even with a method for reading a QR code by hand, like you sometimes can with barcodes, there’s no way to read it without a smartphone since it changes so rapidly.
Of course [Aaron] recognizes the flaw in his design in his video in which he notes tongue-in-cheek that with this clock you would never have to look at a smartphone again, since the clock is right there on the wall. We appreciate the humor and also that [Aaron] has made all of his source code available in case you would like to use this as an example project for using QR codes for more useful purposes. For now, though, we’ll just forward you along to some other useless machines.
Once upon a time, the computer mouse didn’t exist. Early computers used a variety of other input devices, from the typical keyboard to more esoteric options such as joysticks or light pens. While the mouse as we know it dominates all, it doesn’t mean other tools can’t find their place. One such device is this hat mouse, from [Jacek Fedorynski].
The mouse consists of an Adafruit Feather nRF52840 Sense, mounted upon a basic baseball cap. The development board packs in a 9 degree-of-freedom motion sensor package featuring the ST LSM6DS33 acceleromater/gyro and LIS3MDL magnetometer. Through a robust sensor fusion algorithm, this enables the board to measure the orientation and motion of the wearer’s head with a great degree of finesse. This allows the user to look at different parts of the screen to move the mouse cursor, with the system working in an absolute rather than relative fashion. Commands are sent to the attached PC with the Feather’s built-in Bluetooth, avoiding the need for dangly cables running down the user’s neck. Files are available on Github for those eager to spin up their own.
Combined with some built-in accessibility aids in Windows, the setup allows the user to move the mouse well, with foot switches used to activate the left and right mouse buttons. For those who find using a traditional mouse difficult, this could be a great tool for better productivity. Of course, if you wish to learn more, it pays to take a look back at the very earliest days of mouse technology. Video after the break.
We never know exactly what to make of university press releases, as we see plenty of them with breathless claims of new batteries or supermaterials, but then we don’t see much else. Sometimes, the claims in the press release don’t hold up in the paper, while other times the claims seem to be impractical for use in real life. We aren’t quite sure what to make of a press release from the University of Arkansas claiming they can draw current from a sheet of freestanding graphene purely from its temperature fluctuations.
The press release seems to claim that this is a breakthrough leading to “clean, limitless power.” But if you look at the actual paper, normal room temperature is causing tiny displacements in the graphene sheet as in Brownian motion. A scanning tunneling microscope with two diodes can detect current flowing even once the system reaches thermal equilibrium. Keep in mind, though, that this in the presence of a bias voltage and we are talking about nanometer-scale displacements and 20 pA of current. You can see a simple video from the university showing a block diagram of the setup.
It seems that the news here is that current is flowing in a thermally stable system without violating the second law of thermodynamics. The innovation, apparently, is the idea of using two diodes to harvest both positive and negative fluctuations. Not much power, though. The press release talks about millions of these tiny circuits could serve as a low-power battery replacement.
There are still some pretty mysterious comments in the press release about the change in resistance of the diodes adds “an extra factor to the power,” and that “switch-like behavior of the diodes actually amplifies the power delivered…” We will have to wade through the math in the paper to see if we can figure out what any of that means.
We hear about exciting new things graphene will do all the time. We just don’t see it much in the wild, at least not yet. All this talk of graphene and diodes made us remember that you can create PN junctions in graphene.
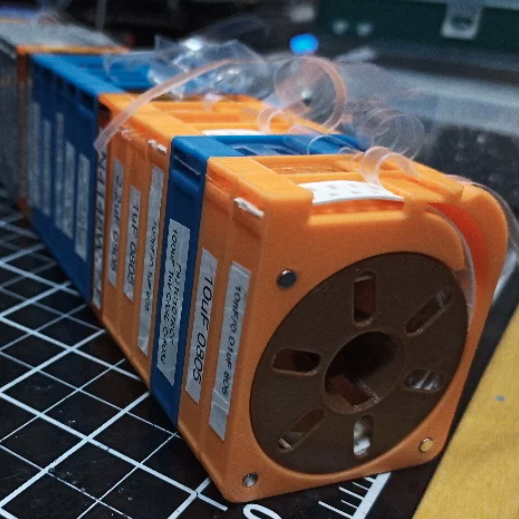
[Kadah]’s solution for storing short tapes of SMT parts is as attractive as it is clever. The small 3D-printed “tape reels” can double as dispensers, and stack nicely onto each other thanks to the sockets for magnets. The units come in a few different sizes, but are designed to stack in a consistent way.
We love the little touches such as recessed areas for labels, and the fact that the parts can print without supports (there are a couple of unsupported bridges, but they should work out fine.) Also, the outer dimensions of the units are not an accident. They have been specifically chosen to nestle snugly into the kind of part drawers that are a nearly ubiquitous feature of every hardware hacker’s work bench.
STLs are provided for handy download but [Kadah] also provides the original Fusion 360 design file, with all sizes defined as easily-customized parameters. In addition, [Kadah] thoughtfully provided each model in STEP format as well, making it easy to import and modify in almost any 3D CAD program.
We think this looks great, and is a great reuse of a glass jar. The brains of this operation is an ESP8266, which drives a continuous-rotation servo underneath the dice. Push the button or use the web app and the servo disturbs the plate, moving the dice around.
Besides the sanitary aspect, one benefit of using the web app is that there are four different speed presets for the servo. As a bonus, [CJA3D] included the files for a pair of printed 6-sided dice. Click through to the project to see it in action.
Plan a special activity for you and your loved one this Valentine’s day. From going ballroom dancing to enjoying a fancy meal at home, watching a live show or going camping, there are plenty of exciting things to do.
If you’re looking for events and other fun things to do in your area, visit Junk Mail today.
Photo Source – www.pixabay.com
Recreate your first or one of your favourite dates
This
idea is one that never fails. Recreating a very special memory can be an
awesome way to spend Valentine’s
Day with your partner. You can even add some new, surprising touches to
make this date even more special than the previous one.
Have a movie marathon
Put
together a selection of your favourite movies and cuddle up on the couch for a
romantic night at home. Don’t forget to prepare popcorn and snacks before you
start watching.
Have a picnic
This is a versatile option as you can have a picnic in a variety of places, from inside your house to outside in your garden, at the botanical gardens, a park, the dam and many more. You can play games, read your favourite book, and go through old pictures while you’re having a picnic.
Build/craft something together
Building
little things for your home or each other is always fun. It can be something as
simple as a photo frame or something more extravagant like building a new patio
couch. These activities will not only relax you and boost your creativity, but it
will also help both of you work together and enjoy the result.
Play arcade games, go bowling, go ice skating or even some mini-golfing
If
you’re into doing fun things, these four options are a good place to start. You
can plan an entire day of fun-filled activities without spending a fortune.
Arrange a photoshoot
A couple’s photoshoot is great fun and a fantastic way to create memories. You can even decorate your house with the pictures afterwards.
Photo Source – www.freepik.com
Spend the day at an amusement or theme park
If you’re an adventurous couple and like to have fun, amusement or theme parks are a perfect idea. From enjoying different rides to buying gifts and enjoying various restaurants, a day at an amusement- or theme park can be an awesome experience you’ll remember forever.
Book a couple’s massage
Relax and unwind during a couple’s massage at a nearby spa. Massages are a great way to relax and relieve stress. You can choose whether you want to do full-body massages or just hands and feet. It all depends on you.
Go watch a live show or theatre production
Surprise your loved one with live music, a comedy show or theatre production. If you can’t find something you like on or close to Valentine’s Day, you can buy tickets to a show at a later stage and surprise your loved one with the tickets over a romantic dinner.
Plan a games night
Gather your favourite board games or cards for a fun games night. This can include anything from playing Snakes and Ladders to Snap, Uno, Rummy, Go Fish, Scrabble, Monopoly, Cluedo and much more. You can even play Jenga or Twister. Add snacks and your favourite drinks to make the evening memorable.
Go for a hike
Spend
some time in nature with your loved one this Valentine’s Day. Find a beautiful hiking
route nearby and pack a picnic bag to enjoy after your walk. This is a great
opportunity to spend quality time together away from any distractions. South
Africa’s stunning scenery makes a hike the perfect adventure for this special
occasion.
Horse riding
This
suggestion is not suitable for everyone, so before you just book it, make sure
your partner will be ok with it. But other than that, horse riding can
be a lot of fun. Enjoying nature from the back of a horse can be peaceful and
calming and most definitely romantic.
Photo Source – www.freepik.com
Quad bike rides
Quad
bike riding
through trails is an extreme amount of fun. You can either share a quad or each
get your own quad, depending on how comfortable you are with driving one. P.S.
you might need a shower after your quad bike trip…
Go camping
Get away from your busy lifestyle by planning a camping trip. On clear evenings, you can even spend the night star gazing. Walking, swimming and braaiing are all great activities for your camping getaway.
Go on a day trip
Discover
popular destinations nearby by going on a day trip. Look for a location within
three hours of your home and set off on a road trip for the day. This mini
holiday will leave you feeling refreshed and will give you the opportunity to
spend some quality time together.
Take a dancing lesson
With
romance in the air, dancing is the perfect activity for you and your partner.
If you don’t have any experience, you can sign up for a class in your
area. Have fun while impressing your partner with your new dance moves.
Take a pottery class
Get creative this Valentine’s Day by booking a pottery class for you and your partner. You’ll learn new skills while enjoying time together with that special person in your life.
Join a cooking/baking class
You
can learn how to make some new and interesting dishes with your partner this Valentine’s Day by
joining a cooking/baking class. Cooking or baking together builds
cooperation, lets you learn more about each other, and improves communication
while having fun.
Prepare a fancy dinner
Put
on an apron and prepare a delicious meal for your partner. Set the table, light
the candles, and add roses to create a romantic ambiance in your home. While
going to a restaurant is a fun night out, there is something special about
enjoying a fancy meal together in the comfort of your own home.
Photo Source – www.freepik.com
Now that you’re feeling inspired, you can start planning an incredible Valentine’s Day packed with exciting activities. Visit Junk Mail to find events, fun activities, cooking classes, dancing classes and more.
Science fiction movies often portray horticulture in the future, be it terrestrial or aboard spacecraft, with hydroponic gardens overflowing with leafy greens and brightly colored fruit. There is no soil, just clear water that hints at future-people creating a utopia of plant strains untethered from their earthly roots.
This star-faring food production method is not fiction if you forego the polycarbonate tubing, neon accent lights, and gardening robots. For his 2020 Hackaday Prize entry, [AVR] shares how he creates a bed for sixteen plants with parts sourced at a nearby home-improvement store. It may lack the visual pizzaz of the Hollywood versions, but it will grow soil-less crops on a hacker budget.
The starting point for this build is a sturdy wooden base. The PVC tubing and fence parts on top are light, but the water inside them will get heavy, and if you grow large plants, they become surprisingly heavy. Speaking of water, the sub-category of hydroponics this falls under is Nutrient Film Technique, or NFT, which uses a shallow stream of water laden with all the nutrients for plant growth. The square fence posts provide a flat top for mounting mesh cups where the plants grow and a flat bottom where the stream continuously flows. A basin and pump keep the plants refreshed and fed until they are ready for harvest.
Ever wonder what your favorite board game sounds like? Neither did we. Thankfully [Sara Adkins] did, and created a step sequencer called Let’s Go that uses the classic board game Go as input.
In the game Go, two players place black and white tokens on a grid, vying for control of the board. As the game progresses, the configuration of game pieces gets more complex and coincidentally begins to resemble Conway’s Game of Life (or a weird QR Code). Sara saw music in the evolving arrangement of circles and transformed the ancient board game into a modern instrument so others could hear it too.
To an observer, [Sara’s] adaptation looks fairly indistinguishable from the version played in China 2,500 years ago — with the exception of an overhead webcam and nearby laptop, of course. The laptop uses OpenCV to digitize the board layout. It feeds that information via Open Sound Control (OSC) into popular music creation software Max MSP (though an open-source version could probably be implemented in Pure Data), where it’s used to control a step sequencer. Each row on the board represents an instrumental voice (melodic for white pieces, percussive for black ones), and each column corresponds to a beat.
Every new game is a new piece of music that starts out simple and gradually increases in complexity. The music evolves with the board, and adds a new dimension for players to interact with the game. If you want to try it out yourself, [Sara] has the project fully documented on her website, and all of the code is available on GitHub. Now we’re just left wondering what other games sound like — [tinkartank] already answered that question for chess, but what about Settlers of Catan?