Motorized Magic Over HDMI

There is a certain warmth that seems to emanate from stereo receivers of the 70s, 80s, and 90s. Despite their large footprint and considerable heft, the soft glow of the indicator lights and solid kerthunk of switches provide a sense of coziness. When [Tom] recently swapped his receiver for a 1970s Pioneer SX-950, he found himself getting up from the couch to adjust the volume when watching TV far too often for his liking. Resolving to do something about it, he added some magic in the form of a motorized volume knob. One of the coolest tricks for stereos was to have a small motor attached to the volume knob so that it could turn the volume up or down via a remote.

The first obstacle came when [Tom] had to forgo the center tap on the potentiometer to get a motorized one. This meant the volume compensation feature would be disabled, which is but a small price to pay for convenience. After scouring the internet, he finally had the part in hand only to discover some troublesome capacitors in the way. The new pot had a rather large motor hanging off the back that the previous one didn’t have. Fortunately, there was a good bit of space between the PCB and the bottom of the chassis, so Tom was able to just flip the capacitors to the underside of the board and bend them on their sides.

The next problem to solve was how to change the volume remotely. IR was considered as well as optical cable control signals. What [Tom] did instead was to implement HDMI CEC (consumer electronics control). CEC was well documented and seemed simple to implement on an ATTINY4313 with the help of a half-H driver. The CEC protocol implemented by [Tom’s] TV seemed to be very sensitive to timing, so an external crystal was used to get more precise timing and additional handshaking was implemented to get the TV to accept the microcontroller as valid. A few fail-safes were added to make sure the motor didn’t burn out if something went wrong with the CEC protocol and a nice enclosure wrapped up the build quite nicely.

We’ve seen CEC implemented before on a PIC 18F87J50, but as a sender of CEC commands not a receiver. [Tom’s] code is available on GitHub and might prove useful if you’re looking to implement CEC on an AVR.

Thanks [Tom] for sending this one in!

source https://hackaday.com/2020/10/19/motorized-magic-over-hdmi/

TTGO ESP32 Module with Multiple Personalities

Volos Projects educator [Danko Bertović] had a TTGO ESP32 board looking for a project, so he implemented a surprisingly functional weather station for such a small screen. Presumably that was too boring for him, so he decided to write a version of the classic Atari game Breakout instead. [Danko] prefers using the Arduino IDE for ESP32 projects, and has made the Breakout software available as an Arduino sketch. We hope the weather station sketch will be released soon, too. The TTGO is a small ESP32 board with an ST7789V 1.14 in (29 mm) TFT color display, available from your favorite Shenzhen market supplier. This platform is perfect for all kinds of niche applications. We’d love to hear how you are using, or plan to use, these modules in your projects.  

We wrote about one such project last summer, where a similar TTGO module was used to display 50-year broadcast delayed transcripts of the Apollo 11 mission. [Danko] is no stranger to Hackaday — he has made several Arduino-based calculator projects.  Perhaps the most remarkable being the circuit sculpture binary number calculator from last year, another project that morphed into a computer game (Pong).  

https://www.youtube.com/watch?v=N6V7ZJkhSbc

source https://hackaday.com/2020/10/19/ttgo-esp32-module-with-multiple-personalities/

Bench Supplies Get Smaller Thanks to USB-C

Bench power supplies are an indispensable tool when prototyping electronics. Being able to set custom voltages and having some sort of current limiting feature are key to making sure that the smoke stays inside all of the parts. Buying a modern bench supply might be a little too expensive though, and converting an ATX power supply can be janky and unreliable. Thanks to the miracle of USB-C, though, you can build your own fully-featured benchtop power supply like [Brian] did without taking up hardly any space, and for only around $12.

USB-C can be used to deliver up to 100W but is limited to a few set voltage levels. For voltages that USB-C doesn’t support, [Brian] turns to an inexpensive ZK-4KX buck-boost DC-DC converter that allows for millivolt-level precision for his supply’s output. Another key aspect of using USB-C is making sure that your power supply can correctly negotiate for the amount of power that it needs. There’s an electronic handshake that goes on over the USB connection, and without it there’s not a useful amount of power that can be delivered. This build includes a small chip for performing this negotiation as well.

With all the electronics taken care of, [Brian] houses all of this in a 3D-printed enclosure complete with a set of banana plugs. While it may not be able to provide the wattage of a modern production unit, for most smaller use cases this would work perfectly. If you already have an ATX supply around, though, you can modify [Brian]’s build using that as the supply and case too.

source https://hackaday.com/2020/10/19/bench-supplies-get-smaller-thanks-to-usb-c/

Retro Calculator Design Has Creative Tactile Touchscreen

We’ve all heard it a thousand times – they don’t make ’em like they used to. Sometimes, that’s for good reason, but there is a certain build quality to electronics of the mid-20th century that is hard to find in hardware today. This inspires great nostalgia and dedication in some, like [Michael Park], who set out to build a calculator reminiscent of the best HP designs from yesteryear.

The scissor mechanism allows the touch screen to move linearly and activate the tactile switch without twisting, no matter where along its surface it is pressed.

One of the major factors for [Michael] was the great feel of the keys on these classic units. Wanting to experiment with different layouts without a lot of rewiring, the idea of keys with individual displays became attractive. Existing parts on the market were prohibitively expensive, however. Instead, [Michael] used a single touchscreen with a switch mounted underneath to provide tactile feedback with a nifty scissor-arm guide mechanism. Combined with individual see-through plastic overlays, the MP-29 has a fully reconfigurable pad of 30 keys with dynamically updatable labels.

It’s a creative choice, and one that looks highly satisfying to use. It has all the tactile benefits of individual keys, both in the keypresses and being able to navigate the keypad without looking. Combined with the benefit of reconfigurable keys thanks to the touch screen underneath, it’s a great way to build a user-interface.

The rest of the calculator design closely mimics the HP-29, though [Michael] is also experimenting with alternative layouts too. There are plenty of religious wars in the calculator community over usability, after all – mostly over which side of the pad has the arithmetic functions.

We’ve lamented the demise of the standalone calculator recently; with so many smart devices around, it’s hard to see it making a major comeback anytime soon. Of course, if you’re opinionated on the topic, sound off in the comments below. Video after the break.


source https://hackaday.com/2020/10/18/retro-calculator-design-has-creative-tactile-touchscreen/

Free P2P VPN

People use a VPN — virtual private network — for a lot of reasons. However, for many people it is synonymous with hiding your network traffic, one thing that VPN can do. FreePN is a relatively new open source project that aims to build a free peer-to-peer VPN network. Like TOR, it is decentralized.

Right now, you can download for Ubuntu and Gentoo. There is a way to ask for early access for Debian, Fedora, and Arch. Windows, iOS, MacOS, and Android versions are promised for the future.

The code is on GitHub, so all questions are in theory answerable. Digging into the fpnd README told us most of the features we hoped to find on the main page (but didn’t):

The FreePN network daemon (fpnd) is a P2P implementation of a distributed virtual private network (dVPN) that creates an anonymous “cloud” of peers where each peer is both a client node and an exit node. Peers are randomly connected on startup and reconnected to new (random) peers as needed.

The FreePN network daemon (fpnd) is a P2P implementation of a distributed virtual private network (dVPN) that creates an anonymous “cloud” of peers where each peer is both a client node and an exit node. Peers are randomly connected on startup and reconnected to new (random) peers as needed.

In addition, the page notes that they only route http(s) traffic and, optionally, DNS traffic. IPv6 packets are dropped, unless you configure it to pass without VPN.

Is this a better answer than TOR? We don’t know. We weren’t clear on how you could set this up for some possible use cases, but there appears to be a fledgling support group on Reddit. If this works well and can support more platforms, it could be a good thing for online privacy and protection.

We’ve noted before that truly secure networking can be hard to accomplish. For many of us, a VPN is just an extra layer of security, or a way to watch TV that is only available in another country. But for some people, a VPN is a political necessity.

source https://hackaday.com/2020/10/18/free-p2p-vpn/

Hackaday Links: October 18, 2020

Remember subliminal advertising? The idea was that a movie theater operator would splice a single frame showing a bucket of hot buttered popcorn into a movie, which moviegoers would see and process on a subconcious level and rush to the concession stand to buy the tub o’ petrochemical-glazed starch they suddenly craved. It may or may not work on humans, but it appears to work on cars with advanced driver assistance, which can be spoofed by “phantom street signs” flashed on electronic billboards. Security researchers at Ben Gurion University stuck an image of a stop sign into a McDonald’s ad displayed on a large LCD screen by the side of the road. That was enough to convince a Tesla Model X to put on the brakes as it passed by the sign. The phantom images were on the screen anywhere from an eighth of a second to a quarter second, so these aren’t exactly subliminal messages, but it’s still an interesting attack that bears looking into. And while we’re skeptical about the whole subliminal advertising thing in the first place, for some reason we really want a bacon cheeseburger right now.

Score one for the good guys in the battle against patent trolls. Mycroft AI, makers of open-source voice assistants, proudly announced their latest victory against what they claim are patent trolls. This appears to be one of those deals where a bunch of investors get together and buy random patents, and then claim that a company that actually built something infringes on their intellectual property. Mycroft got a letter from one such entity and decided to fight it; they’ve won two battles so far against the alleged trolls and it looks pretty good going forward. Their not pulling their punches, either, since Mycroft is planning to go after the other parties for legal expenses and punitive damages under the State of Missouri’s patent troll legislation. Here’s hoping this sends a message to IP squatters that it may not be worth the effort and that their time and money are better spent actually creating useful things.

Good news from Mars — The Mole is finally completely buried! We’ve been following the saga of the HP³, or “Heat Flow and Physical Properties Package” aboard NASA’s Mars InSight lander for quite a while. The self-drilling “Mole”, which is essentially the guts of an impact screwdriver inside a streamlined case, has been having trouble dealing with the Martian regolith, which is simultaneously to soft to offer the friction needed to keep the penetrator in its hole, but also too hard to pierce in places where there is a “duricrust” of chemically amalgamated material below the surface. It took a lot of delicate maneuvers with the lander’s robotic arm to get the Mole back on track, and it’s clearly not out of the woods yet — it needs to get down to three meters depth or so to do the full program of science it was designed for.

If watching Martian soil experiments proceed doesn’t scratch your itch for space science, why not try running your own radio astronomy experiments? Sure, you could build your own radio telescope to do that, but you don’t even have to go that far — just log into PICTOR, the free-to-use radio telescope. It’s a 3.2-m parabolic dish antenna located near Athens, Greece that’s geared toward hydrogen line measurements of the galaxy. You can set up an obervation run and have the results mailed back to you for later analysis.

Here’s a fun, quick hack for anyone who hates the constant drone of white noise coming from fans. Build Comics apparently numbers themselves among that crowd, and decided to rig up a switch to turn on their fume extractor only when the soldering iron is removed from its holder. This hack was executed on a classic old Weller soldering station, but could easily be adapted to Hakko or other irons

And finally, if you’ve never listened to a Nobel laureate give a lecture, here’s your chance. Andrea Ghez, co-winner of the 2020 Nobel Prize in physics for her work on supermassive black holes, will be giving the annual Maria Goeppert Mayer lecture at the University of Chicago. She’ll be talking about exactly what she won the Nobel for: “The Monster at the Heart of Our Galaxy”, the supermassive black hole Sagittarius A*. We suspect the talk was booked before the Nobel announcement, so in normal times the room would likely be packed. But one advantage to the age of social distancingis that everything is online, so you can tune into a livestream of the lecture on October 22.

source https://hackaday.com/2020/10/18/hackaday-links-october-18-2020/

Custom Electronic Load Makes Use Of Gaming PC Tech

At first glance, you might think the piece of hardware pictured here is a modern gaming computer. It’s got water cooling, RGB LED lighting, and an ATX power supply, all of which happen to be mounted inside a flashy computer case complete with a clear window. In truth, it’s hard to see it as anything but a gaming PC.

In actuality, it’s an incredible custom electronic load that [EE for Everyone] has been developing over the last four months that’s been specifically designed to take advantage of all the cheap hardware out there intended for high-performance computers. After all, why scratch build a water cooling system or enclosure when there’s such a wide array of ready-made ones available online?

The “motherboard” with single load module installed.

Inside that fancy case is a large PCB taking the place of the original motherboard, to which four electronic load modules slot into. Each of these loads is designed to accept a standard Intel CPU cooler, be it the traditional heatsink and fan, or a water block for liquid cooling. With the current system installed [EE for Everyone] can push the individual modules up to 275 watts before the temperatures rise to unacceptable levels, though he’s hoping to push that a little higher with some future tweaks.

So what’s the end game here? Are we all expected to have a massive RGB-lit electronic load hidden under the bench? Not exactly. All of this has been part of an effort to design a highly accurate electronic load for the hobbyist which [EE for Everyone] refers to as the “Community Edition” of the project. Those smaller loads will be derived from the individual modules being used in this larger testing rig.

We’ve actually seen DIY liquid cooled electronic loads in the past, though this one certainly sets the bar quite a bit higher. For those with more meager requirements, you might consider flashing a cheap imported electronic load with an open source firmware to wring out some extra functionality.

[Thanks to Zane for the tip.]

source https://hackaday.com/2020/10/18/custom-electronic-load-makes-use-of-gaming-pc-tech/

Custom Electronic Load Makes Use Of Gaming PC Tech

At first glance, you might think the piece of hardware pictured here is a modern gaming computer. It’s got water cooling, RGB LED lighting, and an ATX power supply, all of which happen to be mounted inside a flashy computer case complete with a clear window. In truth, it’s hard to see it as anything but a gaming PC.

In actuality, it’s an incredible custom electronic load that [EE for Everyone] has been developing over the last four months that’s been specifically designed to take advantage of all the cheap hardware out there intended for high-performance computers. After all, why scratch build a water cooling system or enclosure when there’s such a wide array of ready-made ones available online?

The “motherboard” with single load module installed.

Inside that fancy case is a large PCB taking the place of the original motherboard, to which four electronic load modules slot into. Each of these loads is designed to accept a standard Intel CPU cooler, be it the traditional heatsink and fan, or a water block for liquid cooling. With the current system installed [EE for Everyone] can push the individual modules up to 275 watts before the temperatures rise to unacceptable levels, though he’s hoping to push that a little higher with some future tweaks.

So what’s the end game here? Are we all expected to have a massive RGB-lit electronic load hidden under the bench? Not exactly. All of this has been part of an effort to design a highly accurate electronic load for the hobbyist which [EE for Everyone] refers to as the “Community Edition” of the project. Those smaller loads will be derived from the individual modules being used in this larger testing rig.

We’ve actually seen DIY liquid cooled electronic loads in the past, though this one certainly sets the bar quite a bit higher. For those with more meager requirements, you might consider flashing a cheap imported electronic load with an open source firmware to wring out some extra functionality.

[Thanks to Zane for the tip.]

source https://hackaday.com/2020/10/18/custom-electronic-load-makes-use-of-gaming-pc-tech/

Custom Electronic Load Makes Use Of Gaming PC Tech

At first glance, you might think the piece of hardware pictured here is a modern gaming computer. It’s got water cooling, RGB LED lighting, and an ATX power supply, all of which happen to be mounted inside a flashy computer case complete with a clear window. In truth, it’s hard to see it as anything but a gaming PC.

In actuality, it’s an incredible custom electronic load that [EE for Everyone] has been developing over the last four months that’s been specifically designed to take advantage of all the cheap hardware out there intended for high-performance computers. After all, why scratch build a water cooling system or enclosure when there’s such a wide array of ready-made ones available online?

The “motherboard” with single load module installed.

Inside that fancy case is a large PCB taking the place of the original motherboard, to which four electronic load modules slot into. Each of these loads is designed to accept a standard Intel CPU cooler, be it the traditional heatsink and fan, or a water block for liquid cooling. With the current system installed [EE for Everyone] can push the individual modules up to 275 watts before the temperatures rise to unacceptable levels, though he’s hoping to push that a little higher with some future tweaks.

So what’s the end game here? Are we all expected to have a massive RGB-lit electronic load hidden under the bench? Not exactly. All of this has been part of an effort to design a highly accurate electronic load for the hobbyist which [EE for Everyone] refers to as the “Community Edition” of the project. Those smaller loads will be derived from the individual modules being used in this larger testing rig.

We’ve actually seen DIY liquid cooled electronic loads in the past, though this one certainly sets the bar quite a bit higher. For those with more meager requirements, you might consider flashing a cheap imported electronic load with an open source firmware to wring out some extra functionality.

[Thanks to Zane for the tip.]

source https://hackaday.com/2020/10/18/custom-electronic-load-makes-use-of-gaming-pc-tech/

Precision Metal Detector Finds Needles in Haystacks

Full-size metal detectors are great for narrowing down a region to start digging through. But what if you had a smaller metal detector that could pinpoint the location? Then you could spend far less time digging and way more time sweeping for metal.

Metal detectors work because of the way metal behaves around electromagnetic fields. [mircemk] reused the ferrite core from an old MW radio to build the antenna coils. When metal objects are close enough, the induced electromagnetism changes the frequency, and the Arduino blinks an LED and beeps a buzzer in time with the new frequency.

[mircemk]’s handheld metal detector is quite sensitive, especially to smaller objects. As you can see in the demo video after the break, it can sense coins from about 4cm away, larger objects like lids from about 7 cm, and tiny things like needles from a few millimeters away. There’s also an LED for treasure hunting in low light.

Don’t want to pinpoint a bunch of useless junk? Build in some phase detection to help you discriminate.

source https://hackaday.com/2020/10/18/precision-metal-detector-finds-needles-in-haystacks/

Worm Bot Inches Along As You’d Expect

Robot locomotion is a broad topic, and there are a multitude of choices for the budding designer. Often, nature is an inspiration, and many ‘bots have been built to explore the motion regimes of various insects and animals. Inspired himself by the common inch worm, [jegatheesan.soundarapandian] decided to build a robot that moved in a similar way.

The build consists of a series of 3D printed linkages, with servos fitted in between. This allows the robot’s body to articulate and flex in much the same way as a real inch worm. By flexing the body up, shifting along, and flexing back down, the robot can slowly make its way along a surface. An Arduino Pro Mini is the brains of the operation, being compact enough to fit on the small robot while still having enough outputs to command the multiple servos required. Control is via a smartphone app, using MIT’s AppInventor platform and the venerable HC-05 Bluetooth module.

It’s a fun build, and we’d love to see it go further with batteries replacing the tether and perhaps some sensors to enable it to further interact with its environment. We’ve seen other creative 3D-printed designs before, too – like this spherical quadruped ‘bot. Video after the break.

source https://hackaday.com/2020/10/18/worm-bot-inches-along-as-youd-expect/

Duality of Light Explored by Revisiting the Double-Slit Experiment

We’ve all seen recreations of the famous double-slit experiment, which showed that light can behave both as a wave and as a particle. Or rather, it’s likely that what we’ve seen is the results of the double-slit experiment, that barcode-looking pattern of light and dark stripes, accompanied by some handwaving about classical versus quantum mechanics. But if you’ve got 20 minutes to invest, this video of the whole double-slit experiment cuts through the handwaving and opens your eyes to the quantum world.

For anyone unfamiliar with the double-slit experiment,  [Huygens Optics] actually doesn’t spend that much time explaining the background. Our explainer does a great job on the topic, but suffice it to say that when coherent light passes through two closely spaced, extremely fine openings, a characteristic pattern of alternating light and dark bands can be observed. On the one hand, this demonstrates the wave nature of light, just as waves on the ocean or sound waves interfere constructively and destructively. On the other hand, the varying intensity across the interference pattern suggests a particle nature to light.

To resolve this conundrum, [Huygens] jumps right into the experiment, which he claims can be done with simple, easily sourced equipment. This is belied a little by the fact that he used photolithography to create his slits, but it should still be possible to reproduce with slits made in more traditional ways. The most fascinating bit of this for us was the demonstration of single-photon self-interference using nothing but neutral density filters and a CCD camera. The explanation that follows of how it can be that a single photon can pass through both slits at the same time is one of the most approachable expositions on quantum mechanics we’ve ever heard.

[Huygens Optics] has done some really fascinating stuff lately, from variable profile mirrors to precision spirit levels. This one, though, really helped scratch our quantum itch.

source https://hackaday.com/2020/10/18/duality-of-light-explored-by-revisiting-the-double-slit-experiment/

Where We’re Calculating, We Don’t Need No Seven Segments!

There have been many attempts at electronic numerical display technology over the decades since the first incandescent bulb or neon tube flickered into life at the command of a primordial computer, but the lowest common denominator has remained the humble seven segments. Here it might end, but for [Ken Yap] who has taken inspiration from a 1960s Sharp calculator to re-create a numerical display with only six segments.

This seemingly impossible feat is achieved by having six curved segments arranged as a figure-eight, which can render all the digits after a fashion, but which soon reveals why the extra segment made an appearance. The numbers that are made up of curves look good enough, but the straight lines in the 1, 4, and 7, are compromised by the diagonal, and the zero is curiously small at half the height.  You can read the digits, but it takes getting used to.

What made sense to reduce the complexity of 1960s electronics is only a fascinating curiosity in 2020, but we maybe won’t see these displays appearing too often. You can take a look at it in the video below the break, and if you’re curious about the Sharp calculator which inspired it then you can take a look at its page in the Vintage Calculator Museum.

source https://hackaday.com/2020/10/18/where-were-calculating-we-dont-need-no-seven-segments/

Climbing Everest One Hill At A Time – And Keeping Track Of It

The internet is full of self-proclaimed challenges, ranging from some absolutely pointless fads to well-intended tasks with an actual purpose. In times of TikTok, the latter is of course becoming rarer, as a quick, effortless jump on the bandwagon is just easier for raising your internet points. Cyclists on the other hand love a good challenge where they compete with one another online, testing their skills and gamifying their favorite activity along the way. One option for that is Everesting, where you pick a hill of your choice, and within a single session you ride it up and down as many times it takes until you accumulated the height of Mount Everest on it. Intrigued by the idea, but not so much its competitive aspect, [rabbitcreek] became curious how long it would take him to reach that goal with his own casual bicycle usage, so he built a bicycle computer to measure and keep track of it.

While the total distance and time factors into the actual challenge, [rabbitcreek]’s primary interest was the accumulated height, so the device’s main component is a BMP388 barometric pressure sensor attached to a battery-powered ESP32. An e-paper display shows the total height and completed percentage, along with some random Everest-related pictures. Everything is neatly packed together in a 3D-printed case that can be mounted on the bicycle’s handlebar, and the STL files are available along with the source code in his write-up.

Of course, if you’re actually interested in the challenge itself, you probably have an assortment of sports tracking equipment anyway, but this is a nice addition to keep track as you go, and has a lower risk of ransomware attacks. And in case [rabbitcreek] sounds like a familiar name to you, he’s indeed become a Hackaday regular with his environmental hacks like the tide clock, a handheld particle sniffer, or logging temperatures in the Alaskan wilderness.

source https://hackaday.com/2020/10/17/climbing-everest-one-hill-at-a-time-and-keeping-track-of-it/

Polymer Networks Make Better 3D Prints

Biological machines such as human and animal bodies are quite incredible. Your body seamlessly incorporates materials as different as muscle, bone, and tendons into an integrated whole. Now Texas A&M researchers think they can imitate nature using polymer networks that have a tunable stiffness. As a bonus, similar to biological devices, the material spontaneously self-heals.

The trick relies on the Diels-Alder reaction which s a cycloaddition reaction of a conjugated diene to an alkene. Diels-Alder-based polymers or DAPs will bond together even when they have different physical characteristics and they undergo a reversible reaction to heat which offers shape-memory and healing capability.

The polymer itakes the form of a liquid, and a Makerbot Replicator 2X fitted with a custom syringe system did the printing. Different syringes with different materials were put in during layer changes. Different polymer crosslinkers produce different physical properties in the cured polymer.

From what we can tell, this is probably not ready for prime time yet. But it does show that we still have a lot to learn on the best materials to use for creating 3D objects via additive manufacturing. We spend a lot of time thinking about 3D printing materials. While we used to do a lot of ABS, PLA is more in vogue, today.

source https://hackaday.com/2020/10/17/polymer-networks-make-better-3d-prints/

Attemping to Generate Photorealistic Video With Neural Networks

Over the past decade, we’ve seen great strides made in the area of AI and neural networks. When trained appropriately, they can be coaxed into generating impressive output, whether it be in text, images, or simply in classifying objects. There’s also much fun to be had in pushing them outside their prescribed operating region, as [Jon Warlick] attempted recently.

[Jon]’s work began using NVIDIA’s GauGAN tool. It’s capable of generating pseudo-photorealistic images of landscapes from segmentation maps, where different colors of a 2D image represent things such as trees, dirt, or mountains, or water. After spending much time toying with the software, [Jon] decided to see if it could be pressed into service to generate video instead.

The GauGAN tool is only capable of taking in a single segmentation map, and outputting a single image, so [Jon] had to get creative. Experiments were undertaken wherein a video was generated and exported as individual frames, with these frames fed to GauGAN as individual segmentation maps. The output frames from GauGAN were then reassembled into a video again.

The results are somewhat psychedelic, as one would expect. GauGAN’s single image workflow means there is only coincidental relevance between consecutive frames, creating a wild, shifting visage. While it’s not a technique we expect to see used for serious purposes anytime soon, it’s a great experiment at seeing how far the technology can be pushed. It’s not the first time we’ve seen such technology used to create full motion video, either. Video after the break.

source https://hackaday.com/2020/10/17/attemping-to-generate-photorealistic-video-with-neural-networks/

Robot Travels the World

Around the World in 80 Days may have been an impressive feat of international travel in a world before widespread air transit. In modern times though, it’s not even necessary to leave your home in order to travel around the world. To that end, [Norbert] is attempting to accomplish this journey using a robot that will do the traveling for him as part of this year’s Virtual Maker Faire.

The robot is called the World Tour Robot, and the idea for it is to be small enough to ship to each new location around the world and be simple enough to be repaired easily. It is driven by two servo motors and controlled by a Raspberry Pi which also handles a small camera. Once at its location, it can connect to the internet and then be able to be controlled through a web interface. Locations are selected by application, and the robot is either handed off to the next person in the chain or put back in a box to be shipped.

The robot hasn’t left for its maiden voyage just yet but [Norbert] plans to get it started soon. Hopefully there are enough interesting places for this robot to explore on its trip around the world, although it’s probably best to avoid Philadelphia as it is known to be unfriendly to robots.

source https://hackaday.com/2020/10/17/robot-travels-the-world/

SMD Breadboard Adaptors Skip Schematic, Goes Straight to PCB

If you need to add one or two SMT chips to your breadboarded prototype, [Travis Hein] has you covered. He designed a set of small SMD adaptor boards for various SOIC, SOT23, and DPAC patterns using KiCad.  He has released them as open source, so you can feel free to use them or modify them as needed.

Normally we don’t see people bypassing the schematics when designing a PCB. But we can agree that [Travis] has found a situation where going direct to PCB makes more sense. He just plops down the package in Pcbnew, adds some pin headers and wires everything up directly on the PCB. (But don’t worry, some of you may remember [Travis] from his earlier SSR mains switching project, which demonstrates that he can indeed draw proper schematics.) We know there are more people out there who prefer to go straight to PCB layout… [mikeselectricstuff] comes to mind. If you could yourself among this tribe, let use know your reasoning in the comments below.

We wrote about a similar universal breakout boards for SMD parts back in 2016, which is a single breakout board for two- and three-pin jelly-bean components. If you paired some of those boards with [Travis]’s breakout boards, it would make a great combination to keep in your prototyping gadgets bin. Consider this project the next time your favorite PCB shop has a sale.

source https://hackaday.com/2020/10/17/smd-breadboard-adaptors-skip-schematic-goes-straight-to-pcb/

Spare Parts Express

I’ve got spare parts, and I cannot lie.

This week I’m sending out two care packages to friends and coworkers because I’ve got too many hackables on hand, and not enough time to hack them all. One is a funky keyboard, and the other is an FPGA dev board, but that’s not the point. The point is that the world is too interesting, and many of us have more projects piled up in the to-do box, with associated gear, than we’ll ever have time to complete.

Back in the before-times, we would meet up, talk about our ongoing hacks, and invariably someone would say “oh you need an X, I’ve got half a box of them” and send you one. Or maybe you’d be the one with the extra widgets on hand. I know I’ve happily been in both positions.

Either way, it’s a win for the giver, who gets to take a widget off the widget pile, for the receiver, who doesn’t have to go to the widget store, and for the environment, which has to produce fewer widgets. (My apologies to the widget manufacturers and middlemen.)

This reminded me of Lenore Edman and Windell Oskay’s Great Internet Migratory Box Of Electronics Junk back in the late aughts. Trolling through the wiki was like a trip down memory lane. This box visited my old hackerspace, and then ended up with Bunnie Huang. Good times, good people, good hacker junk! And then there’s our own Brian Benchoff’s Travelling Hacker Box and spinoffs.

These are great and fun projects, but they all end up foundering in one respect: to make sense, the value of goods taken and received has to exceed the cost of the postage, and if you’re only interested in a few things in any given box, that’s a lot of dead weight adding to the shipping cost.

So I was trying to brainstorm a better solution. Some kind of centralized pinboard, where the “have too many h-bridge drivers” folks can hook up with the “need an h-bridge” people? Or is this ad-hoc social network that we already have working out well enough?

What do you think? How can we get the goods to those who want to work on them?

source https://hackaday.com/2020/10/17/spare-parts-express/

Spare Parts Express

I’ve got spare parts, and I cannot lie.

This week I’m sending out two care packages to friends and coworkers because I’ve got too many hackables on hand, and not enough time to hack them all. One is a funky keyboard, and the other is an FPGA dev board, but that’s not the point. The point is that the world is too interesting, and many of us have more projects piled up in the to-do box, with associated gear, than we’ll ever have time to complete.

Back in the before-times, we would meet up, talk about our ongoing hacks, and invariably someone would say “oh you need an X, I’ve got half a box of them” and send you one. Or maybe you’d be the one with the extra widgets on hand. I know I’ve happily been in both positions.

Either way, it’s a win for the giver, who gets to take a widget off the widget pile, for the receiver, who doesn’t have to go to the widget store, and for the environment, which has to produce fewer widgets. (My apologies to the widget manufacturers and middlemen.)

This reminded me of Lenore Edman and Windell Oskay’s Great Internet Migratory Box Of Electronics Junk back in the late aughts. Trolling through the wiki was like a trip down memory lane. This box visited my old hackerspace, and then ended up with Bunnie Huang. Good times, good people, good hacker junk! And then there’s our own Brian Benchoff’s Travelling Hacker Box and spinoffs.

These are great and fun projects, but they all end up foundering in one respect: to make sense, the value of goods taken and received has to exceed the cost of the postage, and if you’re only interested in a few things in any given box, that’s a lot of dead weight adding to the shipping cost.

So I was trying to brainstorm a better solution. Some kind of centralized pinboard, where the “have too many h-bridge drivers” folks can hook up with the “need an h-bridge” people? Or is this ad-hoc social network that we already have working out well enough?

What do you think? How can we get the goods to those who want to work on them?

source https://hackaday.com/2020/10/17/spare-parts-express/

Spare Parts Express

I’ve got spare parts, and I cannot lie.

This week I’m sending out two care packages to friends and coworkers because I’ve got too many hackables on hand, and not enough time to hack them all. One is a funky keyboard, and the other is an FPGA dev board, but that’s not the point. The point is that the world is too interesting, and many of us have more projects piled up in the to-do box, with associated gear, than we’ll ever have time to complete.

Back in the before-times, we would meet up, talk about our ongoing hacks, and invariably someone would say “oh you need an X, I’ve got half a box of them” and send you one. Or maybe you’d be the one with the extra widgets on hand. I know I’ve happily been in both positions.

Either way, it’s a win for the giver, who gets to take a widget off the widget pile, for the receiver, who doesn’t have to go to the widget store, and for the environment, which has to produce fewer widgets. (My apologies to the widget manufacturers and middlemen.)

This reminded me of Lenore Edman and Windell Oskay’s Great Internet Migratory Box Of Electronics Junk back in the late aughts. Trolling through the wiki was like a trip down memory lane. This box visited my old hackerspace, and then ended up with Bunnie Huang. Good times, good people, good hacker junk! And then there’s our own Brian Benchoff’s Travelling Hacker Box and spinoffs.

These are great and fun projects, but they all end up foundering in one respect: to make sense, the value of goods taken and received has to exceed the cost of the postage, and if you’re only interested in a few things in any given box, that’s a lot of dead weight adding to the shipping cost.

So I was trying to brainstorm a better solution. Some kind of centralized pinboard, where the “have too many h-bridge drivers” folks can hook up with the “need an h-bridge” people? Or is this ad-hoc social network that we already have working out well enough?

What do you think? How can we get the goods to those who want to work on them?

source https://hackaday.com/2020/10/17/spare-parts-express/

Turning A Desk Drawer Into A Flight Yoke

[Christofer Hiitti] found himself with the latest Microsoft Flight Simulator on his PC, but the joystick he ordered was still a few weeks out. So he grabbed an Arduino, potentiometers and a button and hacked together what a joke-yoke.

The genius part of this hack is the way [Christopher] used his desk drawer for pitch control. One side of a plastic hinge is attached to a potentiometer inside a drawer, while the other side is taped to the top of the desk. The second pot is taped to the front of the drawer for pitch control and the third pot is the throttle. It works remarkably well, as shown in the demo video below.

The linearity of the drawer mechanism probably isn’t great, but it was good enough for a temporary solution. The Arduino Leonardo he used is based on the ATmega32u4 which has a built-in USB, and with libraries like ArduinoJoystickLibrary the computer interface very simple. When [Christopher]’s real joystick finally arrived he augmented it with a button box built using the joke-yoke components.

We’ve seen There is no doubt that Microsoft Flight Simulator 2020 will spawn a lot of great controller and cockpit builds over the next few years. We’ve already covered a new joystick build, and a 3D printed frame to turn an Xbox controller into a joystick.

source https://hackaday.com/2020/10/17/turning-a-desk-drawer-into-a-flight-yoke/

It Came From Outer Space: Listening to the Deep Space Network

Ham radio operators love to push the boundaries of their equipment. A new ham may start out by making a local contact three miles away on the 2m band, then talk to somebody a few hundred miles away on 20m. Before long, they may find themselves chatting to fellow operators 12,000 miles away on 160m. Some of the adventurous return to 2m and try to carry out long-distance conversations by bouncing signals off of the Moon, waiting for the signal to travel 480,000 miles before returning to Earth. And then some take it several steps further when they listen to signals from spacecraft 9.4 million miles away.

That’s exactly what [David Prutchi] set out to do when he started building a system to listen to the Deep Space Network (DSN) last year. The DSN is NASA’s worldwide antenna system, designed to relay signals to and from spacecraft that have strayed far from home. The system communicates with tons of inanimate explorers Earth has sent out over the years, including Voyager 1 & 2, Juno, and the Mars Reconnaissance Orbiter. Because the craft are transmitting weak signals over a great distance (Voyager 1 is 14 billion miles away!), the earth-based antennas need to be big. Real big. Each of the DSN’s three international facilities houses several massive dishes designed to capture these whispers from beyond the atmosphere — and yet, [David] was able to receive signals in his back yard.

Sporting a stunning X-band antenna array, a whole bunch of feedlines, and some tracking software, he’s managed to eavesdrop on a handful of spacecraft phoning home via the DSN. He heard the first, Bepi-Colombo, in May 2020, and has only improved his system since then. Next up, he hopes to find Juno, and decode the signals he receives to actually look at the data that’s being sent back from space.

We’ve seen a small group of enthusiasts listen in on the DSN before, but [David]’s excellent documentation should provide a fantastic starting point for anybody else interested in doing some interstellar snooping.

source https://hackaday.com/2020/10/17/it-came-from-outer-space-listening-to-the-deep-space-network/

ISASTM Runs Vintage Cards Over USB

The ISA bus is a relic of the distant past, and no longer supported by the PC mainstream. Outside of retro fanatics and likely some long-term industrial users, it’s all but forgotten. That hasn’t stopped [Manawyrm] from hacking away, however, and he’s developed a nifty adapter for the modern era.

Still in its early stages of development, the ISASTM is a ISA-over-USB adapter that allows a modern computer to work with older expansion cards. Running on an STM32H743, and using the microcontroller’s native USB1 interface, the ISASTM card is able to be slotted into a backplane in order to address multiple cards with one adapter. [Manawyrm] demonstrates the hardware by running Monkey Island 1 in the PCem emulator, with sound provided by an AdLib ISA soundcard.

There are some throughput issues, which [Manawyrm] aims to solve by switching to USB2 and making some tweaks and improvements to the code. Regardless, it’s an impressive tool that we imagine could have some use in keeping some legacy hardware alive, too. Incidentally, it’s been a long while since we’ve seen a solid ISA hack around these parts. Video after the break.

[Thanks to tsys for the tip!]


source https://hackaday.com/2020/10/16/isastm-runs-vintage-cards-over-usb/

Low-Level Academy gets into Details

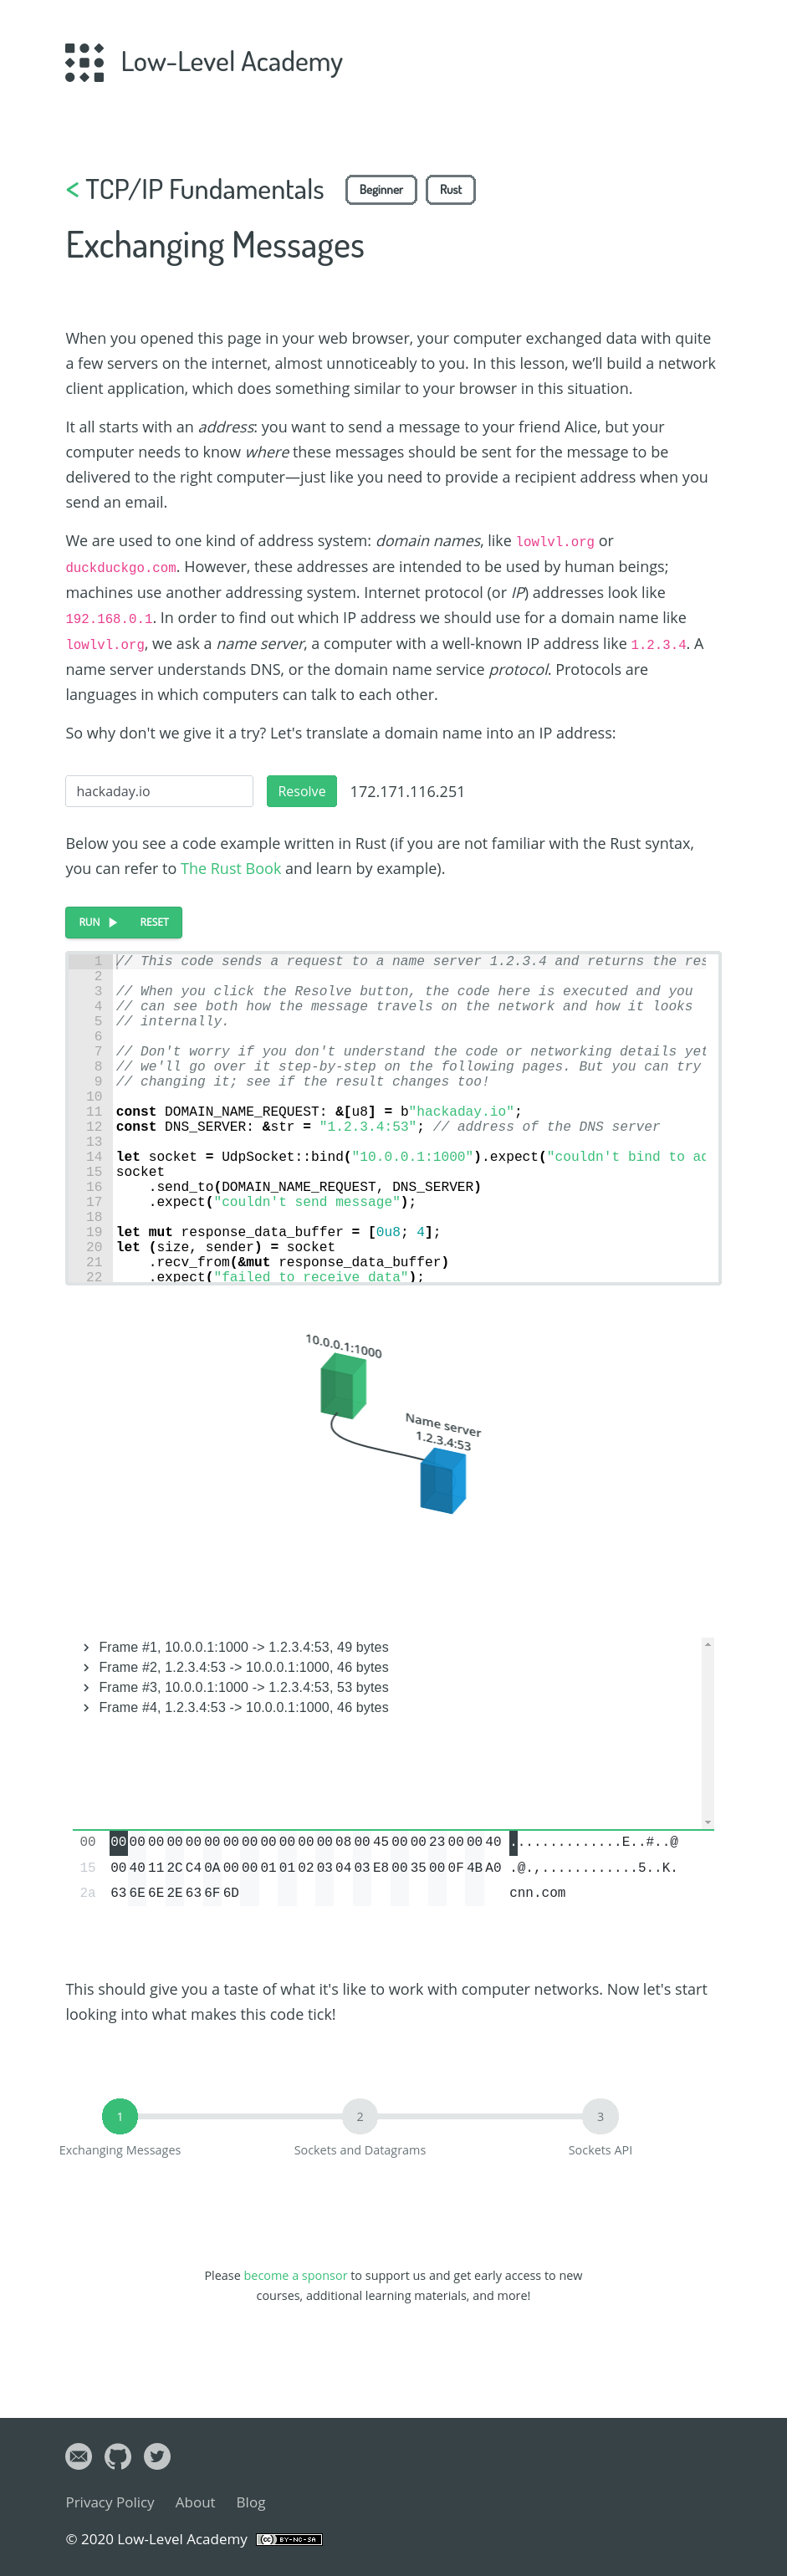
We often say that you don’t have to know how an engine works to drive a car, but you can bet that every driver at the Indy 500 knows exactly how it works. You could say the same for computers. You don’t need to understand the details, but it really helps, especially if something goes wrong. [Low-Level Academy] has an online class where you can program in Rust inside your browser to learn about low-level TCP and UDP networking details.

Just how low it goes, we aren’t exactly sure, yet. There are three of eight modules ready to go. The first three cover number encoding, exchanging messages with UDP, and fragmentation. Reliability, routing, server programming, TCP, and HTTP are not out yet, but the ultimate project is a web server. In addition, new modules are released to sponsors first, so the fragmentation module for example won’t be available for a few more days. While that seems unorthodox, it is no different than having to wait for an HBO show to show up on basic cable in reruns.

The number encoding won’t be anything new for Hackaday readers. It covers things like UTF-8, octal, and hex. However, you should look at it to see how interactive it is. For instance, instead of just showing an example of how to decode a hex number, the text lets you change the input number and the work changes on the fly to show the value.

This same technique populates your input into live Rust code that you can run or edit. For example, here’s a DNS lookup of one of our favorite sites.


If you know Rust or if you want to learn Rust, this might be a good way to do it, even if you do understand networking at this level. If you want to understand more about how networking works, we aren’t sure this is exactly low-level, but it is lower than many people go. Maybe they’ll have future series about MAC addresses, ARP, and routing protocols. But even if they don’t, this is worth a look.

If you know enough about how the network works at the lowest levels, you can probe and figure out what operating system a computer is probably using based on quirks in their network stacks. Understanding network fundamentals is a key part of defending against cyberattack or, we suppose, mounting one.

source https://hackaday.com/2020/10/16/low-level-academy-gets-into-details/