It’s Nutrition Month – These cool products can give your lifestyle a boost

It’s Nutrition Month and time to give your health a boost by investing in kitchen appliances that will promote healthy living. Along with that, you can also try out new healthy meals once or twice a week to keep things interesting. Visit Junk Mail to find a wide range of healthy kitchen appliances for sale.

Start Making Smoothing For Nutrition Month | Junk Mail
Photo Source – www.pixabay.com

What is the purpose of Nutrition Month?

Nutrition Month aims to promote healthy eating and lifestyle choices. During this
month, people are encouraged to eat healthy food and to incorporate exercise
into their daily routine. Nutrition
Month dates back to 1973 where it took place over 7 days and it was
extended to a month in 1980. During this month, information on good nutrition is shared with the
public.

Healthy Kitchen Appliances

•        Electric air fryer

Buy an electric air fryer | Junk Mail
Photo Source – stock.adobe.com

When
it comes to healthy kitchen
appliances, an electric air fryer is a worthwhile investment. This
appliance cooks the food by circulating hot air inside a cooking chamber. The
result is delicious food with a crispy outer layer. Use your air fryer to make
potatoes and pastries. It can also be used to cook steak, chicken, and
vegetables. The advantages of using an electric air fryer are that it’s a
healthier option, it cooks food faster than a deep fryer, and it is more energy-efficient.

•        Pressure cooker/Slow cooker

Buy a pressure cooker | Junk Mail
Photo Source – www.unsplash.com

This
kitchen appliance uses steam pressure to cook food in a sealed pot. The high
pressure that builds up inside the pot ensures that the food cooks faster. You
can cook almost anything in a pressure cooker, including rice, chickpeas,
beans, vegetables, stews, and braised meat. These appliances save you time and
money and make it easy to eat healthy food. Pressure cookers produce rich
flavours and they’re simple and convenient to use.

•        Indoor grill

Buy an indoor grill | Junk Mail
Photo Source – www.unsplash.com

Grilling
uses dry heat to cook food and the heat is transferred through thermal
radiation.

Indoor
grilles can be used to cook both meat and vegetables. Investing in an indoor
grill is advantageous because it’s quick and simple to use. This versatile
cooking method offers you precise heat control. The compact size of this
appliance also means that it doesn’t take up a lot of space in your kitchen.

•        Food processor

Buy a food processor | Junk Mail
Photo Source – www.pixabay.com

A
food processor makes light work of meal preparation. It’s powered by an
electric motor and is used to complete repetitive tasks such as chopping and
slicing. These kitchen appliances are similar to blenders, however, they don’t
need liquid to get the job done. A food processor saves you time in the kitchen
and makes it easier to prepare family meals. If you’re trying to improve your nutrition, these kitchen
appliances will help you prepare healthy food effortlessly.

•        Juicer

Buy a juicer | Junk Mail
Photo Source – www.unsplash.com

When
it comes to healthy kitchen
appliances, a juicer is a must-have addition to your kitchen. This
appliance makes it possible to make fresh juice that has numerous health
benefits. Healthy juices give your immune system a boost and help to prevent
disease. A wide range of vegetables and fruit can be transformed into juice,
which means that you’ll get plenty of variety in your daily nutritional intake.

•        Food steamer

Buy a food steamer | Junk Mail
Photo Source – www.unsplash.com

This kitchen appliance cooks food using steam, which makes it perfect for preparing healthy meals. The food is placed in a closed container, which decreases the amount of steam that escapes. It helps to preserve the nutritional value of food by decreasing the amount of nutrients that are lost during cooking. It cooks food quickly and requires minimal supervision. No oil is needed to steam food and this method of cooking preserves the structure and colour of food.


Fun Food Facts

  • Banana
    plants are giant herbs and the banana fruit is actually a berry
  • Parsley
    helps with digestion and it’s a good breath freshener
  • Strawberries
    have a higher concentration of vitamin C than oranges
  • Avocados
    contain more potassium than bananas

Invest in healthy kitchen appliances and get involved in Nutrition Month. Proper nutrition contributes to your physical and emotional well-being. Find appliances for sale on Junk Mail and upgrade your kitchen today.

Budget-Friendly Bend Sensor Deforms with Precision

We’re pretty familiar with budget resistor-based bend sensors at this point, but this sensor is in a totally different class. Instead of relying on resistive elements, [Useok Jeong] and [Kyu-Jin Cho] devised a bend sensor that relies on geometric properties of the sensor itself. The result is a higher-fidelity measuring device made from a pretty widely available collection of stock parts.

We’ll admit, calling this device a bend sensor might be a bit of a stretch, so let’s dig into some of the operating principles. What we’re actually measuring is the accumulated angle, the sum of all the curvature deformations along the length of the sensing element. The sensor is made of 3 main pieces: an outer extension spring-based wire sheath; a flexible, tensioned inner wire core that’s fixed at one end; and a small displacement sensor that measures the length changes in the wire’s free end. The secret ingredient to making this setup work is a special property of the outer wire sheath or spring guide. Here, the spring guide actually resists being compressed while being bent.  Because the inner radius of the bend remains a constant length, the center wire core is forced to elongate. With the excess wire spooled up at the sensor base, we simply measure how much we collected, apply some math, and get a resulting angle! What’s more, the folks behind this trick also demonstrate that the length and angle relationship is linear with an R-square of 0.9969.

One of the best parts about this sensor is how reproducible it seems from from a modest collection of stock parts. Spring guide (aka: extension spring) is available from McMaster-Carr and DR Templeman, and that flexible core might be readily substituted with some wire rope.

It’s not everyday that new topologies for bend sensors pop into the world, let alone linear ones. To learn more, the folks behind the project have kindly made their research paper open access for your afternoon reading enjoyment. (Bring scratch paper!) Finally, if you’re looking for other bend-related sensors, have a look at this multi-bend measurement setup.

source https://hackaday.com/2020/09/14/budget-friendly-bend-sensor-deforms-with-precision/

Budget-Friendly Bend Sensor Deforms with Precision

We’re pretty familiar with budget resistor-based bend sensors at this point, but this sensor is in a totally different class. Instead of relying on resistive elements, [Useok Jeong] and [Kyu-Jin Cho] devised a bend sensor that relies on geometric properties of the sensor itself. The result is a higher-fidelity measuring device made from a pretty widely available collection of stock parts.

We’ll admit, calling this device a bend sensor might be a bit of a stretch, so let’s dig into some of the operating principles. What we’re actually measuring is the accumulated angle, the sum of all the curvature deformations along the length of the sensing element. The sensor is made of 3 main pieces: an outer extension spring-based wire sheath; a flexible, tensioned inner wire core that’s fixed at one end; and a small displacement sensor that measures the length changes in the wire’s free end. The secret ingredient to making this setup work is a special property of the outer wire sheath or spring guide. Here, the spring guide actually resists being compressed while being bent.  Because the inner radius of the bend remains a constant length, the center wire core is forced to elongate. With the excess wire spooled up at the sensor base, we simply measure how much we collected, apply some math, and get a resulting angle! What’s more, the folks behind this trick also demonstrate that the length and angle relationship is linear with an R-square of 0.9969.

One of the best parts about this sensor is how reproducible it seems from from a modest collection of stock parts. Spring guide (aka: extension spring) is available from McMaster-Carr and DR Templeman, and that flexible core might be readily substituted with some wire rope.

It’s not everyday that new topologies for bend sensors pop into the world, let alone linear ones. To learn more, the folks behind the project have kindly made their research paper open access for your afternoon reading enjoyment. (Bring scratch paper!) Finally, if you’re looking for other bend-related sensors, have a look at this multi-bend measurement setup.

source https://hackaday.com/2020/09/14/budget-friendly-bend-sensor-deforms-with-precision/

Autonomous Multi-Task Performing Robot

[Ruchir] has been pretty into robotics for a while now and has always been amused by the ever-popular obstacle avoiding robot, but wanted something that could do more. So, like any good hacker, he decided to build something himself.

He wanted to incorporate all the popular beginner robot capabilities into a single invention. His robot can follow a line, detect an obstacle, and retrieve an object without switching between modes. It can even follow another robot, which is pretty neat.

His robot has a lot of the hardware you would expect. It uses a Raspberry Pi for all the heavy image processing, has optical sensors for line following and obstacle avoidance, and includes a speaker for audio feedback. What’s especially cool is the impressive interface, called the Regbot GUI, that [Ruchir] is using with his robot. According to the Wiki page, the Regbot GUI appears to accompany an educational robotics platform developed by Professor Jens Christian Andersen of the Technical University of Denmark for teaching controls to engineering students. [Ruchir] was able to adapt the GUI to his particular bot no problem.

Using the Regbot GUI, [Ruchir] can monitor all the robot’s sensor data in real-time (accelerometer, gyroscope, distance sensor, servo, encoder, etc.), dynamically adjust its calibration settings if needed, or even provide a universal killswitch in case the unthinkable happens. We’d say it’s definitely worth a look before you embark on your next robotics project.

source https://hackaday.com/2020/09/14/autonomous-multi-task-performing-robot/

The Interactive Storytelling Radio

[8BitsAndAByte] are back and this time they’re using AI to create an interactive storyteller. With the help of a Raspberry Pi, they upcycled an old Cold War era radio they dug up and the results are pretty impressive.

The main controller board of the radio was intact, so it was easy to use all the preexisting hardware to control the speaker and to trigger a few of the Pi’s GPIO using the buttons and switches on the radio’s front panel. To add some artificial intelligence, they used Google’s AIY Voice Kit, allowing them to tap into Google’s seemingly endless artificial intelligence platform. This could be a “tables have turned moment,” but we’re probably being a bit too hopeful.

Anyway, they used a pretty interesting piece of software called Dialogflow that creates a somewhat natural conversational interaction akin to a chatbox. Dialogflow processes speech to text, as you would expect, but can also interpret contextual speech and provide contextual responses. Pretty neat…but maybe also a little creepy. Who knows? The jury is still out.

Anyway, if you’re like us and sometimes in need of a break from humans, then this project just might be for you.

source https://hackaday.com/2020/09/13/the-interactive-storytelling-radio/

Hackaday Links: September 13, 2020

Like pretty much every other big conference, the Chaos Communication Conference is going virtual this year. What was supposed to be 37C3 has been rebranded as rC3, the remote Chaos Experience. It’s understandable, as a 17,000 person live event would have not only been illegal but a bit irresponsible in the current environment. The event appears to be a hybrid of small local events hosted in hackerspaces linked with streamed talks and a program of workshops and “online togetherness.” rC3 is slated to run in the week between Christmas and New Year, and it seems like a great way to wrap up 2020.

Speaking of remote conferences, don’t forget about our own Remoticon. While it won’t be quite the same as everyone getting together in sunny — historically, at least — Pasadena for a weekend of actual togetherness, it’s still going to be a great time. The event runs November 6 to 8; we’ve had a sneak peek at the list of proposed workshops and there’s some really cool stuff. Prepare to be dazzled, and make sure you keep up on the Remoticon announcements — you really don’t want to miss this.

There’s been a strange confluence of decapping news this week that we’re all too happy to share. First is a collection of transistor die photos that are simply fascinating. Most of them feature 2N3055 power transistors of various vintages and manufacturing methods. Liberated from their TO-3 cans and driven to breakdown at the base-emitter junction, the dies light up, sometimes frighteningly bright. The innards of a potted Darlington array and 2N1613 on the next page are interesting too.

Continuing the theme, if you haven’t been following Ken Shirriff’s series on reverse-engineering the Intel 8086 microprocessor, you’re missing out on a real treat. Working mostly from die photos, he’s delved into how the Arithmetic-Logic Unit (ALU) of the chip worked, the hows and whys of the separate 16-bit adder, and how power and clocking were handled. He even managed to find a fake 8086 chip during his explorations. We’re learning a ton from these teardowns, as is usual when Ken really dives into a subject.

Our final bit of decapping news comes to us via a fan of Zeptobars, a decapper of some renown whose work we’ve featured on our pages quite a few times. Thanks to COVID-19, he was forced to decamp from Moscow back to Switzerland on short notice back in May, leaving behind most of his elaborate setup for decapping and etching chips. While he’s rebuilding his lab, he’s asking for donations of any surplus metal-capped chips, presumably because they’re easier to pop open and photograph. Maybe we can all dig around in our junk bins and see if we have anything interesting to help him keep the blog going.

And finally, Warped Perception is at it again. We recently covered how he put a GoPro inside a tire and showed what it looks like in there while the car drives around a bit. Then he notched it up a bit and did a burnout with a camera-fied tire, which was interesting for those with a destructive bent. And now he’s gone and stuck a GoPro inside the intake manifold of a turbocharged Toyota Supra, just because. It’s actually pretty interesting — the camera can see not only the massive throttle plate at the front of the manifold but also the velocity stacks feeding into each cylinder. We’re also treated to a look straight into the intake vales of one cylinder, with the barest glimpse of its fuel injector. We were a little puzzled by the reddish fluid leaking into the manifold, as was Warped Perception — engine oil, perhaps? It’s a long way to go to get diagnostic information, but makes for some pretty cool footage.

source https://hackaday.com/2020/09/13/hackaday-links-september-13-2020/

Digging in the Dirt Yields Homebrew Inductors

Let’s say you’re stranded on a desert island and want to get the news from the outside world. You’ll have to build your own crystal radio, of course, but your parts bin is nowhere to be found and Digi-Key isn’t delivering. So you’ll need to MacGuyver some components. Capacitors are easy with a couple of pieces of tinfoil, and a rectifier can be made from a pencil and a razor blade. But what about an inductor? Sure, air-core inductors will work, but just because you’re marooned doesn’t mean you’ve abandoned your engineering principles. Luckily, you’ve read [AC7ZL]’s treatise of making inductors from dirt, and with sand in abundance, you’re able to harvest enough material to put together some passable ferrite-core inductors.

Obviously, making your own inductive elements isn’t practical even in fanciful and contrived situations, but that doesn’t make the doing of it any less cool. The story begins with a walk in the Arizona desert many years ago, where [AC7ZL], aka [H.P. Friedrichs], spied bands of dark sand shooting through the underlying lighter sediments. These bands turned out to be magnetite, one of many iron-bearing minerals found in the area. Using a powerful magnet from an old hard drive and a plastic food container, he was able to harvest magnetite sand in abundance and refine it with multiple washing steps.

After experimentally determining the material’s permeability — about 2.3 H/m — [AC7ZL] proceeded with some practical applications. He was able to make a bar antenna for an AM radio by packing the sand into a PVC pipe and rewinding the coils around it. More permanent cores were made by mixing the sand with polyester resin and casting it into bars. Toroids were machined from fat bars of the composite on a lathe, much to the detriment of the cutting tools used.

The full-length PDF account of [AC7ZL]’s experiments makes for fascinating reading — the inductive elements he was able to create all performed great in everything from a Joule Thief to a Hartley oscillator up to 27 MHz. We love these kinds of stories, which remind us of some of the work being done by [Simplifier] and others.

source https://hackaday.com/2020/09/13/digging-in-the-dirt-yields-homebrew-inductors/

USB Bell Rings in Custom Terminal

Old TeleTypes and even typewriters had bells. Real bells. So that ASCII BEL character is supposed to make an honest to goodness ringing sound. While some modern terminals make a beep from the computer speakers, it isn’t the same. [Tenderlove] must agree, because the turned a Microchip USB to I2C bridge chip into a HID-controlled bell.

The only problem we see is that you have to have a patch to your terminal to ring the bell. We’d love to see some filter for TCP or serial that would catch BEL characters, but on the plus side, it is easy to ring the bell from any sort of application since it responds to normal HID commands.

If a bell doesn’t strike your fancy, you could use the same technique to easily add a digital output for anything. Of course, you could also use the MCP2221A as intended and put an I2C bus out there with a digital I/O expander or any number of other I2C chips.

Despite the video’s infomercial attitude, you can’t actually buy the bell. You’ll have to make it. It wouldn’t be very hard to duplicate with an Arduino or anything else you can connect to a PC as long as you modify the driving software accordingly.

We know you can play a sound file of a bell, but sometimes a real bell is just necessary. If you want to ring big bells, turns out there is an entire cult of wanna be Quasimodos.

source https://hackaday.com/2020/09/13/usb-bell-rings-in-custom-terminal/

Open Source VR Headset for $200

We’ve seen homemade VR headsets before, but, often they are dependent on special software or are not really up to par with commercial products. Not so with Relativity, an open source project from [Max Coutte] and [Gabriel Combe]. [Max] says it best:

Relativty is not a consumer product. We made Relativty in my bedroom with a soldering iron and a 3D printer and we expect you to do the same: build it yourself.

Unlike some homebrew gear, Relativity has full Steam VR support. It also has experimental support for positional scaling that tracks your body based on video input.

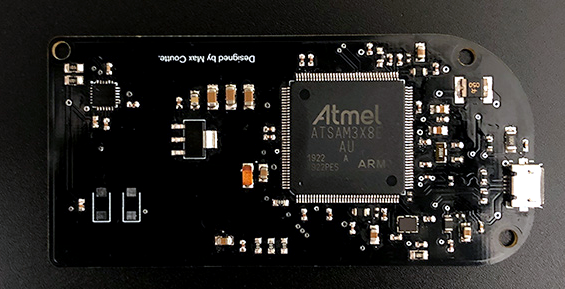
Under the covers, a motherboard with an Atmel ARM Cortex M3 and an IMU do the heavy lifting and account for $25 of the $200 price tag. The firmware though can run on any suitable ArduinoCore processor. The displays, too, have options. You can go for price with 90 Hz 1080p screens or jump up to 4K. The prototypes use a 2K dual display at 120 frames per second.

If you want to build Relativity yourself, all the details are on GitHub and there is a Discord server for help. The 3D printed case looks great and overall it seems like an impressive design.

We’ve seen a few similar projects, some even cheaper. We actually covered an earlier incarnation of the headset from the same team. You can see they’ve come a long way.

source https://hackaday.com/2020/09/13/open-source-vr-headset-for-200/

World Radio Lets Your Fingers Do the Walking

Listening to radio from distant countries used to take a shortwave rig, but thanks to the Internet we can now pull in streams from all over the globe from the comfort of our own desktop. With a few clicks you can switch between your local news station and the latest in pop trends from Casablanca. But as convenient as online streaming might be, some folks still yearn for the traditional radio experience.

For those people, the Raspberry Pi World Radio by [Abraham Martinez Gracia] might be the solution. Built into the body of a 1960s Invicta radio, this Internet radio uses a very unique interface. Rather than just picking from a list of channels, you use the knobs on the front to pan and zoom around a map of the world. Streaming channels are represented by bubbles located within their country of origin, so you’ll actually have to “travel” there to listen in. The video after the break gives a brief demonstration of how it works in practice.

We’ll admit it might become a bit tedious eventually, but from a visual standpoint, it’s absolutely fantastic. [Abraham] even gave the map an appropriately vintage look to better match the overall aesthetic. Normally we’d say using a Raspberry Pi 4 to drive a streaming radio player would be a bit overkill, but considering the GUI component used here, it’s probably the right choice.

Of course we’ve seen Internet radios built into vintage enclosures before, and we’ve even seen one that used a globe to select the station, but combining both of those concepts into one cohesive project is really quite an accomplishment.

source https://hackaday.com/2020/09/12/world-radio-lets-your-fingers-do-the-walking/

Learn About Historic Firearm Design With A 3D Printer

Over the last century, very little of the basic design of firearm cartridges has changed, but the mechanics of firearms themselves have undergone many upgrades. The evolution of triggers, safeties, magazines, and operating mechanisms is a fascinating field of study. Hands-on experience with these devices is rare for most people, but thanks to people like [zvc], you can 3D print accurate replicas of historical firearms and see how all the parts fit together for yourself.

[zvc] is slowly building up a library of 3D models, with nine available so far, from the Mauser C96 “Broomhandle” pistol to the modern M4 rifle. Except for springs and some fasteners, almost every single part of [zvc]’s models are 3D printed, down to the takedown pins and extractors. With the obvious exception of being able to fire a live round, it looks like all the components fit and work together like on the real firearms. None were ever designed with 3D printing in mind, so a well-tuned printer, lots of support structure, and post-processing are required to make everything work. The surface finish will be a bit rough, and some smaller and thin-walled components might be susceptible to breaking after the repeated operation or excessive force. The models are not free, but all prices are below €10.

These models do demonstrate one of the real superpowers of 3D printing: functional mock-ups and prototypes. The ability to do rapid iterative design updates and to have the latest design in hand within a few hours is invaluable in product development. [Giaco] used this extensively during the development of his kinetic driver. When you buy 3D printable models online, always make sure what possible pitfalls exist.

source https://hackaday.com/2020/09/12/learn-about-historic-firearm-design-with-a-3d-printer/

Toy O-Scope is Dope

Not many of our childhood doll and action figure’s accessories revolved around lab equipment except maybe an Erlenmeyer flask if they were a “scientist.” No, they tended to be toasters, vehicles, and guns. When we were young, our heroes made food, drove sexy automobiles, and fought bad guys. Now that we’re older, some of our heroes wield soldering irons, keyboards, and oscilloscopes. [Adrian Herbez] made a scale model oscilloscope that outshines the beakers and test tube racks of yesteryear. Video also shown below.

On the left side of this ‘scope is a twistable knob that actuates a couple of internal levers to bend a neon green rubber band. The levers and background are black, so it all blends to look like a screen while the band approximates a sine wave. [Adrian]’s scope will up the game of any bread toasting, Lambo driving, tacti-cool ninja hunter. The thin rubber band would look more like a sawtooth than a sine at larger scales, but maybe that’s perfect for your Viking-cyborg-DJ-hairdresser. What would a miniature version of you have in their lab?

We love seeing new toys with a modern appeal like this ‘scope, but we respect vintage toys. Hacker parents do a fine job keeping things fresh and lively for their wee ones.

source https://hackaday.com/2020/09/12/toy-o-scope-is-dope/

Adding Luxury Charging Features to an Entry-Level EV

The Nissan Leaf is the best-selling electric car of all time so far, thanks largely to it being one of the first mass produced all-electric EVs. While getting into the market early was great for Nissan, they haven’t made a lot of upgrades that other EV manufacturers have made and are starting to lose customers as a result. One of those upgrades is charge limiting, which allows different charging rates to be set from within the car. With some CAN bus tinkering, though, this feature can be added to the Leaf.

Limiting the charging rate is useful when charging at unfamiliar or old power outlets which might not handle the default charge rate. In Europe, which has a 240V electrical distribution system, Leafs will draw around 3 kW from a wall outlet which is quite a bit of power. If the outlet looks like it won’t support that much power flow, it’s handy (and more safe) to be able to reduce that charge rate even if it might take longer to fully charge the vehicle. [Daniel]’s modification requires the user to set the charge rate by manipulating the climate control, since the Leaf doesn’t have a comprehensive user interface.

The core of this project is performed over the CAN bus, which is a common communications scheme that is often used in vehicles and is well-documented and easy to take advantage of. Luckily, [Daniel] has made the code available on his GitHub page, so if you’re thinking about trading in a Leaf for something else because of its lack of features it may be time to reconsider.

Photo: Chuck Allen (chucka_nc) / CC BY-SA

source https://hackaday.com/2020/09/12/adding-luxury-charging-features-to-an-entry-level-ev/

The Egg-laying Wool-Milk Pig

Last week, I wrote about two recent projects of mine that serve as cautionary tales in keeping projects simple — you probably can’t simplify everything, so it’s worth the time to find out which simplifications have the most bang for the buck. This week, I’d like to share a tale of lack of design focus.

German has the eierlegende Wollmilchsau: a mystical animal that lays eggs, while producing wool, milk, and meat to boot. It’s a little bit like the English “jack of all trades, master of none” except that the eierlegende Wollmilchsau doesn’t do each job badly, it plainly can’t exist. This is obviously a bad way to start a design.

The first surfboard that I made by myself was supposed to be an eierlegende Wollmilchsau. It was going to be a longboard, because we had months with smaller waves that just weren’t all that suitable for shortboarding, but it was also going to turn sharply off the rails like a shortboard. To help it turn, it was going to have tons of camber (bend like a banana), and small fins. And along the way, I thought I’d make it thin to cut through the water.

Of course what I ended up with, not helped by my heavy fiberglassing hand, was a plow that dug into the water, would turn unexpectedly when you managed to get it onto the rails, and couldn’t pick up a small wave to save its life due to the camber and aforementioned plowing. I surfed it anyway, as a matter of pride, but I had no illusions of it being anything but the the worst board I owned. And that’s comparing it to the $30 used rasta-graphic plank that had been taking on water for at least five years, unrepaired, and was rotting out from the inside. At least it had design focus.

My surfboard didn’t suffer from feature creep, where you start piling on features until the project crumbles from overload, but rather from wanting to have my cake and eat it too. Or from failing to realize that certain design goals were necessarily tradeoffs. The “raily” behavior that I wanted when it was in bigger waves was necessarily “diggy” in small waves. Good boards trade off these features, and getting the balance between them is the art of shaping a board.

So when you start up a new project, think about which facets of your design are jointly achievable, and which are necessarily tradeoffs. Ignoring tradeoffs is a recipe for disaster, designing an eierlegende Wollmilchsau. But viewed constructively, it’s exactly these nuanced decisions that separates the simply possible from the truly marvelous. May you identify your trades, and make them well!

source https://hackaday.com/2020/09/12/the-egg-laying-wool-milk-pig/

PLA-F Blends PLA and ABS

In the early days of 3D printing, most people used ABS plastic. It is durable and sticks well to simple surfaces. However, it smells and emits fumes that may be dangerous. It also tends to warp as it cools which causes problems when printing. PLA smells nicer and since it is made from corn is supposed to be less noxious. However, PLA isn’t as temperature resistant and while it will stick better to beds without heat, it also requires more airflow to set the plastic as it prints. [Kerry Stevenson] recently reviewed PLA-F which is a blend of the two plastics. Is it the best of both worlds? Or the worst?

[Kerry]  did several tests with interesting results. He did a temperature test tower and found the material printed well between 190 and 240 °C. He did note some stringing problems, though.

The material had no real issues printing gaps and did not readily warp. What was especially odd, though, was that [Kerry] noted no smell from the material at all. You’d think it would either smell like PLA or ABS or some blend of the two. Another surprise was that the PLA-F appeared to be even less heat tolerant than ordinary PLA.

Given the results, we aren’t sure why we’d pick this over regular PLA. The tests indicate it may be even less prone to warping than PLA, but that’s not usually a problem. On the other hand, we didn’t see any real reason not to use it as long as you don’t need high temperature resistance.

Honestly, we really like PETG these days. Naturally, there are plenty of alternatives.

Thanks [ptkwilliams] for the tip.

source https://hackaday.com/2020/09/12/pla-f-blends-pla-and-abs/

3D POV Display Has The Shakes

Persistence of vision projects are a dime a dozen, but by adding a third dimension [Madaeon] succesfully created one to stand out from the crowd. Instead of waving around a single line of LEDs, he is moving a 2D grid of them vertically to create a volumetric POV display.

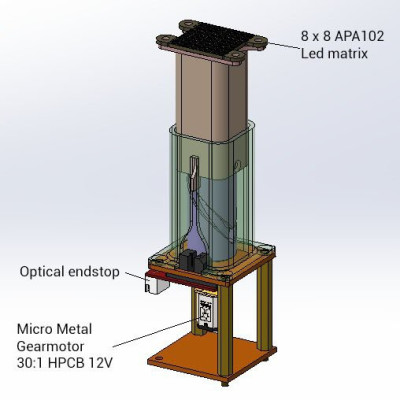
The display consists of oscillating 3D printed piston, powered by a small geared motor, on top of which sits a 8 x 8 RGB LED grid and diffusing film. The motor drives a cylindrical cam, which moves a piston that sits over it, while an optical end stop detects the bottom of the piston’s travel to keep the timing correct. [Madaeon] has not added his code to the project page, but the 3D files for the mechanics are available. The current version creates a lot of vibration, but he plans to improve it by borrowing one of  [Karl Bugeja]’s ideas, and using flexible PCBs and magnets.

He also links another very cool volumetric display that he constructed a few years ago. It works by projecting images from a small DLP projector onto an oscillating piece of fabric, to created some surprisingly high definition images.

POV displays are good projects for learning, so if you want to build your own, take a look a simple POV business card, or this well-documented POV spinning top.

source https://hackaday.com/2020/09/12/3d-pov-display-has-the-shakes/

3D POV Display Has The Shakes

Persistence of vision projects are a dime a dozen, but by adding a third dimension [Madaeon] succesfully created one to stand out from the crowd. Instead of waving around a single line of LEDs, he is moving a 2D grid of them vertically to create a volumetric POV display.

The display consists of oscillating 3D printed piston, powered by a small geared motor, on top of which sits a 8 x 8 RGB LED grid and diffusing film. The motor drives a cylindrical cam, which moves a piston that sits over it, while an optical end stop detects the bottom of the piston’s travel to keep the timing correct. [Madaeon] has not added his code to the project page, but the 3D files for the mechanics are available. The current version creates a lot of vibration, but he plans to improve it by borrowing one of  [Karl Bugeja]’s ideas, and using flexible PCBs and magnets.

He also links another very cool volumetric display that he constructed a few years ago. It works by projecting images from a small DLP projector onto an oscillating piece of fabric, to created some surprisingly high definition images.

POV displays are good projects for learning, so if you want to build your own, take a look a simple POV business card, or this well-documented POV spinning top.

source https://hackaday.com/2020/09/12/3d-pov-display-has-the-shakes/

3D POV Display Has The Shakes

Persistence of vision projects are a dime a dozen, but by adding a third dimension [Madaeon] succesfully created one to stand out from the crowd. Instead of waving around a single line of LEDs, he is moving a 2D grid of them vertically to create a volumetric POV display.

The display consists of oscillating 3D printed piston, powered by a small geared motor, on top of which sits a 8 x 8 RGB LED grid and diffusing film. The motor drives a cylindrical cam, which moves a piston that sits over it, while an optical end stop detects the bottom of the piston’s travel to keep the timing correct. [Madaeon] has not added his code to the project page, but the 3D files for the mechanics are available. The current version creates a lot of vibration, but he plans to improve it by borrowing one of  [Karl Bugeja]’s ideas, and using flexible PCBs and magnets.

He also links another very cool volumetric display that he constructed a few years ago. It works by projecting images from a small DLP projector onto an oscillating piece of fabric, to created some surprisingly high definition images.

POV displays are good projects for learning, so if you want to build your own, take a look a simple POV business card, or this well-documented POV spinning top.

source https://hackaday.com/2020/09/12/3d-pov-display-has-the-shakes/

Infinity Mirror at Warp Speed

Inventing often combines more than one old ideas into a new one. Even when the fused things are similar, the result can be more valuable than the sum of its parts. Unlike those analog watches with a digital clock below the face, when [Mojoptix] combined the re-reflecting properties of an infinity mirror with the image twisting qualities of a funhouse mirror, we get more than just a pair of mirrors. The resulting images look like a lot of fun. Warping one surface of two parallel mirrors doesn’t just alter the result a bit, because the planes feed off each other’s view, the final product is an exponentially skewed show.

Our host mounts a 3D printed ring with an hubward-facing strip of LEDs to an ordinary glass mirror. Over that, he designs four mated plates that hold semi-reflective film sheets in different shapes. The first is a hyperbolic paraboloid, but it’s probably easier to think of it as shaped like a Pringles chip (crisp). Once the light is applied, it looks like a bowtie made by a deranged god or the start of an infinite rabbit hole of light and reflection. To further the madness, he hits us with four shapes at once, so we hope you’ll take a moment to enjoy the video below.

This guy is no stranger to optics, and we’ve reported on a couple of other cool inventions that teach a concept through demonstration. His precision calipers demonstrate the Moiré effect, and his digital sundial capitalizes on parallel light beams.

As the legend goes, if you look into this thing at midnight, you’ll see your own death.

source https://hackaday.com/2020/09/11/infinity-mirror-at-warp-speed/

Give Me a Minute, My Eyes are Busy

Social cues are tricky, but humans are very good at detecting where someone is looking; that goes a long way toward figuring out where someone is placing their attention. All of this goes right out the window though, when you’re talking with somebody who uses eye-tracking software to speak. [Matthew Oppenheim] with Lancaster University, UK wants to give listeners the message of Give Me a Minute with an easy-to-recognize indicator. His choice is a microBit, which displays a rotating arrow on the LED array while someone composes their speech. He chose the microBit because they are readily available, and you can get cases to fit people’s personalities. After the break, you can see a demonstration, but the graphic appears scrambled because of the screen flicker. The rotating arrow is a clear indicator that someone is writing, whereas a clock might suggest a frozen computer, and a progress bar could not be accurate.

[Matthew] wrote a program for the interpreting computer which recognizes when a message is forming by monitoring the number of black pixels in the composition field. If it changes, someone must be composing a sentence. Many people will try to peek over the speaker’s shoulder and see if they are working, but we’re sure that most readers would join the users of such tech in being unhappy if someone blatantly looks at theirr computer screen while they are typing.

Wheelchairs don’t always have to come from a hospital or supply store, and they don’t have to stay on the ground.

source https://hackaday.com/2020/09/11/give-me-a-minute-my-eyes-are-busy/

Making Baseballs Go Supersonic

When professional engineers giggling like kids, you know something interesting is about to happen. [Destin Sandlin] of [Smarter Every Day], [Jeremy Fielding], and a few other like-minded individuals have built what a very impressive air cannon, capable of launching baseballs at supersonic velocities.

Baseball execution. Not for sensitive viewers.

The muzzleloading canon consists of a large pressure chamber and vacuum chamber stuck together, with a plug and baseball separating the two. The barrel acts as part of the vacuum is sealed off at the muzzle end with plastic tape that ruptures when fired. The firing mechanism runs the entire length of the pressure chamber, exiting out the back where it is held in place by a large pneumatic sear mechanism. When the sear is released, it “pops the cork” between the two chambers, sending high-pressure nitrogen into the vacuum chamber, forcing the ball forward. This causes the plug rod to shoot out the back of the pressure chamber, where it is stopped by a pneumatic piston. The entire thing is permanently mounted on a trailer and is ?? long with its barrel attached. A professional-looking control box is used to operate the beast from behind the safety of a steel blast shield.

Be sure to watch the videos after the break with subtitles turned on. The first is the highlights reel, and the second is a very entertaining hour-long behind the scenes look. To the surprise of the builders, they were able to shoot a baseball at Mach 1.38 (1050 mph or 1690 km/h) on the very first try, with only a partially pressurized system and a leaking vacuum chamber. When impacting the thick steel target, the ball disintegrates completely, imprinting its stitches on the target. [Destin] and co documented recorded the results with his usual high-speed cameras, but also included a Schlieren rig that allowed them to photograph the shock waves and Mach cones generated by the speeding ball. After a few shots, the bolts were stripped out of the pneumatic piston that stops the plug rod, which is no surprise judging by how much the steel frame flexes in that area.

This is a very ambitious project, and we have to agree that it is giggle-worthy. After sorting out the teething issues, we expect to see many more spectacular experiments. [Destin] is well knows for his informative and entertaining videos on everything from Fourier analysis to backwards bicycles. [Jeremy Fielding] is builds some impressive tools, and we’ve featured his CNC table saw and DIY dynamometer.

source https://hackaday.com/2020/09/11/making-baseballs-go-supersonic/

Peripheral Doesn’t Need Deskspace

Some of us are suckers for new hardware. There’s absolutely nothing shameful about a drawer overflowing with gamepads, roll-up keyboards, and those funny-shaped ergonomic mice. MyTeleTouch won’t sate your itch for new hardware because [Dimitar Danailov] didn’t design hardware you hold, because it uses your phone as a catch-all Human Interface Device, HID. A dongle plugs into a standard USB port, and your Android phone can emulate a USB keyboard, mouse, or gamepad over Bluetooth.

Chances are high that you already set up your primary computer with your favorite hardware, but we think we’ve found a practical slant for a minimalist accessory. Remember the last time you booted an obsolete Windows desktop and dug out an old mouse with a questionable USB plug? How long have you poked around the bottom of a moving box trying to find a proprietary wireless keyboard dongle, when you just wanted to type a password on your smart TV? What about RetroPi and a game controller? MyTeleTouch isn’t going to transform your daily experience, but it’ll be there when you don’t want to carry a full-size keyboard down three flights of stairs to press {ENTER} on a machine that spontaneously forgot it has a touch screen. If you don’t have opportunities to play the hero very often, you can choose to play the villain. Hide this in a coworker’s USB port, and while they think you’re sending a text message, you could be fiddling with their cursor.

We enjoy a good prank that everyone can laugh off, and we love little keyboards and this one raises the (space) bar.

source https://hackaday.com/2020/09/11/peripheral-doesnt-need-deskspace/

Peripheral Doesn’t Need Deskspace

Some of us are suckers for new hardware. There’s absolutely nothing shameful about a drawer overflowing with gamepads, roll-up keyboards, and those funny-shaped ergonomic mice. MyTeleTouch won’t sate your itch for new hardware because [Dimitar Danailov] didn’t design hardware you hold, because it uses your phone as a catch-all Human Interface Device, HID. A dongle plugs into a standard USB port, and your Android phone can emulate a USB keyboard, mouse, or gamepad over Bluetooth.

Chances are high that you already set up your primary computer with your favorite hardware, but we think we’ve found a practical slant for a minimalist accessory. Remember the last time you booted an obsolete Windows desktop and dug out an old mouse with a questionable USB plug? How long have you poked around the bottom of a moving box trying to find a proprietary wireless keyboard dongle, when you just wanted to type a password on your smart TV? What about RetroPi and a game controller? MyTeleTouch isn’t going to transform your daily experience, but it’ll be there when you don’t want to carry a full-size keyboard down three flights of stairs to press {ENTER} on a machine that spontaneously forgot it has a touch screen. If you don’t have opportunities to play the hero very often, you can choose to play the villain. Hide this in a coworker’s USB port, and while they think you’re sending a text message, you could be fiddling with their cursor.

We enjoy a good prank that everyone can laugh off, and we love little keyboards and this one raises the (space) bar.

source https://hackaday.com/2020/09/11/peripheral-doesnt-need-deskspace/

Peripheral Doesn’t Need Deskspace

Some of us are suckers for new hardware. There’s absolutely nothing shameful about a drawer overflowing with gamepads, roll-up keyboards, and those funny-shaped ergonomic mice. MyTeleTouch won’t sate your itch for new hardware because [Dimitar Danailov] didn’t design hardware you hold, because it uses your phone as a catch-all Human Interface Device, HID. A dongle plugs into a standard USB port, and your Android phone can emulate a USB keyboard, mouse, or gamepad over Bluetooth.

Chances are high that you already set up your primary computer with your favorite hardware, but we think we’ve found a practical slant for a minimalist accessory. Remember the last time you booted an obsolete Windows desktop and dug out an old mouse with a questionable USB plug? How long have you poked around the bottom of a moving box trying to find a proprietary wireless keyboard dongle, when you just wanted to type a password on your smart TV? What about RetroPi and a game controller? MyTeleTouch isn’t going to transform your daily experience, but it’ll be there when you don’t want to carry a full-size keyboard down three flights of stairs to press {ENTER} on a machine that spontaneously forgot it has a touch screen. If you don’t have opportunities to play the hero very often, you can choose to play the villain. Hide this in a coworker’s USB port, and while they think you’re sending a text message, you could be fiddling with their cursor.

We enjoy a good prank that everyone can laugh off, and we love little keyboards and this one raises the (space) bar.

source https://hackaday.com/2020/09/11/peripheral-doesnt-need-deskspace/