[familylovermommy] has been homeschooling her kids even before the pandemic, so she’s pretty well-versed on being a learning coach and a teacher. One of the activities she designed for her boys has them creating 3D models using Tinkercad. In the spirit of openness and cultivating freethinking, she did not give them very many constraints. But rather, gave them the liberty to creatively design whatever scene they imagined.
In the Instructable, she shares her sons’ designs along with instructions to recreate the models. The designs as you’ll see are pretty extensive, so she embedded the Tinkercad designs directly into it. You can even see a number of video showcases as well.
This is a really cool showcase of some pretty stellar workmanship. Also, maybe a bit of inspiration for some of our readers who are creating work from home activities of their own.
Change is inevitable, and a part of life. But we’re told that nobody likes change. So logically, it seems we’ve proved nobody likes life. QED.
That may be a reach, but judging by the reaction of the Fusion 360 community to the announced changes to the personal use license, they’re pretty much hating life right now. The clear message from Autodesk is that Fusion 360 — the widely used suite of CAD and CAM software — will still offer a free to use non-commercial license for design and manufacturing work, with the inclusion of a few very big “buts” that may be deal-breakers for some people. The changes include:
Project storage is limited to 10 active and editable documents
Exports are now limited to a small number of file types. Thankfully this still includes STL files but alas, DXF, DWG, PDF exports are all gone
Perhaps most importantly to the makerverse, STEP, SAT, and IGES file types can no longer be exported, the most common files for those who want to edit a design using different software.
2D drawings can now only be single sheet, and can only be printed or plotted
Rendering can now only be done locally, so leveraging cloud-based rendering is no longer possible
CAM support has been drastically cut back: no more multi-axis milling, probing, automatic tool changes, or rapid feeds, but support for 2, 2.5, and 3 axis remains
All support for simulation, generative design, and custom extensions has been removed
Most of these changes go into effect October 1, with the exception of the limit on active project files which goes into effect in January of 2021. We’d say that users of Fusion 360’s free personal use license would best be advised to export everything they might ever think they need design files for immediately — if you discover you need to export them in the future you’ll need one of the other licenses to do so.
The problem with these personal use licenses is that it’s easy to get used to them and think of them as de facto open-source licenses; changing the terms then ends up leaving a bad taste in everyone’s mouth. To their credit, Autodesk is offering a steep discount on the commercial license right now, which might take some of the sting out of the changes.
When [ccooper] told his parents he was gonna start up his electronics habit again, the last thing he expected was to save his parents’ marriage in the process. But as soon as he dropped this news, they made a special request: build us something to replace the multi-purpose manual cribbage board. It’s too ambiguous and starts too many arguments.
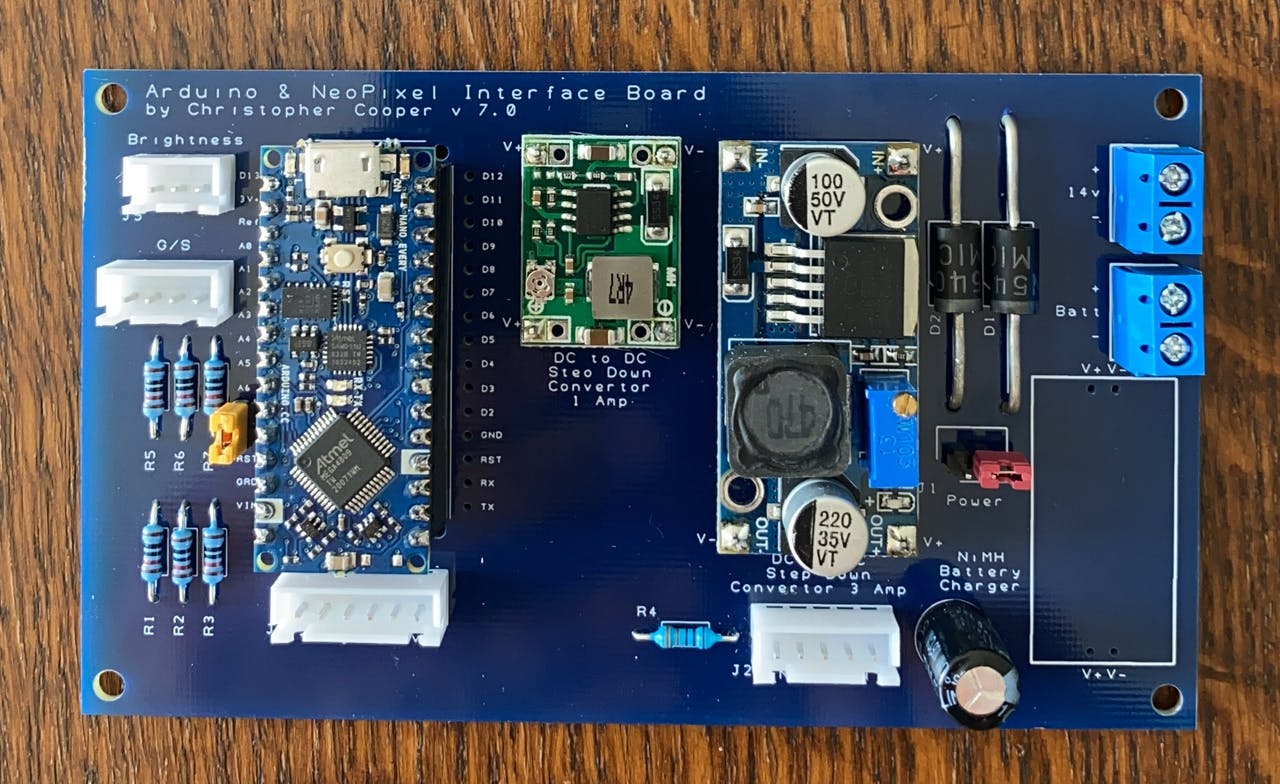
These four matrices are run by an Arduino Nano Every and will display one of three scoring schemes that the parents usually play. A set of eight AA batteries ensures that Mum and Dad can play out in bright daylight and still see the LEDs. You can see how the brightness rivals the sun in the demo after the break. The code and Gerber files for the custom board are there if you want to make one for yourself, or know of another marriage that needs saving.
When [ccooper] told his parents he was gonna start up his electronics habit again, the last thing he expected was to save his parents’ marriage in the process. But as soon as he dropped this news, they made a special request: build us something to replace the multi-purpose manual cribbage board. It’s too ambiguous and starts too many arguments.
These four matrices are run by an Arduino Nano Every and will display one of three scoring schemes that the parents usually play. A set of eight AA batteries ensures that Mum and Dad can play out in bright daylight and still see the LEDs. You can see how the brightness rivals the sun in the demo after the break. The code and Gerber files for the custom board are there if you want to make one for yourself, or know of another marriage that needs saving.
When [ccooper] told his parents he was gonna start up his electronics habit again, the last thing he expected was to save his parents’ marriage in the process. But as soon as he dropped this news, they made a special request: build us something to replace the multi-purpose manual cribbage board. It’s too ambiguous and starts too many arguments.
These four matrices are run by an Arduino Nano Every and will display one of three scoring schemes that the parents usually play. A set of eight AA batteries ensures that Mum and Dad can play out in bright daylight and still see the LEDs. You can see how the brightness rivals the sun in the demo after the break. The code and Gerber files for the custom board are there if you want to make one for yourself, or know of another marriage that needs saving.
Roll your negotiation skill, because this d20 is a hefty one. The Tweet is also below. We are charmed by [Greg Davill]’s twenty-sided LED contraption, but what do we call it? Is it a device? A sculpture? A die? Even though “d20” is right on his custom controller PCB, we don’t think this will grace the table at the next elf campaign since it is rather like taking a Rolls Royce to the grocery store. Our builder estimates the price tag at $350 USD and that includes twenty custom PCB light panels with their components, a controller board, one battery pack, and the 3D printed chassis that has to friction-fit the light faces.
Power and communication for all the panels rely on twenty ribbon cables daisy-chained throughout the printed scaffolding, which you can see in the picture above. [Greg] made a six-sided LED cube last year, and there are more details for it, but we suspect he learned his lesson about soldering thousands of lights by hand. There are one-hundred-twenty LEDs per panel, times twenty, that is over two-thousand blinkenlights. We don’t yet have specs on the controller, but last time he used a SAMD51 processor to support over three-thousand lights. We don’t know where he’ll go next, but we’re game if he wants to make a chandelier for Hackaday’s secret underground lair.
(Editor’s Note: If you were at Supercon last year, and you got to play with this thing in the flesh, it’s worth it!)
Just for fun I went through and quoted this up, if I wanted to try to sell these as completed units or kits.
In reasonable qty these are the prices: Panel: $5.20 each Assembled. Controller: $100 3d print $150
[Daniel] was recently featured here for his work in improving the default charging mode for the Nissan Leaf electric vehicle when using the emergency/trickle charger included with the car. His work made it possible to reduce the amount of incoming power from the car, if the charging plug looked like it might not be able to handle the full 1.2 kW -3 kW that these cars draw when charging. Thanks to that work, he was able to create another upgrade for these entry-level EVs, this time addressing a major Leaf design flaw that is known as Rapidgate.
The problem that these cars have is that they still have passive thermal management for their batteries, unlike most of their competitors now. This was fine in the early ’10s when this car was one of the first all-electric cars to market, but now its design age is catching up with it. On long trips at highway speed with many rapid charges in a row the batteries can overheat easily. When this happens, the car’s charging controller will not allow the car to rapid charge any more and severely limits the charge rate even at the rapid charging stations. [Daniel] was able to tweak the charging software in order to limit the rapid charging by default, reducing it from 45 kW to 35 kW and saving a significant amount of heat during charging than is otherwise possible.
While we’d like to see Nissan actually address the design issues with their car designs while making these straighforward software changes (or at least giving Leaf owners the options that improve charging experiences) we are at least happy that there are now other electric vehicles in the market that have at least addressed the battery thermal management issues that are common with all EVs. If you do own a Leaf though, be sure to check out [Daniel]’s original project related to charging these cars.
Battery technology is the talk of the town right now, as it’s the main bottleneck holding up progress on many facets of renewable energy. There are other technologies available for energy storage, though, and while they might seem like drop-in replacements for batteries they can have some peculiar behaviors. Supercapacitors, for example, have a completely different set of requirements for charging compared to batteries, and behave in peculiar ways compared to batteries.
This project from [sciencedude1990] shows off some of the quirks of supercapacitors by showing one method of rapidly charging one. One of the most critical differences between batteries and supercapacitors is that supercapacitors’ charge state can be easily related to voltage, and they will discharge effectively all the way to zero volts without damage. This behavior has to be accounted for in the charging circuit. The charging circuit here uses an ATtiny13A and a MP18021 half-bridge gate driver to charge the capacitor, and also is programmed in a way that allows for three steps for charging the capacitor. This helps mitigate the its peculiar behavior compared to a battery, and also allows the 450 farad capacitor to charge from 0.7V to 2.8V in about three minutes.
If you haven’t used a supercapacitor like this in place of a lithium battery, it’s definitely worth trying out in some situations. Capacitors tolerate temperature extremes better than batteries, and provided you have good DC regulation can often provide power more reliably than batteries in some situations. You can also combine supercapacitors with batteries to get the benefits of both types of energy storage devices.
Every bit of film or video you’ve ever seen is a mind trick, an optical illusion of continuous movement based on flashing 24 to 30 slightly different images into your eyes every second. The wetware between your ears can’t deal with all that information individually, so it convinces itself that you’re seeing smooth motion.
But what if you slow down time: dial things back to one frame every 100 seconds, or every 1,000? That’s the idea behind this slow-motion LED art display called, appropriately enough, “Continuum.” It’s the work of [Louis Beaudoin] and it was inspired by the original very-slow-motion movie player and the recent update we featured. But while those players featured e-paper displays for photorealistic images, “Continuum” takes a lower-resolution approach. The display is comprised of four HUB75 32×32 RGB LED displays, each with a 5-mm pitch. The resulting 96×96 pixel display fits nicely within an Ikea RIBBA picture frame.
The display is driven by a Teensy 4 and [Louis]’ custom-designed SmartLED Shield that plugs directly into the HUB75s. The rear of the frame is rimmed with APA102 LED strips for an Ambilight-style effect, and the front of the display has a frosted acrylic diffuser. It’s configured to show animated GIFs at anything from 1 frame per second to 1,000 seconds per frame, the latter resulting in an image that looks static unless you revisit it sometime later. [Louis] takes full advantage of the Teensy’s processing power to smoothly transition between each pair of frames, and the whole effect is quite wonderful. The video below captures it as best it can, but we imagine this is something best seen in person.
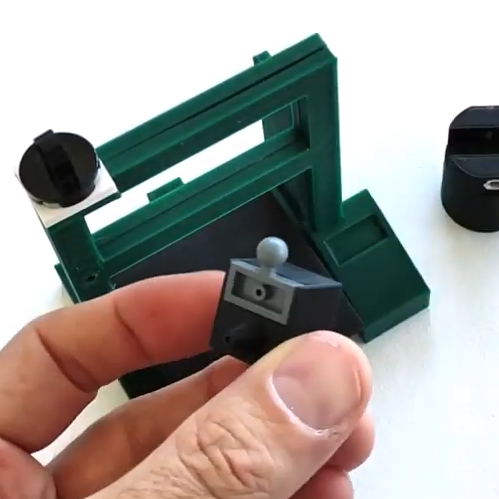
A few Lego pieces provide key functionality, like an articulated dispenser head.
Most of us have bent a length of solder into a more convenient shape and angle when soldering, and just sort of pushed the soldering iron and work piece into the hanging solder instead of breaking out a third hand. Well, [yukseltemiz] seems to have decided that a solder dispenser and a miniature 3D printer model can have a lot in common, and created a 1/5 scale Ender 3 printer model that acts as a solder stand and dispenser. The solder spool hangs where the filament roll would go, and the solder itself is dispensed through the “print head”.
It’s cute, and we do like the way that [yukseltemiz] incorporated a few Lego pieces into the build. A swivel and eyelet guides the solder off the roll and a small Lego ball and socket gives the dispenser its articulation, an important feature for bending solder to a more convenient angle for working. It makes us think that using Lego pieces right alongside more traditional hardware like M3 nuts and bolts might be an under-explored technique. You can see the unit in action in the brief assembly video, embedded below.
A few Lego pieces provide key functionality, like an articulated dispenser head.
Most of us have bent a length of solder into a more convenient shape and angle when soldering, and just sort of pushed the soldering iron and work piece into the hanging solder instead of breaking out a third hand. Well, [yukseltemiz] seems to have decided that a solder dispenser and a miniature 3D printer model can have a lot in common, and created a 1/5 scale Ender 3 printer model that acts as a solder stand and dispenser. The solder spool hangs where the filament roll would go, and the solder itself is dispensed through the “print head”.
It’s cute, and we do like the way that [yukseltemiz] incorporated a few Lego pieces into the build. A swivel and eyelet guides the solder off the roll and a small Lego ball and socket gives the dispenser its articulation, an important feature for bending solder to a more convenient angle for working. It makes us think that using Lego pieces right alongside more traditional hardware like M3 nuts and bolts might be an under-explored technique. You can see the unit in action in the brief assembly video, embedded below.
A few Lego pieces provide key functionality, like an articulated dispenser head.
Most of us have bent a length of solder into a more convenient shape and angle when soldering, and just sort of pushed the soldering iron and work piece into the hanging solder instead of breaking out a third hand. Well, [yukseltemiz] seems to have decided that a solder dispenser and a miniature 3D printer model can have a lot in common, and created a 1/5 scale Ender 3 printer model that acts as a solder stand and dispenser. The solder spool hangs where the filament roll would go, and the solder itself is dispensed through the “print head”.
It’s cute, and we do like the way that [yukseltemiz] incorporated a few Lego pieces into the build. A swivel and eyelet guides the solder off the roll and a small Lego ball and socket gives the dispenser its articulation, an important feature for bending solder to a more convenient angle for working. It makes us think that using Lego pieces right alongside more traditional hardware like M3 nuts and bolts might be an under-explored technique. You can see the unit in action in the brief assembly video, embedded below.
A set of helping hands is a nice tool to have around the shop, especially if soldering or gluing small components is a common task. What we all really want, though, is a robotic arm. Sure, it could help us set up glue or solder but it can do virtually any other task it is assigned as well. A general-purpose tool like this might be out of reach of most of us, unless we have a 3D printer to make this open-source robotic arm at home.
The KAUDA Robotic Arm from [Giovanni Lerda] is a five-axis arm with a gripping tool and has a completely open-source set of schematics so it can be printed on any 3D printer. The robot arm uses three stepper motors and two servo motors, and is based on the Arduino MEGA 2560 for control. The electrical schematics are also open-source, so getting this one up and running is just an issue of printing, wiring, and implementing some software. To that end there are software examples available, and they can easily be modified to fit one’s robotic needs.
A project like this could be helpful for any number of other projects, or also just as a lesson in robotics for yourself or even in a classroom, since many schools now have their own 3D printers. With everything being open-source, this is a much simpler endeavor now than other projects we’ve seen that attempted to get robotic arms running again.
When you buy a chip, how can you be sure you’re getting what you paid for? After all, it’s just a black fleck of plastic with some leads sticking out of it, and a few laser-etched markings on it that attest to what lies within. All of that’s straightforward to fake, of course, and it’s pretty easy to tell if you’ve got a defective chip once you try it out in a circuit.
But what about off-brand chips? Those chips might be functionally similar, but still off-spec in some critical way. That was the case for [Kevin Darrah] which led to his forensic analysis of potentially counterfeit MCU chips. [Kevin] noticed that one of his ATMega328 projects was consuming way too much power in deep sleep mode — about two orders of magnitude too much. The first video below shows his initial investigation and characterization of the problem, including removal of the questionable chip from the dev board it was on and putting it onto a breakout board that should draw less than a microamp in deep sleep. Showing that it drew 100 μA instead sealed the deal — something was up with the chip.
[Kevin] then sent the potentially bogus chip off to a lab for a full forensic analysis, because of course there are companies that do this for a living. The second video below shows the external inspection, which revealed nothing conclusive, followed by an X-ray analysis. That revealed enough weirdness to warrant destructive testing, which showed the sorry truth — the die in the suspect unit was vastly different from the Atmel chip’s die.
It’s hard to say that this chip is a counterfeit; after all, Atmel may have some sort of contract with another foundry to produce MCUs. But it’s clearly an issue to keep in mind when buying bargain-basement chips, especially ones that test functionally almost-sorta in-spec. Caveat emptor.
Counterfeit parts are depressingly common, and are a subject we’ve touched on many times before. If you’d like to know more, start with a guide.
There is a good chance you clicked on this article with a mouse, trackball, trackpad, or tapped with your finger. Our hands are how most of us interact with the digital world, but that isn’t an option for everyone, and [Shu Takahashi] wants to give them a new outlet to express themselves. Some folks who cannot use their hands will be able to use the Magpie MIDI, which acts as a keyboard, mouse, MIDI device, and eventually, a game controller. This universal Human Interface Device (HID) differs from a mouth-operated joystick because it has air pressure sensors instead of buttons. The sensors can recognize the difference between exhalation and inhalation, so the thirteen ports can be neutral, positive, or negative, which is like having twenty-six discrete buttons.
The harmonica mounts on an analog X-Y joystick to move a mouse pointer or manipulate MIDI sound like a whammy bar. [Shu] knows that a standard harmonica has ten ports, but he picked thirteen because all twenty-six letters are accessible by a puff or sip in keyboard mode. The inputs outnumber the Arduino Leonardo’s analog inputs, so there is a multiplexor to read all of them. There was not enough time to get an Arduino with enough native ports, like a Teensy, with HID support baked in. Most of the structure is 3D printed, so parts will be replaceable and maybe even customizable.
Later this month, people who use GitHub may find themselves suddenly getting an error message while trying to authenticate against the GitHub API or perform actions on a GitHub repository with a username and password. The reason for this is the removal of this authentication option by GitHub, with a few ‘brown-out’ periods involving the rejection of passwords to give people warning of this fact.
This change was originally announced by GitHub in November of 2019, had a deprecation timeline assigned in February of 2020 and another blog update in July repeating the information. As noted there, only GitHub Enterprise Server remains unaffected for now. For everyone else, as of November 13th, 2020, in order to use GitHub services, the use of an OAuth token, personal token or SSH key is required.
While this is likely to affect a fair number of people who are using GitHub’s REST API and repositories, perhaps the more interesting question here is whether this is merely the beginning of a larger transformation away from username and password logins in services.
No Skies Are Falling… Yet
First of all, the good news is that dealing with this change isn’t super-complicated, and if reading GitHub’s blog posts has filled you with confusion and various levels of existential dread, here’s an easy way to fix it with minimal changes if you’re used to hammering in your credentials on the command line with the git client:
Switch to SSH.
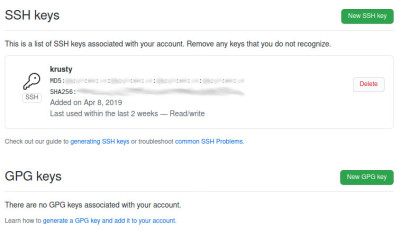
That’s it. If you already have an SSH certificate installed on your system, make sure to copy the public key into your GitHub profile. After this you can either clone your repositories anew with more SSH flavor, or change the git remote URL from HTTPS into its SSH equivalent.
Doing this requires opening the .git/config file in your local repository’s root folder in your favorite text editor (like Vim) and changing the remote’s URL. Simply change ‘https’ to ‘ssh’, and append ‘git@’ before the host name so that e.g. https://github.com/Foo/Bar.git becomes ssh://git@github.com/Foo/Bar.git.
Congratulations, you should now be able to use your SSH key to push, pull, fetch, rebase, squash and all those other naughty things with your remote repositories just like before. If you get weird SSH errors, it might be that you have the wrong permissions set on your ~/.ssh folder. Otherwise, enjoy not typing your username and password (or access token) any more every single time.
The Broader Picture
According to GitHub, the reason for this change is to increase security. Instead of passwords, they offer the use of personal access tokens (PATs) when using the REST API or accessing git repositories via HTTPS. The idea is that PATs can be created for specific services and individuals, to limit and grant certain rights. The resulting token is however a long string that you aren’t just going to remember and type in, which makes a password manager essential.
It is telling that none of this applies to logging into the GitHub website itself. There you can still use your username and password as before, possibly in addition to two-factor authentication (2FA) if you weren’t using it already. Here, the second factor in 2FA can be a code sent in a text message or mobile app, or something like WebAuthentication (FIDO2), with all the potential gotchas when using biometrics.
For those of us who were already using SSH with our GitHub repository queries, this means that essentially nothing changes. The use of access tokens should also come as no surprise to anyone who has integrated a CI system or similar with GitHub. It does however lead one to ask the question of what the point of GitHub’s change is if it only makes a few DevOps scurry around to update services (and fix the few that do fall over). Is anyone really trying to get rid of passwords?
As anyone who has ever managed a large, multi-user system at a university or large business knows, user account management is essential. Ideally you want to keep every user (whether a person, shell script or manager) in their own little permission zone. This is where GitHub’s announcement is perhaps the most puzzling. As noted by commenters over at Hacker News on the announcement, it would have made more sense to have expanded the access tokens to make more fine-grained and per-project roles.
The Power of Knowledge
Graphic courtesy of the EFF.
Whether or not passwords are actually problematic seems to mostly depend on who you ask. If it’s a study commissioned by a company that sells alternatives to password-based logins, or the company behind Windows Hello, it’s the most insecure thing ever. However, as mentioned earlier, there are significant issues with these alternatives, especially biometrics.
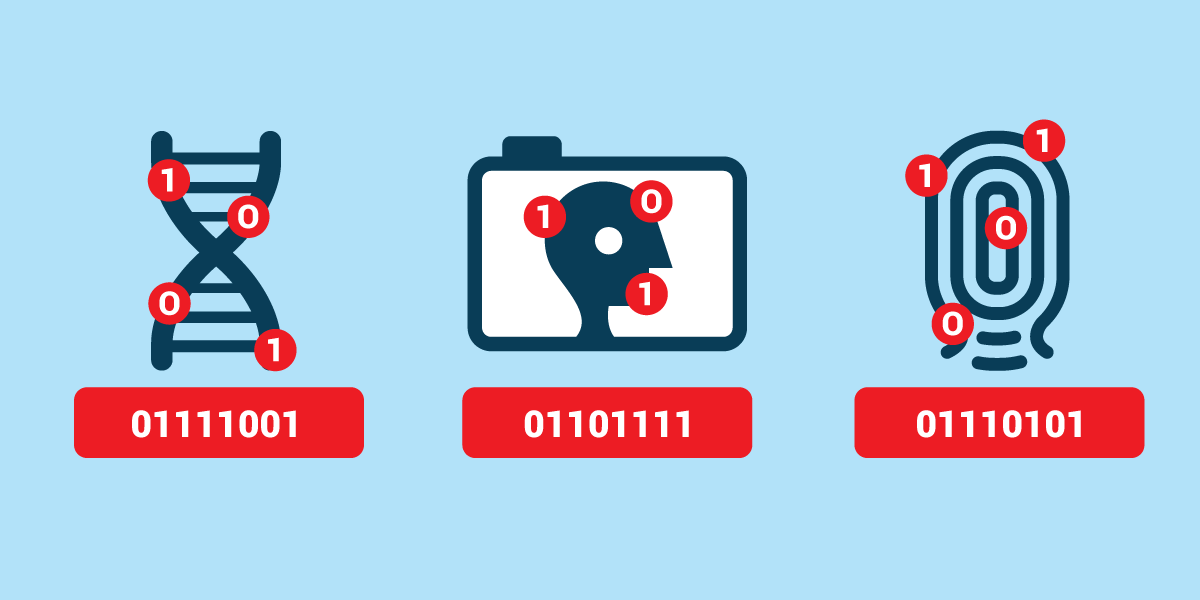
In user authentication, identification can take place using something you have, something you are, and something you know. Biometrics is the practice of scanning a part of a person’s body and comparing it with previously stored data. This is public data which is becoming increasingly easier to copy and reproduce to fool biometric sensors. And of course if your biometric data falls into the hands of bad actors you can never change it.
Something which one has (wallet, credit card, hardware token) is easily stolen or lost. This is why such tokens are inevitably unlocked with a password, in the form of a personal identification number (PIN), which is awkwardly danced around as being a password, even though as a thing that ‘someone knows’ it is totally a password.
Things that people know are pretty amazing, because the only ways that they can be compromised are by forgetting them or by having someone record them using keyloggers, compromised ATMs, etc. This is demonstrated by the inability of US federal departments to force their way into password-secured iPhones. With the use of facial recognition all it takes is holding the phone up to the person’s face in order to unlock it, something which might even be legal for fingerprints. In some cases a photograph of the person suffices.
All You Need Is SSH
The OpenSSH logo.
Realistically, the nice thing about GitHub’s change seems to be that it forces more people to finally toss out or rewrite those old scripts and forgotten-but-still-active Java back-end services that have username and password credentials hard-coded in them. Having them use SSH (conceivably using ssh-agent or GPG agent) eases maintenance and should improve security. Even if one just uses git repositories from the command line and doesn’t bother with a password manager, switching to SSH means less typing.
As an authentication mechanism, SSH provides two-factor authentication in the form of something you have (the secret key) and something you know (the key phrase). Its benefits are acknowledged by GitLab as well, who as of August 15th this year are no longer offering multi-factor resets for free user accounts. If one has an SSH key registered with the account, one can use SSH authentication to recover the account in cases where all of the other authentication methods have become unavailable.
It’s Passwords All the Way Down
Because of the power of keeping authentication information safely stored in our squishy, organic brains, all authentication methods seem to lead back to a form of passwords at some point. Even ‘password-less’ authentication tokens require a passcode (PIN), which one has to remember. The same is true for credit cards, debit cards, online banking accounts, SIM cards, password managers and so on.
On last count, I have to remember the PIN codes for multiple SIM cards, debit cards, credit cards, online banking apps, and one password manager for nearly a dozen total. Guess where these PIN codes end up? That’s correct, in the password manager, because remembering a random string of numbers is tricky, but remembering a dozen of them is a borderline nightmare scenario. Was it 7634 for that one debit card, or 7643? Or was that for the second credit card? Even Elliot Williams’ brain-based hashing system for PINs lets him write the public key on the card but it still demands that he remember the private key (and how to hash them in his head).
Perhaps that’s the appeal of biometrics: to have something that just is, with nothing to remember or some physical item to keep track of. Yet biometrics is the cryptology equivalent of printing your SSH private key on your forehead (or fingertips).
At the end of the day, it seems that all authentication roads end up leading to password managers and SSH keys.
Later this month, people who use GitHub may find themselves suddenly getting an error message while trying to authenticate against the GitHub API or perform actions on a GitHub repository with a username and password. The reason for this is the removal of this authentication option by GitHub, with a few ‘brown-out’ periods involving the rejection of passwords to give people warning of this fact.
This change was originally announced by GitHub in November of 2019, had a deprecation timeline assigned in February of 2020 and another blog update in July repeating the information. As noted there, only GitHub Enterprise Server remains unaffected for now. For everyone else, as of November 13th, 2020, in order to use GitHub services, the use of an OAuth token, personal token or SSH key is required.
While this is likely to affect a fair number of people who are using GitHub’s REST API and repositories, perhaps the more interesting question here is whether this is merely the beginning of a larger transformation away from username and password logins in services.
No Skies Are Falling… Yet
First of all, the good news is that dealing with this change isn’t super-complicated, and if reading GitHub’s blog posts has filled you with confusion and various levels of existential dread, here’s an easy way to fix it with minimal changes if you’re used to hammering in your credentials on the command line with the git client:
Switch to SSH.
That’s it. If you already have an SSH certificate installed on your system, make sure to copy the public key into your GitHub profile. After this you can either clone your repositories anew with more SSH flavor, or change the git remote URL from HTTPS into its SSH equivalent.
Doing this requires opening the .ssh/config file in your local repository’s root folder in your favorite text editor (like Vim) and changing the remote’s URL. Simply change ‘https’ to ‘ssh’, and append ‘git@’ before the host name so that e.g. https://github.com/Foo/Bar.git becomes ssh://git@github.com/Foo/Bar.git.
Congratulations, you should now be able to use your SSH key to push, pull, fetch, rebase, squash and all those other naughty things with your remote repositories just like before. If you get weird SSH errors, it might be that you have the wrong permissions set on your ~/.ssh folder. Otherwise, enjoy not typing your username and password (or access token) any more every single time.
The Broader Picture
According to GitHub, the reason for this change is to increase security. Instead of passwords, they offer the use of personal access tokens (PATs) when using the REST API or accessing git repositories via HTTPS. The idea is that PATs can be created for specific services and individuals, to limit and grant certain rights. The resulting token is however a long string that you aren’t just going to remember and type in, which makes a password manager essential.
It is telling that none of this applies to logging into the GitHub website itself. There you can still use your username and password as before, possibly in addition to two-factor authentication (2FA) if you weren’t using it already. Here, the second factor in 2FA can be a code sent in a text message or mobile app, or something like WebAuthentication (FIDO2), with all the potential gotchas when using biometrics.
For those of us who were already using SSH with our GitHub repository queries, this means that essentially nothing changes. The use of access tokens should also come as no surprise to anyone who has integrated a CI system or similar with GitHub. It does however lead one to ask the question of what the point of GitHub’s change is if it only makes a few DevOps scurry around to update services (and fix the few that do fall over). Is anyone really trying to get rid of passwords?
As anyone who has ever managed a large, multi-user system at a university or large business knows, user account management is essential. Ideally you want to keep every user (whether a person, shell script or manager) in their own little permission zone. This is where GitHub’s announcement is perhaps the most puzzling. As noted by commenters over at Hacker News on the announcement, it would have made more sense to have expanded the access tokens to make more fine-grained and per-project roles.
The Power of Knowledge
Graphic courtesy of the EFF.
Whether or not passwords are actually problematic seems to mostly depend on who you ask. If it’s a study commissioned by a company that sells alternatives to password-based logins, or the company behind Windows Hello, it’s the most insecure thing ever. However, as mentioned earlier, there are significant issues with these alternatives, especially biometrics.
In user authentication, identification can take place using something you have, something you are, and something you know. Biometrics is the practice of scanning a part of a person’s body and comparing it with previously stored data. This is public data which is becoming increasingly easier to copy and reproduce to fool biometric sensors. And of course if your biometric data falls into the hands of bad actors you can never change it.
Something which one has (wallet, credit card, hardware token) is easily stolen or lost. This is why such tokens are inevitably unlocked with a password, in the form of a personal identification number (PIN), which is awkwardly danced around as being a password, even though as a thing that ‘someone knows’ it is totally a password.
Things that people know are pretty amazing, because the only ways that they can be compromised are by forgetting them or by having someone record them using keyloggers, compromised ATMs, etc. This is demonstrated by the inability of US federal departments to force their way into password-secured iPhones. With the use of facial recognition all it takes is holding the phone up to the person’s face in order to unlock it, something which might even be legal for fingerprints. In some cases a photograph of the person suffices.
All You Need Is SSH
The OpenSSH logo.
Realistically, the nice thing about GitHub’s change seems to be that it forces more people to finally toss out or rewrite those old scripts and forgotten-but-still-active Java back-end services that have username and password credentials hard-coded in them. Having them use SSH (conceivably using ssh-agent or GPG agent) eases maintenance and should improve security. Even if one just uses git repositories from the command line and doesn’t bother with a password manager, switching to SSH means less typing.
As an authentication mechanism, SSH provides two-factor authentication in the form of something you have (the secret key) and something you know (the key phrase). Its benefits are acknowledged by GitLab as well, who as of August 15th this year are no longer offering multi-factor resets for free user accounts. If one has an SSH key registered with the account, one can use SSH authentication to recover the account in cases where all of the other authentication methods have become unavailable.
It’s Passwords All the Way Down
Because of the power of keeping authentication information safely stored in our squishy, organic brains, all authentication methods seem to lead back to a form of passwords at some point. Even ‘password-less’ authentication tokens require a passcode (PIN), which one has to remember. The same is true for credit cards, debit cards, online banking accounts, SIM cards, password managers and so on.
On last count, I have to remember the PIN codes for multiple SIM cards, debit cards, credit cards, online banking apps, and one password manager for nearly a dozen total. Guess where these PIN codes end up? That’s correct, in the password manager, because remembering a random string of numbers is tricky, but remembering a dozen of them is a borderline nightmare scenario. Was it 7634 for that one debit card, or 7643? Or was that for the second credit card? Even Elliot Williams’ brain-based hashing system for PINs lets him write the public key on the card but it still demands that he remember the private key (and how to hash them in his head).
Perhaps that’s the appeal of biometrics: to have something that just is, with nothing to remember or some physical item to keep track of. Yet biometrics is the cryptology equivalent of printing your SSH private key on your forehead (or fingertips).
At the end of the day, it seems that all authentication roads end up leading to password managers and SSH keys.
We all bring our own areas of expertise to our work when we build the projects that find their way in front of Hackaday writers, for instance a software developer brings clever brains to their microcontroller, or an electronic engineer might bring a well-designed piece of circuitry. [Yvo de Haas] is a mechanical engineer, and it’s pretty clear from his animatronic tentacle that he has used his expertise in that field to great effect.
If you think it looks familiar then some readers may recall that we saw a prototype model back in February at Hacker Hotel 2020. In those last weeks before the pandemic hit us with lockdowns and cancellations he’d assembled a very worthy proof of concept, and from what we can see from his write-up and the video below he’s used all the COVID time to great effect in the finished product. Back in February the control came via a pair of joysticks, we’re particularly interested to see his current use of a mini tentacle as a controller.
At its heart is a linkage of 3D-printed anti-parallelograms linked by gears, with cables holding the tension and controlling the movement of the tentacle from a set of winches. The design process is detailed from the start and makes a fascinating read, and with its gripper on the end we can’t wait for an event that goes ahead without cancellation at which we can see the tentacle for real.
For his project, [Ish] used an Arduino Nano 33 BLE Sense due to its built-in microphone, sizeable RAM for storing large chunks of data, and it’s BLE capabilities for later connecting with an app. He began his project by collecting background noise using Edge Impulse Studio’s data acquisition functionality. [Ish] really emphasized that Edge Impulse was really doing all the work for him. He really just needed to collect some test data and that was mostly it on his part. The work needed to run and test the Neural Network was taken care of by Edge Impulse. Sounds handy, if you don’t mind offloading your data to the cloud.
[Ish] ended up with an 86.3% accurate classifier which he thought was good enough for a first pass at things. To make his prototype a bit more “finished”, he added some status LEDs, providing some immediate visual feedback of his classifier and to notify the caregiver. Eventually, he wants to add some BLE support and push notifications, alerting him whenever his baby needs attention.
[ananords] and his girlfriend wanted to make a simple and easy to use music player for her grandmother. Music players like CD players and MP3s have gotten just a bit too difficult to handle, so they wanted to find a much simpler solution.
They conceived the idea of creating a little jukebox called Juuk, with a simple and easy to use interface. They created individual RFID cards with the artist’s photo on the front face, making it easy to select different options from the music library. Juuk has a built-in RFID reader that will recognize each RFID card and play the appropriate musical number from an SD card.
This simple interface is much more user-friendly than those awful touchscreen devices that we’re all forced to fiddle with today and also has a cool retro appeal that many of our readers are sure to appreciate. Juuk also has a pretty ergonomic interface with a big, easy-to-use knob for controlling the volume and two appropriately illuminated buttons, one green and one red, for simple stop and play options.
We are all intimate with face coverings to slow the spread of the coronavirus. Some are reusable, and some become waste after one use. [Dr. Ye Ruquan] and a research team from City University of Hong Kong, CityU, are developing an inexpensive reusable mask with outstanding antibacterial properties, and, get this, the graphene it contains will generate a tiny current when moistened by human breath. There isn’t enough power to charge your phone or anything, but that voltage drops as the masks get dirty, so it can help determine when it needs cleaning. The video after the break shows the voltage test, and it reminds us of those batteries.
All the remarkable qualities of this mask come from laser-induced graphene. The lab is producing LIG by lasering polyimide film with a commercial CO2 infrared model. In a speed test, the process can convert 100cm² in ninety seconds, so the masks can be made more cheaply than an N95 version with that melt-blown layer that is none too good for the earth. Testing the antibacterial properties against activated carbon fiber and blown masks showed approximately 80% of the bacteria is inert after 8 hours compared to the others in the single digits. If you put them in the sun for 10 minutes, blown fabric goes to over 85%, but the graphene is 99.998%, which means that one bacteria in 50K survives. The exact mechanism isn’t known, but [Dr. Ye] thinks it may have something to do with graphene’s sharp edges and hydrophobic quality. A couple of coronavirus species were also affected, and the species that causes COVID-19 will be tested this year.
Over the last couple of years, we’ve seen a wave of impressive rugged mobile computing devices based on the ubiquitous Raspberry Pi. Sometimes they involve repurposing an existing heavy duty enclosure, and in others the Pi takes up residence in a 3D printed case which may or may not be as strong as it appears. In either event, they usually don’t lend themselves to duplication because of the time and expense involved in tracking down or printing all the parts required.
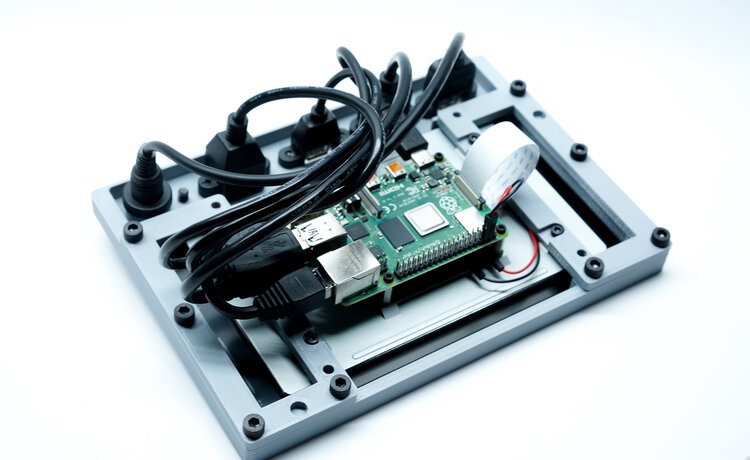
But the Raspberry Pi Quick Kit by [Jay Doscher] may change that. It represents what must surely be the simplest and fastest route to a building a rugged mobile ARM computer for your hacking adventures. Beyond the Pelican 1150 case that serves as the outer enclosure, you only need three printed parts and a handful of fasteners to complete the build. Of course you’ll need a Raspberry Pi and the official touch screen as well, but that’s sort of a given.
Electronics mounted to the 3D printed frame.
All of the electronics mount onto the three piece 3D printed frame, which is then press-fit into the opening of the Pelican case. Since you don’t need to pop any holes through the case itself, the assembled unit remains water and air tight. While [Jay] has recently shown off a very impressive 3D printed Pi enclosure, there’s really no beating a legitimate heavy duty storage case if you’re trying to protect the hardware.
When you want to use the Pi, just open the case and plug your power and accessories into the panel mount connectors under the display. There’s no integrated battery or keyboard on this build, but considering how small it is, that shouldn’t really come as a surprise.
[Jay] is targeting the Pi 4 for the Quick Kit, so that means WiFi and Bluetooth will come standard without the need for any external hardware. It looks like there might just be enough room to include an RTL-SDR receiver inside the case as well, but you’ll need to do a little redesigning of the 3D printed parts. If you do modify this design to pack in a few new tricks, we’d love to hear about it.
Over the last couple of years, we’ve seen a wave of impressive rugged mobile computing devices based on the ubiquitous Raspberry Pi. Sometimes they involve repurposing an existing heavy duty enclosure, and in others the Pi takes up residence in a 3D printed case which may or may not be as strong as it appears. In either event, they usually don’t lend themselves to duplication because of the time and expense involved in tracking down or printing all the parts required.
But the Raspberry Pi Quick Kit by [Jay Doscher] may change that. It represents what must surely be the simplest and fastest route to a building a rugged mobile ARM computer for your hacking adventures. Beyond the Pelican 1150 case that serves as the outer enclosure, you only need three printed parts and a handful of fasteners to complete the build. Of course you’ll need a Raspberry Pi and the official touch screen as well, but that’s sort of a given.
Electronics mounted to the 3D printed frame.
All of the electronics mount onto the three piece 3D printed frame, which is then press-fit into the opening of the Pelican case. Since you don’t need to pop any holes through the case itself, the assembled unit remains water and air tight. While [Jay] has recently shown off a very impressive 3D printed Pi enclosure, there’s really no beating a legitimate heavy duty storage case if you’re trying to protect the hardware.
When you want to use the Pi, just open the case and plug your power and accessories into the panel mount connectors under the display. There’s no integrated battery or keyboard on this build, but considering how small it is, that shouldn’t really come as a surprise.
[Jay] is targeting the Pi 4 for the Quick Kit, so that means WiFi and Bluetooth will come standard without the need for any external hardware. It looks like there might just be enough room to include an RTL-SDR receiver inside the case as well, but you’ll need to do a little redesigning of the 3D printed parts. If you do modify this design to pack in a few new tricks, we’d love to hear about it.
Over the last couple of years, we’ve seen a wave of impressive rugged mobile computing devices based on the ubiquitous Raspberry Pi. Sometimes they involve repurposing an existing heavy duty enclosure, and in others the Pi takes up residence in a 3D printed case which may or may not be as strong as it appears. In either event, they usually don’t lend themselves to duplication because of the time and expense involved in tracking down or printing all the parts required.
But the Raspberry Pi Quick Kit by [Jay Doscher] may change that. It represents what must surely be the simplest and fastest route to a building a rugged mobile ARM computer for your hacking adventures. Beyond the Pelican 1150 case that serves as the outer enclosure, you only need three printed parts and a handful of fasteners to complete the build. Of course you’ll need a Raspberry Pi and the official touch screen as well, but that’s sort of a given.
Electronics mounted to the 3D printed frame.
All of the electronics mount onto the three piece 3D printed frame, which is then press-fit into the opening of the Pelican case. Since you don’t need to pop any holes through the case itself, the assembled unit remains water and air tight. While [Jay] has recently shown off a very impressive 3D printed Pi enclosure, there’s really no beating a legitimate heavy duty storage case if you’re trying to protect the hardware.
When you want to use the Pi, just open the case and plug your power and accessories into the panel mount connectors under the display. There’s no integrated battery or keyboard on this build, but considering how small it is, that shouldn’t really come as a surprise.
[Jay] is targeting the Pi 4 for the Quick Kit, so that means WiFi and Bluetooth will come standard without the need for any external hardware. It looks like there might just be enough room to include an RTL-SDR receiver inside the case as well, but you’ll need to do a little redesigning of the 3D printed parts. If you do modify this design to pack in a few new tricks, we’d love to hear about it.
We’ve seen incredible strides made in the last decade or so towards democratizing manufacturing. Things that it once took huge, vertically integrated industries with immense factories at their disposal are now commonly done on desktop CNC machines and 3D printers. Open-source software has harnessed the brainpower of millions of developers into tools that rival what industry uses, and oftentimes exceeds them. Using these tools and combining them with things like on-demand PCB production and contract assembly services, and you can easily turn yourself into a legit manufacturer.
This model of pushing manufacturing closer to the Regular Joe and Josephine only goes so far, though. Your designs have pretty much been restricted to chips made by one or the other big manufacturers, which means pretty much anyone else could come up with the same thing. That’s all changing now thanks to SkyWater PDK, the first manufacturable, open-source process-design kit. With the tools in the PDK, anyone can design a chip for the SkyWater foundry’s 130-nm process. And the best part? It’s free — as in beer. That’s right, you can get an open-source chip built for nothing during chip manufacturing runs that start as early as this November and go through 2021.
We’re sure this news will stir a bunch of questions, so Tim Ansell, a software engineer at Google who goes by the handle “mithro” will drop by the Hack Chat to discuss the particulars. He’ll be joined by Mohamed Kassem, CTO and co-founder of efabless.com, and Michael Gielda, VP of Business Development at Antmicro. Together they’ll field your questions about this exciting development, and they’ll walk us through just what it takes to turn your vision into silicon.
Click that speech bubble to the right, and you’ll be taken directly to the Hack Chat group on Hackaday.io. You don’t have to wait until Wednesday; join whenever you want and you can see what the community is talking about.





 Switch to SSH.