Linux Fu: Literate Regular Expressions

Regular expressions — the things you feed to programs like grep — are a bit like riding a bike. It seems impossible until you learn to do it, and then it’s easy. Part of their bad reputation is because they use a very concise and abbreviated syntax that alarms people. To help people who don’t use regular expressions every day, I created a tool that lets you write them in something a little closer to plain English. Actually, I’ve written several versions of this over the years, but this incarnation that targets grep is the latest. Unlike some previous versions, this time I did it all using Bash.

Those who don’t know regular expressions might freak out when they see something like:

[0-9]{5}(-[0-9]{4})?

How long does it take to figure out what that does? What if you could write that in a more literate way? For example:

digit repeat 5 \

start_group \

   - digit repeat 4 \

end_group optional

Not as fast to type, sure. But you can probably deduce what it does: it reads US Zipcodes.

I’ve found that some of the most popular tools I’ve created over the years are ones that I don’t need myself. I’m sure you’ve had that experience, too. You know how to operate a computer, but you create a menu system for people who don’t and they love it. That’s how it is with this tool. You might not need it, but there’s a good chance you know someone who does. Along the way, the code uses some interesting features of Bash, so even if you don’t want to be verbose with your regular expressions, you might pick up a trick or two.

Tower of Babel

One of the problems is that there isn’t a single form of regular expressions. Every tool has a slightly different flavor with different rules and extensions. For the purposes of this, I’m targeting egrep, although much of it will work in other systems, too. Once you have the idea, it would be easy to extend this for different flavors of regular expressions.

Even grep has some uncommon regular expression elements, so I’m only going to work with a subset of patterns, but they are the ones you tend to use the most. It’s easy to add more exotic ones or even macros that contain multiple regular expression patterns if you decide you want to extend the program.

Tool Chest

There are a few things that are important in our quest for literate regular expressions. The idea is to have a small program that converts our literate text into a regular expression. We can naturally combine this with grep or any tool that needs a regular expression:

egrep $(regx start space zero_or_more digit repeat 5)

The $(...) construct runs the command within and whatever it writes out is placed on the command line. So, for example:

for I in $( mount | cut -d ' ' -f 3 )
do
   echo $I
   if [ -f "$I/mountinfo.txt" ]
   then
     cat "$I/mountinfo.txt"
   fi
done

This contrived example selects every mount point from the mount command and tries to locate and display the mountinfo.txt file.

So the key is to build a regx script that can convert our verbose syntax into regular expressions and then use $() to insert the patterns into the command line.

Another odd Bash tool used a bit in these scripts is the regular expression parameter expansion. For example, if $1="Hackanight" then ${1/night/day} will give you Hackaday.

Quoting

Another tool isn’t really necessary for the regx command, but I wanted to build something you can use instead of employing the $() notation with grep. The problem is you have a script getting arguments and then passing them to another program. When you have spaces, potentially, you have a problem.

If script A has $1="Hack A Day" you can assume the command line used quotes or backslashes to keep that together as one string. But passing it to another program could strip the quotes resulting in the other program seeing three different arguments. In this case, you could pass "$1” and that would be fine. But it isn’t always that simple.

To make litgrep work, you need to know about the Bash shell expansion that quotes a value so the shell can read it again:

VAR="${1@Q}"

In our previous example, VAR would now equal ‘Hack a Day’ (including the single quotes).

Why?

Why is this important? Because litgrep will pick off command line arguments and send them to regx. If you have a space in the middle of an argument, it needs to pass as a whole to regx.

Here’s an example:

litgrep Hack space a space Day space optional -- *.txt

The regx Script

The regx script itself is pretty simple. There are two functions to escape characters because so many special characters are present in a regular expression. The reesc function escapes backslash characters along with other metacharacters. Inside a class (that is, square brackets) there isn’t much quoting. You generally have to arrange the expression correctly. For example, to build a character class that has a dash, it needs to come first or last. I didn’t attempt to rearrange your class, but you could do that in the placeholder reescclass function. You could also use it for some other regular expression variants that have more escaping options.

There are three broad groups of patterns. The majority take no arguments like any_char (.) or end ($). The script uses shift to move these out of the way after processing.

The other groups take one or two arguments such as repeat or range. Those commands do extra shifts to dispose of their arguments Once you have the definitions, the script is almost anti-climatic.

The litgrep Script

The litgrep program is a bit more difficult to follow because it has to ensure that spaces are handled correctly.  The script pulls arguments out until it reads — as an argument and the rest of the command line goes to grep. That is, you can include grep arguments and file names after the –.  If you omit the –, then grep will read from standard input, the same as if you put the — with no file arguments after it.

The ${1@Q} syntax, as described above, makes sure the arguments are quoted properly. Then using eval when setting RELIST puts it back together in the right format to send to egrep.

Motivation

I have had versions of this tool floating around for years. My original version was in C++ and there’s been at least one version for Python inspired by the C version.

A tool like this is certainly handy if you don’t know regular expressions. But, honestly, you should really learn regular expressions. If you want a quick start, there’s a Linux Fu post for that. Or, take your chances and let a program infer your regular expression from a data set.

source https://hackaday.com/2020/09/11/linux-fu-literate-regular-expressions/
Hackaday Podcast 084: Awful Floppy Disk Music, Watching a Robot Climb Walls, A Futuristic Undersea Lab, and Inside a Digital Pregnancy Test

With Editor in Chief Mike Szczys off this week, Managing Editor Elliot Williams is joined by Staff Writer Dan Maloney to look over the hacks from the last week. If you’ve ever wondered how the Beatles sound on a floppy disk, wonder no more. Do you fear the coming robopocalypse? This noisy wall-climbing robot will put those fears to rest. We’ll take a look at an undersea lab worthy of the Cousteau name, and finally we’ll look inside a digital pregnancy test and wonder at its unusual power switch.

Take a look at the links below if you want to follow along, and as always, tell us what you think about this episode in the comments!

Direct download (~65 MB)

Places to follow Hackaday podcasts:

Episode 084 Show Notes:

Interesting Hacks of the Week:

Quick Hacks:

Can’t-Miss Articles:

source https://hackaday.com/2020/09/11/hackaday-podcast-084-awful-floppy-disk-music-watching-a-robot-climb-walls-a-futuristic-undersea-lab-and-inside-a-digital-pregnancy-test/

Friendly Fiberglassing: Can Hide Glue Replace Epoxy?

Hide glue has been around for thousands of years, and some of it is holding wood pieces three thousand years after application. It is made from animal protein, so vegetarians may want to stick to the petroleum-based adhesives. [Surjan Singh] wanted to see if its longevity made it a contender with modern epoxy by casting a couple of fiberglass car parts with the competing glues. In short, it doesn’t hold up in this situation, but it is not without merit.

Musical instrument makers and antique restorers still buy and use hide glue, but you would never expose it to heat or moisture. To its credit, hide glue doesn’t require a ventilator. All you need is boiling water and a popsicle stick, and you are in business. [Surjan] writes his findings like a narrative rather than steps, so his adventures are a delight to read. He found that a car part made with fiberglass and epoxy will withstand the weather better than the alternative because heat and humidity will soften hide glue. His Saab 96 isn’t the right application, but since it is nearly as strong as epoxy once set, you could make other fabric shapes, like a flannel nightstand or a lace coffee table, and you could shape them in the living room without toxifying yourself

No matter how you want to work with glues and substrates, Bil Herd has you covered, and here is an excellent tip for a cheap degassing setup.

source https://hackaday.com/2020/09/11/friendly-fiberglassing-can-hide-glue-replace-epoxy/

Security this Week: Racoons in My TLS, Bypassing Frontends, and Obscurity

Raccoon is the next flashy security flaw with a name, cute logo, and a website (and a PDF). Raccoon is a flaw in TLS version prior to 1.3, and seems to be a clever bit of work, albeit one with limited real-world application. The central problem is that these older versions of TLS, when using Diffie Hellman (DH), drop leading all-zero bytes in the resulting pre-master key. As that key is part of the input for calculating the master session key, a shortened pre-master key results in a slightly faster calculation of the master key. If an attacker can make fine-grained timing measurements, he can determine when the pre-master key is trimmed.

Let’s review Diffie Hellman, briefly. The client and server agree on two numeric values, a base g and modulus p, and each party generates a secret key, a and b. Each party calculates a public key by raising the shared base to their own private key, mod the shared modulus: A = g^a mod p. These public keys are exchanged, and each party raises the received key to their own secret key: A^b. Exponents have a non-obvious quirk, the power rule. A value raised to a power raised to a power is the same as the value raised to the power of the exponents multiplied together. g^a^b is equal to g^(a*b). By going through this mathematical dance, the server and client have arrived at a shared value that only they know, while preserving the secrecy of their private keys.

On to the attack, which is only exploitable when the server is reusing its DH key for multiple connections. The attack is to capture the target client’s public DH key, which is sent in the clear as part of the TLS handshake. The attacker now initiates a new TLS handshake, but chooses a special value for its own public key: The target’s public key, raised to a random-but-known exponent. Note that this means the attacker can’t actually calculate the new shared key, but can learn something about it. Through carefully measuring the server’s response time, it can be determined if this new DH shared key has a leading zero byte. This isn’t terribly useful on its own, but there is a mathematical trick that changes the game, the Hidden Number Problem.

The Hidden Number Problem (HNP) is an approach to breaking public key cryptography like DH. The math involved is above my pay grade, but we’ll try to get an overview, at least. In the DH exchange, the modulo operator is used to keep the magnitude of the numbers manageable. There is a side effect — the normally one-dimensional number line can be thought of as a two-dimensional number grid. There are some clever algorithms that work on a 2D lattice that don’t work on the normal number line. The result is that when you have enough clues about the hidden number you’re looking for, it can become much easier to find that number.

One of the unexpected conclusions of HNP is that not all bits are equally important. Knowing the most significant bits (MSBs) are much more useful when trying to solve HNP. To put it another way, it’s more useful to know that a number is between one thousand and five thousand, than to know that it is even. The fact that the information leakage reveals the most significant byte means that it’s much more useful than just shortening the key size by eight bits.

After discovering multiple cases where the new key starts with a zero byte, an HNP solution is feasible, and the victim’s session key can be calculated. With that key, the entire session can be decrypted.

Raccoon isn’t too hard to mitigate. On the server-side, simply don’t reuse DH keys. This is considered best practice anyway, and most distros and devices ship in this configuration by default. On the client side, dropping support for Diffie Hellman key exchange in the TLS handshake also mitigates the issue. All the major web browsers have already retired these older modes, but there will inevitably be support in libraries and applications for years to come. The timing side-channel that makes this all possible requires very tight measurement tolerances, so it will likely be difficult to actually use Raccoon in the real world.

There are cases where Raccoon is much easier to pull off. Certain configurations of F5 BIG-IP devices have a particular bug that makes detection of the zero byte much easier. The report indicates that there are other implementation with similar flaws, likely in the process of being reported and fixed.

TLS Finished

Next is yet another TLS attack, but this one is entirely a vulnerability in the wolfSSL client. The report describes the problem as the TLS 1.3 state machine not being strictly enforced. Put simpler, wolfSSL accepts a “finished” message while still in the process of validating the certificate. An attacker can successfully man-in-the-middle a TLS connection. Version 4.5.0 has been released, addressing the bug.

h2c Request Smuggling

Many web services use an architecture where an Nginx instance works as a reverse proxy and load balance. Nginx often does the TLS termination, as well as providing security and user authentication. In this arrangement, end users aren’t intended to directly connect to the back-end servers. A method to bypass that separation often brings about unexpected security problems. [Jake Miller] over at Bishop Fox Labs did some interesting work on using HTTP/2 over cleartext (h2c) as a new way to accomplish HTTP request smuggling. We’ve talked a bit about HTTP request smuggling in the past.

The trick here is that it’s possible to request a connection upgrade from HTTP/1.1 directly to an h2c connection. This is usually done using TLS-ALPN, a TLS extension specifically designed for managing allowed protocols. The HTTP/2 specification doesn’t allow the upgrade request to be sent in a regular TLS connection, but it seems that some front-ends incorrectly allow the request to be forwarded to the back-end. If the protected HTTP server allows the connection upgrade, the front-end will dutifully treat the connection as an unmanaged tunnel, bypassing any protections built into the front-end service.

SSH Honeypot

How many login attempts does an open SSH service attract in three months? Thanks to [David Tomaschik], we can safely say it’s over nine (hundred) thousand! The analysis of the login attempts proves interesting, with a litany of default and often used username/password combinations represented. One password in particular caught my attention, J5cmmu=Kyf0-br8CsW. This doesn’t seem to show up anywhere other than the list of commonly guessed passwords. I immediately wondered if it was an injection attack that worked on some obscure system. [David] asks for information on this password guess, if anybody knows where it’s from, and I’ll echo that curiosity.

Security Through Obscurity

Finally for this week, an essay by [Utku Sen] caught my attention on the virtues of security through obscurity. It’s a good opportunity to talk about this controversial topic, but if you have time, go read the essay first. His point is essentially that obscurity is a useful component of a defense in depth strategy. So long as one is careful about it, this isn’t a terrible idea, with some caveats.

On some level, nearly all security is through obscurity. Your password is secure because it’s obscure enough to not be on a list of common passwords. Your 4096 bit key is obscure enough that it won’t be guessed before the heat death of the universe. Beyond that, things like moving your SSH port is useful to cut down log noise. Disabling root SSH logins forces an attacker to guess the account name as well as the password, essentially adding key length.

But really, neither of those scenarios are what we’re talking about when we talk negatively about security through obscurity. The phrase usually refers to vulnerable software, or really bad policy, that we don’t think will ever get attacked because it won’t get noticed, like running a super old version of WordPress on the company website, and not worrying about it, because hardly anybody visits it. A particularly troubling example is the tendency of certain companies to write really sloppy and insecure code, and trusting that because the source is closed, the flaws will never be found.

What we really need is to think about what threats we are protecting against. Avoiding SSH log spam is a bit different from protecting against a determined attacker. Moving your SSH port is helpful in the first case, but not at all in the second. In the end, I agree with [Utku]’s conclusion. Obscurity isn’t a security solution, but sometimes it can be useful. Also, since he mentioned port knocking, I have to plug Fwknop. It’s the idea of port knocking, but with real crypto, not just obscurity.

source https://hackaday.com/2020/09/11/security-this-week-racoons-in-my-tls-bypassing-frontends-and-obscurity/

A Deep Dive into the Sterzo Steering Plate

Peddling in place isn’t the most exciting pastime, so it’s no surprise that modern technology is being used to make the in-home biking experience a bit more interactive. With a stand on the rear wheel providing resistance, and a movable steering plate under the front to read the handlebar angle, you can now use your standard bike as the “controller” in a virtual environment provided by software such as Zwift.

Paving the way towards a DIY Sterzo clone

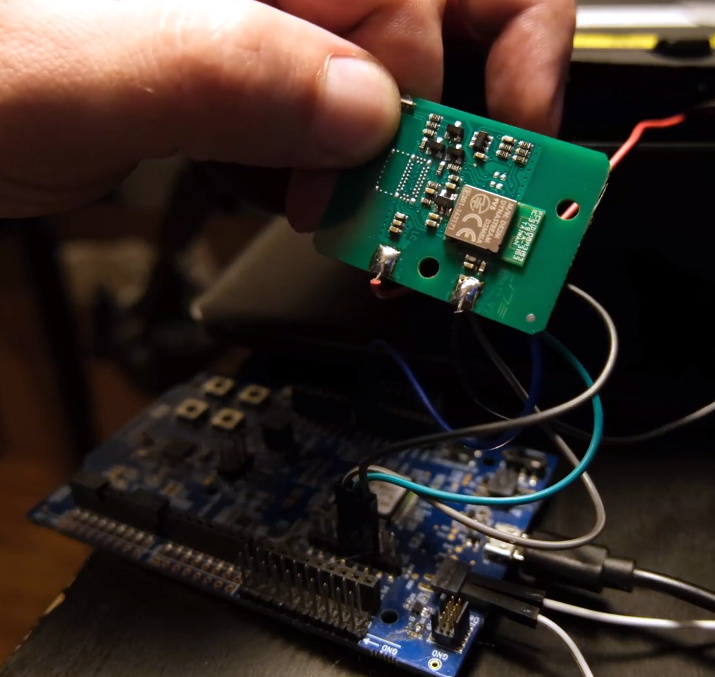
[Keith Wakeham] wanted to take a closer look at how Zwift communicated with his Sterzo steering device, and it turned into a pretty epic bout of exploration and reverse engineering. As the video after the break shows, he didn’t just go from sniffing the device’s proprietary Bluetooth Low Energy (BLE) communications protocol to figuring out how to emulate it in software so you could roll your own Zwift peripheral. He also tore the device apart, pulled the firmware from its microcontroller, and postulated how you could build your own low-cost clone device that would work with the existing software.

Even if you have absolutely zero interest in virtual biking, the video [Keith] has put together for this project is really a must watch. Have you ever wanted to sniff and reverse engineer BLE communications? Looking for a real-world example of pulling the firmware off of a consumer device? Maybe in the market for some tips on how to identify unknown ICs on a board? All of that, and quite a bit more, is covered in this nearly hour long hacking tour de force.

On the other hand, if you are interested in adding your own hardware to Zwift, then this look at getting an unsupported stationary bike working with it should be useful.

source https://hackaday.com/2020/09/11/a-deep-dive-into-the-sterzo-steering-plate/

A Deep Dive into the Sterzo Steering Plate

Peddling in place isn’t the most exciting pastime, so it’s no surprise that modern technology is being used to make the in-home biking experience a bit more interactive. With a stand on the rear wheel providing resistance, and a movable steering plate under the front to read the handlebar angle, you can now use your standard bike as the “controller” in a virtual environment provided by software such as Zwift.

Paving the way towards a DIY Sterzo clone

[Keith Wakeham] wanted to take a closer look at how Zwift communicated with his Sterzo steering device, and it turned into a pretty epic bout of exploration and reverse engineering. As the video after the break shows, he didn’t just go from sniffing the device’s proprietary Bluetooth Low Energy (BLE) communications protocol to figuring out how to emulate it in software so you could roll your own Zwift peripheral. He also tore the device apart, pulled the firmware from its microcontroller, and postulated how you could build your own low-cost clone device that would work with the existing software.

Even if you have absolutely zero interest in virtual biking, the video [Keith] has put together for this project is really a must watch. Have you ever wanted to sniff and reverse engineer BLE communications? Looking for a real-world example of pulling the firmware off of a consumer device? Maybe in the market for some tips on how to identify unknown ICs on a board? All of that, and quite a bit more, is covered in this nearly hour long hacking tour de force.

On the other hand, if you are interested in adding your own hardware to Zwift, then this look at getting an unsupported stationary bike working with it should be useful.

source https://hackaday.com/2020/09/11/a-deep-dive-into-the-sterzo-steering-plate/

A Deep Dive into the Sterzo Steering Plate

Peddling in place isn’t the most exciting pastime, so it’s no surprise that modern technology is being used to make the in-home biking experience a bit more interactive. With a stand on the rear wheel providing resistance, and a movable steering plate under the front to read the handlebar angle, you can now use your standard bike as the “controller” in a virtual environment provided by software such as Zwift.

Paving the way towards a DIY Sterzo clone

[Keith Wakeham] wanted to take a closer look at how Zwift communicated with his Sterzo steering device, and it turned into a pretty epic bout of exploration and reverse engineering. As the video after the break shows, he didn’t just go from sniffing the device’s proprietary Bluetooth Low Energy (BLE) communications protocol to figuring out how to emulate it in software so you could roll your own Zwift peripheral. He also tore the device apart, pulled the firmware from its microcontroller, and postulated how you could build your own low-cost clone device that would work with the existing software.

Even if you have absolutely zero interest in virtual biking, the video [Keith] has put together for this project is really a must watch. Have you ever wanted to sniff and reverse engineer BLE communications? Looking for a real-world example of pulling the firmware off of a consumer device? Maybe in the market for some tips on how to identify unknown ICs on a board? All of that, and quite a bit more, is covered in this nearly hour long hacking tour de force.

On the other hand, if you are interested in adding your own hardware to Zwift, then this look at getting an unsupported stationary bike working with it should be useful.

source https://hackaday.com/2020/09/11/a-deep-dive-into-the-sterzo-steering-plate/

Game Boy Plays Forever

For those of us old enough to experience it first hand, the original Game Boy was pretty incredible, but did have one major downside: battery consumption. In the 90s rechargeable batteries weren’t common, which led to most of us playing our handhelds beside power outlets. Some modern takes on the classic Game Boy address these concerns with modern hardware, but this group from the Delft University of Technology and Northwestern has created a Game Boy clone that doesn’t need any batteries at all, even though it can play games indefinitely.

This build was a proof-of-concept for something called “intermittent computing” which allows a computer to remain in a state of processing limbo until it gets enough energy to perform the next computation. The Game Boy clone, fully compatible with the original Game Boy hardware, is equipped with many tiny solar panels which can harvest energy and is able to halt itself and store its state in nonvolatile memory if it detects that there isn’t enough energy available to continue. This means that Super Mario Land isn’t exactly playable, but other games that aren’t as action-packed can be enjoyed with very little impact in gameplay.

The researchers note that it’ll be a long time before their energy-aware platform becomes commonplace in devices and replaces batteries, but they do think that internet-connected devices that don’t need to be constantly running or powered up would be a good start. There are already some low-powered options available that can keep their displays active when everything else is off, so hopefully we will see even more energy-efficient options in the near future.

Thanks to [Sascho] for the tip!

source https://hackaday.com/2020/09/11/game-boy-plays-forever/

Arduino Takes Control of Dead Business Card Cutter

It’s a common enough situation, that when an older piece of equipment dies, and nobody wants to spend the money to repair it. Why fix the old one, when the newer version with all the latest bells and whistles isn’t much more expensive? We all understand the decision from a business standpoint, but as hackers, it always feels a bit wrong.

Which is exactly why [tommycoolman] decided to rebuild the office’s recently deceased Duplo CC-330 heavy duty business card cutter. It sounds like nobody really knows what happened to the machine in the first place, but since the majority of the internals were cooked, some kind of power surge seems likely. Whatever the reason, almost none of the original electronics were reused. From the buttons on the front panel to the motor drivers, everything has been implemented from scratch.

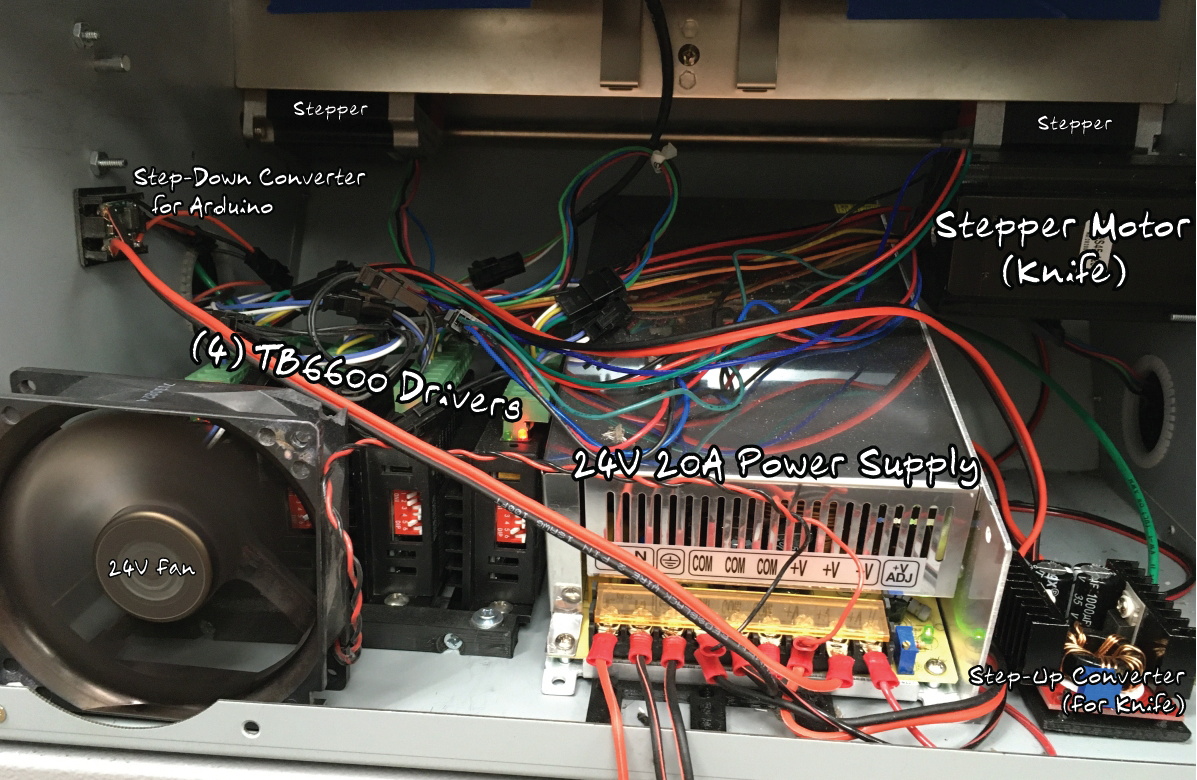
An Arduino Mega 2560 clone is used to control four TB6600 stepper motor drivers, with a common OLED display module installed where the original display went. The keypad next to the screen has been replaced with 10 arcade-style buttons soldered to a scrap of perfboard, though in the end [tommycoolman] covers them with a very professional looking printed vinyl sheet. There’s also a 24 V power supply onboard, with the expected assortment of step up and step down converters necessary to feed the various electronics their intended voltages.

In the end, [tommycoolman] estimates it took about $200 and 30 hours of work to get the card cutter up and running again. The argument could be made that the value of his time needs to be factored into the repair bill as well, but even still, it sounds like a bargain to us; these machines have a four-figure price tag on them when new.

Stories like this one are important reminders of the all wondrous things you can find hiding in the trash. Any time a machine like this can be rescued from the junkyard, it’s an accomplishment worthy of praise in our book.

source https://hackaday.com/2020/09/10/arduino-takes-control-of-dead-business-card-cutter/

Arduino Takes Control of Dead Business Card Cutter

It’s a common enough situation, that when an older piece of equipment dies, and nobody wants to spend the money to repair it. Why fix the old one, when the newer version with all the latest bells and whistles isn’t much more expensive? We all understand the decision from a business standpoint, but as hackers, it always feels a bit wrong.

Which is exactly why [tommycoolman] decided to rebuild the office’s recently deceased Duplo CC-330 heavy duty business card cutter. It sounds like nobody really knows what happened to the machine in the first place, but since the majority of the internals were cooked, some kind of power surge seems likely. Whatever the reason, almost none of the original electronics were reused. From the buttons on the front panel to the motor drivers, everything has been implemented from scratch.

An Arduino Mega 2560 clone is used to control four TB6600 stepper motor drivers, with a common OLED display module installed where the original display went. The keypad next to the screen has been replaced with 10 arcade-style buttons soldered to a scrap of perfboard, though in the end [tommycoolman] covers them with a very professional looking printed vinyl sheet. There’s also a 24 V power supply onboard, with the expected assortment of step up and step down converters necessary to feed the various electronics their intended voltages.

In the end, [tommycoolman] estimates it took about $200 and 30 hours of work to get the card cutter up and running again. The argument could be made that the value of his time needs to be factored into the repair bill as well, but even still, it sounds like a bargain to us; these machines have a four-figure price tag on them when new.

Stories like this one are important reminders of the all wondrous things you can find hiding in the trash. Any time a machine like this can be rescued from the junkyard, it’s an accomplishment worthy of praise in our book.

source https://hackaday.com/2020/09/10/arduino-takes-control-of-dead-business-card-cutter/

ISS Ham Radio Repeater

There is a long history of spacecraft carrying ham radio gear, as the Space Shuttle, Mir, and the ISS have all had hams aboard with gear capable of talking to the Earth. However, this month, the ISS started operating an FM repeater that isn’t too dissimilar from a terrestrial repeater. You can see [TechMinds] video on the repeater, below.

The repeater has a 2 meter uplink and a 70 centimeter downlink. While you can use a garden variety dual-band ham transceiver to use the repeater, you’ll probably need a special antenna along with special operating techniques.

One of the problems you’ll find is that ISS moves fast enough that you will observe doppler shift in the frequencies. The video reproduces a table of frequencies you may have to move through to receive the shifting signal.

You can probably hear the ISS with a good pass with no special equipment, but [TechMinds] wasn’t able to close an actual contact in the video. But [K0LWC] got really close using a pretty standard radio setup, as you can see in the second video.

The ISS has been on the air with digital repeaters and conventional FM radio for some time. The antenna you need doesn’t have to be a huge disk. We’ve seen it done with a handheld beam antenna and a handheld radio.

source https://hackaday.com/2020/09/10/iss-ham-radio-repeater/

Reverse Engineering a Module from a Vacuum Tube Computer

It’s best to admit upfront that vacuum tubes can be baffling to some of the younger generation of engineers. Yes, we get how electron flow from cathode to anode can be controlled with a grid, and how that can be used to amplify and control current. But there are still some things that just don’t always to click when looking at a schematic for a tube circuit. Maybe we just grew up at the wrong time.

Someone who’s clearly not old enough to have ridden the first wave of electronics but still seems to have mastered the concepts of thermionic emission is [Usagi Electric], who has been doing some great work on reverse engineering modules from old vacuum tube computers. The video below focuses on a two-tube pluggable module from an IBM 650, a machine that dates clear back to 1954. The eBay find was nothing more than two tube sockets and a pair of resistors joined to a plug by a hoop of metal. With almost nothing to go on, [Usagi] was still able to figure out what tubes would have gone in the sockets — the nine-pin socket was a big clue — and determine that the module was likely a dual NAND gate. To test his theory, [Usagi] took some liberties with the original voltages used by IBM and built a breakout PCB. It’s an interesting mix of technologies, but he was able to walk through the truth table and confirm that his module is a dual NAND gate.

The video is a bit long but it’s chock full of tidbits that really help clear up how tubes work. Along with some help from this article about how triodes work, this will put you on the path to thermionic enlightenment.

source https://hackaday.com/2020/09/10/reverse-engineering-a-module-from-a-vacuum-tube-computer/

Surfboard LED Strips Light Up The Waves

Surfing is an activity predominantly enjoyed during the day, primarily for reasons of warmth and water safety. Of course, if you prefer to carve the waves at night, you might enjoy the latest project from [Moritz Sivers] – a surfboard kitted out with motion-reactive LEDs.

The build consists of a regular surfboard, with a channel cut around the perimeter into which WS2812B LED strips are glued. Powered by a lithium rechargable battery, commands are given by an Arduino Nano hooked up to a MPU6050 3-axis gyroscope. This allows the Arduino to change the light patterns based on the movement of the board. Left and right turns, pumping the board, and surfing down a wave all come with their own animations.

It’s a fun twist on night surfing, and makes it easier to spot a downed surfer, too. It’s a build we expect to see recreated in a high-end 4K surf film before the year is out. Of course, if you just need to know if the conditions are right before you head out, this surf weather station might be just the build for you. Video after the break.

source https://hackaday.com/2020/09/10/surfboard-led-strips-light-up-the-waves/

Garbage Can Takes Itself Out

Home automation is a fine goal but typically remains confined to lights, blinds, and other things that are relatively stationary and/or electrical in nature. There is a challenge there to be certain, but to really step up your home automation game you’ll need to think outside the box. This automated garbage can that can take itself out, for example, has all the home automation street cred you’d ever need.

The garbage can moves itself by means of a scooter wheel which has a hub motor inside and is powered by a lithium battery, but the real genius of this project is the electronics controlling everything. A Raspberry Pi Zero W is at the center of the build which controls the motor via a driver board and also receives instructions on when to wheel the garbage can out to the curb from an Nvidia Jetson board. That board is needed because the creator, [Ahad Cove], didn’t want to be bothered to tell his garbage can to take itself out or even schedule it. He instead used machine learning to detect when the garbage truck was headed down the street and instruct the garbage can to roll itself out then.

The only other thing to tie this build together was to get the garage door to open automatically for the garbage can. Luckily, [Ahad]’s garage door opener was already equipped with WiFi and had an available app, unbeknownst to him, which made this a surprisingly easy part of the build. If you have a more rudimentary garage door opener, though, there are plenty of options available to get it on the internets.

source https://hackaday.com/2020/09/10/garbage-can-takes-itself-out/

Cell Phone Signal Booster Gets Teardown and Demo

Ever wonder what was inside a cell phone booster, or what it is like to set up or use one? If so, [Kerry Wong]’s got you covered with his teardown of a Cel-Fi Go X Cell Signal Booster by Nextivity. [Kerry] isn’t just ripping apart a cheap unit for laughs; his house has very poor reception and this unit was a carefully-researched, genuine investment in better 4G connectivity.

The whole setup consists of three different pieces: the amplifier unit pictured above, and two antennas. One is an omnidirectional dome antenna for indoors, and the other is a directional log-periodic dipole array (LPDA) antenna for outdoors. Mobile phones connect to the indoor antenna, and the outdoor antenna connects to the distant cell tower. The amplifier unit uses a Bluetooth connection and an app on the mobile phone to manage settings and actively monitor the device, which works well but bizarrely doesn’t seem to employ any kind of password protection or access control whatsoever.

Overall [Kerry] is happy, and reports that his mobile phone enjoys a solid connection throughout his house, something that was simply not possible before. Watch a hands-on of the teardown along with a short demonstration in the video embedded below.

Devices that claim to enhance or boost wireless signals of various kinds seem to attract more than their share of snake oil salesmen, but [Kerry]’s teardown reminds us there are legit hardware offerings (albeit ones with imperfect management app design.) There is also junk out there, like this antenna that was outperformed by a literal rusty nail.

source https://hackaday.com/2020/09/10/cell-phone-signal-booster-gets-teardown-and-demo/

New Zealand to Test Wireless Power Transmission

Nikola Tesla wanted to beam power without wires. NASA talked about building power-generating satellites that would do the same thing. But now New Zealand’s second-largest power utility — Powerco — is working with a start-up company to beam energy to remote locations. There have been several news releases, but possibly the most technical detail is from an interview [Loz Blain] did with the founder of the startup company.

It isn’t really news that you can send radio waves somewhere and convert the signal back into power. Every antenna does that routinely. The question is how efficient is the power transmission and — when the power levels are high — how safe is it? According to [Greg Kushnir], the founder of Emrod, the technology is about 70% efficient and uses ISM frequencies.

According to [Kushnir], the technology relies on metamaterials that are very efficient and a beam that sends all the power to the receiver, possibly through some passive relay stations [Kushnir] claims are like lenses and nearly lossless. Reading between the lines, it sounds like a modern take on the MASER with very good receiving antennas.

The relay antennas allow you to send power beyond your line of sight. Apparently, the power density is not enough to be very harmful if you intersect the beam for brief times, but a laser sensor can stop some part of the energy flow if something obstructs the beam.

Is it real? We don’t doubt it is possible. Their existing prototype sends a few watts about 40 meters, which is not a big deal. The new system will transmit “a few kilowatts” for a longer distance. The real question is can you safely operate at power levels that make economic sense based on actual efficiency. Honestly, 70% isn’t that great and even that sounds like it would be difficult to achieve over a long distance. But Powerco must see some promise in the technology, so we’ll wait and see how it goes.

Based on a tower we saw in Milford, Texas, we think Tesla had a different method in mind. We did recently see a Tesla coil-powered bike, though.

source https://hackaday.com/2020/09/10/new-zealand-to-test-wireless-power-transmission/

A Real Working Lego NES

Lego is an entry into the world of engineering for many a youngster, and an enjoyable pursuit for many more. These days, high quality kits are available to make everything from the Tower of Pisa to Nintendo’s venerated NES console. [TronicsFix] picked up the latter set, and decided it needed to be fully functional.

Consisting of 2646 pieces, the official Lego NES is a faithful recreation of the original, albeit at approximately 80% of the size. After building the kit to spec, [TronicsFix] noted that there was no way a cartridge would fit in the slot.

Given this failing, a ground-up rebuild was in order. Starting with the internals from an original NES, [TronicsFix] set about building an appropriately sized base and working from there. Supports were built to mount the various components, with the controller ports being particularly well done, and the video output and power switches being a little more tricky. The many cosmetic pieces from the official kit came in handy here, giving the final product the aesthetic touches it needed to fit the bill.

The final result is an authentic, functional NES in a LEGO case. [TronicsFix] demonstrates as such, showing the console playing Super Mario 3. Nintendo consoles remain a favorite amongst modders; some going so far as to build fire-breathing creations. Video after the break.

[Thanks to Mark for the tip!]

source https://hackaday.com/2020/09/09/a-real-working-lego-nes/

Digital Pregnancy Tests Use LEDs to Read Between the Lines

[Foone] saw a tweet a few weeks ago alleging that digital pregnancy tests are a rip-off. Regular, cheap tests have an absorbent strip running the length of the plastic, with one end exposed for collecting urine. A few excruciating minutes later, a little plastic window in the middle will show one line, two lines, or a plus or minus sign depending on the presence of human chorionic gonadotropin (HCG) in the urine.

As it turns out, at least two digital tests out there are the exact same thing, but with more steps. Instead of a window, they include circuitry that interprets the lines and publishes the result to a little screen in plain English. It can even tell you if you’re doing it wrong by flashing a little RTFM icon.

[Foone]’s teardown reveals a CR1616 coin cell, an 8-bit microcontroller, and a little phototransistor setup that shines LEDs on the strip and reads the incoming light. Unfortunately, the micro is the mask ROM version, so [Foone] can’t reprogram it to run Doom.

The original tweet’s author is probably not alone in assuming that digital tests are supposed to be more accurate somehow. We think the accuracy claim is more about removing the frazzled and/or incompetent human variable from the equation. If the test interprets the results for you, then there’s no mistaking the results, which is technically a higher degree of accuracy. But if you’re in doubt, you get a test from a doctor.

There’s been some discussion about the e-waste aspect of these all these tests — that it’s a shame to produce a microcontroller just to pee on it and throw it away. Sure, you could look at it that way, but unlike a lot of e-waste, these are tools. It’s unfortunate that this is the industry’s idea of higher accuracy, but what should we expect? It’s just testing for the presence of a hormone in urine. Interpreting the results is up to the viewer. We should probably be astounded that they got the cost down to two for $7.

Many people choose to wait a while to start spreading the news. With a Bluetooth-enabled pregnancy test, everyone can find out together.

Thanks for the tip, [Jay]!

source https://hackaday.com/2020/09/09/digital-pregnancy-tests-use-leds-to-read-between-the-lines/

Digital Pregnancy Tests Use LEDs to Read Between the Lines

[Foone] saw a tweet a few weeks ago alleging that digital pregnancy tests are a rip-off. Regular, cheap tests have an absorbent strip running the length of the plastic, with one end exposed for collecting urine. A few excruciating minutes later, a little plastic window in the middle will show one line, two lines, or a plus or minus sign depending on the presence of human chorionic gonadotropin (HCG) in the urine.

As it turns out, at least two digital tests out there are the exact same thing, but with more steps. Instead of a window, they include circuitry that interprets the lines and publishes the result to a little screen in plain English. It can even tell you if you’re doing it wrong by flashing a little RTFM icon.

[Foone]’s teardown reveals a CR1616 coin cell, an 8-bit microcontroller, and a little phototransistor setup that shines LEDs on the strip and reads the incoming light. Unfortunately, the micro is the mask ROM version, so [Foone] can’t reprogram it to run Doom.

The original tweet’s author is probably not alone in assuming that digital tests are supposed to be more accurate somehow. We think the accuracy claim is more about removing the frazzled and/or incompetent human variable from the equation. If the test interprets the results for you, then there’s no mistaking the results, which is technically a higher degree of accuracy. But if you’re in doubt, you get a test from a doctor.

There’s been some discussion about the e-waste aspect of these all these tests — that it’s a shame to produce a microcontroller just to pee on it and throw it away. Sure, you could look at it that way, but unlike a lot of e-waste, these are tools. It’s unfortunate that this is the industry’s idea of higher accuracy, but what should we expect? It’s just testing for the presence of a hormone in urine. Interpreting the results is up to the viewer. We should probably be astounded that they got the cost down to two for $7.

Many people choose to wait a while to start spreading the news. With a Bluetooth-enabled pregnancy test, everyone can find out together.

Thanks for the tip, [Jay]!

source https://hackaday.com/2020/09/09/digital-pregnancy-tests-use-leds-to-read-between-the-lines/

Third Time’s a Charm for This Basketball-Catching Robot

We all know that version one of a project is usually a stinker, at least in retrospect. Sure, it gets the basic idea into concrete form, but all it really does is set the stage for a version two. That’s better, but still not quite there. Version three is where the magic all comes together.

At least that’s how things transpired on [Shane Wighton]’s quest to build the perfect basketball robot. His first version was a passive backboard that redirected incoming shots based on its paraboloid shape. As cool as the math was that determined the board’s shape, it conspicuously lacked any complicated systems like motors and machine vision — you know, the fun stuff.  Version two had all these elaborations and grabbed off-target shots a lot better, but still, it had a limited working envelope.

Enter version three, seen in action in the video below. Taking a page from [Mark Rober]’s playbook, [Shane] built a wickedly overengineered CoreXY-style robot to cover his shop wall. Everything was built with the lightest possible materials to keep inertia to a minimum and ensure the target ends up in the right place as quickly as possible. [Shane] even figured out how to mount the motor that tilts the backboard on the frame rather than to the carriage. A Kinect does depth-detection duty on the incoming ball — or the builder’s head — and drains pretty much every shot it can reach.

[Shane] has been doing some great work automating away the jobs of pro athletes. In addition to basketball, he has tackled both golf and baseball, bringing explosive power to each. We’re looking forward to versions two and three on both of those builds as well.

source https://hackaday.com/2020/09/09/third-times-a-charm-for-this-basketball-catching-robot/

Wooden Tank’s Movement Hinges on Hinges

When we first looked at this tank, we thought it was pretty cool. The sides are unpainted 1/2″ (12mm) plywood, so it is not flashy. The dimensions came from Google-fu-ing the heck out of the WWII Hetzer and scaling them to 1:6. What knocks our socks off is how much [Bret Tallent] made use of parts you would find in a hardware store or bicycle shop. He uses twin motors from electric bikes, and the wheels look like replacement shopping cart wheels. The best part is the treads, which are dozens of hinges fastened with pairs of bolts and nylon-insert nuts. Something is reassuring about knowing that a repair to your baby is no further than a bike ride.

We don’t know what started [Bret] on his path to sidewalk superiority, but we suspect he is cooped up like the rest of us and looking to express himself. Mini-Hetzer is not licensed by Power Wheels and never will be, so it probably won’t turn into a business anytime soon. There is a complete gallery starting with an empty plywood base, and the pictures tell the story of how this yard Jäger got to this point. There are plans to add a paintball gun and streaming video, so we’d advise that you don’t mess with the jack-o-lanterns on his block this year. Give his gallery a view and see if you don’t become inspired to cobble something clever from the hardware store too. Then, tell us about it.

Another creative hacker used wood for their tank body and the treads as well. If you like your treaded vehicles functional, we have one meant to taxi small planes over the tarmac.

source https://hackaday.com/2020/09/09/wooden-tanks-movement-hinges-on-hinges/

Tesla Coil Electric Bikes is Wireless

Electric bikes, and really all electric vehicles, have one major downside: the weight and cost of batteries. Even with lithium, battery packs for ebikes can easily weigh more than the bike itself and cost almost as much. But having to deal with this shortcoming could be a thing of the past thanks to [LightningOnDemand]’s recent creation. Of course, this would rely on a vast infrastructure of Tesla coils since that’s how this bike receives the power it needs to run its electric motor.

The Tesla coil used for the demonstration is no slouch, either. It’s part of the Nevada Lightning Laboratory and can pack a serious punch (PDF warning). To receive the electrical energy from the coil, the bike (actually a tricycle) uses a metal “umbrella” of sorts which then sends the energy to the electric motor. The bike drags a chain behind itself in order to have a ground point for the electricity to complete its circuit. There is limited range, though, and the Tesla coil will start ionizing paths to the ground if the bike travels too far away.

While we can’t realistically expect Tesla’s idea of worldwide, free, wireless electricity to power our bicycles anytime soon, it is interesting to see his work proven out, even if its on a small scale like this. Of course, it doesn’t take a research laboratory to start working with Tesla coils. This one is built out of common household parts and still gets the voltages required to create the signature effects of a Tesla coil.

Thanks to [Adam] for the tip!

source https://hackaday.com/2020/09/09/tesla-coil-electric-bikes-is-wireless/

Paper Keyboard is Self-Powered

Building a keyboard isn’t a big project these days. Controller chips and boards are readily available, switches are easy to find, and a 3D printer can do a lot of what used to be the hard parts. But engineers at Purdue have printed a self-powered Bluetooth keyboard on an ordinary sheet of paper. You can see videos of the keyboards at work below.

The keyboards work by coating paper with a highly fluorinated coating that repels water, oil, and dust. Special inks print triboelectric circuits so that pressing your finger on a particular part of the paper generates electricity. We were skeptical that the Bluetooth part is self-powered, although maybe it is possible if you have some very low-power electronics or you manage the power generated very carefully.

Conductive nanoparticles are involved and — supposedly — they keyboards cost less than $0.25 to print. We presume that is after the fixed costs of setting everything up.

What would you use this for? It seems like paper isn’t going to be a good choice for long-term durable goods like laptops or cell phones. We can imagine a deli menu with buttons on it, perhaps, but it seems like it will be a while before that’s truly practical.

Still, if it is as robust as it looks, it should be interesting for something. We just aren’t sure what yet. Triboelectricity from key strikes probably isn’t going to run much electronics for very long, but it is fine for energizing some wires for a keypress. This isn’t the first paper generator we’ve seen, oddly enough.

source https://hackaday.com/2020/09/09/paper-keyboard-is-self-powered/

LEGO Delivers Corvette Experience on a Budget

Many dream of tooling around in a high performance sports car, but the cost of owning, maintaining, and insuring one of them make it a difficult proposition. While this LEGO version of the Corvette ZR1 might not be exactly like the real thing, it’s 4-speed manual and electronic gauge cluster can give you a taste of the supercar lifestyle without having to taken out a second mortgage.

Working through the gears.

Built by [HyperBlue], this desktop speedster has more going on under the hood (or more accurately, the roof) than you might expect. While it looks pretty unassuming from the outside, once the top is lifted, you can see all the additional components that have been packed in to motorize it. The functional gearbox takes up almost the entire interior of the car, but it’s not like you were going to be able to fit in there anyway.

But the motorized car is really only half of the project. [HyperBlue] has built a chassis dynamometer for his plastic ride that not only allows you to “start” the engine with realistic sights and sounds (recorded from an actual GM LT1 V8 engine), but put the mini ‘Vette through its paces. With a virtual dashboard powered by the Raspberry Pi, you can see various stats about the vehicle such as throttle position, RPM, and calculated scale speed; providing a real-world demonstration of how the transmission operates.

While a LEGO sports car might not be quite as exciting as getting yourself a real project car, there’s something to be said for being able to rebuild your transmission without getting your hands dirty.

source https://hackaday.com/2020/09/08/lego-delivers-corvette-experience-on-a-budget/

LEGO Delivers Corvette Experience on a Budget

Many dream of tooling around in a high performance sports car, but the cost of owning, maintaining, and insuring one of them make it a difficult proposition. While this LEGO version of the Corvette ZR1 might not be exactly like the real thing, it’s 4-speed manual and electronic gauge cluster can give you a taste of the supercar lifestyle without having to taken out a second mortgage.

Working through the gears.

Built by [HyperBlue], this desktop speedster has more going on under the hood (or more accurately, the roof) than you might expect. While it looks pretty unassuming from the outside, once the top is lifted, you can see all the additional components that have been packed in to motorize it. The functional gearbox takes up almost the entire interior of the car, but it’s not like you were going to be able to fit in there anyway.

But the motorized car is really only half of the project. [HyperBlue] has built a chassis dynamometer for his plastic ride that not only allows you to “start” the engine with realistic sights and sounds (recorded from an actual GM LT1 V8 engine), but put the mini ‘Vette through its paces. With a virtual dashboard powered by the Raspberry Pi, you can see various stats about the vehicle such as throttle position, RPM, and calculated scale speed; providing a real-world demonstration of how the transmission operates.

While a LEGO sports car might not be quite as exciting as getting yourself a real project car, there’s something to be said for being able to rebuild your transmission without getting your hands dirty.

source https://hackaday.com/2020/09/08/lego-delivers-corvette-experience-on-a-budget/