
Yearly Archives: 2019
Electric Dreams Help Cows Survive The Desert Of The Real
Pictures of a cow wearing a pair of comically oversized virtual reality goggles recently spread like wildfire over social media, and even the major news outlets eventually picked it up. Why not? Nobody wants to read about geopolitical turmoil over the holidays, and this story was precisely the sort of lighthearted “news” people would, if you can forgive the pun, gobble up.
But since you’re reading Hackaday, these images probably left you with more questions than answers. Who made the hardware, what software is it running, and of course, why does a cow need VR? Unfortunately, the answers to the more technical questions aren’t exactly forthcoming. Even tracking the story back to the official press release from the Ministry of Agriculture and Food of the Moscow Region doesn’t tell us much more than we can gather from the image itself.
But it does at least explain why somebody went through the trouble of making a custom bovine VR rig: calm cows produce more milk. These VR goggles, should they pass their testing and actually be adopted by the Russian dairy industry, will be the newest addition to a list of cow-calming hardware devices that farmers have been using for decades to get the most out of their herds.
Presented in Cattle-Vision
The press release claims that the VR goggles were modified from commercially available hardware to take into account the shape and size of a cow’s head, but there’s no word of which product served as the basis for the experiment. Given the massive size of the goggles in relation to the cow’s human handler though, it’s safe to assume that whatever headset was used is being completely obscured by the obviously custom enclosure.
 That said, because we can see no obvious cables coming from the headset, it’s possible researchers using some variant of the phone-based VR goggles that were all the rage after the release of Google Cardboard. We’ve noticed that excitement over these simple gadgets has waned significantly in the last year or so, but here the idea makes perfect sense. If you’re looking to outfit whole herds of animals with this technology, a basic plastic enclosure that holds a cheap Android device makes perfect sense.
One also has to wonder what sort of optics are required to fool a cow into thinking they’re looking at a real pasture. Like many prey animals, a cow’s binocular vision is minimal when compared to human vision. In other words, they have limited depth perception when looking directly ahead. In fact, it’s said that cows have trouble discerning shadows from actual holes in the ground, and will avoid walking over them. On the other hand, they have excellent panoramic vision which allows them to see nearly 360 degrees without having to move their heads.
Accordingly, it seems there would be little need for the sort of stereoscopic optics used in even low-cost VR headsets. A more likely arrangement would perhaps be a large-format phone (or small tablet) behind a Fresnel lens that would expand the image to fill the cow’s field of view. Since the goggles don’t appear to wrap around the cow’s head it seems unlikely it could provide much more than a 180 degree view for the animal, but that may still be enough to achieve the desired effect.
Adding a New Dimension
It might seem like this technology is a stretch, but one could argue that it’s simply the logical evolution of what dairy farmers have already been doing for decades. For nearly as long as humans have been keeping cows domestically, it’s been known that they seem to enjoy listening to music. In the early days farmers would actually play instruments for their herds, but as technology improved, they installed loudspeakers and piped in recorded audio.
In an oft-referenced 2001 study, psychologists from the University of Leicester observed a 3% increase in milk production in cows that were exposed to slow, relaxing music during the day. That might not seem like a lot on a small scale, but when multiplied by thousands of cows, it’s certainly worth the cost of a few speakers. The science behind this is still not fully understood, and the psychologists explained the experiment was designed primarily to fact-check the anecdotal claims of farmers who were already serenading their animals.

The general consensus is that nervous and agitated cows produce less milk, so anything that can calm them down should result in a noticeable increase in yield. Some even claim the taste of the milk is improved when the animal is more relaxed, but there’s even less science to back up that idea.
Given this, the idea that providing the cows with visual stimulation to go along with the music that many farmers are already playing for them doesn’t seem completely unreasonable. The press release claims that researchers have already found wearing the VR headset seems to improve the cow’s general mood. In the future, a more comprehensive study will be performed to see how much it actually increases milk production over existing techniques.
Life Imitates Art
Even so, it’s hard to look at this experiment and not see it as needlessly complex. After all, humans have been managing to coax milk out of cows for all of recorded history without any video game trickery. But of course, the demands of modern farming are quite a bit different than the idyllic mental images most of us have. If you’re picturing something that looks like what they put on the carton: a handful of cows meandering around a wide-open pasture, complete with grain silos and a windmill in the background; the reality of a high-yield dairy farm might come as something of a shock.

It could be that providing the cows with a vision of a somewhat less dystopian environment might make life in captivity easier for them. If this sounds a bit like the plot of The Matrix, that’s because it literally is. As depressing a realization as it may be, putting cows into a virtual environment where they can forget they’re being mechanically drained of their bodily fluids in service of a technologically superior species might be the nicest thing we can do for them.
From a purely practical standpoint it seems like lining their pens with high-definition displays showing scenes from a spring meadow would make more sense than equipping each cow with an individual video system, but perhaps the simulation wouldn’t be accurate enough. Like Morpheus said, “No one can be told what the Matrix is. You have to see it for yourself.”
source https://hackaday.com/2019/12/03/electric-dreams-help-cows-survive-the-desert-of-the-real/
Chef Ramsay Shocked That Chef is Actually Cooking – Gordon Ramsay #youtubevids
r/IDOworkherelady – I Actually DO Work Here…. #youtubevids
The Open Makers Cube: Have Hack, Will Travel
Don’t bother denying it, we know your workbench is a mess. A tangled pile of wires, tools, and half-completed projects is standard decor for any hardware hacker. In fact, if you’ve got a spotless work area, we might even be a bit skeptical about your credentials in this field. But that’s not to say we wouldn’t be interested in some way of keeping the electronic detritus in check, perhaps something like the Open Makers Cube created by [technoez].
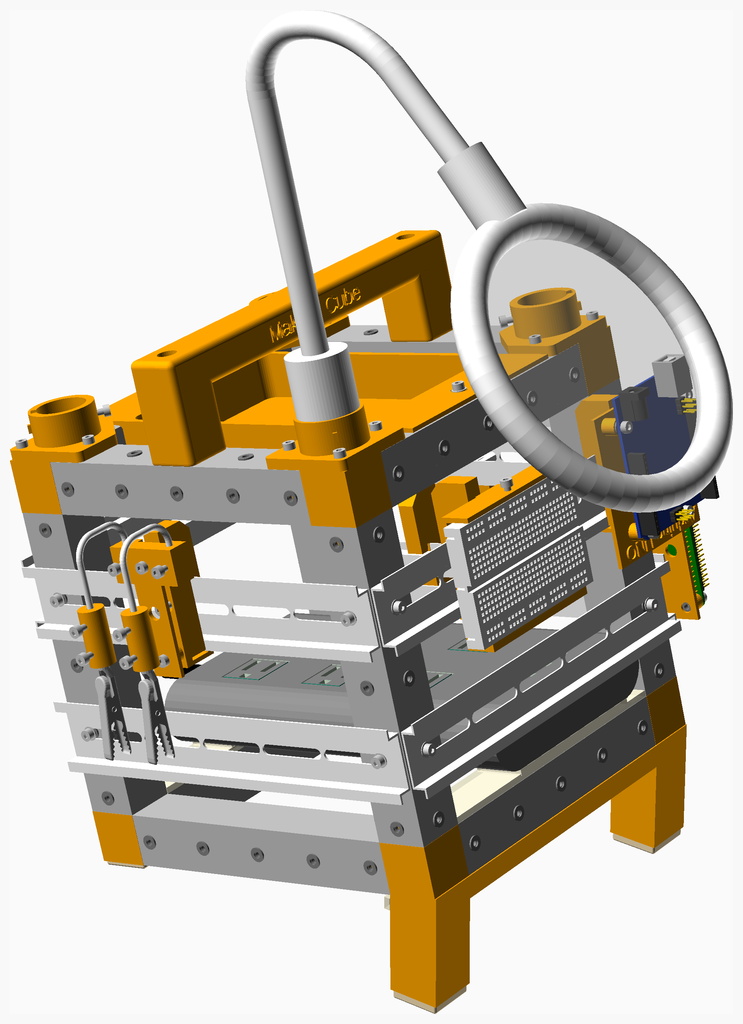 This all-in-one hardware hacking station uses DIN rails and 3D-printed mounting hardware to allow the user to attach a wide array of tools, gadgets, and boards to the outside surface where they’re easily accessible. The OpenSCAD design includes mounts for the usual suspects like the Raspberry Pi, Arduino Uno, and general purpose breadboards. Of course, your own custom mounts are just a few lines of code away.
The Cube also includes a lighted magnifying glass on a flexible arm so you can zoom in on what you’re working on, a simple “helping hands” attachment, and provisions for internal USB power. It even features angled feet so the front side of the cube is held at a more comfortable viewing angle. All of which is held together by a lightweight and portable frame built from square aluminum tubing.
We can understand if you’ve got some doubts about the idea of mounting all of your tools and projects to the side of a jaunty little cube. But even if the jury is still out on the mobile workspace concept, one thing is for sure: the Open Makers Cube is easily one of the best documented projects we’ve seen in recent memory. Thanks to NopSCADlib, [technoez] was able to generate an exploded view and Bill of Materials for each sub-assembly of the project. If you’ve ever needed proof that NopSCADlib was worth checking out, this is it.
source https://hackaday.com/2019/12/03/the-open-makers-cube-have-hack-will-travel/
Building a Mechanical Oscillator, Tesla Style
Before Tesla devised beautifully simple rotary machinery, he explored other methods of generating alternating current. One of those was the mechanical oscillator, and [Integza] had a go at replicating the device himself. (Video, embedded below the break.)
Initial attempts to reproduce the technology using 3D-printed parts were a failure. The round cylinder had issues sealing, and using O-ring seals introduced too much friction to allow the device to oscillate properly. A redesign that used external valving and a square cylinder proved more successful.
Once the oscillator was complete, the output shaft was fitted with magnets and a coil to generate electricity. After generating a disappointing 0.14 volts, [Integza] went back and had a look at the Maxwell-Faraday equations. Using this to guide the design, a new coil was produced with more turns, and the magnetic flux was maximised. With this done, the setup could generate seven volts, enough to light several LEDs.
While it’s not a particularly efficient generator, it’s a great proof-of-concept. Yes, Tesla’s invention worked, but it’s easy to see why he moved on to rotary designs when it came to real-world applications. We’ve seen [Integza] take on other builds too, like the ever-popular Tesla turbine.
source https://hackaday.com/2019/12/03/building-a-mechanical-oscillator-tesla-style/
r/idontworkherelady | Tech Karen VS Amish Shopkeepers #youtubevids
Fun With A 200-kW Fiber Laser
We’ve all heard the “Do not stare into laser with remaining eye” joke. It’s funny because it’s true, as pretty much any laser a hobbyist can easily come by permanent damage to eyes unless the proper precautions are taken. But a fiber laser with 200kW peak power is in another hazard class entirely.
Granted, outsized power ratings like this are a bit misleading, based as they are on femtosecond-long pulses. And to be sure, the fiber laser that [Marco Reps] tears down in the video below was as harmless as a kitten when he got it, thanks to its output optics having been unceremoniously shorn from the amplifier by its former owner. Reattaching the output and splicing the fiber would be necessary to get the laser lasing again, but [Marco] had other priorities in mind. He wanted to understand the operation of a fiber laser, but the tangle of fibers on two separate levels inside the chassis was somewhat inscrutable. The coils of fiber wrapped around the aluminum drums inside the chassis turned out to be the amplifier; fed by a semiconductor seed laser, the light pulse travels through the ytterbium-doped fiber of the two-stage amplifier, which is the active gain medium where stimulated emission, and therefore amplification, occurs.
With a little reverse engineering and the help of an online manual, he was able to understand the laser’s operation. A laser company helped him splice the optics back together – seeing the splicing rig in action is worth the price of admission alone – and the unit seems to be in more or less working order at this point. Normally the most powerful laser we see around here are the CO2 lasers in those cheap Chinese laser cutters, so we’re looking forward to learning more about fiber lasers.
source https://hackaday.com/2019/12/02/fun-with-a-200-kw-fiber-laser/
r/maliciouscompliance | The Most EXPENSIVE Battery in the Store? #youtubevids
The Vegan Restaurant That Charges You More If You Are a Man Goes out of Business #youtubevids
r/IDontWorkHereLady – DON’T YOU KNOW WHO I AM?! I DEMAND YOU FIRE THIS SERVER! #youtubevids
r/IDOWorkHereLady – Lady Thinks I Go To School But I’m 20 And Work At The Retail Store #youtubevids
Self-Driving Cars Are Predicting Driving Personalities
In a recent study by a team of researchers at MIT, self driving cars are being programmed to identify the social personalities of other drivers in an effort to predict their future actions and drive safer on roads.
It’s already been made evident that autonomous vehicles lack social awareness. Drivers around a car are regarded as obstacles rather than human beings, which can hinder the automata’s ability to identify motivations and intentions, potential signifiers to future actions. Because of this, self-driving cars often cause bottlenecks at four-way stops and other intersections, perhaps explaining why the majority of traffic accidents involve them getting rear-ended by impatient drivers.
The research taps into social value orientation, a concept from social psychology that classifies a person from selfish (“egoistic”) to altruistic and cooperative (“prosocial”). The system uses this classification to create real-time driving trajectories for other cars based on a small snippet of their motion. For instance, cars that merge more often are deemed as more competitive than other cars.
When testing the algorithms on tasks involving merging lanes and making unprotected left turns, the behavioral predictions were shown to improve by a factor of 25%. In a left-turn simulation, the automata was able to wait until the approaching car had a more prosocial driver.
Even outside of self-driving cars, the research could help human drivers predict the actions of other drivers around them.
Thanks [Qes] for the tip!
source https://hackaday.com/2019/12/02/self-driving-cars-are-predicting-driving-personalities/
Vintage Plotter Gets Bluetooth Upgrade
Recently [iot4c] stumbled upon this gorgeous Robotron Reiss plotter from 1989, brand-new and still in its original box. Built before the fall of the Berlin Wall in East Germany, it would be a crime to allow such a piece of computing history to go unused. But how to hook it up to a modern system? Bad enough that it uses some rather unusual connectors, but it’s about to be 2020, who wants to use wires anymore? What this piece of Cold War hardware needed was an infusion of Bluetooth.
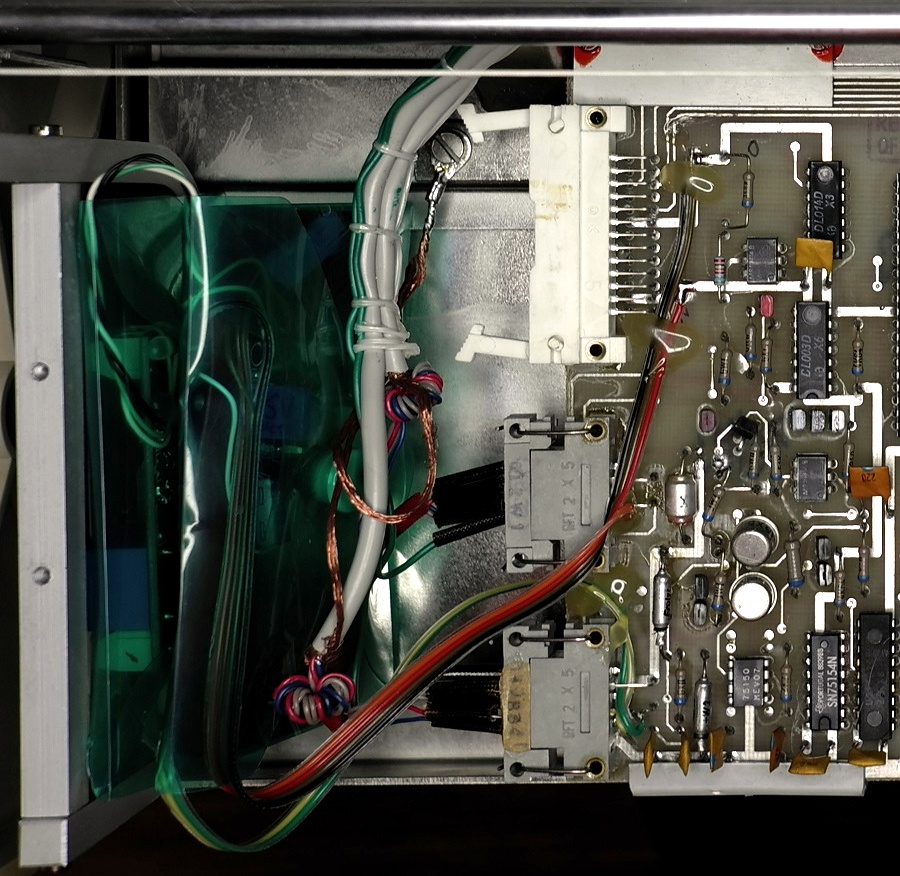 While the physical ports on the back of the Robotron certainly look rather suspect, it turns out that electrically they’re just RS-232. In practice, this means converting it over was fairly straightforward. With a Bolutek BK3231 Bluetooth module and an RS-232 to UART converter, [iot4c] was able to create a wireless adapter that works transparently on the plotter by simply connecting it to the RX and TX pins.
A small DC buck converter was necessary to provide 3.3 V for the Bluetooth adapter, but even still, there was plenty of room inside the plotter’s case to fit everything in neatly. From the outside, you’d have no idea that the hardware had ever been modified at all.
But, like always, there was a catch. While Windows had no trouble connecting to the Bluetooth device and assigning it a COM port, the 512 byte buffer on the plotter would get overwhelmed when it started receiving commands. So [iot4c] wrote a little script in Node.js that breaks the commands down into more manageable chunks and sends them off to the plotter every 0.1 seconds. With this script in place the Robotron moved under its own power for the first time in ~30 years by parsing a HP-GL file generated by Inkscape.
If you’re interested in a plotter of your own but don’t have a vintage one sitting around, never fear. We’ve seen an influx of DIY plotters recently, ranging from builds that use popsicle sticks and clothespins to customizable 3D printed workhorses.
source https://hackaday.com/2019/12/02/vintage-plotter-gets-bluetooth-upgrade/
Cooking A Turkey With 880 AA Batteries
Cooking a turkey right is serious business this time of year. With major holidays on the line, there’s no room for error – any mistake can leave guests disgruntled and starving. [Stephen Farnsworth] took a risk, though, and attempted to cook a turkey using AA batteries.
The allure of the AA for such a task is precisely because it’s such a poor choice. Designed for portability rather than high power output, it was never designed to be the energy source for a major cooking job. To get things over the line, [Steve] busted out the math to figure out how many batteries would be required. This involved computing cooking efficiencies, battery thermal performance, and the specific heat of the bird itself. With the numbers coming together a 300W slow cooker was put on duty, in order to avoid over-draining the batteries.
With 880 AAs loaded into a custom carrier, [Steve] hooked up the power meter and the cooker and kept a close eye on the temperatures. After a couple of hours, the battery pack started to heat up, so additional cooling was brought in to avoid fire. At just before the six hour mark, the turkey was cooked through and ready to eat. Estimates are that the batteries still had plenty of capacity to keep going for a few hours yet, too.
It’s not a fast or effective way to cook a turkey, but it’s certainly achievable. We fully expect [Steve] to submit the coin-cell turkey cook-off next year, too. Remember, a little engineering always helps, especially in the kitchen. Video after the break.
source https://hackaday.com/2019/12/02/cooking-a-turkey-with-880-aa-batteries/
John McMaster Explains Crypto Ignition Phone Keys and How to Reproduce Them
When you’re a nation state, secure communications are key to protecting your sovereignty and keeping your best laid plans under wraps. For the USA, this requirement led to the development of a series of secure telephony networks over the years. John McMaster found himself interested in investigating the workings of the STU-III secure telephone, and set out to replicate the secure keys used with this system.
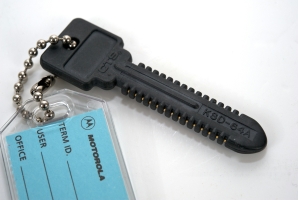
[John] had a particular affinity for the STU-III for its method of encrypting phone calls. A physical device known as a Crypto Ignition Key had to be inserted into the telephone, and turned with a satisfying clunk to enable encryption. This physical key contains digital encryption keys that, in combination with those in the telephone, are used to encrypt the call. The tactile interface gives very clear feedback to the user about securing the communication channel. Wishing to learn more, John began to research the system further and attempted to source some hardware to tinker with.
As John explains in his Hackaday Superconference talk embeded below, he was able to source a civilian-model STU-III handset but the keys proved difficult to find. As carriers of encryption keys, it’s likely that most were destroyed as per security protocol when reaching their expiry date. However, after laying his hands on a broken key, he was able to create a CAD model and produce a mechanically compatible prototype that would fit in the slot and turn correctly.
Due to the rarity of keys, destructive reverse engineering wasn’t practical, so other methods were used. Thanks to the use of the STU-III in military contexts, the keys have a National Stock Number that pointed towards parallel EEPROMs from AMD. Armed with the datasheet and X-rays of encryption keys from the Crypto Museum, it was possible to figure out a rough pinout for the key. With this information in hand, a circuit board was produced and combined with an EEPROM and a 3D print to produce a key that could replicate the functionality of the original.
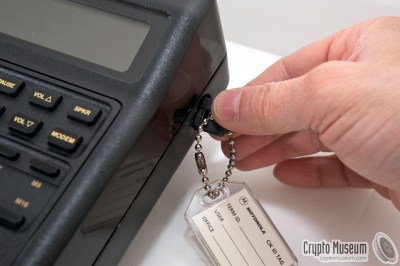
Like most projects, it didn’t work first time. The printed key had issues with the quality of the teeth and flushing of the support material, which was solved by simply removing them entirely and relying on the circuit board to index to the relevant pins. Testing was performed using a PKS-703 key reader, which itself was an incredibly rare piece of hardware. In combination with a logic analyzer, it revealed that a couple of the write pins were lined up backwards. Once this was fixed, the key worked and could be programmed with a set of encryption keys. Once inserted into the STU-III and turned, the telephone sprung to life!
Despite this success, there’s still a long way to go before John can start making secured phone calls with the STU-III. Only having one phone, he’s limited to how much he can do — ideally, a pair is needed in order to experiment further. He is also trying to make it easier for others to tinker with this hardware which involves the development of a circuit board to allow keys to be read and reprogrammed with a standard EEPROM writer. He’s also begun reverse engineering of the STU-III’s internals. As a bit of fun, John went as far as to reproduce some promotional swag from the project that spawned the STU-III, showing off his Future Secure Voice System mug and T-shirt.
Reverse engineering national security devices certainly comes with its own unique set of challenges, but John has proven he’s more than up to the task. We look forward to seeing the crypto community hack deeper into this hardware, and can’t wait to see hackers making calls over the venerable STU-III!
How To Get Into Cars – Choosing Your First Project Car
The automobile is a wonderous invention, perhaps one of the most transformative of the 20th century. They’re machines that often inspire an all-consuming passion, capturing the heart with sights, sounds, and smells. However, for those who grew up isolated from car culture, it can be difficult to know how to approach cars as a hobby. If this sounds like you, fear not – this article is a crash course into getting your feet wet in the world of horsepower.
So You Like Cars, Eh?

The first step to becoming a true gearhead is identifying your specific passion. Car culture is a broad church, and what excites one enthusiast can be boring or even repulsive to another. Oftentimes, the interest can be spawned by a fond memory of a family member’s special ride, or a trip to a motor race during childhood.
Knowing what kind of cars you like is key to your journey. You might fall in love with classic American muscle and drag racing, or always fancied yourself in the seat of a tweaked-out tuner car a la The Fast And The Furious. Movies, posters, magazines, and your local car shows are a great way to figure out what excites you about cars. Once you’ve got an idea of what you like, it’s time to start thinking about picking out your first project car.
To Craigslist And Back Again
Choosing the right project car is a process that requires careful research, realistic ambition, and emotion. Your own circumstances, taking into account your living situation, finances, and the country you live in, all feed into this decision. Weighing these factors is key to sourcing a sweet ride that you’ll actually be able to enjoy.
Once you’ve got a good idea of the type of cars you’re into, this will help you narrow down what you’re looking for. If you want to go cruising out on the sand dunes, a drop-top 4WD or even a beach buggy might be for you. If you want to soak up the sun on a twisty mountain road, you might be looking at roadsters. Or, if you want to lay down the ultimate lap times, a high-powered coupe with serious track credentials could be just the ticket. Identifying what you want to do with your car will help you choose the right model. Don’t be afraid to reach out to other enthusiasts to ask for tips! Jalopnik have long run a great series helping people choose the right vehicle, and communities like OppositeLock are always open to questions. Alternatively, head out to your local Cars and Coffee, and start chatting with the owners of the rides you like best. The nicer members of the car scene will always be glad to chat and point you in the right direction.
Now that you’ve got an idea of what you’re looking for, it’s time to consider your budget. This should take into account not just the purchase price of the car, but other fees like insurance and registration. Being that you’re an enthusiast, you’ll want some cash set aside for modifications and upgrades, too, along with basic maintenance. Getting this right can be the difference between cruising the boulevards on a sunny summer’s afternoon, versus staring out the window at your former darling as it slowly rusts away under a tarp.

Consider the condition of the vehicle you’re looking at sourcing. You can generally knock money off the purchase price for body or mechanical damage. If you’re looking to do an engine swap anyway, buying a car with a blown head gasket is a great way to save coin. On the flipside, if you want a car that looks and feels nice, purchasing a car with heavily sun-damaged paint is going to cost thousands to fix. Money can be saved by doing the work yourself, but think carefully about your abilities and circumstances. There’s no point planning to respray your own car if you live in an apartment and have to work in the street!
There are several ways to keep things affordable. Certain cars become ultra-desirable, driving their prices up. If you’re just out of college with a part time job, you’re probably not going to be able to score a Mark IV Supra to build your own tribute to Paul Walker. Similarly, marques like Ferrari and Lamborghini will be out of reach. However, other factors also come into play. Certain vehicles, such as Mustangs and Miatas, are desirable to a wide range of enthusiasts. Despite this, as they were built in such large numbers, they remain affordable on the second-hand market. This has knock-on benefits, too. The popularity of these vehicles has led to a vibrant aftermarket, making replacement parts and performance hardware both cheap and readily available. For those on limited budgets, this can make all the difference. A set of shocks for a popular muscle car like an old Camaro can be had for a couple hundred dollars. If instead, you’re riding around in a 1980s Mercedes with air suspension, you could be looking at five times as much – if you can find the parts at all.
Your country of residence feeds into this, too. Corvettes and Challengers are a viable choice in the US, with parts on the shelf in every small town in the country. Junk yards are similarly full of old wrecks to pick over. If you find yourself down in Australia however, these cars would be a far more expensive choice. If you can get such a car in the first place, you’ll find everything from brake pads to universal joints have to be special ordered in from overseas, because it’s simply not viable for local stores to keep large stocks of parts for such obscure vehicles. Instead, those in the antipodes might consider picking up a Ford Falcon or Holden Commodore to get started with. This is a story that plays out around the world. Swedes will find it far easier to source parts for Volvos, while a Japanese resident will easily lay their hands on a Skyline that would be near-unobtainable in the States.
If you’re a beginner in the automotive scene, it definitely pays to go easy on yourself by choosing a vehicle with a strong local scene. On top of cheap parts, it also allows one to draw on the rich local knowledgebase when diagnosing problems. Finding a good local car forum or Facebook group can be a huge help when you’re starting out. Plus, if you’re lucky, you’ll meet a local greybeard or two with a few parts cars tucked away in a garage somewhere.
Narrowing It Down

With the basics laid out, let’s consider an example. You’ve decided, after much pondering, that you’ve always wanted an offroad rig to tackle the trails in your local area. Lacking the knowledge to begin with, you join some local Facebook groups, and start eyeing off rides and asking questions. You’ve always been partial to Jeeps, but you want a car you can also use for the grocery run, so have a hard top in mind. Scraping the local classifieds, you’ve seen plenty of Jeep Patriots at used car lots, for fairly reasonable prices. This looks like a great way into the hobby, so you decide to post online to get some feedback before heading out.
Your post is met with a torrent of abuse and derision. Hardcore four-wheelers are laughing at you for considering a “mall-crawler”, and teenagers too young to drive are calling you a soccer mom in the comments. Thankfully, a handful of members reach out, asking a few questions about what you’re actually looking for in a car. You mention that you want to go offroad, do a little mudding, but as you’re looking for a second vehicle, your rig doesn’t have to be too nice and you’re not concerned about fuel economy.
The more helpful group members tell you that the Patriot, being a model based around front wheel drive and lacking good stock parts and aftermarket support, isn’t really the car for you. Instead, being based in the United States, they point you towards the XJ model Jeep Cherokee. With a stout 4.0 l engine, a rich community, and great aftermarket support, help and parts will always be close at hand. Plus, there’s plenty of beaters available for under a couple grand, so you won’t feel too guilty if you do end up wrecking out on the trail.
You end up doing a little more research, and with the help of your new pals, source a weather-beaten 1993 model with well-worn upholstery and plenty of charm. Being a simple car to work on with a huge fanbase, you begin to teach yourself to change the oil and coolant and do basic maintenance, and even manage to tackle the job of replacing your belts when the charging system suddenly conks out. With the help of your fellow wheelers, you slap a lift kit on and some big mud tyres, and have a great weekend wrenching while sinking a few beers. Your new rig can handle plenty of the local rough stuff, and you start eyeing off a classic CJ for your next build, just maybe!
It’s All About Community
Fundamentally, the best way to learn about cars is with the community by your side. It’s virtually a necessity too, particularly when trying to source rare parts or figure out how to diagnose strange sounds you haven’t heard before. By doing your research and learning about what’s out there before you buy, you can score yourself a great ride and begin an exciting project. Skip these steps, and you risk spending a huge wad of cash on a poorly performing lawn ornament. Good luck out there, and next time, we’ll look at what tools you’ll need when you’re starting to tinker with your new rig. Happy wrenching!
source https://hackaday.com/2019/12/02/how-to-get-into-cars-choosing-your-first-project-car/
AMSAT CubeSat Simulator Hack Chat
Join us on Wednesday, December 4th at noon Pacific for the AMSAT CubeSat Simulator Hack Chat with Alan Johnston!
For all the lip service the world’s governments pay to “space belonging to the people”, they did a pretty good job keeping access to it to themselves for the first 50 years of the Space Age. Oh sure, private-sector corporations could spend their investors’ money on lengthy approval processes and pay for a ride into space, but with a few exceptions, if you wanted your own satellite, you needed to have the resources of a nation-state.
All that began to change about 20 years ago when the CubeSat concept was born. Conceived as a way to get engineering students involved in the satellite industry, the 10 cm cube form factor that evolved has become the standard around which students, amateur radio operators, non-governmental organizations, and even private citizens have designed and flown satellites to do everything from relaying ham radio messages to monitoring the status of the environment.
But before any of that can happen, CubeSat builders need to know that their little chunk of hardware is going to do its job. That’s where Alan Johnston, a teaching professor in electrical and computer engineering at Villanova University, comes in. As a member of AMSAT, the Radio Amateur Satellite Corporation, he has built a CubeSat simulator. Built for about $300 using mostly off-the-shelf and 3D-printed parts, the simulator lets satellite builders work the bugs out of their designs before committing them to the Final Frontier.
Dr. Johnston will stop by the Hack Chat to discuss his CubeSat simulator and all things nanosatellite. Come along to learn what it takes to make sure a satellite is up to snuff, find out his motivations for getting involved in AMSAT and CubeSat testing, and what alternative uses people are finding the platform. Hint: think high-altitude ballooning.
 Our Hack Chats are live community events in the Hackaday.io Hack Chat group messaging. This week we’ll be sitting down on Wednesday, December 4 at 12:00 PM Pacific time. If time zones have got you down, we have a handy time zone converter.
Click that speech bubble to the right, and you’ll be taken directly to the Hack Chat group on Hackaday.io. You don’t have to wait until Wednesday; join whenever you want and you can see what the community is talking about.

source https://hackaday.com/2019/12/02/amsat-cubesat-simulator-hack-chat/
Winter is Coming, This Clock Will Let You Know When
For Game of Thrones fans, it’s an awkward time. The show has ended its run on HBO (not without a certain level of controversy), the planned prequel is still years away, and who knows when George R. R. Martin will actually get around to writing the final books in the series. Fans have no choice but to entertain themselves while waiting for further tales of adventure from Westeros, which is how we get things like this motorized clock from [Techarge].
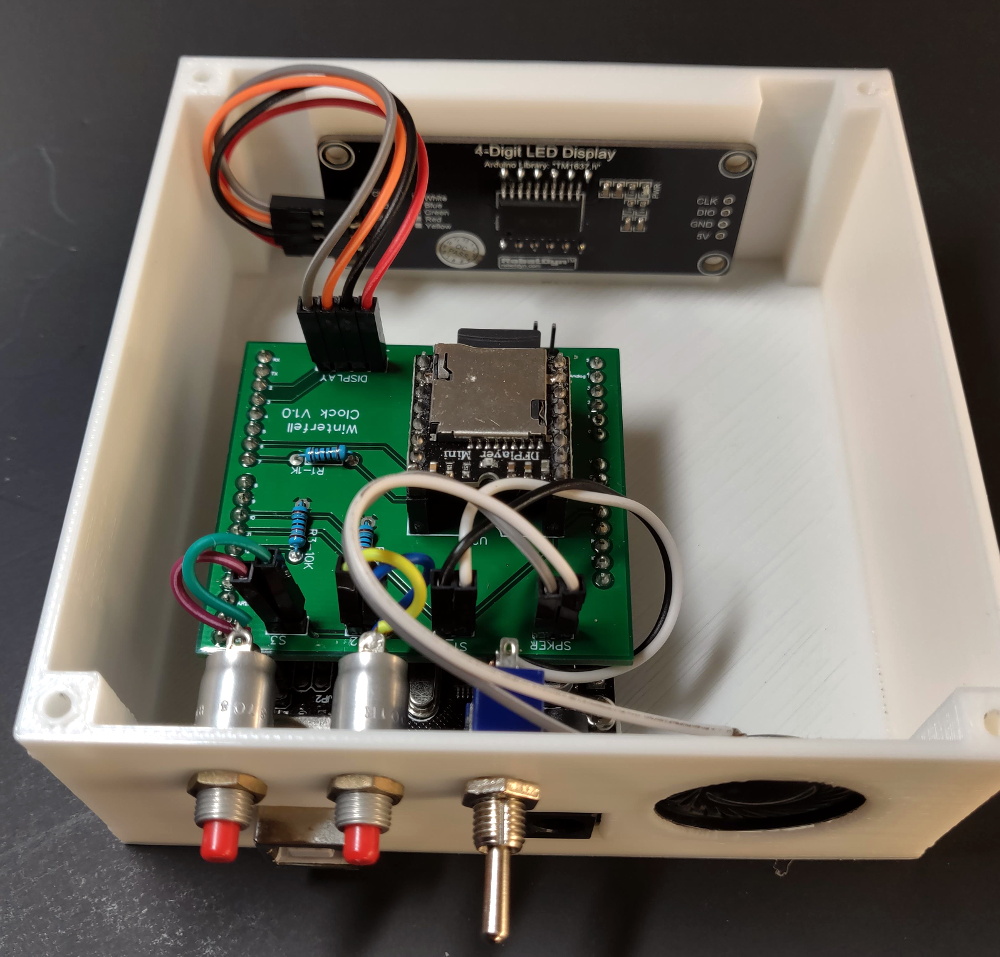 Inspired by the now iconic opening sequence from the HBO series, elements of the 3D printed model spin around while the theme song is played courtesy of a DFPlayer Mini MP3 player module and small 2 watt speaker. The audio hardware, motor, and four digit LED display module in the front are all connected to an Arduino with a custom PCB shield, giving the inside of the clock a very clean and professional appearance.
Around the back side [Techarge] has two small push buttons to set the hour and minutes, and a large toggle to control the music and movement. As of right now it needs to be switched on and off manually, but a future enhancement could see it kick on hourly. We’d also like to see an RTC module added to the PCB, or better yet, switch over to the ESP8266 and just pull the time down from NTP.
Who knows? By the time you’ve built one of these clocks for yourself, and the hand-made Iron Throne phone charger stand to go with it, maybe ol’ George will have slipped out a new book. But don’t count on it.
source https://hackaday.com/2019/12/02/winter-is-coming-this-clock-will-let-you-know-when/
Metric Vs Imperial: What Does a Carpenter Use? #youtubevids
When House Knows You’re Lying | House M.D. #youtubevids
Crazy Caller #28 – Jesus Turns Grown Men Into Helpless Children – Atheist Experience 369 #youtubevids
Our Food Isn’t That Bad
Supercon: The Things You Brought, and a Few You Forgot
Part of the fun of Supercon is that there is so much available in one place. For the price of admission, you’re surrounded by expertise, power, and soldering irons. Digi-Key brought several large parts bins stuffed full of everything from passives to LEDs to chips for people use in hacking away on their badges. But one thing that makes the whole experience really special is the stuff people bring. We don’t just mean the projects you brought to show off, we mean the stuff you bring to enhance your Supercon experience, whether it be tools, bits and bobs, or other fun stuff to play with.
This year was my first Supercon, and you never forget your first. I had a great time, and was overwhelmed by how much awesomeness was going on in one place. I wish Supercon was a simulation I could run again and again so I could listen to every talk, attend every workshop, and spend time talking to everyone about the things they brought and the cool things they’re doing with their time and badges.
 Awesome Stuff Hanging Off of People

Hanging around every neck was a Hackaday or Adafruit badge (or both!) in various stages of hacked-ness. But we want to give a shout-out to some of the other things people were wearing around like the badges of honor they are.
I was so glad that I encountered [Amy Qian] and her amazing array of flexure examples. [Amy], a mechanical engineer by day, gave a workshop on these flexible mechanisms she designed, including one that functions as a cat feeding schedule. Those lucky enough to attend got to make their own gripper mechanism out of laser-cut Delrin.
By wearing this board full of examples around the Supercon village, [Amy]’s reach extended to anyone curious enough to ask about them.
[Craig Bishop]’s big, beautiful Gameslab stopped me in my tracks, as I’m sure it did everyone who laid eyes on it. This labor of love started coming to life when [Craig] was able to source a handful of huge, expensive FPGA chips for a lot less than usual. Here are some pictures of the beautiful v1.0 guts.


Last fall, we showed you [Tim Trzepacz]’s Stylish!, a sweet little synth that looks like a cyclops with a Cheshire grin. Back then, we could only show you the render.
[Tim] originally designed this as a short run of premium swag badges for MAGWest, each in a lovely handmade wooden case, and he was walking around with one of these rare beasts clipped to his waist like a cowboy belt buckle. It was super cool just to see it in person, but then [Tim] kicked it up a notch and gave us a screamin’ demo.
A Carnival of Amazing Things
Besides the hardware being worn on a lanyard, there was a steady parade of items pulled out of backpacks, wheeled in on carts, or driven into Supercon under their own power. Some were even source from local party stores and thrift shops, performing into fantastic things I saw and/or played with.


I like big badge hacks and I cannot lie. [RobotGrrl] spent her time in the badge hacking area using everything from the swag bag poster tube to plastic utensils to six-packs of snack crackers to build a tree-planting robot driven by her Adafruit edge badge. In autonomous mode, the ‘bot will search for well-lit locales to plant its payload. Once it finds a place in the sun, the robot requests confirmation from a human, who would respond with a yes or no via Tensorflow voice commands.
Elsewhere in the Hacker Village, [Chris Gervang] was piloting a very different vehicle. After taking the logic noise synthesizer workshop hosted by [Elliot Williams] he turned the Verilog tricks he learned toward the IRDA transceiver on the badge. Of course with infrared working he wanted something to control and found that in the form of this large remote-controlled shark balloon sourced at a local party supply store. He and [Thomas Sarlandie] got to work and before long, started driving the shark around with a Supercon badge. With badge hacks like these, you’re gonna need a bigger venue.
[Josh]’s BeagleBone-based stenography keyboard will not play the theme from Jaws, unless he turns it into a MIDI device. What it will do is support a bunch of different dictionaries for different contexts thanks to an SD card slot. If it could do both, it would be the keyboard of my dreams.


To drive home a sense of the eclectic seen at every turn, check out this quartet of oddities.
LEDs, LEDs Everywhere
It seems that our love for LEDs will never dim, just burn brighter with each step forward in blinky technology. Here are just a few of the projects that lit up the balmy November nights of this year’s Supercon.


Every time I saw [Greg Davill] and his dazzling LED polyhedra, a crowd was gathered around to marvel at their complexity. Sure, [Greg] could have used pre-made LED panels, but picking and placing each one by hand is a sure route to mad respect and piles of internet points. How does he get back under the hood? The last panel attaches to the metal frame with magnets. This image is from a particularly awesome meeting of the dense LED panel minds.
[Kristin Paget]’s Pixel Flinger lit up the tents of the Hacker Village where everyone was busy pushing their badges to the limit. It’s made of a whole bunch of RGB LED panels that are networked together with six ESP8266s. These out of sync rainbows indicate some kind of a network issue that might have been caused by interference. [Kristin]’s hopes for it never dimmed, and neither did ours. Since we live in the future, she was able to throw money at the problem, and had a new router delivered directly to Supercon later that day. The router solution worked so well that [Kristin] was able to show Finding Nemo on it.

Saturday night after the Hackaday Prize ceremony concluded, it was time to get down. There were rented arcade cabinets and a DJ, but the biggest draw inside the Design Lab was the game [John McMaster] contributed — a colorful marriage of Minesweeper and DDR. Step on a tile’s lamp-style switch, and if you’re lucky, it comes up blue, green, or red. And just like the computer version, blue stands for 1, green for 2, and red for 3 (it maxes out at 3). [John] had a big bag of champagne poppers on hand for explosions.


The Stuff You Wish You’d Brought
I went around asking people what they wish they’d brought, and I have to agree with most of the answers. The number one answer centered around that great intangible resource: time. Many people wanted more time to prepare for Supercon, and basically everyone wanted much more time at Supercon.
Some people wished they had brought their current project to work on, and that’s totally relatable. After all, what better place than this gathering of great international minds is there to squash the bugs? [Joshua Vasquez] told me he wished he’d brought more screws, and the Digi-Key guys wanted a way to get extras of the more popular parts in their bins.
Some people wanted to have their own soldering iron and tools, but there is only so much luggage a person can carry. Yours truly would have packed some shorts, because that California sunshine is no joke, even in November. Now I’m back in the dreary Midwest, dreaming of next year.
source https://hackaday.com/2019/12/02/supercon-the-things-you-brought-and-a-few-you-forgot/