One of the features that made Scientific American magazine great was a column called “The Amateur Scientist.” Every month, readers were treated to experiments that could be done at home, or some scientific apparatus that could be built on the cheap. Luckily, [Ben Krasnow]’s fans remember the series and urged him to tackle a build from it: a DIY mass spectrometer. (Video, embedded below the break.)
[Ben] just released the video below showing early experiments with a copper tube contraption that was five months in the making; it turns out that analytical particle physics isn’t as easy as it sounds. The idea behind mas spectrometry is to ionize a sample, accelerate the ions as they pass through a magnetic field, and measure the deflection of the particles as a function of their mass-to-charge ratio. But as [Ben] discovered, the details of turning a simple principle into a working instrument are extremely non-trivial.
His rig uses filaments extracted from carefully crushed incandescent lamps to ionize samples of potassium iodide; applied to the filament and dried, the salt solution is ionized when the filament is heated. The stream of ions is accelerated by a high-voltage field and streamed through a narrow slit formed by two razor blades. A detector sits orthogonal to the emitter across a powerful magnetic field, with a high-gain trans-impedance amplifier connected. With old analog meters and big variacs, the whole thing has a great mad scientist vibe to it that reminds us a bit of his one-component interferometer setup.
[Ben]’s data from the potassium sample agreed with expected results, and the instrument is almost sensitive enough to discern the difference between two different isotopes of potassium. He promises upgrades to the mass spec in the future, including perhaps laser ionization of the samples. We’re looking forward to that.
As the world grapples with transitioning away from fossil fuels, engineers are hard at work to integrate new types of generation into the power grid. There’s plenty of challenges, particularly around the intermittent nature of many renewable energy sources. Energy storage projects are key to keeping the lights on round the clock, even when the wind isn’t blowing and the sun isn’t shining.
Conventional grid-level energy storage has long made use of pumped hydro installations where water is pumped uphill to a storage reservoir where it can later be used to run a generator. More recently, batteries are being used to do the job. When you consider the cost of these installations and their storage capacities, there is a gap between batteries and pumped hydro. A recently published whitepaper proposes Mountain Gravity Energy Storage — gravity-based energy storage using sand or gravel in mountainous areas — is the technology that can bridge the gap.
They’re Storing Energy On Mountains Now
A diagram of an representative example installation in Molokai Island, Hawaii.
The concept of Mountain Gravity Energy Storage, or MGES, involves storing excess energy from the grid by raising sand or gravel to a higher elevation. This is achieved using a pair of cranes, which load the material into storage containers, before pulling them up to height on a cable. The material can then be held in storage at higher elevation until power is requested by the grid. At this stage, the material can be reloaded into storage containers, and lowered to the bottom storage site, with gravity doing the work to pull the weight back down, turning a generator in the process. Interestingly, the same electric motors that lifted the gravel in the first place can also be used as the generators.
If this sounds familiar, you’d be right. It’s not dissimilar from the basic theory of pumped hydroelectric installations, where water is pumped into a dam, and then allowed to flow out through a turbine when energy is required. However, these installations are typically only economically viable in larger installations of 50 MW and above. MGES systems are intended as an option for smaller installations, on the order of 1-20 MW output. For small islands or other isolated areas, an MGES could be a great way to support the local power grid in combination with renewable sources of energy.
Can You Spare a Mountain?
A GIS data analysis was used to determine areas around the world that would be viable for MGES installations.
The viability of such an installation is dependent on the availability of suitable mountainous terrain. The higher the elevation difference between the top and bottom of the system, the more energy can be stored. An MGES would likely become viable for areas where the natural landscape enables an elevation gap of between 500-2000 meters.
Obviously, using sand or gravel as the energy storage medium brings its own set of challenges. It’s not possible to easily pump dry materials around like liquids, hence the need for cranes to move the material. Said cranes would need to be specially designed to carry heavy loads, and work reliably for high duty cycles during periods of rapid energy transfer. Loading and unloading of the sand or gravel would ideally be done with an automated system, with the paper’s authors suggesting this be handled by passing containers underneath the upper and lower storage areas. Thus, gravity could simply feed the material into the containers when required through a hopper. This adds a small loss of potential energy to the system, but minimizes the complication of the loading and unloading process.
On the other hand, pumped hydro has its own problems. One is the need for large amounts of water. Another is that storage reservoirs are prone to evaporation and freezing.
Is It Competitive?
While the basic physics of the system is sound, there are pitfalls to such a system. There’s a high degree of mechanical complexity involved, which not only complicates the design, but also adds to maintenance and running costs which could spoil the viability of a full-scale project. In large-scale electricity grids, pumped hydro is likely a more prudent choice, being an established technology that scales well to higher power levels. For smaller scale, isolated grids, MGES could have a place, but it is forced to compete with battery systems capable of delivering similar power levels. In these cases, batteries have the edge for short-term storage, while MGES could prove valuable where energy needs to be stored for weeks or months at a time. This has particular relevance to holiday spots, where there may be large seasonal changes in energy use.
If there’s a particularly bold company willing to invest in a pilot plant in a far-flung mountainous island, we may yet see such a system in action. It would likely make quite the spectacle, or eyesore, depending on your point of view. In the event that happens, we’ll be sure to cover it, but for now, MGES remains a novel and interesting concept that hasn’t quite reached fruition just yet.
As popular as the post-apocalyptic Zombie genre is, there is a quite unrealistic component to most of the stories. Well, apart from the whole “the undead roaming the Earth” thing. But where are the nerds, and where is all the apocalypse-proof, solar-powered tech? Or is it exactly this lack of tech in those stories that serves as incentive to build it in the first place? Well, maybe it doesn’t have to be the end of the world to seek for ways to cope with a collapse of our modern communication infrastructure either. Just think of natural disasters — an earthquake or hurricane causing a long-term power outage for example. The folks at [sudomesh] tackle exactly this concern with their fully open source, off-grid, solar-powered, LoRa mesh network, Disaster Radio.
The network itself is built from single nodes comprising of a battery-backed solar panel, a LoRa module, and either the ESP8266 or ESP32 for WiFi connectivity. The idea is to connect to the network with your mobile phone through WiFi, therefore eliminating any need for additional components to actually use the network, and have the nodes communicate with each other via LoRa. Admittedly, LoRa may not be your best choice for high data rates, but it is a good choice for long-range communication when cellular networks aren’t an option. And while you can built it all by yourself with everything available on [sudomesh]’s GitHub page, a TTGO ESP32 LoRa module will do as well.
If the idea itself sounds familiar, we did indeed cover similar projects like HELPER and Skrypt earlier this year, showing that LoRa really seems to be a popular go-to for off-grid communication. But well, whether we really care about modern communication and helping each other out when all hell breaks loose instead of just primevally defending our own lives is of course another question.
Another day, another retro computer lovingly restored to like-new condition by [Drygol]. This time, the subject of his attention is a Commodore 128DCR that earned every bit of the “For Parts, Not Working” condition it was listed under. From a spider infestation to a cracked power supply PCB, this computer was in quite a state. But in the end he got the three decade old machine back in working condition and even managed to teach it a few new tricks along the way.
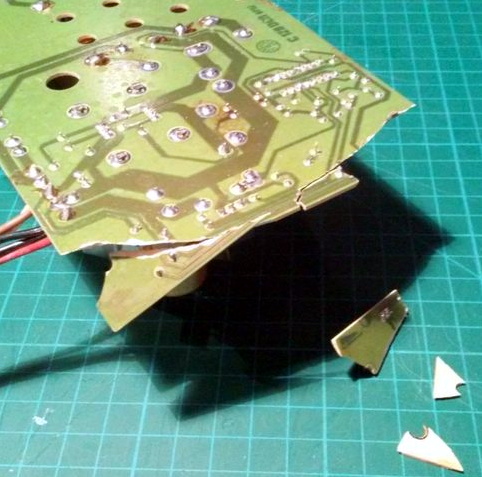
Obviously the chattered PSU was the most pressing issue with the Commodore. Interestingly, the machine still had its warranty seal in place on the back, so whatever happened to this PSU seems to have occurred without human intervention.
Rather than just replacing the PSU, [Drygol] first pieced the board back together with the help of cyanoacrylate glue, and then coated the top with an epoxy resin to give it some mechanical strength. On the back side the traces were either repaired or replaced entirely with jumper wires where the damage was too severe.
With the PSU repaired and tested, he moved on to cleaning the computer’s main board and whitening all the plastic external components. Even the individual keycaps took a bath to get them looking like new again. This put the computer in about as close to like-new condition as it could get.
But why stop there? He next installed the JiffyDOS modification to improve system performance, and wired in an adapter that lets the computer output a crisp 80 columns over S-Video. It’s safe to say this particular Commodore is in better shape now than it was when it rolled off the assembly line.
While an impressive enough final result, this is still fairly tame for [Drygol]. If you want to see a real challenge, take a look at the insane amount of work that went into recreating this smashed Atari 800XL case.
FreeCAD started out a little shaky, but it has gotten better and better. If you are trying to draw a schematic, it probably isn’t the best way to do it. However, it is a great graphical alternative to OpenSCAD for 3D printing and even incorporates OpenSCAD if you don’t want to choose. However, if you have a 3D part — regardless of how you want to create it in real life — having a proper mechanical drawing is very valuable. FreeCAD’s TechDraw workbench makes this very easy and [Joko] has a tutorial that shows exactly how to do it.
Machinists everywhere are used to looking at these drawings that typically show a top view, a front view, and a side view. The program will automatically project the views you select and then allows you to pick dimensions. It creates them and keeps them up to date if you change them in the model later.
The only things we had to remember from drafting class are which dimensions you need and which you don’t. FreeCAD just puts them where you tell it to.
If you need a mechanical drawing to show a colleague, a customer, a machine shop, or to file with a patent, FreeCAD has you covered. We didn’t try it, but you ought to be able to pull in OpenSCAD files and then create a drawing from that, as well.
FreeCAD is changing rapidly, especially if you download the latest versions. However, we did do a tutorial that will get you started. You can even send it data from KiCAD. Now if they would make a schematic workbench, we’d be very happy.
The device consists of an Arduino, a Bluetooth module, and an SD card. When it’s plugged into the target computer the device loads the selected payload from the SD card, compromising the system. Then it does its unique trick which is to switch the injector over to Bluetooth mode. Now the attacker has much more control, albeit local, over the system.
While we would never even be tempted to plug this device into a real computer, we like some of the additional features, like how an added dip switch can be used to select from up to eight different payloads depending on the required attack. The addition of a photo diode is also interesting, and makes us dream of all sorts of impractical movie hacker scenarios. [Amirreza] says it’s to trigger when the person leaves the room and turns the lights off.
[Amirreza] has all the code and design files on the GitHub. There are also a few payload examples, which should be fun to hack on. After all, one of life’s pleasures is to find new ways to mess with your friends.
Back in the early days of computing, user terminals utilized line printers for output. Naturally this took an incredible amount of paper, but it came with the advantage of creating a hard copy of everything you did. Plus it was easy to annotate the terminal output with nothing more exotic than a ballpoint pen. But once CRT displays became more common, these paper terminals (also known as teleprinters, or teletypes) quickly fell out of style.
A fan of nostalgic hacks, [Drew DeVault] recently tried to recreate the old-school teletype experience with (somewhat) more modern hardware. He picked up an Epson LX-350 line printer, and with a relatively small amount of custom code, he was able to create a fairly close approximation of what it would have been like to use one of these terminals. He’s published all the source code, so if you’ve got an old line printer and a Linux box, you too can learn what it was like to measure your work day in reams of paper.
This is made possible by the fact that the modern Linux virtual terminal is simply a userspace emulation of those physical terminals of yore. [Drew] just need to write some code that would essentially spawn a shell on the Linux USB line printer device, plus sprinkle in some quality of life improvements such as using Epson’s proprietary ANSI escape sequences to feed the paper out far enough so the user can see what it says before pulling it back in to write the next interactive line.
Building something on your own usually carries with it certain benefits, such as being in full control over what it is you are building and what it will accomplish, as well as a sense of pride when you create something that finally works just the way you want it. If you continue down that path, you may eventually start making your own tools to help build your other creations, and if you also have some CAD software you can make some very high quality tools like this belt grinder.
This build comes to us from [Emiel] aka [The Practical Engineer] who is known for his high quality solenoid engines. His metal work is above and beyond, and one thing he needed was a belt grinder. He decided to make a 3D model of one in CAD and then build it from scratch. The build video goes through his design process in Fusion 360 and then the actual build of this beast of a machine. The motor is 3.5 horsepower which, when paired with a variable frequency drive, can provide all of his belt grinding needs.
[Emiel]’s videos are always high quality, and his design process is easy to follow as well. We’re always envious of his shop as well, and it reminds us a lot of [Eric Strebel] and his famous designs.
A common sight in the world of hackerspaces is an old vending machine repurposed from hawking soda cans into a one-stop shop for Arduinos or other useful components. [Gabriel D’Espindula]’s mini vending machine may have been originally designed as an exercise for his students and may not be full sized, but we can see it or machines like it taking away some of the demand for those surplus models.
Its construction mimics that of some older 3D printers in using laser-cut ply to form the components of a box. Behind a clear lockable door are the shelves containing the products, at the back of which are continuous rotation servos that will drive the spiral Archimedes screws that eject the products. To the side is a membrane keypad and display, and the whole is drawn together with an STM32 board and an Arduino. It supports both RFID card login and keyboard login, and though it’s not finished we can see it forming the basis of a very useful system.
He’s posted the most recent progress in the form of a video that we’ve placed below the break. All the various files are available for download, so should you fancy one yourself then you have a good chance of success.
In the early 1950s, the only thing scarier than the threat of nuclear war was the annual return of polio — an easily-spread, incurable disease that causes nerve damage, paralysis, and sometimes death. At the first sign of an outbreak, public hot spots like theaters and swimming pools would close up immediately.
One of the worst polio epidemics in the United States struck in 1952, a few years into the postwar baby boom. Polio is more likely to infect children than adults, so the race to create a vaccine reached a fever pitch.
Most researchers were looking into live-virus vaccines, which had worked nicely for smallpox and rabies and become the standard approach. But Jonas Salk, a medical researcher and budding virologist, was keen on the idea of safer, killed-virus vaccines. He believed the same principle would work for polio, and he was right. Within a few years of developing his vaccine, the number of polio cases in the United States dropped from ~29,000 in 1955 to less than 6,000 in 1957. By 1979, polio had been eradicated in the US.
Jonas Salk is one of science’s folk heroes. The polio vaccine was actually his sophomore effort — he and Thomas Francis developed the first influenza vaccine in the 1940s. And he didn’t stop with polio, either. Toward the end of his life, Salk was working on an AIDS vaccine.
The Salk family L-R: Jonas, Dora, Lee, Daniel, and Herman. Image via San Diego Union-Tribune
A Doctor in the House
Jonas Salk was born in 1914 and raised in New York City. He was the oldest son of Russian-Jewish immigrants who didn’t have much money or education, but wanted the best for their children.
Salk has said in interviews that he was not interested in science as a child — he was “merely interested in things human”. The NYC polio epidemic of 1916 would have likely given Jonas an eyeful of humanity in the form of afflicted classmates with crutches and leg braces.
Jonas was a curious kid who read everything he could get his hands on. He had dreams of becoming a lawyer, but his mother wanted a doctor in the house. When Jonas was 13, he entered Townsend Harris High School, a public school for gifted students. Two years later at age 15, Jonas entered City College of New York (CCNY), where he would earn a Bachelor of Science in Chemistry. A fifteen-year-old college freshman at this competitive college was not particularly noteworthy, because many of the students there had skipped more than one grade.
After CCNY, Salk went to study medicine at NYU. It was here that he decided that although he liked medicine, he didn’t want to practice it. Salk was more interested in research. He believed he was meant to help humankind rather than treat the individual.
For thousands of years, people believed influenza, or the flu, was caused by bacteria. The influenza virus was first discovered in the early 1930s, around the time Salk entered med school. In his senior year, he had a chance to spend time in a lab that was researching influenza, and he jumped on it. Salk believed that the virus strains could be effectively destroyed and still immunize, and he was eager to test this theory. As it turns out, he was right.
Salk did postgraduate work in virology, and spent some elective time in the laboratory of his mentor, Thomas Francis. It was here that he and Francis developed the first influenza vaccine by incubating a strain of the virus in a chicken embryo, then rendering it inactive.
Salk started his residency in Francis’ lab at Mount Sinai Hospital. Within a few years, he was eager to study infectious diseases in his own lab. He wouldn’t have to wait long. A man named Harry Weaver contacted him about researching polio. Weaver was director of research at the National Foundation for Infantile Paralysis, and was in a position to offer Salk his own lab and researchers. Soon, Salk started to get grants, which he used to build up his virology laboratory.
In 1947, Salk began working on a polio vaccine. First he had to sort out all 125 known strains of the virus. As he did, he noticed they all fell into one of three basic types. A successful vaccine would have to cover all three groups to give full protection from polio. Having figured this out, his next problem was making enough vaccine to experiment with. Luckily, in 1948, a group of scientists discovered that the polio virus would multiply just fine on scraps of non-nerve tissue from human embryos, meaning that a full-blown organism like a chicken embryo was not necessary. Thanks to this discovery, Salk could iterate much more quickly.
At the same time, another researcher named Albert Sabin was working on a live-virus vaccine to be taken orally. Sabin believed that only a live, weakened virus could make the human body produce antibodies, and believed that Salk was wasting his time trying to make an effective vaccine with dead strains.
Dr. Salk injects a child with his polio vaccine. Image via The New Atlantis
The Polio Pioneers
In July 1952, Salk was ready to try out his killed-virus vaccine. His first patients were children who had already contracted polio and recovered. After vaccination, they all showed an increase in antibodies.
Then he tried the vaccine on himself, his wife, and his own children. When everyone in his family showed increased antibodies and no signs of illness, Salk knew it was time to share it with the world.
In 1953, Salk reported his results to the American Medical Association, and a massive trial was conducted the following year. One million children, known as the polio pioneers, were injected with Salk’s vaccine, and the results were incredible, with 60-70% prevention. The US wasted no time rolling out mass inoculations for children.
Unfortunately, there was an incident at one of the labs producing the vaccine. Some of the lots contained a live virus, and this mistake generated 40,000 new polio cases from the 120,000 poorly-controlled vaccines. The labs adopted higher standards and resumed production, but the incident would have a lasting impact on the pharmaceutical world. The news must have been bittersweet for Albert Sabin, who was still working on his live-virus version. Sabin completed human trials of his oral vaccine in 1957, and it was approved in 1962.
Jonas holds up bottles of the culture he used to grow the polio virus. Image via Forbes
Could You Patent the Sun?
Once his vaccine was proven effective, Salk instantly shot to rock star status, much to his dismay. All the attention took time and energy away from his research, and he regretted losing his privacy and anonymity, especially where his research was concerned. Salk received a load of honors for his vaccine, including four honorary degrees and Presidential Medal of Freedom.
In an interview with Edward R. Murrow, he was asked who owned the patent on the vaccine. Salk famously replied, “Well, the people, I would say. There is no patent. Could you patent the sun?”
Though it’s easy to believe that Salk had completely altruistic intentions and never thought to patent it himself, it has since been discovered that the National Foundation for Infantile Paralysis’ lawyers had inquired about it at some point, and were told that the vaccine wasn’t novel enough to warrant a patent. Some would argue that the public had paid for it already through programs like the March of Dimes.
The Salk Institute in La Jolla, CA. Image via Salk Institute
Giving Back: The Salk Institute
Salk was never in it for the money, and he never forgot where he came from. In 1963, he established the Salk Institute for Biological Studies in La Jolla, CA to provide a research space for scientists working toward the elimination of diseases like multiple sclerosis and cancer. The Salk Institute was the kind of place he could only dream of as a student.
Salk died of heart failure in 1995. Toward the end of his life, he had been working on vaccines for cancer, multiple sclerosis, and AIDS.
Jonas Salk had a huge impact on virology, on the United States, and on the longevity of thousands of baby boomers. The world could certainly use more scientists who follow his philosophy of helping humankind as a whole.
Advances in filaments for FDM 3D printers have come in leaps and bounds over the past few years, and carbon fibre (CF) reinforced filament is becoming a common sight. Robotics extraordinaire [James Bruton] got his hands on some CF reinforced PLA, and ended up building a completely over-engineered 3D printed skateboard. (Video, embedded below.)
[James] started by printing some test pieces with a 0.5 mm and a big 1.2 mm nozzle with and without the CF, which he subjected to cantilever deflection tests. The piece with CF was 20% stiffer than without.
[James] then built an extremely strong and cool looking skateboard deck with alternating section of the CF PLA and toughened PLA, totalling 2.7 kg of filament. It was extremely strong, so after bolting on a set of trucks and wheels, he did some mild riding at a local skate park, where it survived without any problems. He admits it was completely over-engineered, but points out in that the internal cavities in the deck is the perfect place for batteries on an electric long board.
Designing something from the ground up with the strength and weaknesses 3D printing in mind, leads to some very interesting and innovative designs, of which this is a perfect example, and we hope to see many more like it. We’ve featured a number of [James]’ project, including the remote controlled bowling ball he built for [Mark Rober] and his impressive OpenDog and Start Wars robots.