
Yearly Archives: 2019
Bring The Smithsonian Home With 3D Printing
If you’ve ever been to Washington DC, you know the Smithsonian isn’t just a building, instead it’s a collection of 19 museums, 21 libraries, 9 research centers, and a zoo. Even though there are hundreds of affiliated museums, there is a way to bring at least some of the museum to you. The Smithsonian has a 3D digitization portal that currently features 124 models of items from the collection. Almost 100 of them have models you can download and print — or have someone print for you.
Printing yourself is probably the most cost-effective option if you already have a printer. According to the Smithsonian, if you want a 1/20th scale model of a T. Rex cranium, Shapeways will do it for about $21. If you want a 9-inch version of Neil Armstrong’s spacesuit, that would go for $130 or so.
Some of the models are pretty intricate. The Apollo 11 hatch door, for example, has quite a few details. The models range from space, to the Bodhisattva Avalokiteshvara, to a model of the remnants of a supernova. There are models of the gunboat Philadelphia and a blue crab, too.
Of course, you might need to scale and support the models for printing. We also suspect many of them will look better in exotic filaments or printed. For example, the Funerary Relief Bust of Haliphat would probably benefit from some stone- or marble-like filament.
We followed project Egress, but had no idea there were so many printable models provided by the Smithsonian. If you are really wanting NASA models, you can always hit up NASA itself.
source https://hackaday.com/2019/12/09/bring-the-smithsonian-home-with-3d-printing/
Restoring a 1949 Golden Throat Radio
[Mr. Carlson] has a really beautiful old 1949-era radio to restore and you can watch him do it in a comprehensive video, below. We aren’t sure what we were more amused by: the odd speaker that looks like a ceiling air vent or the sticker on the back certifying that the radio produces the tone of the “golden throat” signed by RCA’s chief engineer.
Electrically, the radio didn’t look that remarkable. Of course, the capacitors were presumed bad and replaced. The video made us remember how much we hated restringing dial radios!
The best part about any [Mr. Carlson] video, though, is the view of his workshop. It looks like some 1955 concept of an orbital space station for one astronaut. We aren’t sure where he gets the bench space to work on things like this beautiful old radio though.
Despite the unusual speaker covering, the speaker itself looked pretty conventional. [Carlson] notes that all speakers are inherently screwdriver magnets. At the end, though, you can hear the sound coming from that speaker and it sounds great. If it’s whetted your appetite for more, this is hardly the first tube radio restoration we’ve shown you.
source https://hackaday.com/2019/12/09/restoring-a-1949-golden-throat-radio/
Drive A Plasma Ball With An ATV Ignition Coil And A 555
[Discrete Electronics Guy] sends in his short tutorial on building a high voltage power supply from simple things.
The circuit is a classic, but we love the resourcefulness shown. The ignition coil comes from a three wheeler, the primary power supply is a ATX supply from a computer and the oscillator is powered by a 9V battery. We do wonder whose vehicle stopped working though.
He gives a great explanation of how the circuit works and was constructed and then moves on to build his own Plasma bulb. Despite expecting something more complicated the end result was achieved by putting a lightbulb on a stick. Fantastic. The circuitry was nearly packaged into a takeaway food container and the entire construction was called complete.
All in all it shows what someone can accomplish if they’re resourceful and understand the basics. However, it’s probably that you don’t electroBoom yourself to death if you can avoid it.
source https://hackaday.com/2019/12/09/drive-a-plasma-ball-with-an-atv-ignition-coil-and-a-555/
Hackaday Superconference: An Analog Engineer Dives Into RF
Those of us who work with electronics will usually come to the art through a particular avenue that we master while imbibing what we need from those around it. For example, an interest in audio circuitry may branch into DSP and microcontrollers as projects become more complex. Some realms though retain an aura of impossibility, a reputation as a Dark Art, and chief among them for many people is radio frequency (RF). Radio circuitry is often surprisingly simple, yet that simplicity conceals a wealth of complexity because the medium does not behave in the orderly manner of a relatively static analogue voltage or a set of low-frequency logic levels.
Chris Gammell is a familiar face to many Hackaday readers for his mastery of much electronic trickery, so it comes as something of a surprise to find that RF has been one of the gaps in his knowledge. In his talk at the Hackaday Superconference he took us through his journey into RF work, and the result is a must-watch for anyone with a curiosity about radio circuitry who didn’t know where to start.
For readers whose introduction to electronics came through the medium of amateur radio, the talk will follow a familiar path as it deals at a simple level with the very fundamentals of how signals pass through circuitry at RF frequencies. We learn about matching and gain, and most importantly about losses between stages and how careful design can minimise them. He makes the point that advances in integrated circuits have put wireless capabilities within the range of almost any designer, and it’s worth observing that this along with a more relaxed approach to spectrum usage in most regions means that ever-higher frequencies have become the norm at which physical design becomes ever more critical.
The talk continues with his discoveries in test equipment, in PCB layout, and in the shortcomings of common components at higher frequencies. It’s a subject that we’ve touched on before in a report from a previous Superconference, as RF design guru Michael Ossmann gave us his tips.
If you’re an experimenter this shouldn’t be an area to be afraid of. The low cost of so many of the devices and modules involved mean that there is plenty of scope to give it a try without breaking the bank. At a simpler level some experience can also be gained with more traditional RF, try experimenting with TV antenna pre-amplifiers for example, something for the 70cm amateur band, or even messing about with scrap UHF TV tuners. There may be plenty of pitfalls for the unwary RF experimenter, but there is still plenty of scope for learning experiences.
source https://hackaday.com/2019/12/09/hackaday-superconference-an-analog-engineer-dives-into-rf/
Can You Piezo A Peugeot?
Car manufacturers have a problem when it comes to climate change. Among the variety of sources for extra atmospheric CO2 their products are perhaps those most in the public eye, and consequently their marketing departments are resorting to ever more desperate measures to sanctify them with a green aura. Among these are the French marque Peugeot, whose new electric version of their 208 model features in a slick video alongside a futuristic energy-harvesting billboard.
This is no ordinary billboard, nor is it a conventional wind turbine or solar array, instead it harvests ambient noise in one of the busiest parts of Paris, and turns it into electricity to charge the car with an array of piezoelectric energy capture units. This caught our eye here at Hackaday, because it seemed rather too good to be true. Is it a marketing stunt, or could you make a piezo billboard as a practical green energy device? Let’s take a closer look.
What Is Piezoelectricity Anyway?
As most readers will be aware, the pieoelectric effect is a property of some materials by which electric charge accumulates at their surface when they are deformed. In turn a piezoelectric material will also deform when an external electrical charge is applied to it.
There are a variety of piezoelectric substances commonly available including crystaline materials and polymers, and most people will encounter them in domestic applications such as speakers, buzzers, and gas lighters light like that clicky button that ignites your grill. The spark generated by those gas lighters demonstrates that the voltage created by piezoelectric materials can be surprisingly large, but they have by nature an extremely high impedance so they are not generally capable of delivering significant current. Yes, in theory they could be used to generate usable power but it does not appear to a casual observer that they would be an obvious choice. Thus the Peugeot billboard deserves some scrutiny.

We might expect that the billboard would make use of an advanced material, perhaps one of the piezoelectric polymers in a sheet with a large surface area. It’s a surprise then in the video to see that it is instead composed of a large array of the commonly available piezoelectric disk sounders that can be found in a multitude of cheap toys and musical greeting cards. They are held in an array by a lasercut sheet and each one has a small printed circuit board behind it to hold a power connector, feeding its output to another PCB that presumably contains some kind of regulator.
The use of these components really raises an eyebrow. While they will undoubtedly generate some electricity from ambient sound it is definitely not their intended use. There are several reasons for this, and they lie in both the nature of the sound they are facing and their differences from piezoelectric devices intended for energy harvesting.
Carefully-Tuned Energy Harvesting it is Not
Piezoelectric energy harvesters do exist and they can produce usable quantities of power, but to do so they must be distorted slightly, or bent. They are best suited to harvesting energy from constant vibration at a particular frequency, and will normally be chosen and mounted such that they are working close to their resonant frequency of the system they are in.
The cheap piezo sounder disks will also generate electricity if you bend them and also have a resonant frequency, but here they are not being mounted in a way that causes them to do that and are being fed what amounts to a broad spectrum of frequencies rather than a carefully tuned vibration source. Thus it’s unlikely that they are operating at anywhere close to their peak efficiency, which would not have been as high as that of the purpose-built device anyway.

The clinching moment of doubt comes in a fleeting instant of the Peugeot video itself. The whole project is extremely light on technical details, but we do have a glimpse of a block diagram that shows a connection to the city electrical grid. At this point the story becomes clear, this is not a sound-harvesting charge point but a normal mains charge point which can take some input from the sound harvesting panels. Thus it’s safe to declare it a publicity stunt rather than a serious attempt at power harvesting.
This is a shame though, because it remains an interesting project into which its creators have evidently put a significant quantity of work. We doubt that Peugeot will be publishing a full technical write-up of its design, construction, and efficiency, but we think that it wouldn’t do any harm to their image in our community at least (much the opposite, we want to see the data!). Electric cars are still a niche product that has more traction among people with a technical interest, so any of the technology surrounding them will bring plenty of readers.
If there’s a final point to be gleaned from this, it’s that there is a significant quantity of energy contained in ambient sound, so how might it be harvested? Our gut feeling from youthful experiments with high-impedance moving-iron earpieces would take us in the direction of something with a much wider audio bandwidth, but we’re not sure whether an array of surplus 1960s telephone parts would be any more efficient or appropriate than one of cheap greeting-card speakers. We’re sure you’ll have your own views, please feel free to make them known in the comments.
Open-Source Satellite Propulsion Hack Chat
Join us on Wednesday, December 11 at noon Pacific for the Open-Source Satellite Propulsion Hack Chat with Michael Bretti!
When you look back on the development history of any technology, it’s clear that the successful products eventually reach an inflection point, the boundary between when it was a niche product and when it seems everyone has one. Take 3D-printers, for instance; for years you needed to build one if you wanted one, but now you can buy them in the grocery store.
It seems like we might be getting closer to the day when satellites reach a similar inflection point. What was once the province of nations with deep pockets and military muscles to flex has become far more approachable to those of more modest means. While launching satellites is still prohibitive and will probably remain so for years to come, building them has come way, way down the curve lately, such that amateur radio operators have constellations of satellites at their disposal, small companies are looking seriously at what satellites can offer, and even STEM programs are starting to get students involved in satellite engineering.
Michael Bretti is on the leading edge of the trend toward making satellites more DIY friendly. He formed Applied Ion Systems to address one of the main problems nano-satellites face: propulsion. He is currently working on a range of open-source plasma thrusters for PocketQube satellites, a format that’s an eighth the size of the popular CubeSat format. His solid-fuel electric thrusters are intended to help these diminutive satellites keep station and stay in orbit longer than their propulsion-less cousins. And if all goes well, someday you’ll be able to buy them off-the-shelf.
Join us for the Hack Chat as Michael discusses the design of plasma thrusters, the details of his latest testing, and the challenges of creating something that needs to work in space.
 Our Hack Chats are live community events in the Hackaday.io Hack Chat group messaging. This week we’ll be sitting down on Wednesday, December 11 at 12:00 PM Pacific time. If time zones have got you down, we have a handy time zone converter.
Click that speech bubble to the right, and you’ll be taken directly to the Hack Chat group on Hackaday.io. You don’t have to wait until Wednesday; join whenever you want and you can see what the community is talking about.

source https://hackaday.com/2019/12/09/open-source-satellite-propulsion-hack-chat/
DIY Music Controllers for Raging With Machines
[Tristan Shone], aka Author & Punisher, found a way to make industrial music even heavier. This former mechanical engineer from Boston crafted his one-man band in the university fab labs of Southern California while pursing an art degree. He started machining robust custom MIDI controllers that allow him to get physical while performing, instead of hunching over tiny buttons and trying to finesse microscopic touch pad-style pitch sliders.
 Starting about ninety seconds into the video after the break, [Tristan] explains his set up and walks through each of his handmade controllers, all of which are built on Arduinos and Raspberry Pis.
Our favorite is probably Grid Iron, because it looks like the most fun. Grid Iron is a rhythm controller that works by running back and forth and side-to-side over a grid of machined textures that act like speed bumps. A spring-loaded stylus picks up the textures, and an encoder translates them to sound. Eight buttons along the 3D-printed pistol grip let [Tristan] make changes on the fly.
 Tired of twiddling tiny knobs, [Tristan] made Big Knobs, a set of three solid aluminum knobs that look to be 3-4″ in diameter. These are assigned jobs like delay and filter, and their weight combined with ball bearings allows them to spin almost indefinitely while [Tristan] injects other sounds into the mix.
[Tristan] has made a few custom microphones to make the most of his voice. One is a trachea mic made from four piezos strapped to his throat that picks up every possible vocal utterance and other guttural sounds quite nicely. The other is an 8-pack of mics built into a curved metal box. He can assign a different effect to each one and do things like turn a breathy scream into the sounds of swelling cymbals.
There are more machines not covered in the video, and you can read about those on [Tristan]’s site. In a bonus video after the break, [Tristan] discusses a trio of pneumatically-driven mask controllers he made.
Don’t have a machine shop at your disposal? Dig out that fidget spinner and get moving on your own MIDI controller.
Thanks for the tip, [saabcrow]! \m/
source https://hackaday.com/2019/12/09/diy-music-controllers-for-raging-with-machines/
My Balls – (Your Favorite Martian music video) #youtubevids
Teardown: 168-in-1 Retro Handheld Game
The holidays are upon us, and that can mean many furrowed brows trying to figure out what token gift they can give out this year as stocking-stuffers. Something that’s a bit more interesting than a coupon book or a lotto scratcher, but also affordable enough that you can buy a few of them without having to take part in that other great holiday tradition: unnecessary credit debit.

Which is how I came to possess, at least temporarily, one of these cheap handheld multi-games that are all over Amazon and eBay. The one I ordered carries the brand name Weikin, but there are dozens of identical systems available, all being sold at around the same $20 USD price point. With the outward appearance of a squat Game Boy, these systems promise to provide precisely 168 games for your mobile enjoyment, and many even include a composite video out cable and external controller for the less ambulatory classic game aficionado.
At a glance, the average Hackaday reader will probably see right through this ploy. Invariably, these devices will be using some “NES on a Chip” solution to emulate a handful of legitimate classics mixed in with enough lazy ROM hacked versions of games you almost remember to hit that oddly specific number of 168 titles. It’s nearly a foregone conclusion that at the heart of this little bundle of faux-retro gaming lies a black epoxy blob, the bane of hardware tinkerers everywhere.
Of course, there’s only one way to find out. Let’s crack open one of these budget handhelds to see what cost reduction secrets are inside. Have the designers secured their place on the Nice List? Or have we been sold the proverbial lump of coal?
A Brief Intermission
In general, I try not to present these teardowns as product reviews. It’s partially an ideological choice, but more practically, most of the gadgets I take apart simply don’t live long enough for me to actually use them as intended. But as getting permission from my significant other to take this system apart was contingent on me being able to restore it to like-new condition in time for wrapping, I’m able to give a slightly more informed than usual opinion on its operation.
The short answer is, it’s not actually that bad. The screen is bright, the buttons aren’t terrible, and on the whole it feels pretty solid. I’d go so far as to say that, given the price, I was impressed with the build quality from a user standpoint. I have no doubt that the hardware is more than worth the asking price.

As for the software, well that’s something of a mixed bag. As expected, there are a handful of games you might actually want to play included, such as all three Super Mario Bros. titles and favorites such as Contra, Adventure Island, and Spy Hunter. They’ve also wisely included NES games based on franchises that remain popular today, such as the surprisingly solid Captain America and The Avengers, and the technically impressive Batman: The Video Game.
But outside of that, the majority of the games on the system are modified into fever-dream versions of the originals, many with modern characters and themes shoehorned in.
Particular standouts include a reskinned version of Super Mario Bros. where you play as characters from Kung Fu Panda, and a bizarre side-scrolling Harry Potter shooter where you do battle against unrecognizable gremlins and what appear to be reanimated slices of bacon.
Minimal to the Extreme
Once you’ve had enough of Mr. Potters aerial escapades, the only thing standing between you and the inside of the system are a few screws on the back of the unit. Thankfully there’s no glue or clips keeping it shut, there aren’t even any wires running to the back side of the case that you need to deal with.

The first thing to note here is of course the fact that the back of the PCB is completely blank. The smooth panel is broken only by the volume knob and a the connector for the battery, which is incidentally a clone of the Nokia BL-5C, perhaps one of the most bootlegged batteries of all time. Which I suppose is good news if your marathon Super Mario Bros. 14 session demands you have a second charged battery at the ready.

Flipping the system over, we can see just how little is actually on the board. Front and center is the dreaded epoxy blob, along with a 128 Mbit S29GL128P90 NOR flash chip that obviously holds the games. The datasheet for this chip (or at least, the original it’s a clone of) are readily available, so it should be possible to read its contents and potentially replace the ROMs included on the system. On the other hand, if you’re looking to play arbitrary NES ROMs on the go, there’s certainly better and more expedient ways to do it.

It’s also worth mentioning that, just like we saw with the Quirky Egg Minder, the single sided SMD board necessitates the use of zero value resistors when the traces start getting dense. However in this case we see only a handful used; a reminder that one needs to really commit if they hope to over-engineer at the same level as the fine folks at Quirky.
The Non-Controller
This system is one of the ones that comes bundled with an external controller, and while I can’t quite fathom a scenario in which it might be useful, I’ll admit that the input device was intriguing. It’s a bit small, but I liked the buttons and it felt reasonably solid in the hand. But what really had me interested was the fact it connected to the system’s USB port. Could it actually be a USB HID device?

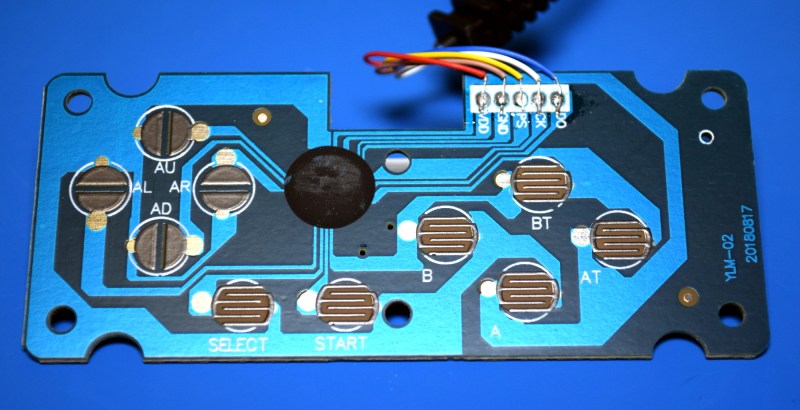
But another black blob and the wiring would seem to suggest otherwise. The trio of communication wires made me think it was using some form of SPI, but when I connected the logic analyzer to confirm this, I found all the lines dead. Indeed, the system doesn’t seem to acknowledge the presence of the controller at all, and nothing in the manual explains if there is something I have to do to actually enable it other than plugging it in. Certainly something to keep in mind if you were excited about this particular feature.
You Get What You Pay For
Beyond the fact that the controller appears to be DOA, I’d say the system ultimately lives up to its advertising. While there’s probably no more than a dozen or so “real” NES games on the system, even the ROM hacks and bootleg titles are entertaining in their own way. If for nothing else but to see the lengths that the creators went to in an attempt to convince the user that these 30+ year old games were related to modern characters and franchises. I’d be lying if I said I wasn’t impressed with the NES-ified version of Plants vs Zombies.
From a hacking standpoint though, I’m less optimistic. When I did my teardown on The Oregon Trail handheld, I thought that it had the potential to make an excellent retro-themed Raspberry Pi handheld. With this system there’s enough room inside that you could fit a Pi Zero, but honestly there’s already Game Boy styled enclosures for the Pi that do it better so there seems little point.
Fiddling with the data on the flash and trying to insert your own ROMs would be an interesting experiment, and if anyone out there wants to take on the challenge we’d certainly love to hear about it. But personally, I think this gadget is best left as-is: a $20 stocking stuffer that will probably be forgotten come New Years.
source https://hackaday.com/2019/12/09/teardown-168-in-1-retro-handheld-game/
Guitar Effect Built from an Old Record Player
With little more than a gutted record player, a light bulb, and the legendary 555 timer IC, [Jacob Ellzey] has constructed this very slick optical tremolo effect for his guitar. By modulating the volume of the input signal, the device creates the wavering effect demonstrated in the video after the break.
 The key is a vinyl record with large tabs cut out of it. As the record spins, these voids alternately block and unblock a small incandescent bulb. A common GL5537 photoresistor, mounted on the arm that originally held the player’s needle, picks up the varying light levels and passes that on to the electronics underneath the deck. An important note here is that different spacing and sizing of the cutouts will change the sound produced by the effect. [Jacob] has already produced a few different designs and plans on experimenting with more now that the electronics are completed.
Under the hood there’s a voltage divider and low gain amplifier connected to the photoresistor, and also a 555 timer circuit that’s driving the incandescent bulb. Once he was done fiddling with them, the circuit was moved to a neat little protoboard. A pair of potentiometers mounted through the side of the record player allow for adjusting the depth of the effect itself, as well as the output volume. Naturally, there’s also an external foot pedal that allows keying the effect on and off without taking your hands from the guitar.
As is usually the case, everything was going well on this project until the final moments, when [Jacob] found that the circuit and bulb were both browning out when powered from the same transformer. As a quick fix, he gutted a Keurig and used its transformer to drive the light bulb by itself. With independent power supplies, he was ready to rock.
Of course this isn’t the first time we’ve seen a piece of consumer electronics modified into a guitar effect, but if you’re looking for something a bit more built for purpose, there’s plenty of high-tech options to keep you busy.
source https://hackaday.com/2019/12/09/guitar-effect-built-from-an-old-record-player/
Conductive Tape Current Capacity Comparison
The world of DIY circuits for STEM and wearables has a few options for conductors. Wire with Dupont connectors is a standard, as is adhesive copper tape. There’s also conductive nylon/steel thread or ribbon. Which you choose depends on your application, of course, but as a general rule wire is cheap and ubiquitous while making connections is more challenging; copper tape is cheap and simple to use, but delicate and rips easily, so is best used for flat surfaces that won’t see a lot of stress or temporary applications; and conductive nylon thread or tape is better for weaving into fabrics.
The Brown Dog Gadgets team wanted to respond to a frequent question they are asked, what are the current limits for their Maker Tape (nylon/steel ribbon), so they ran some experiments to find out. In the name of Science you’ll see some flames in the video below, but only under extreme conditions.
You may already have bits of each of these options lying around in your bins, and if you don’t it may be worth it. Each connection option has its benefits.
| Wire | Copper Tape | Nylon/Steel Tape | |
|---|---|---|---|
| Insulation | Yes, must be removed to connect | None, and adhesive backing is sometimes conductive | None |
| Solderability | Usually great (not for some wires) | Great | Not at all |
| Resistance | <.1ohms/ft | <.1ohms/ft | 5-15ohms/ft |
| Reusability | Yes | No | Yes |
| Flexibility | Yes | No | Yes |
| Ease of connecting | Crimp, solder, twist, spring, press | Solder, adhesive, press | Twist, tie, spring, press |
| Cost | Cheap | Less cheap | Least cheap |
| Application | Any electronics | Temporary delicate projects | Fabrics, less delicate projects |
Their scientific process yielded sound results. While not as capable as copper tape, which could easily handle 5A (the limit of their power supply), their Maker Tape endured 3A before the adhesive started to struggle, and at 3.5A the tape acted like a fuse and burned itself out. It was only under very specific unusual conditions that took them a long time to recreate that they were able to get flames. For them this was a huge success, as most of their users are powering their circuits with coin cell batteries and only driving a motor or some LEDs, and this current consumption was at least an order of magnitude greater than most of their use cases. Anyone trying to use the nylon/steel tape at the level that can fry the tape likely knows what they’re doing enough to avoid the potential problem.
Incidentally, if you’re wondering why wire rating is measured in amps and not watts, here’s some physics. Power = Current * Voltage, and Voltage = Current * Resistance. These are the two formulas we all learn from the beginning of electronics lessons. When it comes to wires, resistance is measured as ohms per length. What we’re interested in is not the power that can flow through the wire, but the amount of power that the wire can safely dissipate before failing as it heats up through its own resistance.
Doing some algebra, Power dissipated by the wire as heat = Current*Current*Wire Resistance*Length. We don’t need the voltage. But also notice that if the length doubles then the power dissipated by the wire doubles but so does the amount of surface area of the wire to dissipate that heat. If you were to rate a wire by power, you’d have to include the length. To simplify things and keep the length out of the rating, and relate the rating back to how much energy is transferred across the wire (and not dissipated by it), and since source voltage doesn’t matter, the wire is thus rated with the amount of current.
source https://hackaday.com/2019/12/09/conductive-tape-current-capacity-comparison/
Antique Pocket Watch Project Updates Antique Pocket Watch
Here at Hackaday we have a bit of a preoccupation with timepieces. Maybe it’s the deeply personal connection to an object you wear on your body, or the need for ultimate reliability. Perhaps it’s just a fascination with the notion of time itself. Whatever the case, we don’t seem to be alone as there is a constant stream of time-related projects coming through our virtual doors. For this article we’ve unearthed the LED Pocketwatch 1.0 by [Dr. Paul Pounds] from way back in 2009 (ironically via a post about a wristwatch from last year!). Fortunately for us the Internet Archive has saved this heirloom nouveau from the internet dustbin so we can appreciate the craftsmanship involved in [Dr. Pounds]’ work.

My how far we’ve come; a decade after this project was posted a hacker might choose to 3d print a case for a new wearable, but in 2009 that would have been an entire project by itself! [Dr. Pounds] chose to use the casing from an antique Elgin pocket watch. Even through the mists of a grainy demo video we can imagine how soft the well-worn casing must be from heavy use. This particular unit was chosen because it was a hefty 50mm in diameter, leaving plenty of room inside for a 44mm double sided PCBA with 133 0603 LEDs (60 seconds, 60 minutes, 12 hours), a PIC 16F946, an ERM, and a 110mAh LiPo. But what really sets the LED Pocketwatch 1.0 apart is the user interface.
The ERM is attached directly to the rear of the case in order to best conduct vibration to the outside world. For maximum authenticity it blips on the second, to give a sense that the digital watch is mechanically ticking like the original. The original pocket watch was designed with a closing lid which is released when the stem is pressed. [Dr. Pounds] integrated a button and encoder with the end of the stem (on the PCBA) so the device can be aware of this interaction; on lid open it wakes the device to display the time on the LEDs. The real pièce de résistance is that he also integrated a minuscule rotary encoder, so when the stem is pressed you can rotate it to set the time. It’s all quite elegantly integrated and imminently usable.

At this point we’d love to link to sources, detailed drawings, or CAD files, but unfortunately we haven’t found any. If this has you inspired check out some of the other pocket watches we’ve posted about in the past. If you’re interested in a live demo of the LED Pocketwatch 1.0, check out the original video after the break.
source https://hackaday.com/2019/12/08/antique-pocket-watch-project-updates-antique-pocket-watch/
The TRUTH About Swallowing Gum | Responding To Comments #16 #youtubevids
Al Bundy’s Best Insults Reaction | DREAD DADS PODCAST | Rants, Reviews, Reactions #youtubevids
4 INCREDIBLE project with old CD/DVDrom #youtubevids
r/TalesFromRetail – Lady Сlaiming She Never Signed An Application To Run Her Credit. #youtubevids
RC Strandbeest is a Head Above the Rest
Prolific maker [Jeremy Cook] recently put the finishing touches (at least, for now) on his impressive ClearCrawler remote controlled Strandbeest, which includes among other things a surprisingly expressive “head” complete with LED matrix eyes. For anyone in the audience who was only mildly terrified of these multi-legged robotic beasties before, you may want to avert your eyes from the video after the break.
The clever locomotive design of [Theo Jansen] known as Strandbeest is a legged walker. What makes it special is that the legs themselves are not independent, but work together for a gliding action more akin to wheeled bots. [Jeremy’s] work with ClearCrawler has taken this to another level of precision and mechanization.
 Before installation of the electronics, the ClearCrawler had to be tethered to a bench power supply, and could only move forward and backward. Once the locomotion was working as expected, [Jeremy] was ready to install some brains into the beast.
The robot is controlled by a dual motor driver and an Arduino Nano socketed in an I/O expansion board. Communication between the Nano onboard the walker and the hand-held remote control is provided by of a pair of nRF24L01 modules. The controller itself is a simple affair, comprised of a joystick shield plugged into an Arduino Uno.
The robot’s head is made up of a chunk of clear polycarbonate tube with a 3D printed internal frame to hold the dual 8×8 LED matrices that serve as its animated eyes. This arrangement is mounted on a servo pan and tilt mount, which is controlled by an analog stick on the controller. While the head doesn’t currently serve any practical function, it does give [Jeremy] a chance to emote a bit with his creation; a popular trick when he shows the ClearCrawler off.
A few years ago we covered this robot’s predecessor, the considerably larger ClearWalker. While that machine was surely a beauty to behold, this smaller and more agile iteration of the concept is quite a bit more practical.
source https://hackaday.com/2019/12/08/rc-strandbeest-is-a-head-above-the-rest/
Hackaday Links: December 8, 2019
Now that November of 2019 has passed, it’s a shame that some of the predictions made in Blade Runner for this future haven’t yet come true. Oh sure, 109 million people living in Los Angeles would be fun and all, but until we get our flying cars, we’ll just have to console ourselves with the ability to “Enhance!” photographs. While the new service, AI Image Enlarger, can’t tease out three-dimensional information, the app is intended to sharpen enlargements of low-resolution images, improving the focus and bringing up details in the darker parts of the image. The marketing material claims that the app uses machine learning, and is looking for volunteers to upload high-resolution images to improve its training set.
We’ve been on a bit of a nano-satellite bender around here lately, with last week’s Hack Chat discussing simulators for CubeSats, and next week’s focusing on open-source thrusters for PocketQube satellites. So we appreciated the timing of a video announcing the launch of the first public LoRa relay satellite. The PocketCube-format satellite, dubbed FossaSat-1, went for a ride to space along with six other small payloads on a Rocket Lab Electron rocket launched from New Zealand. Andreas Spiess has a short video preview of the FossaSat-1 mission, which was designed to test the capabilities of a space-based IoT link that almost anyone can access with cheap and readily available parts; a ground station should only cost a couple of bucks, but you will need an amateur radio license to uplink.
We know GitHub has become the de facto standard for source control and has morphed into a collaboration and project management platform used by everybody who’s anybody in the hacking community. But have you ever wished for a collaboration platform that was a little more in tune with the needs of hardware designers? Then InventHub might be of interest to you. Currently in a limited beta – we tried to sign up for the early access program but seem to have been put on a waiting list – it seems like this will be a platform that brings versioning directly to the ECAD package of your choice. Through plugins to KiCad, Eagle, and all the major ECAD players you’ll be able to collaborate with other designers and see their changes marked up on the schematic — sort of a visual diff. It seems interesting, and we’ll be keeping an eye on developments.
 Amazon is now offering a stripped-down version of their Echo smart speaker called Input, which teams up with speakers that you already own to satisfy all you’re privacy invasion needs on the super cheap — only $10. At that price, it’s hard to resist buying one just to pop it open, which is what Brian Dorey did with his. The teardown is pretty standard, and the innards are pretty much what you’d expect from a modern piece of surveillance apparatus, but the neat trick here involved the flash memory chip on the main board. Brian accidentally overheated it while trying to free up the metal shield over it, and the BGA chip came loose. So naturally, he looked up the pinout and soldered it to a micro-SD card adapter with fine magnet wire. He was able to slip it into a USB SD card reader and see the whole file system for the Input. It was a nice hack, and a good teardown.
source https://hackaday.com/2019/12/08/hackaday-links-december-8-2019/
This FPV Tank Explores The Lawn
Radio control is good and all, and it’s always fun to watch a little vehicle scoot about the backyard. But there’s always something to be said for feeling as though you’re really in control. First person view, or FPV, is the way to do it, and [Brian] has gone down that route with this tidy tank build.
The tank is 3D printed, from the chassis right down to the wheels. There’s even a moving “eye” up front containing the FPV camera, controlled by a servo, allowing the driver to look up and down. A 5.8 GHz transmitter is used to send the signal back to the driver’s goggles. The tracks are a snap-together design that are fully 3D printed, requiring no additional metal links or hardware. Forward propulsion is courtesy of a pair of 12 volt gear motors, driven from an L298N motor driver. An Arduino Nano is used in conjunction with Spektrum RC gear to receive signals and tell the tank where to go.
It’s a tidy build that would be great fun to drive through the bushes or through the house. We’ve seen even tinier builds used to inspect crawlspaces. If you build one of your own, be sure to let us know.



source https://hackaday.com/2019/12/08/this-fpv-tank-explores-the-lawn/
From Fail to Wail: Guitar Picks Made from 3D Printed Waste
Between failed prints and iterative designs that need a few attempts before you nail them down, a certain amount of wasted material is essentially unavoidable when 3D printing. The good news is that PLA is a bioplastic and can be broken down via industrial composting, but even still, any method that allows you to reuse this material at home is worth taking a look at.
 In a recent video, [Noah Zeck] details one potential use for your scrap plastic by turning his failed 3D prints into guitar picks. The idea here could really be applied to anything you can make out of thin plastic sheeting, but the fact that you can easily and cheaply produce picks with a commercially available punch makes this application particularly appealing.
The first step in this process is about as low-tech as it gets: wrap your scrap printed parts in rags, and beat them with a sledge hammer. This breaks them up into smaller and more manageable pieces, which is important for the next step. If the parts are small enough and you’ve got a decently powerful blender you don’t mind devoting to plastic recycling, we imagine that would make short work of this step as well.
Once suitably pulverized, [Noah] puts the plastic on a piece of glass and gets it warmed up with a heat gun. PLA has a fairly low glass transition temperature, so it shouldn’t take much time to soften. Then he puts a second piece of glass on top and squeezes them together to get a thin, flat sheet of plastic. Once cooled, he punches his guitar picks out of the sheet, with bonus points if the colors swirled around into interesting patterns. If you’re not musically inclined, we’ve seen a very similar method used to produce colorful floor tiles.
source https://hackaday.com/2019/12/08/from-fail-to-wail-guitar-picks-made-from-3d-printed-waste/
Creative Craft DIY That Are At Another Level #youtubevids
Get Out Of My Head House!! | House M.D. #youtubevids
Controlling Tremors As They Happen
Some neurological disorders, like Parkinson’s disease, can cause muscle tremors which can get worse as time goes along. In the beginning it may not be too difficult to manage, but as the disease progresses the tremors get worse and worse, until day-to-day movements are extremely difficult. Even picking up a fork or pouring a glass of water becomes nearly impossible. Some helpful tools have been designed to limit the impacts of the tremors, but this new device seeks to dampen the tremors directly.
A research team from Fresno State has been developing the Tremelo, which is a hand stabilizer that straps onto the arm of a person suffering from tremors. It has sets of tuned mass dampers in each of two enclosures, which rapidly shift the weights inside to counter the motion of the wearer’s tremors. The device has already shown success in 36 trial patients and does an incredible job at limiting the amount of tremors the user experiences, and also has a bonus of being non-invasive for the wearer.
The team has successfully trialed the program, but is currently seeking funding on Indiegogo. The project seems worthwhile and is a novel approach to a common problem. In the past, devices (admittedly with a much cheaper price tag) try to solve the problem externally rather than in the direction that the Tremelo has gone, and it’s a unique idea that shows a lot of promise.
source https://hackaday.com/2019/12/08/controlling-tremors-as-they-happen/