FBI Reports on Linux Drovorub Malware

The FBI and the NSA released a report on the Russian-based malware that attacks Linux known as Drovorub (PDF) and it is an interesting read. Drovorub uses a kernel module rootkit and allows a remote attacker to control your computer, transfer files, and forward ports. And the kernel module takes extraordinary steps to avoid detection while doing it.

What is perhaps most interesting though, is that the agencies did the leg work to track the malware to its source: the GRU — Russian intelligence. The name Drovorub translates into “woodcutter” and is apparently the name the GRU uses for the program.

A look inside the code shows it is pretty mundane. There’s a server with a JSON configuration file and a MySQL backend. It looks like any other garden-variety piece of code. To bootstrap the client, a hardcoded configuration allows the program to make contact with the server and then creates a configuration file that the kernel module actively hides. Interestingly, part of the configuration is a UUID that contains the MAC address of the server computer.

The rootkit won’t persist if you have UEFI boot fully enabled (although many Linux computers turn UEFI signing off rather than work through the steps to install an OS with it enabled). The malware is easy to spot if you dump raw information from the network, but the kernel module makes it hard to find on the local machine. It hooks many kernel functions so it can hide processes from both the ps command and the /proc filesystem. Other hooks remove file names from directory listings and also hides sockets. The paper describes how to identify the malware and they are especially interested in detection at scale — that is, if you have 1,000 Linux PCs on a network, how do you find which ones have this infection?

This is a modern spy story, but not quite what we’ve come to expect in Bond movies. “Well, Moneypenny, it appears Spectre is using the POCO library to generate UUIDs,” is hard to work into a trailer. We prefer the old days when high-tech spying meant nonlinear junction detectors, hacking Selectrics, moon probe heists, and passive bugging.

source https://hackaday.com/2020/08/22/fbi-reports-on-linux-drovorub-malware/

Mini Marble-Powered Synth Pays Homage to Its Bigger Cousins

If imitation is the sincerest form of flattery, what then are we to make of something that shares only a few of the original’s design elements, operates in a completely different way, and has been scaled down to a fifth its size? Still seems like flattery to us.

Despite the changes, it’s clear where [Love Hultén] took inspiration for his miniature Marble Machine XS. Readers will no doubt see in it elements from [Martin Molin]’s original Marble Machine, the fantastic plywood and Lego musical contraption, along with his new Marble Machine X, the construction of which never seems to end. Like the originals, [Love]’s miniature version uses a lot of steel balls, albeit considerably scaled down, and it still uses a programming drum to determine where and when to drop them. But rather than strike real traditional instruments, the falling balls strike synthesizer keys, triggering a range of sounds through its built-in speaker. The whole thing is powered by a small electric motor rather than being hand-cranked and is small enough to sit on a desktop, a decided advantage over the mammoth machines to which it pays homage.

We have to say that as much as we love the hacksmanship of the original Marble Machine and the craftsmanship of its successor, the look and feel of [Love]’s machine just blows us away. We’re not sure what materials he used, but the whole hammertone paint scheme and Meccano look is a feast for nostalgic eyes.

source https://hackaday.com/2020/08/22/mini-marble-powered-synth-pays-homage-to-its-bigger-cousins/

Seeing the Skill is Better than Seeing the Project

Pulling off a flashy project that gets the viral-media hug of widespread approval feels great. Getting there is no easy path to walk and often times the craft that went into a finished project doesn’t even take the back seat but gets no mention at all. Often I find I’m more impressed by — or a least my attention is more strongly captured by — the skills put on display as prominently as the finished build.

Case-in-point this week comes from the model railroad work of [Diorama111]. Seeing an OLED screen in the nose of an HO scale locomotive just like the real-life version is impressive, but how many people missed the one-off soldering masterpiece that went into this one? You’ll marvel at the SMD techniques used with through-hole protoboard on this one.

Occasionally we do get to look over the shoulder of the master as decades of skills are shared for the purpose of passing them on. So was the case back in May when we watched as [Leo] walked through his tips and tricks for prototyping at the electronics bench. This included a lot of non-obvious but clever stuff; tips on working with copper tape for solder buses, using Teflon tubing with bare wire instead of stripping PVC-insulated wire, and a deep dive into copper clad prototyping.

So remember all of us hardware geeks when you look to tell the story of your project. We want to know how it was done at least as much as what was done. There was a time when electronic designers were a separate work group from electronic technicians (and wow, those technicians were in a league of their own). These days we all have that technician hat hanging on our workbenches and I’m always interested in packing in yet another unlearnt skill. Throw us a bone!

source https://hackaday.com/2020/08/22/seeing-the-skill-is-better-than-seeing-the-project/

Stealing Keys from the Sound of the Lock

If you are smart, you wouldn’t hand your house key over to a stranger for a few minutes, right? But every time you use your key to unlock your door, you are probably broadcasting everything an attacker needs to make their own copy. Turns out it’s all in the sound of the key going into the lock.

Researchers in Singapore reported that analyzing metallic clicks as the key slides past the pins gives them the data they need to 3D print a working key. The journal published research is behind a paywall, but there is a copy on co-author [Soundarya Ramesh’s] website which outlines the algorithm used to decode the clicks of key teeth on lock pins into usable data.

The attack didn’t require special hardware. The team used audio capture from common smartphones. While pushing your phone close to the lock while the victim inserts a key might be problematic, it isn’t hard to imagine a hacked phone or smart doorbell picking up the audio for an attacker. Long-range mikes or hidden bugs are also possible.

There are practical concerns, of course. Some keys have a plateau that causes some clicks to skip, so the algorithm has to deal with that. It sounds like the final result be a small number of key possibilities and not just converge on one single key, but even if you had to carry three or four keys with you to get in, it is still a very viable vulnerability.

The next step is to find a suitable defense. We’ve heard that softening the pins might reduce the click, but we wondered if it would be as well to put something in that deliberately makes loud clicks as you insert the key to mask the softer clicks of the pins.

While a sound recording is good, sometimes a picture is even better. Of course, if you want to go old school, you can 3D print your lockpicks.

source https://hackaday.com/2020/08/22/stealing-keys-from-the-sound-of-the-lock/

Unique LED Display Inspired by Fighter Jet Dashboard

Last year, [Mangy_Dog] was asked by a few friends to consult on a project they were working on. The goal was to build an authentic replica of an F-18 cockpit, apparently for the purposes of creating a film. The project never materialized, but it did inspire him to take a hard look at the 1970s era alphanumeric displays utilized in the real aircraft. One thing lead to another, and he ended up using his own take on the idea to build his own “starburst” digit display.

As [Mangy_Dog] explains, while the faces of these original displays might have been quite small, there was a lot going on behind the scenes. Due to the technical limitations of the time, each alphanumeric character was made up of an array of incandescent light bulbs and fiber optic cables. This worked well enough, but was bulky and complex to manufacture.

Today, we can do better, even on the hobbyist level. As it turns out, 0402 LEDs are just about the right size to recreate the segments of the original starburst displays. So [Mangy_Dog] came up with a simple PCB design to not only align the LEDs properly, but drive them with a 74HC595 shift register and an array of MOSFETs. While assembly wasn’t without its challenges, he made good use of his custom built reflow oven to get all the diminutive components in place.

He went through a few different ideas for the diffuser, but eventually settled on black plastic with tiny holes drilled through courtesy of his laser cutter. Behind each set of three holes is a small pocket that got filled from both sides with transparent UV resin, which was then sanded down after curing. The end result isn’t perfect as you can still tell the center dot is brighter than its peers, but the overall effect is still very nice and definitely has a sort of faux-retro appeal.

The military naturally has access to some incredible technology, though they have a tendency to hold onto it for decades. That an individual with a meager budget and homemade tools can improve upon a piece of hardware installed in a $60+ million airplane is a testament to just how fast things are moving.

source https://hackaday.com/2020/08/22/unique-led-display-inspired-by-fighter-jet-dashboard/

Student Rover Explores the Backyard in Tribute

Three students were a little sad when NASA’s Opportunity rover went silent after 15 years on the Martian surface. So they decided to build their own rover inspired by Opportunity to roam their backyards using an off-the-shelf robot chassis, a Raspberry Pi, and the usual list of parts like motors, H-bridges, and batteries.

Like the real rover, the vehicle uses a rocker-bogie system, although it is a little less complex than the version NASA sent blasting off towards the Red Planet. The plucky vehicle comes complete with miniature solar panels to recharge its onboard battery, courtesy of some dollar-store garden lights. A pair of videos after the break show how the rover is controlled, as well as the view sent back from its onboard camera.

The rover ran a simulated Mars mission as part of a school project where it had to find an object and transmit an image of it back to home base, and by the looks of it, is was a rousing success. But the young explorers aren’t resting on their laurels, and are already working on a second version of their exploration vehicle that can operate in inclement weather and includes some new tools such as a robotic arm and infrared illumination for low-light imaging.

We’ve seen plenty of Mars rover clones in the past, but there’s always room for more. Of course, if you’re looking for something a bit easier to start with, you can always go the LEGO route.

source https://hackaday.com/2020/08/21/student-rover-explores-the-backyard-in-tribute/

Cool Off with a Piezo and a Glass of Water

Some cool-mist humidifiers work by flinging water at a vaporizer, but our favorite kind uses a piezoelectric transducer. These work by using high-frequency sound waves to pound the surface of the water with mechanical energy. That energy introduces standing waves that force the water to break apart into a fine mist on the surface of the piezo disk.

The driving circuit for this DIY mist maker uses a 555 to generate 113 KHz, a trimmer potentiometer to fine-tune it, and a MOSFET to amplify the signal. You don’t need much more than that and a handful of passives to recreate this cool junk box experiment, but the spec of the piezo disk is quite important. The circuit is designed for atomizing transducers, which have a resonant frequency of 113 KHz — much higher than your average junk box piezo. Check out the demo and build video after the break.

Atomizing transducers can do way more than than moisten the air for our comfort. They’re not picky about where the water comes from, so if you have enough of them, you can dry a load of laundry in a few minutes.

source https://hackaday.com/2020/08/21/cool-off-with-a-piezo-and-a-glass-of-water/

Get Creative with This ESP8266 Photography Light

In today’s fast-paced world of social media, if you want your photos to grab attention, you’ve got to have an edge. Whether it’s a deft touch in Photoshop or an amazing lens, it’s important to stand apart. Another great way is to experiment with lighting and color. To do just that, [Andrei] built a pocket RGB photo light for the home studio.

[Andrei]’s cat models for the camera.

This is a project that any experienced maker should be able to whip up in a weekend. Not that there’s anything wrong with that, of course. The basic enclosure is 3D printed and readily reproducible on any FDM printer. Lighting is provided via the venerable WS2812B LED, 68 of them, to be exact. Finally there’s an ESP8266 running WLED, a webserver for the platform that’s dedicated to controlling LED strips. This makes it easy to tweak the LEDs with your smartphone.

Thanks to the WS2812Bs LEDs, a full range of RGB colors are available for [Andrei] to experiment with. He’s done a great job showing off the light with a few choice cat pics that serve to show its capabilities. While we wouldn’t expect to use such a device for clean white lighting in a serious photographic sense, it’s a perfect tool for art photography.

We’ve covered other studio light builds before, too. Video after the break.

source https://hackaday.com/2020/08/21/get-creative-with-this-esp8266-photography-light/

Four Years Later, Off-Grid Office Shed Still Rocks

About four years ago, [Russell Graves] created what was, to him, the ultimate work-from-home environment: an off-grid office shed. The shed might look a bit small, but it’s a considerably larger workspace than most people in an office are granted. Four years later, in the middle of a global pandemic, working from home has become much more common and [Russel] shares some thoughts on working from home and specifically reflects on how his off-grid, solar powered shed office (or “shoffice” as he likes to call it) has worked out. In short, after four years, it rocks hard and is everything he wanted and more.

Its well-insulated plywood walls let him mount monitor arms and just about anything else anywhere he wants, and the solar power system allows him to work all day (and into the night if he wants, which he doesn’t) except for a few spells in the winter where sunlight is just too scarce and a generator picks up the slack. Most importantly, it provides a solid work-life separation — something [Russell] is convinced is critical to basic wellness as a human being.

That’s not to say an off-grid solar shed is the perfect solution for everyone. Not everyone can work from home, but for those who can and who identify with at least some of the motivations [Russell] expressed when we covered how he originally created his office shed, he encourages giving it some serious thought.

The only thing he doesn’t categorically recommend is the off-grid, solar powered part. To be clear, [Russell] is perfectly happy with his setup and even delights in being off-grid, but admits that unless one has a particular interest in solar power, it makes more sense to simply plug a shed office into the grid like any other structure. Solar power might seem like a magic bullet, but four years of experience has taught him that it really does require a lot of work and maintenance. Determined to go solar? Maybe give the solar intensity sensor a look, and find out just how well your location is suited to solar before taking the plunge.

source https://hackaday.com/2020/08/21/four-years-later-off-grid-office-shed-still-rocks/

Microsoft Flight Simulator’s Data Insanity Spawns Enormous Buildings and Anomalies from OpenStreetMap

The OpenStreetMap project is an excellent example of how powerful crowdsourced data can be, but that’s not to say the system is perfect. Invalid data, added intentionally or otherwise, can sometimes slip through the cracks and lead to some interesting problems. A fact that developers Asobo Studio are becoming keenly aware of as players explore their recently released Microsoft Flight Simulator 2020.

Like a Wiki, users can update OpenStreetMap and about a year ago, user nathanwright120 marked a 2 story building near Melbourne, Australia as having an incredible 212 floors (we think it’s this commit). The rest of his edits seem legitimate enough, so it’s a safe bet that it was simply a typo made in haste. The sort of thing that could happen to anyone. Not long after, thanks to the beauty of open source, another user picked up on the error and got it fixed up.

But not before some script written by Asobo Studio went through sucked up the OpenStreetMap data for Australia and implemented it into their virtual recreation of the planet. The result is that the hotly anticipated flight simulator now features a majestic structure in the Melbourne skyline that rises far above…everything.

The whole thing is great fun, and honestly, players probably wouldn’t even mind if it got left in as a Easter egg. It’s certainly providing them with some free publicity; in the video below you can see a player by the name of Conor O’Kane land his aircraft on the dizzying edifice, a feat which has earned him nearly 100,000 views in just a few days.

But it does have us thinking about filtering crowdsourced data. If you ask random people to, say, identify flying saucers in NASA footage, how do you filter that? You probably don’t want to take one person’s input as authoritative. What about 10 people? Or a hundred?

The Army Marches on Data

When you think about geospatial data, what heuristics could you use to at least identify areas to look at closer? In this case, the fact that the tallest building in the world only has 163 floors would have been a good clue. Even if the building had 100 floors, the fact that nothing else near it has even a quarter of that number would be another clue. In either case, the Great Tower of Melbourne could have been avoided with a single line of code validating the height data pulled from OpenStreetMap.

For terrain, rapid changes in elevation might be another data indicator. That would have prevented the wall of ice that guards us from the White Walkers. We wondered if anyone had given this any thought before. Turns out, the US Army has. They even mention OpenStreetMap and many other sources, some of which we didn’t know about.

Section 4 of the aptly named Crowdsourced Geospatial Data talks about how to vet crowdsourced data and address errors due to sensor variability, language, and other technical factors. However, errors from logical inconsistency should be moderately simple to filter out, and the paper identifies efforts to automate that for geospatial data.  For example, the angle between two intersecting roads is typically within a relatively narrow range of angles.

According to the paper, several researchers have validated data and found high error rates in public information sources. For example, in the United Kingdom and Ireland, OpenStreetMap data with more than 15 edits had errors in about 8% of the time. In France, about 5% of the crossroads had geometric inaccuracies.

Geospatial Graffiti

Of course, that assumes the errors are the result of honest mistakes. Protecting against malicious data entry is an entirely different problem, and one that’s potentially much harder to identify and fix.

This situation is also addressed in the Army’s report, but only briefly. It stands to reason that if the military has some particular tips and tricks they use to sniff out this sort of thing, they probably don’t want them to become public knowledge.

With crowdsourced data growing in popularity, it would be easy to imagine wanting to displace key targets slightly or even significantly. A bunker “known” to be at the center of a facility might survive if the data says that the facility is a few hundred meters to the right of its actual position. Disinformation has always been a powerful tool, and it’s only amplified in the era of Big Data.

That said, some of it isn’t too hard to find. People actually use GPS tracks to spell out graffiti in OpenStreetMap, for example. So if you stumble upon any mile-wide letters written in the countryside, it’s probably safe to leave them out of your flight simulator.

Closer To Home

This doesn’t just apply to geospatial data, either. How often do you take data from a pressure or temperature sensor? Do you validate it? For high-reliability data, you might need multiple redundant sensors with some voting logic. That’s common in aircraft and spacecraft. You might have three sensors and take the average of the three if they read close together or reject one if it is way off compared to its counterparts.

I had a commercial drone once suddenly decide it was 4,096 feet below sea level due to a failed pressure sensor. The resulting rapid ascent to try to correct the altitude was both amazing and terrifying since it was a big drone. The firmware should have made some simple assumptions about data quality, such as realizing that it wasn’t likely to suddenly find itself hundreds of feet below seal level, or that the data wasn’t trending in the expected way as it tried to gain altitude. It certainly would have made my day easier, not to mention the pilot’s.

What’s your favorite data validation trick? How much do you trust crowdsource data? Wikipedia is usually right over the long term, but there are certainly cases where bad data slips through until someone catches it.

Thanks [ptkwilliams] for the tip about Flight Simulator.

source https://hackaday.com/2020/08/21/microsoft-flight-simultors-data-insanity-spawn-enourmous-buildings-an-anomalies-from-openstreetmap/

Hand-Stitched Keycaps for Truly Luxurious Typing

We’ve seen some very unique custom keycaps recently, but nothing quite like the embroidered ones that [Billie Ruben] has been experimenting with. Using a clever 3D printed design, she’s crafted what could well be one of the most easily customizable keycaps ever made…assuming you’ve got a needle and thread handy.

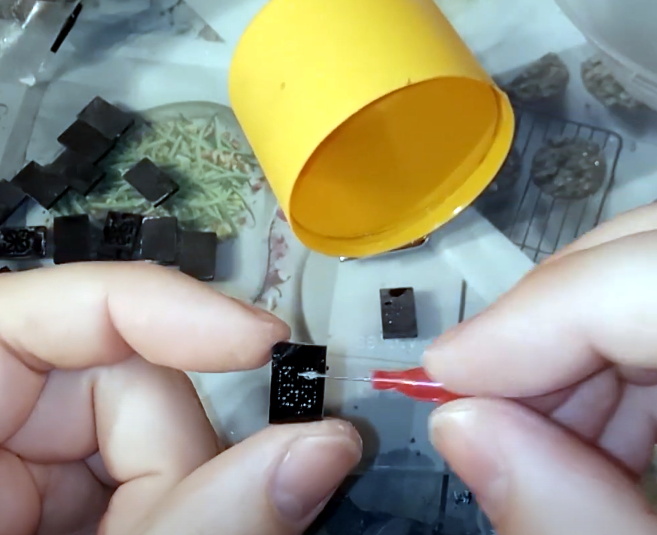
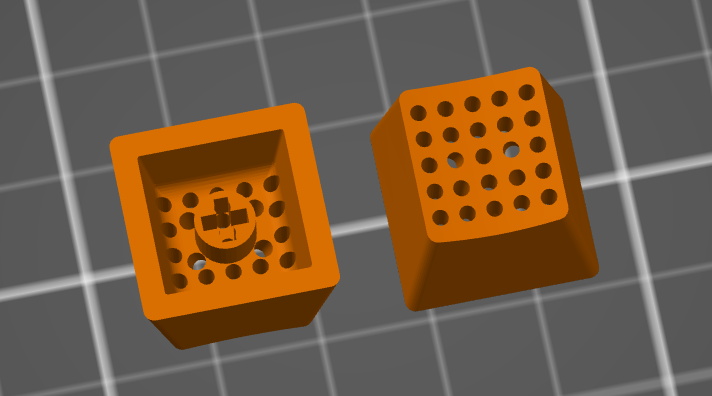
The idea is to take a standard keycap blank and pop an array of 25 holes in the face. Your thread or yarn is run through these holes, allowing you to create whatever shape you wish within the 5 x 5 matrix. While it’s somewhat tight quarters on the underside of the cap, nothing prevents you from using multiple colors or even materials to do your stitching. As an added bonus, the soft threads should provide a very comfortable and particularly tactile surface to tap on.

Now the most obvious application is to simply stitch up versions of all the alphanumeric keys, but there’s clearly room for some interpretation here. [Billie] has already shown off some simple iconography like a red heart and we’re sure creative folks will have no trouble coming up with all sorts of interesting needlepoint creations to top their prized mechanical keyboards.

The intricate details necessary to make this idea work may be beyond the common desktop FDM 3D printer, so [Billie] ran these prototypes off on a resin printer (she attributes the visible layer lines to a hasty print). She’d love to hear feedback from other keyboard aficionados who’ve made the leap to liquid goo printing, so be sure to drop her a line if you print out a set of your own. It sounds like a new version is in the works which will provide a false bottom to cover the stitching from below, but functionally these should get you started.

source https://hackaday.com/2020/08/21/hand-stitched-keycaps-for-truly-luxurious-typing/

This Week in Security: Bluetooth Hacking, NEC Phones, and Malicious Tor Nodes

One of the fun things about vulnerability research is that there are so many places for bugs to hide. Modern devices have multiple processors, bits of radio hardware, and millions of lines of code. When [Veronica Kovah] of Dark Mentor LLC decided to start vulnerability research on the Bluetooth Low Energy protocol, she opted to target the link layer itself, rather than the code stack running as part of the main OS. What’s interesting is that the link layer has to process data before any authentication is performed, so if a vulnerability is found here, it’s guaranteed to be pre-authentication. Also of interest, many different devices are likely to share the same BLE chipset, meaning these vulnerabilities will show up on many different devices. [Veronica] shares some great info on how to get started, as well as the details on the vulnerabilities she found, in the PDF whitepaper. (Just a quick note, this link isn’t to the raw PDF, but pulls up a GitHub PDF viewer.) There is also a video presentation of the findings, if that’s more your speed.

The first vuln we’ll look at is CVE-2019-15948, which affects a handful of Texas Instruments BT/BLE chips. The problem is in how BLE advertisement packets are handled. An advertisement packet should always contain a data length of at least six bytes, which is reserved for the sending device address. Part of the packet parsing process is to subtract six from the packet length and do a memcpy using that value as the length. A malicious packet can have a length of less than six, and the result is that the copy length integer underflows, becoming a large value, and overwriting the current stack. To actually turn this into an exploit, a pair of data packets are sent repeatedly, to put malicious code in the place where program execution will jump to.

The second vulnerability of note, CVE-2020-15531 targets a Silicon Labs BLE chip, and uses malformed extended advertisement packets to trigger a buffer overflow. Specifically, the sent message is longer than the specification says it should be. Rather than drop this malformed message, the chip’s firmware processes it, which triggers a buffer overflow. Going a step further, this chip has non-volatile firmware, and it’s possible to modify that firmware permanently. [Veronica] points out that even embedded chips like these should have some sort of secure boot implementation, to prevent these sort of persistent attacks.

NEC Phone Systems

This story was sent in directly by [Austin Martinetti], who worked on this research with [Brett Bryant]. They took a look at an interesting platform, NEC phone systems. What did they find? A handful of issues, like a hard coded username/password, and an HTTP endpoint that resets the user passwords to default: PasswordReset.htm?PWD_RESET() What can you do once you have access to the web interface? How about a hidden endpoint that downloads voicemail messages. For the impatient, there’s even a quick-and-dirty script to automate the process of downloading the entire backlog of voicemails. Next up is the really interesting developer level account. Doing just a bit of manipulation of POST data in your web browser allows modifying an account to have a privilege level above administrator.

All this is interesting, but we know better than to ever expose the web interface of an embedded device to the internet. So long as it’s inaccessible to the outside world, we don’t have to worry about these bugs. Right? It seems that when NEC built their voicemail add-on, they built in a slick little hidden feature. On extension 740, an old-school dial-up modem is available. Any valid credentials from the web interface can make the connection and gain access to the system, including some undocumented services.

These vulnerabilities were privately disclosed, and updated firmware is available (PDF). If you happen to have NEC phones sitting on your desk, it might be worth trying to get the firmware updates applied. And for goodness sake, don’t put your phone system’s ports on the internet!

Tor Exit Nodes

Tor is a boon for anonymity on the Internet, but have you ever looked closely at the potential downsides? Tor is a clever mesh network that uses layers of encryption to strongly anonymize traffic by sending it through multiple relays, and finally out to the regular internet through an exit node. That exit node is the weak point of the Tor network, in multiple ways. Because of the sometimes malicious or illegal traffic sent through Tor, exit nodes are often targeted by law enforcement or network operators. These nodes are a weak spot for another reason — the exit node gets to inspect and potentially modify all the traffic that goes through it.

This shouldn’t be a problem, as we have TLS to protect against MitM attacks. There is a clever attack that can get around TLS protection, SSL stripping, notably introduced by [Moxie Marlinspike] in 2009. The idea is simple: when a user tries to access a website using HTTP, and the site returns a redirect to an HTTPS connection. The attacker intercepts this redirect and proxies the HTTPS connection, leaving the user on an unencrypted connection. This attack is of limited usefulness, as web browsers will remember a permanent redirect, which is why it’s considered best practice to use the “301 Moved Permanently” redirect for enforcing HTTPS connections.

That said, how many of the current Tor exit nodes do you think are malicious? According to [nusenu], at one point almost 25% of the Tor exit node connections were using malicious exit nodes. This isn’t an easy problem to solve, as the vast majority of exit nodes are run by volunteers. When these malicious nodes are found, many of them are removed at once, but it’s relatively straightforward to shuffle the names and IPs and get those nodes back into the network. It’s estimated that right now, you have a 10% chance of using a malicious exit node when you use Tor. It’s known problem, and it’s slowly being worked on, but currently the Tor project doesn’t have the resources to really tackle the issue in earnest. If you’re going to use Tor to access outside sites, make sure to specifically check that your connection is a valid HTTPS connection.

A Red Team Story

Some of the best stories in infosec come from the red teams doing penetration tests. This week, [Federico Lago] shares some stories and tips from a recent successful pentest. The single best tip in the write-up is to try scanning ports while specifying the source port as a commonly used port. Apparently many firewalls are misconfigured to allow incoming traffic from these ports, when the intention was to allow outgoing traffic.

The second tip is that the Simple Network Management Protocol (SNMP) can be incredibly powerful for leaking information about a system. It’s not a TCP service, so it’s easy to miss, but it’s worth the effort. There’s a lot of potential information to be gained, including the list of processes and their command line arguments. In this case, a valid username/password combination was found for a Jenkins instance discovered earlier. Jenkins can be configured with a “script console” enabled, and it’s possible to abuse this to get a reverse shell and access to bash.

Part 2 continues the story, detailing how they used a command available to run using sudo in order to get a root shell, and then used the same SNMP trick to access the company’s databases. The whole thing is a good read, so go check it out.

Bits and Bytes

Ars told us about FritzFrog, a new Linux botnet client that spreads through poor SSH password policy. The technical report by Guardicore, has the juicy details and the indicators of compromise. You might want to check your servers for an added ssh authorized key, binaries running from nonexistent locations, and a listening socket on port 1234.

Gmail’s DMARC/SPF protections can be short-circuited by using Gmail’s inbound gateway setting, together with a global mail routing setting in the G Suite’s administrative console. In essence, the inbound gateway turns off the SPF and DMARC check for mail coming from the specified IP address. Forwarding it through Google’s mail service does mean that the messages get signed by Google, so it then passes those checks. While there were some complications, the bug has now been fixed.

Kali Linux, formerly Backtrack, has minted their 2020.3 release. Most notable is the addition of a new set of Bluetooth tools. There is also the new “Win-KeX”, a persistent GUI for running Kali inside the Windows Subsystem for Linux.

source https://hackaday.com/2020/08/21/this-week-in-security-bluetooth-hacking-nec-phones-and-malicious-tor-nodes/

GTA V Mod Shows (And Cheats) Those Stunt Jump Hoops

While the recent announcement of Grand Theft Auto V for the upcoming next-generation game consoles was a disappointment for those fervently waiting for a successor in the infamous video game series, it shows that after almost seven years of its initial release, the epic title is still going strong — and rightfully so. But a game as varied and complex as GTA V isn’t without some quirks, especially if you’re going for 100% completeness.

The stunt jumps seem a particular pesky nut to crack here, so [Anthony Som] made it his mission to shed some light on what qualifies as a successful jump by reverse engineering the system and writing both a mod for displaying the landing zone and a cheat to instant success.

If you’re not familiar with the game, its vast open world map features a variety of side quests, one of them being stunt jumps, where certain locations allow you to launch the vehicle you’re driving into the air in hopes to land on an adjacent road or area — whether to evade the people chasing you, or just for fun. There’s no telling how to actually succeed though, the game just tells you if you did or not afterwards, causing some degree of frustration. As an avid speedrunner (as in finishing a game in the shortest possible time), [Anthony] was looking for a way to increase the success rate for those stunt jumps, and decided to dig into the code to find out how to get there. Of course, being a proprietary game, he had to resort to reverse engineering and utilizing GTA’s vivid modding scene to do so.

His initial outcome was a mod that displays the launch and landing area as rectangles inside the game itself, which was a great help. But well, after already getting that far, [Anthony] figured he might as well continue and add a cheat mode to teleport the car right inside that expected landing area and be done with second-guessing his attempts once and for all.

If you’re curious about modding GTA yourself, his write-up has a few good pointers for that, and of course features some real examples of it. Whether this is a good idea for the self-driving AI that uses GTA as learning environment is probably a different story though.

source https://hackaday.com/2020/08/21/gta-v-mod-shows-and-cheats-those-stunt-jump-hoops/

Transparent OLED Hitting The Market With Xiaomi’s Mi TV LUX Transparent Edition

One of the major advantages of OLED over LCD panels is that the former can be made using far fewer layers as the pixels themselves are emitting the light instead of manipulating the light from a backlight. This led some to ask the question of whether it’s possible to make an OLED panel that is transparent or at least translucent. As Xiaomi’s new Mi TV LUX OLED Transparent Edition shows, the answer there is a resounding ‘yes’. Better yet, for a low-low price of about $7,200 you can own one of these 55″ marvels.

Transparent OLED technology is not new, of course. Back in 2018 LG was showing off a prototype TV that used one of the early transparent OLED panels. In the video that is embedded after the break, [Linus] from Linus Tech Tips goes hands-on with that LG prototype while at LG in South Korea, while including a number of crucial details from an interview from one of the engineers behind that panel.

As it turns out, merely removing the opaque backing from an OLED panel isn’t enough to make it transparent. In order for an OLED panel to become transparent, the circuitry in the pixel layer and TFT layer need to be aligned as best as possible to allow for many, many tiny holes to be punched through the display.

Looking at [Linus]’s experiences with the LG prototype, it does appear that this kind of technology would be highly suitable for signage purposes, while also allowing for something like an invisible television or display in a room that could be placed in front of a painting or other decoration. Once displaying an image, the screen is bright enough that you can comfortably make out the image. Just don’t put any bright lights behind the TV.

Anyone else anxious waiting for sub-10″ versions of these panels?

[Thanks, Qes]

source https://hackaday.com/2020/08/21/transparent-oled-hitting-the-market-with-xiaomis-mi-tv-lux-transparent-edition/

Mixing Up Your Own Supersized Sidewalk Chalk

When folks started quarantining, chalk art spilled onto driveways and sidewalks to remind us that there’s still beauty and creative people doing what they always do. Now it’s time to strut your stuff and show your neighbors that things are greener on your slab of concrete. [friedpotatoes] has shared their giant sidewalk recipe with the world so you can paint the town red. With chalk.

Name brand sidewalk chalk is expensive considering how easy it is to make. What Big Chalk doesn’t want you to know is that the ingredients are just water, plaster of Paris, and tempera paint; meaning this project should be safe enough for the junior hackers to get some hands-on time. Some folks use food coloring instead of paint, but we know what happens to clothing when kids get their mitts on food coloring. [friedpotatoes] also includes extensive repurposing of recyclables, which is commendable.

The instructions suggest filling potato chip (crisp) tubes through a milk jug funnel to make giant pieces, but you can use any mold you like. If you have a CNC machine, it should be no trouble to make stamp-like pieces of chalk for tagging on the go, or shapes like arrows when you have to direct a miniature parade.

For permanent and precise sidewalk decorations, you can check out a graffiti paint machine and for totally temporary messages there is a water-dispensing writer.

source https://hackaday.com/2020/08/20/mixing-up-your-own-supersized-sidewalk-chalk/

Fire Pit Burns to the Beat with Bluetooth

Humans have several primal fascinations and perhaps two of the biggest ones are fire and music. While you can picture some cavemen and cavewomen sitting around a fire beating on sticks for rhythm, we think they’d be impressed if the fire danced along with the music. Through the power of Bluetooth, that’s exactly what [Random Tech DIY’s] new fire pit does.

Technically, this is called a Rubens tube, and while it’s an old technology, the Bluetooth is a certainly a modern touch. As you might expect, most of this project is workshop time, cutting MDF and plastic. The audio system is off-the-shelf and drives some car stereo speakers. The results looked good, and although it always makes us nervous building things that carry propane gas, it seems to work well enough from where we’re sitting.

We had to wonder what things you could change that would affect the display. Changing the number of holes, the diameter of the holes, or the gas pressure, for example, would certainly change how the flames look and react to the sound waves.

We have seen other Rubens tube projects, of course. However, we were really interested in the use of these as crude oscilloscopes before the availability of cathode ray tubes. We’ve seen a modern take on that, too.

source https://hackaday.com/2020/08/20/fire-pit-burns-to-the-beat-with-bluetooth/