Fox hunting, or direction finding, is a favorite pastime in the ham radio community where radio operators attempt to triangulate the position of a radio transmission. While it may have required a large amount of expensive equipment in the past, like most ham radio operations the advent of software-defined radio (SDR) has helped revolutionize this aspect of the hobby as well. [Aaron] shows us how to make use of SDR for direction finding using his custom SDR-based Linux distribution called DragonOS.
We have mentioned DragonOS before, but every iteration seems to add new features. This time it includes implementation of a software package called DF-Aggregator. The software (from [ckoval7]), along with the rest of DragonOS, is loaded onto a set of (typically at least three) networked Raspberry Pis. The networked computers can communicate information about the radio waves they receive, and make direction finding another capable feature found in this distribution.
[Aaron] has a few videos showing the process of setting this up and using it, and all of the software is available for attempting something like this on your own. While the future of ham radio as a hobby does remain in doubt, projects like this which bring classic ham activities to the SDR realm really go a long way to reviving it.
Many ham radio operators now live where installing an outdoor antenna is all but impossible. It seems that homeowner’s associations are on the lookout for the non-conformity of the dreaded ham radio antenna. [Peter] can sympathize, and has a solution based on lessons of spycraft from the cold war.
[Peter] points out that spies like the [Krogers] needed to report British Navy secrets like the plans for a nuclear boomer sub to Russia but didn’t want to attract the attention of their neighbors. In this case, the transmitter itself was so well-hidden that it took MI5 nine days to find the first of them. Clearly, then, there wasn’t a giant antenna on the roof. If there had been, the authorities could simply follow the feedline to find the radio. A concealed spy antenna might be just the ticket for a deed-restricted ham radio station.
The antenna the [Kroger’s] used was a 22-meter wire in the attic of their home. Keep in mind, the old tube transmitters were less finicky about SWR and by adjusting the loading circuits, you could transmit into almost anything. Paradoxically, older houses work better with indoor antennas because they lack things like solar cell panels, radiant barriers, and metallic insulation.
Like many people, [Peter] likes loop antennas for indoor use. He also shows other types of indoor antennas. They probably won’t do as much good as a proper outdoor antenna, but you can make quite a few contacts with some skill, some luck, and good propagation. [Peter] has some period spy radios, which are always interesting to see. By today’s standards, they aren’t especially small, but for their day they are positively tiny. Video after the break.
If you think spy radios were small then, you should see what you can do now. Then again, some of the most famous cold war spy radios didn’t have any obvious antenna or even required power.
We don’t know how much time passed between the invention of the wheel and someone putting wheels on their feet, but we expect that was a great moment of discovery: combining the ability to roll off at speed and our leg’s ability to quickly adapt to changing terrain. Now that we have a wide assortment of recreational wheeled footwear, what’s next? How about teaching robots to skate, too? An IEEE Spectrum interview with [Marko Bjelonic] of ETH Zürich describes progress by one of many research teams working on the problem.
For many of us, the first robot we saw rolling on powered wheels at the end of actively articulated legs was when footage of the Boston Dynamics ‘Handle’ project surfaced a few years ago. Rolling up and down a wide variety of terrain and performing an occasional jump, its athleticism caused quite a stir in robotics circles. But when Handle was introduced as a commercial product, its job was… stacking boxes in a warehouse? That was disappointing. Warehouse floors are quite flat, leaving Handle’s agility under-utilized.
Boston Dynamic has typically been pretty tight-lipped on details of their robotics development, so we may never know the full story behind Handle. But what they have definitely accomplished is getting a lot more people thinking about the control problems involved. Even for humans, we face a nontrivial learning curve paved with bruised and occasionally broken body parts, and that’s even before we start applying power to the wheels. So there are plenty of problems to solve, generating a steady stream of research papers describing how robots might master this mode of locomotion.
Adding to the excitement is the fact this is becoming an area where reality is catching up to fiction, as wheeled-legged robots have been imagined in forms like Tachikoma of Ghost in the Shell. While those fictional robots have inspired projects ranging from LEGO creations to 28-servo beasts, their wheel and leg motions have not been autonomously coordinated as they are in this generation of research robots.
As control algorithms mature in robot research labs around the world, we’re confident we’ll see wheeled-legged robots finding applications in other fields. This concept is far too cool to be left stacking boxes in a warehouse.
We’ll admit that most of the Hackaday staff wouldn’t get too far on a skateboard, but that doesn’t mean we can’t appreciate the impressive DIY wheels that [Chris McCann] has managed to cast using 3D printed molds. From unique color combinations to experimental materials, the process certainly opens up some interesting possibilities for those looking to truly customize their rides. Though it’s worth noting there’s a certain element of risk involved; should a set of homemade wheels fail at speed, it could go rather poorly for the rider.
Both the STL and STEP files for the mold have been released under the Creative Commons Attribution 4.0 license, meaning anyone with a 3D printer can follow along at home. Unfortunately, it’s not quite as simple as clicking print and coming back to a usable mold. Because of the layer lines inherent to FDM 3D printing, the inside of the mold needs to be thoroughly sanded and polished. [Chris] mentions that printing the mold in ABS and using vapor smoothing might be a workable alternative to elbow grease and PLA, but he hasn’t personally tried it yet.
Once you’ve got the three part mold printed, smoothed, and coated with an appropriate release agent like petroleum jelly, it’s time to make some wheels. The core of each wheel is actually 3D printed from PETG, which should give it pretty reasonable impact resistance. If you have access to a lathe, producing aluminum cores shouldn’t be too difficult either. With the core loaded into the mold, urethane resin is poured in through the top until all the empty space is filled.
But you’re not done yet. All those little air bubbles in the resin need to be dealt with before it cures. [Chris] puts his filled molds into a pressure chamber, though he mentions that vacuum degassing might also be a possibility depending on the urethane mixture used. After everything is solidified, the mold can easily be taken apart to reveal the newly cast wheel.
Sometimes the decision to tackle a project or not can boil down to sourcing parts. Not everything is as close as a Digi-Key or Mouser order, and relying on the availability of surplus parts from eBay or other such markets can be difficult. Knowing if and when a substitute will work for an exotic part can sometimes be a project all on its own.
Building lasers is a great example of this, and [Les Wright] recently looked at substitutes for hard-to-find “doorknob” capacitors for his transversely excited atmospheric lasers. We took at his homebrew TEA lasers recently, which rely on a high voltage supply and very rapid switching to get nitrogen gas to lase. His design uses surplus doorknob caps, big chunky parts rated for very high voltages but also with very low parasitic inductance, which makes them perfect for the triggering circuit.
[Les] tried to substitute cheaper and easier-to-find ceramic power caps with radial wire leads rather than threaded lugs. With a nominal 40-kV rating, one would expect these chunky blue caps to tolerate the 17-kV power supply, but as he suspected, the distance between the leads was short enough to result in flashover arcing. Turning down the pressure in the spark gap chamber helped reduce the flashover and prove that these caps won’t spoil the carefully engineered inductive properties of the trigger. Check out the video below for more details.
Thanks to [Les] for following up on this and making sure everyone can replicate his designs. That’s one of the things we love about this community — true hackers always try to find a way around problems, even when it’s just finding alternates for unobtanium parts.
It seems like within the last ten years, every other gadget to be released has some sort of heart rate monitoring capability. Most modern smartwatches can report your BPMs, and we’ve even seen some headphones with the same ability hitting the market. Most of these devices use an optical measurement method in which skin is illuminated (usually by an LED) and a sensor records changes in skin color and light absorption. This method is called Photoplethysmography (PPG), and has even been implemented (in a simple form) in smartphone apps in which the data is generated by video of your finger covering the phone camera.
The basic theory of operation here has its roots in an experiment you probably undertook as a child. Did you ever hold a flashlight up to your hand to see the light, filtered red by your blood, shine through? That’s exactly what’s happening here. One key detail that is hard to perceive when a flashlight is illuminating your entire hand, however, is that deoxygenated blood is darker in color than oxygenated blood. By observing the frequency of the light-dark color change, we can back out the heart rate.
This is exactly how [Andy Kong] approached two methods of measuring heart rate from a webcam.
Now things are getting a bit more advanced. What if you don’t want to clean your webcam after each time you measure your heart rate? Well thankfully there’s a remote sensing option as well.
Every now and then we see something that works even though it really seems like it shouldn’t. How is a webcam sensitive enough to measure these minute changes in facial color? Why isn’t the signal uselessly noisy? This project is in good company with other neat heart rate measurement tricks we’ve seen. It’s amazing that this works at all, and even more incredible that it works so well.
We all know we shouldn’t use 1234 as our password. But we often don’t do the absolute best practice when it comes to passwords. After all, you should have some obscure strange password that is unique for every site. But we all have lots of passwords, so most of us use $pock2020 or something like that. If you know I’m a Star Trek fan, that wouldn’t be super hard to guess. [Phani] writes about a technique called Horcruxing — a term taken from the literary realm of Harry Potter that allowed Voldemort to preserve life by splitting it into multiple parts, all of which were required to bring an end to his villany. [Phani’s] process promises to offer better security than using a single password, without the problems associated with having hundreds of random passwords.
Most people these days use some form of password manager. That’s great because the manager can create 48 character passwords of random words or symbols and even you don’t know the password. Of course, you do know the master password or, at least, you better. So if anyone ever compromised that password, they’d have all your passwords at their fingers. Horcruxing makes sure that the password manager doesn’t know the entire password, just the hard parts of it.
Here’s how it works. Suppose you decide your personal horcrux string will be HamNCheese. That’s easy to remember and spell. It isn’t a great password all by itself. However, the idea is to never store that string in your password manager. Instead, you store a unique prefix and you have to add the horcrux.
If the password manager, for example, creates a password of 4337feeb90210, then you’d set the actual password to be 4337feeb90210HamNCheese. This means you’d have to set the password manager to not auto-submit the login form, of course. Once it filled in its part, you’ll have to add the extra string. Now if someone compromises your password manager, it doesn’t help them unless they also know your horcrux which, obviously, you should keep super secret.
This doesn’t help if someone phishes your password from you or otherwise intercepts it using, say, a keystroke logger. But it does seem like it has some value of preventing your password database from being a useful target. You’ll probably have to figure the best way to configure not only to prevent automatic submission but also to stop the password manager from helpfully trying to update your password every time you enter the horcrux, but that’s a small thing.
[Phani] doesn’t mention it, but it reminded us of the problem with security questions, too. It is reasonably easy to research people and find things like their mother’s maiden name or where they went to high school. The best solution is to have a made-up identity that you use to answer those questions. So your mother’s maiden name might be Pfffft and your older brother’s middle name might be MiddleName. The problem, of course, is keeping all that straight. Maybe you can store it in your password manager.
The convergence of mechanics and electronics in robotics brings with it a lot of challenges. Thanks to 3D printing and low cost components, it’s possible to quickly and easily experiment with a variety of robotics mechanism for various use cases. [Paul Gould] has been doing exactly this, and is giving us a taste of ten designs he will be open sourcing in the near future. Video after the break.
Three of the designs are capstan mechanisms, with different motors and layouts, tested for [Paul]’s latest quadruped robot. Capstan mechanisms are a few centuries old, and were originally used on sailing ships to give the required mechanical advantage to tension large sails and hoist cargo.
Two of the mechanisms employ GUS Simpson Drives, which use a combination of belts and a rolling joint. These were inspired by the LIMS2-AMBIDEX developed at the University of Korea. The ever-popular cycloidal gearbox also makes and appearance in the form of a high torque dual disk linked, two stage, NEMA17 driven gearbox.
[Paul] also built a room sized skycam-like claw robot for his daughter, suspended by four ball chain strings reeled in by four brushless motors with ESP32 powered motor controllers. We are looking forward to having a close look at these designs when [Paul] releases them, and to see how his quadruped robot will turn out.
A niche activity in console fandom is the shrinking of full-size consoles to smaller formats, taking what could once only be played on the family TV into portable formats that fit in the pocket. In a particularly impressive example of the art, [GmanModz] has made what he claims is the world’s smallest portable Nintendo 64. What makes it particularly noteworthy is that he’s done it not with an emulator or a custom PCB, instead there is a real Nintendo 64 motherboard in there having undergone a significant quantity of trimming.
The video below the break goes into detail on the state of the art in these mods, and shows how he has eschewed the latest tech and instead restricted himself to only using commercially available breakout PCBs and off the shelf modules. The N64 board trimmed down particularly aggressively, requiring a lot of fine magnet wire soldering for the various PCBs replacing the parts removed. The cartridge slot is brought out to the back of the board at a right angle, jutting out from the rear of the 3D printed case above a space for an 18650 cell and allowing an original game cartridge to be played. There is a microcontroller to facilitate a few compromises on lesser uses of the Nintendo control pads, but the result is a fully playable mini handheld console. He does admit that “The battery life sucks, it’s uncomfortable to hold […] But hey — it fits in my pocket. Does your N64?” We can’t fault him on that.
As electric skateboards kits and components become more commonly available, you really need to do something different to make your custom board stand out. [Emiel] [The Practical Engineer] has managed to do this by building a half-track skateboard. (Video, embedded below.)
Except for the front trucks, fasteners and bearings, all the mechanical components on the board were custom-made. The sturdy rear chassis and the track sections were machined from aluminum plate, and the wheels and track linkages were machined from POM/Delrin. The large carbon fiber deck and the polyurethane pads on the tracks were custom molded, which [Emiel] covered in detail in separate videos, also below. Two beefy brushless motors drive the tracks and are powered by LiPos in enclosed in the sheet metal electronics box. The final product looks very well-built and refined, especially considering most of the work happened in a tiny 2 m x 3 m workshop.
It looks like the board handles gravel paths well, but we would really like to see how it performs on soft surfaces like sand, where even off-road skateboards can struggle. It struggled a bit with low RPM torque, so a slight gearing change is in this board’s future.
It seems as though we still can’t hit the ceiling on better control schemes for 3D Printers. Input Shaping is the latest technique to land on our radar, a form of resonance compensation that all but eliminates the ghosting (aka: vertical ringing) artifacts we see on the walls of printed parts. While the technique has been around for decades, only recently did [Dmitry Butyugin] both apply it to 3D printer control and merge their hard work into the open source firmware package Klipper. Once tuned, the results are simply astonishing–especially since this scheme can augment the print quality of even the most budget printer.
A Split A/B Test with and without Klipper’s Input Shaping feature courtesy of [@LukesLaboratory]
Assuming your 3D printer isn’t infinitely stiff, when your nozzle moves from point to point or changes direction, it vibrates in response to having its speed altered. The result is that the nozzle wobbles along the ideal path it’s trying to track. The result is ghosting, an aesthetic blemish that looks like vertical waves on the sides of your printed part.
Input Shaping is a feed-forward controls technique for cancelling the mechanical vibrations that create ghosting. The idea is that, if we wanted to move the machine from point to point, we send it two impulses. The first impulse kicks the machine into moving and the second impulse follows up at a precise time to cancel the vibrations we would see when the machine comes to a stop. Albeit, moving any machine by sending it two impulses is pretty crude, so we take these impulses, adjust their amplitudes so that they sum to 1, and convolve them with a control input signal that we’d actually like to send it. The result is that the resonance cancellation part of the signal seamlessly “mixes” into the control input signal, and the machine moves from point to point with significantly less vibration at the end of the travel move. For more info on the maths behind this process, have a look at the first four pages of this paper from [Singh and Singhose].
The only hiccup is that you need to do some up-front system characterization of your 3D Printer running Klipper before you can take advantage of this technique. Thankfully the Klipper update comes with a set of step-by-step instructions for characterizing your machine up-front. After a couple test prints to measure the periodicity of your ringing, you can simply apply your measurement results to your config file, and you’re set.
Input Shaping is a prime example of “just wrap a computer around it!“–fixing hardware by characterizing and cancelling unwanted behaviors with software. If you’re hungry for more clever, characterized hardware control schemes, look no further than this Anti-Cogging algorithm for BLDC Motors. And for a video walkthrough of the Klipper implementation, have a look at [eddietheengineer]’s breakdown after the break.
Does your 3D Printer run Klipper? We’d love to see some of your Input Shaping results in the comments.
It seems as though we still can’t hit the ceiling on better control schemes for 3D Printers. Input Shaping is the latest technique to land on our radar, a form of resonance compensation that all but eliminates the ghosting (aka: vertical ringing) artifacts we see on the walls of printed parts. While the technique has been around for decades, only recently did [Dmitry Butyugin] both apply it to 3D printer control and merge their hard work into the open source firmware package Klipper. Once tuned, the results are simply astonishing–especially since this scheme can augment the print quality of even the most budget printer.
A Split A/B Test with and without Klipper’s Input Shaping feature courtesy of [@LukesLaboratory]
Assuming your 3D printer isn’t infinitely stiff, when your nozzle moves from point to point or changes direction, it vibrates in response to having its speed altered. The result is that the nozzle wobbles along the ideal path it’s trying to track. The result is ghosting, an aesthetic blemish that looks like vertical waves on the sides of your printed part.
Input Shaping is a feed-forward controls technique for cancelling the mechanical vibrations that create ghosting. The idea is that, if we wanted to move the machine from point to point, we send it two impulses. The first impulse kicks the machine into moving and the second impulse follows up at a precise time to cancel the vibrations we would see when the machine comes to a stop. Albeit, moving any machine by sending it two impulses is pretty crude, so we take these impulses, adjust their amplitudes so that they sum to 1, and convolve them with a control input signal that we’d actually like to send it. The result is that the resonance cancellation part of the signal seamlessly “mixes” into the control input signal, and the machine moves from point to point with significantly less vibration at the end of the travel move. For more info on the maths behind this process, have a look at the first four pages of this paper from [Singh and Singhose].
The only hiccup is that you need to do some up-front system characterization of your 3D Printer running Klipper before you can take advantage of this technique. Thankfully the Klipper update comes with a set of step-by-step instructions for characterizing your machine up-front. After a couple test prints to measure the periodicity of your ringing, you can simply apply your measurement results to your config file, and you’re set.
Input Shaping is a prime example of “just wrap a computer around it!“–fixing hardware by characterizing and cancelling unwanted behaviors with software. If you’re hungry for more clever, characterized hardware control schemes, look no further than this Anti-Cogging algorithm for BLDC Motors. And for a video walkthrough of the Klipper implementation, have a look at [eddietheengineer]’s breakdown after the break.
Does your 3D Printer run Klipper? We’d love to see some of your Input Shaping results in the comments.
The AlphaSmart NEO and NEO2 are great little word processors for distraction-free writing anywhere you want to go, but they lack the backlight of the later Dana model. Well, [starboyk] has done what many thought impossible and added a backlight to a NEO2. Experience gained from a ton of console mods and repairs led to the question of whether the NEO2’s LCD is similar to a Game Boy’s.
[starboyk] started with a fresh NEO2 from ebay, then swapped out the reflective polarizer for a translucent polarizer and added a trio of LED backlights meant for the original Game Boy across the back of the screen. The best part is that the backlight has its own power switch and a brightness control pot. It sounds easy enough, but this mod is not for the faint of heart as it sounds like a really tight fit in the end. Apparently we only need 500 orders to get a custom backlight manufactured, but barring that does anyone know of a backlight that’s 157mm x 44mm?
You can always stick with the mod where you power the USB-A port and use a USB reading light like I did with my NEO.
While there are loads of impressive and complex projects here on Hackaday, sometimes it’s the simple ones that really speak to us. In this case we were presented with [Isabell Park]’s easy-to-follow instructable on how to build an anti-procrastination device.
On the hardware side there are no surprises, it consists of a PIR sensor connected to a NodeMCU microcontroller. It checks for a signal from the sensor, and if it’s triggered, it sends a command through the Adafruit IO libraries to IFTTT. On its own it could make for a decent movement alarm, but the part that makes the project interesting is how it’s applied to become a device to help with procrastination instead.
First, you put your phone in a jar along with the electronics and close it. Then, with everything configured, the circuit is powered on and stays vigilant for any movement inside the jar. Should you try to take your phone out of it for a quick social media break (which, if you’re like us, can turn into a few hours), IFTTT will be alerted and run through whatever script you have in place. In [Isabell]’s case, she suggests sending an SMS to a trusted contact to keep you in check.
[Teaching Tech] has been interested in adding a tool changer to his 3D printer. E3D offers a system that allows you to switch print heads or even change out a hot end for a laser or a (probably) light-duty CNC head. The price of the entire device, though, is about $2,500, which put him off. But now he’s excited about a product from PrinterMods called XChange. This is a kit that will allow rapid tool changes on many existing printers and costs quite a bit less. Preorder on KickStarter is about $150, but that probably won’t be the final price.
Not all printers are compatible. It appears the unit attaches to printers that have linear rails and there is an adapter for printers that have V rollers in extrusions. Supposedly, there is an adapter in the works for printers that use rods and bearings.
It looks like the installation wouldn’t be very difficult and once you have the main part attached, the tools attach to a plate that simply snaps in and out. There is a sturdy mechanical attachment and also an electrical attachment.
This can cause the head position to change which could affect your print area, your center position, and generally require changes in your production G code or maybe your firmware. Still, you probably expect anything like this to require a little fiddling to get working. Apparently, there will be some prebuilt firmware for popular machines available by the time the units actually ship.
Switching hot ends is certainly attractive. But the real value, it seems, would be adding other things. Lasers and pen plotters seem to be a good idea. We aren’t sure a common printer is stiff enough to do anything serious with mechanical CNC, though. The video also mentions the possibility of having a pick and place system in the future.
This seems like a good idea and we’ve seen quick-change carriage designs for some time. The real issue is if the system requires recalibration on each tool change each time. If so, the value of any system like this is limited. We also wondered if there shouldn’t be an option of a serial EEPROM on the tool plates so the firmware could interrogate the tool head for its identity and even store configuration data on the plate itself. Maybe that’ll be version two. Our own [Joshua Vasquez] released his toolchanging platform, Jubilee, late last year that’s worth checking out, too.
The holiday season is here, and along with it comes Christmas music. Love them or hate them, Yuletide tunes are a simple fact of life each December. This year, [Derek Anderson] put a modern spin on a few classic melodies and listened to them via his set of self-playing chimes.
Inspired by [Derek]’s childhood Ye Merry Minstrel Caroling Christmas Bells (video), these chimes really bring the old-school Christmas decoration into the 21st century. Each chime is struck by a dedicated electromagnetically-actuated mallet, which is in turn controlled by an ESP32 running MicroPython.
Winding the electromagnets
The chimes play MIDI files, so you could, of course, play music unrelated to Christmas if you wanted to. And they even feature an OLED screen that displays what song is being played. For added flair, the entire thing is beautifully framed in black walnut, not to mention the custom-wound solenoids.
This project incorporated mechanical and electrical design, woodworking, 3D printing, programming, and song arrangement. It’s a wonder that [Derek] was able to create the entire product in the 40-80 hour time frame he estimated. (Though it looks like he had a bit of help.)
We always love to see projects like this, ones in which several disciplines get rolled together to create a beautiful finished piece.
Humanity is another step closer to a fantasy-accurate lightsaber thanks to Hackaday alumnus [James Hobson] at Hacksmith. Their proto-saber cuts through (cosplay) stormtrooper armor, (foam) walls, and a (legit!) 1/4″ (6.35mm) steel plate. For so many reasons, we want to focus on the blade and handle. (Video, embedded below.)
The blade is a plasma stream designed for glassworking and burns a propane/oxygen mix with almost no residue, but the “blade” stays in a tight cylinder shape. With a custom PCB hosting a mixing controller, the blade extends and retracts like in the movies. The handle is not a technical marvel; it is an artistic wonder and if you want to see some machining eye-candy, check out the first video after the break. The second video demonstrates just how much damage you can do with a 4000° Fahrenheit tube of portable plasma.
You won’t be dueling anyone just yet, since there is no magnetic field shaping the blade like the ones [Lucas] envisioned. Unfortunately, you can’t block anything more substantial than a balloon sword since solid material will pass right through it, but it will suffer a mighty burn in the process. Lightsabers are a fantasy weapon, but the collective passion of nerds have made it as real as ever, and the Guinness folks give credibility to this build.
Holograms are tricky to describe because science-fiction gives the name to any three-dimensional image. The science-fact versions are not as flashy, but they are still darn cool. Legitimate holograms are images stored on a photographic medium, and they retain a picture of the subject from certain angles. In other words, when [Justin Atkin] makes a hologram of a model building, (video, embedded below) you can see the east side of the belfry, but when you reorient, you see the west side, or the roof if you point down. Holography is different from stereoscopy, which shows you a 3D image using two cameras. With a stereoscopic image, you cannot tilt it and see a new part of the subject, so there is a niche for each method.
There are a couple of different methods for making a hologram at home. First, you probably want a DIY hologram kit since it will come with the exposure plate and a known-good light source. Far be it for us to tell you you can’t buy plates and a laser pointer to take the path less traveled. Next, you need something that will not move, so we’re afraid you cannot immortalize your rambunctious kitty. The last necessity is a stable platform since you will perform a long-exposure shot, and even breathing on the setup can ruin the image. Different colors come from the coherent light source, so getting the “Rainbow Holograms” advertised in the video is a matter of mixing lights. Since you can buy red, green, and blue laser pointers for a pittance, you can do color remixes to your content.
Another type of hologram appears on things like trading cards as those wildly off-color (chromatic, not distasteful) images of super-heroes or abstract shapes. They’re a different variety, which can be printed en-masse, unlike the one-off [Justin] shows us how to make.
If you’re yearning for volumetric displays, we are happy to point you to this beauty capable of showing a jaw-dropping 3D model or this full-color blocky duck.
It might be fair to suspect that most people who are considered digital natives have very little to no clue about what is actually going on inside their smartphones, tablets, and computers. To be fair, it is not easy to understand how modern CPUs work but this was different at the beginning of the 80s when personal computers just started to become popular. People who grew up back then might have a much better understanding of computer basics thanks to computer education systems. The Busch 2090 Microtronic Computer System released in 1981 in Germany was one of these devices teaching people the basics of programming and machine language. It was also [Michael Wessel]’s first computer and even though he is still in proud possession of the original he just recently recreated it using an Arduino.
The original Microtronic was sold under the catchy slogan “Hobby of the future which has already begun!” Of course, the specs of the 4-bit, 500 kHz TMS 1600 inside the Microtronic seem laughable compared to modern microcontrollers, but it did run a virtual environment that taught more than the native assembly. He points out though that the instruction manual was exceptionally well written and is still highly effective in teaching students the basics of computer programming.
Already, a couple of years back he wrote an Arduino-based Microtronic emulator. In his new project, he got around to extending the functionality and creating a custom PCB for the device. The whole thing is based on ATMega 2560 Pro Mini including an SD card module for file storage, an LCD display, and a whole bunch of pushbuttons. He also added an RTC module and a speaker to recreate some of the original functions like programming a digital clock or composing melodies. The device can also serve as an emulator of the cassette interface of the original Microtronic that allowed to save programs with a whopping data rate of 14 baud.
He has certainly done a great job of preserving this beautiful piece of retro-tech for the future. Instead of an Arduino, retro computers can also be emulated on an FPGA or just take the original hardware and extend it with a Raspberry Pi.
Australia has always had a reputation for astronomy. It is a great site low in the Southern hemisphere and there are lots of sparsely inhabited areas free from light and radio interference. Some of the first video from the Apollo 11 landing, for example, came in from “the dish” — a very large radio telescope down under. Australian hobbyists have formed a group, SpaceAusScope, where teams across Australia are building radio telescopes with the plan — which has been delayed by the pandemic — of collecting data and providing it for public analysis.
A secondary goal of the group is to provide better documentation for amateur radio telescope builders. So even if you don’t live in Australia, you might want to check out their website. It looks as thoughthe documentation will arrive in the future, but there is a very informative blog post from one team member about the helical antenna design most of the teams are using to eavesdrop on the hydrogen line.
[Geoff] had access to high dollar simulation tools and some test equipment, so he managed to build an antenna that has good performance and is easier to build than some other common antenna types. Receiving gear that would have been astronomically priced — no pun intended — a few years ago is now commonplace. If you ever thought about building a radio telescope, this might be the time to do it.
Because of the availability of software-defined radios, we’ve seen quite a few radio telescopes lately. Some are reusing old TV dishes. Others use Wi-Fi gear.
[Keenan Rebera] recently found himself with an old racing clock (a chronoix cc3000) left behind by a roommate. How the roommate obtained such a clock seems murky at best, but undeterred [Keenan] set to work bringing the clock to life with Bluetooth functionality. The mechanical nature of the digits provided a satisfying auditory click, making it a good candidate for some upgrading. The new brain transplant is the venerable ESP32 with an RTC for good measure. He created a custom PCB with QWIC connectors to daisy chain together the driver boards together. Each PCB has four TBD62083 for driving the digits, two MCP expanders to increase the address space. This allows the ESP32 to address all the various segments over I2C. By soldering different pads together, he can change the address of each MCP, giving a maximum of 16 digits (9 possible MCP’s each driving 2 digits).
A handsomely designed app accompanies the clock, making updating the RTC and setting the timezone a breeze. Currently, it is displaying a count down to the time when 2020 is officially over. While 2020 will certainly go down in the books as a tumultuous year, it was a great year for DIY clocks at Hackaday. Just in the past few weeks, we’ve seen big LED workshop clocks, esoteric domino clocks, and beautiful clocks that double as works of art. Come 2021, we’re quite confident that [Keenan] will still have a gorgeous clock on his wall ticking and clicking away.
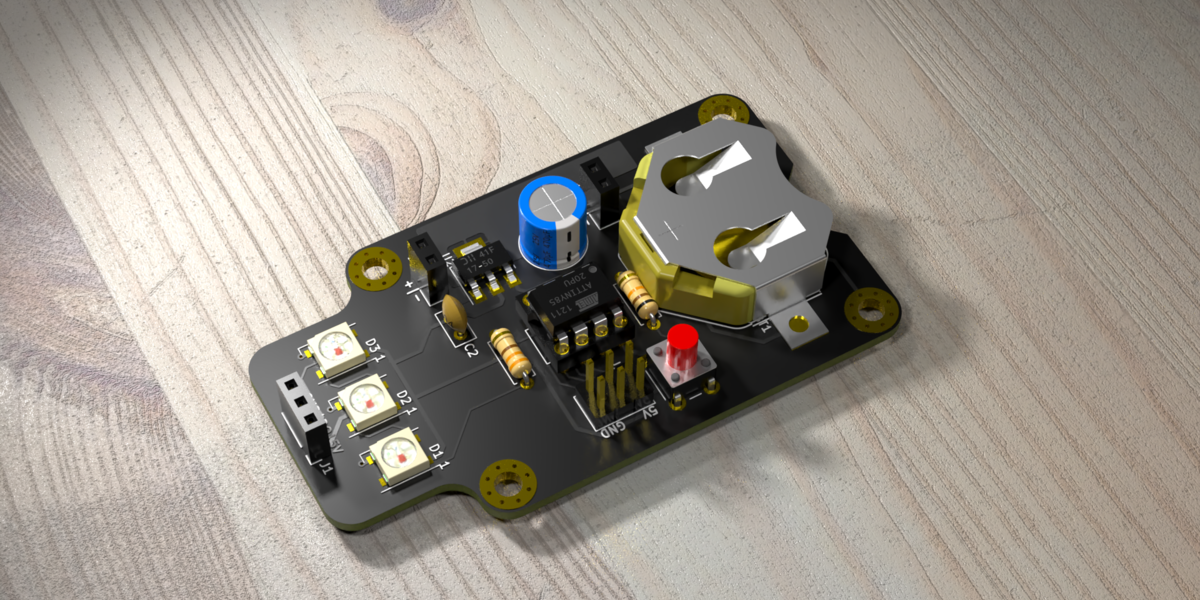
We seem to want our PCB design software to do everything these days, and it almost delivers. You can not only lay it all out, check electrical and design rules, and even spit out a bill of materials, but many PCB tools produce 3D models that are good enough to check parts clearance or are useful in designing enclosures. But when it comes to producing photorealistic output, whether for advertising or just for eye-candy, you might want to turn to 3D design tools.
In this workshop, Anool Mahidharia takes the output of KiCad’s VRML export, gets it rendering in Blender, and then starts tweaking the result until you’re almost not sure if it’s the real thing or a 3D model. He starts off with a board in KiCad, included in the project’s GitHub repo, and you can follow along through the basic import, or go all the way to copying the graphics off the top of an ATtiny85 and making sure that the insides of the through-plated holes match the tops.
If you don’t know Blender, maybe you don’t know how comprehensive a 3D modelling and animation tool it is. And with the incredible power comes a notoriously steep learning curve up a high mountain. Anool doesn’t even try to turn you into a Blender expert, but focuses on the tweaks and tricks that you’ll need to make good looking PCB renders. You’ll find general purpose Blender tutorials everywhere on the net, but if you want something PCB-specific, you’ve come to the right place.
The National Institute Of Standards and Technology was founded on March 3, 1901 as the National Bureau of Standards, taking on its current moniker in 1988. The organisation is charged by the government with ensuring the uniformity of weights and measures across the United States, and generally helping out industry, academia and other users wherever some kind of overarching standard is required.
One of the primary jobs of NIST is the production and sale of Standard Reference Materials, or SRMs. These cover a huge variety of applications, from steel samples to concrete and geological materials like clay. However, there are also edible SRMS, too. Yes, you can purchase yourself a jar of NIST Standard Peanut Butter, though you might find the price uncompetitive with the varieties at your local supermarket. Let’s dive into why these “standard” foods exist, and see what’s available from the shelves of our favourite national standards institute.
A selection of various NIST Standard Reference Materials from the Food and Beverage category.
It’s fun to think about a government organisation creating a “standard” peanut butter to rule them all, one neither better nor worse than one could expect a peanut butter to be. However, these standards are not intended to be a guide on how manufacturers should craft their foods. Instead, the materials are intended for use as calibration standards.
Manufacturers need to verify the nutritional content of their foods, and also need to verify that they’re safe and free of dangerous contaminants. This requires the use of a variety of complex tests. In order to verify that the results of these tests are valid, it’s necessary to have a known standard material on hand to check with. For example, if you run a test on NIST’s standard apple juice, and your measured levels for arsenic match the documented values, you can be relatively certain that when you measure your own company’s product, the numbers you get are valid.
Some of the standards are more familiar than others. Baby Food Composite is fairly straightforward; Typical Diet is a material with broader testing applications.
While the NIST standards could technically be considered edible, they’re not intended to be ingested, and prices are orders of magnitude higher than what you’d pay at your local store. A 3-pack of standard peanut butter will set you back $881 before shipping, while five bars of baking chocolate will cost you the same. Suffice to say, NIST aren’t known for handing out holiday promo codes, either. If we had to cater a picnic with nothing but SRMs, we’d lean on the milk & egg powders along with flour samples to bake a nice standard loaf of bread, topped with either oyster tissue (a steal at $672 for 25 grams), bovine liver, or perhaps the slurried spinach for those wanting a vegetarian option.
Overall, these reference materials serve an important role in ensuring the quality of the foods and beverages we consume every day. Combined with the formal, bleak aesthetic of their label designs, they also make an excellent gag prop for your refrigerator, albeit at great cost. NIST’s work makes life easier for manufacturers, and helps produce better products for consumers. Thus, the enigmatic Standard Reference Materials play an highly important role in the food and beverage industry.
One of Hyundai’s recent concept cars was an electric vehicle named “45” in honor of its inspiration, another concept car from 45 years ago. When footage of a child-sized “Mini 45” surfaced, it was easy to conclude the car was a motorized toy for children. But Jalopnik got more information from Hyundai about this project, where we learned that was not nearly the whole picture.
The video (embedded below) explained this little vehicle is a concept car in its own right, and most of the video is a scripted performance illustrating their concept: using technology to help calm young patients in a hospital, reducing their anxiety as they faced treatment procedures. Mini 45 packs a lot more equipment than the toy cars available at our local store. The little driver’s heartbeat and breathing rate are monitored, and a camera analyzes facial expressions to gauge emotional stress. The onboard computer has an animated avatar who will try to connect with the patient, armed with tools like colorful animations, happy music, candy scent dispenser, and a bubble-blowing machine.
After watching the video masterfully edited to tug at our heartstrings (go blow your nose if you need to) we have many questions. If this was just Hyundai we would have dismissed it as a puff piece and moved on. But a children’s hospital in Barcelona was named as participant in this research project, lending some credibility to the claims. However, it’s not clear how many features shown were actually functional during hospital trial. For example, the UI on the adult-held tablet looks suspiciously like glitzy Hollywood fantasy UI instead of a real tablet app. The video ended with a few clips from the hospital trial, and children’s faces ranged from ecstatic to indifference. Not a surprise since different kids have different personalities.
While some were obviously thrilled to ride in an electric chariot of the future, others might have been better comforted by a trusted adult human instead of a robot. What was the metric for measuring success rate of calming young patients? Has the trial proved this to be a cost-effective solution to a problem that actually exists, or is this the result of a bunch of automotive engineers doing what they do best (build cars) to solve a non-existing problem?
Unsurprisingly, answers to such questions are not found in this Hyundai public relations exercise. But even in the absence of rigorous documentation, this project prompts us to ask if we want robots to monitor our body this closely. Is it a good idea to have computers know our moods? Do we want them to manipulate our emotions? As technology becomes ever more pervasive in our lives, these are not merely academic questions. Hyundai’s Mini 45 might be a cute little thing, but its ambitions raise questions that give us pause.