The next time you find yourself in need of some large-ish plastic springs, maybe consider [PattysLab]’s method for making plastic springs out of spare filament. The basic process is simple: tightly wind some 3D printer filament around a steel rod, secure it and wrap it in kapton tape, then heat it up. After cooling, one is left with a reasonably functional spring, apparently with all the advantages of annealed plastic.
The basic process may be simple, but [PattysLab] has a number of tips for getting best results. The first is to use a 3D-printed fixture to help anchor one end of filament to the steel rod, then use the help of an electric drill to wind the filament tightly. After wrapping the plastic with kapton tape (wrap counter to the direction of the spring winding, so that peeling the tape later doesn’t pull the spring apart), he suspends it in a pre-heated oven at 120 C for PLA and 160 C for PETG. How long does it stay in there? [PattysLab] uses the following method: when the spring is wound, he leaves a couple inches of filament sticking out to act as a visual indicator. When this segment of filament sags down, that’s his cue to begin the retrieval process. After cooling, the result is a compression or extension spring, depending on how it was wound before being heated.
[PattysLab] shared a short video on this Reddit post that shows both springs in action, and the process is all covered in the video, embedded below.
This method clearly works for [PattysLab] and doesn’t require any unusual hardware or equipment, but should anyone wish to apply a bit more finesse to the process, this scientific approach to annealing plastics used in 3D printing might come in handy.
[Mark Aren] purchased a pair of Turbomolecular pumps (TMP) sans controllers, and then built an FPGA based BLDC controller for the Turbomolecular pumps. A TMP is similar to a jet turbine, consisting of several stages of alternating moving turbine blades and stationary stator blades, and having turbine rotation speeds ranging from 10,000 rpm to 90,000 rpm. TMP’s cannot exhaust directly to atmosphere, and must be combined with a backing (or roughing) pump to create a lower grade vacuum first. They find use in lots of applications such as electron microscopy, analytical sciences, semiconductors and lamp manufacturing. With the lamp industry rapidly embracing LEDs, many of the traditional lamp making lines are getting decommissioned, and if you are lucky, you can snag a TMP at a low cost – but it still will not be cheap by any means.
The two BOC-Edwards EXT255H Compound Molecular Pumps (PDF), that [Mark] bought did not have their accompanying EXC100E Turbomolecular Pump Controllers (PDF), and given pandemic related restrictions, he decided to build a controller of his own, using components and modules from his parts bin. The pump and controller user manuals offered only sketchy details about the sensored BLDC motor used in the pump. The low phase-to-phase resistance implied low drive voltage, and [Mark] decided to try running it at 24 V to start with. He already had experience using the Mitsubishi PS21245-E IGBT inverter bridge, and even though it was rated for much higher voltages, he knew that it would work just fine at 24 V too.
After figuring out a state machine for motor commutation that utilized PWM based adjustable current control, he implemented it on a 128 element FPGA board. Considering how expensive the TMP was, he wisely decided to first try out his driver on a smaller “expendable” BLDC motor. This whole process was non-trivial, since his available IGBT module was untested and undocumented, and required several tweaks before he could run it at the required 12 kHz PWM signals. His test motor was also undocumented, failing to run correctly when first hooked up. Fixing that issue meant having to disassemble the motor to check its internal wiring. Eventually, his efforts paid off, and he was able to safely run the TMP motor to confirm that his design worked.
With FPGA code, IGBT wiring and power supply issues sorted, the next step was to add a supervisory micro-controller, using an Arduino Nano. Its functions included interfacing with a touch screen LCD as a user interface, communicating with the FPGA module, and controlling several relays to switch power to the motor power supply, the roughing pump, TMP cooling fan, and a solenoid for the vacuum vent. Spindle current is calculated by measuring voltage drop across shunt resistors on the low side of the IGBT. Motor speed is measured using one of the motor hall sensors, and a thermistor provides motor temperature sensing. [Mark]’s PCB fabrication technique seems a bit different too. Using an Excellon drill file, he drills holes in a piece of plastic using a laser cutter to create a bare board, and then solders copper tracks by hand.
His initial tests at atmospheric pressure (although not recommended unless you monitor pump temperature), resulted in 7300 rpm while consuming about 7 Amps before he had to shut it down. In further tests, after adding a roughing pump to the test setup, he was able to spin the TMP to 20,000 rpm while it consumed 0.6 A. Obviously, the pump is rated to operate at a higher voltage, possibly 48 V based on the values mentioned in the TMP controller manual. The project is still “work in progress” as [Mark] hopes to eventually drive the pump up to its specified 60,000 rpm operating speed. What is not clear is what he eventually intends to do with this piece of exotic machinery. All he mentions is that “he has recently taken an interest in high-vacuum systems and is interested in exploring the high-vacuum world of electron guns.”
Many a gamer has found that after a few years of racing around the track or sending demons back from whence they came, the analog sticks on their trusty controller can start to drift around. Many times it’s a fairly minor problem, something you might only notice if you were really keeping an eye out for it, but it can definitely be annoying. Those handy with a soldering iron might just swap out the sticks for replacements once it gets to that point, but [Taylor Burley] wondered how difficult it would be to recalibrate the ailing sticks instead.
To be clear, [Taylor] acknowledges this approach is overkill. It would be cheaper and easier to just replace the drifting stick with a new one. Even if you take into account that new sticks might not be as high quality as the originals and could give up the ghost faster, this probably isn’t worth the effort. But that doesn’t mean it’s not an interesting hack.
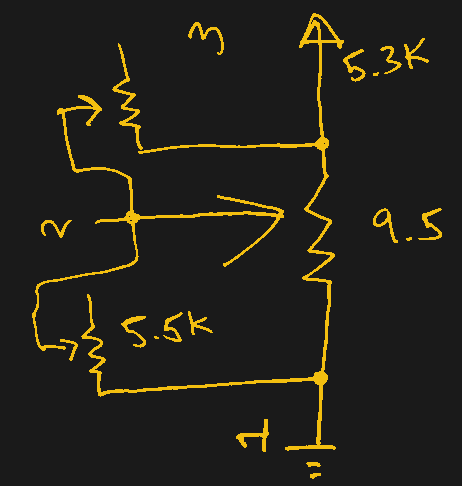
In the video after the break, [Taylor] starts by explaining how stick drift occurs in the first place. Each axis of the stick is physically connected to the wiper of a potentiometer, so for 10K pots, the stick’s center point should correspond to a resistance of 5K. He then goes on to measure the resistance in a bad joystick, and sure enough, the center resistance is off by several hundred Ohms.
To fix this, he comes up with a simple circuit that places additional potentiometers between the wipers. With two joysticks and two adjustment pots per axis, that makes eight little adjustment wheels that need to be fiddled with to get the center points calibrated properly. In this case [Taylor] uses a controller diagnostic tool for the Xbox to quantify the impact his adjustments are making so he can dial it in perfectly, but the idea is the same no matter who’s logo is on the box.
Many a gamer has found that after a few years of racing around the track or sending demons back from whence they came, the analog sticks on their trusty controller can start to drift around. Many times it’s a fairly minor problem, something you might only notice if you were really keeping an eye out for it, but it can definitely be annoying. Those handy with a soldering iron might just swap out the sticks for replacements once it gets to that point, but [Taylor Burley] wondered how difficult it would be to recalibrate the ailing sticks instead.
To be clear, [Taylor] acknowledges this approach is overkill. It would be cheaper and easier to just replace the drifting stick with a new one. Even if you take into account that new sticks might not be as high quality as the originals and could give up the ghost faster, this probably isn’t worth the effort. But that doesn’t mean it’s not an interesting hack.
In the video after the break, [Taylor] starts by explaining how stick drift occurs in the first place. Each axis of the stick is physically connected to the wiper of a potentiometer, so for 10K pots, the stick’s center point should correspond to a resistance of 5K. He then goes on to measure the resistance in a bad joystick, and sure enough, the center resistance is off by several hundred Ohms.
To fix this, he comes up with a simple circuit that places additional potentiometers between the wipers. With two joysticks and two adjustment pots per axis, that makes eight little adjustment wheels that need to be fiddled with to get the center points calibrated properly. In this case [Taylor] uses a controller diagnostic tool for the Xbox to quantify the impact his adjustments are making so he can dial it in perfectly, but the idea is the same no matter who’s logo is on the box.
Many a gamer has found that after a few years of racing around the track or sending demons back from whence they came, the analog sticks on their trusty controller can start to drift around. Many times it’s a fairly minor problem, something you might only notice if you were really keeping an eye out for it, but it can definitely be annoying. Those handy with a soldering iron might just swap out the sticks for replacements once it gets to that point, but [Taylor Burley] wondered how difficult it would be to recalibrate the ailing sticks instead.
To be clear, [Taylor] acknowledges this approach is overkill. It would be cheaper and easier to just replace the drifting stick with a new one. Even if you take into account that new sticks might not be as high quality as the originals and could give up the ghost faster, this probably isn’t worth the effort. But that doesn’t mean it’s not an interesting hack.
In the video after the break, [Taylor] starts by explaining how stick drift occurs in the first place. Each axis of the stick is physically connected to the wiper of a potentiometer, so for 10K pots, the stick’s center point should correspond to a resistance of 5K. He then goes on to measure the resistance in a bad joystick, and sure enough, the center resistance is off by several hundred Ohms.
To fix this, he comes up with a simple circuit that places additional potentiometers between the wipers. With two joysticks and two adjustment pots per axis, that makes eight little adjustment wheels that need to be fiddled with to get the center points calibrated properly. In this case [Taylor] uses a controller diagnostic tool for the Xbox to quantify the impact his adjustments are making so he can dial it in perfectly, but the idea is the same no matter who’s logo is on the box.
A couple of announcements caught our attention last week regarding AI-controlled cars. South Korea’s Kakao Mobility and local startup Autonomous A2G launched a limited self-driving taxi service in Sejong City this month, made possible by enabling legislation passed in May. For now, the service is restricted to government employees, and the AI driver will be backed-up by an engineer who is there to monitor the systems and take over in an emergency. The companies plan to expand the fleet and service areas this year, although no details are given.
Another announcement comes from the Ministry of Land, Infrastructure and Transport about the on-going successes of the semi-autonomous truck platooning program. This is a collaboration between the Korean Expressway Corporation, Kookmin University in Seoul, and Hyundai Motors. Previously restricted to a designated test road called the Yeoju Smart Highway, the program is now being tested on public roads at speeds up to 70 kph. This year the program will expand to platoons of 4 trucks running at 90 kph. We’ve always thought that long-haul trucking and freight industries would be an early adaptor AI technologies, and one which AI could offer significant benefits.
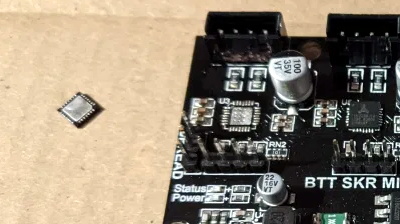
It didn’t take long to figure out that a dead X axis and an message saying “TMC CONNECTION ERROR” meant that one of the stepper drivers on the SKR E3 Mini 3D printer control board had released the magic smoke. Manufacturer BigTreeTech replaced the board under warranty, and the printer was back up and running in short order. But instead of tossing it in the trash, [Simon] wondered how hard it would be to repair the dead board.
Removing the original stepper driver IC.
The short answer is, not very hard. There was no question as to which of the four TMC2209 drivers was shot, since the X motor was the only one experiencing a problem. The drivers unfortunately aren’t socketed on this board, but after a little kiss with the hot air, the old chip was off.
[Simon] didn’t have any spare TMC2209 chips, but the TMC2208 has the same pinout and is a drop-in replacement. The TMC2208 is rated for a bit less current, but it shouldn’t be a problem under normal circumstances.
Other than the stepper connector getting a little toasty during the installation, the swap went off without a hitch and the board was up and running again. [Simon] ended up putting the now repaired SKR E3 Mini in his Ender 3; a nice 32-bit upgrade compared to the ATmega1284 that was originally running the show. Though in the past, he’s managed to squeeze a bit more performance out of the older 8-bit board as well.
It didn’t take long to figure out that a dead X axis and an message saying “TMC CONNECTION ERROR” meant that one of the stepper drivers on the SKR E3 Mini 3D printer control board had released the magic smoke. Manufacturer BigTreeTech replaced the board under warranty, and the printer was back up and running in short order. But instead of tossing it in the trash, [Simon] wondered how hard it would be to repair the dead board.
Removing the original stepper driver IC.
The short answer is, not very hard. There was no question as to which of the four TMC2209 drivers was shot, since the X motor was the only one experiencing a problem. The drivers unfortunately aren’t socketed on this board, but after a little kiss with the hot air, the old chip was off.
[Simon] didn’t have any spare TMC2209 chips, but the TMC2208 has the same pinout and is a drop-in replacement. The TMC2208 is rated for a bit less current, but it shouldn’t be a problem under normal circumstances.
Other than the stepper connector getting a little toasty during the installation, the swap went off without a hitch and the board was up and running again. [Simon] ended up putting the now repaired SKR E3 Mini in his Ender 3; a nice 32-bit upgrade compared to the ATmega1284 that was originally running the show. Though in the past, he’s managed to squeeze a bit more performance out of the older 8-bit board as well.
It didn’t take long to figure out that a dead X axis and an message saying “TMC CONNECTION ERROR” meant that one of the stepper drivers on the SKR E3 Mini 3D printer control board had released the magic smoke. Manufacturer BigTreeTech replaced the board under warranty, and the printer was back up and running in short order. But instead of tossing it in the trash, [Simon] wondered how hard it would be to repair the dead board.
Removing the original stepper driver IC.
The short answer is, not very hard. There was no question as to which of the four TMC2209 drivers was shot, since the X motor was the only one experiencing a problem. The drivers unfortunately aren’t socketed on this board, but after a little kiss with the hot air, the old chip was off.
[Simon] didn’t have any spare TMC2209 chips, but the TMC2208 has the same pinout and is a drop-in replacement. The TMC2208 is rated for a bit less current, but it shouldn’t be a problem under normal circumstances.
Other than the stepper connector getting a little toasty during the installation, the swap went off without a hitch and the board was up and running again. [Simon] ended up putting the now repaired SKR E3 Mini in his Ender 3; a nice 32-bit upgrade compared to the ATmega1284 that was originally running the show. Though in the past, he’s managed to squeeze a bit more performance out of the older 8-bit board as well.
Think you’ve seen the best component storage system? This system could only be better if you could walk up and talk to it. [APTechnologies] was tired of using a hodgepodge of drawers and boxen for storing their components. What they needed was an all-purpose solution for storing all kinds of small-to-medium-sized goodies, be they through hole or SMT.
This one happens to have a software interface as well that is searchable with short, crisp expressions that find parts by ID or with parameters. It’s a Python 3 script running on a Raspberry Pi 4B that’s hiding behind the HDMI display. [APTechnologies] printed a special arm for that, and you can find all the files on GitHub. Not only does the LED above the corresponding drawer light up, it lights up in a color that represents the inventory levels. We assume green/yellow/red, but [APTechnologies] doesn’t specify.
Very few people want to invent the universe before they blink their first LED. Sure, with enough interest a lot of folks will drill-down to the atomic level of technology and build their way back up. But there’s something magical about that first time you got your blinky to blink, and knowing how to write makefiles plays no part in that experienc). Now apply that to projects using smartphone as wireless interfaces… how simple can we make it for people?
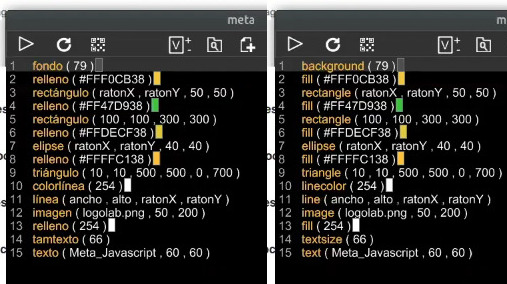
Meta_Processing can translate the instructions into any of 14 languages
Jose David Cuartas is working to answer that very question and gives us a guided tour of his progress in this Meta_Processing workshop held during the Hackaday Remoticon. Meta-Processing is an IDE based on — as you’ve probably guessed — Processing, the programming language that unlocked higher-level functionality to anyone who wanted to perform visually-interesting things without becoming software zen masters. The “Meta_” part here is that it can now be done with very limited typing and interchangeably between different spoken languages.
The approach is to take the best of text programming and block programming languages and mash them together. In that way, you don’t type new lines, you add them with a click of the mouse and select the instruction you want to use on that line from a list. It means you don’t need to have the instructions memorized, and avoids typos in your code. The docs for that instruction will be shown on the bottom bar of the IDE to help you with parameters. And the kicker is that since you’re selecting the instructions, choosing any of the IDE’s 14 available spoken languages will update your “code” with translations into the new language.
In the workshop, video of which is included below, Jose demonstrates a number if interesting examples including audio, video, and user input, using a surprisingly small amount of code. The IDE even spawns a server on the network so that the apps you’ve written can be loaded by a smartphone. It has support for communicating with Arduino-compatible devices with digital read/write, analog read, and servo control. There’s even a fork of the project called Meta_Javascript that rolls in the ability to work with REST-like APIs.
People learn in many different ways. Having options like this to help people get to blinky very quickly is a great way to break down barriers to understanding and using computers.
Now here’s a stocking stuffer of a keyboard. The DecaTxt is the size of a deck of cards, and at first glance it looks like some kind of pocket Keno machine or other gambling or gaming apparatus. But that’s just because it’s so colorful. When you only have ten keys emulating a full keyboard, there’s bound to be some serious labeling going on, as there should be.
The DecaTxt is a Bluetooth 4.0 chording keyboard that’s meant to be used with your phone or whatever you want to pair it with. It was originally called the In10did, which stands for Input Nomenclature Ten Digit Interface Device. Catchy, no? At some point in the last ten years, this little guy went wireless and got a cooler name — the DecaTxt.
By itself, a chording keyboard isn’t that special, but this one is fairly interesting in its design. You can operate it with either one hand or two, but you’re supposed to want to use two — it was after all the In10did, not the In5did. All the chords are a maximum of three keys, so it’s not as though you need to use both hands. Some letters are accessed with a single key press, namely A through J. The rest of the alphabet uses one of the two thumb keys at the top in conjunction with the eight keys on the front. Everything else is a color-coded pair or trio of key presses away.
The idea behind this keyboard is to use your ten digits to maximum advantage, planting your thumbs on top and curling your fingers around the thing in a two-fisted, white-knuckle death grip that seems anything but ergonomic and more appropriate for, say, cracking open a coconut or separating a block of ramen into two servings. Actual users report a much better experience using it one-handed while bracing it against themselves as demonstrated in the video below. That definitely looks like the more comfortable way to go.
I think the basic idea of this keyboard is sound, and the layout could definitely be reworked into a more ergonomic housing (and probably for a lot cheaper than the $125 Bezos Barn price tag). According to the inventor, the price is so high because every DecaTxt is hand-assembled in the United States. As far as I can tell it only comes in one size, which is a bummer for people with particularly large or small hands.
I recently looked at another chording keyboard — the Infogrip BAT, which is a full keyboard with only seven keys. Both are chording keebs that do single glyphs instead of entire words, like stenography machines. The BAT is is designed for desktop use and roughly four times the size of the DecaTxt, so it’s not quite as portable, but its size and shape goes a long way toward ergonomic comfort. The DecaTxt is definitely more mobile friendly — easy to pop in a backpack — but the tradeoff is the loss of that ergonomic design.
Have you tried a chording keyboard like this one? Would you be willing to try one? How would you make it better? Here’s one you can build yourself.
Companies like Google and Microsoft have been investing heavily in the concept of cloud gaming, where a player uses their computer or a mobile device to stream the video feed of a game that’s running on powerful machine tucked away in a data center somewhere. With this technology you can play the latest and greatest titles, even if the device you’re using doesn’t have the processing power to run it locally.
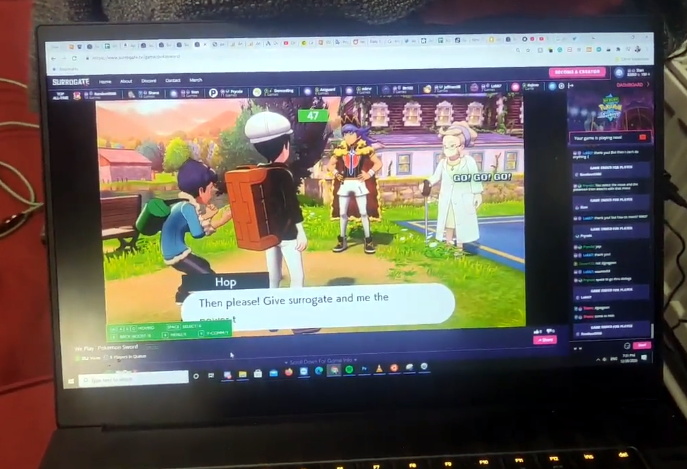
Considering the Switch is already a portable system, it’s not too surprising Nintendo doesn’t seem interested in the technology. But that didn’t stop [Stan Dmitriev] from doing a bit of experimentation on his own. With little more than a Raspberry Pi 4 and Trinket M0, he’s demonstrated that users can remotely interact with the Switch well enough to play games in real time.
The setup is fairly straightforward. A cheap HDMI capture device is used to grab the video from the Nintendo Switch dock, which is then streamed out to web with the help of the Pi’s hardware video encoder. Input from the user is sent over the Pi’s UART to the Trinket, which itself is running a firmware specifically developed for mimicking Nintendo Switch controllers. With so many elements involved, naturally some latency comes into play. The roughly 100 millisecond delay [Stan] is reporting isn’t exactly ideal for fast-paced gaming, but is certainly adequate for more relaxed titles.
On the software side of things, the project is using a SDK developed by [Stan]’s employer SurrogateTV. Right now you need to apply if you want to get your game or other interactive gadget up on the service, though he says it will be opened up to the public next year. But even without all the details, we’ve got a clear idea of how both the video capture and user input sides of the equation are being handled. For personal use, all you’d really need to do is put together a simple web interface to tie it all together.
A solderless breadboard is a place where ideas go to become real for the first time. Usually, this is a somewhat messy affair, with random jumpers flying all about the place, connecting components that can be quickly swapped to zero in on the right values, or to quickly change the circuit topology. Breadboards aren’t the place to make circuit artwork.
That is, however, not always the case, and we’ve seen more than a few examples from [Ben Eater] on breadboarding that approaches the circuit sculpture level of craftsmanship. And like any good craftsman, [Ben] has shared some of his breadboarding tips and tricks in a new video. Starting with a simple 555 blinkenlight project that’s wired up in the traditional anything-goes fashion, [Ben] walks us through his process for making a more presentation-worthy version.
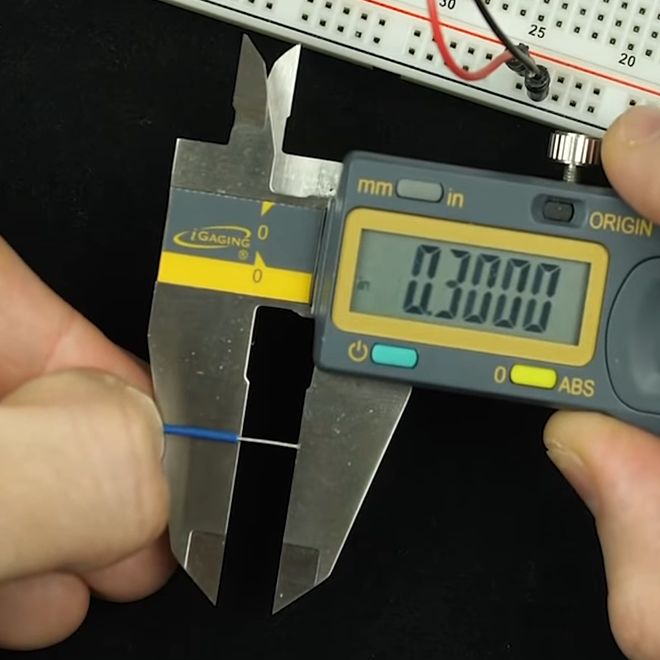
His tools are high-quality but simple, with the wire strippers being the most crucial to good results. Surprisingly, [Ben] relies most heavily on the simple “scissors-style” strippers for their versatility, rather than the complicated semi-automatic tools. We found that to be the biggest take-home from the video, as well as the results of practice. [Ben] has done tons of this type of breadboarding before, which means when he “eyeballs” stripping 0.3 inches of insulation, he can do it down to a ten-thousandth precision.
Granted, there’s not much new here, but watching this video is a little like watching [Bob Ross] paint — relaxing and strangely compelling at the same time. You can get more of the same with pretty much any of his videos that we’ve covered, like this 6502 breadboard computer build. We’ve also seen [Eater]-inspired builds that are pretty impressive, like this full-8-bit breadboard computer.
A solderless breadboard is a place where ideas go to become real for the first time. Usually, this is a somewhat messy affair, with random jumpers flying all about the place, connecting components that can be quickly swapped to zero in on the right values, or to quickly change the circuit topology. Breadboards aren’t the place to make circuit artwork.
That is, however, not always the case, and we’ve seen more than a few examples from [Ben Eater] on breadboarding that approaches the circuit sculpture level of craftsmanship. And like any good craftsman, [Ben] has shared some of his breadboarding tips and tricks in a new video. Starting with a simple 555 blinkenlight project that’s wired up in the traditional anything-goes fashion, [Ben] walks us through his process for making a more presentation-worthy version.
His tools are high-quality but simple, with the wire strippers being the most crucial to good results. Surprisingly, [Ben] relies most heavily on the simple “scissors-style” strippers for their versatility, rather than the complicated semi-automatic tools. We found that to be the biggest take-home from the video, as well as the results of practice. [Ben] has done tons of this type of breadboarding before, which means when he “eyeballs” stripping 0.3 inches of insulation, he can do it down to a ten-thousandth precision.
Granted, there’s not much new here, but watching this video is a little like watching [Bob Ross] paint — relaxing and strangely compelling at the same time. You can get more of the same with pretty much any of his videos that we’ve covered, like this 6502 breadboard computer build. We’ve also seen [Eater]-inspired builds that are pretty impressive, like this full-8-bit breadboard computer.
A solderless breadboard is a place where ideas go to become real for the first time. Usually, this is a somewhat messy affair, with random jumpers flying all about the place, connecting components that can be quickly swapped to zero in on the right values, or to quickly change the circuit topology. Breadboards aren’t the place to make circuit artwork.
That is, however, not always the case, and we’ve seen more than a few examples from [Ben Eater] on breadboarding that approaches the circuit sculpture level of craftsmanship. And like any good craftsman, [Ben] has shared some of his breadboarding tips and tricks in a new video. Starting with a simple 555 blinkenlight project that’s wired up in the traditional anything-goes fashion, [Ben] walks us through his process for making a more presentation-worthy version.
His tools are high-quality but simple, with the wire strippers being the most crucial to good results. Surprisingly, [Ben] relies most heavily on the simple “scissors-style” strippers for their versatility, rather than the complicated semi-automatic tools. We found that to be the biggest take-home from the video, as well as the results of practice. [Ben] has done tons of this type of breadboarding before, which means when he “eyeballs” stripping 0.3 inches of insulation, he can do it down to a ten-thousandth precision.
Granted, there’s not much new here, but watching this video is a little like watching [Bob Ross] paint — relaxing and strangely compelling at the same time. You can get more of the same with pretty much any of his videos that we’ve covered, like this 6502 breadboard computer build. We’ve also seen [Eater]-inspired builds that are pretty impressive, like this full-8-bit breadboard computer.
Running a camera studio is a complicated affair from pretty much every angle. Not only is the camera gear expensive but the rest of the studio setup takes care and attention down to the lighting as well. When adding multiple cameras to the mix, like for a television studio, the level of complexity increases exponentially. It’s great to have a few things that simplify the experience of running all of this equipment too, without the solution itself causing more problems than it solves, like these network-operated Raspberry Pi-powered tally lights.
A tally light is the light on a camera that lets the person being recorded know which camera is currently in use. Networking them all together often requires complex wiring or at least some sort of networking solution, which is what this particular build uses. However, the lights are controlled directly over HTTP rather than using a separate application which might need a port open on a firewall or router, which not only simplifies their use but doesn’t decrease network security.
The HTTP interface, plus all of the software and schematics for this build, are available on the project’s GitHub page. We imagine the number of people operating a studio and who are in need of a tally light system to be fairly low, but the project is interesting from a networking point-of-view regardless of application. If you do have a studio like this and are looking for other ways to improve it, we do have a simple teleprompter hack that might be right up your alley.
Looking for the ultimate Christmas gift? From illuminated braai tongs to recipe books, we have plenty of exciting ideas for you. These practical tools make the perfect gift for braai enthusiasts. With a variety of options to choose from, there is something to suit everyone’s budget. Find braai equipment for sale on Junk Mail and enjoy your next braai!
Photo Source – By Jaco Pretorius on unsplash.com
1. Illuminated braai tongs
Now
there’s no excuse to burn the meat after the sun goes down. Cook your food to
perfection using illuminated braai
tongs! The centrally positioned light makes it easy to flip your meat at
exactly the right moment. The torch is removable, making it convenient to clean
the tongs when you’re done with them.
2. Braai mat
Make light work of cleaning up after your braai with help from a non-stick braai mat. Once the festivities are over and everyone has gone home, the last thing a braai master feels like is scrubbing the grill. All you need to do is put the braai sheet over the grill so that you can cook your food on it. Most of these braai mats can withstand temperatures of over 200˚C. Not only do these high-tech mats add to the convenience of cleaning up, but they are also perfect for cooking vegetables and marinating sosaties on. You can even bake pancakes or crumpets with marshmallows and chocolate sauce on it for a delicious dessert. The sheet is suitable for use with a gas or coal braai, but you should avoid placing it over an open flame.
3. Braai utensil set
Every
braai master needs
a reliable set of braai tools. Tongs, a grill brush, and basting brush lay the
foundation for any braai.
A braai set in a nice case makes it even better and keeps the essential tools
together and well protected.
Photo Source – GreenLeaf Home on Junk Mail
4. Stainless steel grid
Whether
you’re going camping or making a braai at home, a quality stainless steel grid will come in
handy. Different sizes and designs make it easy to take your grill with you
wherever your next adventure leads you. Perfect for braaing meat and
sandwiches, a stainless-steel grill offers you improved control for consistent
cooking. Simply place your food between the two grids and use the locking ring
on the handle to keep it in place.
5. Meat thermometer
Enjoy
your meat exactly the way you prefer it with the help of a meat thermometer.
You’ll be able to select the best temperature for each type of meat to ensure
that it’s cooked to perfection.
6. Recipe books
There is a wide variety of cookbooks on the market that will take your braai to the next level. From starters to main courses, side dishes, snacks, and deserts, cookbooks will give you endless opportunities this Christmas.
Whether you are vegan or just want to try something new in the shoe department, Adidas will soon have your feet covered. They are currently working on a leather alternative made of mycelium, which is the network of fungal filament material that produces mushrooms, toadstools, truffles, and more. Hopefully they’re not using live mycelium, otherwise your shoes will grow mushrooms when they get wet like this mycelium canoe we saw a few weeks ago.
Adidas have really rooted themselves in sustainability over the past few years. They claim to have made 15 million pairs of shoes in 2020 out of recycled plastic waste collected from beaches and coastlines, and they’re shooting for 17 million pairs in 2021. The company started offering these in 2017, and they feature thread in the laces and other places that was spun from ocean plastic waste. Adidas are also using a lot of recycled polyester and are developing a new type of recycled cotton, according to Business Insider.
The setup is a little different than builds you may be used to. The website runs on a cloud-hosted virtual machine on Digital Ocean, rather than running locally. This allows anyone on the web to visit the site, and use the interface to control the lights on the Christmas tree. An image of the tree is used as the interface, and allows users to set the color of each individual LED on the tree. The LEDs themselves are driven from an NodeMCU ESP8266, which uses its WiFi connection to query the website itself and grab the color data as needed. [JT] has also included a secondary interface, where the chat of the Youtube livestream can be used to control the LEDs, too.
It’s a build that’s a touch more complicated than most typical online LED blinkers, but one that teaches useful skills in interfacing on the web and using virtual machines. We’ve seen other builds in this genre too; even some that are reactive to “Christmas fever” itself. Video after the break.
A common complaint we’ve seen on many of the recent cyberdeck builds is that they don’t offer any display technology more advanced than a tablet-sized IPS panel. The argument goes that to be a true deck in the Gibsonian sense, it’s got to have some kind of virtual reality interface or at least a head mounted display. Unfortunately such technology is expensive, and often not particularly hacker friendly.
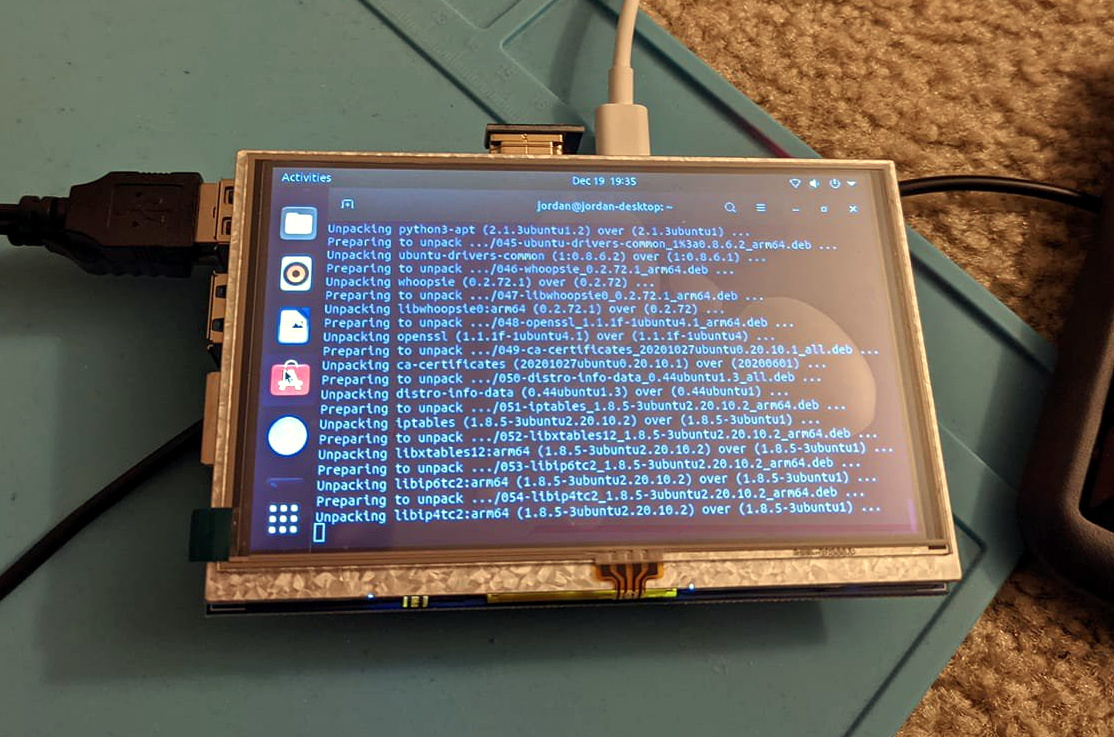
But assuming you can settle for a somewhat low-tech alternative, the simple head mounted display that [Jordan Brandes] has been fiddling with is certainly a viable option. By mounting a five inch 800×480 TFT LCD to the front of a pair of goggles designed for first person view (FPV) flying, you can throw together a workable rig for around $30 USD. Add in some headphones, and you’ve got a fairly immersive experience for not a lot.
Naturally the display will show whatever HDMI signal you give it, but in his case, [Jordan] has mounted a Raspberry Pi to the back of it to make it a complete wearable computer. With a Bluetooth travel keyboard in the mix, he’s even able to get some legitimate work done with this setup. If he ends up combining this with the ultrasonic keyboard he was working on earlier in the year, he’ll be getting pretty close to jacking into cyberspace for real.
A common complaint we’ve seen on many of the recent cyberdeck builds is that they don’t offer any display technology more advanced than a tablet-sized IPS panel. The argument goes that to be a true deck in the Gibsonian sense, it’s got to have some kind of virtual reality interface or at least a head mounted display. Unfortunately such technology is expensive, and often not particularly hacker friendly.
But assuming you can settle for a somewhat low-tech alternative, the simple head mounted display that [Jordan Brandes] has been fiddling with is certainly a viable option. By mounting a five inch 800×480 TFT LCD to the front of a pair of goggles designed for first person view (FPV) flying, you can throw together a workable rig for around $30 USD. Add in some headphones, and you’ve got a fairly immersive experience for not a lot.
Naturally the display will show whatever HDMI signal you give it, but in his case, [Jordan] has mounted a Raspberry Pi to the back of it to make it a complete wearable computer. With a Bluetooth travel keyboard in the mix, he’s even able to get some legitimate work done with this setup. If he ends up combining this with the ultrasonic keyboard he was working on earlier in the year, he’ll be getting pretty close to jacking into cyberspace for real.
A common complaint we’ve seen on many of the recent cyberdeck builds is that they don’t offer any display technology more advanced than a tablet-sized IPS panel. The argument goes that to be a true deck in the Gibsonian sense, it’s got to have some kind of virtual reality interface or at least a head mounted display. Unfortunately such technology is expensive, and often not particularly hacker friendly.
But assuming you can settle for a somewhat low-tech alternative, the simple head mounted display that [Jordan Brandes] has been fiddling with is certainly a viable option. By mounting a five inch 800×480 TFT LCD to the front of a pair of goggles designed for first person view (FPV) flying, you can throw together a workable rig for around $30 USD. Add in some headphones, and you’ve got a fairly immersive experience for not a lot.
Naturally the display will show whatever HDMI signal you give it, but in his case, [Jordan] has mounted a Raspberry Pi to the back of it to make it a complete wearable computer. With a Bluetooth travel keyboard in the mix, he’s even able to get some legitimate work done with this setup. If he ends up combining this with the ultrasonic keyboard he was working on earlier in the year, he’ll be getting pretty close to jacking into cyberspace for real.
The circuit is a simple one, and a classic. The spring from a ballpoint pen is soldered to the base of a BC547 transistor, and when held close enough to a conductor carrying AC power, a current is induced in the spring which is sufficient to turn the transistor on. The transistor then switches on a second BC547, which lights an LED. The whole circuit is built on top of a battery clip so it can be run straight from the top of a standard 9 volt battery.
It’s a circuit you’ll find all over the place, even built into many modern multimeters. It can be particularly useful to help avoid drilling through mains wires embedded in the walls of your home. Of course, if you’d like even more information about what’s lurking within your walls, consider this capacitive imaging hack. Video after the break.
Virtual reality has seen enormous progress in the past few years. Given its recent surges in development, it may come as a bit of a surprise to learn that the ideas underpinning what we now call VR were laid way back in the 60s. Not all of the imagined possibilities have come to pass, but we’ve learned plenty about what is (and isn’t) important for a compelling VR experience, and gained insights as to what might happen next.
If virtual reality’s best ideas came from the 60s, what were they, and how did they turn out?
Interaction and Simulation
First, I want to briefly cover two important precursors to what we think of as VR: interaction and simulation. Prior to the 1960s, state of the art examples for both were the Link Trainer and Sensorama.
The Link Trainer was an early kind of flight simulator, and its goal was to deliver realistic instrumentation and force feedback on aircraft flight controls. This allowed a student to safely gain an understanding of different flying conditions, despite not actually experiencing them. The Link Trainer did not simulate any other part of the flying experience, but its success showed how feedback and interactivity — even if artificial and limited in nature — could allow a person to gain a “feel” for forces that were not actually present.
Sensorama was a specialized pod that played short films in stereoscopic 3D while synchronized to fans, odor emitters, a motorized chair, and stereo sound. It was a serious effort at engaging a user’s senses in a way intended to simulate an environment. But being a pre-recorded experience, it was passive in nature, with no interactive elements.
Combining interaction with simulation effectively had to wait until the 60s, when the digital revolution and computers provided the right tools.
The Ultimate Display
In 1965 Ivan Sutherland, a computer scientist, authored an essay entitled The Ultimate Display (PDF) in which he laid out ideas far beyond what was possible with the technology of the time. One might expect The Ultimate Display to be a long document. It is not. It is barely two pages, and most of the first page is musings on burgeoning interactive computer input methods of the 60s.
The second part is where it gets interesting, as Sutherland shares the future he sees for computer-controlled output devices and describes an ideal “kinesthetic display” that served as many senses as possible. Sutherland saw the potential for computers to simulate ideas and output not just visual information, but to produce meaningful sound and touch output as well, all while accepting and incorporating a user’s input in a self-modifying feedback loop. This was forward-thinking stuff; recall that when this document was written, computers weren’t even generating meaningful sounds of any real complexity, let alone visual displays capable of arbitrary content.
A Way To Experience The Unreal
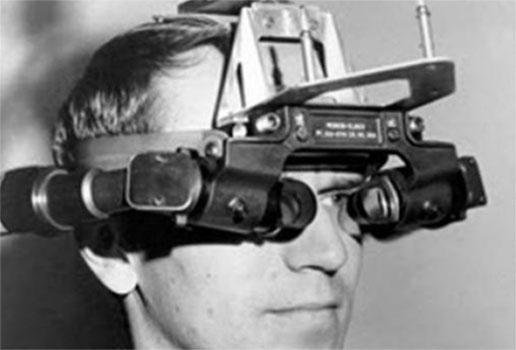
Closeup of Sutherland’s Sword of Damocles, a ceiling-suspended system into which a user’s head was strapped. [image source: History of VR]
Sutherland’s main idea was this: as humans, we have an intuitive familiarity with what we can see and feel. The effects of gravity, how it feels to start or stop something from moving, or imagining how an object will look from a different angle, these are all things we comprehend effortlessly.
What if we could similarly experience concepts that could not be realized in our physical world? It would be a way to gain intuitive and intimate familiarity with concepts not otherwise available to us.
As a first step in actualizing these ideas, Sutherland and some of his students created a large ceiling-suspended system dubbed Sword of Damocles. It was the first head-mounted display whose visuals did not come from a camera, but were generated by a computer. It displayed only line-based vector graphics, but it was able to modify what it showed in real-time based on head position and user input.
Leveraging a computer’s ability to process feedback and dynamically generate visuals was key to an interactive system capable of generating its own simulated environment. For the first time, a way to meaningfully fuse interaction with abstract simulation was within reach, and there was nowhere to go but up.
Ideas From the 60s That Happened
Many concepts that Sutherland predicted have come to pass, at least partially, and are recognizable in some modern form.
Objects Displayed by a Computer Need Not Follow Ordinary Rules of Reality
Being able to define things free from the confines of physical reality, and adjust their properties at will, encompasses functions like CAD modeling and other simulation work as well as it does entertainment like gaming. In fact, it would even be fair to say that gaming in particular thrives in this space.
Sutherland envisioned a computer-controlled display as a looking glass into a mathematical wonderland. A great example of this concept is this 3D engine for non-Euclidean geometry which presents impossible geometries in a familiar, interactive way.
Tactile and Haptic Feedback
Today’s VR controllers (and mobile devices like phones, for that matter) rely heavily on being able to deliver a range of subtle vibrations as meaningful feedback. While not measuring up to Sutherland’s ideal of accurately simulating things like complex physics, it nevertheless gives users an intuitive understanding of unseen forces and boundaries, albeit simple ones, like buttons that do not exist as physical objects.
Head Tracking
Making a display change depending on where one is looking is a major feature of VR. While Sutherland only mentioned this concept briefly, accurate and low-latency tracking has turned out to be a feature of critical importance. When Valve was first investigating VR and AR, an early indicator that they were onto something was when researchers experienced what was possible when low-persistence displays were combined with high-quality tracking; it was described as looking through a window into another world.
Hand and Body Tracking, Including Gaze Tracking
Sutherland envisioned the ability of a computer to read a user’s body as an input method, particularly high-dexterity parts of the body like the hand and eyes. Hand tracking is an increasingly common feature in consumer VR systems today. Eye tracking exists, but more on that in a moment.
Some Ideas Haven’t Happened Yet
There are a number of concepts that haven’t happened, or exist only in a very limited way, but that list is shrinking. Here are the most notable standouts.
Robust Eye Tracking Is Hard
Sutherland wrote “it remains to be seen if we can use a language of glances to control a computer,” and so far that remains the case.
It turns out that eye tracking is fairly easy to get mostly right: one simply points a camera at an IR-illuminated eyeball, looks for the black circle of the pupil, and measures its position to determine where its owner is looking. No problems there, and enterprising hackers have made plenty of clever eye tracking projects.
Eye tracking gets trickier when high levels of reliable accuracy are needed, such as using it to change how visuals are rendered based on exactly where a user is looking. There are a number of reasons for this: not only does the human eye make frequent, involuntarily movements called saccades, but roughly 1% of humans have pupils that do not present as nice round black shapes, making it difficult for software to pick out. On top of that, there is a deeper problem. Because a pupil is nothing more than an opening in the flexible tissue of the iris, it is not always a consistent shape. The pupil in fact wobbles and wiggles whenever the eye moves — which is frequently — and this makes highly accurate positioning difficult to interpret. Here is a link (cued to 37:55 in) to a video presentation explaining these issues, showing why it is desirable to avoid eye tracking in certain applications.
Simulation-Accurate Force Feedback Isn’t Ready
Force feedback devices have existed for years, and there is renewed interest in force feedback thanks to VR development. But we are far from using it in the way Sutherland envisioned: to simulate and gain intuitive familiarity with complex concepts and phenomena, learning them as well as we know our own natural world.
Probably the most frequently-quoted part of The Ultimate Display is the final few sentences, in which Sutherland describes something that sounds remarkably like the holodeck from Star Trek:
The ultimate display would, of course, be a room within which the computer can control the existence of matter. A chair displayed in such a room would be good enough to sit in. Handcuffs displayed in such a room would be confining, and a bullet displayed in such a room would be fatal. With appropriate programming such a display could literally be the Wonderland into which Alice walked.
Clearly we’re nowhere near that point, but if we ever are, it might be the last thing we ever need to invent.
Important Features vs. Cool Ones
The best ideas may have come from the 60s, but we’ve learned a lot since then about what is and isn’t actually important to creating immersive experiences. Important features are the ones a technology really needs to deliver on, because they are crucial to immersion. Immersion is a kind of critical mass, a sensory “aha!” moment in which one ceases to notice the individual worky bits involved, and begins to interact seamlessly and intuitively with the content in a state of flow. Important features help that happen.
For example, it may seem that a wide field of view in an HMD is important for immersion, but that turns out to not quite be the case. We covered a fascinating presentation about how human vision uses all sorts of cues to decide how “real” something is, and what that means for HMD development. It turns out that a very wide field of view in a display is desirable, but it is not especially important for increasing immersion. Audio has similar issues, with all kinds of things being discovered as important to delivering convincing audio simulation. For example, piping sound directly into the ear canals via ear buds turns out to be a powerful way for one’s brain to classify sounds as “not real” no matter how accurately they have been simulated. Great for listening to music, less so for a convincing simulation.
Another feature of critical importance is a display with robust tracking and low latency. I experienced this for myself the first time I tried flawless motion tracking on a modern VR headset. No matter how I moved or looked around, there was no perceptible lag or drift. I could almost feel my brain effortlessly slide into a groove, as though it had decided the space I was in and the things I was looking at existed entirely separate from the thing I was wearing on my head. That was something I definitely did not feel when I wore a Forte VFX1 VR headset in the mid-90s. At the time, it wasn’t the low resolution or the small field of view that bothered me, it was the drifty and vague head tracking that I remember the most. There was potential, but it’s no wonder VR didn’t bloom in the 90s.
What’s Next?
One thing that fits Sutherland’s general predictions about body tracking, but which he probably did not see coming, is face and expression tracking. It is experimental work from Facebook, but is gaining importance mainly for the purpose of interacting with other people digitally, rather than as a means of computer input.
Speaking of Facebook, a social network spearheading VR development (while tightening their grip on it) definitely was not predicted in the 60s, yet it seems to be next for VR nevertheless. But I never said the future of VR came from the 60s, just that the good ideas did.

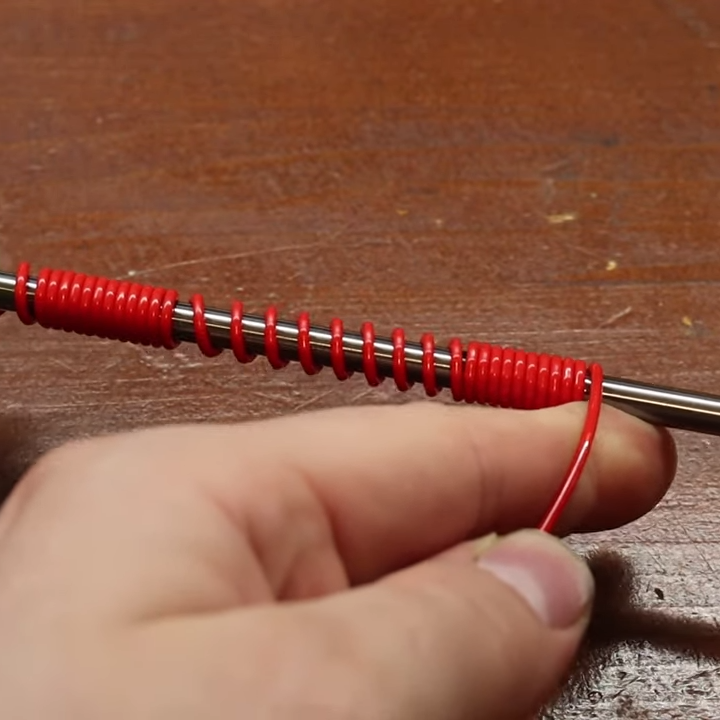 The next time you find yourself in need of some large-ish plastic springs, maybe consider [PattysLab]’s method for making plastic springs out of spare filament. The basic process is simple: tightly wind some 3D printer filament around a steel rod, secure it and wrap it in kapton tape, then heat it up. After cooling, one is left with a reasonably functional spring, apparently with all the advantages of annealed plastic.
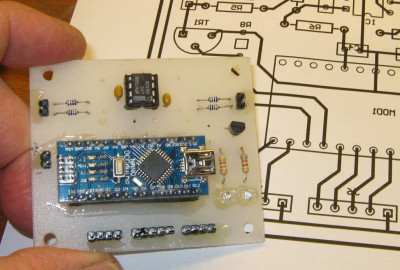 With FPGA code, IGBT wiring and power supply issues sorted, the next step was to add a supervisory micro-controller, using an Arduino Nano. Its functions included interfacing with a touch screen LCD as a user interface, communicating with the FPGA module, and controlling several relays to switch power to the motor power supply, the roughing pump, TMP cooling fan, and a solenoid for the vacuum vent. Spindle current is calculated by measuring voltage drop across shunt resistors on the low side of the IGBT. Motor speed is measured using one of the motor hall sensors, and a thermistor provides motor temperature sensing. [Mark]’s PCB fabrication technique seems a bit different too. Using an Excellon drill file, he drills holes in a piece of plastic using a laser cutter to create a bare board, and then solders copper tracks by hand.