
Yearly Archives: 2020
Try not to laugh CHALLENGE 33 – by AdikTheOne
Raspberry Pi Shuffler Is Computerized Card Shark
If you’re playing Texas Hold’em or other card games with a small group, you may get tired of shuffling over and over again. [3dprintedLife] was in just such a position, and realized there were no good automatic card shufflers in his budget. Instead, he elected to build one, and put in some extra functionality to corrupt the game to his whims.
The mechanicals of the machine took much development, as accurately handling and dispensing cards is a challenge, particularly with the loose tolerances of 3D printed parts. After developing a reliable transport mechanism, it was more than capable of shuffling a deck well with some basic commands.
However, the real magic comes from installing a camera and Raspberry Pi running OpenCV. This is capable of reading the value and suit of each card, and then stacking the deck in a particular order to suit the dealer’s wishes. It’s all controlled through a web interface and is capable of creating guaranteed wins in Blackjack and Texas Hold’em. Files are on Github for those eager to delve deeper into how the machine works.
The mechanism does such a beautiful job of shuffling, that your friends may not even notice the ruse. It goes to show that you should always have your wits about you when gambling with the aid of machines. Of course, if you wish only to create havoc, this Lego card machine gun may be more your speed. Video after the break.
[via Reddit]
source https://hackaday.com/2020/07/20/raspberry-pi-shuffler-is-computerized-card-shark/
Wood-turning the fabulous $66,600 *Root of all evil* bowls
5 MINUTES OF PLEASURE! VLOG22
Automated Part Removal Gets Serious with the Chain Production Add-on
Giving a 3D printer the ability to remove its own prints means that it can crank out part after part automatically, without relying on a human operator between jobs. [Damien Weber] has done exactly that to his Prusa MK3/S printer, with what he calls the Chain Production Add-on.
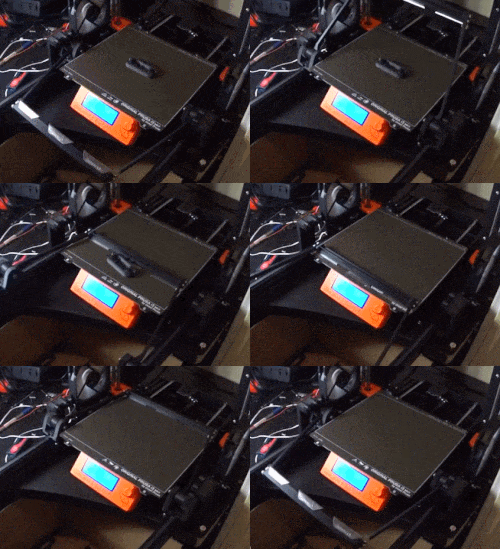 [Damien]’s approach is one we haven’t quite seen before. When printing is complete, a fan cools the part then an arm (with what looks like utility knife blades attached at an angle) swings up and behind the bed. The arm zips forward and scoops the print off the bed, dumping the finished part in the process. It’s all made from 3D printed parts, aluminum extrusion and hardware, two stepper motors, and a driver PCB. The GitHub repository linked above holds all the design files, but there is also a project page on PrusaPrinters.org.
Not quite sure how it all works? Watch it in action in the video embedded below.
We have seen quite a few different approaches for automatic part removal in the past. Literally punching prints off the bed is a thing we have seen, and we’ve also witnessed an industrial robot arm handle an entire print farm.
Automated Part Removal Gets Serious with the Chain Production Add-on
Giving a 3D printer the ability to remove its own prints means that it can crank out part after part automatically, without relying on a human operator between jobs. [Damien Weber] has done exactly that to his Prusa MK3/S printer, with what he calls the Chain Production Add-on.
[Damien]’s approach is one we haven’t quite seen before. When printing is complete, a fan cools the part then an arm (with what looks like utility knife blades attached at an angle) swings up and behind the bed. The arm zips forward and scoops the print off the bed, dumping the finished part in the process. It’s all made from 3D printed parts, aluminum extrusion and hardware, two stepper motors, and a driver PCB. The GitHub repository linked above holds all the design files, but there is also a project page on PrusaPrinters.org.
Not quite sure how it all works? Watch it in action in the video embedded below.
We have seen quite a few different approaches for automatic part removal in the past. Literally punching prints off the bed is a thing we have seen, and we’ve also witnessed an industrial robot arm handle an entire print farm.
Ramsay’s MOST INTENSE Moments on the Kitchen Nightmares! | Ramsay’s Kitchen Nightmares | Part 1
Grok The Z80 With This Simulator
Many of us will have at some point encountered a Z80 microprocessor, whether we’ve bare-metal programmed for it, or simply had a go at blasting some invaders on a game system using one. Like all the processors of its era, it’s got a relatively simple and accessible internal block diagram, so there’s a good chance that readers well even know how it works, too. But do any of know how it really works, down to the gate, transistor, and net level? [Goran] does, because he’s written a Z80 netlist simulator that allows the running of code alongside the examination of the chip and its signals. It’s not particularly fast, achieving a modest 2.3kHz clock speed when run of a fairly high-end PC, but we’re guessing readers needing to run Z80 code for anything other than learning would use the real thing anyway.
There’s a video of the software in operation which we’ve placed below the break, and we can see it will be a fascinating tool even to people who aren’t dedicated reverse engineers. To be able to bring up a logic analyzer view of the internals of a processor while it is in operation is truly astounding if you are used to it as a black box, and to have logic diagrams at your fingertips rather than puzzling out individual transistors really gives a window into what is going on.
This isn’t the only such simulator out there, in the past we’ve mentioned Visual6502, when we covered the Monster 6502.
source https://hackaday.com/2020/07/20/grok-the-z80-with-this-simulator/
Blackhead extraction pimple popping whitehead
Creative Girlfriends And Wives Who Keep The Humor Alive In Their Relationships
Let the Hair Out (Ear Foreign Body Removal) | Auburn Medical Group
r/ProRevenge – Coworker Frames Me! STEALS a $5000 Ring to Get Me Fired! [My Revenge]
Outdoor Mini Skirt, Panties & Thongs Unboxing Try On Haul! Panty Raid!
r/maliciouscompliance | “You DON’T want me to Fix it? Okay, Free iPhone for me!”
3D Printer Revives Large Format Camera
With a quarter-century of more of consumer digital cameras behind us, it’s easy to forget that there was once another way to see your photos without waiting for them to be developed. Polaroid Land cameras and their special film could give the impatient photographer a print in about a minute, but sadly outside a single specialist producer, it is no longer a product that is generally available. [The Amateur Engineer] sought an alternative for a large format camera, by adapting a back designed for Fuji Instax film instead.
Lomography, the retailer of fun plastic cameras, had produced an Instax back for one of their cameras, and to adapt it for a Tachihara large format camera required a custom 3D-printed frame. Being quite a large item it had to be printed in three pieces and stuck together with epoxy. Then a series of light leaks had to be chased down and closed up. The result is a working Instax back for the camera, which appears to deliver the photographic goods.
We’ve seen a few digital backs for larger cameras produced with scanners, but we rather like this linear CCD one.
source https://hackaday.com/2020/07/19/3d-printer-revives-large-format-camera/
Instant Regret Compilation 2020 Episode 12 | Amazing Moments
Gigantic pulsating parasite extracted from 8-week-old kitten.
‘Dr Pimple Popper’: Kevin Olaeta Passed Away In His Sleep Shortly After Episode Was Filmed | MEAWW
Funny Situations That Husbands Of Pregnant Wives Have To Face Each Day
“Atheists tiptoe around Islam” | Lee – Richmond, VA | Atheist Experience #684
Ultimate Food Hacks Compilation
Digging Deep Into SD Card Secrets
To some, an SD card is simply an SD card, notable only for the amount of storage it provides as printed on the label. However, just like poets, SD cards contain multitudes. [Jason Gin] was interested as to what made SanDisk’s High Endurance line of microSDXC cards tick, so he set out to investigate.
Naturally, customer service was of no help. Instead, [Jason] started by scraping away the epoxy covering which hides the card’s test points. Some delicate soldering was required to hook up the test points to a breakout board, while also connecting the SD interface to a computer to do its thing. A DS Logic Plus signal analyzer was used to pick apart the signals going to the chip to figure out what was going on inside.
After probing around, [Jason] was able to pull out the NAND Flash ID, which, when compared to a Toshiba datasheet, indicates the card uses BiCS3 3D TLC NAND Flash. 3D NAND Flash has several benefits over traditional planar Flash technology, and SanDisk might have saved [Jason] a lot of time investigating if they’d simply placed this in their promotional material.
We’ve seen other similar hacks before, like this data recovery performed via test points. If you’ve been working away on SD cards in your own workshop, be sure to let us know!
source https://hackaday.com/2020/07/19/digging-deep-into-sd-card-secrets/