There was a time when any electronics student would have a slide rule hanging off their belt. By the 1970s, the slide rule changed over to an electronic calculator which was a pricy item. Today you can buy calculators at the dollar store. [JohnAudioTech] pulled out an old Radio Shack vacuum fluorescent display (VFD) calculator and found it didn’t work. Obviously, that means it is time to open it up.
It is fun to see one of these old devices opened up again. Consumer electronics with big through-hole ICs! Troubleshooting the device wound up being anti-climatic, as a broken wire to the battery compartment explained the whole thing.
As a teardown, though, this is a fun video. Not only are all the parts through-hole, but the PCB is clearly a manual layout with serpentine traces flowing across the board like some sort of art piece.
[John] even has a need hack for the calculator itself, if you happen to have one. Apparently, the calculator IC had a provision for a pi constant key, but there was no key for that function. Pressing the square root and 4 keys at the same time will trick the chip into providing pi anyway.
Another interesting item: [John] modified a cheap camera and removed the IR filter from it. Using that he was able to image the display’s cathode wire, which is normally difficult to see unaided.
There isn’t much need for a calculator now since your phone can easily do math ranging from a simple calculator app to symbolic math programs. But, like slide rules, we have a soft spot for these handheld computers.
If you don’t want vintage, an Arduino has plenty of power compared to these old machines. If, by chance, you want a modern calculator, they can also do plenty these days.
When [0xRickSanchez] found some D-Link firmware he couldn’t unpack, he was curious to find out why. The firmware had a new encryption method which was doing its job of preventing tampering and static analysis. Of course, he had to figure out how to get around it and is documenting his work in a series of blog posts.
Looking at the entropy analysis showed the data to be totally random, a good sign it was either encrypted or compressed. The target router cost about $200, but a similar cheaper router used the same encryption and thus this model became the hardware of choice for testing.
A console cable provided access to the router and an executable named imgdecrypt immediately caught his eye. Moving that file to a regular PC allowed the usual attack to see how it does its job.
You can follow along with part 2 which is in 2 different parts. The end result is on GitHub, but — honestly — the real adventure is in the story of how it came together.
Each pixel lamp consists of a Wemos D1 controller fitted with an old-school 4-wire RGB LED. The components are placed in a 3D printed translucent cube, which serves as an attractive enclosure and diffuser. With WiFi connectivity on board, it’s possible to connect the individual cubes up to a Raspberry Pi serving as a Phillips Hue bridge thanks to DIYHue. Once setup, the lights can be configured as an Ambilight system within the Phillips Hue app.
It’s an impressive way to give a room reactive lighting on a budget, without resorting to costly off-the-shelf solutions. We’d love to see this expanded further, as we’re sure a room full of reactive lights would be truly a sight to behold. Other methods to recreate the Ambilight technology are possible, too. Video after the break.
Spectrophotometry is an important scientific tool, most commonly used in biology and chemistry. It’s a method to measure the amount of light absorbed by a chemical solution at various different wavelengths. While it’s typically the preserve of expensive lab equipment, [Daniel Hingston] built a rig to do the job at home.
The heart of the rig is a normal filament-based flashlight bulb, which produces good-quality white light containing all colors. A prism is then used to split the light into its component wavelengths, so that the sample can be tested across the whole light spectrum. The prism is rotated by a servo motor, which exposes the sample to the full rainbow, while an Arduino uses a light-dependent resistor to measure how much light makes it through the sample. Thus, the amount of light absorbed by the sample can be calculated, relative to calibrations made with no sample present.
It’s a simple build that can be achieved with fairly common materials, barring the prism which may need to be specially ordered. It would be a great way to teach highschool students about advanced scientific concepts, as well as showing them behind the curtain of how lab equipment works.
South Africa has been plagued by drought for years, and 2019
saw us struck particularly hard. Cape Town had their Day Zero restrictions,
thousands of farmers lost livestock and crops, and the effects on our economy were
devastating. So how do we counter this? How do we ensure that we don’t fall victim
to the drier times that no doubt lay ahead? We become ‘water-smart’.
South Africa as a water-scarce county
What does this mean? It means that SA does not have a sufficient amount of water to meet the demands and needs of the country. A term that has become more prominent lately is ‘water stress’ and refers to the difficulty in finding fresh water sources during a certain time period. The inability to do so puts stress on current sources, further depleting and deteriorating them.
Out of 193 countries, South Africa ranks as the 29th driest country in the world. Should we not all do our part in being smart about our usage?
Photo credit: jasper wilde on Unsplash
How you can help relieve the pressure on our water
resources
There are plenty of things you can do to reduce wastage to help lessen the pressure on the system:
Scale back on watering your lawn and invest in water-wise plants. If you must water the garden, do it early in the mornings or late afternoons.
Pack your dishwasher as full as possible before switching it on.
Switch out your bath for a shower.
Collect rainwater or grey water for use around the house and garden.
Fix dripping taps!
Today we want to look at one specific way to relieve the burden on local supplies. Boreholes. They offer many benefits for both businesses and homeowners.
The benefits of a borehole
Borehole water is good for you!
Water taken from a borehole is free from all the chemicals
and micro-organisms found in tap water. It’s rich in minerals, pure, natural,
and clean because it mainly consists of filtered rainwater.
A self-sufficient water source
If you want to do your part for the environment, using natural resources is a good way to go about it. The water found underground is considered ‘inactive’ and is an independent source from what we receive via our taps. Not only is using a borehole environmentally responsible, but it will also stand you in good stead when there are water shortages or restrictions in your area.
It saves you money in the long run
Looking for a good way to cut on your water and lights each
month? Aside from getting solar panels for electricity, installing a borehole
on your property is the way to go. As a bonus, it’s also a great way to
increase your property’s value.
Great for farms
More than anybody, farmers need a constant supply of fresh
water for things like irrigation, livestock, and other farm-related activities.
Having to pay a hefty municipal account is an unnecessary expense when you can
have access to your own supply of fresh water.
You can make money from
it!
Image the income possibilities of owning a business that
offers this kind of service. With more and more people looking into acquiring
boreholes of their own, you will have the unique opportunity to be a part of an
industry with plenty of room to grow.
Better yet… What if you could buy an already established
business that has a stellar reputation?
A water-focused business for sale
If you’re an entrepreneur looking to invest in a business that will allow you to make a difference in the environment and your life, you’re reading this at the right time. Ground Water Practitioners has recently gone up for sale and is looking for a buyer who will take this already successful business to new heights.
GWP is committed to making water an environmentally safe and sustainable reality, and in today’s challenging climate, they provide much-needed services.
These services include:
General borehole services – drilling of boreholes is outsourced
We have to hand it to this team, their entry for the 2020 Hackaday Prize is a classic pincer maneuver. A team from [The University of Auckland] in New Zealand and [New Dexterity] is designing a couple of gloves for both rehabilitation and human augmentation. One style is a human-powered prosthetic for someone who has lost mobility in their hand. The other form uses soft robotics and Bluetooth control to move the thumb, fingers, and an extra thumb (!).
The human-powered exoskeleton places the user’s hand inside a cabled glove. When they are in place, they arch their shoulders and tighten an artificial tendon across their back, which pulls their hand close. To pull the fingers evenly, there is a differential box which ensures pressure goes where it is needed, naturally. Once they’ve gripped firmly, the cables stay locked, and they can relax their shoulders. Another big stretch and the cords relax.
In the soft-robotic model, a glove is covered in inflatable bladders. One set spreads the fingers, a vital physical therapy movement. Another bladder acts as a second thumb for keeping objects centered in the palm. A cable system draws the fingers closed like the previous glove, but to lock them they evacuate air from the bladders, so jamming layers retain their shape, like food in a vacuum bag.
We are excited to see what other handy inventions appear in this year’s Hackaday Prize, like the thumbMouse, or how about more assistive tech that uses hoverboards to help move people?
What do you get when you add a thermal camera, a software-defined radio dongle, and a battery to a Raspberry Pi? If you are [saveitforparts] you make a tricorder for sniffing radio signals and viewing heat signatures. He admits, the videos (see below) aren’t exactly a “how-to” but it will still give you some ideas for your next build.
You can sense the frustration with some Linux configuration issues, but [saveitforparts] admits he isn’t a Linux or Raspberry Pi guru. Version 1 seemed to be a bit of a prototype, but version 2 is more polished. We still aren’t sure we’d see Spock carrying a case like that, but some 3D printing could spiff that right up.
Of course, a real tricorder is a McGuffin that does whatever the plot calls for. This one is a bit more practical, but it can monitor thermal and RF energy and could accommodate more sensors. This is a great example of a project that would have been very hard to do in the past but is much easier today. The availability of cheap computers and ready-made modules along with associated software open up many possibilities.
If you want to do your own Tricorder hacking you could take over a commercial model. Then again, there’s an official replica on its way that seems like it might have some similar features.
With the repair manual circuit diagrams in hand, it was no problem to find the GPS RX and TX lines that were being broken out to the external connector. Unfortunately, the radio’s electronics are all 5 volts and the GPS module [Selim] wanted to use was only 3.3 V. So he came up with a small PCB that included not only the voltage regulator to power the GPS module, but also some voltage-dividers to level shift those signals.
Since the Kenwood TM-D710a was already designed to accept a GPS upgrade module, he just needed to change some configuration options in the radio’s menus for it to see the new hardware. Technically the project was done at this point, but since there was still room in the case and he had a GPS module spitting out NMEA sentences, [Selim] tacked on a common Bluetooth serial module so he could see the position information on his smartphone. With an application like APRSdroid, he now has a nice moving map display using the position pulled from the radio’s GPS.
With this modification done it looks like the head unit is ready to go, but that’s only the beginning for a mobile rig. Now we want to see how he integrates the whole thing into the car.
How much would you enjoy a movie that took months to finish? We suppose it would very much depend on the film; the current batch of films from the Star Wars franchise are quite long enough as they are, thanks very much. But a film like Casablanca or 2001: A Space Odyssey might be a very different experience when played on this ultra-slow-motion e-paper movie player.
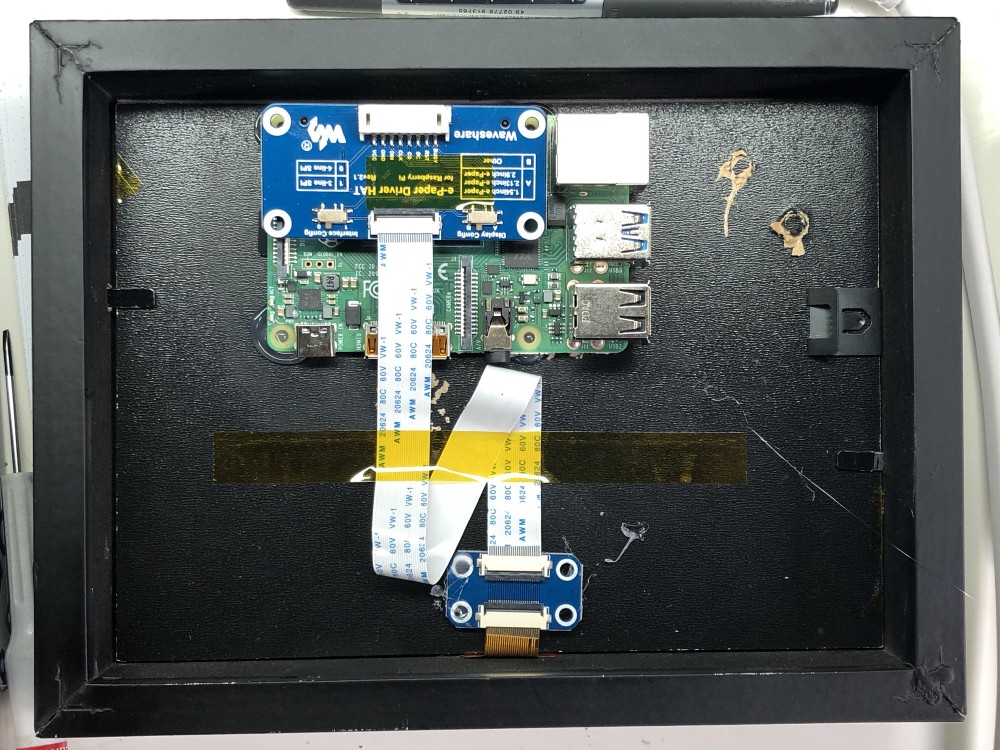
The idea of displaying a single frame of a movie up for hours rather than milliseconds has captivated [Tom Whitwell] since he saw [Bryan Boyer]’s take on the concept. The hardware [Tom] used is similar: a Raspberry Pi, an SD card hat with a 64 GB card for the movies, and a Waveshare e-paper display, all of which fits nicely in an IKEA picture frame.
[Tom]’s software is a bit different, though; a Python program uses FFmpeg to fetch and dither frames from a movie at a configurable rate, to customize the viewing experience a little more than the original. Showing one frame every two minutes and then skipping four frames, it has taken him more than two months to watch Psycho. He reports that the shower scene was over in a day and a half — almost as much time as it took to film — while the scene showing [Marion Crane] driving through the desert took weeks to finish. We always wondered why [Hitch] spent so much time on that scene.
With the proper films loaded, we can see this being an interesting way to really study the structure and flow of a good film. It’s also a good way to cut your teeth on e-paper displays, which we’ve seen pop up in everything from weather stations to Linux terminals.
How much would you enjoy a movie that took months to finish? We suppose it would very much depend on the film; the current batch of films from the Star Wars franchise are quite long enough as they are, thanks very much. But a film like Casablanca or 2001: A Space Odyssey might be a very different experience when played on this ultra-slow-motion e-paper movie player.
The idea of displaying a single frame of a movie up for hours rather than milliseconds has captivated [Tom Whitwell] since he saw [Bryan Boyer]’s take on the concept. The hardware [Tom] used is similar: a Raspberry Pi, an SD card hat with a 64 GB card for the movies, and a Waveshare e-paper display, all of which fits nicely in an IKEA picture frame.
[Tom]’s software is a bit different, though; a Python program uses FFmpeg to fetch and dither frames from a movie at a configurable rate, to customize the viewing experience a little more than the original. Showing one frame every two minutes and then skipping four frames, it has taken him more than two months to watch Psycho. He reports that the shower scene was over in a day and a half — almost as much time as it took to film — while the scene showing [Marion Crane] driving through the desert took weeks to finish. We always wondered why [Hitch] spent so much time on that scene.
With the proper films loaded, we can see this being an interesting way to really study the structure and flow of a good film. It’s also a good way to cut your teeth on e-paper displays, which we’ve seen pop up in everything from weather stations to Linux terminals.
Apple, the world’s first trillion-dollar company — give or take a trillion — has built a bit of libertarian cachet by famously refusing to build backdoors into their phones, despite the entreaties of the federal government. So it came as a bit of a surprise when we read that the company may have worked with federal agents to build an “enhanced” iPod. David Shayer says that he was one of three people in Apple who knew about the 2005 program, which was at the behest of the US Department of Energy. Shayer says that engineers from defense contractor Bechtel, seemed to want to add sensors to the first-generation iPod; he was never clued in fully but suspects they were adding radiation sensors. It would make sense, given the climate in the early 2000s, walking down the street with a traditional Geiger counter would have been a bit obvious. And mind you, we’re not knocking Apple for allegedly working with the government on this — building a few modified iPods is a whole lot different than turning masses of phones into data gathering terminals. Umm, wait…
A couple of weeks back, we included a story about a gearhead who mounted a GoPro camera inside of a car tire. The result was some interesting footage as he drove around; it’s not a common sight to watch a tire deform and move around from the inside like that. As an encore, the gearhead in question, Warped Perception, did the same trick bit with a more destructive bent: he captured a full burnout from the inside. The footage is pretty sick, with the telltale bubbles appearing on the inside before the inevitable blowout and seeing daylight through the shredded remains of the tire. But for our money, the best part is the slo-mo footage from the outside, with the billowing smoke and shredded steel belts a-flinging. We appreciate the effort, but we’re sure glad this guy isn’t our neighbor.
Speaking of graphic footage, things are not going well for some remote radio sites in California. Some towers that host the repeaters used by public service agencies and ham radio operators alike have managed to record their last few minutes of life as wildfires sweep across the mountains they’re perched upon. The scenes are horrific, like something from Dante’s Inferno, and the burnover shown in the video below is terrifying; watch it and you’ll see a full-grown tree consumed in less than 30 seconds. As bad as the loss of equipment is, it pales in comparison to what the firefighters face as they battle these blazes, but keep in mind that losing these repeaters can place them in terrible jeopardy too.
For everyone who enjoyed The Martian, here’s your chance to science the Watney out of something. Element14 is running the “One Meter of Pi” contest, which asks you to imagine how to make the most productive use out of one cubic meter. Using a Raspberry Pi 4 and a bunch of other goodies supplied to each of 20 successful applicants, your challenge will be to figure out how to use the Pi and the space to feed as many people as possible, whether they be space travelers or just people here on terra firma. It’s an interesting challenge that we hope someone from Hackaday will absolutely crush.
Another Pi contest: the ZeroDays cyberdeck building competition. This one asks you to design a cyberdeck around the Raspberry Pi Zero. The rules on this one are considerably more flexible, and really seems more about the design of the case rather than the functionality of the cyberdeck. Not familiar with cyberdecks? We’ve got you covered.
And finally, did you ever wonder what DNA sounds like? Neither have we, but it turns out that the sequences of DNA bases can make some interesting music, with a little help from DNA Sonification. The idea is to use the rules of gene expression — how the As, Ts, Gs, and Cs code for different proteins — and use them to create music by mapping notes to each base. Feed the DNA Sonifier a sequence, — say, from your 23 and Me results — set a few reading rules, and you can listen to the music of your genes.
Spectrum recently published a post on a new lithium sulfur battery technology specifically targeting electric aviation applications. Although lots of electric vehicles could benefit from the new technology, airplanes are especially sensitive to heavy batteries and lithium-sulfur batteries can weigh much less than modern batteries of equivalent capacity. The Spectrum post is from Oxis Energy who is about to fly tests with the new batteries which they claim have twice the energy density of conventional lithium-ion batteries. The company also claims the batteries are safer, which is another important consideration when flying through the sky.
The batteries have a cathode comprised of aluminum foil coated with carbon and sulfur — which avoids the use of cobalt, a cost driver in traditional lithium cell chemistries. The anode is pure lithium foil. Between the two electrodes is a separator soaked in an electrolyte. The company says the batteries go through multiple stages as they discharge, forming different chemical compounds that continue to produce electricity through chemical action.
The safety factor is due to the fact that, unlike lithium-ion cells, the new batteries don’t form dendrites that short out the cell. The cells do degrade over time, but not in a way that is likely to cause a short circuit. However, ceramic coatings may provide protection against this degradation in the future which would be another benefit compared to traditional lithium batteries.
We see a lot of exciting battery announcements, but we rarely see real products with them. Time will tell if the Oxis and similar batteries based on this technology will take root.
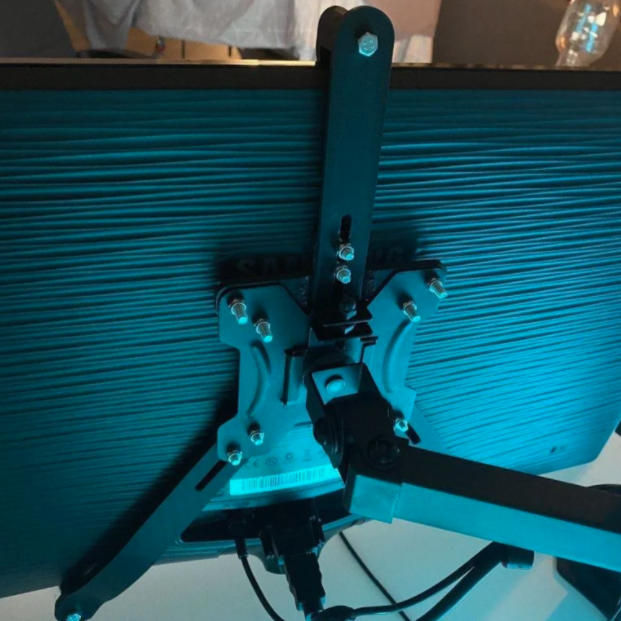
Some monitors lack the holes on the back that make them VESA-compliant, so mounting them on a monitor arm can be a non-starter. To handle this, [Patrick Hallek] designed and 3D printed these adapter arms to make flat monitors mount to VESA hardware whether they want to or not.
How does it work? When a monitor can’t attach directly to a VESA mount, this assembly attaches to the mount instead. The three arms extend around the edge of the monitor to grip it from the bottom and top. Some hex-head M5 bolts and nuts are all that are required to assemble the parts, and the top arm is adjustable to accommodate different sizes of monitor. As long as the screen size is between 17 and 27 inches diagonal, and the monitor thickness falls between 30 mm and 75 mm, it should fit.
It’s a smart design that leverages one of the strengths of 3D printing: that of creating specialized adapters or fixtures that would be troublesome to make by hand. That is not to say that there’s no other way to make exactly what one wants when it comes to mounting monitors: check out this triple-monitor setup using some common metal struts, no welding required.
If you’re looking to experiment with plasma, you’re going to need a high voltage power supply. Usually that means something big, complex, and (naturally) expensive. But it doesn’t have to be. As [Jay Bowles] demonstrates in his latest Plasma Channel video, you can put together a low-cost power supply capable of producing up to 20,000 volts that fits in the palm of your hand. Though you should probably just put the thing down on a table when in use…
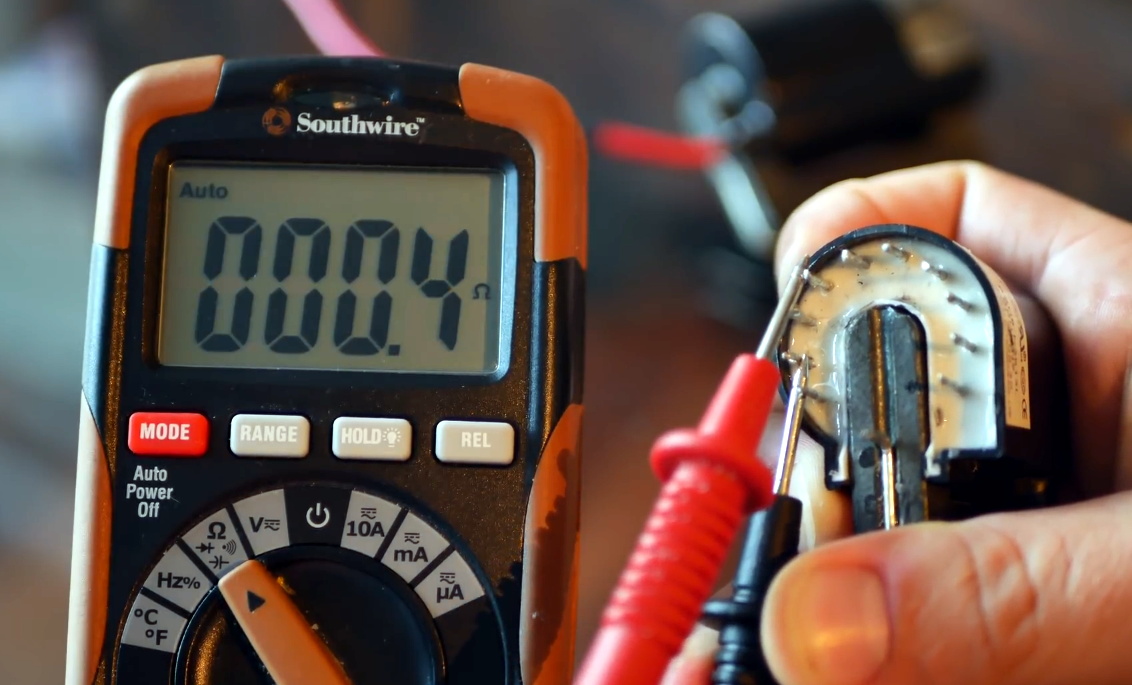
Finding the feedback coil with a multimeter.
The secret to the build is the flyback transformer. A household staple during the era of CRT televisions, these devices can still be readily found online or even salvaged from a broken TV. We’d recommend searching eBay for new old stock (NOS) transformers rather than risk getting blown through a wall while poking around in an old TV you found on the side of the road, but really it all depends on your experience level with this sort of thing.
In any event, once you have the flyback transformer in hand, the rest of the build is very simple. [Jay] demonstrates how you can determine the pinout for your transformer even if you can’t find a datasheet for it, and then proceeds to assemble the handful of ancillary parts necessary to drive it. Housed on a scrap of perfboard and mounted to a piece of plastic to keep stray objects away from the sparky bits underneath, this little power supply would be a reliable workhorse for anyone looking to start experimenting with high voltage. Perhaps an ionic lifter is in your future?
If you’re looking to experiment with plasma, you’re going to need a high voltage power supply. Usually that means something big, complex, and (naturally) expensive. But it doesn’t have to be. As [Jay Bowles] demonstrates in his latest Plasma Channel video, you can put together a low-cost power supply capable of producing up to 20,000 volts that fits in the palm of your hand. Though you should probably just put the thing down on a table when in use…
Finding the feedback coil with a multimeter.
The secret to the build is the flyback transformer. A household staple during the era of CRT televisions, these devices can still be readily found online or even salvaged from a broken TV. We’d recommend searching eBay for new old stock (NOS) transformers rather than risk getting blown through a wall while poking around in an old TV you found on the side of the road, but really it all depends on your experience level with this sort of thing.
In any event, once you have the flyback transformer in hand, the rest of the build is very simple. [Jay] demonstrates how you can determine the pinout for your transformer even if you can’t find a datasheet for it, and then proceeds to assemble the handful of ancillary parts necessary to drive it. Housed on a scrap of perfboard and mounted to a piece of plastic to keep stray objects away from the sparky bits underneath, this little power supply would be a reliable workhorse for anyone looking to start experimenting with high voltage. Perhaps an ionic lifter is in your future?
If you’re looking to experiment with plasma, you’re going to need a high voltage power supply. Usually that means something big, complex, and (naturally) expensive. But it doesn’t have to be. As [Jay Bowles] demonstrates in his latest Plasma Channel video, you can put together a low-cost power supply capable of producing up to 20,000 volts that fits in the palm of your hand. Though you should probably just put the thing down on a table when in use…
Finding the feedback coil with a multimeter.
The secret to the build is the flyback transformer. A household staple during the era of CRT televisions, these devices can still be readily found online or even salvaged from a broken TV. We’d recommend searching eBay for new old stock (NOS) transformers rather than risk getting blown through a wall while poking around in an old TV you found on the side of the road, but really it all depends on your experience level with this sort of thing.
In any event, once you have the flyback transformer in hand, the rest of the build is very simple. [Jay] demonstrates how you can determine the pinout for your transformer even if you can’t find a datasheet for it, and then proceeds to assemble the handful of ancillary parts necessary to drive it. Housed on a scrap of perfboard and mounted to a piece of plastic to keep stray objects away from the sparky bits underneath, this little power supply would be a reliable workhorse for anyone looking to start experimenting with high voltage. Perhaps an ionic lifter is in your future?