Cold Tube Draws the Heat

If you live anywhere near the tropics, air conditioning isn’t a luxury but a necessity. The problem however is that humid climates can cause conventional air conditioners to draw more power to dehumidify the air than it requires to just cool it, which increases the power needed to run the unit. Back in 1963, there was a proposal to create a cooling system that didn’t foster condensation and couple it with different methods of removing humidity. Researchers in Singapore have now created such a system. It uses a membrane that is permeable to infrared radiation but prevents condensation around the cooling unit.

You can see a video of the apparatus in a pavilion in the Singapore heat in the video below. Chilled water runs through tubes behind a membrane that passes thermal radiation. Since the tubes are not exposed to the ambient atmosphere, condensation is minimal. But heat radiates from the warmer area to the much colder area of the tubes.

Desiccant passively dries the air. Does it work? The paper mentions testing in January which sounds odd to people from chillier latitudes, but Singapore is so near the equator that it isn’t really what others might call  winter there even in January. A quick search reveals the average temperature in January is 87F or about 30.5C. People found the area to be subjectively cool and comfortable.

We wonder of course if you could cool electronics with a scheme like this in applications where airflow or vibration from a contact surface could be an issue–for example, under a microscope. You can build a classic air conditioner out of odd parts if you like. Swamp coolers work well, but not with humidity.

source https://hackaday.com/2020/08/27/cold-tube-draws-the-heat/

Hands-On: BornHack 2020 Badge has 9×32 of Bling Fed by CircuitPython

Despite widespread pandemic cancellations, BornHack still happened this year and they even managed to once again bring an electronic badge to all attendees. If you missed it, I’ve already published an overview of the hacker camp itself. Today let’s dig into the 2020 BornHack badge!

Designed by Thomas Flummer and manufactured in Denmark, it takes the form of a PCB in the shape of a roughly 60 degree circular arc with most of its top side taken up by a 9 by 32 array of SMD LEDs. There is the usual 4-way button array and space for an SAO connector on the rest of the front face, while on the rear are a set of GPIO pads and a pair of AA battery holders for power. Connectivity is via USB-C and infra-red, and usefully there is also a power on/off switch.

At the heart of its hardware is a SAMD21G18A ARM Cortex M0+ microcontroller which is perhaps not the most exciting of chips, but the hardware becomes more interesting with the LED drivers. A pair of the IS31FL3731 chips (you may recognise from Brian Benchoff’s Mr. Robot badge) each drive half of the Charliplexed LED array. These versatile chips take the bother of scanning the LED matrix away from the microcontroller with their own internal frame registers fed from an I2C interface. This choice both makes the best use of the relatively meagre microcontroller in this application, and opens the way for the software choice. This badge runs Adafruit’s CircuitPython, and can thus be programmed over the USB connection in the same way as any other CircuitPython board. To test this I put aside my GNU/Linux laptop, and picked up something considerably less versatile to test its ease of use: a Chromebook.


# configure I2C
i2c = busio.I2C(board.SCL, board.SDA)

# turn on LED drivers
sdb = DigitalInOut(board.SDB)
sdb.direction = Direction.OUTPUT
sdb.value = True

# set up the two LED drivers
display = adafruit_is31fl3731.Matrix(i2c, address=0x74)
display2 = adafruit_is31fl3731.Matrix(i2c, address=0x77)

text_to_show = "BornHack 2020 - make clean"

CircuitPython devices mount as a disk drive in which can be found a Python file that can be edited with the code of your choice. The BornHack badge ships with code to display a BornHack banner text, which serves as a quick introduction to the capabilities of its display. It’s noticeable that the text scrolling performance leaves something to be desired, but this microcontroller is hardly one of the more powerful supported by the CircuitPython platform. The Chromebook was happily able to edit the code, though viewing the Python serial console necessitated diving into its Linux virtual machine.

The BornHack badge then, an attractive design that fulfils the aim of being capable and easy to program through its use of the popular CircuitPython platform, and through its decent sized LED matrix and available GPIOs with the chance of seeing a use beyond the camp as a general purpose display/experimentation platform. It may not be the most powerful of badges, but it does its job well. In particular it has achieved the feat missed by so many others, of arriving at the camp fully assembled and with working hardware and software. You can see more about it in Thomas’ badge presentation at the camp (cut from a stream, talk begins at 5:27) which we’ve placed below the break.

We look forward to seeing its influence upon other similar badges. Meanwhile if you are interested, you can compare it with the 2019 BornHack badge which we reviewed last year.

source https://hackaday.com/2020/08/27/hands-on-bornhack-2020-badge-has-9×32-of-bling-fed-by-circuitpython/

Hands-On: BornHack 2020 Badge has 9×32 of Bling Fed by CircuitPython

Despite widespread pandemic cancellations, BornHack still happened this year and they even managed to once again bring an electronic badge to all attendees. If you missed it, I’ve already published an overview of the hacker camp itself. Today let’s dig into the 2020 BornHack badge!

Designed by Thomas Flummer and manufactured in Denmark, it takes the form of a PCB in the shape of a roughly 60 degree circular arc with most of its top side taken up by a 9 by 32 array of SMD LEDs. There is the usual 4-way button array and space for an SAO connector on the rest of the front face, while on the rear are a set of GPIO pads and a pair of AA battery holders for power. Connectivity is via USB-C and infra-red, and usefully there is also a power on/off switch.

At the heart of its hardware is a SAMD21G18A ARM Cortex M0+ microcontroller which is perhaps not the most exciting of chips, but the hardware becomes more interesting with the LED drivers. A pair of the IS31FL3731 chips (you may recognise from Brian Benchoff’s Mr. Robot badge) each drive half of the Charliplexed LED array. These versatile chips take the bother of scanning the LED matrix away from the microcontroller with their own internal frame registers fed from an I2C interface. This choice both makes the best use of the relatively meagre microcontroller in this application, and opens the way for the software choice. This badge runs Adafruit’s CircuitPython, and can thus be programmed over the USB connection in the same way as any other CircuitPython board. To test this I put aside my GNU/Linux laptop, and picked up something considerably less versatile to test its ease of use: a Chromebook.


# configure I2C
i2c = busio.I2C(board.SCL, board.SDA)

# turn on LED drivers
sdb = DigitalInOut(board.SDB)
sdb.direction = Direction.OUTPUT
sdb.value = True

# set up the two LED drivers
display = adafruit_is31fl3731.Matrix(i2c, address=0x74)
display2 = adafruit_is31fl3731.Matrix(i2c, address=0x77)

text_to_show = "BornHack 2020 - make clean"

CircuitPython devices mount as a disk drive in which can be found a Python file that can be edited with the code of your choice. The BornHack badge ships with code to display a BornHack banner text, which serves as a quick introduction to the capabilities of its display. It’s noticeable that the text scrolling performance leaves something to be desired, but this microcontroller is hardly one of the more powerful supported by the CircuitPython platform. The Chromebook was happily able to edit the code, though viewing the Python serial console necessitated diving into its Linux virtual machine.

The BornHack badge then, an attractive design that fulfils the aim of being capable and easy to program through its use of the popular CircuitPython platform, and through its decent sized LED matrix and available GPIOs with the chance of seeing a use beyond the camp as a general purpose display/experimentation platform. It may not be the most powerful of badges, but it does its job well. In particular it has achieved the feat missed by so many others, of arriving at the camp fully assembled and with working hardware and software. You can see more about it in Thomas’ badge presentation at the camp (cut from a stream, talk begins at 5:27) which we’ve placed below the break.

We look forward to seeing its influence upon other similar badges. Meanwhile if you are interested, you can compare it with the 2019 BornHack badge which we reviewed last year.

source https://hackaday.com/2020/08/27/hands-on-bornhack-2020-badge-has-9×32-of-bling-fed-by-circuitpython/

Print-in-Place Engine Aims to be the Next Benchy

While there are many in the 3D-printing community who loudly and proudly proclaim never to have stooped to printing a 3DBenchy, there are far more who have turned a new printer loose on the venerable test model, just to see what it can do. But Benchy is getting a little long in the tooth, and with 3D-printers getting better and better, perhaps a better benchmarking model is in order.

Knocking Benchy off its perch is the idea behind this print-in-place engine benchmark, at least according to [SunShine]. And we have to say that he’s come up with an impressive model. It’s a cutaway of a three-cylinder reciprocating engine, complete with crankshaft, connecting rods, pistons, and engine block. It’s designed to print all in one go, with only a little cleanup needed after printing before the model is ready to go. The print-in-place aspect seems to be the main test of a printer — if you can get this engine to actually spin, you’re probably set up pretty well. [SunShine] shares a few tips to get your printer dialed in, and shows a few examples of what can happen when things go wrong. In addition to the complexities of the print-in-place mechanism, the model has a few Easter eggs to really challenge your printer, like the tiny oil channel running the length of the crankshaft.

Whether this model supplants Benchy is up for debate, but even if it doesn’t, it’s still a cool design that would be fun to play with. Either way, as [SunShine] points out, you’ll need a really flat bed to print this one; luckily, he recently came up with a compliant mechanism dial indicator to help with that job.

Thanks to [Keith Olson] for the tip.

source https://hackaday.com/2020/08/27/print-in-place-engine-aims-to-be-the-next-benchy/

Mil-Spec Looks Without Defense Department Budget

While hackers and makers have a tendency to focus on functionality above all else, that doesn’t mean there isn’t room for some visual flair. A device that works well and looks good will always be more impressive than the bare bones approach, but the extra time and money it usually takes to polish up the visual component of a build means it’s often overlooked. Which is exactly what [Jay Doscher] wanted to address with his Mil-Plastic project.

On the surface, the Mil-Plastic is yet another entry in the rapidly growing and often ill-defined world of cyberdecks: custom computing devices that forgo the standard laptop and desktop dichotomy and instead explore the road not taken by mainstream consumer electronics. To that end, it’s a solid build more than worthy of praise. But more than that, it’s also a lesson on how 3D printing and some clever design can create a truly impressive visual for little more than the cost of a spool of PLA.

The modular design allows parts to be printed in parallel.

The Mil-Plastic, as the name implies, looks like it was pulled from a Humvee or an Abrams tank. While the gorgeous olive green PETG filament that [Jay] has stumbled upon certainly helps, his eye for detail and design chops aren’t to be underestimated. He’s given the case a rugged and armored look that simply screams “Your Tax Dollars At Work”, complete with faux cooling fins running along the back and a generous application of low-profile stainless steel fasteners. We’ve taken a close look at the decadence of military engineering in the past, and the Mil-Plastic could hang with the best of them.

Most importantly, [Jay] has given us all the tools and information we need to recreate the look on our own terms. You don’t have to be in the market for yet another Raspberry Pi gadget to appreciate the Mil-Plastic; the design can serve as the backbone for whatever you happen to be building. The printed case not only looks impressive, but can easily be modified and expanded as needed.

[Jay] kicked off a minor revolution late last year with his Raspberry Pi Recovery Kit, and has continued to produce well-documented designs that illustrate the incredible power of desktop 3D printing. If you can look through his portfolio and not get inspired, you may want to speak with a doctor.

source https://hackaday.com/2020/08/27/mil-spec-looks-without-defense-department-budget/

Tiny Raspberry Pi Mac Nails the Apple Aesthetic

We know that some in the audience will take issue with calling a Raspberry Pi in a 3D-printed case the “World’s Smallest iMac”, but you’ve got to admit, [Michael Pick] has certainly done a good job recreating the sleek look of the real hardware. While there might not be any Cupertino wizardry under all that PLA, it does have a properly themed user interface and the general aversion to external ports and wires that you’d expect to see on an Apple desktop machine.

The clean lines of this build are made possible in large part by the LCD itself. Designed specifically for the Raspberry Pi, it offers mounting stand-offs on the rear, integrated speakers, a dedicated 5 V power connection, and a FFC in place of the traditional HDMI cable. All that allows the Pi to sit neatly on the back of the panel without the normal assortment of awkward cables and adapters going in every direction. Even if you’re not in the market for a miniature Macintosh, you may want to keep this display in mind for your future Pi hacking needs.

Well, that’s one way to do it.

Despite this clean installation, the diminutive Raspberry Pi was still a bit too thick to fit inside the 3D-printed shell [Michael] designed. So he slimmed it down in a somewhat unconventional, but admittedly expedient, way. With a rotary tool and a steady hand, he simply cut the double stacked USB ports in half. With no need for Ethernet in this build, he bisected the RJ-45 connector as well. We expect some groans in the comments about this one, but it’s hard to argue that this isn’t a hack in both the literal and figurative sense.

We really appreciate the small details on this build, from the relocated USB connectors to the vent holes that double as access to the LCDs controls. [Michael] went all out, even going so far as to print a little insert for the iconic Macintosh logo on the front of the machine. Though given the impressive work he put into his miniature “gaming PC” a couple months back, it should come as no surprise; clearly this is a man who takes his tiny computers very seriously.

source https://hackaday.com/2020/08/27/tiny-raspberry-pi-mac-nails-the-apple-aesthetic/

TMD-1 Makes Turing Machine Concepts Easy to Understand

For something that has been around since the 1930s and is so foundational to computer science, you’d think that the Turing machine, an abstraction for mechanical computation, would be easily understood. Making the abstract concepts easy to understand is what this Turning machine demonstrator aims to do.

The TMD-1 is a project that’s something of a departure from [Michael Gardi]’s usual fare, which has mostly been carefully crafted recreations of artifacts from the early days of computer history, like the Minivac 601  trainer and the DEC H-500 computer lab. The TMD-1 is, rather, a device that makes the principles of a Turing machine more concrete. To represent the concept of the “tape”, [Mike] used eight servo-controlled flip tiles. The “head” of the machine conceptually moves along the tape, its current position indicated by a lighted arrow while reading the status of the cell above it by polling the position of the servo.

Below the tape and head panel is the finite state machine through which the TMD-1 is programmed. [Mike] limited the machine to three states and four transitions, each of which is programmed by placing 3D-printed tiles on a matrix. Magnets were inserted into cavities during printing; Hall Effect sensors in the PCB below the matrix read the pattern of magnets to determine which tiles are where. The video below shows the TMD-1 counting from 0 to 10, which is enough to demonstrate the basics of Turing machines.

It’s hard not to comment on the irony of a Turing machine being run by an Arduino, but given that [Mike]’s goal was to make abstract concepts easy to understand, it makes perfect sense to leverage the platform rather than try to do this with discrete logic. And you can’t argue with results — TMD-1 made Turing machines clear to us for the first time.

source https://hackaday.com/2020/08/27/tmd-1-makes-turing-machine-concepts-easy-to-understand/

Discrete-Logic UART Keeps 8-Bit TTL Computer Connected

Pity the poor TTL computer aficionado. It’s an obsession, really — using discrete logic chips to scratch-build a computer that would probably compare unfavorably to an 80s era 8-bit machine in terms of performance. And yet they still forge ahead with their breadboards full of chips and tangles of wire. It’s really quite beautiful when you think about it.

[Duncan] at Shepherding Electrons has caught the TTL bug, and while building his 8-bit machine outfitted it with this discrete logic UART. The universal asynchronous receiver-transmitter is such a useful thing that single-chip versions of the device have been available since the early 1970s. [Duncan]’s version makes the magic of serial communications happen in just 12 chips, all from the 74LS logic family.

As if the feat of building a discrete logic UART weren’t enough, [Duncan] pulled this off without the aid of an oscilloscope. Debugging was a matter of substituting the 2.4576-MHz crystal oscillator clock with a simple 1-Hz 555 timer circuit; the reduced clock speed made it easier to check voltages and monitor the status of lines with LEDs. Once the circuit was working, the full-speed clock was substituted back in, allowing him to talk to his 8-bit computer at up to 38,400-kbps. Color us impressed.

For more TTL computer goodness, and to see where [Duncan] got his inspiration, check out [Ben Eater]’s many discrete logic projects — his scratch-built 6502, a low-end video card, or even his take on serial communications.

source https://hackaday.com/2020/08/26/discrete-logic-uart-keeps-8-bit-ttl-computer-connected/

Tiny Robot Beetle Runs On Alcohol

Batteries have come a long way in the past few centuries, but pale in comparison to hydrocarbon fuels when it comes to energy density. When it comes to packing plenty of juice in a light, compact package, hydrocarbons are the way to go. Recently, researchers have begun to take advantage of this, powering small robots with liquid fuels. Just like Bending Unit 22, aka Bender Bending Rodriguez, this tiny robotic beetle runs on alcohol.

Robeetle can carry up to 2.6 times its own weight, using Nitinol muscle wires to move its legs.

Affectionately named Robeetle, the tiny ‘bot weighs just 88 milligrams, comparable in mass its insectoid contemporaries. It stores methanol in a polyimide film tank, operating for up to 2 hours on a single fill.  As shown in the video, a solely mechanical control system is used to actuate the robot’s legs. In the neutral state, vents in the fuel tank are open, releasing methanol vapor. This passes over nitinol muscle wires coated in a special catalyst which causes the combustion of the methanol, heating the wires. The wires then contract, moving the legs, and closing the vents. When the wire cools, the wires relax, opening the vents and beginning the cycle anew.

While the ‘bot is solely capable of walking in a single direction, it nevertheless shows the possibilities enabled by powering small devices from energy-dense fuels. Waiting for improved battery technologies to develop is such a bore, after all. We look forward to swarms of such ‘bots exploring disaster areas or performing environmental sampling in years to come. The scientific paper outlines the research outcomes in detail.

We love tiny robots at Hackaday; we’ve featured a few in the past, too. Video after the break.

source https://hackaday.com/2020/08/26/tiny-robot-beetle-runs-on-alcohol/

Tiny Robot Beetle Runs On Alcohol

Batteries have come a long way in the past few centuries, but pale in comparison to hydrocarbon fuels when it comes to energy density. When it comes to packing plenty of juice in a light, compact package, hydrocarbons are the way to go. Recently, researchers have begun to take advantage of this, powering small robots with liquid fuels. Just like Bending Unit 22, aka Bender Bending Rodriguez, this tiny robotic beetle runs on alcohol.

Robeetle can carry up to 2.6 times its own weight, using Nitinol muscle wires to move its legs.

Affectionately named Robeetle, the tiny ‘bot weighs just 88 milligrams, comparable in mass its insectoid contemporaries. It stores methanol in a polyimide film tank, operating for up to 2 hours on a single fill.  As shown in the video, a solely mechanical control system is used to actuate the robot’s legs. In the neutral state, vents in the fuel tank are open, releasing methanol vapor. This passes over nitinol muscle wires coated in a special catalyst which causes the combustion of the methanol, heating the wires. The wires then contract, moving the legs, and closing the vents. When the wire cools, the wires relax, opening the vents and beginning the cycle anew.

While the ‘bot is solely capable of walking in a single direction, it nevertheless shows the possibilities enabled by powering small devices from energy-dense fuels. Waiting for improved battery technologies to develop is such a bore, after all. We look forward to swarms of such ‘bots exploring disaster areas or performing environmental sampling in years to come. The scientific paper outlines the research outcomes in detail.

We love tiny robots at Hackaday; we’ve featured a few in the past, too. Video after the break.

source https://hackaday.com/2020/08/26/tiny-robot-beetle-runs-on-alcohol/

Tiny Robot Beetle Runs On Alcohol

Batteries have come a long way in the past few centuries, but pale in comparison to hydrocarbon fuels when it comes to energy density. When it comes to packing plenty of juice in a light, compact package, hydrocarbons are the way to go. Recently, researchers have begun to take advantage of this, powering small robots with liquid fuels. Just like Bending Unit 22, aka Bender Bending Rodriguez, this tiny robotic beetle runs on alcohol.

Robeetle can carry up to 2.6 times its own weight, using Nitinol muscle wires to move its legs.

Affectionately named Robeetle, the tiny ‘bot weighs just 88 milligrams, comparable in mass its insectoid contemporaries. It stores methanol in a polyimide film tank, operating for up to 2 hours on a single fill.  As shown in the video, a solely mechanical control system is used to actuate the robot’s legs. In the neutral state, vents in the fuel tank are open, releasing methanol vapor. This passes over nitinol muscle wires coated in a special catalyst which causes the combustion of the methanol, heating the wires. The wires then contract, moving the legs, and closing the vents. When the wire cools, the wires relax, opening the vents and beginning the cycle anew.

While the ‘bot is solely capable of walking in a single direction, it nevertheless shows the possibilities enabled by powering small devices from energy-dense fuels. Waiting for improved battery technologies to develop is such a bore, after all. We look forward to swarms of such ‘bots exploring disaster areas or performing environmental sampling in years to come. The scientific paper outlines the research outcomes in detail.

We love tiny robots at Hackaday; we’ve featured a few in the past, too. Video after the break.

source https://hackaday.com/2020/08/26/tiny-robot-beetle-runs-on-alcohol/

This Geiger Counter has Few Parts

With all the focus on biological problems, we might forget that sometimes it’s handy to know about radiation hazards, too. [Ryan Harrington] shows us how to make a Geiger counter with very few parts, and you can see the results in the video below.

The glut of surplus Russian tubes has made this a common project, but we were amused to see the main part of the high-voltage supply was gutted from a cheap electronic flyswatter sourced from Harbor Freight. Even without a coupon, it only costs about $4.

There’s also a stack of zener diodes, a transistor, and some resistors. A battery, a piezo speaker, and a switch round out the bill of materials. Even then, the switch was upcycled from the flyswatter, so there’s not much to buy.

We see these flyswatters on deep sale sometimes, so maybe next time we do we’ll stock up. You could probably use the high voltage module for other projects, too. The module puts out enough voltage that it needs 400V worth of zener diodes to clamp it. [Ryan] used four 100V zeners.

The transistor causes the speaker to click. Apparently you can omit it, but the clicking becomes much harder to hear. Even with no radioactive material around, you’ll hear clicks occasionally from background radiation. But if you get the device near a smoke detector or a lantern mantle, you should hear a lot more clicks.

This reminded us of another cheap build with a camera flash. Want something more complex? Try this one.

source https://hackaday.com/2020/08/26/this-geiger-counter-has-few-parts/

Slack Off from Home with a Networked Jam Session

Those of you who were regular office dwellers before the pandemic: do you miss being with your coworkers at all? Maybe just a couple of them? There’s only so much fun you can have through a chat window or a videoconference. Even if you all happen to be musicians with instruments at the ready, your jam will likely be soured by latency issues.

[Eden Bar-Tov] and some fellow students had a better idea for breaking up the work-from-home monotony — a collaborative sequencer built for 2020 and beyond. Instead of everyone mashing buttons at once and hoping for the best, the group takes turns building up a melody. Each person is assigned a random instrument at the beginning, and the first to go is responsible for laying down the beat.

Inside each music box is an ESP8266 that communicates with a NodeRed server over MQTT, sending each melody as a string of digits. Before each person’s turn begins, the LED matrix shows a three second countdown, and then scrolls the current state of the song. Your turn is over when the LED strip around the edge goes crazy.

Music can be frustrating if you don’t know what you’re doing, but this instrument is built with the non-musician in mind. There are only five possible notes to play, and they’re always from the same scale to avoid dissonance. Loops are always in 4/4, which makes things easy. Players don’t even have to worry about staying in time, because their contributions are automatically matched to the beat. Check it out after the break.

Tired of sitting indoors all day, but still want to make music? Build a modular synth into a bike and you’ve solved two problems.

source https://hackaday.com/2020/08/26/slack-off-from-home-with-a-networked-jam-session/

Driving a PAL TV Over RF Thanks To PWM Harmonics

While most analog televisions come with composite video inputs on a yellow RCA jack, the feature is not universal. This problem was even more prevalent in the 1980s, and most home consoles got around the problem by instead feeding video to the television’s tuner with an RF modulator. [Manzel Seet] had just such a television which used the PAL standard. Wanting to display images from a microcontroller, he put together PAL-Streamer.

The aim of the project was to display images on an analog television with minimal investment in hardware over and above what [Manzel] already had on hand. To this end, the project was built using a STM32F411 Nucleo development board. Capable of running at clock speeds up to 100 MHz, there’s plenty of grunt to handle demanding tasks like outputting video signals to a TV.

To achieve the target frequency of VHF Channel 3 (61.25 MHz), [Manzel] elected to rely on the onboard PWM hardware, after being inspired by [CNLohr]’s ATTiny NTSC project. The project takes advantage of the odd harmonics of square waves. Setting the PWM output to operate at 6.86 MHz, the ninth harmonic ends up at around 61.71 MHz, close enough to be tuned in on the TV set. With the hard part done, [Manzel] then implemented a virtual COM port allowing an attached PC to send PNG images or GIF animations to the display.

It’s a fun project that shows it’s possible to drive all kinds of analog displays if you’re willing to be creative about how you do it. Files are available on GitHub for those eager to recreate the work. [Manzel] points out that this method does put out a lot of RF energy in the surrounding bands, but for direct hookup to an antenna input, it works just fine. We love to see creative video projects on microcontrollers, so if you’ve figured out how to get an Arduino Uno to do 1080P over HDMI, be sure to let us know. Video after the break.

source https://hackaday.com/2020/08/26/driving-a-pal-tv-over-rf-thanks-to-pwm-harmonics/

Dealing with a Hacked Brain; Let’s Talk About Depression

This post is different from normal Hackaday fare. I don’t want to presume anything about you, but I’m pretty sure the story I’m about to share resonates with at least some of you.

I’ve been having a tough time, exacerbated by this age of social distancing. This all crept up on me at first, but as I began to look back on my behavior and moods, I began noticing patterns that I hadn’t noticed before. This is certainly a relevant issue in this community, so let’s talk about mental health, beginning with my own journey.

Discovering the Problem

I am a prolific maker. I always have projects that I’m working on, projects that I’m thinking about working on, and projects that I’m getting paid to work on. I have an idea about how long the projects should take, and I get stressed and frustrated and beat myself up when they take longer than I think they should. I can’t admit defeat, so I continue the project until it is complete, but all of the joy is gone because it was stressful more than fun while I was working on it. Even at completion it’s difficult to enjoy the product because I’m already behind on starting the next thing in my queue (you may remember my earlier article on dealing with time debt). Further, I haven’t documented the project enough for my own satisfaction, so I’m uncomfortable sharing it to the public. It’s a perpetual problem, leading to perpetual grump.

I see other people on Hackaday and YouTube who are also prolific makers, but they have millions of subscribers, do much cooler projects, and put them out at a frequency I could only dream of. Imposter syndrome creeps in. I work harder on my projects, spending more and more time on them; the family makes fun of the fact that I’m the “basement troll” whose primary line is “I have to work on my projects.” Weekends are spent primarily watching YouTube and scrolling Reddit (but not contributing) and beating myself up for not working harder and getting on top of my pile of things to fix or improve around the house.

I have no social life to speak of. I had a plan, but the pandemic trashed that, and I still haven’t discovered a solution. People assume that I’m super busy and don’t have time to socialize, but the reality is that working on projects is a default for me, but not a preference, and it’s a thing I can do alone, so it’s easy to fall into.

The inner voice is loud, constant, and extremely critical. It tells me my work isn’t good enough, I’m not fast enough, I’m not interesting enough to have friends. Just to put something out there is a huge risk, and anyone who reads Hackaday regularly knows that the commenters are really good at identifying the slightest mistakes, meaning I agonize about every sentence far longer than I should.

This has been getting worse for years, though I didn’t notice and it wasn’t until someone pointed it out that I even realized it. It’s a self-perpetuating cycle that’s difficult to discover, and really difficult to get out of, especially with the inner voice. This is more than just being too busy, depression and anxiety have crept into the picture for me and these are not issues that should be ignored. So I got some help and started working through the problem.

Dealing with the problem

The hardest part about depression and anxiety is getting started. The voice is telling you you can’t, and that even if you could, life sucks and there’s nothing to look forward to. Enter one of the most important scenes in movie history.

can you fly a helicopter? not yet...

The movie magic of The Matrix reduces the difficult part for learning incredible skills to an eye flutter, but the point is not to say “I can’t” and give up; it’s to say “not YET”, and then learn the skills you need to do the thing.

One of the most important steps in getting out of the rut for me has been to silence the critic. With the bully crushing me constantly, I didn’t have a chance of getting out. Therapy was helping, but it wasn’t enough. What helped a lot was prescribed antidepressants. Antidepressants are not an easy thing to take. Most people have to try a few different medications before finding one that works, and then adjust the dose to get it right. The side effects are no joke, either, and sometimes make things worse than they were before. And they can take weeks to start to become effective. It’s tempting to give up on them, or endure the side effects of a misfit longer than you should.

In my case I started one at the direction of my doctor, had headaches and migraines and extreme exhaustion for a little more than a week, and stopped, waited two weeks to return to a baseline, then started a new medication. After a couple weeks of that, with few side effects but not much positive benefit, we increased the dose a little. A week later the inner critic was gone, I was no longer irrationally irritable, and while the exhaustion hasn’t gone away, it was eased somewhat by switching to nighttime for taking the med. I still have off days where I feel like I did before the meds, but they are rare and recognizable.

I also reached out on social media to friends and family, and explained what I was going through, and that I needed more social interaction. This was a huge success, and I spent weeks catching up with people I hadn’t talked to in decades. One of the biggest lessons here was that it’s ok to absolve yourself of the guilt of not keeping in constant contact with people, and that it’s ok to say “we haven’t talked in a long time. What’s your life like?”

Solving the Problem

For many, pharmaceuticals are the solution. They are content to silence the inner voice so they can resume their day-to-day. I hope that for me they will just be a crutch on my way to healing; a temporary measure that will allow me to change the underlying cause of the injury to my mental health. Maybe my brain is broken and not capable of producing the right chemicals, and antidepressants will be a permanent solution. I hope not, and here are the more permanent mental fitness goals that research has shown are likely to be successful.

  • Therapy – It’s important to find a good therapist whose methods agree with your goals. My first attempt wanted to meet more frequently than I was comfortable and talk about my broken home as a child, and ignored my pleas to deal with my current problems and find tools to get through until I had resolved my childhood. My current therapist is far better, and listens and suggests tools that make sense. Consider something called Cognitive Behavioral Therapy.
  • Exercise – The statistics are solid here. Most of us aren’t getting enough exercise now anyway, which just makes the problem worse. One of the reasons I develop hardware and not just software is I like to do things with my hands and see physical progress and point to something I built. That’s hard when working on mental health, but if you also work on your physical health, you’ll have demonstrable results you can point to.
  • Gratitude journaling – This one also has lots of science behind it. The idea is to regularly write down things for which you are grateful. Short lists are fine. The point is to get in the habit of thinking about good things in your life. It’s really difficult to start, and for a while I was criticizing myself because most of my entries were spins on things that I didn’t like “I like that I have the skills to fix the house when it breaks.” Then I realized that was actually exactly the point of the exercise; that instead of focusing on all the terrible things like the house falling apart all the time, I should be appreciating and celebrating the good things more, like the satisfaction of looking around the room at all the things I’ve done to improve it. Eventually this becomes a habit and the gratitude journal becomes ingrained in the brain.
  • Social interaction – This is hard, but extremely important right now. When nobody reached out to me for months I was miserable, but I realized I wasn’t reaching out to anybody, either. After an experiment I discovered that the things I feared about reaching out pretty much never happen. It feels good to interact with people and have friends. You feel more important and seen.
  • Giving – There are a lot of people struggling right now. Not more than you; this isn’t a contest. But struggling in ways that you can offer help. Find causes that you believe in, and offer to help in whatever ways you can contribute. Feeling needed is important, feeling like you are valued and that you’ve made someone’s life better is a good thing.
  • Putting more out there – I recently presented a project at my local makerspace’s monthly meeting (now held over zoom). It wasn’t a finished project, but I did it anyway. There were so many details in the work I had done that deserved attention that it didn’t matter that it wasn’t yet complete. You’re not going to be just like Colin Furze and Mark Rober and Adam Savage and all the others combined; that’s not your day job (unless you are Colin or Mark or Adam, in which case I’m honored that you are reading this, and please don’t have imposter syndrome comparing yourself to yourself). But you can put out something and some people will see it and they will be more supportive than nobody.
  • Fake it until you make it – Your inner critic is a lying jerk, and you know it’s a lying jerk, but you can’t ignore it. Well, you can pretend you are ignoring it. This was the actual advice of my therapist. He’s pretty cool. Objectively, you know the science is behind doing the things you want to do but just can’t. You know the science says you should exercise and eat right and be more social, and yet your inner critic tells you that you can’t. If you can ignore that critic just long enough to get started (and many people require antidepressants to help them get started with this), then you can discover that your inner critic was wrong all along and it becomes easier to ignore it.
  • Listen to your inner critic, then do what they say – I had this revelation on my own, and it was completely counter to the previous point, but it was oddly successful. One day I was beating myself up a lot, and I decided to just give in to my inner critic. I wasn’t giving enough; so I researched a few charities and donated. I wasn’t exercising enough; so I went for a run. I wasn’t doing enough social things; so I reached out to three friends. Every time my voice criticized me I acknowledged it, agreed with it, and did something about it. It worked really well, and felt empowering because I was dealing with everything my critic was throwing at me. Maybe I didn’t give enough or exercise enough, but I did what I could do at the time, and the voice couldn’t make me feel guilty about that more than I felt good about doing something.

Conclusions

While an article can have a hasty conclusion, depression and anxiety usually don’t. This is likely something many of us are dealing with, now more than ever, and it’s likely to stick around for a while. It affects a lot of people, and you don’t often know who, so please be gentle to others, including yourself. I’ll end with a video I recently discovered, which illustrates that the problems persist at all levels, and we probably all have some work to do.

source https://hackaday.com/2020/08/26/dealing-with-a-hacked-brain-lets-talk-about-depression/

New Arduino JPEG Library Focuses On Speed

Working with graphics on microcontrollers has always meant focusing on making the most of limited resources. Particularly in the 8-bit era, all manner of tricks were used to get low-performance chips to achieve feats beyond their lowly station. However, these days, we’re blessed with 32-bit workhorses with clock speeds in the tens, or even hundreds, of MHz and many kilobytes of RAM to match. It’s these higher performance chips [Larry] had in mind when writing his JPEGDEC library.

As [Larry] discusses in a blog post on the topic, JPEG libraries already exist for the Arduino platform. However, many of these are aimed at 8-bit platforms with tiny amounts of RAM. While it’s possible to decode JPEGs piece by piece with some intelligent code under these conditions, it’s possible to go much faster when you’ve got a little more headroom. [Larry] does a great job of explaining the variety of optimizations he’s developed in the two decades since writing his first JPEG decoder back in 1994. From eliminating unnecessary marker checks to ignoring unneeded data for scaled-down output, it all adds up to get the job done faster. The library targets the Cortex-M0+, or any chip with a minimum of 20K of RAM, as its bare minimum to operate. Faster chips with higher clock rates naturally do better, and [Larry] provides benchmark decoding times for various common hardware using the library.

We’ve featured [Larry]’s GIF decoder for the Arduino platform before, again a useful library that’s optimised for good performance. If you’ve got your own neat tricks for image processing on microcontrollers, you know how to call!

source https://hackaday.com/2020/08/26/new-arduino-jpeg-library-focuses-on-speed/

Circle Guitar Creates Wall of Sound

In the 60s a musical recording technique called the “wall of sound” came to prominence which allowed artists to create complex layers of music resulting in a novel, rich orchestral feeling. While this technique resulted in some landmark albums (Pet Sounds by the Beach Boys for example) it took entire recording studios and many musicians to produce. This guitar, on the other hand, needs only a single musician but can create impressive walls of sound on its own thanks to some clever engineering.

Called the Circle Guitar and created by [Anthony Dickens], the novel instrument features a constantly-rotating wheel around the guitar’s pickups in the body. Various picks can be attached in different ways to the wheel which pluck the strings from behind continuously. This exceeds what a normal guitar player would be able to do on their own, but the guitarist is able to control the sounds by using several switches and pushbuttons which control a hexaphonic humbucker and are able to mute individual strings at will. Of course, this being the 21st century, it also makes extensive use of MIDI and [Anthony] even mentions the use of a Teensy.

While details on this project are admittedly a little fleeting, the videos linked below are well worth a watch for the interesting sounds this guitar is able to produce. Perhaps paired with a classic-sounding guitar amplifier it could produce other impressive walls of sound as well. Either way, we could expect someone like [Brian Wilson] to be interested in one once it is in production.

Thanks to [Mel] for the tip!


source https://hackaday.com/2020/08/26/circle-guitar-creates-wall-of-sound/

Sunrise, Sunset, Repeat

Sunrises and sunsets hardly ever disappoint. Still, it’s difficult to justify waking up early enough to catch one, or to stop what you’re doing in the evening just to watch the dying light. If there’s one good thing about CCTV cameras, it’s that some of them are positioned to catch a lovely view of one of the two, and a great many of them aren’t locked down at all.

[Dries Depoorter] found a way to use some of the many unsecured CCTV cameras around the world for a beautiful reason: to constantly show the sun rising and setting. Here’s how it works: a pair of Raspberry Pi 3B + boards pull the video feeds and display the sunrise/sunset location and the local time on VFD displays using an Arduino Nano Every. There isn’t a whole lot of detail here, but you can probably get the gist from the high-quality pictures.

If you wanted to recreate this for yourself, we might know where you can find some nice CCTV camera candidates. Just look through this dystopian peephole.

Thanks for the tip, [Luke]!

source https://hackaday.com/2020/08/25/sunrise-sunset-repeat/

Assembly Language for Real

We all probably know that for ultimate control and maximum performance, you need assembly language. No matter how good your compiler is, you’ll almost always be able to do better by using your human smarts to map your problem onto a computer’s architecture. Programming in assembly for PCs though is a little tricky. A lot of information about PC assembly language dates back from when assembly was more common, but it also covers old modes that, while still available, aren’t the best answer for the latest processors. [Gpfault] has launched a series on 64-bit x86 assembly that tries to remedy that, especially if you are working under Windows.

So far there are three entries. The first covers setting up your toolchain and creating a simple program that does almost nothing. But it is a start.

The second entry talks more about FASM and how to use macros and other features to simplify your programming. In particular, he shows macros that can wrap details like PE tables and calling convention protocols to make things easier. You wind up with a working Hello World program.

The third entry starts work on a fantasy CPU emulator, QBX. This isn’t a bad idea since emulating a CPU forces you to use many of the host computer instructions and doesn’t require any special knowledge other than what you probably have if you are trying to learn assembly language, anyway.

Of course, if you are writing boot code, you need to know all that old-fashioned legacy stuff. We liked [Ben Jojo’s] tutorial for that. If Linux is more your jam, we have an introduction for that, too.

Header: AMD Ryzen x86-64 processor, Fritzchens Fritz / CC0

source https://hackaday.com/2020/08/25/assembly-language-for-real/

Two-Part, Four-Wire Air Quality Meter Shows How It’s Done

The Bosch BME680 is a super-capable environmental sensor, and [Random Nerd Tutorials] has married it to the ESP32 to create an air quality meter that serves as a great tutorial on not just getting the sensor up and running, but also in setting up a simple (and optional) web server to deliver the readings. It’s a great project that steps through everything from beginning to end, including how to install the necessary libraries and how to program the ESP32, so it’s the perfect weekend project for anyone who wants to learn.

The BME680 is a small part that communicates over SPI or I2C and combines gas, pressure, temperature, and humidity sensors. The gas sensor part detects a wide range of volatile organic compounds (VOCs) and contaminants, including carbon monoxide, which makes it a useful indoor air quality sensor. It provides only a relative measurement (lower resistance corresponds to lower air quality) so for best results it should be calibrated against a known source.

The tutorial uses the Arduino IDE with an add-on to support the ESP32, and libraries from Adafruit. Unfamiliar with such things? The tutorial walks through the installation of both. There’s a good explanation of the source code, and guidance on entering setup values (such as local air pressure, a function of sea level) for best results.

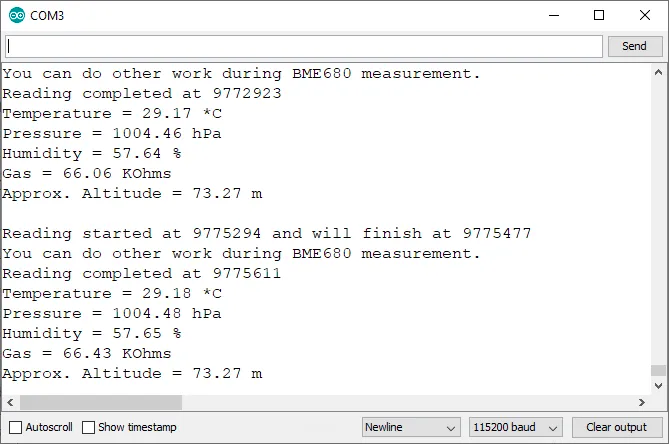
Once the software is on the ESP32, the results can be read from the serial port monitor. By going one step further, the ESP32 can run a small web server (using ESPAsyncWebServer) to serve the data to any device wirelessly. It’s a well-written tutorial that covers every element well, and complements this other BME680-based air quality meter that uses MQTT and Raspberry Pi.

source https://hackaday.com/2020/08/25/two-part-four-wire-air-quality-meter-shows-how-its-done/

Two-Part, Four-Wire Air Quality Meter Shows How It’s Done

The Bosch BME680 is a super-capable environmental sensor, and [Random Nerd Tutorials] has married it to the ESP32 to create an air quality meter that serves as a great tutorial on not just getting the sensor up and running, but also in setting up a simple (and optional) web server to deliver the readings. It’s a great project that steps through everything from beginning to end, including how to install the necessary libraries and how to program the ESP32, so it’s the perfect weekend project for anyone who wants to learn.

The BME680 is a small part that communicates over SPI or I2C and combines gas, pressure, temperature, and humidity sensors. The gas sensor part detects a wide range of volatile organic compounds (VOCs) and contaminants, including carbon monoxide, which makes it a useful indoor air quality sensor. It provides only a relative measurement (lower resistance corresponds to lower air quality) so for best results it should be calibrated against a known source.

The tutorial uses the Arduino IDE with an add-on to support the ESP32, and libraries from Adafruit. Unfamiliar with such things? The tutorial walks through the installation of both. There’s a good explanation of the source code, and guidance on entering setup values (such as local air pressure, a function of sea level) for best results.

Once the software is on the ESP32, the results can be read from the serial port monitor. By going one step further, the ESP32 can run a small web server (using ESPAsyncWebServer) to serve the data to any device wirelessly. It’s a well-written tutorial that covers every element well, and complements this other BME680-based air quality meter that uses MQTT and Raspberry Pi.

source https://hackaday.com/2020/08/25/two-part-four-wire-air-quality-meter-shows-how-its-done/

Mini CNC Mill Goes Horizontal to Reuse CD Drives

Here at Hackaday, we pride ourselves on bringing you the freshest of hacks, preferably as soon as we find out about them. Thanks to the sheer volume of cool hacks out there, though, we do miss one occasionally, like this e-waste horizontal CNC mill that we just found out about.

Aptly called the “CDCNC” thanks to its reliance on cast-off CD drive mechanisms for its running gear, [Paul McClay]’s creation is a great case study on what you can do without buying almost any new parts. It’s also an object lesson in not getting caught in standard design paradigms. Where most CNC mills mount the spindle vertically, [Paul] tilted the whole thing 90 degrees so the spindle lies on its side. Moving it back and forth on a pair of CD drive mechanisms is far easier than fighting gravity for control, and as a bonus the X- and Y-axes have minimal loading too. The video below shows the mill in action, and it’s easy to see how the horizontal arrangement really helps make this junk bin build into something special.

We think [Paul] did a great job of thinking around the problem with this build, and we’re glad he took the time to tip us off. Apparently it was the upcoming CNC on the Desktop Hack Chat that moved him to let us know about this build. Here’s hoping he drops by for the chat and shares his experience with us.


source https://hackaday.com/2020/08/25/mini-cnc-mill-goes-horizontal-to-reuse-cd-drives/

Prop-Driven Cardboard RC Car Doesn’t Skimp on Performance

[Kryzer Channel] takes making a DIY RC car to a whole new level with this prop-driven electric car that is made almost entirely out of cardboard (YouTube video, also embedded below.) By attaching an electric motor with a push prop to the back of the car, [Kryzer] avoids the need for any kind of drive system or gearing. Steering works normally thanks to some scratch-built linkages, but the brake solution is especially clever.

Braking is done by having a stocky servo push a reinforced stub downward, out of a hole in the center of the car. This provides friction against the road surface. After all, on an RC car a functional brake is simply not optional. Cutting the throttle and coasting to a stop works for a plane, but just won’t do for a car.

Winding thread around metal components then saturating with CA glue makes a durable assembly.

Layers of corrugated cardboard and hot glue make up the bulk of the car body, and some of the assembly techniques shown off are really slick and make the video really worth a watch. For example, the construction of the wheels (starting around 2:24) demonstrates making them almost entirely out of cardboard, saturated with CA glue for reinforcement, with a power drill acting as a makeshift lathe for trimming everything down. A section of rubber inner tube provides the tire surface and a piece of hard plastic makes a durable hub. Wraps of thread saturated in CA glue, shown here, is another technique that shows up in several places and is used in lieu of any sort of fasteners.

The well-edited video (embedded below) is chock full of clever assembly and construction. Unsurprisingly, this is not [Krazer]’s first cardboard vehicle: their video channel has other impressive cardboard models and racers to show off.

Cardboard is an often under-rated prototyping material that offers loads of advantages. We’ve also seen the results of saturating paper products with CA glue before, like in this paper slug-flinging cardboard gun.

source https://hackaday.com/2020/08/25/prop-driven-cardboard-rc-car-doesnt-skimp-on-performance/

Prop-Driven Cardboard RC Car Doesn’t Skimp on Performance

[Kryzer Channel] takes making a DIY RC car to a whole new level with this prop-driven electric car that is made almost entirely out of cardboard (YouTube video, also embedded below.) By attaching an electric motor with a push prop to the back of the car, [Kryzer] avoids the need for any kind of drive system or gearing. Steering works normally thanks to some scratch-built linkages, but the brake solution is especially clever.

Braking is done by having a stocky servo push a reinforced stub downward, out of a hole in the center of the car. This provides friction against the road surface. After all, on an RC car a functional brake is simply not optional. Cutting the throttle and coasting to a stop works for a plane, but just won’t do for a car.

Winding thread around metal components then saturating with CA glue makes a durable assembly.

Layers of corrugated cardboard and hot glue make up the bulk of the car body, and some of the assembly techniques shown off are really slick and make the video really worth a watch. For example, the construction of the wheels (starting around 2:24) demonstrates making them almost entirely out of cardboard, saturated with CA glue for reinforcement, with a power drill acting as a makeshift lathe for trimming everything down. A section of rubber inner tube provides the tire surface and a piece of hard plastic makes a durable hub. Wraps of thread saturated in CA glue, shown here, is another technique that shows up in several places and is used in lieu of any sort of fasteners.

The well-edited video (embedded below) is chock full of clever assembly and construction. Unsurprisingly, this is not [Krazer]’s first cardboard vehicle: their video channel has other impressive cardboard models and racers to show off.

Cardboard is an often under-rated prototyping material that offers loads of advantages. We’ve also seen the results of saturating paper products with CA glue before, like in this paper slug-flinging cardboard gun.

source https://hackaday.com/2020/08/25/prop-driven-cardboard-rc-car-doesnt-skimp-on-performance/

Schlieren on a Stick

Schlieren imaging is a technique for viewing the density of transparent fluids using a camera and some clever optical setups. Density of a fluid like air might change based on the composition of the air itself with various gasses, or it may vary as a result of a sound or pressure wave. It might sound like you would need a complicated and/or expensive setup in order to view such things, but with a few common things you can have your own Schlieren setup as [elad] demonstrates.

His setup relies on a cell phone, attached to a selfie stick, with a spherical mirror at the other end. The selfie stick makes adjusting the distance from the camera to the mirror easy, as a specific distance from the camera is required as a function of focal length. For cell phone cameras, it’s best to find this distance through experimentation using a small LED as the point source. Once it’s calibrated and working, a circular field of view is displayed on the phone which allows the viewer to see any change in density in front of the mirror.

The only downside of this build that [elad] notes is that the selfie stick isn’t stiff enough to prevent the image from shaking around a little bit, but all things considered this is an excellent project that shows a neat and useful trick in the photography/instrumentation world that could be useful for a lot of other projects. We’ve only seen Schlieren imaging once before and it used a slightly different method of viewing the changing densities.

source https://hackaday.com/2020/08/25/schlieren-on-a-stick/