There’s an old tale that TV companies only need to make a few years of kids’ TV shows, because their audience constantly grows out of their offerings and is replaced by a new set with no prior knowledge of the old shows. Whether it’s true or not is up for debate, but does the same apply to single board computers aimed at kids? The original BBC micro:bit was first announced back in 2015 and must be interesting its second generation of kids by now, but that hasn’t stopped them bringing out a second version of the little educational computer. How do you update such a simple device? Time to take a look.
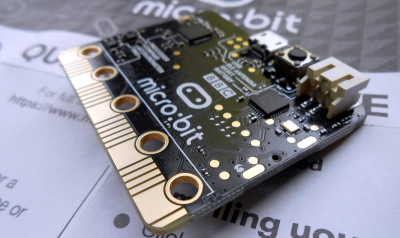
Edge connector shown on the original micro:bit design
The form factor of the new board is substantially the same as its predecessor, with the same edge connector and large connection pads, and the familiar LED matrix display. The most obvious additions are a small speaker and MEMS microphone allowing kids to interact with audio in their code, but less obvious is a new touch button in the micro:bit logo. The original had it in the silk screen layer, while the new one has it as copper for a capacitive sensor.
The silicon has an upgrade too, now sporting a Nordic Semiconductor nRF52833 running at 64 MHz and sporting 512k of RAM and 128k of ROM with built-in Bluetooth Low Energy. Binaries are incompatible with the original, however all the development environments can recompile code for a new universal binary format capable of running the appropriate software for either version.
The micro:bit has been more of a hit in schools than it has in our community, perhaps because it has the misfortune to have arrived alongside so many strong competitors. However it remains a powerful contender whose easy programming alongside the power of more traditional toolchains make it a good choice for kids and grown-ups alike. We took a look at the original back in 2016, if you are interested.
Over the years, the 1993 classic Doom has gained an almost meme-like status where it can seemingly run on anything. Everything from printers to smartwatches has been shown off running the now-iconic first level of Doom. Looking to up the bar, [Equalo] set out to run Doom on potatoes. However until we develop full biological computers, he had to settle for running Doom on a device powered by potatoes. (Video, embedded below.)
As we’ve seen with other hacks before, potatoes are a decent power source that just requires potato, zinc, and copper. Some have attempted to make it easier to scale potato power and others have focused on making the individual potatoes more powerful. The biggest obstacle when working with potatoes as a battery is that even though each potato can put out almost a volt, the current is laughably small.
The lack of current is what drove [Equalo] to dramatically scale up the typical potato battery. With a target device of a Raspberry Pi Zero requiring around 100 mA at 4.5V, this means he needed over 700 potato slices. After boiling hundreds of potatoes and with a bit of help from friends and family, the giant potato battery was constructed, and we can’t help but marvel at the sheer scale and audacity. The challenge of scaling up a potato battery is that by the time you’re wiring up the 400th potato, your first potato has already started to corrode.
Next time you’re looking for some inspiration for a monumental task, perhaps watch the tale of [Equalo’s] giant potato battery and remember what can be accomplished with some determination and a hundred pounds of spuds.
You need a Swiss Army knife of serial communications? Ollie is a compact isolated USB adaptor that provides USB, CAN bus, and two UARTs at logic, RS-232, and RS-485 signaling levels, as well as an isolated power supply. [Slimelec] has managed to squeeze all this into a package the size of a harmonica. We like the technique of making the enclosure from PCB material, complete with clearly labeled switch, LED and connector pinout names.
So far, only the compiled firmware is available for this project, but hardware files, and presumably the source code and documentation, are coming soon.
The central themes here are isolation and flexibility. We can’t find the isolation voltage in the project specifications, but the CANable project on which this adaptor is based provides 2.5 kV galvanic isolation. A single isolated USB interface is also provided over a standard Type A connector. The four-wire logic-level UART signals are available on a 2 x 7 box header, and are voltage selectable. The RS-232, RS-485, and CAN signals are on an 8-pin pluggable screw terminal block, or you can use a DB9 connector with a pluggable adaptor board.
Whether you need a troubleshooting aid for field testing, are using CAN bus on your projects, or just want to isolate your expensive computer from sketchy prototype hardware, have a look at this project.
We know what you’re thinking: this is yet another one of those “Gut the retro gear for its cool old case and then fill it up with IoT junk” projects. Well, rest assured that extending and enhancing this 1970s computer trainer is very much an exercise in respecting the original design, and while there’s a Pi inside, it doesn’t come close to spoiling the retro goodness.
Like many of a similar vintage as [Scott M. Baker], the Heathkit catalog was perhaps only leafed through marginally less than the annual Radio Shack catalog. One particularly desirable Heathkit item was the ET-3400 microcomputer learning system, which was basically a 6800-based computer surrounded by a breadboarding area for experimentation. [Scott] got a hold of one of these, but without the optional expansion accessory that would allow it to do interesting things such as running BASIC or even supporting a serial port. So [Scott] decided to roll his own expansion board.
The expansion card that [Scott] designed is not strictly a faithful reproduction, at least in terms of the original BOM. He turned to more modern — and more readily available — components, but still managed to provide the serial port, cassette interface, and RAM/ROM expansion of the original unit. The Raspberry Pi is an optional add-on, which just allows him to connect wirelessly if he wants. The card fits into a 3D-printed case that sits below the ET-3400 and maintains the original trainer’s look and feel. The longish video below shows the build and gives a tour of the ET-3400, both before and after the mods.
It looks as though trainers like these and other artifacts from the early days of the PC revolution are getting quite collectible. Makes us wish we hadn’t thrown some things out.
Retro computer enthusiast [Steven Combs] documents his adventure building the TEDuino, a modern replacement for the Commodore Datasette which uses an SD card instead of audio tape. He based the design on [Peter Edwards]’s Tapuino project, which was featured by Hackaday back in 2014. [Steven] took the aesthetic design to a new level, and also modified it to work with his Plus/4 and other TED series Commodores. We are amazed that he was able to design this enclosure in SketchUp, and impressed with the results from his Creality Ender 3. He went to great lengths to match the color and style of the Plus/4, and pulled it off quite well. [Steven] also applied some interesting design features in this enclosure. The PCB modules are snap-fit, the buttons are made as a single piece – not unlike a living hinge. The 3D-printed strain relief for the cable is a nice finishing touch, and we cannot disagree with [Steven]’s sage advice – “Gorilla anything is just cool”.
This is only part 1 of the project. Stay tuned for future improvements, tweaks and embellishments.
[Forsyth Creations] started by CAD-modeling the chassis right on top of a still from the video. The entire body is 3D-printed in four large pieces, which took several days because each piece took around 24 hours. Inside the car there’s an Arduino brain driving a motor in the back and a servo in the front. This bad boy runs on a couple of rechargeable battery packs and can be controlled with either a Wii balance board or a PS2 controller. This thing really moves, although it doesn’t quite reach 100MPH. Watch it zoom around in the video after the break.
Celebrate Bird-Feeding Month by building a bird feeder. From connecting to nature to promoting good health in birds, there are plenty of reasons to add a bird feeder to your garden. Get inspired and build your own feeder or buy a ready-made one online. What are you waiting for? Find a bird feeders for sale on Junk Mail today!
Photo Source – www.pixabay.com
The history of Bird-Feeding Month
Bird-Feeding
Month started in 1994 to acknowledge the important role
that birds play in our environment. The history of this month has its origins
in America where John Porter declared his resolution to support wild birds as
part of the Congressional Record. In America, migratory birds start returning
as the weather warms up in February. However, it can be difficult for them to
find food during this period as the weather is still unpredictable. This
predicament resulted in the beginning of Bird-Feeding Month in support of wild birds.
The importance of having a bird feeder in your garden
A bird feeder is an important addition to your garden. Feeding birds
is an opportunity to connect with nature while learning more about the
different bird species in your area. Connecting to nature reduces stress and
birds bring joy and colour to your outdoor space. A reliable source of food
supports parent birds when they’re feeding their babies. This helps families of
birds to thrive and means that the parents spend less time away from their
chicks. The food also helps to keep birds healthy and happy. Bird feeders also provide
birds with energy for migration. For birds who don’t migrate, a feeder is a
reliable source of food during the cold months.
Photo Source – www.pixabay.com
Different bird feeder ideas
Don’t know where to start? Here are some ideas
that will leave you feeling inspired:
Jar bird feeder
Recycle an old jar by turning it into a bird feeder with leather and
ribbon. Add a perch to create a space for the birds to sit on while they’re
eating.
Plastic bottle
Turn an empty plastic bottle into a bird feeder by adding holes
and wooden spoons. In a few easy steps, you’ll have a bird feeder that’s ready to use.
Teacup
Transform an old teacup into a source of food
for birds using wire and beads. You’ll need to drill holes into the sides of
the teacup to hang it up, using beads for decoration. The saucer can be
attached to the cup using a nut and bolt.
Logs
Create a bird feeder with a natural look from a log. Remove
the center of the log using a chainsaw and hang your creation up using chains
once you’re done.
How to build a bird feeder
Define your budget
Decide on how much you can afford to spend on
building your bird feeder.
Your budget will influence your choice of design and materials.
Decide on a design and define your materials
Choose a design and make a list of the
materials you need. You can use recycled materials to save cash while helping
to preserve our environment.
Decide where you are going to hang it
Choose a spot in your garden to hang/place your bird feeder. The place should be out of reach from cats and dogs. You can get the most out of your feeder by positioning it where you can watch the birds.
Gather all your supplies and materials
Before you get started, you’ll need to collect
the necessary materials. Proper preparation ensures that there are no
disruptions to the building process.
Start constructing
Follow the design you have chosen to create a unique bird feeder that will
brighten up your garden. Make sure that the feeder is easy to clean and safe
for birds to use.
Fill with seeds
Fill the feeder with seeds that are healthy
for the bird species in your region. Avoid using bread and other sources of
food that can be harmful to birds.
Install outside
Secure your feeder outside in your chosen
spot. You can use wire or durable string to attach it to a tree or pole.
Other factors to consider:
Will it withstand the weather conditions outside?
Is there enough space for the birds to sit?
Are the seeds secure inside?
Do you have the right seeds for the birds in your area?
If you have pets, is the bird feeder in a secure location away from your pets?
Will the seeds get wet when it rains? If so, can you prevent it?
Bonus Tip: Add a
birdbath or some water to your garden where birds and other insects can drink
water.
Photo Source – www.pixabay.com
With so many benefits to placing a bird feeder in your garden, it’s easy to see why these outdoor accessories are so popular. Bird-Feeding Month is the perfect opportunity to start providing the birds in your neighbourhood with a reliable source of food. Don’t delay, find a bird feeder for sale on Junk Mail today.
The piano is a bit of an oddball within the string instrument family. Apart from rarely seeing people carry one around on the bus or use its case to discretely conceal a Tommy Gun, the way the strings are engaged in the first place — by having little hammers attached to each key knock the sound of of them — is rather unique compared to the usual finger or bow movement. Still, it is a string instrument, so it’s only natural to wonder what a piano would sound like if it was equipped with guitar strings instead of piano wire. Well, [Mattias Krantz] went on to actually find out the hard way, and shows the results in this video.
After a brief encounter with a bolt cutter, the point of no return was reached soon on. Now, the average piano has 88 keys, and depending on the note, a single key might have up to three strings involved at once. In case of [Mattias]’ piano — which, in his defense, has certainly seen better days — a total of 210 strings had to be replaced for the experiment. Guitars on the other hand have only six, so not only did he need 35 packs of guitar strings, the gauge and length variety is quite limited on top. What may sound like a futile endeavor from the beginning didn’t get much better over time, and at some point, the strings weren’t long enough anymore and he had to tie them together. Along with some inevitable breakage, he unfortunately ran out of strings and couldn’t finish the entire piano, though it seems he still managed to roughly cover a guitar’s frequency range, so that’s an appropriate result.
We’re not sure if [Mattias] ever expected this to actually work, but it kinda does — there is at least some real sound. Are the results more than questionable though? Oh absolutely, but we have to admire the audacity and perseverance he showed to actually pull through with this. It took him 28 hours just to get the guitar strings on, and another good amount of time to actually get them all in tune. Did it pay off? Well, that depends how you look at it. It definitely satisfied his and other’s curiosity, and the piano produces some really unique and interesting sounds now — but check for yourself in the video after the break. But that might not be for everyone, so luckily there are less final ways to change a piano’s sound. And worst case, you can always just turn it into a workbench.
You’re sitting at your bench, surrounded by the tools of the trade — meters and scopes, power supplies and hand tools, and a well-stocked parts bin. Your breadboard is ready, your fingers are itching to build, and you’ve got everything you need to get started, but — nothing happens. Something is missing, and if you’re like many of us, it’s the one thing you can’t get from eBay or Amazon: the creative spark that makes innovation happen.
Creativity is one of those things that’s difficult to describe, and is often noticed most when it’s absent. Hardware hacking requires great buckets of creativity, and it’s not always possible to count on it being there exactly when it’s called for. It would be great if you could somehow reduce creativity to practice and making it something as easy to source for every project as any other commodity.
His projects, though, aren’t the whole story here: it’s his process that we’re going to discuss. Leo joins us for this Hack Chat to poke at the creative process and see what can be done to remain rigorous and systematic in your approach but still make the process creative and flexible. Join us with your questions about finding the inspiration you need to turn parts and skills into finished projects that really innovate.
Click that speech bubble to the right, and you’ll be taken directly to the Hack Chat group on Hackaday.io. You don’t have to wait until Wednesday; join whenever you want and you can see what the community is talking about.
You’re sitting at your bench, surrounded by the tools of the trade — meters and scopes, power supplies and hand tools, and a well-stocked parts bin. Your breadboard is ready, your fingers are itching to build, and you’ve got everything you need to get started, but — nothing happens. Something is missing, and if you’re like many of us, it’s the one thing you can’t get from eBay or Amazon: the creative spark that makes innovation happen.
Creativity is one of those things that’s difficult to describe, and is often noticed most when it’s absent. Hardware hacking requires great buckets of creativity, and it’s not always possible to count on it being there exactly when it’s called for. It would be great if you could somehow reduce creativity to practice and making it something as easy to source for every project as any other commodity.
His projects, though, aren’t the whole story here: it’s his process that we’re going to discuss. Leo joins us for this Hack Chat to poke at the creative process and see what can be done to remain rigorous and systematic in your approach but still make the process creative and flexible. Join us with your questions about finding the inspiration you need to turn parts and skills into finished projects that really innovate.
Click that speech bubble to the right, and you’ll be taken directly to the Hack Chat group on Hackaday.io. You don’t have to wait until Wednesday; join whenever you want and you can see what the community is talking about.
The Raspberry Pi is a powerful computer in a compact form factor, making it highly useful for all manner of projects. However, it lacks some of the IO capabilities you might find on a common microcontroller. This is most apparent when it comes to running addressable LED strings. Normally, this is done using the Pi’s PWM or audio output, and is limited to just a couple of short strings. However, [Jeremy P Bentham] has found a way to leverage the Pi’s hardware to overcome these limitations.
The trick is using the Raspberry Pi’s little-documented Secondary Memory Interface. The SMI hardware allows the Pi to shift out data to 8 or 16 I/O pins in parallel using direct memory access (DMA), with fast and accurate timing. This makes it perfect for generating signals such as those used by WS2812B LEDs, also known as NeoPixels.
With [Jeremy]’s code and the right supporting hardware, it’s possible to run up to 16 LED strips of arbitrary length from the Raspberry Pi. [Jeremy] does a great job outlining how it all works, covering everything from the data format used by WS2812B LEDs to the way cache needs to be handled to avoid garbled data. The hack works on all Pis, from the humble Pi Zero to the powerful Pi 4. Thanks to using DMA, the technique doesn’t overload the CPU, so performance should be good across the board.
Modern computers are incredible feats of engineering, but there are many that still yearn for the simpler times. When keyboards clacked and a desktop computer quite literally dominated the top of your desk. There’s a whole community of folks who scratch that itch by restoring vintage computers, but not everyone has the time, money, or skill for such pursuits. Plus, even the most lovingly cared for Apple II isn’t going to help you watch YouTube.
Those who wish to recreate the look and feel of a vintage computer with modern internals will certainly be interested in the HALWOP by [Maz_Baz]. While its 3D printed case isn’t a replica of any one computer, it does draw inspiration from iconic machines like the Apple Lisa and IBM XT. It’s an amalgamation of design ideas that seemed like a good idea circa 1982 or so, with plenty of 90° angles and air vents to go around.
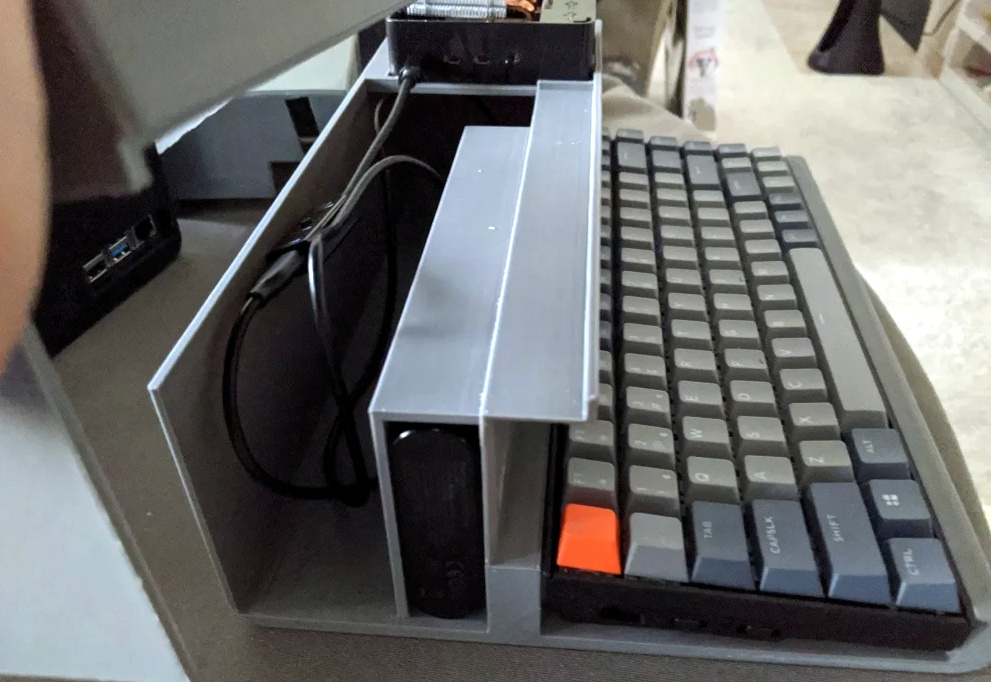
Considering the size of the Raspberry Pi 4 that powers the HALWOP, most of the case is just hollow plastic. But of course, the whole idea depends on it being almost comically large. On the plus side, [Maz_Baz] says you can use one of those empty compartments to hold a Anker PowerCore 26800 battery pack. At least in theory that makes it a “luggable” computer, though good luck trying to move it around.
In addition to the Pi 4 and battery pack, the HALWOP also uses a seven-inch touch LCD and Keychron K2 Bluetooth mechanical keyboard. Since everything is so modular, assembly is about as simple as it gets. Outside of the USB cables that power everything, you just need a long enough ribbon cable to connect the LCD to the Pi.
Modern computers are incredible feats of engineering, but there are many that still yearn for the simpler times. When keyboards clacked and a desktop computer quite literally dominated the top of your desk. There’s a whole community of folks who scratch that itch by restoring vintage computers, but not everyone has the time, money, or skill for such pursuits. Plus, even the most lovingly cared for Apple II isn’t going to help you watch YouTube.
Those who wish to recreate the look and feel of a vintage computer with modern internals will certainly be interested in the HALWOP by [Maz_Baz]. While its 3D printed case isn’t a replica of any one computer, it does draw inspiration from iconic machines like the Apple Lisa and IBM XT. It’s an amalgamation of design ideas that seemed like a good idea circa 1982 or so, with plenty of 90° angles and air vents to go around.
Considering the size of the Raspberry Pi 4 that powers the HALWOP, most of the case is just hollow plastic. But of course, the whole idea depends on it being almost comically large. On the plus side, [Maz_Baz] says you can use one of those empty compartments to hold a Anker PowerCore 26800 battery pack. At least in theory that makes it a “luggable” computer, though good luck trying to move it around.
In addition to the Pi 4 and battery pack, the HALWOP also uses a seven-inch touch LCD and Keychron K2 Bluetooth mechanical keyboard. Since everything is so modular, assembly is about as simple as it gets. Outside of the USB cables that power everything, you just need a long enough ribbon cable to connect the LCD to the Pi.
Modern computers are incredible feats of engineering, but there are many that still yearn for the simpler times. When keyboards clacked and a desktop computer quite literally dominated the top of your desk. There’s a whole community of folks who scratch that itch by restoring vintage computers, but not everyone has the time, money, or skill for such pursuits. Plus, even the most lovingly cared for Apple II isn’t going to help you watch YouTube.
Those who wish to recreate the look and feel of a vintage computer with modern internals will certainly be interested in the HALWOP by [Maz_Baz]. While its 3D printed case isn’t a replica of any one computer, it does draw inspiration from iconic machines like the Apple Lisa and IBM XT. It’s an amalgamation of design ideas that seemed like a good idea circa 1982 or so, with plenty of 90° angles and air vents to go around.
Considering the size of the Raspberry Pi 4 that powers the HALWOP, most of the case is just hollow plastic. But of course, the whole idea depends on it being almost comically large. On the plus side, [Maz_Baz] says you can use one of those empty compartments to hold a Anker PowerCore 26800 battery pack. At least in theory that makes it a “luggable” computer, though good luck trying to move it around.
In addition to the Pi 4 and battery pack, the HALWOP also uses a seven-inch touch LCD and Keychron K2 Bluetooth mechanical keyboard. Since everything is so modular, assembly is about as simple as it gets. Outside of the USB cables that power everything, you just need a long enough ribbon cable to connect the LCD to the Pi.
One of the most difficult user interfaces to get right is video editing. It is complex and fiddly with large amounts of precision required even after four or five hours of straight editing. Seeking to bring some of that interface out into the real world, [Zack Freedman] built a mechanical video editing keyboard.
The keyboard in question features popular shortcuts and keys to breeze through different parts of editing. The biggest feature is, of course, the large scrubbing knob, allowing [Zack] to fly through long video with precision. We’ve seen our fair share of mechanical keyboards that aren’t traditional keyboards on Hackaday before, such as this number pad or this macro pad.
One of the unique constraints of this project was the fact that Zack had a deadline of two days. This self-imposed deadline was to help focus the work and drive it towards completion. This meant that it had to be designed in such a way that roadblocks or troublesome features could be designed around or cut out altogether. At its heart, this project is just 14 mechanical switches, 4 potentiometers, and a Teensy to drive it all. It is the design, prototyping, and thought that went into this project that makes it noteworthy. There are plenty of lessons here about how to manage a project’s timeline and advice about how to actually finish it.
Code, STL’s, diagrams, and instructions are all on his GitHub.
Gauntlet is a well-known arcade game from 1985 with many sequels and ports to more modern architectures such as Xbox and GameCube. Thanks to its popularity and relative age, the original arcade cabinet is well documented with the schematics available online. It was regarded as the most complex and ambitious hardware Atari had ever developed at the time it was released. In what can only be described as an absolute labor of love, [Alex] has recreated the arcade hardware on the Pipistrello FPGA board.
The project can actually play Gauntlet, Gauntlet II, and Vindicators II as they all ran on the same hardware. Four joysticks are supported so up to four players can play, though the EEPROM is emulated in RAM so high scores are reset when the device is powered down. The FPGA is almost out of space and can’t quite squeeze in the SRAM needed. So an SRAM expansion daughterboard is required; nothing a quick board run from our favorite purple PCB manufacturer can’t solve.
In the repo is an incredible write-up detailing the system, how it works, and the process of debugging it. This project also includes a complete simulation of the TMS5220 Voice Synthesis Processor, as Gauntlet was the first coin-operated arcade machine with a voice synthesizer. Getting the video correct was particularly tricky and it took several tries to get the color palette and motion looking right. Since [Alex] didn’t have access to an original Gauntlet arcade cabinet, they had to make do with MAME. After writing a test to make sure the FPGA was working correctly, there were differences between the MAME emulation and the FPGA output. To help out, [Colin Davies] came to the rescue. After [Colin] hooked up an original Gauntlet Arcade PCB with the motion test loaded up, the test showed that the FPGA had the correct behavior.
During development [Alex] actually simulated several frames of the game in ISIM (at a whopping 90 seconds per frame or 90 minutes per in-game second). Using ISIM allowed them to compare system state to MAME and validate the design much faster as they could better inspect the interworkings of the different modules. Using a clever trick of grabbing state from MAME after a few seconds, they primed the FPGA state and saved themselves a few hours of simulation.
Finding the JLCPCB component parts library frustrating to navigate, [Jan Mrázek] took matters into his own hands and made an open-source parametric search utility. We’ve all probably wasted time before trying to track down a particular flavor of a part, and this tool promises to make the process easier. It downloads data from the JLCPCB parts site upon initialization and presents the user with typical selection filters for categories and parameter values. You can install it yourself on GitHub Pages, or [Jan] provides a link to his site.
For the curious, the details of how to pull parts information from the JLBPCB site can be found in the project’s source code. We like it when a distributor provides this level of access to their part details and parameters, allowing others to sort and filter the parts in ways not originally envisioned by the site design team. We think this is a win-win situation — distributors can’t sell parts that designers can’t find.
If [Jan]’s name sounds familiar, it should be. We have written about several of his projects before, two of them are also PCB designer tools ( KiCad Board Renderings and KiCad Panelization ).
If you’re interested in SDR and digital signal processing but don’t know where to start, you’re in luck. Ben Hillburn, president of the GNU Radio Project, recently tweeted about an online curriculum for learning SDR and DSP using Python. The course was developed by Dr. Mark Lichtman, who was a lead on GNU Radio, and from the look of it, this is the place to go to learn about putting SDRs to use doing cool things. The course is chock full of animations that make the concepts clear, and explain what all the equations mean in a way that’s sure to appeal to practical learners.
It’s not much of a secret that the Hackaday community loves clocks. We build clocks out of everything and anything, and any unique way of telling time is rightly applauded and celebrated on our pages. But does the clock motif make a good basis for a video game? Perhaps not, but that didn’t stop Clock Simulator from becoming a thing. To “play” Clock Simulator, you advance the hands of an on-screen clock by pressing a button once per second. Now, thanks to Michael Dwyer, you don’t even have to do that one simple thing. He developed a hardware cheat for Clock Simulator that takes the 1PPS output from a GPS module and wires it into a mouse. The pulse stream clicks the mouse once per second with atomic precision, rendering the player irrelevant and making the whole thing even more pointless. Or perhaps that is the point.
Maybe we were a little hard on Clock Simulator, though — we can see how it would help achieve a Zen-like state with its requirement for steady rhythm, at least when not cheating. Another source of Zen for some is watching precision machining, and more precise, the better. We ran into this mesmerizing video of a CNC micro-coil winder and found it fascinating to watch, despite the vertical format. The winder is built from a CNC lathe, to the carriage of which a wire dispenser and tensioning attachment have been added. The wire is hair-fine and passes through a ruby nozzle with a 0.6 mm bore, and LinuxCNC controls the tiny back and forth motion of the wire as it winds onto the form. We don’t know what the coil will be used for, but we respect the precision of winding something smaller than a matchhead.
Dave Jones over at EEVblog posted a teardown video this week that goes to a place few of us have ever seen: inside a processor module for an IBM System/390 server. These servers earned the name “Big Iron” for a reason, as everything about them was engineered to perform. The processor module Dave found in his mailbag was worth $250,000 in 1991, and from the look of it was worth every penny. From the 64-layer ceramic substrate supporting up to 121 individual dies to the stout oil-filled aluminum enclosure, everything about this module is impressive. We were particularly intrigued by the spring-loaded copper pistons used to transfer heat away from each die; the 2,772 pins on the other side were pretty neat too.
Here’s an interesting question: what happens if an earthquake occurs in the middle of a 3D printing run? It’s probably not something you’ve given much thought, but it’s something that regular reader Marius Taciuc experienced recently. As he relates, the magnitude 6.7 quake that struck near Kainatu in Papua New Guinea (later adjusted to a 6.3 magnitude) resulted in a solid 15 seconds of shaking at his location, where he was printing a part on his modified Mendel/Prusa i2. The shaking showed up clearly in the part as the machine started swaying with the room. It’s probably not a practical way to make a seismograph, but it’s still an interesting artifact.
If you’re interested in SDR and digital signal processing but don’t know where to start, you’re in luck. Ben Hillburn, president of the GNU Radio Project, recently tweeted about an online curriculum for learning SDR and DSP using Python. The course was developed by Dr. Mark Lichtman, who was a lead on GNU Radio, and from the look of it, this is the place to go to learn about putting SDRs to use doing cool things. The course is chock full of animations that make the concepts clear, and explain what all the equations mean in a way that’s sure to appeal to practical learners.
It’s not much of a secret that the Hackaday community loves clocks. We build clocks out of everything and anything, and any unique way of telling time is rightly applauded and celebrated on our pages. But does the clock motif make a good basis for a video game? Perhaps not, but that didn’t stop Clock Simulator from becoming a thing. To “play” Clock Simulator, you advance the hands of an on-screen clock by pressing a button once per second. Now, thanks to Michael Dwyer, you don’t even have to do that one simple thing. He developed a hardware cheat for Clock Simulator that takes the 1PPS output from a GPS module and wires it into a mouse. The pulse stream clicks the mouse once per second with atomic precision, rendering the player irrelevant and making the whole thing even more pointless. Or perhaps that is the point.
Maybe we were a little hard on Clock Simulator, though — we can see how it would help achieve a Zen-like state with its requirement for steady rhythm, at least when not cheating. Another source of Zen for some is watching precision machining, and more precise, the better. We ran into this mesmerizing video of a CNC micro-coil winder and found it fascinating to watch, despite the vertical format. The winder is built from a CNC lathe, to the carriage of which a wire dispenser and tensioning attachment have been added. The wire is hair-fine and passes through a ruby nozzle with a 0.6 mm bore, and LinuxCNC controls the tiny back and forth motion of the wire as it winds onto the form. We don’t know what the coil will be used for, but we respect the precision of winding something smaller than a matchhead.
Dave Jones over at EEVblog posted a teardown video this week that goes to a place few of us have ever seen: inside a processor module for an IBM System/390 server. These servers earned the name “Big Iron” for a reason, as everything about them was engineered to perform. The processor module Dave found in his mailbag was worth $250,000 in 1991, and from the look of it was worth every penny. From the 64-layer ceramic substrate supporting up to 121 individual dies to the stout oil-filled aluminum enclosure, everything about this module is impressive. We were particularly intrigued by the spring-loaded copper pistons used to transfer heat away from each die; the 2,772 pins on the other side were pretty neat too.
Here’s an interesting question: what happens if an earthquake occurs in the middle of a 3D printing run? It’s probably not something you’ve given much thought, but it’s something that regular reader Marius Taciuc experienced recently. As he relates, the magnitude 6.7 quake that struck near Kainatu in Papua New Guinea (later adjusted to a 6.3 magnitude) resulted in a solid 15 seconds of shaking at his location, where he was printing a part on his modified Mendel/Prusa i2. The shaking showed up clearly in the part as the machine started swaying with the room. It’s probably not a practical way to make a seismograph, but it’s still an interesting artifact.
Display technology has improved by leaps and bounds over the last few years, thanks in no small part to the smartphone revolution. High-resolution LCD panels are dirt cheap and easy to interface with. There’s absolutely no logical reason to try and show images on a 32×32 array of RGB LEDs. But that didn’t stop [Felix Spöttel] from doing it anyway.
The project, which he calls thirtytwopixels, was designed to work in conjunction with MPD (Music Player Daemon) to show the album art for whatever is currently playing. The ultra-low resolution display added a certain element of abstractness to the artwork, which [Felix] said made it an interesting conversation starter. Guests would try and guess what the album art was depicting given the sparse rendition shown on the matrix.
[Felix] gives an excellent explanation of how to get the server and client-side software up and running should you want to recreate his setup, but his Python scripts also have a function where you can push an arbitrary image to the display if you don’t want to connect everything up to the MPD backend.
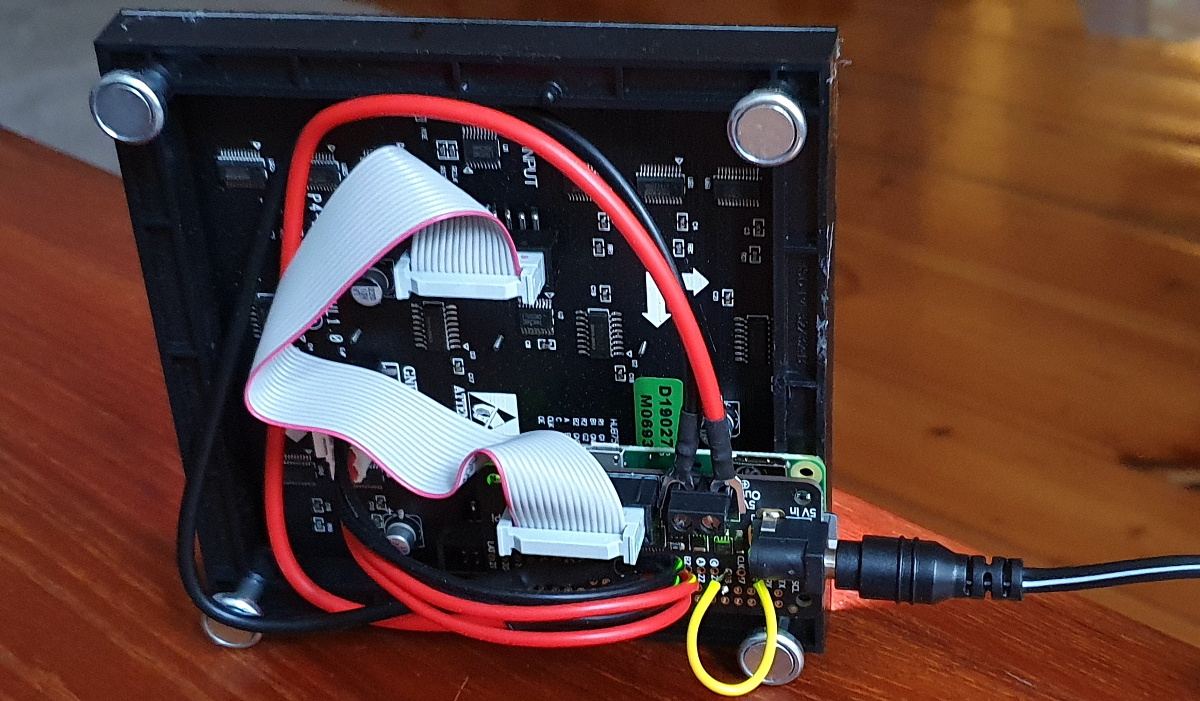
On the hardware side, thirtytwopixels uses the Raspberry Pi Zero W, a Adafruit RGB Matrix Bonnet, and a 32×32 LED matrix that uses the HUB75 interface. Even a relatively small LED matrix like this can get pretty thirsty, so [Felix] is using a 5 volt power supply that can deliver 4 amps to keep the electronics happy.
Display technology has improved by leaps and bounds over the last few years, thanks in no small part to the smartphone revolution. High-resolution LCD panels are dirt cheap and easy to interface with. There’s absolutely no logical reason to try and show images on a 32×32 array of RGB LEDs. But that didn’t stop [Felix Spöttel] from doing it anyway.
The project, which he calls thirtytwopixels, was designed to work in conjunction with MPD (Music Player Daemon) to show the album art for whatever is currently playing. The ultra-low resolution display added a certain element of abstractness to the artwork, which [Felix] said made it an interesting conversation starter. Guests would try and guess what the album art was depicting given the sparse rendition shown on the matrix.
[Felix] gives an excellent explanation of how to get the server and client-side software up and running should you want to recreate his setup, but his Python scripts also have a function where you can push an arbitrary image to the display if you don’t want to connect everything up to the MPD backend.
On the hardware side, thirtytwopixels uses the Raspberry Pi Zero W, a Adafruit RGB Matrix Bonnet, and a 32×32 LED matrix that uses the HUB75 interface. Even a relatively small LED matrix like this can get pretty thirsty, so [Felix] is using a 5 volt power supply that can deliver 4 amps to keep the electronics happy.
Display technology has improved by leaps and bounds over the last few years, thanks in no small part to the smartphone revolution. High-resolution LCD panels are dirt cheap and easy to interface with. There’s absolutely no logical reason to try and show images on a 32×32 array of RGB LEDs. But that didn’t stop [Felix Spöttel] from doing it anyway.
The project, which he calls thirtytwopixels, was designed to work in conjunction with MPD (Music Player Daemon) to show the album art for whatever is currently playing. The ultra-low resolution display added a certain element of abstractness to the artwork, which [Felix] said made it an interesting conversation starter. Guests would try and guess what the album art was depicting given the sparse rendition shown on the matrix.
[Felix] gives an excellent explanation of how to get the server and client-side software up and running should you want to recreate his setup, but his Python scripts also have a function where you can push an arbitrary image to the display if you don’t want to connect everything up to the MPD backend.
On the hardware side, thirtytwopixels uses the Raspberry Pi Zero W, a Adafruit RGB Matrix Bonnet, and a 32×32 LED matrix that uses the HUB75 interface. Even a relatively small LED matrix like this can get pretty thirsty, so [Felix] is using a 5 volt power supply that can deliver 4 amps to keep the electronics happy.
There is a certain magic and uniqueness to hardware, particularly when it comes to audio. Tube amplifiers are well-known and well-loved by audio enthusiasts and musicians alike. However, that uniqueness also comes with the price of the fact that gear takes up space and cannot be configured outside the bounds of what it was designed to do. [keyth72] has decided to take it upon themselves to recreate the smooth sound of the Fenders Blues Jr. small tube guitar amp. But rather than using hardware or standard audio software, the magic of AI was thrown at it.
In some ways, recreating a transformation is exactly what AI is designed for. There’s a clear and recordable input with a similar output. In this case, [keyth72] recorded several guitar sessions with the guitar audio sent through the device they wanted to recreate. Using WaveNet, they created a model that applies the transform to input audio in real-time. The Gain and EQ knobs were handled outside the model itself to keep things simple. Instructions on how to train your own model are included on the GitHub page.
While the model is simply approximating the real hardware, it still sounds quite impressive, and perhaps the next time you need a particular sound of your home-built amp or guitar pedal, you might reach for your computer instead.
Building a retro computer, or even restoring one, is a great way to understand a lot of the fundamentals of computing. That can take a long time and a lot of energy, though. Luckily, there is a Twitter bot out there that can let you experience an old 8-bit Atari without even needing to spin up an emulator. Just tweet your program to the bot, and it outputs the result.
The bot was built by [Kay Savets] and accepts programs in five programming languages: Atari BASIC, Turbo-Basic XL, Atari Logo, Atari PILOT, and Atari Assembler/Editor, which was a low-level assembly-type language available on these machines. The bot itself runs on a Raspberry Pi with the Atari 800 emulator, rather than original hardware, presumably because it’s much simpler to get a working network connection on a Pi than on a computer from the 80s. The Pi runs a python script that polls Twitter every two minutes and then hands the code off to the emulator.
[Kay]’s work isn’t limited to just Ataris, though. There’s also an Apple II BASIC bot for all the Apple fans out there that responds to programs written in AppleSoft BASIC. While building your own retro system or emulating one on other hardware is a great exercise, it’s also great that there are tools like these that allow manipulation of retro computers without having to do any of the dirty work ourselves.
How many people still have a PS/2 keyboard kicking around in 2020? Admittedly asking such a question of the Hackaday audience is probably cheating (there’s a decent chance one of you will type a comment on one just to prove a point), but even the most pedantic reader has to admit that it’s a long dead standard. So we’re hardly surprised to hear that [Turbaned Engineer] didn’t have one handy when he tried to boot a motherboard so old that he couldn’t access the BIOS with a USB keyboard.
But rather than waiting for an adapter to show up in the mail, he decided to rig up an Arduino Nano to mimic a PS/2 keyboard just long enough for him to navigate the system configuration. Since that basically meant he only needed the arrow keys and Enter, he was able to rig up a handful of momentary buttons to serve as input. We wouldn’t recommend typing out your memoirs with such a spartan board, but it’s certainly good enough to juggle around the order of boot devices.
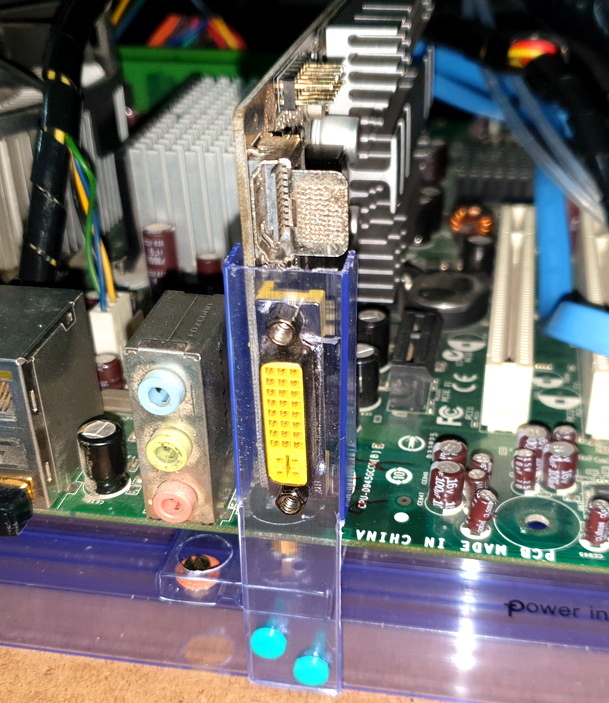
The fun didn’t stop there, though. [Turbaned Engineer] also had to clean some corrosion and fix a blown resistor on a bank of RAM to drag this old soldier over the finish line. He didn’t have a case handy, so he made a free-form one using the polycarbonate packaging that ICs ship in. The final machine isn’t exactly a sleeper, but it’s good enough to play Super Mario Bros. 3 on the TV.
At the end of the day, the minimal input device [Turbaned Engineer] put together isn’t so far removed from other homebrew keyboards we’ve seen recently. It seems that QMK even has some basic support for the PS/2 interface. Not that it would come up very often, but a “retro” mode might be an interesting addition to your next custom keyboard build.