A VGA Retro Console With Everything Generated From A Single ARM Cortex M0

The later game consoles of the 8-bit era such as Nintendo’s NES or Sega’s Master System produced graphics that went beyond what owners of early 1980s home computers had come to expect from machines with the same processors, but they did so only with the help of powerful custom chipsets for their day that took care of the repetitive hard work of assembling frames and feeding them to the display device. Reproducing their equivalent with more modern hardware requires either some means of creating similar custom silicon, or a processor significantly more powerful such that it can do the work of those extra chips itself. But even with a modern microcontroller it’s still a significant challenge, so [Nicola Wrachien]’s uChip, a VGA console that does the whole job in software on a humble ARM Cortex M0 is a significant achievement.

If you are familiar with the home computers that used the processor to generate the display output, you’ll know that they spent most of their time working on the lines of the display and only had a few milliseconds of the frame blanking period for the device to perform any computing tasks before returning to the next frame. The 320×240 at 57 frames per second gives a line sync frequency of 30 kHz, and the computing happens while the display is sent the black space at the top and bottom of the screen. This is reckoned to be equivalent of the ATSAMD21E18 microcontroller on the uChip module the system uses running at only 10MHz rather than the 48MHz it is running at in reality, and with these resources it also runs the game logic, USB controller interfacing, reading games from the SD card, and game sound.

The result is a complete game console on a small PCB little longer on its longest side than its connectors. We may have largely seen the demise of VGA on the desktop several years after we called it, but it seems there is plenty of life in the interface yet for hardware hackers.

source https://hackaday.com/2020/10/28/a-vga-retro-console-with-everything-generated-from-a-single-arm-cortex-m0/

Circuit Sculpture Breathes Life into Discrete Components

We’ve probably all given a lot of thought to breathing this year in various contexts. Though breathing is something we all must do, this simple act has become quite the troublemaker in 2020. They say the best art imitates life, and [bornach]’s Astable Exhalation certainly does that, right down to the part about astability. It’s especially interesting that the end result — breathing, visualized — is so calming, it could almost be a meditative device.

There is nary a microcontroller to be found on this circuit sculpture, which uses a pair of astable multivibrator(s) to light two sets of LEDs that represent air being inhaled and exhaled. We like that [bornach] used two sized of exhale LEDs to represent droplets and aerosols in this beautiful circuit sculpture, and we love that most of the components were scavenged from old electronics and older projects.

Our Circuit Sculpture Challenge runs until November 10th, so even if you’re waiting to take the Remoticon workshop before entering, there’s still a little bit of time to whip something up afterward in the post-con adrenaline rush phase. If you need inspiration, check out some of the other contest entries or just surf through all things circuit sculpture.

source https://hackaday.com/2020/10/27/circuit-sculpture-breathes-life-into-discrete-components/

Quantum Inspired Algorithm Going Back To The Source

Recently, [Jabrils] set out to accomplish a difficult task: porting a quantum-inspired algorithm to run on a (simulated) quantum computer. Algorithms are often inspired by all sorts of natural phenomena. For example, a solution to the traveling salesman problem models ants and their pheromone trails. Another famous example is neural nets, which are inspired by the neurons in your brain. However, attempting to run a machine learning algorithm on your neurons, even with the assistance of pen and paper would be a nearly impossible exercise.

The quantum-inspired algorithm in question is known as the wavefunction collapse function. In a nutshell, you have a cube of voxels, a graph of nodes, or simply a grid of tiles as well as a list of detailed rules to determine the state of a node or tile. At the start of the algorithm, each node or point is considered in a state of superposition, which means it is considered to be in every possible state. Looking at the list of rules, the algorithm then begins to collapse the states. Unlike a quantum computer, states of superposition is not an intrinsic part of a classic computer, so this solving must be done iteratively. In order to reduce possible conflicts and contradictions later down the line, the nodes with the least entropy (the smallest number of possible states) are solved first. At first, random states are assigned, with the changes propagating through the system. This process is continued until the waveform is ultimately collapsed to a stable state or a contradiction is reached.

What’s interesting is that the ruleset doesn’t need to be coded, it can be inferred from an example. A classic use case of this algorithm is 2D pixel-art level design. By providing a small sample level, the algorithm churns and produces similar but wholly unique output. This makes it easy to provide thousands of unique and beautiful levels from an easy source image, however it comes at a price. Even a small level can take hours to fully collapse. In theory, a quantum computer should be able to do this much faster, since after all, it was the inspiration for this algorithm in the first place.

[Jabrils] spent weeks trying to get things running but ultimately didn’t succeed. However, his efforts give us a peek into the world of quantum computing and this amazing algorithm. We look forward to hearing more about this project from [Jabrils] who is continuing to work on it in his spare time. Maybe give it a shot yourself by learning the basics of quantum computing for yourself.

source https://hackaday.com/2020/10/27/quantum-inspired-algorithm-going-back-to-the-source/

Community Rallies Behind youtube-dl After DMCA Takedown

At this point, you’ve likely heard that the GitHub repository for youtube-dl was recently removed in response to a DMCA takedown notice filed by the Recording Industry Association of America (RIAA). As the name implies, this popular Python program allowed users to produce local copies of audio and video that had been uploaded to YouTube and other content hosting sites. It’s a critical tool for digital archivists, people with slow or unreliable Internet connections, and more than a few Hackaday writers.

It will probably come as no surprise to hear that the DMCA takedown and subsequent removal of the youtube-dl repository has utterly failed to contain the spread of the program. In fact, you could easily argue that it’s done the opposite. The developers could never have afforded the amount of publicity the project is currently enjoying, and as the code is licensed as public domain, users are free to share it however they see fit. This is one genie that absolutely won’t be going back into its bottle.

In true hacker spirit, we’ve started to see some rather inventive ways of spreading the outlawed tool. A Twitter user by the name of [GalacticFurball] came up with a way to convert the program into a pair of densely packed rainbow images that can be shared online. After downloading the PNG files, a command-line ImageMagick incantation turns the images into a compressed tarball of the source code. A similar trick was one of the ways used to distribute the DeCSS DVD decryption code back in 2000; though unfortunately, we doubt anyone is going to get the ~14,000 lines of Python code that makes up youtube-dl printed up on any t-shirts.

Screenshot of the Tweet sharing YouTube-dl repository as two images

It’s worth noting that GitHub has officially distanced themselves from the RIAA’s position. The company was forced to remove the repo when they received the DMCA takedown notice, but CEO Nat Friedman dropped into the project’s IRC channel with a promise that efforts were being made to rectify the situation as quickly as possible. In a recent interview with TorrentFreak, Friedman said the removal of youtube-dl from GitHub was at odds with the company’s own internal archival efforts and financial support for the Internet Archive.

But as it turns out, some changes will be necessary before the repository can be brought back online. While there’s certainly some debate to be had about the overall validity of the RIAA’s claim, it isn’t completely without merit. As pointed out in the DMCA notice, the project made use of several automated tests that ran the code against copyrighted works from artists such as Taylor Swift and Justin Timberlake. While these were admittedly very poor choices to use as official test cases, the RIAA’s assertion that the entire project exists solely to download copyrighted music has no basis in reality.

source https://hackaday.com/2020/10/27/community-rallies-behind-youtube-dl-after-dmca-takedown/

AMD Acquires Xilinx for $35 Billion

News this morning that AMD has reached an agreement to acquire Xilinx for $35 Billion in stock. The move to gobble up the leading company in the FPGA industry should come as no surprise for many reasons. First, the silicon business is thick in the age of mergers and acquisitions, but more importantly because AMD’s main competitor, Intel, purchased the other FPGA giant Altera back in 2015.

Primarily a maker of computer processors, AMD expands into the reconfigurable computing market as Field-Programmable Gate Arrays (FPGA) can be adapted to different tasks based on what bitstream (programming information written to the chips) has been sent to them. This allows the gates inside the chip to be reorganized to perform different functions at the hardware level even after being put into products already in the hands of customers.

Xilinx invented the FPGA back in the mid-1980s, and since then the falling costs of silicon fabrication and the acceleration of technological advancement have made them evermore highly desirable solutions. Depending on volume, they can be a more economical alternative to ASICs. They also help with future-proofing as technology not in existence at time of manufacture — such as compression algorithms and communications protocols — may be added to hardware in the field by reflashing the bitstream. Xilinx also makes the Zynq line of hybrid chips that contain both ARM and FPGA cores in the same device.

The deal awaits approval from both shareholders and regulators but is expected to be complete by the end of 2021.

source https://hackaday.com/2020/10/27/amd-acquires-xilinx-for-35-billion/

Going For The Home Run Record With Explosive Help

The baseball home run distance challenge for crazy engineers is really heating up, with the two main (only?) competitors joining forces. [Shane] of [Stuff Made Here] and [Destin] of [Smarter Every Day] did a deep dive into [Shane]’s latest powder charged baseball bat, designed to hit a ball 600+ feet.

[Shane] built two new versions of his bat this time, using the lessons he learned from his previous V1 and V2 explosive bats. It still uses blank cartridges, but this time the max capacity was increased from three to four cartridges. For V3 a section of the bat was removed, and replaced with a four-bar linkage, which allowed the entire front of the bat to move. The linkage integrated a chamber for four blank cartridges that could be loaded almost like a double barrel shotgun and closed with a satisfying snap. Unfortunately the mass of the moving section was too much for the welds, and the entire the front broke off on the first test, so the design was scrapped.

V4 returned to the piston concept of the initial version, except V4 contains two parallel pistons, in a metal bat, with a larger hitting surface. With two cartridges it worked well, but parts started breaking with three and four, and required multiple design updates to fix. [Destin] covered the physics of the project and took some really cool high speed video. He and [Jeremy Fielding] hold the current distance record of 617 ft with their crazy Mad Batter. Unfortunately on [Shane]’s final distance attempt the bat broke again, and the ball was lost in a field with tall grass beyond the 600-foot mark, so they could not confirm if the record was actually broken.

[Destin] and his team still remain the undisputed baseball velocity record holders, with their supersonic baseball canon. It sounds like there might be another collaboration between [Destin] and [Shane] in the future, and we’re definitely looking forward to the results of that crazy venture.

source https://hackaday.com/2020/10/27/going-for-the-home-run-record-with-explosive-help/

Low-Tech Fix Saves Expensive, High-Tech TV From Junk Pile

Wiggling this connector caused the backlight to turn off and on.

[Tweepy]’s TV stopped working, and the experience is a brief reminder that if a modern appliance fails, it is worth taking a look inside because the failure might be something simple. In this case, the dead TV was actually a dead LED backlight, and the fix was so embarrassingly simple that [Tweepy] is tempted to chalk it up to negligently poor DFM (design for manufacture) at best, or even some kind of effort at planned obsolescence at worst.

What happened is this: the TV appeared to stop working, but one could still make out screen content while shining a bright light on the screen. Seeing this, [Tweepy] deduced that the backlight had failed, and opened up the device to see if it could be repaired. However, the reason for the backlight failure was a surprise. It was not the power supply, nor even any of the LEDs themselves; the whole backlight wouldn’t turn on because of a cheap little PCB-to-PCB connector, and the two small spring contacts inside that had failed.

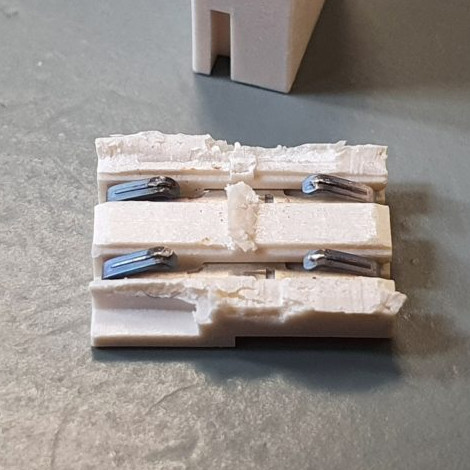
The failed connector, once cut open, showed contacts in poor condition (click to enlarge). It was ditched for a soldered connection, and the TV lived again.

From the outside things looked okay, but wiggling the connector made the backlight turn on and off, so the connection was clearly bad. Investigating further, [Tweepy] saw that the contact points of the PCBs and the two little conductors inside the connector showed clear signs of arcing and oxidation, leading to a poor connection that eventually failed, resulting in a useless TV. The fix wasn’t to clean the contacts; the correct fix was to replace the connector with a soldered connection.

Using that cheap little connector doubtlessly saved some assembly time at the factory, but it also led to failure within a fairly short amount of time. Had [Tweepy] not been handy with a screwdriver (or not bothered to investigate) the otherwise working TV would doubtlessly have ended up in a landfill.

It serves as a good reminder to make some time to investigate failures of appliances, even if one’s repair skills are limited, because the problem might be a simple one. Planned obsolescence is a tempting doorstep upon which to dump failures like this, but a good case can be made that planned obsolescence isn’t really a thing, even if manufacturers compromising products in one way or another certainly is.

source https://hackaday.com/2020/10/27/low-tech-fix-saves-expensive-high-tech-tv-from-junk-pile/

Low-Tech Fix Saves Expensive, High-Tech TV From Junk Pile

Wiggling this connector caused the backlight to turn off and on.

[Tweepy]’s TV stopped working, and the experience is a brief reminder that if a modern appliance fails, it is worth taking a look inside because the failure might be something simple. In this case, the dead TV was actually a dead LED backlight, and the fix was so embarrassingly simple that [Tweepy] is tempted to chalk it up to negligently poor DFM (design for manufacture) at best, or even some kind of effort at planned obsolescence at worst.

What happened is this: the TV appeared to stop working, but one could still make out screen content while shining a bright light on the screen. Seeing this, [Tweepy] deduced that the backlight had failed, and opened up the device to see if it could be repaired. However, the reason for the backlight failure was a surprise. It was not the power supply, nor even any of the LEDs themselves; the whole backlight wouldn’t turn on because of a cheap little PCB-to-PCB connector, and the two small spring contacts inside that had failed.

The failed connector, once cut open, showed contacts in poor condition (click to enlarge). It was ditched for a soldered connection, and the TV lived again.

From the outside things looked okay, but wiggling the connector made the backlight turn on and off, so the connection was clearly bad. Investigating further, [Tweepy] saw that the contact points of the PCBs and the two little conductors inside the connector showed clear signs of arcing and oxidation, leading to a poor connection that eventually failed, resulting in a useless TV. The fix wasn’t to clean the contacts; the correct fix was to replace the connector with a soldered connection.

Using that cheap little connector doubtlessly saved some assembly time at the factory, but it also led to failure within a fairly short amount of time. Had [Tweepy] not been handy with a screwdriver (or not bothered to investigate) the otherwise working TV would doubtlessly have ended up in a landfill.

It serves as a good reminder to make some time to investigate failures of appliances, even if one’s repair skills are limited, because the problem might be a simple one. Planned obsolescence is a tempting doorstep upon which to dump failures like this, but a good case can be made that planned obsolescence isn’t really a thing, even if manufacturers compromising products in one way or another certainly is.

source https://hackaday.com/2020/10/27/low-tech-fix-saves-expensive-high-tech-tv-from-junk-pile/

Inside the Top Secret Doughnut: a Visit to GCHQ

There’s an old joke that the world’s greatest secret agent was Beethoven. Didn’t know Beethoven was a secret agent? That’s why he was the greatest one! While most people have some idea about the CIA, MI6, and the GRU, agencies like the NRO and GCHQ keep a much lower profile. GCHQ (Government Communications Headquarters) is the United Kingdom’s electronic listening center housed in a 180 meter round doughnut. From there they listen to… well… everything. They are also responsible for codebreaking and can trace their origin back to Bletchley Park as well as back to the Great War. So what’s inside the Doughnut? National Geographic managed to get a tour of GCHQ and if you have any interest in spies, radios, cybersecurity, or codebreaking, it is worth having a look at it.

Of course, only about half of the GCHQ’s employees work in the Doughnut. Others are scattered about the UK and — probably — some in other parts of the world, too. According to the article, GCHQ had a hand in foiling 19 terrorist attacks, arresting at least two sex offenders, and prevented about £1.5 billion of tax evasion.

The agency wasn’t even mentioned in public until 1982. Before that, an American journalist wrote an article about the operation and was promptly deported. The article, of course, shows the agency in a favorable light, but it does mention that Edward Snowden revealed the agency’s controversial Tempora program to collect all online and telephone data within the UK. However, as one employee put it, “We save people’s lives, we stop bombs going off, we stop army units being killed in Afghanistan.”

As an aside, they also release a puzzle to the public once a year. We virtually went to a museum exhibit in London about GCHQ, and that post is also worth a look if you want to read more about the historical technology in the Doughnut.

source https://hackaday.com/2020/10/26/inside-the-top-secret-doughnut-a-visit-to-gchq/

Jetson Emulator Gives Students a Free AI Lesson

With the Jetson Nano, NVIDIA has done a fantastic job of bringing GPU-accelerated machine learning to the masses. For less than the cost of a used graphics card, you get a turn-key Linux computer that’s ready and able to handle whatever AI code you throw at it. But if you’re trying to set up a lab for 30 students, the cost of even relatively affordable development boards can really add up.

Spoiler: These things don’t exist.

Which is why [Tea Vui Huang] has developed jetson-emulator. This Python library provides a work-alike environment to NVIDIA’s own “Hello AI World” tutorials designed for the Jetson family of devices, with one big difference: you don’t need the actual hardware. In fact, it doesn’t matter what kind of computer you’ve got; with this library, anything that can run Python 3.7.9 or better can take you through NVIDIA’s getting started tutorial.

So what’s the trick? Well, if you haven’t guessed already, it’s all fake. Obviously it can’t actually run GPU-accelerated code without a GPU, so the library [Tea] has developed simply pretends. It provides virtual images and even “live” camera feeds to which randomly generated objects have been assigned.

The original NVIDIA functions have been rewritten to work with these feeds, so when call something like net.Classify(img) against one of them you’ll get a report of what faux objects were detected. The output will look just like it would if you were running on a real Jetson, down to providing fictitious dimensions and positions of the bounding boxes.

If you’re a hacker looking to dive into machine learning and computer vision, you’d be better off getting a $59 Jetson Nano and a webcam. But if you’re putting together a workshop that shows a dozen people the basics of NVIDIA’s AI workflow, jetson-emulator will allow everyone in attendance to run code and get results back regardless of what they’ve got under the hood.

source https://hackaday.com/2020/10/26/jetson-emulator-gives-students-a-free-ai-lesson/

Jetson Emulator Gives Students a Free AI Lesson

With the Jetson Nano, NVIDIA has done a fantastic job of bringing GPU-accelerated machine learning to the masses. For less than the cost of a used graphics card, you get a turn-key Linux computer that’s ready and able to handle whatever AI code you throw at it. But if you’re trying to set up a lab for 30 students, the cost of even relatively affordable development boards can really add up.

Spoiler: These things don’t exist.

Which is why [Tea Vui Huang] has developed jetson-emulator. This Python library provides a work-alike environment to NVIDIA’s own “Hello AI World” tutorials designed for the Jetson family of devices, with one big difference: you don’t need the actual hardware. In fact, it doesn’t matter what kind of computer you’ve got; with this library, anything that can run Python 3.7.9 or better can take you through NVIDIA’s getting started tutorial.

So what’s the trick? Well, if you haven’t guessed already, it’s all fake. Obviously it can’t actually run GPU-accelerated code without a GPU, so the library [Tea] has developed simply pretends. It provides virtual images and even “live” camera feeds to which randomly generated objects have been assigned.

The original NVIDIA functions have been rewritten to work with these feeds, so when call something like net.Classify(img) against one of them you’ll get a report of what faux objects were detected. The output will look just like it would if you were running on a real Jetson, down to providing fictitious dimensions and positions of the bounding boxes.

If you’re a hacker looking to dive into machine learning and computer vision, you’d be better off getting a $59 Jetson Nano and a webcam. But if you’re putting together a workshop that shows a dozen people the basics of NVIDIA’s AI workflow, jetson-emulator will allow everyone in attendance to run code and get results back regardless of what they’ve got under the hood.

source https://hackaday.com/2020/10/26/jetson-emulator-gives-students-a-free-ai-lesson/

Jetson Emulator Gives Students a Free AI Lesson

With the Jetson Nano, NVIDIA has done a fantastic job of bringing GPU-accelerated machine learning to the masses. For less than the cost of a used graphics card, you get a turn-key Linux computer that’s ready and able to handle whatever AI code you throw at it. But if you’re trying to set up a lab for 30 students, the cost of even relatively affordable development boards can really add up.

Spoiler: These things don’t exist.

Which is why [Tea Vui Huang] has developed jetson-emulator. This Python library provides a work-alike environment to NVIDIA’s own “Hello AI World” tutorials designed for the Jetson family of devices, with one big difference: you don’t need the actual hardware. In fact, it doesn’t matter what kind of computer you’ve got; with this library, anything that can run Python 3.7.9 or better can take you through NVIDIA’s getting started tutorial.

So what’s the trick? Well, if you haven’t guessed already, it’s all fake. Obviously it can’t actually run GPU-accelerated code without a GPU, so the library [Tea] has developed simply pretends. It provides virtual images and even “live” camera feeds to which randomly generated objects have been assigned.

The original NVIDIA functions have been rewritten to work with these feeds, so when call something like net.Classify(img) against one of them you’ll get a report of what faux objects were detected. The output will look just like it would if you were running on a real Jetson, down to providing fictitious dimensions and positions of the bounding boxes.

If you’re a hacker looking to dive into machine learning and computer vision, you’d be better off getting a $59 Jetson Nano and a webcam. But if you’re putting together a workshop that shows a dozen people the basics of NVIDIA’s AI workflow, jetson-emulator will allow everyone in attendance to run code and get results back regardless of what they’ve got under the hood.

source https://hackaday.com/2020/10/26/jetson-emulator-gives-students-a-free-ai-lesson/

World’s Smallest Benchy Shows off What 3D-Printing Can Do for “Microswimmers”

We’ve said it before, but we cast a wary eye at any superlative claims that come our way. “World’s fastest” or “world’s first” claims always seem to be quickly debunked, but when the claim of “World’s Smallest Benchy” is backed up by a tugboat that two dozen E. coli would have a hard time finding space on, we’re pretty comfortable with it.

Of course the diminutive benchmark was not printed just for the sake of it, but rather as part of a demonstration of what’s possible with “microswimmers”, synthetic particles which are designed to move about freely in microscopic regimes. As described in a paper by [Rachel P. Doherty] et al from the Soft Matter Physics lab at Leiden University, microswimmers with sizes on the order of 10 to 20 μm can be constructed repeatably, and can include a small area of platinum catalyst. The catalyst is the engine of the microswimmer; hydrogen peroxide in the environment decomposes on the catalyst surface and provides a propulsive force.

Artificial microswimmers have been around for a while, but most are made with chemical or evaporative methods which result in simple shapes like rods and spheres. The current work describes much more complex shapes — the Benchy was a bit of a flex, since the more useful microswimmers were simple helices, which essentially screw themselves into the surrounding fluid. The printing method was based on two-photon polymerization (2PP), a non-linear optical process that polymerizes a resin when two photons are simultaneously absorbed.

The idea that a powered machine so small could be designed and manufactured is pretty cool. We’d love to see how control mechanisms could be added to the prints — microfluidics, perhaps?

source https://hackaday.com/2020/10/26/worlds-smallest-benchy-shows-off-what-3d-printing-can-do-for-microswimmers/

The importance of regular aircon services

Aircons keep your home cool during the hot summer days and maintain a pleasant temperature in the office so that you can focus on your work. While investing in a quality system is advantageous, you’ll also need to remember to maintain it regularly. Proper maintenance ensures that your air conditioner delivers optimal performance. It also helps to avoid more expensive problems later on. Find a range of reliable aircon services and repairs on Junk Mail today.

Home Air Conditioner | Junk Mail
Photo Source – www.freeimages.com

How to choose the right aircon services

If you want to enjoy the benefits of regular aircon maintenance, you’ll
need to choose the right service provider. It’s essential to use a company that
employs qualified personnel who deliver an efficient service. Staff should have
the knowledge and skills to do a good, quality job. Select a trustworthy repair
service otherwise you could find yourself stuck with a bill that’s much higher
than you expected. Do an online search to find information on the company’s
reputation before you use their services. It can also be helpful to ask them
for a reference from another client who was satisfied with their work. Customer
ratings are a good indication of the quality of their services.

Aircon Maintenance | Junk Mail
Photo Source – www.freeimages.com

The importance of regular aircon services

  • Boost efficiency

Wear and tear decreases the performance of your aircon system over time. In order to keep your system working efficiently, you’ll need to get it serviced at least once a year. Not only will the system perform better, but it will also use less energy. Poorly functioning systems can cause a significant spike in your utility bills.

  • Decrease emergency repairs

If you don’t take good care of your aircon system, it’s likely to
break down unexpectedly. Over time, small issues turn into bigger problems that
cause the system to stop working. Not only is a broken system inconvenient, but
it can also cause expensive repairs that could have been avoided with proper maintenance.

  • Longer lifespan

Regular maintenance
ensures that your aircon system lasts longer. If some of the components aren’t
working properly, it can damage the rest of your system. While aircon services incur an
additional cost, they save you money in the long run.

  • Better quality air

An aircon system that delivers an optimal performance will keep
you cool by controlling the humidity levels. Poor quality air puts your health
at risk so it’s important to avoid this problem by maintaining the aircon
system and by ensuring that it’s properly installed. Filters trap dust so they
need to be cleaned and changed regularly. If you don’t keep the filters in good
condition, it causes trapped allergens to be reintroduced to the air. You can
find specially designed aircon systems for sale that are built to filter out
microorganisms and bacteria from the air. If these systems aren’t cared for
properly they won’t perform efficiently and the quality of the air will be
negatively impacted.

  • Avoid losing your warranty

If you fail to maintain your aircon system, you could lose out on
your warranty. Many manufacturers offer a one- or two-year warranty that’s
valid if you take proper care of the system. Check the warranty period that
comes with your system as well as the conditions that accompany it.

  • Reduce noise levels

Damaged aircon systems can be noisy. This background noise makes
it difficult to enjoy a relaxing environment at home or to concentrate on your
job in the office. On the other hand, a proper functioning aircon system
eliminates the need for noisy fans. With a cool temperature inside you can keep
the doors and windows closed, which means that you won’t be disturbed by the
noise outside your office or home.

Aircon Services & Repairs | Junk Mail
Photo Source – www.freeimages.com

Now that you know more about the benefits of proper maintenance, you can keep your system functioning at maximum efficiency. Visit Junk Mail and find quality aircon services today.

Simple Induction Heater Helps with Homebrew Shrink-Fitting

Machinists have a lot of neat shop tricks, but one especially interesting one is shrink-fitting tools. Shrink-fitting achieves an interference fit between tool and holder by creating a temperature difference between the two before assembly. Once everything returns to temperature, the two parts may as well be welded together.

The easiest way to shrink-fit machine tooling is with induction heating, and commercial rigs exist for doing the job. But [Roetz 4.0] decided to build his own shrink-fitting heater, and the results are pretty impressive. The induction heater itself is very simple — a 48 volt, 20 amp power supply, an off-the-shelf zero-voltage switching (ZVS) driver, and a heavy copper coil. When the coil is powered up, any metal within is quickly and evenly heated by virtue of the strong magnetic flux in the coil.

To use the shrinker, [Roetz 4.0] starts with a scrupulously clean tool holder, bored slightly undersized for the desired tool. Inside the coil, the steel tool holder quickly heats to a lovely deep brown color, meaning it has gotten up to the requisite 250-300°C. The tool is quickly dropped into the now-expanded bore, which quickly shrinks back around it. The advantage of this method over a collet or a chuck is clear in the video below: practically zero runout, and the tool is easily released after another run through the heater.

You say you’ve got no need for shrink-fitting tools? How about stuck bolts? Induction heaters work great there too.

source https://hackaday.com/2020/10/26/simple-induction-heater-helps-with-homebrew-shrink-fitting/

Plastic Strips Protect Ball Screws on This Homebrew CNC Router

It’s a fact of life for CNC router owners — swarf. Whether it’s the fine dust from a sheet of MDF or nice fat chips from a piece of aluminum, the debris your tool creates gets everywhere. You can try to control it at its source, but swarf always finds a way to escape and cause problems.

Unwilling to deal with the accumulation of chips in the expensive ball screws of his homemade CNC router, [Nikodem Bartnik] took matters into his own hands and created these DIY telescopic ball screw covers. Yes, commercial ball screw covers are available, but they are targeted at professional machines, and so are not only too large for a homebrew machine like his but also priced for pro budgets. So [Nikodem] recreated their basic design: strips of thin material wound into a tight spring that forms a tube that can extend and retract. The first prototypes were from paper, which worked but proved to have too much friction. Version 2 was made from sheets of polyester film, slippery enough to get the job done and as a bonus, transparent. They look pretty sharp, and as you can see in the video below, seem to perform well.

It’s nice to see a build progress to the point where details like this can be addressed. We’ve been following [Nikodem]’s CNC build for years now, and it really has come a long way.

source https://hackaday.com/2020/10/26/plastic-strips-protect-ball-screws-on-this-homebrew-cnc-router/

Improved Flexible Build Plate for SLA is Ready to Rock

The Elegoo Mars is an affordable SLA (resin-based) 3D printer, and there are probably few that have seen more mods and experimentation than [Jan Mrázek]’s machine. The final design of his DIY flexible build plate is a refinement of his original proof of concept, which proved a flexible build platform can be every bit as useful on an SLA printer as it is for FDM; instead of chiseling parts off a rigid build platform, simply pop the flexible steel sheet off the magnetic base and flex it slightly for a much easier part removal process. His original design worked, but had a few rough edges that have since been ironed out.

[Jan]’s magnetic build platform.

We love how [Jan] walks through all of the design elements and explains what worked and what didn’t. For example, originally he used a galvanized steel sheet which was easy enough to work with, but ended up not being a viable choice because once it’s bent, it stays bent. Spring steel is a much better material for a flexible build platform, but is harder for a hobbyist to cut.

Fortunately, it’s a simple job for any metal fabrication shop and [Jan] got a variety of thicknesses cut very cheaply. It turns out that the sweet spot is 0.3 mm (although 0.2 mm is a better choice for particularly fragile parts.) [Jan] also suggests cutting the sheet a few millimeters larger than the build platform; it’s much easier to peel the sheet off the magnetic base when one can get a fingertip under an edge, after all.

The magnetic base that the steel sheet sticks to is very simple: [Jan] converted a stock build platform by mounting an array of 20 x 20 x 1 mm magnets with 3M adhesive mounting tape. He was worried that resin might seep in between the magnets and cause a problem, perhaps even interfering with the adhesive; but so far it seems to be working very well. Resin is viscous enough that it never penetrates far into the gaps, and no effect on the adhesive has been observed so far.

Watch how easily parts are removed in the short video embedded below, in which [Jan] demonstrates his latest platform design.

It looks like only fine tuning is left from here on out. [Jan] suspects the new sheet is responsible for a slight apparent increase in elephant foot distortion (where an object widens out slightly right at the base) but that’s a minor issue at worst. Flexible build platforms for SLA are recently starting to show up for sale as aftermarket parts, but [Jan]’s work shows that an effective DIY solution is perfectly accessible to a hobbyist.

If you’re curious about adding an SLA 3D printer to your workshop, here’s an article that explains what you’d be getting into in terms of moving from FDM to SLA.

source https://hackaday.com/2020/10/26/improved-flexible-build-plate-for-sla-is-ready-to-rock/

A Unique Display Makes An Unusual Clock

Do you know the clock speed of the computer you’re reading this article on? Maybe Hackaday readers are more likely to reply “Yes!” to that question than the general public, but if there’s a takeaway it’s that for most computer users their clock speed is now an irrelevance. It’s quick enough for the job in hand and that’s all that matters. This was not always the case though, and a few decades ago the clock speed of a PC was its major selling point. Beige boxes would have seven-segment displays lit up with the figure, and it was an unusual example of one that [Ken Yap] used to produce a clock that he believes is one-of-a-kind; unless by some slim chance somebody else has rescued the same part.

The displays were hard wired without any signals from the processor, and what makes this one unusual is that as well as having a couple of digits in yellow it also sports a segmented “MHz” in red. This would have been quite a big deal on your 486 back in about 1994. To make a clock from this unpromising start required a little creative thinking, and he manages it by using the “M” and the “H” digits to represent minutes and hours, and displaying each figure in turn. The display is wired on a piece of protoboard with an STM8 dev board, and yes, as you can see in the very short video below the break, it does tell the time.

Custom displays are more usually seen in the world of LCDs than LEDs, so this one remains a rarity on these pages. Happily there are projects out there in which people spin their own takes on the idea.

source https://hackaday.com/2020/10/25/a-unique-display-makes-an-unusual-clock/

STM32 Gets Up Close and Personal with Mandelbrot

The Mandelbrot set is a curious mathematical oddity that, while interesting in its own right, is also a useful tool for benchmarking various types of computers. Its constant computing requirement when zooming in and out on the function, combined with the fact that it can be zoomed indefinitely, means that it takes some quality hardware and software to display it properly. [Thanassis] has made this a pet project of his, running Mandelbrot set visualizations in different ways on many different hardware platforms.

This particular one is based on an STM32 board called the Blue Pill, which [Thanassis] chose because he hadn’t yet done a continuous Mandelbrot zoom on a microcontroller yet. The display is handled by a tiny 16K IPS color screen, and some clever memory tricks had to come into play in order to get smooth video output since the STM has only 20 kB available. The integer multiplication is also tricky on a platform this small while keeping the continuous zoom function, so it’s limited to fixed point multiplication.

Even with the limitations of the platform, he is still able to achieve nearly double-digit FPS rates with this one. If you want to play around with graphics like this on an STM platform, [Thanassis] has released all of the source code on his GitHub page, but if you’d like to see more Mandelbrot manipulation you can check out one of his older projects where he built a similar project on an FPGA.

source https://hackaday.com/2020/10/25/stm32-gets-up-close-and-personal-with-mandelbrot/

Hackaday Links: October 25, 2020

Siglent has been making pretty big inroads into the mid-range test equipment market, with the manufacturers instruments popping up on benches all over the place. Saulius Lukse, of Kurokesu fame, found himself in possession of a Siglent SPD3303X programmable power supply, which looks like a really nice unit, at least from the hardware side. The software it came with didn’t exactly light his fire, though, so Saulius came up with a Python library to control the power supply. The library lets him control pretty much every aspect of the power supply over its Ethernet port. There are still a few functions that don’t quite work, and he’s only tested it with his specific power supply so far, but chances are pretty good that there’s at least some crossover in the command sets for other Siglent instruments. We’re keen to see others pick this up and run with it.

From the “everyone needs a hobby” department, we found this ultra-detailed miniature of an IBM 1401 mainframe system to be completely enthralling. We may have written this up at an earlier point in its development, but it now appears that the model maker, 6502b, is done with the whole set, so it bears another look. The level of detail is eye-popping — the smallest features of every piece of equipment, from the operator’s console to the line printer, is reproduced . Even the three-ring binders with system documentation are there. And don’t get us started about those tape drives, or the wee chair in period-correct Harvest Gold.

Speaking of diversions, have you ever wondered how many people are in space right now? Or how many humans have had the privilege to hitch a ride upstairs? There’s a database for that: the Astronauts Database over on Supercluster. It lists pretty much everything — human and non-human — that has been intentionally launched into space, starting with Yuri Gagarin in 1961 and up to the newest member of the club, Sergey Kud-Sverchkov, who took off got the ISS just last week from his hometown of Baikonur. Everyone and everything is there, including “some tardigrades” that crashed into the Moon. They even included this guy, which makes us wonder why they didn’t include the infamous manhole cover.

And finally, for the machinists out there, if you’ve ever wondered what chatter looks like, wonder no more. Breaking Taps has done an interesting slow-motion analysis of endmill chatter, and the results are a bit unexpected. The footage is really cool — watching the four-flute endmill peel mild steel off and fling the tiny curlicues aside is very satisfying. The value of the high-speed shots is evident when he induces chatter; the spindle, workpiece, vise, and just about everything starts oscillating, resulting in a poor-quality cut and eventually, when pushed beyond its limits, the dramatic end of the endmill’s life. Interesting stuff — reminds us a bit of Ben Krasnow’s up close and personal look at chip formation in his electron microscope.

source https://hackaday.com/2020/10/25/hackaday-links-october-25-2020/

Hackaday Links: October 25, 2020

Siglent has been making pretty big inroads into the mid-range test equipment market, with the manufacturers instruments popping up on benches all over the place. Saulius Lukse, of Kurokesu fame, found himself in possession of a Siglent SPD3303X programmable power supply, which looks like a really nice unit, at least from the hardware side. The software it came with didn’t exactly light his fire, though, so Saulius came up with a Python library to control the power supply. The library lets him control pretty much every aspect of the power supply over its Ethernet port. There are still a few functions that don’t quite work, and he’s only tested it with his specific power supply so far, but chances are pretty good that there’s at least some crossover in the command sets for other Siglent instruments. We’re keen to see others pick this up and run with it.

From the “everyone needs a hobby” department, we found this ultra-detailed miniature of an IBM 1401 mainframe system to be completely enthralling. We may have written this up at an earlier point in its development, but it now appears that the model maker, 6502b, is done with the whole set, so it bears another look. The level of detail is eye-popping — the smallest features of every piece of equipment, from the operator’s console to the line printer, is reproduced . Even the three-ring binders with system documentation are there. And don’t get us started about those tape drives, or the wee chair in period-correct Harvest Gold.

Speaking of diversions, have you ever wondered how many people are in space right now? Or how many humans have had the privilege to hitch a ride upstairs? There’s a database for that: the Astronauts Database over on Supercluster. It lists pretty much everything — human and non-human — that has been intentionally launched into space, starting with Yuri Gagarin in 1961 and up to the newest member of the club, Sergey Kud-Sverchkov, who took off got the ISS just last week from his hometown of Baikonur. Everyone and everything is there, including “some tardigrades” that crashed into the Moon. They even included this guy, which makes us wonder why they didn’t include the infamous manhole cover.

And finally, for the machinists out there, if you’ve ever wondered what chatter looks like, wonder no more. Breaking Taps has done an interesting slow-motion analysis of endmill chatter, and the results are a bit unexpected. The footage is really cool — watching the four-flute endmill peel mild steel off and fling the tiny curlicues aside is very satisfying. The value of the high-speed shots is evident when he induces chatter; the spindle, workpiece, vise, and just about everything starts oscillating, resulting in a poor-quality cut and eventually, when pushed beyond its limits, the dramatic end of the endmill’s life. Interesting stuff — reminds us a bit of Ben Krasnow’s up close and personal look at chip formation in his electron microscope.

source https://hackaday.com/2020/10/25/hackaday-links-october-25-2020/

Iconic Yugoslavian Galaksija Computer Reborn, With a Documentary Too

One of the humbling things about writing for Hackaday is the breadth of experience among our colleagues, despite one’s own skills or achievements there is probably for all of us a level of impostor syndrome when we look at their work. This week provided a reminder of this, while taking a closer look at the crowdfunder for a documentary about the Galaksija, the Yugoslavian 8-bit computer from the 1980s designed by our colleague [Voja Antonić]. Not only will the documentary be produced, but also they are recreating the Galaksija as a kit, so you can experiment with this historic computer for yourself. The campaign has reached passed its goal a couple times over but still has a few days left, so jump in if you are interested.

Freshly made original Galaksija (top), and new double-sided Galaksija (bottom).

With the advantage of being able to reach out to [Voja] as a colleague, it was time to secure the straight dope on the project. Though he’s not spearheading it, aside from appearing in the documentary he’s also produced the new Galaksija PCB to take advantage of double-sided manufacture and remove the wire links that were a feature of the original.

In that sense this isn’t so much a clone of the original as an updated version from the same designer, with only a few other updates such as key switches and connectors where the exact original component could no longer be sourced. A particularly fascinating side-tale comes from a reprint of the first Galaksija magazine. Photo-reproductions of the original printed pictures did not yield good results, so [Voja] built from scratch an entirely original Galaksija, carefully recreating the framing of each step shown in those original photos.

This project has faced its fair share of obstacles before launching on CrowsSuppy, so it’s very good indeed to see it receive its funding with time to spare. We look forward to seeing the results, meanwhile you can see a promo video in Serbian with Youtube’s English subtitling below the break. You can read [Voja]’s writing on the machine in Hackaday articles past, but don’t miss the opportunity to meet him at a live event — he’s the mastermind behind a number of hardware badges at Hackaday events.

source https://hackaday.com/2020/10/25/iconic-yugoslavian-galaksija-computer-reborn-with-a-documentary-too/

Smoothing Big Fonts on Graphic LCDs

Here’s a neat little trick: take the jaggies out of scaled fonts on the fly! This technique is for use on graphic displays where you might want to scale your fonts up. Normally you’d just write a 2×2 block of pixels for every area where there would have been one pixel and boom, larger font. Problem is, that also multiplies each empty area and you end up with jagged edges in the transitions that really catch your eye.

[David Johnson-Davies] entered big-brain mode and did something much cleverer than the obvious solution of using multiple font files. Turns out if you analyze the smoothing problem you’ll realize that it’s only the angled areas that are to blame, horizontal and vertical scaling are nice and smooth. [David’s] fix looks for checker patterns in what’s being drawn, adding a single pixel in the blank spots to smooth out the edge incredibly well!

The technique has been packaged up in a simple function that [David] wrote to play nicely in the Arduino ecosystem. However, the routine is straightforward and would be quick to implement no matter the language or controller. Keep this one in your back pocket!

Now if all you have on hand is an HD44780 character LCD, that one’s arguably even more fun to hack around on just because you’re so limited on going beyond the hard-coded font set. We’ve seen amazing things like using the custom character slots to play Tetris.

source https://hackaday.com/2020/10/25/smoothing-big-fonts-on-graphic-lcds/

POV LED Staff Takes Art for a Spin

The human body does plenty of cool tricks, but one of the easiest to take advantage of is persistence of vision (POV). Our eyes continue to see light for a fraction of a second after the light goes off, and we can leverage this into fun blinkenlight toys like POV staffs. Sure, you can buy POV staffs and other devices, but they’re pretty expensive and you won’t learn anything that way. Building something yourself is often the more expensive route, but that’s not the case with [shurik179]’s excellent open-source POV staff.

There’s a lot to like about this project, starting with the detailed instructions. It’s based on the ItsyBitsyM4 Express and Adafruit’s Dotstar LED strips. You could use the Bluetooth version, but it’s already quite easy to load images to the staff because it shows up as a USB mass storage device. We like that [shurik179] added an IMU and coded the staff so that the images look consistent no matter how fast the staff is spinning. In the future, [shurik179] might make a Bluetooth version that’s collapsible. That sounds like quite the feat, and we can’t wait to see it in action.

As cool as it is to wave a POV staff around, there’s no real practical application. What’s more practical than a clock?

source https://hackaday.com/2020/10/25/pov-led-staff-takes-art-for-a-spin/

The Clock Under the Dome

In what can only be described as a work of art, [suedbunker] has created a clock under a glass dome. Sporting Nixie tubes, a DS3223, BCD encoders, and MPSA43 transistors driven by an MCP23008 I/O expander it is truly a sight to behold. [suedbunker] has previously created the Circus Clock, a similar clock that celebrated a diversity of ways of displaying the time.

The dome clock represents a continuation of that idea. Reading the clock requires looking at the horizontal and vertical numbers separately. The hours are on the horizontal and minutes are on the vertical. Monday to Sunday is represented in the neon bulbs on the back. The power supply at the bottom provides a wide range of voltages including 5 V, 12 V, 24 V, 45 V, 90 V, 150 V, and -270 V for all the various types of lights. For safety, an optocoupler is used on the -270 volts to drive the clear seven-segment display.

An Arduino Nano controls the whole clock by communicating with the DS3223 real-time clock module and the port expanders via I2C. The soldering and wiring work, in particular, is tidy and beautiful. We look forward to future clocks by [suedbunker] and his wife.

source https://hackaday.com/2020/10/25/the-clock-under-the-dome/