It seems there are as many ways to display the time as there are ways to measure it in the first place. [Kothe] saw a fancy designer domino clock, and wanted a piece of the action without the high price tag. Thus, the natural solution was to go the DIY route.
An Arduino Nano is the heart of the build, paired with a DS1307 RTC for accurate timekeeping. The case of the clock consists of a 3D printed housing, fitted with layers of lasercut acrylic. Behind this, a smattering of WS2812B addressable LEDs are fitted, which shine through the translucent grey plastic of the front panel. This enables each LED to light up a dot of the domino, while remaining hidden when switched off. Reading the time is as simple as counting the dots on the dominoes. The first domino represents hours, from 1 to 12, while the second and third dominoes represent the minutes.
As a timepiece, the domino clock serves well as a stylish decor piece, and could also be a fun way to teach kids about electronics and telling the time. Makers do love a good timepiece, and our clock tag is always overflowing with fresh hacks on a regular basis. If you’ve got your own fancy build coming together at home, you know who to call!
If you made a motor out of a magnet, a wire coil, and some needles, you probably remember that motors and generators depend on a rotating magnetic field. Once you know how it works, the concept is pretty simple, but did you ever wonder who worked it all out to start with? Tesla figures into it, unsurprisingly. But what about Michael Dobrowolsky or Walter Bailey? Not common names to most people. [Learn Engineering] has a slick video covering the history and theory of rotating magnetic field machines, and you can watch it below.
Motors operated on direct current were not very practical at the time and caused a jerky motion. However, Tesla and another inventor named Ferraris realized that AC current could cause a rotating magnetic field without a moving commutator.
Tesla’s motor used two AC currents with a 90-degree phase difference produced by his two-phase generator. Ferraris used a single phase along with an inductor to create the phase difference. However, two-phase motors have limitations and Dobrowolsky’s three-phase design quickly replaced two-phase designs.
The video has many animations to help understand how motors work. It also explains why the magnetic poles of a motor winding appear opposite of the poles in a permanent magnet. Will you be ready to design the next super-efficient electric motor after watching this video? No. But you will have a better understanding of what really goes on inside an AC motor.
We know that the Hackaday family includes many enthusiasts for quality keyboards, and thus mention of the fabled ‘boards of yore such as the IBM Model F is sure to set a few pulses racing. Few of us are as lucky as [Brennon], who received the familial IBM PC-XT complete with its sought-after keyboard.
This Model F has a manufacture date in March 1983, and as a testament to its sturdy design was still in one piece with working electronics. It was however in an extremely grimy condition that necessitated a teardown and deep clean. Thus we are lucky enough to get a peek inside, and see just how much heavy engineering went into the construction of an IBM keyboard before the days of the feather-light membrane devices that so many of us use today. There follows a tale of deep cleaning, with a Dremel and brush, and then a liberal application of Goo Gone. The keycaps had a long bath in soapy water to remove the grime, and we’re advised to more thoroughly dry them should we ever try this as some remaining water deep inside them caused corrosion on some of the springs.
The PC-XT interface is now so ancient as to have very little readily available in the way of adapters, so at first a PS/2 adapter was used along with a USB to PS/2 converter. Finally though a dedicated PC-XT to USB converter was procured, allowing easy typing on a modern computer.
Due to the high noise, still photos don’t do it justice. The video quality is highly impressive for a system running with no IR illumination.
The camera in question is the Runcam Night Eagle 2, prized for its 0.00001 lux sensitivity. Black and white only, its capable of providing vision in moonlight and starlight conditions without external illumination. In this project, it’s hooked up to a monocle display designed for use with drone FPV setups. With lithium batteries and a charge circuit hooked up, and everything stuffed inside a compact 3D printed case, the final result is a portable, pocket sized night vision device for under $200 USD.
[Happy_Mad_Scientist] notes that in starlight conditions, it provides an advantage over other nighttime Airsoft players relying on IR illumination to see in the dark. We can imagine it would perform well in concert with a bright IR headlamp for those times when there’s simply no ambient light available – particularly indoors.
When the news broke recently that communications had finally been re-established with Voyager 2, I felt a momentary surge of panic. I’ve literally been following the Voyager missions since the twin space probes launched back in 1977, and I’ve been dreading the inevitable day when the last little bit of plutonium in their radioisotope thermal generators decays to the point that they’re no longer able to talk to us, and they go silent in the abyss of interstellar space. According to these headlines, Voyager 2 had stopped communicating for eight months — could this be a quick nap before the final sleep?
Thankfully, no. It turns out that the recent blackout to our most distant outpost of human engineering was completely expected, and completely Earth-side. Upgrades and maintenance were performed on the Deep Space Network antennas that are needed to talk to Voyager. But that left me with a question: What about the rest of the DSN? Could they have not picked up the slack and kept us in touch with Voyager as it sails through interstellar space? The answer to that is an interesting combination of RF engineering and orbital dynamics.
Below the Belt
To understand the outage, one needs to know a little about the Deep Space Network and how it works. I discussed this in detail in the past, but here’s a quick summary. The DSN is comprised of three sites: Madrid in Spain, Goldstone in California, and the site in Canberra, Australia. Each site has an array of dish antennas ranging from 26 meters in diameter to a whopping 70-meter dish. The three sites work together to provide a powerful communication infrastructure that has supported just about every spacecraft that has been launched in the last 50 years or so.
What’s interesting about the DSN sites is their geographic arrangement. Looking down on Earth from the north pole, the DSN sites are spaced almost exactly 120° apart. This means that each site’s view of the sky overlaps the other about 300,000 km into space, thus providing round-the-clock coverage for every space probe. But space travel is not necessarily only two-dimensional, and that’s where the geographic oddities of Earth and curiously, the birth of the solar system itself, play into the recent Voyager blackout.
Almost everything that orbits the Sun does so in a pretty well-defined plane called the ecliptic. The ecliptic plane is likely a remnant of the early disk of dust and debris that eventually congealed into our Sun and the planets. The only major body in the solar system that varies appreciably from the ecliptic is Pluto, whose orbit is inclined about 17° to the ecliptic. The Earth is pretty much always in the ecliptic, and therefore anything that leaves Earth is pretty much going to stay in that plane too, unless provisions are made to alter its orbit.
And that’s exactly what happened with the Voyager twins. Launched to take advantage of a quirk in orbital alignment of the outer planets that occurs only once every 175 years, the Voyager probes were able to complete their Grand Tour because each planetary encounter was planned to give the probes a gravitational assist, flinging them on to their next destination. Both probes remained very close to the plane of the ecliptic for the first part of their journey before intersecting the orbit of Jupiter and picking up speed for the trip to Saturn.
At Saturn, the twin probes would part to carry on very different missions. To get a good look at Saturn’s moon Titan, Voyager 1 approached the planet from below the ecliptic, coming under the south pole. The gravitational assist put it on a trajectory aimed above the ecliptic plane, in the general direction of the constellation Ophiuchus. Voyager 2, however, continued on in the ecliptic, using its gravitational assist to shoot first to Uranus, and eventually to Neptune. There, in the mirror of the trick its twin used to explore Titan, Voyager 2 flew over the north pole of Neptune, which put it on a path to fly close to its moon Triton and on in the general direction of the constellation Sagittarius.
Hello, Canberra Calling
It was this last move that would eventually make Voyager 2 completely dependent on Canberra for communications. Canberra is the only DSN site that lies below the equator, and even though the plane of the equator and the ecliptic are not coplanar — they differ by the roughly 23° tilt of the Earth’s axis — eventually Voyager would get so far below the ecliptic plane that none of the northern hemisphere DSN sites would have line-of-sight to it.
Luckily, Canberra is well-equipped to support Voyager 2. As the probe streaks away from home at 55,000 km/h, with its fuel slowly decaying, Voyager is getting harder and harder to talk to. The giant 70-m dish at Canberra, dubbed DSS-43, provides the gain needed to blast a signal powerful enough to cross the 17 light-hour gap between us and Voyager. Interestingly, Richard Stephenson, a DSN controller at Canberra, reports that although the smaller 34-m dishes at the complex can still be used to radiate a control signal to Voyager, such contacts are “spray and pray” affairs that may or may not be received by the probe and acted upon. Only DSS-43 has the power and gains to still effectively command the spacecraft.
Despite its importance in continuing the Voyager Interstellar Mission (VIM), DSS-43 was showing its age and had to be scheduled for repairs. As we reported back in July, the big dish was taken offline in March of 2020 and has been getting upgrades ever since. After eight months the repairs have progressed to the point where DSS-43 could try out a simple command link to Voyager 2 — just a basic “Are you still there?” ping, which was sent on October 29.
Happily, despite the fact that Voyager had crossed an additional 300 million kilometers of interstellar space in the meantime, the probe returned confirmation of the command almost a day and a half later. There are still a number of DSS-34 upgrade tasks to complete before the antenna is returned to full service in January of 2021, but it seems like the controllers just couldn’t bear to be out of touch with Voyager any longer.
If you want to keep up on progress on DSS-43 specifically and the goings-on at DSN Canberra in general, I highly recommend checking out Richard Stephenson’s Twitter feed. He’s got a ton of great tweets, plenty of pictures of the big dishes, and a wealth of insider information. And a hearty thanks to him for pitching in on this story, and to all the engineers making the DSN continue to deliver important science.
When the news broke recently that communications had finally been re-established with Voyager 2, I felt a momentary surge of panic. I’ve literally been following the Voyager missions since the twin space probes launched back in 1977, and I’ve been dreading the inevitable day when the last little bit of plutonium in their radioisotope thermal generators decays to the point that they’re no longer able to talk to us, and they go silent in the abyss of interstellar space. According to these headlines, Voyager 2 had stopped communicating for eight months — could this be a quick nap before the final sleep?
Thankfully, no. It turns out that the recent blackout to our most distant outpost of human engineering was completely expected, and completely Earth-side. Upgrades and maintenance were performed on the Deep Space Network antennas that are needed to talk to Voyager. But that left me with a question: What about the rest of the DSN? Could they have not picked up the slack and kept us in touch with Voyager as it sails through interstellar space? The answer to that is an interesting combination of RF engineering and orbital dynamics.
Below the Belt
To understand the outage, one needs to know a little about the Deep Space Network and how it works. I discussed this in detail in the past, but here’s a quick summary. The DSN is comprised of three sites: Madrid in Spain, Goldstone in California, and the site in Canberra, Australia. Each site has an array of dish antennas ranging from 26 meters in diameter to a whopping 70-meter dish. The three sites work together to provide a powerful communication infrastructure that has supported just about every spacecraft that has been launched in the last 50 years or so.
What’s interesting about the DSN sites is their geographic arrangement. Looking down on Earth from the north pole, the DSN sites are spaced almost exactly 120° apart. This means that each site’s view of the sky overlaps the other about 300,000 km into space, thus providing round-the-clock coverage for every space probe. But space travel is not necessarily only two-dimensional, and that’s where the geographic oddities of Earth and curiously, the birth of the solar system itself, play into the recent Voyager blackout.
Almost everything that orbits the Sun does so in a pretty well-defined plane called the ecliptic. The ecliptic plane is likely a remnant of the early disk of dust and debris that eventually congealed into our Sun and the planets. The only major body in the solar system that varies appreciably from the ecliptic is Pluto, whose orbit is inclined about 17° to the ecliptic. The Earth is pretty much always in the ecliptic, and therefore anything that leaves Earth is pretty much going to stay in that plane too, unless provisions are made to alter its orbit.
And that’s exactly what happened with the Voyager twins. Launched to take advantage of a quirk in orbital alignment of the outer planets that occurs only once every 175 years, the Voyager probes were able to complete their Grand Tour because each planetary encounter was planned to give the probes a gravitational assist, flinging them on to their next destination. Both probes remained very close to the plane of the ecliptic for the first part of their journey before intersecting the orbit of Jupiter and picking up speed for the trip to Saturn.
At Saturn, the twin probes would part to carry on very different missions. To get a good look at Saturn’s moon Titan, Voyager 1 approached the planet from below the ecliptic, coming under the south pole. The gravitational assist put it on a trajectory aimed above the ecliptic plane, in the general direction of the constellation Ophiuchus. Voyager 2, however, continued on in the ecliptic, using its gravitational assist to shoot first to Uranus, and eventually to Neptune. There, in the mirror of the trick its twin used to explore Titan, Voyager 2 flew over the north pole of Neptune, which put it on a path to fly close to its moon Triton and on in the general direction of the constellation Sagittarius.
Hello, Canberra Calling
It was this last move that would eventually make Voyager 2 completely dependent on Canberra for communications. Canberra is the only DSN site that lies below the equator, and even though the plane of the equator and the ecliptic are not coplanar — they differ by the roughly 23° tilt of the Earth’s axis — eventually Voyager would get so far below the ecliptic plane that none of the northern hemisphere DSN sites would have line-of-sight to it.
Luckily, Canberra is well-equipped to support Voyager 2. As the probe streaks away from home at 55,000 km/h, with its fuel slowly decaying, Voyager is getting harder and harder to talk to. The giant 70-m dish at Canberra, dubbed DSS-43, provides the gain needed to blast a signal powerful enough to cross the 17 light-hour gap between us and Voyager. Interestingly, Richard Stephenson, a DSN controller at Canberra, reports that although the smaller 34-m dishes at the complex can still be used to radiate a control signal to Voyager, such contacts are “spray and pray” affairs that may or may not be received by the probe and acted upon. Only DSS-43 has the power and gains to still effectively command the spacecraft.
Despite its importance in continuing the Voyager Interstellar Mission (VIM), DSS-43 was showing its age and had to be scheduled for repairs. As we reported back in July, the big dish was taken offline in March of 2020 and has been getting upgrades ever since. After eight months the repairs have progressed to the point where DSS-43 could try out a simple command link to Voyager 2 — just a basic “Are you still there?” ping, which was sent on October 29.
Happily, despite the fact that Voyager had crossed an additional 300 million kilometers of interstellar space in the meantime, the probe returned confirmation of the command almost a day and a half later. There are still a number of DSS-34 upgrade tasks to complete before the antenna is returned to full service in January of 2021, but it seems like the controllers just couldn’t bear to be out of touch with Voyager any longer.
If you want to keep up on progress on DSS-43 specifically and the goings-on at DSN Canberra in general, I highly recommend checking out Richard Stephenson’s Twitter feed. He’s got a ton of great tweets, plenty of pictures of the big dishes, and a wealth of insider information. And a hearty thanks to him for pitching in on this story, and to all the engineers making the DSN continue to deliver important science.
When the news broke recently that communications had finally been re-established with Voyager 2, I felt a momentary surge of panic. I’ve literally been following the Voyager missions since the twin space probes launched back in 1977, and I’ve been dreading the inevitable day when the last little bit of plutonium in their radioisotope thermal generators decays to the point that they’re no longer able to talk to us, and they go silent in the abyss of interstellar space. According to these headlines, Voyager 2 had stopped communicating for eight months — could this be a quick nap before the final sleep?
Thankfully, no. It turns out that the recent blackout to our most distant outpost of human engineering was completely expected, and completely Earth-side. Upgrades and maintenance were performed on the Deep Space Network antennas that are needed to talk to Voyager. But that left me with a question: What about the rest of the DSN? Could they have not picked up the slack and kept us in touch with Voyager as it sails through interstellar space? The answer to that is an interesting combination of RF engineering and orbital dynamics.
Below the Belt
To understand the outage, one needs to know a little about the Deep Space Network and how it works. I discussed this in detail in the past, but here’s a quick summary. The DSN is comprised of three sites: Madrid in Spain, Goldstone in California, and the site in Canberra, Australia. Each site has an array of dish antennas ranging from 26 meters in diameter to a whopping 70-meter dish. The three sites work together to provide a powerful communication infrastructure that has supported just about every spacecraft that has been launched in the last 50 years or so.
What’s interesting about the DSN sites is their geographic arrangement. Looking down on Earth from the north pole, the DSN sites are spaced almost exactly 120° apart. This means that each site’s view of the sky overlaps the other about 300,000 km into space, thus providing round-the-clock coverage for every space probe. But space travel is not necessarily only two-dimensional, and that’s where the geographic oddities of Earth and curiously, the birth of the solar system itself, play into the recent Voyager blackout.
Almost everything that orbits the Sun does so in a pretty well-defined plane called the ecliptic. The ecliptic plane is likely a remnant of the early disk of dust and debris that eventually congealed into our Sun and the planets. The only major body in the solar system that varies appreciably from the ecliptic is Pluto, whose orbit is inclined about 17° to the ecliptic. The Earth is pretty much always in the ecliptic, and therefore anything that leaves Earth is pretty much going to stay in that plane too, unless provisions are made to alter its orbit.
And that’s exactly what happened with the Voyager twins. Launched to take advantage of a quirk in orbital alignment of the outer planets that occurs only once every 175 years, the Voyager probes were able to complete their Grand Tour because each planetary encounter was planned to give the probes a gravitational assist, flinging them on to their next destination. Both probes remained very close to the plane of the ecliptic for the first part of their journey before intersecting the orbit of Jupiter and picking up speed for the trip to Saturn.
At Saturn, the twin probes would part to carry on very different missions. To get a good look at Saturn’s moon Titan, Voyager 1 approached the planet from below the ecliptic, coming under the south pole. The gravitational assist put it on a trajectory aimed above the ecliptic plane, in the general direction of the constellation Ophiuchus. Voyager 2, however, continued on in the ecliptic, using its gravitational assist to shoot first to Uranus, and eventually to Neptune. There, in the mirror of the trick its twin used to explore Titan, Voyager 2 flew over the north pole of Neptune, which put it on a path to fly close to its moon Triton and on in the general direction of the constellation Sagittarius.
Hello, Canberra Calling
It was this last move that would eventually make Voyager 2 completely dependent on Canberra for communications. Canberra is the only DSN site that lies below the equator, and even though the plane of the equator and the ecliptic are not coplanar — they differ by the roughly 23° tilt of the Earth’s axis — eventually Voyager would get so far below the ecliptic plane that none of the northern hemisphere DSN sites would have line-of-sight to it.
Luckily, Canberra is well-equipped to support Voyager 2. As the probe streaks away from home at 55,000 km/h, with its fuel slowly decaying, Voyager is getting harder and harder to talk to. The giant 70-m dish at Canberra, dubbed DSS-43, provides the gain needed to blast a signal powerful enough to cross the 17 light-hour gap between us and Voyager. Interestingly, Richard Stephenson, a DSN controller at Canberra, reports that although the smaller 34-m dishes at the complex can still be used to radiate a control signal to Voyager, such contacts are “spray and pray” affairs that may or may not be received by the probe and acted upon. Only DSS-43 has the power and gains to still effectively command the spacecraft.
Despite its importance in continuing the Voyager Interstellar Mission (VIM), DSS-43 was showing its age and had to be scheduled for repairs. As we reported back in July, the big dish was taken offline in March of 2020 and has been getting upgrades ever since. After eight months the repairs have progressed to the point where DSS-43 could try out a simple command link to Voyager 2 — just a basic “Are you still there?” ping, which was sent on October 29.
Happily, despite the fact that Voyager had crossed an additional 300 million kilometers of interstellar space in the meantime, the probe returned confirmation of the command almost a day and a half later. There are still a number of DSS-34 upgrade tasks to complete before the antenna is returned to full service in January of 2021, but it seems like the controllers just couldn’t bear to be out of touch with Voyager any longer.
If you want to keep up on progress on DSS-43 specifically and the goings-on at DSN Canberra in general, I highly recommend checking out Richard Stephenson’s Twitter feed. He’s got a ton of great tweets, plenty of pictures of the big dishes, and a wealth of insider information. And a hearty thanks to him for pitching in on this story, and to all the engineers making the DSN continue to deliver important science.
Thanksgiving is just round the corner and [mrak_ripple] was worried about serving food under social distancing conditions. Rather than bother with standard best practice, he chose to take a more exciting route – flinging side dishes with miniature siege weaponry. (Video, embedded below.)
The mashed potato trebuchet is a build in the modern style, relying on 8020 aluminium extrusion to allow for quick and easy assembly. It also takes advantage of what appears to be a heavy duty laser cutter, which creates strong steel brackets to hold everything together. The launcher cup to hold the mash is a 3D printed part, created in resin and held on the end of the arm with duct tape, since appropriate bolts didn’t fall to hand.
In the end, repeatability was a struggle, and we suspect the trebuchet won’t actually do food service on the holiday itself. However, it could certainly make for a fun game after dinner, seeing who can get the most mash onto a willing target. We’d love to see a mash cannon too, so if you’ve built one, drop us a line. Of course, if you’re into weirder, high performance designs, the flywheel trebuchet may be more your speed. Video after the break.
[James Bruton] is an impressive roboticist, building all kinds of robots from tracked, exploring robots to Boston Dynamics-esque legged robots. However, many of the robots are proof-of-concept builds that explore machine learning, computer vision, or unique movements and characteristics. This latest build make use of everything he’s learned from building those but strives to be useful on a day-to-day basis as well, and is part of the beginning of a series he is doing on building a Really Useful Robot. (Video, embedded below.)
While the robot isn’t quite finished yet, his first video in this series explores the idea behind the build and the construction of the base of the robot itself. He wants this robot to be able to navigate its environment but also carry out instructions such as retrieving a small object from a table. For that it needs a heavy base which is built from large 3D-printed panels with two brushless motors with encoders for driving the custom wheels, along with a suspension built from casters and a special hinge. Also included in the base is an Nvidia Jetson for running the robot, and also handling some heavy lifting tasks such as image recognition.
As of this writing, [James] has also released his second video in the series which goes into detail about the mapping and navigation functions of the robots, and we’re excited to see the finished product. Of course, if you want to see some of [James]’s other projects be sure to check out his tracked rover or his investigations into legged robots.
In the grand scheme of things, it really wasn’t all that long ago that a slide rule was part of an engineer’s every day equipment. Long before electronic calculators came along, a couple of sticks of wood inscribed with accurate scales was all it took to do everything from simple multiplication to logarithms and trig functions.
While finding a slide rule these days isn’t impossible, it’s still not exactly easy, and buying one off the shelf isn’t as fun or as instructive as building one yourself. [JavierL90]’s slide rule build started, ironically enough, on the computer, with a Python program designed to graphically plot the various scales needed for the fixed sections of the slide rules (the “stators”) and the moving bit (the “slide”). His first throught was to laser-engrave the scales, but the route of printing them onto self-adhesive vinyl stock proved to be easier.
With the scale squared away, work turned to the mechanism itself. He chose walnut for the wood, aluminum for the brackets, and a 3D-printed frame holding a thin acrylic window for the sliding cursor. The woodworking is simple but well-done, as is the metalwork. We especially like the method used to create the cursor line — a simple line scored into the acrylic with a razor, which was then filled with red inks. The assembled slide rule is a thing of beauty, looking for all the world like a commercial model, especially when decked out with its custom faux leather carry case.
We have to admit that the use of a slide rule is a life skill that passed us by, but seeing this puts us in the mood for another try. We might have to start really, really simple and work up from there.
There is a certain charm to older electronics gear. Heavy metal chassis and obviously hand-wired harness can be a work of art even if they would be economically impractical for most modern gear. Watching [msylvain59’s] tear down of a Collins 51R VOR receiver is a good example of that. The construction looks so solid.
If you aren’t familiar with VOR, it stands for VHF omnidirectional range and allows airplanes to tune into a fixed ground-based beacon and determine its heading in relation to the beacon. In some cases, it can also calculate distance.
Years ago, VOR antennas actually rotated rapidly, but today it is more likely to be an array of antennas switched electrically. The radio beam has several encoding schemes, including an FM reference signal that allows an airplane receiver — like the 51R — to determine the heading to the beacon. If you know the heading to two beacons, you can figure out where you are. Even with a single beacon, you can hold course towards it or away from it if you maintain a steady heading.
A receiver like the Collins would drive a Course Deviation Indicator (CDI), a Horizontal Situation Indicator (HSI), and a Radio Magnetic Indicator (RMI) on the plane’s cockpit and might also provide input to an autopilot. Compared to modern gear, the components look huge.
Understanding where an aircraft is has always been a big deal, and there are many ways to deal with it. Transponders are one part of the equation. We see a lot of hacks relating to ADS-B, too.
A pen plotter is often the first experience many ambitious makers have of the world of Computer Numerical Control, or CNC. While they typically operate on flat stock, with the right build, they can be designed to draw on curved surfaces, too – as [tuenhidiy] demonstrates with this rotary bottle plotter.
The plotter uses shafts salvaged from an old printer to act as the rollers for the bottle to be drawn upon, turned by a pair of stepper motors. X and Z axes are created out of two CD drive mechanisms – a popular way to build two linear axes on the cheap. The hardware is controlled by GRBL, running on an Arduino Uno kitted out with a CNC shield to handle the necessary I/O.
The build is somewhat limited to by the short range of its X axis, which prevents the plotter from easily drawing on a full-size bottle label or can. However, this could easily be fixed with some upgrades and extra steppers if so desired. As a home build, it’s a great way to learn about the CNC techniques required to work with curved surfaces effectively. Video after the break.
It seems like every year, it gets a bit easier to build your own CNC. From the Enhanced Machine Controller (EMC) project of the early 1990s to Arduinos running Grbl in the late 2000s, the open source community has moved ahead in leaps and bounds. Grbl is at its core firmware that interprets G-code and commands stepper motors, usually to move a tool head in such a way as to make something. Tons of systems have been built around it, including early Makerbot printers.
Its also spawned a plethora of other projects (the Grbl GitHib repo has 2,400 forks!), including a 32-bit flavor called grblHAL. This version is at the heart of a fantastic CNC controller board developed by [Phill Barrett]. Ditching the Arduino for a more powerful Teensy 4.1, [Phil]’s controller supports full five-axis control, variable frequency drive spindles, dust extractor control, and flood and mist coolant control. It can run at blazing stepping rates of up to 160 kHz (standard Grbl on an Arduino hits 30 kHz) and can be assembled with either a USB or Ethernet interface.
There’s no shortage of interesting Grbl-based machines out there — including a revamped Atari plotter and a three-axis rotary CNC (shameless plug for the author’s own project) but it’s always exciting to see new hardware developed that will undoubtedly find its way into the next generation of a family of projects. We can’t wait to see what comes next!
It seems like every year, it gets a bit easier to build your own CNC. From the Enhanced Machine Controller (EMC) project of the early 1990s to Arduinos running Grbl in the late 2000s, the open source community has moved ahead in leaps and bounds. Grbl is at its core firmware that interprets G-code and commands stepper motors, usually to move a tool head in such a way as to make something. Tons of systems have been built around it, including early Makerbot printers.
Its also spawned a plethora of other projects (the Grbl GitHib repo has 2,400 forks!), including a 32-bit flavor called grblHAL. This version is at the heart of a fantastic CNC controller board developed by [Phill Barrett]. Ditching the Arduino for a more powerful Teensy 4.1, [Phil]’s controller supports full five-axis control, variable frequency drive spindles, dust extractor control, and flood and mist coolant control. It can run at blazing stepping rates of up to 160 kHz (standard Grbl on an Arduino hits 30 kHz) and can be assembled with either a USB or Ethernet interface.
There’s no shortage of interesting Grbl-based machines out there — including a revamped Atari plotter and a three-axis rotary CNC (shameless plug for the author’s own project) but it’s always exciting to see new hardware developed that will undoubtedly find its way into the next generation of a family of projects. We can’t wait to see what comes next!
Ubuntu 20.04 is an incredibly popular operating system, perhaps the most popular among the Linux distributions due to its ease-of-use. In general, it’s a fairly trustworthy operating system too, especially since its source code is open. However, an update with the 20.04 revision has led to security researcher [Kevin Backhouse] finding a surprisingly easy way to escalate privileges on this OS, which we would like to note is not great.
The exploit involves two bugs, one in accountservice daemon which handles user accounts on the computer, and another in the GNOME Display Manager which handles the login screen. Ubuntu 20.04 added some code to the daemon which looks at a specific file on the computer, and with a simple symlink, it can be tricked into reading a different file which locks the process into an infinite loop. The daemon also drops its privileges at one point in this process, a normal security precaution, but this allows the user to crash the daemon.
The second bug for this exploit involves how the GNOME Display Manager (gdm3) handles privileges. Normally it would not have administrator privileges, but if the accountservice daemon isn’t running it escalates itself to administrator, where any changes made have administrator privileges. This provides an attacker with an opportunity to create a new user account with administrator privileges.
Of course, this being Ubuntu, we can assume that this vulnerability will be immediately patched. It’s also a good time to point out that the reason that open-source software is inherently more secure is that when anyone can see the source code, anyone can find and report issues like this which allow the software maintainer (or even the user themselves) to make effective changes more quickly.
After a couple of months away we’re returning with our periodic roundup of happenings in orbit, as we tear you away from Star Trek: Discovery and The Mandalorian, and bring you up to date with some highlights from the real world of space. We’ve got a launch to look forward to this week, as well as a significant anniversary.
The ISS as it looked twenty years ago. NASA (Crew of STS-106), Public domain.
A quiet but extremely significant anniversary first up: in the week that this is being written we’ve passed the 20-year anniversary of a continuous human presence in space aboard the ISS. The geopolitical map of the world may have swirled around down on the surface over the last couple of decades, but American, Russian, Canadian, European, and Japanese astronauts and cosmonauts with all their modules and experiments have continually passed over our heads in an island of international harmony and scientific endeavour. There appears to be political uncertainty over how long the station will eventually serve, however for now its future seems assured with talk of its use in research for Mars missions and for commercial expansion modules.
SpaceX’s Starlink global satellite broadband project has been in the news. As any long-term space-watchers will know, there is a failure rate among satellites and it’s not uncommon for craft to be lost before they can come into service, and in this Starlink is no exception. Their failure figure was reported as 2.5% leading to a possible thousand or so dead satellites in orbit by the completion of the constellation, but revised calculations from the astronomer Jonathan McDowell show an impressive improvement over the different series’ of launches. The latest launches boast a failure rate of only 0.2%, which almost certainly corresponds to some impressive behind-the-scenes work from the SpaceX engineers.
If you remember Nokia only for their dominance of the consumer mobile phone market over a decade ago then you may not be aware that they remain a major player in the world of cellular phone infrastructure, even if their handset glory days are behind them. As such they’ve been selected by NASA to deploy the first 4G cellular network off-planet, on the lunar surface. So if you’re in a spot with poor signal down on Earth you can now complain that even astronauts have better service than you! Jokes aside, the network won’t be an extension of the ones we use down here. Instead it will use 4G technologies to provide reliable on-moon communication for voice, video, and telemetry across the whole surface of NASA’s area of operations. The system will consist of space-hardened and miniaturised base stations that will be robotically deployed, so there are unlikely to be astronaut cell tower engineers working on the moon any time soon.
The story to look out for this week will be the launch of SpaceX’s Crew-1 mission to the ISS on the 14th of November. We all saw the first manned Crew Dragon test mission earlier in the year, and this will form the first operational crew launch of the capsule. This mission has been delayed since August due to some technical issues for the SpaceX engineers to iron out. We wish them every success, and will let out a sigh of relief when we watch the hatch open and them coming aboard their new orbiting home.
From the sound of reports in the press, graphene is the miracle material that will cure all the world’s ills. It’ll make batteries better, supercharge solar panels, and revolutionize medicine. While a lot of applications for the carbon monolayer are actually out in the market already, there’s still a long way to go before the stuff is in everything, partly because graphene can be very difficult to make.
It doesn’t necessarily have to be so hard, though, as [Zachary Tong] shows us with his laser-induced graphene supercapacitors. His production method couldn’t be simpler, and chances are good you’ve got everything you need to replicate the method in your shop right now. All it takes is a 405-nm laser, a 3D-printer or CNC router, and a roll of Kapton tape. As [Zach] explains, the laser energy converts the polyimide film used as the base material of Kapton into a sort of graphene foam. This foam doesn’t have all the usual properties of monolayer graphene, but it has interesting properties of its own, like extremely high surface area and moderate conductivity.
To make his supercaps, [Zach] stuck some Kapton tape to glass slides and etched a pattern into with the laser. His pattern has closely spaced interdigitated electrodes, which when covered with a weak sulfuric acid electrolyte shows remarkably high capacitance. He played with different patterns and configurations, including stacking tape up into layers, and came up with some pretty big capacitors. As a side project, he used the same method to produce a remarkable effective Kapton-tape heating element, which could have tons of applications.
Here’s hoping that [Zach]’s quick and easy graphene method inspires further experimentation. To get you started, check out our deep-dive into Kapton and how not every miracle material lives up to its promise.
Today we’re sad to report that one of the primary support cables at the Arecibo Observatory has snapped, nudging the troubled radio telescope closer to a potential disaster. The Observatory’s 300 meter reflector dish was already badly in need of repairs after spending 60 years exposed to the elements in Puerto Rico, but dwindling funds have made it difficult for engineers to keep up. Damage from 2017’s Hurricane Maria was still being repaired when a secondary support cable broke free and smashed through the dish back in August, leading to grave concerns over how much more abuse the structure can take before a catastrophic failure is inevitable.
The situation is particularly dire because both of the failed cables were attached to the same tower. Each of the remaining cables is now supporting more weight than ever before, increasing the likelihood of another failure. Unless engineers can support the dish and ease the stress on these cables, the entire structure could be brought down by a domino effect; with each cable snapping in succession as the demands on them become too great.
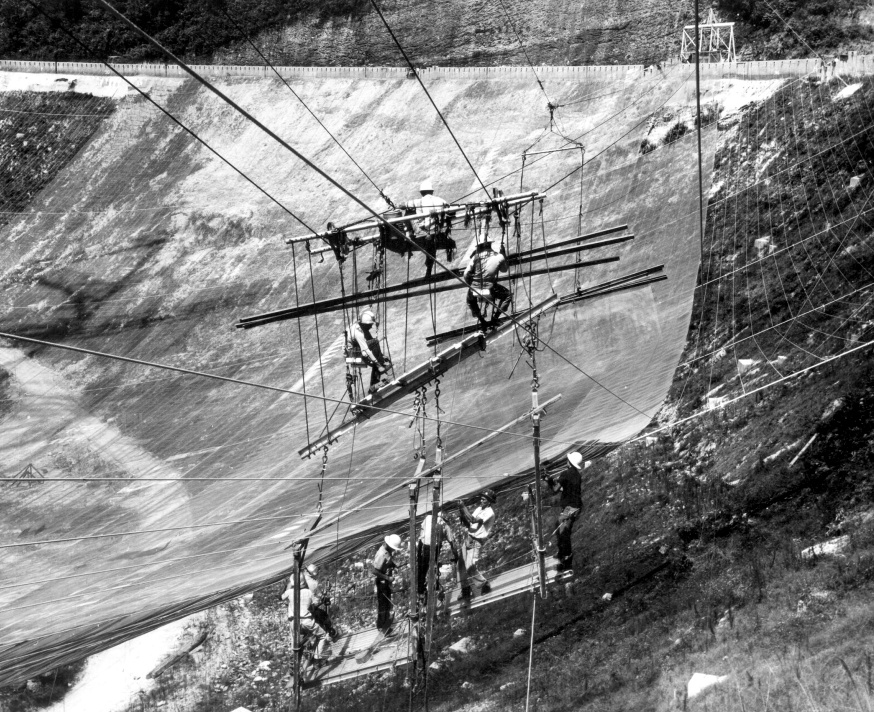
Workers installing the reflector’s mesh panels in 1963.
As a precaution the site has been closed to all non-essential personnel, and to limit the risk to workers, drones are being used to evaluate the dish and cabling as engineers formulate plans to stabilize the structure until replacement cables arrive. Fortunately, they have something of a head start.
Back in September the University of Central Florida, which manages the Arecibo Observatory, contacted several firms to strategize ways they could address the previously failed cable and the damage it caused. Those plans have now been pushed up in response to this latest setback.
Unfortunately, there’s still a question of funding. There were fears that the Observatory would have to be shuttered after Hurricane Maria hit simply because there wasn’t enough money in the budget to perform the relatively minor repairs necessary. The University of Central Florida stepped in and provided the funding necessary to keep the Observatory online in 2018, but they may need to lean on their partner the National Science Foundation to help cover the repair bill they’ve run up since then.
The Arecibo Observatory is a unique installation, and its destruction would be an incredible blow for the scientific community. Researchers were already struggling with the prospect of repairs putting the powerful radio telescope out of commission for a year or more, but now it seems there’s a very real possibility the Observatory may be lost. Here’s hoping that teams on the ground can safely stabilize the iconic instrument so it can continue exploring deep space for years to come.
Today we’re sad to report that one of the primary support cables at the Arecibo Observatory has snapped, nudging the troubled radio telescope closer to a potential disaster. The Observatory’s 300 meter reflector dish was already badly in need of repairs after spending 60 years exposed to the elements in Puerto Rico, but dwindling funds have made it difficult for engineers to keep up. Damage from 2017’s Hurricane Maria was still being repaired when a secondary support cable broke free and smashed through the dish back in August, leading to grave concerns over how much more abuse the structure can take before a catastrophic failure is inevitable.
The situation is particularly dire because both of the failed cables were attached to the same tower. Each of the remaining cables is now supporting more weight than ever before, increasing the likelihood of another failure. Unless engineers can support the dish and ease the stress on these cables, the entire structure could be brought down by a domino effect; with each cable snapping in succession as the demands on them become too great.
Workers installing the reflector’s mesh panels in 1963.
As a precaution the site has been closed to all non-essential personnel, and to limit the risk to workers, drones are being used to evaluate the dish and cabling as engineers formulate plans to stabilize the structure until replacement cables arrive. Fortunately, they have something of a head start.
Back in September the University of Central Florida, which manages the Arecibo Observatory, contacted several firms to strategize ways they could address the previously failed cable and the damage it caused. Those plans have now been pushed up in response to this latest setback.
Unfortunately, there’s still a question of funding. There were fears that the Observatory would have to be shuttered after Hurricane Maria hit simply because there wasn’t enough money in the budget to perform the relatively minor repairs necessary. The University of Central Florida stepped in and provided the funding necessary to keep the Observatory online in 2018, but they may need to lean on their partner the National Science Foundation to help cover the repair bill they’ve run up since then.
The Arecibo Observatory is a unique installation, and its destruction would be an incredible blow for the scientific community. Researchers were already struggling with the prospect of repairs putting the powerful radio telescope out of commission for a year or more, but now it seems there’s a very real possibility the Observatory may be lost. Here’s hoping that teams on the ground can safely stabilize the iconic instrument so it can continue exploring deep space for years to come.
Today we’re sad to report that one of the primary support cables at the Arecibo Observatory has snapped, nudging the troubled radio telescope closer to a potential disaster. The Observatory’s 300 meter reflector dish was already badly in need of repairs after spending 60 years exposed to the elements in Puerto Rico, but dwindling funds have made it difficult for engineers to keep up. Damage from 2017’s Hurricane Maria was still being repaired when a secondary support cable broke free and smashed through the dish back in August, leading to grave concerns over how much more abuse the structure can take before a catastrophic failure is inevitable.
The situation is particularly dire because both of the failed cables were attached to the same tower. Each of the remaining cables is now supporting more weight than ever before, increasing the likelihood of another failure. Unless engineers can support the dish and ease the stress on these cables, the entire structure could be brought down by a domino effect; with each cable snapping in succession as the demands on them become too great.
Workers installing the reflector’s mesh panels in 1963.
As a precaution the site has been closed to all non-essential personnel, and to limit the risk to workers, drones are being used to evaluate the dish and cabling as engineers formulate plans to stabilize the structure until replacement cables arrive. Fortunately, they have something of a head start.
Back in September the University of Central Florida, which manages the Arecibo Observatory, contacted several firms to strategize ways they could address the previously failed cable and the damage it caused. Those plans have now been pushed up in response to this latest setback.
Unfortunately, there’s still a question of funding. There were fears that the Observatory would have to be shuttered after Hurricane Maria hit simply because there wasn’t enough money in the budget to perform the relatively minor repairs necessary. The University of Central Florida stepped in and provided the funding necessary to keep the Observatory online in 2018, but they may need to lean on their partner the National Science Foundation to help cover the repair bill they’ve run up since then.
The Arecibo Observatory is a unique installation, and its destruction would be an incredible blow for the scientific community. Researchers were already struggling with the prospect of repairs putting the powerful radio telescope out of commission for a year or more, but now it seems there’s a very real possibility the Observatory may be lost. Here’s hoping that teams on the ground can safely stabilize the iconic instrument so it can continue exploring deep space for years to come.
The Raspberry Pi platform grows more capable and powerful with each iteration. With that said, they’re still not the go-to for high powered computing, and their external interfaces are limited for reasons of cost and scope. Despite this, people like [Jeff Geerling] strive to push the platform to its limits on a regular basis. Unfortunately, [Jeff’s] recent experiments with GPUs hit a hard stop that he’s as yet unable to overcome.
With the release of the new Compute Module 4, the Raspberry Pi ecosystem now has a device that has a PCI-Express 2.0 1x interface as stock. This lead to many questioning whether or not GPUs could be used with the hardware. [Jeff] was determined to find out, buying a pair of older ATI and NVIDIA GPUs to play with.
Immediate results were underwhelming, with no output whatsoever after plugging the modules in. Of course, [Jeff] didn’t expect things to be plug and play, so dug into the kernel messages to find out where the problems lay. The first problem was the Pi’s limited Base Address Space; GPUs need a significant chunk of memory allocated in the BAR to work. With the CM4’s BAR expanded from 64MB to 1GB, the cards appeared to be properly recognised and ARM drivers were able to be installed.
Alas, the story ends for now without success. Both NVIDIA and ATI drivers failed to properly initialise the cards. The latter driver throws an error due to the Raspberry Pi failing to account for the I/O BAR space, a legacy x86 feature, however others suggest the problem may lay elsewhere. While [Jeff] may not have pulled off the feat yet, he got close, and we suspect with a little more work the community will find a solution. Given ARM drivers exist for these GPUs, we’re sure it’s just a matter of time.
OK, you’re going to have to engage your safety squints and sit back to enjoy this one: a classic bit of safety propaganda from US heavy-equipment manufacturer Caterpillar from 1980 entitled “Shake Hands with Danger.”
Actually, you’ll probably need to engage your schlock filters for this 23-minute film too, as both the writing and the theme song are pretty hard to take. The film is one of those “Scared Straight” attempts to show just how horrifically wrong things can go both in the field and in the shop when working on anything made of stuff stronger than human flesh and bone. And in that regard, the film is highly effective — we found ourselves getting a bit queasy at a few points, with the poor dude who got his hand sucked into a bench grinder being both terrifying and relatable. [Three-Finger Joe] indeed.
Now, you might take exception with the acting, but as you watch all these vignettes, keep in mind that these are all old-school stunts — that’s actually a gigantic D9 bulldozer they crashed, and that brake chamber explosion really blew out that truck’s windows. They did a great job making the potential consequences of a moment’s thoughtlessness sickeningly vivid. Especially that arm-in-the-linkages scene. Ugh.
Whatever way you practice the hacking arts, stay safe out there. And don’t “Shake Hands with Danger.”
Console launch season is upon us. A time for billion dollar corporations ingratiate themselves with “Johnny Consumer” by promising the future of entertainment is finally available to one-and-all. The focus of this new generation of consoles has been the battle for 4K supremacy between Xbox Series X and PlayStation 5. Interestingly, Microsoft also created another iteration of their Xbox Series for those satisfied with games in 1080p, and thanks to [Dimitris] we have been able to see the internals of the Xbox Series S (XSS).
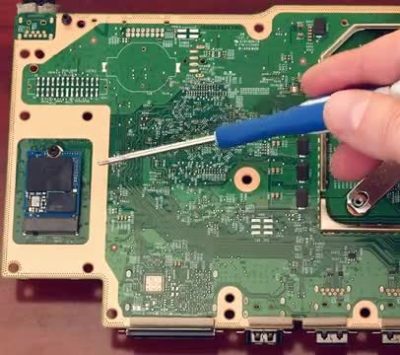
The Xbox Series S features standard m.2 slot that could be used for future storage expansion.
Microsoft choosing to produce an all-digital console has greatly effected the internal design of the XSS. With the lack of a disc-drive there is only a single cable (the fan cable) tying the components together. The heat sink covering the 197mm² AMD APU takes up nearly 60% of the motherboard surface area. Though the XSS may be diminutive by modern console standards, its cooling fan is huge being somewhere in the 140mm range. What little space is left by the heat sink and fan assembly is taken up by the internal power supply. As a fun nod, the PSU sports a Master Chief insignia to denote the location of the two-pronged connector beneath.
On the underside of the motherboard lies the biggest surprise of the “little brother” console. The system storage SSD is socketed rather than directly soldered to the board itself. The primary design goal of the XSS was to provide a cheaper alternative for players, but this standard m.2 slot reveals that Microsoft has plans for future expansion. This SSD, while not user-accessible in a traditional sense, will likely provide an alternative method to expanding storage outside of Microsoft’s proprietary external offerings. For a look at the teardown in process, [Dimitris’] video from his Modern Vintage Gamer YouTube channel is below.
Console launch season is upon us. A time for billion dollar corporations ingratiate themselves with “Johnny Consumer” by promising the future of entertainment is finally available to one-and-all. The focus of this new generation of consoles has been the battle for 4K supremacy between Xbox Series X and PlayStation 5. Interestingly, Microsoft also created another iteration of their Xbox Series for those satisfied with games in 1080p, and thanks to [Dimitris] we have been able to see the internals of the Xbox Series S (XSS).
The Xbox Series S features standard m.2 slot that could be used for future storage expansion.
Microsoft choosing to produce an all-digital console has greatly effected the internal design of the XSS. With the lack of a disc-drive there is only a single cable (the fan cable) tying the components together. The heat sink covering the 197mm² AMD APU takes up nearly 60% of the motherboard surface area. Though the XSS may be diminutive by modern console standards, its cooling fan is huge being somewhere in the 140mm range. What little space is left by the heat sink and fan assembly is taken up by the internal power supply. As a fun nod, the PSU sports a Master Chief insignia to denote the location of the two-pronged connector beneath.
On the underside of the motherboard lies the biggest surprise of the “little brother” console. The system storage SSD is socketed rather than directly soldered to the board itself. The primary design goal of the XSS was to provide a cheaper alternative for players, but this standard m.2 slot reveals that Microsoft has plans for future expansion. This SSD, while not user-accessible in a traditional sense, will likely provide an alternative method to expanding storage outside of Microsoft’s proprietary external offerings. For a look at the teardown in process, [Dimitris’] video from his Modern Vintage Gamer YouTube channel is below.
It’s fair to say that many Hackaday readers will have a propensity for hoarding electronic or tech junk. Who hasn’t hung on to something because “It might be useful someday”? Spare a thought for [Mike Drew], who in his own words is “buried alive by tablets”. In this case the tablets are Intel-based ones that look as though they ran one of those cut-down Windows versions, and they appear to be rejects from a repair shop processing customer returns that he saved from the dumpster. They are missing their backs, and not all of their screens work, but they amount to a tidy pile of Stuff That’s Too Good To Throw Away.
The exact spec is a 1.4 GHz quad-core Atom with 4 GB of RAM and 32 GB of Flash, and appear from the photos to have HDMI and USB 3 interfaces. Happily they run Linux Mint 20 so they have plenty of potential, but there is only so much that one person can do with them before running out of ideas. He tells us he’s made a Folding@Home cluster, but beyond that he’s open to suggestions. Depending on the age of the commenter no doubt he’ll be exhorted to run Beowulf or mine Bitcoin, but we’d suggest more sensible ideas.
So, what would you do with them? They lack the handy GPIO port of a Raspberry Pi, but with suitable USB peripherals could you use them in any lowish-power distributed node project where the popular SBC would be the usual choice? Perhaps something like WeeWX, or OpenEnergyMonitor. Or how about distributed mesh network nodes, after all there’s an x86 port of LibreMesh. It’s obvious that there’s plenty of potential to be found, so help [Mike] with his problematic bounty in the comments.


 usually to move a tool head in such a way as to make something. Tons of systems have been built around it, including early Makerbot printers.