Why Your Scanner Has A Hole In It

The SDR revolution has completely changed the way radio enthusiasts pursue their hobby, but there is still a space for the more traditional scanning receiver. If you are an American, have you ever noticed that it has a gap in its coverage between 800 and 900 MHz? The curious reason for this is explored by [J. B. Crawford], and it’s a tale of dusty laws relating to a long-gone technology, remaining on the books only because their removal requires significant political effort.

What we might today refer to as “1G” phones used an entirely analogue transmission scheme, with an easily-receivable FM carrier for the voice and extremely low-bandwidth bursts of serial data only for the purposes of managing the call. Listening to these calls was an illegal activity, but for those with the appropriate scanners it became a voyeuristic hobby within a hobby. It even made the world news via the pages of the gossip sheets, when (truthfully or not) it was credited for the leak of a revealing and controversial conversation involving Diana Princess of Wales.

This caused significant worry to the cellular phone companies who understandably didn’t want their product to become associated with insecurity. Thus they successfully petitioned the US Congress to include a clause restricting the capabilities of scanning receivers into another telecoms-related Act, and here we are three decades later with analogue phones a distant memory and the law still on the books. It may be ancient and unnecessary but there is neither the will nor the resources to remove it, so it seems destined to become one of those curious legal oddities that remains on the books for centuries. Whether an RTL-SDR breaks it is something we’ll leave for the lawyers, but the detail in the write-up makes it well worth a read.

Header image: krystof.k (Twitter) & nmuseum, CC BY-SA 3.0.

source https://hackaday.com/2020/12/19/why-your-scanner-has-a-hole-in-it/

Hamster Wheel Tacho Measures Tiny Pet Performance

Humans often like to monitor their exercise habits with the use of a pedometer, which tracks steps taken during a walk. Such devices are a little cumbersome for smaller creatures however, but no matter. Hamsters tend to get most of their workouts done on a wheel anyway, so it’s simple enough to instrument the equipment instead.

The build is a simple tachometer, using an infrared emitter and sensor pair to read the rotation speed of the hamster wheel. The wheel itself is light-colored plastic, so a strip of black felt is used to create a non-reflective section, creating a pulse one per revolution that can be read by the Adafruit Feather 32U4 running the show. Data on peak speed and total rotations is available for tracking the exercise habits of the hamster in question, output on a set of 14-segment displays.

It’s a fun project, and one that would be a great way to teach kids about pet care and basic embedded systems. Hamster performance could even be uploaded to the cloud with a more advanced build, and training milestones linked to rewards a la Premier League footballers. At the end of the day, a hamster wheel is just an exercise bike for our four-legged friends, and we’ve seen those hacked too. Video after the break.

source https://hackaday.com/2020/12/19/hamster-wheel-tacho-measures-tiny-pet-performance/

How Researchers Used Salt to Give Masks an Edge Against Pathogens

Masks are proven tools against airborne diseases, but pathogens — like the COVID-19 virus — can collect in a mask and survive which complicates handling and disposal. [Ilaria Rubino], a researcher at the University of Alberta, recently received an award for her work showing how treating a mask’s main filtration layer with a solution of mostly salt and water (plus a surfactant to help the wetting process) can help a mask inactivate pathogens on contact, thereby making masks potentially re-usable. Such masks are usually intended as single-use, and in clinical settings used masks are handled and disposed of as biohazard waste, because they can contain active pathogens. This salt treatment gives a mask a kind of self-cleaning ability.

Analysis showing homogenous salt coating (red and green) on the surface of fibers. NaCl is shown here, but other salts work as well.

How exactly does salt help? The very fine salt coating deposited on the fibers of a mask’s filtration layer first dissolves on contact with airborne pathogens, then undergoes evaporation-induced recrystallization. Pathogens caught in the filter are therefore exposed to an increasingly-high concentration saline solution and are then physically damaged by spikes of salt crystals. There is a bit of a trick to getting the salt deposited evenly on the polypropylene filter fibers, since the synthetic fibers are naturally hydrophobic, but a wetting process takes care of that.

The salt coating on the fibers is very fine, doesn’t affect breathability of the mask, and has been shown to be effective even in harsh environments. The research paper states that “salt coatings retained the pathogen inactivation capability at harsh environmental conditions (37 °C and a relative humidity of 70%, 80% and 90%).”

Again, the salt treatment doesn’t affect the mask’s ability to filter pathogens, but it does inactivate trapped pathogens, giving masks a kind of self-cleaning ability. Interested in the nuts and bolts of how researchers created the salt-treated filters? The Methods section of the paper linked at the head of this post (as well as the Methods section in this earlier paper on the same topic) has all the ingredients, part numbers, and measurements. While you’re at it, maybe brush up on commercially-available masks and what’s inside them.

source https://hackaday.com/2020/12/19/how-researchers-used-salt-to-give-masks-an-edge-against-pathogens/

How Researchers Used Salt to Give Masks an Edge Against Pathogens

Masks are proven tools against airborne diseases, but pathogens — like the COVID-19 virus — can collect in a mask and survive which complicates handling and disposal. [Ilaria Rubino], a researcher at the University of Alberta, recently received an award for her work showing how treating a mask’s main filtration layer with a solution of mostly salt and water (plus a surfactant to help the wetting process) can help a mask inactivate pathogens on contact, thereby making masks potentially re-usable. Such masks are usually intended as single-use, and in clinical settings used masks are handled and disposed of as biohazard waste, because they can contain active pathogens. This salt treatment gives a mask a kind of self-cleaning ability.

Analysis showing homogenous salt coating (red and green) on the surface of fibers. NaCl is shown here, but other salts work as well.

How exactly does salt help? The very fine salt coating deposited on the fibers of a mask’s filtration layer first dissolves on contact with airborne pathogens, then undergoes evaporation-induced recrystallization. Pathogens caught in the filter are therefore exposed to an increasingly-high concentration saline solution and are then physically damaged by spikes of salt crystals. There is a bit of a trick to getting the salt deposited evenly on the polypropylene filter fibers, since the synthetic fibers are naturally hydrophobic, but a wetting process takes care of that.

The salt coating on the fibers is very fine, doesn’t affect breathability of the mask, and has been shown to be effective even in harsh environments. The research paper states that “salt coatings retained the pathogen inactivation capability at harsh environmental conditions (37 °C and a relative humidity of 70%, 80% and 90%).”

Again, the salt treatment doesn’t affect the mask’s ability to filter pathogens, but it does inactivate trapped pathogens, giving masks a kind of self-cleaning ability. Interested in the nuts and bolts of how researchers created the salt-treated filters? The Methods section of the paper linked at the head of this post (as well as the Methods section in this earlier paper on the same topic) has all the ingredients, part numbers, and measurements. While you’re at it, maybe brush up on commercially-available masks and what’s inside them.

source https://hackaday.com/2020/12/19/how-researchers-used-salt-to-give-masks-an-edge-against-pathogens/

How Researchers Used Salt to Give Masks an Edge Against Pathogens

Masks are proven tools against airborne diseases, but pathogens — like the COVID-19 virus — can collect in a mask and survive which complicates handling and disposal. [Ilaria Rubino], a researcher at the University of Alberta, recently received an award for her work showing how treating a mask’s main filtration layer with a solution of mostly salt and water (plus a surfactant to help the wetting process) can help a mask inactivate pathogens on contact, thereby making masks potentially re-usable. Such masks are usually intended as single-use, and in clinical settings used masks are handled and disposed of as biohazard waste, because they can contain active pathogens. This salt treatment gives a mask a kind of self-cleaning ability.

Analysis showing homogenous salt coating (red and green) on the surface of fibers. NaCl is shown here, but other salts work as well.

How exactly does salt help? The very fine salt coating deposited on the fibers of a mask’s filtration layer first dissolves on contact with airborne pathogens, then undergoes evaporation-induced recrystallization. Pathogens caught in the filter are therefore exposed to an increasingly-high concentration saline solution and are then physically damaged by spikes of salt crystals. There is a bit of a trick to getting the salt deposited evenly on the polypropylene filter fibers, since the synthetic fibers are naturally hydrophobic, but a wetting process takes care of that.

The salt coating on the fibers is very fine, doesn’t affect breathability of the mask, and has been shown to be effective even in harsh environments. The research paper states that “salt coatings retained the pathogen inactivation capability at harsh environmental conditions (37 °C and a relative humidity of 70%, 80% and 90%).”

Again, the salt treatment doesn’t affect the mask’s ability to filter pathogens, but it does inactivate trapped pathogens, giving masks a kind of self-cleaning ability. Interested in the nuts and bolts of how researchers created the salt-treated filters? The Methods section of the paper linked at the head of this post (as well as the Methods section in this earlier paper on the same topic) has all the ingredients, part numbers, and measurements. While you’re at it, maybe brush up on commercially-available masks and what’s inside them.

source https://hackaday.com/2020/12/19/how-researchers-used-salt-to-give-masks-an-edge-against-pathogens/

Bringing Full Colour PCB Art To Production

One of the Holy Grails in the world of electronic badges has been full-colour PCB art as a logical progression from the limited palette of traditional PCB artwork. In the progression towards achieving this goal there have been a variety of techniques applied, and it’s become an expensive commercial possibility rather than an unachievable dream. Has it become practical for mere mortals then? [Tom Clement] has put together a write-up of his progression towards achieving full-colour PCB artwork on a limited production run , and it makes for a fascinating read.

The board in question is the Pixel badge, an improved commercial version of the CampZone 2019 I-Pane badge we reviewed last year. It’s a very bright large multicolour LED matrix that has caught the eye of campgoers at events ever since the original, and has generated enough demand for a new production run. As well as a few electronic enhancements it replaces the original’s dithered monochrome silkscreen rear art with a full-colour design, and it is that with which the write-up is concerned.

It starts with UV printing, and goes through the various iterations of the process until a satisfactory result is achieved. We learn about the effect of reflow temperatures on UV printing inks, it seems that white ink discolours with temperature and the inventive solution is to transfer all the whites to the PCB silkscreen layer. He closes with a discourse on alignment, and we start to appreciate the achievement behind producing this badge. A colour print isn’t necessary for the Pixel’s eye-searing light show, but the point of badges is as much to show off the cutting edge of the art.

As the regular Hackaday reader will know, colour PCB art is a long-time topic of interest here at Hackaday.

source https://hackaday.com/2020/12/19/bringing-full-colour-pcb-art-to-production/

Logitech Joystick Gets a Mechanical Sidekick

The mechanical keyboard rabbit hole is a deep one, and can swallow up as much money and time as you want to spend. If you’ve become spoiled on the touch and responsiveness of a Cherry MX or other mechanical switch, you might even start putting them on other user interfaces as well, such as this Logitech joystick that now sports a few very usable mechanical keys for the touch-conscious among us.

The Logitech Extreme 3D Pro that [ErkHal] and friend [HeKeKe] modified to accept the mechanical keys originally had a set of input buttons on the side, but these were unreliable and error-prone with a very long, inconsistent push. Soldering some mechanical switches directly on the existing board was a nice improvement, but the pair decided that they could do even better and rolled out an entire custom PCB to mount the keys more ergonomically. The switches are Kailh Choc V2 Browns and seem to have done a great job of improving the responsiveness of the joystick’s side buttons. If you want to spin up your own version, they’ve made the PCBs available on their GitHub page.

While [ErkHal] notes the switches aren’t the best and were only used since they were available, they certainly appear to work much better than what the joystick shipped with originally. In fact, we recently saw similar switches used to make a custom mechanical keyboard made for the PinePhone.

source https://hackaday.com/2020/12/19/logitech-joystick-gets-a-mechanical-sidekick/

Protect Your Tomatoes With A 9V Battery

Growing fresh vegetables at home is a popular pastime, even moreso in a year when we’ve all been locked inside. However pests can easily spoil a harvest, potentially putting a lot of hard work down the drain. [Matt] of [DIY Perks] isn’t one to give up his tomatoes without a fight, however, and came up with a solution to protect his plants.

The trick is to take advantage of the mildly conductive slime excreted by snails as they travel along the ground. To protect potted plants, [Matt] places two strips of copper tape around the perimeter of the pot, spaced about a centimeter apart. Each strip is connected to one terminal of a 9 V battery. When a snail attempts to cross the strips, it completes a circuit between the two, and the electrical current that flows irritates the snail, forcing it to retreat.

[Matt] notes that no snails were harmed in the making of the video, and that the solution is far kinder to the slimy critters than poisons or traps. He also goes so far as to demonstrate alternative solutions for garden beds, as well. We’ve more commonly seen [Matt] working with lighting, though it’s great to see he has a bit of a green thumb, too. Video after the break.

source https://hackaday.com/2020/12/19/protect-your-tomatoes-with-a-9v-battery/

A Camera Slider with a Twist

“Scope creep” is often derided as an obstacle between your idea and the delivery of a finished project. That may be, but sometimes the creep is the whole point. It’s how we end up with wonderful builds like this multi-axis differential camera slider.

We mention scope creep because that’s what [Jan Derogee] blames for this slider’s protracted development time, as well as its final form. The design is a bit unconventional in that it not only dollies the camera left and right but also works in pan and tilt axes, and it does this without putting any motors on the carriage. Instead, the motors, which are located near the end of the slider rails, transmit power to the carriage via loops of 217timing belt. It’s a little like the CoreXY mechanism; rotating the motors in the same direction and speed slides the carriage, while moving them in opposite directions pans the camera. A Sparkfun Pro Micro in the controller coordinates the motors for smooth multi-axis motion, and the three steppers — there’s a separate motor for the tilt axis — sound really cool all working at the same time. Check out the video below for the full story.

We’ve seen a few fun projects from [Jan] before. Check out his linear clock, the persistence of phosphorescence display, or his touchpad for retrocomputers.

source https://hackaday.com/2020/12/18/a-camera-slider-with-a-twist/

A Bullet For The Digital You

Harkening back to a not-so-distant past where duels settled arguments, [Joris Wegner] put a twist on the idea of quarrels with a gun that damages your online persona rather than your physical one. The controversy of social media is nothing new, but most people today have a large percentage of their lives online. A gun that can destroy your social media by deleting your account feels far more potent than most would like to admit.

At the heart of this build, each gun contains a battery-powered ESP8266 that connects to another ESP8266 in the gun case, which in turn is connected to a computer. When a trigger is pulled, the computer deletes the Facebook account with the credentials stored on the gun. It offers a new look at the importance of one’s social media presence. While the concept of being attacked on social media is nothing new, the idea of digitally dying on social media is perhaps something new. This particular project was put on hold when [Joris] realized that Facebook accounts can be reactivated after 30 days, which renders the gesture less potent.

Playful and interesting twists on the idea of a gun are nothing new here on Hackaday. We’ve seen also [Joris’] work before with a MIDI-controlled video distortion box.

source https://hackaday.com/2020/12/18/a-bullet-for-the-digital-you/

Machining Without Machines

It’s a luxury to be able to access a modern machine shop, complete with its array of lathes, mills, and presses. These tools are expensive though, and take up a lot of space, so if you want to be able to machine hard or thick metals without an incredible amount of overhead you’ll need a different solution. Luckily you can bypass the machines in some situations and use electricity to do the machining directly.

This project makes use of a process known as electrochemical machining and works on the principle that electricity passed through an electrolyte solution will erode the metal that it comes in contact with. With a well-designed setup, this can be used to precisely machine metal in various ways. For [bob]’s use this was pretty straightforward, since he needed to enlarge an existing hole in a piece of plate steel, so he forced electrolyte through this hole while applying around half an amp of current in order to make this precise “cut” in the metal, avoiding the use of an expensive drill press.

There are some downsides to the use of this process as [bob] notes in his build, namely that any piece of the working material that comes in contact with the electrolyte will be eroded to some extent. This can be mitigated with good design but can easily become impractical. It’s still a good way to avoid the expense of some expensive machining equipment, though, and similar processes can be used for other types of machine work as well.

source https://hackaday.com/2020/12/18/machining-without-machines/

Over-Engineered Bottle Opener Takes the Drudgery out of Drinking

Some projects take but a single glance for you to know what inspired them in the first place. For this over-engineered robotic bottle opener, the obvious influence was a combination of abundant free time and beer. Plenty of beer.

Of course there are many ways to pop the top on a tall cold one, depending on the occasion. [Matt McCoy] and his cohorts selected the “high-impulse” method, which when not performed by a robot is often accomplished by resting the edge of the cap on a countertop and slapping the bottle down with the palm of one’s hand. This magnificently pointless machine does the same thing, except with style.

The bottle is placed in a cradle which grips it, gently but firmly, and presents it to the opening mechanism in a wholly unnecessary motion-control ballet. Once in place, a lead screw moves a carriage down, simultaneously storing potential energy in a bundle of elastic surgical tubing while tripping a pawl on the edge of the cap. A lever trips at the bottom of the carriage’s travel, sending the pawl flying upward to liberate the libation, giving the robot a well-deserved and sudsy showers. Behold the wonderful interplay of 190 custom parts — and beer — in the video below.

Hats off to [Matt] et al for their tireless efforts on behalf of beleaguered beer-openers everywhere. This seems like the perfect accessory to go along with a game of mind-controlled beer pong.

source https://hackaday.com/2020/12/18/over-engineered-bottle-opener-takes-the-drudgery-out-of-drinking/

Remoticon Video: How to 3D Print onto Fabric with Billie Ruben

We’re impressed to see the continued flow of new and interesting ways to utilize 3D printing despite its years in the hacker limelight. At the 2020 Hackaday Remoticon [Billie Ruben] came to us from across the sea to demonstrate how to use 3D printing and fabric, or other flexible materials, to fabricate new and interesting creations. Check out her workshop below, and read on for more detail about what you’ll find.

The workshop is divided into two parts, a hands-on portion where participants execute a fabric print at home on their own printer, and a lecture while the printers whirr away describing ways this technique can be used to produce strong, flexible structures.

The technique described in the hands on portion can be clumsily summarized as “print a few layers, add the flexible material, then resume the printing process”. Of course the actual explanation and discussion of how to know when to insert the material, configure your slicer, and select material is significantly more complex! For the entire process make sure to follow along with [Billie]’s clear instructions in the video.

The lecture portion of the workshop was a whirlwind tour of the ways which embedded materials can be used to enhance your prints. The most glamourous examples might be printing scales, spikes, and other accoutrement for cosplay, but beyond that it has a variety of other uses both practical and fashionable. Embedded fabric can add composite strength to large structural elements, durable flexibility to a living hinge, or a substrate for new kinds of jewelry. [Billie] has deep experience in this realm and she brings it to bear in a comprehensive exposition of the possibilities. We’re looking forward to seeing a flurry of new composite prints!

source https://hackaday.com/2020/12/18/remoticon-video-how-to-3d-print-onto-fabric-with-billie-ruben/

Edge-Mounted LEDs Make This Spherical POV Look Fantastic

For as many of them as we’ve seen, we still love a good persistence of vision display project. There’s something fascinating about the combination of movement and light creating the illusion of solid surfaces, and there’s always fun to be had in electromechanical aspects of a POV build. This high-resolution spherical POV display pushes all those buttons, and more.

Called “Flicker” for obvious reasons by its creator [Dan Foisy], this POV display started with a pretty clear set of goals in terms of resolution and image quality, plus the need to support animated images, all in a spherical form factor. These goals dictated the final form of the display — a PCB disc spinning vertically. The shaft has the usual slip rings for power distribution and encoders for position feedback. The PCB, though, is where the interesting stuff is.

[Dan] chose to use an FPGA to slice and dice the images, which are fed from a Raspberry Pi’s HDMI port, to the LED drivers. And the LEDs themselves are pretty slick — he found parts with 1.6 mm lead spacing, making them a perfect fit for mounting on the rim of the PCB rather than on either side. A KiCAD script automated the process of laying out the 256 LEDs and their supporting components as evenly as possible, to avoid imbalance issues.

The video below shows Flicker in action — there are a few problem pixels, but on the whole, the display is pretty stunning. We’ve seen a few other spherical POV displays before, but none that look as good as this one does.

source https://hackaday.com/2020/12/18/edge-mounted-leds-make-this-spherical-pov-look-fantastic/

Edge-Mounted LEDs Make This Spherical POV Look Fantastic

For as many of them as we’ve seen, we still love a good persistence of vision display project. There’s something fascinating about the combination of movement and light creating the illusion of solid surfaces, and there’s always fun to be had in electromechanical aspects of a POV build. This high-resolution spherical POV display pushes all those buttons, and more.

Called “Flicker” for obvious reasons by its creator [Dan Foisy], this POV display started with a pretty clear set of goals in terms of resolution and image quality, plus the need to support animated images, all in a spherical form factor. These goals dictated the final form of the display — a PCB disc spinning vertically. The shaft has the usual slip rings for power distribution and encoders for position feedback. The PCB, though, is where the interesting stuff is.

[Dan] chose to use an FPGA to slice and dice the images, which are fed from a Raspberry Pi’s HDMI port, to the LED drivers. And the LEDs themselves are pretty slick — he found parts with 1.6 mm lead spacing, making them a perfect fit for mounting on the rim of the PCB rather than on either side. A KiCAD script automated the process of laying out the 256 LEDs and their supporting components as evenly as possible, to avoid imbalance issues.

The video below shows Flicker in action — there are a few problem pixels, but on the whole, the display is pretty stunning. We’ve seen a few other spherical POV displays before, but none that look as good as this one does.

source https://hackaday.com/2020/12/18/edge-mounted-leds-make-this-spherical-pov-look-fantastic/

Edge-Mounted LEDs Make This Spherical POV Look Fantastic

For as many of them as we’ve seen, we still love a good persistence of vision display project. There’s something fascinating about the combination of movement and light creating the illusion of solid surfaces, and there’s always fun to be had in electromechanical aspects of a POV build. This high-resolution spherical POV display pushes all those buttons, and more.

Called “Flicker” for obvious reasons by its creator [Dan Foisy], this POV display started with a pretty clear set of goals in terms of resolution and image quality, plus the need to support animated images, all in a spherical form factor. These goals dictated the final form of the display — a PCB disc spinning vertically. The shaft has the usual slip rings for power distribution and encoders for position feedback. The PCB, though, is where the interesting stuff is.

[Dan] chose to use an FPGA to slice and dice the images, which are fed from a Raspberry Pi’s HDMI port, to the LED drivers. And the LEDs themselves are pretty slick — he found parts with 1.6 mm lead spacing, making them a perfect fit for mounting on the rim of the PCB rather than on either side. A KiCAD script automated the process of laying out the 256 LEDs and their supporting components as evenly as possible, to avoid imbalance issues.

The video below shows Flicker in action — there are a few problem pixels, but on the whole, the display is pretty stunning. We’ve seen a few other spherical POV displays before, but none that look as good as this one does.

source https://hackaday.com/2020/12/18/edge-mounted-leds-make-this-spherical-pov-look-fantastic/

This Week in Security: SolarWinds and FireEye, WordPress DDoS, And Enhance!

The big story this week is Solarwinds. This IT management company supplies network monitoring and other security equipment, and it seems that malicious code was included in a product update as early as last spring. Their equipment is present in a multitude of high-profile networks, like Fireeye, many branches of the US government, and pretty much any other large company you can think of. To say that this supply chain attack is a big deal is an understatement. The blame has initially been placed on APT42, AKA, the Russian hacking pros.

The attack hasn’t been without some positive effects, as Fireeye has released some of their internal tooling as open source as a result. Microsoft has led the official response to the attack, managing to win control of the C&C domain in court, and black-holing it.

The last wrinkle to this story is the interesting timing of the sale of some Solarwinds stock by a pair of investment firms. If those firms were aware of the breech, and sold their shares before the news was made public, this would be a classic case of illegal insider trading.

WordPress Pingback DDoS

It never ceases to amaze me, the clever ways attackers find to misuse features. In this case, the WordPress pingback function can be used to facilitate a DDoS attack.

So a bit of history, what is a WordPress pingback? It’s simple. Say you have a wordpress blog where you write a new article. Someone else likes your article enough to link to it on their own WordPress site. If both sites have pingbacks enabled, the wordpress instances will automatically talk to each other, and generate a pingback comment on the original article. It’s clever, but of limited use, so many sites have the feature disabled.

The problem is that an attacker can connect directly to the pingback API of many WordPress sites, and announce a new pingback originating from the target site. Each of those sites will then attempt to open a new connection to verify the pingback announcement, effectively amplifying a DDoS attack.

You might think that your content distribution service will take care of you. Cloudflare and the like can be thought of as a distributed cache. You request a protected site, and the DNS name resolves to one of Cloudflare’s IP addresses. Cloudflare uses some magic routing tricks (anycast) to automatically route your connection to their nearest datacenter. Cloudflare can then proxy your connection, or serve cached content during a traffic spike. An important element to this protection is that the public doesn’t connect directly to your server’s IP address, which protects you from the DDoS.

Unless a WordPress site is set up particularly carefully, the pingback response gives away the true IP address, allowing for a trivial bypass. Ouch.

The Worst Security Problem

Cisco got hit by the oldest security bug in the book, back in 2018. This unpatchable vulnerability led to the deletion of 456 VMs and over 16,000 Webex accounts. The price tag on the cleanup came to over two million dollars. What vulnerability was this? An employee with admin privileges and a grudge. Five months after leaving Cisco, [Sudish Ramesh] still had valid credentials, which doesn’t reflect well on Cisco’s security practices around HR. Ramesh will serve two years in prison, as well as paying a small fine.

Enhance! — er, Depixelate?

It’s the classic movie trope, present everywhere from Blade Runner to MacGyver — “Zoom in on that section and enhance the image.” (Warning, tvtropes.) We love to make fun of this one, but it turns out, there are a few limited instances where it’s possible. [Sipke Mellema] put the work in, and brings us the Depix tool. Designed to make a best-guess at the original text behind a pixelated image, assuming that you know the font that it’s written in and some other details, Depix could be a useful tool for extracting passwords and other data from poorly redacted images. For more details, check his write-up.

Thanks to [Sevron Kitsune] for sending this one in in the tips line!

OAuth Can Go Wrong

OAuth seems to be one of the better security protocols to be developed in the last few years. You have a Google or Facebook account, and you can use that single sign on to authenticate everywhere. OAuth can even be used to run your own identity service. As good as the protocol is, there are ways for it to go wrong. The good folks at Portswigger bring us a good overview of OAuth 2.0, as well as the common pitfalls.

source https://hackaday.com/2020/12/18/this-week-in-security-solarwinds-and-fireeye-wordpress-ddos-and-enhance/


Building A Smash Bros. Controller With Keyswitches

When it comes to competitive fighting games, having the right controller in your hands can make the difference between victory and defeat. Many tournaments have strict rules around controllers for this very reason. [Akaki Kuumeri] has recently put together a custom controller, aimed at maximising performance in Super Smash Brothers: Ultimate on the Nintendo Switch. (Video, embedded below.)

The build is assembled in an attractive 3D-printed body, made to be reminiscent of the original Nintendo Entertainment System controller. Inside, a cheap third-party Gamecube controller is used to interface with the console. Mechanical keyboard switches are used to replace the buttons and even the analog sticks, with a special modifier key that enables walking and running across the stage. This is pulled off with a handful of resistors emulating the intermediate position of the analog sticks, and makes pulling off advanced combos easier.

It’s a fun build, and we can imagine the precise digital key inputs having some benefits over analog controls. It also pays to note that such a build wouldn’t be as easy without the ready supply of mechanical key switches thanks to the custom keyboard subculture. We’ve seen these satisfying switches cropping up in many controller builds in recent times.

source https://hackaday.com/2020/12/18/building-a-smash-bros-controller-with-keyswitches/

Stacked Material Makes Kitchen Temperature Superconductors

Belgian, Italian, and Australian researchers are proposing that by stacking semiconductor sheets, they should be able to observe superconducting behavior at what is known as “kitchen temperature” or temperatures you could get in a household freezer. That’s not quite as good as room temperature, but it isn’t bad, either. The paper is a bit technical but there is a very accessible write-up at Sci-Tech Daily that gives a good explanation.

Superconductors show no loss but currently require very cold temperatures outside of a few special cases. The new material exploits the idea that an electron and a hole in a semiconducting material will have a strong attraction to each other and will form a pair known as an exciton. Excitons move in a superfluid state which should exhibit superconductivity regardless of the temperature. However, the attraction is so strong that in conventional materials, the excitons only exist for the briefest blip of time before they cancel each other out.

The new material has layers and manages the holes in one layer and the electrons in the other. The pair will move together but are not in danger of canceling each other out as they stay on their layer. As you might guess, that means one layer has p doping and the next layer will have n doping.

The team claims that their predictions are they will see superconducting currents in these 3D stacks at temperatures up to -3 °C which is only about 26 °F. Cold, but not crazy cold. Liquid nitrogen, for example, is nearly -200 °C and dry ice is about -80 °C. Compared to those, -3 °C is almost balmy.

(Editor’s note: it’s -3 °C outside our house right now.)

The researchers also think they will be able to raise the temperature with more work. As of now, the paper is just a proposal, although the researchers say that building the stacks doesn’t rely on any unusual technology. It will be interesting to see if anyone can implement superconducting materials using this method.

While building this lattice of alternating semiconductor seems hard, we’ve seen hackers do harder things. It is possible to make superconducting ceramic that works at relatively high temperatures. We have seen one room-temperature superconductor, but there’s a big catch to it that makes it pretty impractical for real use.

source https://hackaday.com/2020/12/18/stacked-material-makes-kitchen-temperature-superconductors/

900-Degree Racing Wheel Helps You Nail The Apex

There are many racing wheels on the market for the budding sim enthusiast. Unfortunately, lower end models tend to have a limited range of motion and ship with cheap plastic wheels that don’t feel good in the hand. As always, if what’s on the shelf doesn’t meet your needs, you can always build your own. [ilge]’s DIY racing wheel build is a great example of how to go about it. 

It’s a no-frills build, with an Arduino Leonardo doing the USB Human Interface Device duties in this case. It reads a standard 10K potentiometer via an analog input to determine wheel position. To enable a realistic 900 degrees of motion, unlike the standard 270 degree rotation of the potentiometer, [ilge] uses 3D printed gears of 15 and 54 degrees respectively. This also has the benefit of allowing the wheel to be mounted to a stout bearing for smooth motion. The steering wheel itself is a high quality drift wheel from MOMO, and the benefit of building your own setup is that you can choose whatever wheel you like to taste.

It’s a simple build both mechanically and electronically speaking, but one that serves as a great entry into building a DIY sim for the beginner. We’d love to see further upgrades towards force feedback, or even shift paddles added on the back. Those looking to go all out can even consider building a motion platform. Video after the break.

source https://hackaday.com/2020/12/17/900-degree-racing-wheel-helps-you-nail-the-apex/

BASH Template Promises Safer Scripts

Many bash scripts start out as something quick and dirty but then become so useful that they live for years, indeed sometimes seeing more use than our traditional programs. Now that you can even run bash well under Windows (although, you’ve always been able to run it there if you tried), there are even more opportunities for your five-minute bash script to proliferate. [Maciej] decided he was tired of always having to patch up his quick and dirty scripts to be more robust, so he created (and shared) his boilerplate template for scripts.

Probably most of us have at least some basic template we start with, even if it just our last script project. What’s nice about [Maciej’s] template is that he documents what’s going on with each part of it. It is also relatively short without a lot of excess stuff. Of course, you’ll probably customize it, but it is a great place to start.

The template has a good shell selection line using env and also sets up basic error handling. That includes a trap function that runs on termination and argument parsing including a help message. There’s a oneliner that sets the current directory to the script directory (although you don’t always want that).

The only real excesses in the template are the short example script and a function that sets colors based on the terminal type that you might not need for your script. However, it is nice to print warnings with highlight color when they are not redirected and this code handles that for you.

If you don’t want to bother yanking the code from a web page, the template is also on a GitHub Gist. As [Maciej] points out, there are other similar projects out there, but some of them are a bit bloated.

If you want to clean up your scripts, try lint in the form of ShellCheck. We’ve talked about writing safer scripts before and also our own system for dealing with traps.

source https://hackaday.com/2020/12/17/bash-template-promises-safer-scripts/

Hypercar Valve Technology On A Harbour Freight Engine

The inlet and exhaust valve timing of a piston engine plays a large role in engine performance. Many modern automotive engines have some sort of variable valve timing, but the valves are still mechanically coupled together and to the crankshaft. This means that there is always a degree of performance compromise for various operating conditions. [Wesley Kagan] took inspiration from Koenigsegg’s camless Freevalve technology, and converted a Harbour Freight engine to camless technology for individual valve control.

By eliminating the traditional camshaft and giving each valve its actuator, it is possible to tune valve timing for any specific operating condition or even for each cylinder. A cheap single-cylinder engine is a perfect testbed for the garage hacker. [Wesley] removed the rocker arms and pushrods, and replaced the stock rocker cover with a 3D printed rocker cover which contains two small pneumatic pistons that push against the spring-loaded valve stems. These pistons are controlled by high-speed pneumatic solenoid valves. A reference timing signal is still required from the crankshaft, so [Wesley] built a timing system with a 3D printed timing wheel containing a bunch of embedded magnets and being sensed by a stationary Hall effect sensor. An Arduino is used to read the timing wheel position and output the control signals to the solenoid valves. With a rough timing program he was able to get the engine running, although it wouldn’t accelerate.

In the second video after the break, he makes a digital copy of the engine’s existing camshaft. Using two potentiometers in a 3D printed bracket, he measured push rod motion for a complete engine cycle. He still plans to add position sensing for each of the valves, and after a bit more work on the single-cylinder motor he plans to convert a full-size car, which we are looking forward to.

People have been tinkering with cars in their garage for as long as cars have existed. [Lewin Day] has been doing a series on how to get into tinkering with cars yourself. With all the electronics in modern automobiles, messing around with their software has become a growing part of this age-old pastime.

source https://hackaday.com/2020/12/17/hypercar-valve-technology-on-a-harbour-freight-engine/

Adaptive Macro-Pad Uses Tiny OLED Screens as Keycaps

When we first laid eyes on Keybon, the adaptive macro keyboard, we sort of wondered what the big deal was. It honestly looked like any other USB macro keyboard, with big icons for various common tasks on the chunky keys. But looks can be deceiving, and [Max.K] worked a couple of surprises into Keybon.

First of all, each one of Keybon’s buttons is actually a tiny OLED display, making the keycaps customizable through software. Each of the nine 0.66″ displays has a resolution of 64 x 48 pixels, which is plenty for all kinds of icons, and each is mounted over an SMD pushbutton switch. He had to deal with the problem of the keycaps just wobbling around atop the switch button without depressing it; this was solved with a 3D-printed cantilever frame that forced the keycaps to pivot only in one axis, resulting in clean, satisfyingly clicky keypresses.

The other trick that Keybon has is interactivity. By itself, it boots up with a standard set of icons and sends the corresponding keystrokes over USB. But when used with its companion Windows application, the entire macro set can be switched out to accommodate whatever application is being used. This gives the users access to custom macros for a web browser, EDA suite, CAD applications, or an IDE. The app supports up to eight macro sets and can be seen in action in the video below.

We love the look and the functionality [Max.K] has built into Keybon, but we wonder if e-ink displays would be a good choice for the keycaps too. They’re available for a song as decommissioned store shelf price tags now, and they might be nice since the icon would persist without power.

source https://hackaday.com/2020/12/17/adaptive-macro-pad-uses-tiny-oled-screens-as-keycaps/

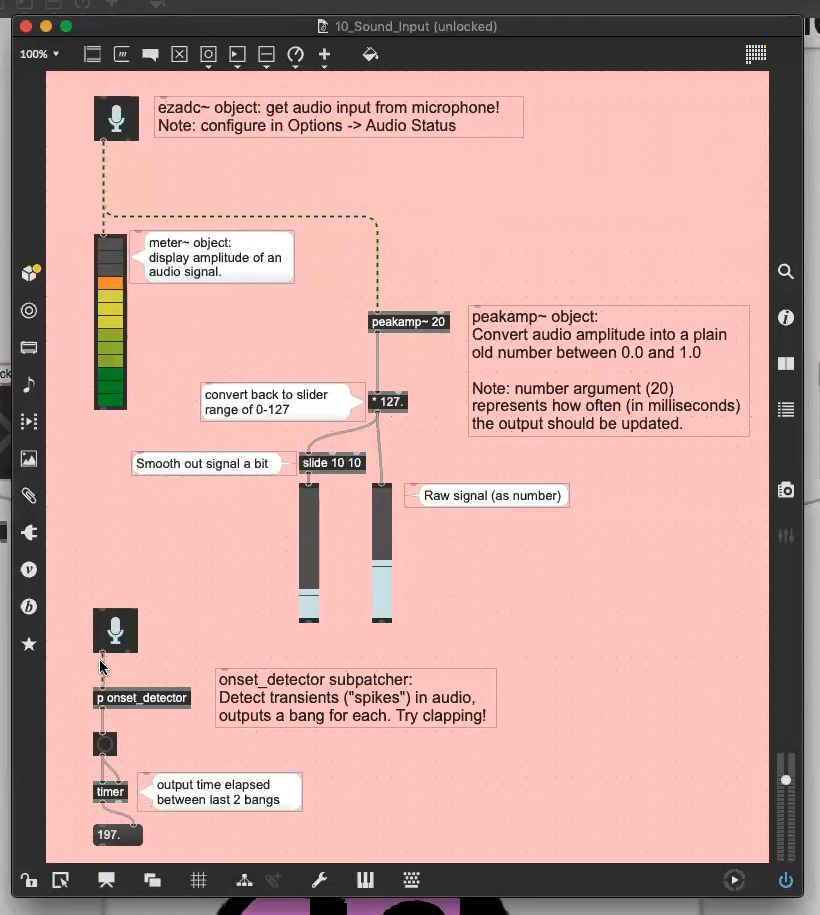
Remoticon Video: How to Use Max in Your Interactive Projects

When you want to quickly pull together a combination of media and user interaction, looking to some building blocks for the heavy lifting can be a lifesaver. That’s the idea behind Max, a graphical programming language that’s gained a loyal following among anyone building art installations, technology demos (think children’s museum), and user Kiosks.

Guy Dupont gets us up to speed with a how to get started with Max workshop that was held during the 2020 Hackaday Remoticon. His crash course goes through the basics of the program, and provides a set of sixteen demos that you can play with to get your feet under you. As he puts it, if you need sound, video, images, buttons, knobs, sensors, and Internet data for both input and output, then Max is worth a look. Video of the workshop can be found below.

Head on over to the workshop page where you can download the examples from the files section. Max is a commercial program which has a free trial period. Guy points out that its sibling program, Pure Data, is free and open source, it will run on almost anything, but comparing it to Max is like like driving stick versus driving an automatic. If you have first-hand experience using both of these programs, we’d love to hear your thoughts in the comments below.

Anyone familiar with graphical programming languages will feel right at home with Max. Blocks are dragged into a workspace and connected with wires between inputs and outputs. There are a multitude of blocks available for everything you can possibly imagine. Included in some demonstrations are advanced interactivity features like accepting commands from chat messages on Twitch, triggering from IFTTT, and adding interactivity between different Max instances on the same wireless network.

The example shown in the image at the top of this article is webcam input. When Guy holds up the pink sign it unmutes his microphone, when he puts it down it is muted again. It’s the digital equivalent of having a talking stick during your Zoom calls. Guy’s recommendation for those looking for hardware interactivity is to utilize serial, or leverage MIDI control.

This quick start will get anyone up and running, no matter your previous experience. As an example of the shenanigans you can eventually get yourself into, Guy closes the session by showing off a shift register he modeled in Max, all the way down to the NAND gates. If you want to check out some of Guy’s other work, we loved his Bonnaroo Jukebox and his recreation of the Wurlitzer note visualizer.

source https://hackaday.com/2020/12/17/remoticon-video-how-to-use-max-in-your-interactive-projects/

Fancy Filament Joiner Has Promise, But Ultimately Fails

[Proper Printing] has been trying to 3D print rims for his car for quite some time. However, the size of the print has led to problems with filament spools running out prior to completion. This led to endless headaches trying to join several smaller lengths of filament in order to make a single larger spool. After his initial attempts by hand failed, a rig was built to try and bring some consistency to the process. (Video, embedded below.)

The rig consists of a heater block intended to melt the ends of two pieces of filament so that they can be fused together. A cheap set of brass calipers was modified with a tube in order to form a guide for the filament, ensuring that it gets bonded neatly without flaring out to a larger size. Fan coolers are then placed either side of the heating area to avoid turning the whole filament into a hot mess.

Unfortunately, the rig simply didn’t work. The initial design simply never got the filament hot enough, with the suspicion being that heat was instead being dumped into the calipers instead of the filament itself. Modifications to reduce this sadly didn’t help, and in the end, more success was had by simply holding a lighter below a length of brass tube.

While the project wasn’t a success, there’s still value in the learning along the way. We can’t see any fundamental reason why such a rig couldn’t be made to work, so if you’ve got ideas on how it could be improved, sound off in the comments. We’ve seen other successful builds using hair straighteners in a relatively simple setup, too.

[Thanks to Baldpower for the tip!]

source https://hackaday.com/2020/12/17/fancy-filament-joiner-has-promise-but-ultimately-fails/