As anyone who has ever assembled a run of PCBs will tell you, quality inspection of solder joints can be a difficult process. Even under a microscope their appearances can be deceptive, and one silver blob can be perfect while its neighbour conceals a problem. The electronics industry have developed inspection tools to help, including optical inspection devices. It’s one of these that [Sina Roughani] has built, in the form of a hemispherical 3D printed dome with concentric rings of coloured LEDs mounted within it.
The principle behind this tool is as unexpected and simple as it is clever; by having different colours of light from different elevations of the dome it ensures that each different angle of the solder joint surface reflects a different colour. Thus a colour photograph shot from directly above the board allows visual inspection of the quality of the solder joints by the rainbow of colours that appears around their edges. This process can even be automated with OpenCV or similar, hence the process is referred to as Automated Optical Inspection, or AOI.
The technique is demonstrated with some pictures of a Raspberry Pi Pico, on which it shows really well the rainbow-edged solder joints and the red colour reflected from flat pads. What at first might seem like a novelty lighting effect becomes a very useful inspection tool.
Serial ports used to be everywhere. In a way, they still are since many things that appear to plug in as a USB device actually look like a serial port. The problem is that today, the world runs on the network. Sure, you can buy a terminal server that converts a serial port to an Ethernet port, but what fun is that? In this article, I’m going to show you how to stream serial ports over the network using some available Linux tools. It isn’t perfect, and it won’t work for every case, but when it works it works well.
Everything is a File, Until it Isn’t
At some point in the past, Unix — the progenitor of Linux — treated virtually everything as a file, and all files were created more or less equal. Programs didn’t care if a file was local, on the network, from a tape drive, or arriving over a named pipe.
But things started to change. Even though a serial port is just a file under Linux, it has some special attributes that let you set, for example, baud rates. Worse, some programs “know” too much about files and insist on certain naming conventions. So, in theory, you should be able to create a network socket, connect one end to a serial port and the other end to a program, and be done with it. In theory.
The practice is different, of course. That might work in some very simple cases. You can use a utility called socat (like cat for a socket) to set it up. However, if the program you are trying to fake tries to set a baud rate, for example, it is probably going to throw up its hands. Some programs won’t even recognize your fake serial port.
About socat
The socat program is like a magic adapter cable that simply pipes everything from one place to another and also handles the reverse traffic. The program can read from files, pipes, devices, sockets, and a few other items. For example, you might want to build a simple TCP proxy to forward connections on the local host to another host. That’s easy with socat:
socat TCP4-LISTEN:88 TCP4:10.1.1.125:8000
That will only handle one connection, but you can even ask socat to fork off a new connection to handle multiple requests.
The Problem
If you try doing this with a serial port, though, it is unlikely to work without a lot of setup. This is such a common desire that there are several programs available to help. Most Linux distributions will support ser2net, a program made to handle the task of converting a serial port to a socket. If ser2net doesn’t suit you, there’s also some Python code that ships as an example with the pyserial library, but your distribution version of pyserial maybe too old to support it. If that’s the case, you’ll need to install it outside of your package manager using pip, for example. I’m going to assume you are using ser2net.
The ser2net program normally installs as a system service and you can edit /etc/ser2net.conf to configure it. I took out all the default lines and added the two serial ports I wanted to expose along with the baud rates I wanted:
Then you’ll need to restart the service (probably systemctl restart ser2net; if it fails to restart the first time, try again as sometimes it tries to start before the old copy is totally shutdown).
For debugging, you might want to stop the service and run with some debugging messages:
Either way, once the service is running, the ports you specify (7777 and 7778 in my configuration file) will act like the associated serial ports.
A few notes. If you are doing this with a 3D printer and you have something like Octoprint running, you’ll need to shut it down or otherwise make it let go of the printer port before you set all this up. This would be true of any program that would hold the serial port you are interested in opening. For some standard ports, you need to make sure login is not holding the port open and waiting for a user. Exactly how all that works will depend on your setup. The same goes for your firewall. If you are listening on port 7777 and you use a firewall, you’ll need to set it up to allow connections on that port. Don’t forget you usually have to be root to open up low-numbered ports, too.
The Client Side
On the client side, you can use socat, but some programs will figure out it isn’t a real serial port. You can still, try though:
Some programs are only going to look for devices in /dev, though. If that’s the case for you, you are going to need to run socat as root (use sudo) and then also set /dev/ttyNET0 so that you have read and write permissions (e.g., sudo chmod 666 /dev/ttyNET0).
Testing 1, 2, 3…
Instead of trying your program right away, though, I suggest you test using something like picocom. For example, on the client machine after you run socat, you should be able to run something like:
picocom -b 115200 $HOME/dev/ttyNET0
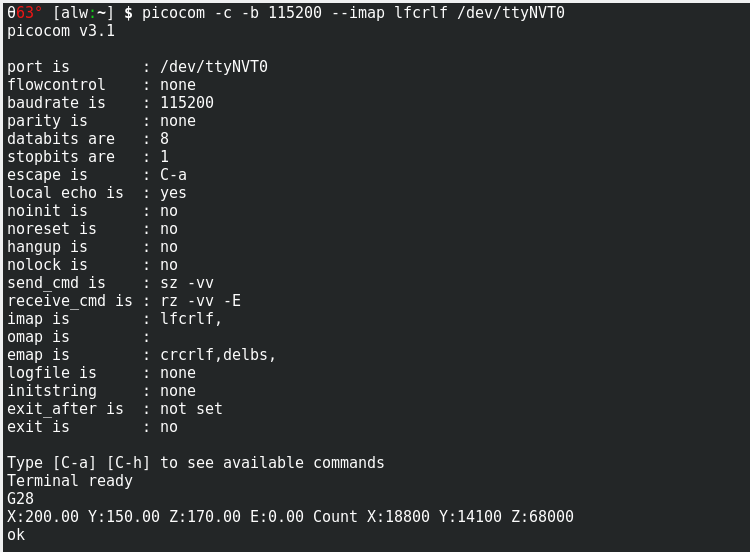
Picocom can talk across the network using a virtual serial device
Obviously, you’ll need to use the right name and baud rate. You should be able to talk to the remote device. If not, figure out why before you run the regular program. If your serial device isn’t text-based, you might have more luck with cutecom but, alas, the program knows your fake serial port is fake and won’t let you select it. On the other hand, the program is open source, so you could easily create a local version that used any device name you like. There are other choices, of course. For example, gtkterm will let you pick up the fake serial port.
If you run into a protocol error, you may find that the serial port has moved (e.g., it was /dev/ttyUSB0 and now it is /dev/ttyUSB1) or you have an invalid baud rate. The error message isn’t very helpful, but don’t forget to use the -d option in ser2net while troubleshooting.
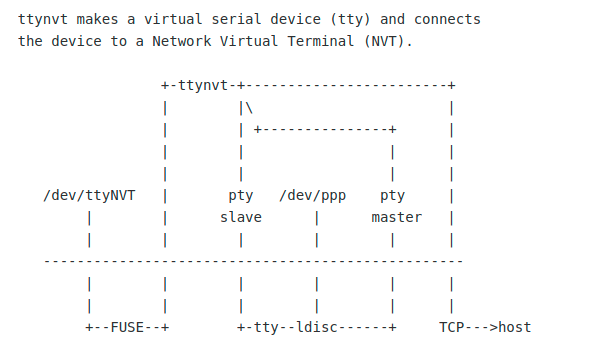
The ttynvt program doesn’t have great documentation graphics, but they are accurate.
When you do run the regular program, it might work. However, it also might throw an error or, in some cases, refuse to let you select the file because it isn’t really a serial port. In some cases, you are simply out of luck. However, a smarter client that understands the serial port might help, too. The ttynvt program is one example of that. You will probably have to build it from source, but it is very easy to do that. it does depend on libfuse, but otherwise doesn’t need anything exotic.
This will create the /dev/ttyNET0 device (so you need to be root). On my system, the new device had read and write permissions set for root and the dialout group. You might need to check and fix the permissions, though, depending on your setup.
Again, test with picocom, and then try your target program. Cross your fingers!
Why, Oh Why?
My original goal was to run Lightburn software for my laser cutter on a big machine using a remote desktop. I wanted the laser cutter plugged into the USB port on the local machine and have the software talk to a fake port on the bigger computer.
Alas, as of today, Lighburn is too smart for my naughty tricks and refuses to show my virtual serial ports. There’s no way that I know of to force it to use a file name of my choice, so I can’t even try to see if it would work. However, I was able to test the setup with some other G code software and it does work. I’ve mentioned this to Lightburn, so maybe it will be fixed by the time you read this.
The paradigm that “everything is a file” is very powerful. Unfortunately, every year it gets less true and that causes more hoops to jump through when you want to do something interesting like this. Still, in true Linux fashion, there’s always a way to get there. I have no doubt that I could trace the calls Lighburn is making to open the port and find a way to fake them for the serial client. I’m hoping, though, that I don’t have to.
Serial ports used to be everywhere. In a way, they still are since many things that appear to plug in as a USB device actually look like a serial port. The problem is that today, the world runs on the network. Sure, you can buy a terminal server that converts a serial port to an Ethernet port, but what fun is that? In this article, I’m going to show you how to stream serial ports over the network using some available Linux tools. It isn’t perfect, and it won’t work for every case, but when it works it works well.
Everything is a File, Until it Isn’t
At some point in the past, Unix — the progenitor of Linux — treated virtually everything as a file, and all files were created more or less equal. Programs didn’t care if a file was local, on the network, from a tape drive, or arriving over a named pipe.
But things started to change. Even though a serial port is just a file under Linux, it has some special attributes that let you set, for example, baud rates. Worse, some programs “know” too much about files and insist on certain naming conventions. So, in theory, you should be able to create a network socket, connect one end to a serial port and the other end to a program, and be done with it. In theory.
The practice is different, of course. That might work in some very simple cases. You can use a utility called socat (like cat for a socket) to set it up. However, if the program you are trying to fake tries to set a baud rate, for example, it is probably going to throw up its hands. Some programs won’t even recognize your fake serial port.
About socat
The socat program is like a magic adapter cable that simply pipes everything from one place to another and also handles the reverse traffic. The program can read from files, pipes, devices, sockets, and a few other items. For example, you might want to build a simple TCP proxy to forward connections on the local host to another host. That’s easy with socat:
socat TCP4-LISTEN:88 TCP4:10.1.1.125:8000
That will only handle one connection, but you can even ask socat to fork off a new connection to handle multiple requests.
The Problem
If you try doing this with a serial port, though, it is unlikely to work without a lot of setup. This is such a common desire that there are several programs available to help. Most Linux distributions will support ser2net, a program made to handle the task of converting a serial port to a socket. If ser2net doesn’t suit you, there’s also some Python code that ships as an example with the pyserial library, but your distribution version of pyserial maybe too old to support it. If that’s the case, you’ll need to install it outside of your package manager using pip, for example. I’m going to assume you are using ser2net.
The ser2net program normally installs as a system service and you can edit /etc/ser2net.conf to configure it. I took out all the default lines and added the two serial ports I wanted to expose along with the baud rates I wanted:
Then you’ll need to restart the service (probably systemctl restart ser2net; if it fails to restart the first time, try again as sometimes it tries to start before the old copy is totally shutdown).
For debugging, you might want to stop the service and run with some debugging messages:
Either way, once the service is running, the ports you specify (7777 and 7778 in my configuration file) will act like the associated serial ports.
A few notes. If you are doing this with a 3D printer and you have something like Octoprint running, you’ll need to shut it down or otherwise make it let go of the printer port before you set all this up. This would be true of any program that would hold the serial port you are interested in opening. For some standard ports, you need to make sure login is not holding the port open and waiting for a user. Exactly how all that works will depend on your setup. The same goes for your firewall. If you are listening on port 7777 and you use a firewall, you’ll need to set it up to allow connections on that port. Don’t forget you usually have to be root to open up low-numbered ports, too.
The Client Side
On the client side, you can use socat, but some programs will figure out it isn’t a real serial port. You can still, try though:
Some programs are only going to look for devices in /dev, though. If that’s the case for you, you are going to need to run socat as root (use sudo) and then also set /dev/ttyNET0 so that you have read and write permissions (e.g., sudo chmod 666 /dev/ttyNET0).
Testing 1, 2, 3…
Instead of trying your program right away, though, I suggest you test using something like picocom. For example, on the client machine after you run socat, you should be able to run something like:
picocom -b 115200 $HOME/dev/ttyNET0
Picocom can talk across the network using a virtual serial device
Obviously, you’ll need to use the right name and baud rate. You should be able to talk to the remote device. If not, figure out why before you run the regular program. If your serial device isn’t text-based, you might have more luck with cutecom but, alas, the program knows your fake serial port is fake and won’t let you select it. On the other hand, the program is open source, so you could easily create a local version that used any device name you like. There are other choices, of course. For example, gtkterm will let you pick up the fake serial port.
If you run into a protocol error, you may find that the serial port has moved (e.g., it was /dev/ttyUSB0 and now it is /dev/ttyUSB1) or you have an invalid baud rate. The error message isn’t very helpful, but don’t forget to use the -d option in ser2net while troubleshooting.
The ttynvt program doesn’t have great documentation graphics, but they are accurate.
When you do run the regular program, it might work. However, it also might throw an error or, in some cases, refuse to let you select the file because it isn’t really a serial port. In some cases, you are simply out of luck. However, a smarter client that understands the serial port might help, too. The ttynvt program is one example of that. You will probably have to build it from source, but it is very easy to do that. it does depend on libfuse, but otherwise doesn’t need anything exotic.
This will create the /dev/ttyNET0 device (so you need to be root). On my system, the new device had read and write permissions set for root and the dialout group. You might need to check and fix the permissions, though, depending on your setup.
Again, test with picocom, and then try your target program. Cross your fingers!
Why, Oh Why?
My original goal was to run Lightburn software for my laser cutter on a big machine using a remote desktop. I wanted the laser cutter plugged into the USB port on the local machine and have the software talk to a fake port on the bigger computer.
Alas, as of today, Lighburn is too smart for my naughty tricks and refuses to show my virtual serial ports. There’s no way that I know of to force it to use a file name of my choice, so I can’t even try to see if it would work. However, I was able to test the setup with some other G code software and it does work. I’ve mentioned this to Lightburn, so maybe it will be fixed by the time you read this.
The paradigm that “everything is a file” is very powerful. Unfortunately, every year it gets less true and that causes more hoops to jump through when you want to do something interesting like this. Still, in true Linux fashion, there’s always a way to get there. I have no doubt that I could trace the calls Lighburn is making to open the port and find a way to fake them for the serial client. I’m hoping, though, that I don’t have to.
Serial ports used to be everywhere. In a way, they still are since many things that appear to plug in as a USB device actually look like a serial port. The problem is that today, the world runs on the network. Sure, you can buy a terminal server that converts a serial port to an Ethernet port, but what fun is that? In this article, I’m going to show you how to stream serial ports over the network using some available Linux tools. It isn’t perfect, and it won’t work for every case, but when it works it works well.
Everything is a File, Until it Isn’t
At some point in the past, Unix — the progenitor of Linux — treated virtually everything as a file, and all files were created more or less equal. Programs didn’t care if a file was local, on the network, from a tape drive, or arriving over a named pipe.
But things started to change. Even though a serial port is just a file under Linux, it has some special attributes that let you set, for example, baud rates. Worse, some programs “know” too much about files and insist on certain naming conventions. So, in theory, you should be able to create a network socket, connect one end to a serial port and the other end to a program, and be done with it. In theory.
The practice is different, of course. That might work in some very simple cases. You can use a utility called socat (like cat for a socket) to set it up. However, if the program you are trying to fake tries to set a baud rate, for example, it is probably going to throw up its hands. Some programs won’t even recognize your fake serial port.
About socat
The socat program is like a magic adapter cable that simply pipes everything from one place to another and also handles the reverse traffic. The program can read from files, pipes, devices, sockets, and a few other items. For example, you might want to build a simple TCP proxy to forward connections on the local host to another host. That’s easy with socat:
socat TCP4-LISTEN:88 TCP4:10.1.1.125:8000
That will only handle one connection, but you can even ask socat to fork off a new connection to handle multiple requests.
The Problem
If you try doing this with a serial port, though, it is unlikely to work without a lot of setup. This is such a common desire that there are several programs available to help. Most Linux distributions will support ser2net, a program made to handle the task of converting a serial port to a socket. If ser2net doesn’t suit you, there’s also some Python code that ships as an example with the pyserial library, but your distribution version of pyserial maybe too old to support it. If that’s the case, you’ll need to install it outside of your package manager using pip, for example. I’m going to assume you are using ser2net.
The ser2net program normally installs as a system service and you can edit /etc/ser2net.conf to configure it. I took out all the default lines and added the two serial ports I wanted to expose along with the baud rates I wanted:
Then you’ll need to restart the service (probably systemctl restart ser2net; if it fails to restart the first time, try again as sometimes it tries to start before the old copy is totally shutdown).
For debugging, you might want to stop the service and run with some debugging messages:
Either way, once the service is running, the ports you specify (7777 and 7778 in my configuration file) will act like the associated serial ports.
A few notes. If you are doing this with a 3D printer and you have something like Octoprint running, you’ll need to shut it down or otherwise make it let go of the printer port before you set all this up. This would be true of any program that would hold the serial port you are interested in opening. For some standard ports, you need to make sure login is not holding the port open and waiting for a user. Exactly how all that works will depend on your setup. The same goes for your firewall. If you are listening on port 7777 and you use a firewall, you’ll need to set it up to allow connections on that port. Don’t forget you usually have to be root to open up low-numbered ports, too.
The Client Side
On the client side, you can use socat, but some programs will figure out it isn’t a real serial port. You can still, try though:
Some programs are only going to look for devices in /dev, though. If that’s the case for you, you are going to need to run socat as root (use sudo) and then also set /dev/ttyNET0 so that you have read and write permissions (e.g., sudo chmod 666 /dev/ttyNET0).
Testing 1, 2, 3…
Instead of trying your program right away, though, I suggest you test using something like picocom. For example, on the client machine after you run socat, you should be able to run something like:
picocom -b 115200 $HOME/dev/ttyNET0
Picocom can talk across the network using a virtual serial device
Obviously, you’ll need to use the right name and baud rate. You should be able to talk to the remote device. If not, figure out why before you run the regular program. If your serial device isn’t text-based, you might have more luck with cutecom but, alas, the program knows your fake serial port is fake and won’t let you select it. On the other hand, the program is open source, so you could easily create a local version that used any device name you like. There are other choices, of course. For example, gtkterm will let you pick up the fake serial port.
If you run into a protocol error, you may find that the serial port has moved (e.g., it was /dev/ttyUSB0 and now it is /dev/ttyUSB1) or you have an invalid baud rate. The error message isn’t very helpful, but don’t forget to use the -d option in ser2net while troubleshooting.
The ttynvt program doesn’t have great documentation graphics, but they are accurate.
When you do run the regular program, it might work. However, it also might throw an error or, in some cases, refuse to let you select the file because it isn’t really a serial port. In some cases, you are simply out of luck. However, a smarter client that understands the serial port might help, too. The ttynvt program is one example of that. You will probably have to build it from source, but it is very easy to do that. it does depend on libfuse, but otherwise doesn’t need anything exotic.
This will create the /dev/ttyNET0 device (so you need to be root). On my system, the new device had read and write permissions set for root and the dialout group. You might need to check and fix the permissions, though, depending on your setup.
Again, test with picocom, and then try your target program. Cross your fingers!
Why, Oh Why?
My original goal was to run Lightburn software for my laser cutter on a big machine using a remote desktop. I wanted the laser cutter plugged into the USB port on the local machine and have the software talk to a fake port on the bigger computer.
Alas, as of today, Lighburn is too smart for my naughty tricks and refuses to show my virtual serial ports. There’s no way that I know of to force it to use a file name of my choice, so I can’t even try to see if it would work. However, I was able to test the setup with some other G code software and it does work. I’ve mentioned this to Lightburn, so maybe it will be fixed by the time you read this.
The paradigm that “everything is a file” is very powerful. Unfortunately, every year it gets less true and that causes more hoops to jump through when you want to do something interesting like this. Still, in true Linux fashion, there’s always a way to get there. I have no doubt that I could trace the calls Lighburn is making to open the port and find a way to fake them for the serial client. I’m hoping, though, that I don’t have to.
Just when you think you’ve seen every possible way to play the piano, [Alessandro Perini] came up with a new one. In this piece, written for the percussionist [Irene Bianco], hand-held motors become a tangible interface between composer, electronic music equipment, and the performer.
The performance involved ten small disc motors, held above the strings by a wooden frame. The motors are controlled by a Arduino Nano, which turns the motors on or off based on MIDI commands from a computer. However, the performance is not entirely automated. [Irene] wears a pair of contact microphones on her fingers, which she moves around inside the piano to capture the sounds of the strings vibrating in harmony with the motors themselves.
Flash storage failures in the computer behind Tesla’s famous touch screen are causing headaches for drivers.
It’s a problem familiar to anyone who’s spent a decent amount of time playing with a Raspberry Pi – over time, the flash in the SD card reaches its write cycle limits, and causes a cavalcade of confusing errors before failing entirely. While flash storage is fast, compact, and mechanically reliable, it has always had a writeable lifespan much shorter than magnetic technologies.
Of course, with proper wear levelling techniques and careful use, these issues can be mitigated successfully. The surprising thing is when a major automaker fails to implement such basic features, as was the case with several Tesla models. Due to the car’s Linux operating system logging excessively to its 8 GB eMMC storage, the flash modules have been wearing out. This leads to widespread failures in the car, typically putting it into limp mode and disabling many features controlled via the touchscreen.
With the issue affecting important subsystems such as the heater, defroster, and warning systems, the NHTSA wrote to the automaker in January requesting a recall. Tesla’s response acquiesced to this request with some consternation, downplaying the severity of the issue. Now they are claiming that the eMMC chip, ball-grid soldered to the motherboard, inaccessible without disassembling the dash, and not specifically mentioned in the owner’s manual, should be considered a “wear item”, and thus should not be subject to such scrutiny.
Certainly An Odd Wear Item
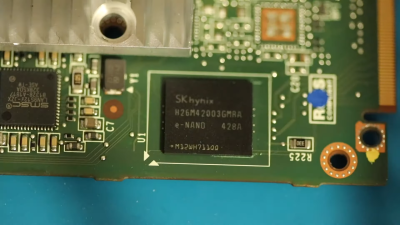
The chip in question, a sub-$7 eMMC chip packing 8GB of storage.
Historically, major electronic parts in automobiles are not considered consumables. While it’s not uncommon for some cars to face issues with engine control units or body control modules, they’re not typically treated as wear items to be replaced at nominal intervals. Thus far, precedent has considered these parts as something to last the lifetime of the vehicle, and to be replaced in the case of unexpected malfunction. The Tesla case is different in that the eMMC failure is, by and large, inevitable. Rather than being a case of isolated malfunctions in a small percentage of cars as would be expected from the occasional manufacturing defect, this is a issue affecting every car that rolled off the line up to a certain date. Failure rates are up to 30 percent in certain build months. With the computer and touchscreen being in charge of so many vital vehicle functions, it’s not a defect that can be easily ignored by the end user.
Tesla’s assertion that the eMMC chip should be considered a ‘wear item’ is a dubious one at best. Flash memory does wear out, it’s true, as Tesla points out when discussing the limits of the technology. Many parts on a modern car wear out over time – brake pads, belts, and air filters are all common examples. The difference is that these parts are all designed to be replaced by the end user or a typical mechanic.
Trying to claim that a ball-grid array chip, permanently soldered onto a PCB and buried inside the dashboard is a wear item is patently ludicrous. If it were, we’d expect to see several things. There’d be a recommend time and mileage upon which the eMMC would be changed to avoid surprise failures, and this would be listed in the manual. Additionally, Tesla’s repair process would involve desoldering the eMMC chip from the board and replacing it directly. Given that Tesla are instead replacing the computers as a whole is indicative that the part is not being treated as a wear item by anyone, anywhere.
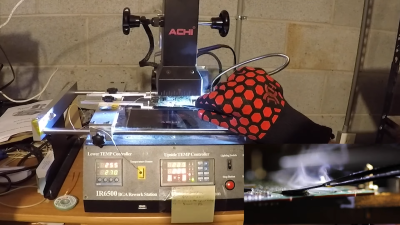
Obviously, the chip can be replaced, but it’s no easy job. Once the computer’s main board has been extracted from the car, the storage must be backed up over JTAG. Then, it must be carefully reflowed to remove the chip, in a delicate process that has a significant chance of damaging other components on the board. If the chip was a wear item, it wouldn’t require specialist BGA reflow equipment to change. We’d see Tesla doing it routinely, replacing a sub-$7 chip rather than swapping out entire mainboards instead at the costs of thousands of dollars. Granted, there are parts of modern cars that are also time consuming to replace – such as timing belts, water pumps, and so on. However, again, in these cases, automakers make it clear that these are wear items ahead of time, create maintenance schedules for them, and standard processes to change them.
Nobody would put up with swapping out their entire front suspension setup every time their brakes wore out – automakers realised brake pads were wear items and designed accordingly. Tesla simply dropped the ball, writing too often to the flash memory, which isn’t easily replaceable. The proper solution is trivial. Either stop logging so much to flash storage, or make it easier to swap out.
And maybe put the logs in their own partition. While SD cards probably aren’t up to snuff for storing the car’s operating system, they’d make a cheap place to store non-critical logs that probably are never read anyway. Alternatively, put the eMMC chip on a removable module, or just use an M.2 drive with automotive-rated connectors.
The issue is claimed to only effect models built prior to March 2018, which run on an NVIDIA Tegra 3. Later models are based on the Intel Atom, and feature a larger eMMC chip on board. These modules are yet to demonstrate the same failures, and Tesla claim they should not suffer the issue. We’ll see.
[Bren Sutton] has been a long time fan of SEGA’s Dreamcast, eagerly snapping one up right around its October 1999 European release. But after decades of neglect, and a somewhat questionable paint job a decade or so back, he decided it was time to spruce his old friend up. He could have just cleaned the machine and been done with it, but he took the opportunity to revamp the console’s internals with both practical and cosmetic trickery.
The first step was getting the system looking a bit fresher. Removing the silver metallic paint he applied in his youth with a rattle can wasn’t going so well, so he ended up buying a broken donor console on eBay so he’d have a new shell to work with. The donor was yellowed with age, but a coating of peroxide cream and a few hours under a cheap UV light got it whitened up nicely. Now that he had a fresh new case, [Bren] turned his attention to the internal components.
Those who might be plugged into the active Dreamcast homebrew scene may already know that several upgrade modules exist for SEGA’s last home game console. One of the most popular replaces the optical drive with an SD card filled with your favorite game ISOs. You can also get a modern high efficiency power supply, as well as a board that replaces the original soldered-on clock battery with a slot that fits a CR2032. [Bren] threw them all in, ensuring several more years of gaming bliss.
But he wasn’t done yet. He also wanted to add some visual flair to his new and improved console. After some consideration, he carefully cut the logo out of the Dreamcast’s lid, and installed an Adafruit CLUE board underneath it. With a few carefully crafted GIFs installed onto the CircuitPython-powered board, the console now has a gorgeous fully animated logo that you can see in the video after the break.
[Bren] could have really taken his console to the next level by doubling its available RAM to an eye-watering 32 MB, but considering the limited software support for that particularly bodacious modification, we’ll let it slide.
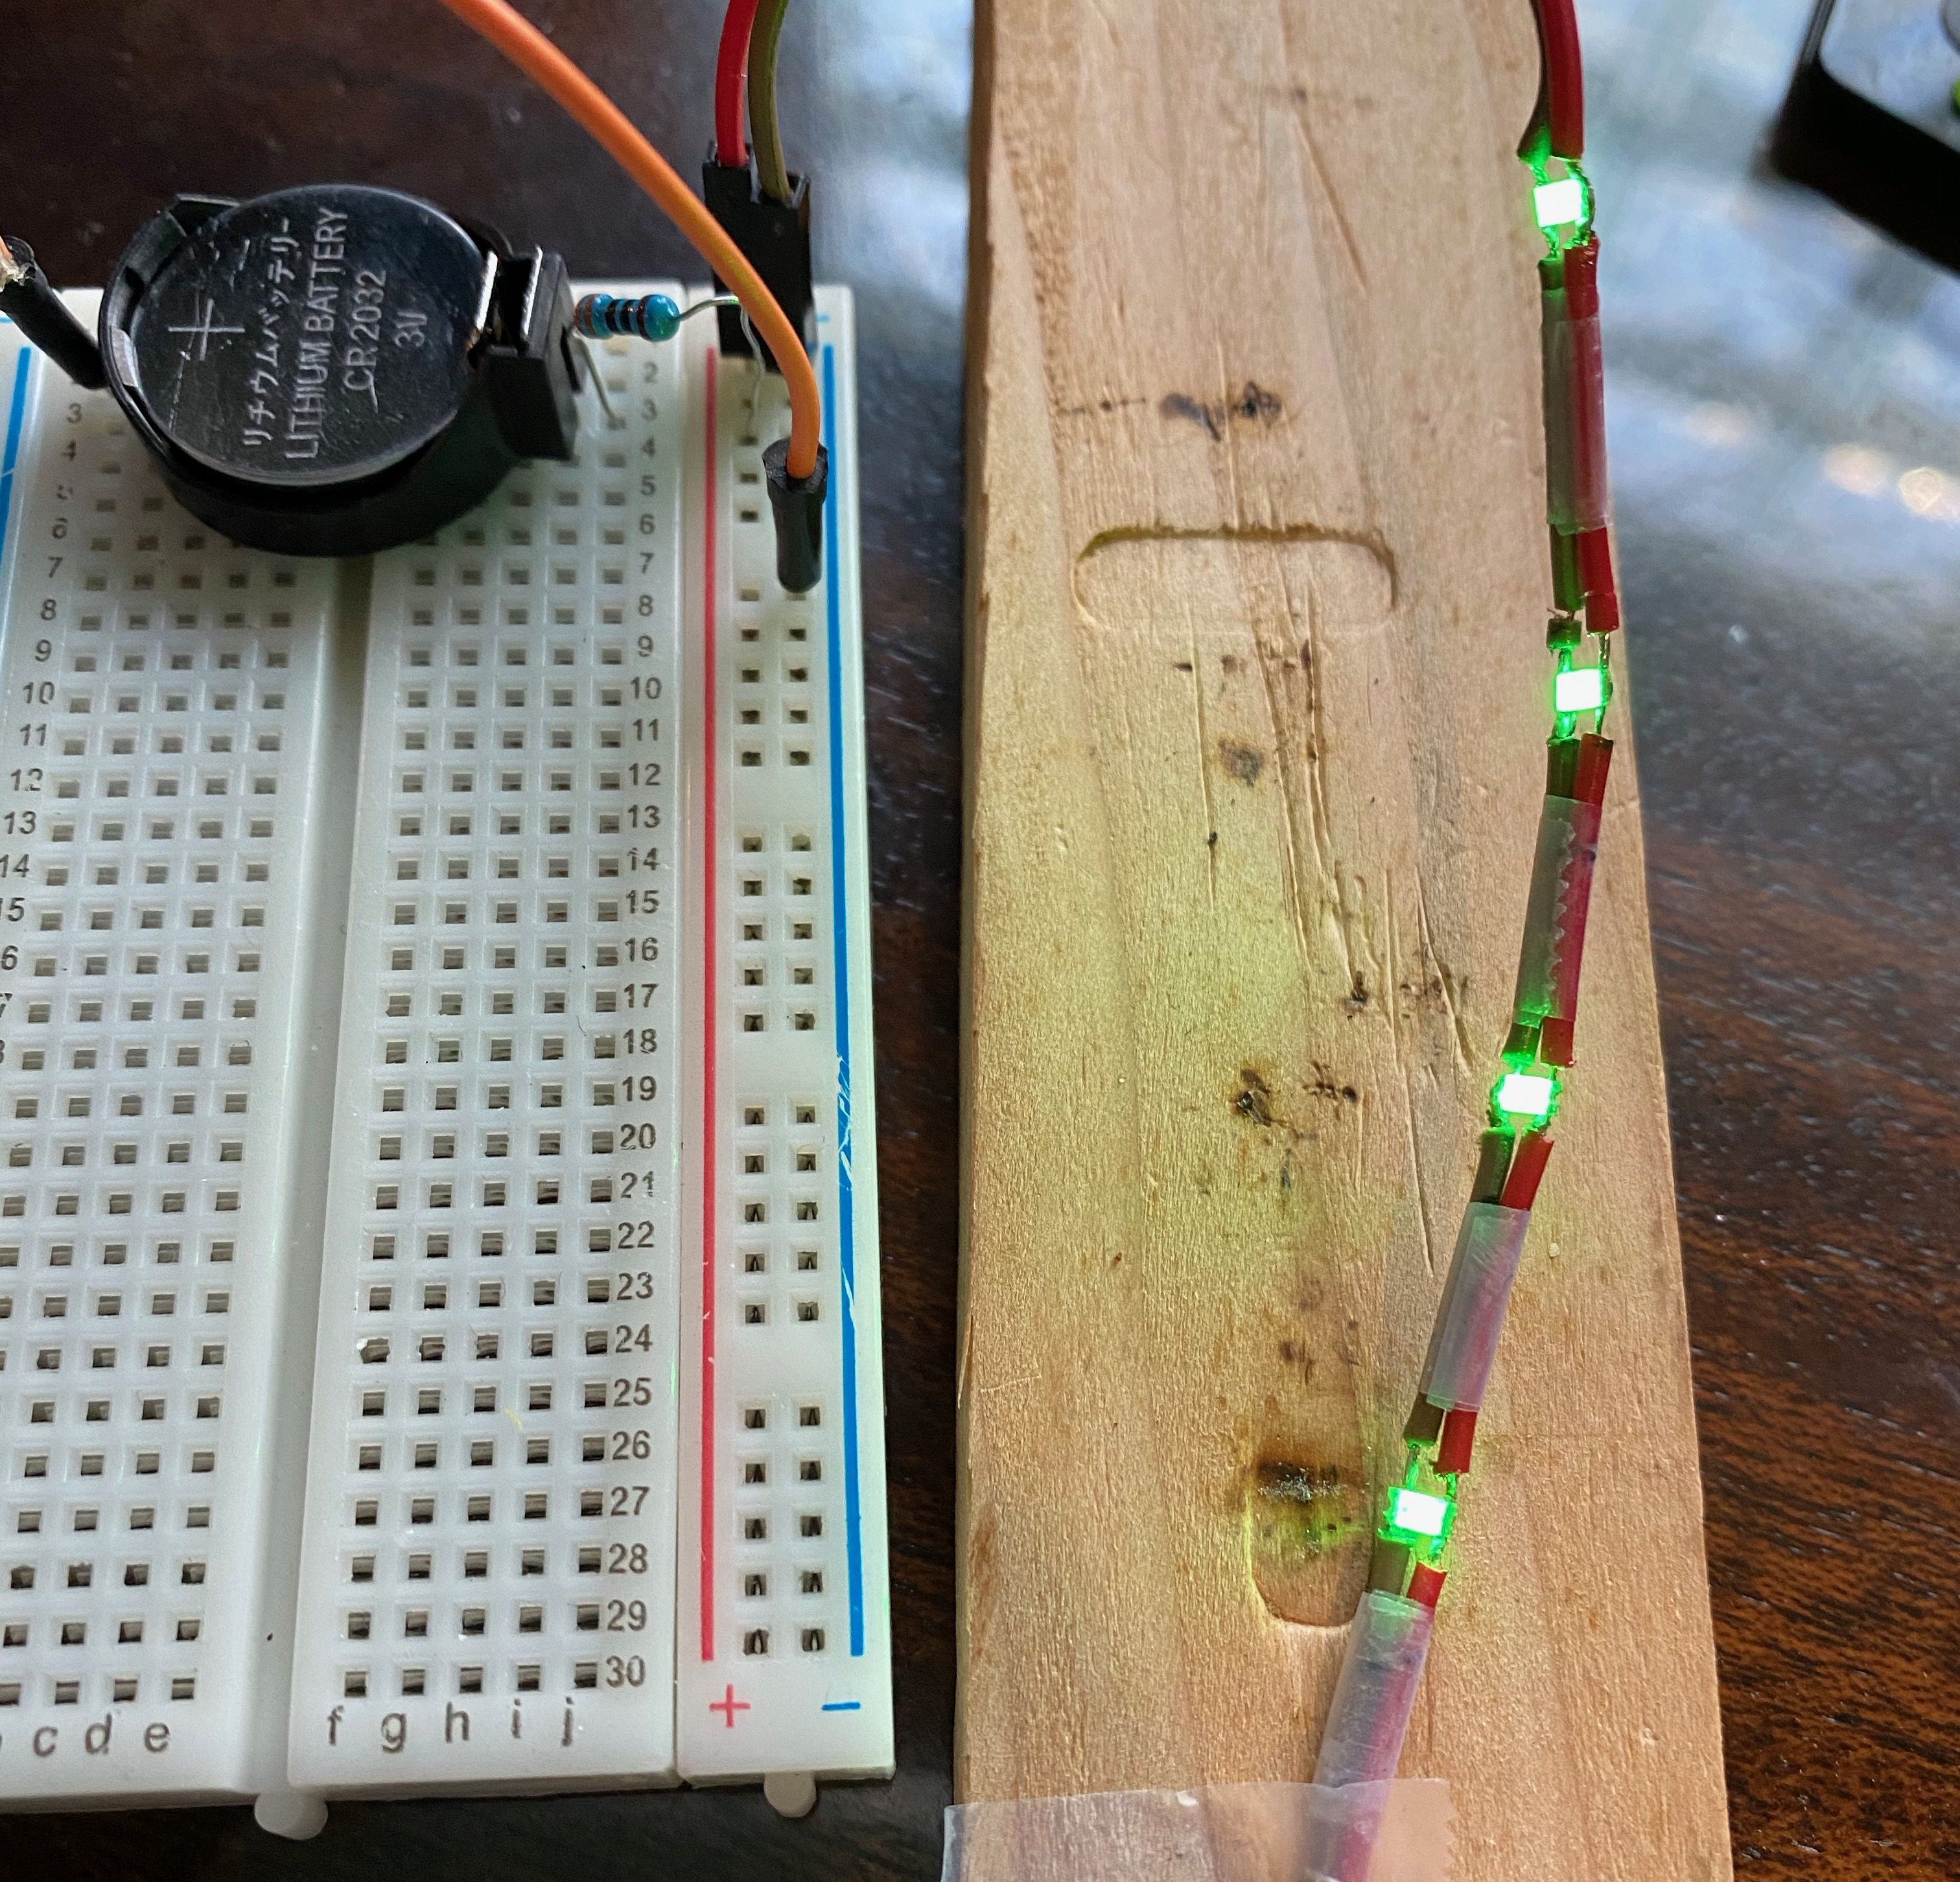
Just when we thought we’d seen it all in the infinity mirror department, [FieldCrafting] blazed a tiny, shiny new trail with their electroplated infinity mirror hair pin. We’d sure like to stick this in our French twist. Fortunately, [FieldCrafting] provided step-by-step instructions for everything from the 3D printing to the copper electroplating to the mirror film and circuitry application.
And what tiny circuitry it is! This pin is powered by a coin cell and even has a micro slider switch to conserve it. The stick parts are a pair of knitting needles, which is a great idea — they’re pointy enough to get through hair, but not so pointy that they hurt.
[FieldCrafting] was planning to solder 1206 LEDs to copper tape and line the cavity with it, but somehow the CAD file ended up with 0603, so there wasn’t enough space for two tape traces. We think it’s probably for the better — [FieldCrafting]’s solution was to use two-conductor wire, strategically stripped, which seems a lot less fiddly than trying to keep two bare tape traces separated and passing pixies.
Don’t have enough hair for one of these? Surely you could use some handsome infinity coasters to round out that home bar setup.
[Mr. Carlson] is truly an old radio surgeon. The evidence? He recently restored an 83-year-old DeForest radio by transplanting an identical chassis from another similar radio. The restoration is fun to watch, but the 7D832 radio dial looks amazing. The dial is very colorful and the wooden knobs and preset selector are beautiful. To seal the deal, the center of the dial has a magic eye tube, giving the radio a retro high tech look.
The donor chassis needed some work before the surgery. In addition, [Carlson] makes some improvements along the way. The radio showed signs of previous service work, which is not surprising after 83 years.
The preset dial is interesting and required two adjustments in the back of the radio. Each button had a limited range of frequencies. We suspect this was a pretty high-end radio in its day.
There are some interesting tubes in the radio including Canadian tubes with a metal spray-on shield. We will warn you: the video is about three and a half hours long. No kidding. There’s a lot to talk about. We know its a big investment of time, but if you are interested in old radios, there’s a lot here and a great opportunity to watch a pro restore a radio from start to finish.
Younger readers may not recall the days when every mall had a music store — not the kind where tapes and LPs were sold, but the kind where you could buy instruments. These places inevitably had an employee belting out mall-music to all and sundry on an electric organ. And more often than not, the organist was playing a Hammond organ, with the distinct sound of these instruments generated by something similar to this tonewheel organ robot.
Tonewheels are toothed ferromagnetic wheels that are rotated near a pickup coil. This induces a current that can be amplified; alter the tooth profile or change the speed of rotation, and you’ve got control over the sounds produced. While a Hammond organ uses this technique to produce a wide range of sounds, [The Mixed Signal]’s effort is considerably more modest but nonetheless interesting. A stepper motor and a 1:8 ratio 3D-printed gearbox power a pair of shafts which each carry three different tonewheels. The tonewheels themselves are laser-cut from mild steel and range from what look like spur gears to wheels with but a few large lobes. This is a step up from the previous version of this instrument, which used tonewheels 3D-printed from magnetic filament.
Each tonewheel has its own pickup, wound using a coil winder that [TheMixed Signal] previously built. Each coil has a soft iron core, allowing for the addition of one or more neodymium bias magnets, which dramatically alters the tone. The video below shows the build and a demo; skip ahead to 16:10 or so if you just want to hear the instrument play. It’s — interesting. But it’s clearly a work in progress, and we’re eager to see where it goes.
Pulsejets are a popular DIY build for the keen experimenter, much loved for their mechanical simplicity and powerful roar. However, it can be difficult to get them running smoothly and producing high amounts of thrust. In an ongoing quest to do just that, [Integza] has been iterating hard on his designs, recently adding an electric turbocharger to add some boost.
Like any combustion engine, adding more air means that more fuel can be burned for more power. The electric turbocharger is a perfect way to do this, using a powerful brushless motor to turn a radial compressor wheel to force high-pressure air into the pulse jet’s combustion chamber. [Integza] used a resin printer to produce the turbocharger compressor wheel and housing, which made producing the complex geometry a cinch.
Initial results were positive, with the pulsejet maintaining better combustion with the turbocharger activated. It does come with the drawback of requiring battery power to run, but it may be worth the tradeoff for added thrust. However, the fragile setup requires more refinement before a thrust test can be carried out. Up until now, [Integza] has made do with a set of bathroom scales; we imagine a spring force gauge or strain gauge might be in order. If you’re keen to build your own pulsejet without welding, consider the carbon fiber method used in this project. Video after the break.
As it is generally practiced, ham radio is a little like going to the grocery store and striking up a conversation with everyone you bump into as you ply the aisles. Except that the grocery store is the size of the planet, and everyone brings their own shopping cart, some of which are highly modified and really expensive. And pretty much every conversation is about said carts, or about the grocery store itself.
With that admittedly iffy analogy in mind, if you’re not the kind of person who would normally strike up a conversation with someone while shopping, you might think that you’d be a poor fit for amateur radio. But just because that’s the way that most people exercise their ham radio privileges doesn’t mean it’s the only way. Exploring a few of the more popular ways to leverage the high-frequency (HF) bands and see what can be done on a limited budget, in terms of both cost of equipment as well as the amount of power used, is the focus of this installment of The $50 Ham. Welcome to the world of microphone-optional ham radio: weak-signal digital modes.
Just a Regular Joe
First things first, let me make it clear that there are a ton of modes available to amateur radio service licensees that don’t require talking into a microphone, going right back to the beginning of radio with continuous wave (CW) modes. Banging out dits and dahs with a straight key is perhaps the original digital mode, if we stretch the meaning of the term just a wee bit from its current modern connotation of transmitting and receiving encoded messages using computers, either built into the radio or attached as a separate component. I’ll use that as my definition of “digital mode” for the purposes of this article.
But even with that stricter definition, there is still a huge ecosystem of digital modes that have cropped up over the history of ham radio; the desire for communications without the need to be a conversationalist goes way back, it seems. But for this article, I’ll be focusing on a couple of modes within the “weak signals” family of modes, mainly because I find them fascinating and incredibly useful, and I get a real kick out of seeing what kinds of contacts are possible using less power than it takes to light up an LED light bulb.
When you get into the weak-signal space, one name keeps popping up: Joe Taylor (K1JT). Joe is a ham based in New Jersey, and when you first start hearing about him, you figure he’s just a, well, regular Joe, an old school ham who has come up with some clever software to make low-power signals easier to pull out of a high-noise environment. And while that’s certainly true, it quickly becomes apparent that Joe is a lot more than that. Joseph Hooton Taylor, Jr. earned his Ph.D. in astronomy from Harvard in 1968. He joined the physics faculty at Princeton in 1980, and has won pretty much every major prize in physics and mathematics, including the Draper Medal, the Wolf Prize, and in 1993, the Nobel Prize in Physics.
The Magic of WSJT-X
For all these lofty achievements, in many ways Joe is very much a “ham’s ham”, and since his retirement in 2006 he has turned his considerable experience in digital signal processing toward an all-encompassing weak-signals package called “WSJT“, for “weak signals, Joe Taylor.” Actually first written in 2001, the program has undergone nearly constant revision and updating by Joe and a cadre of digital-modes enthusiasts, with the latest incarnation, WSJT-X, which implements ten different weak-signal digital modes.
Joseph H. Taylor, Jr. (K1JT), 1993 Nobel Prize in Physics. Source: Nobel.org.
We’ll skip a deep dive into the DSP techniques underpinning WSJT-X — although it’s fascinating stuff and probably worthy of an article all by itself — and suffice it to say that the package implements various multiple frequency-shift keying (MFSK) modulation methods, each of which is optimized to work under different propagation conditions. The ten modes currently implemented cover everything from high-noise ionospheric propagation to tropospheric scatter, with modes that support bouncing signals off meteor ionization trails or even listening to your own signals bouncing off the Moon.
Even though WSJT-X modes are separated into broad “fast” and “slow” categories, by modern networking standards, they’re all pretty slow. Typical bit-rates range from a dozen characters per second to 400 baud or so. The low-throughput nature of these modes is entirely by design; by not attempting to achieve blazing speeds, WSJT-X makes very efficient use of the spectrum. Some modes only need a few hertz of bandwidth, with the tradeoff being that even very short messages can take multiple minutes to transmit.
The mode that I’ve been playing with most lately, FT8, is a relatively recent addition to the WSJT-X suite. FT8 was written by Joe Taylor and Steve Franke (K9AN), hence the “FT” in the moniker. The “8” refers to “8-FSK”, which means that the modulation scheme uses eight different tones spaced 6.25 Hz apart. Each FT8 signal therefore occupies 50 Hz, a huge chunk of bandwidth when compared to other weak-signal modes, but still pretty compact. All that extra bandwidth means that FT8 transmissions can be much shorter than, say, a 30-minute transmission on JT9. That makes FT8 suitable for quick QSOs and contesting, which is sort of the contact sport of amateur radio.
Speed Dating for Hams
While FT8 is fast, the tradeoff is message length. Each FT8 transmission encodes only 75 bits, with a 12-bit cyclic-redundancy check (CRC). That and the rapid turnaround time means that most operators rely on automation built into WSJT-X, as well as standardized messages, to make their FT8 contacts.
Setting up WSJT-X and getting a transceiver ready for FT8 is highly dependent on your computer and your radio. In my case, I built a dedicated Raspberry Pi 4 to run my ham radio operation, using the excellent Ham Pi image by Dave Slotter (W3DJS). I also attempted to use KM4ACK’s equally excellent Build-a-Pi image, but I had trouble getting my Icom IC-7200 transceiver talking to WSJT-X, and rather than devote a lot of time to troubleshooting I just tried the Ham Pi build. Both images have outstanding communities that will help you get spun up, as does WSJT-X, which has a forum where you’ll often see Joe Taylor pop in to answer questions. A community that has a Nobel laureate as a frequent contributor is a strong community indeed.
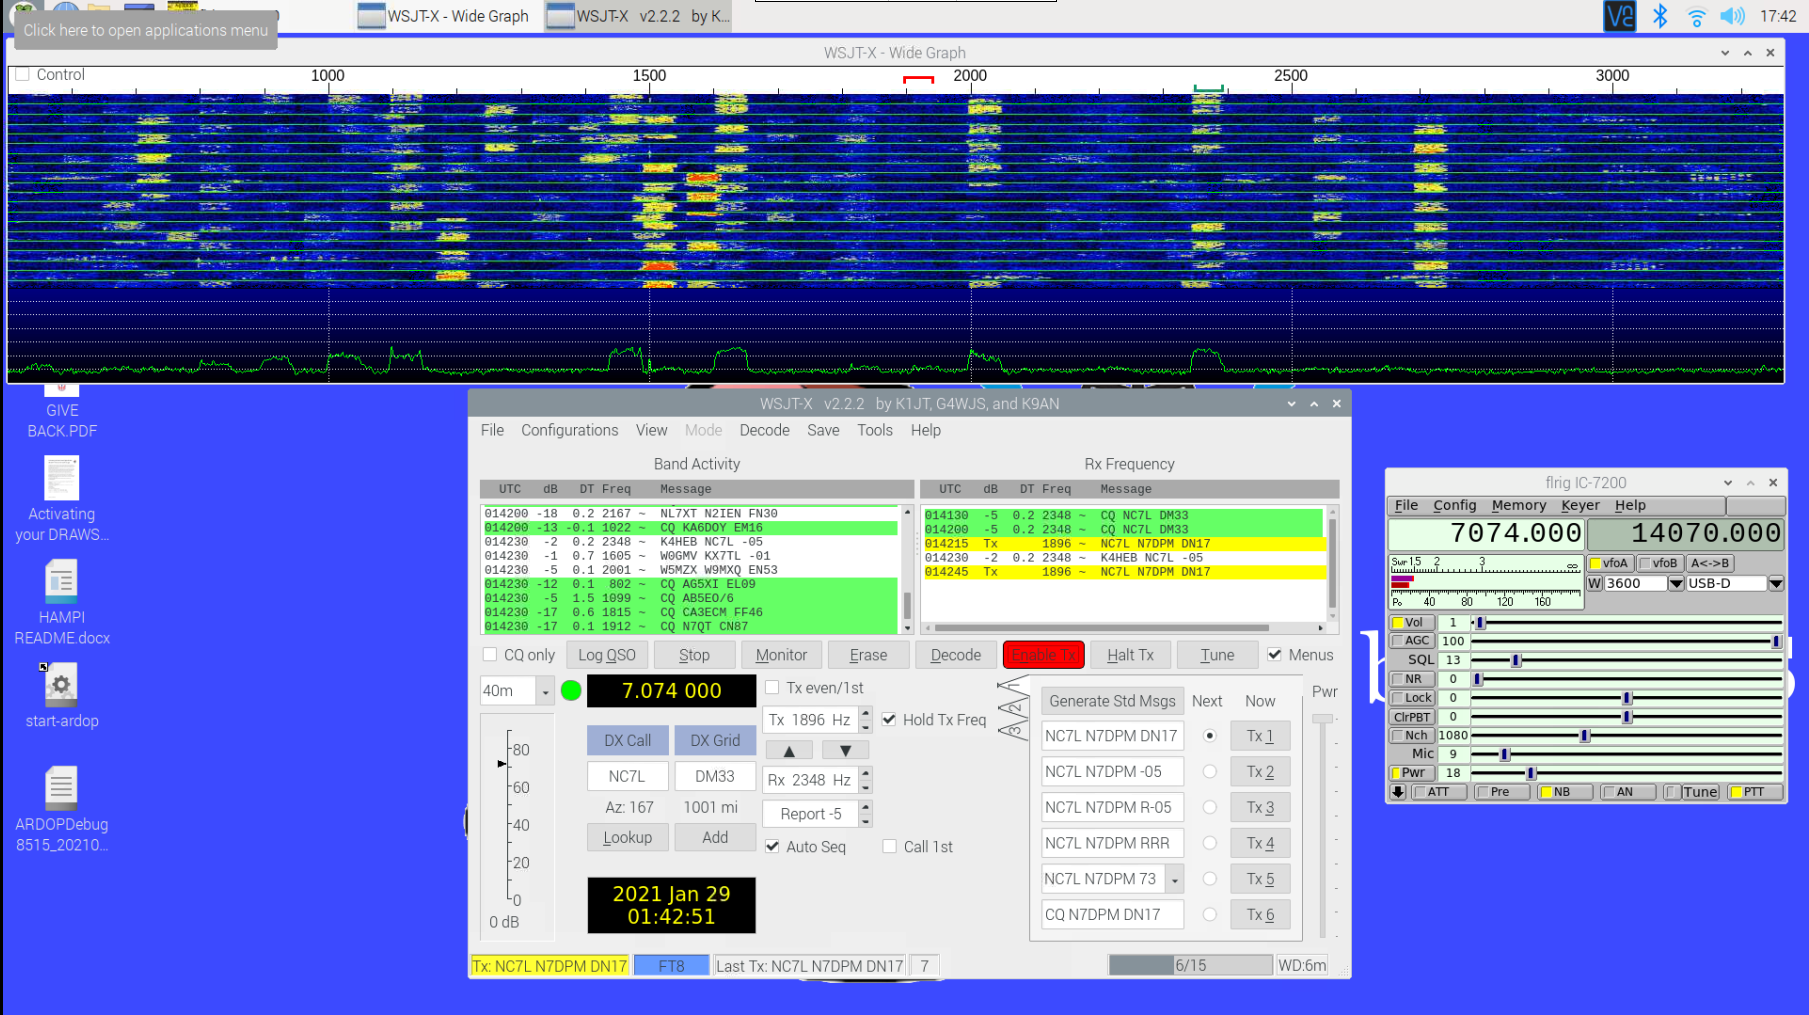
The video above shows why I call FT8 “the speed dating of ham radio.” The waterfall display at the top shows about 2,500 Hz of passband — the transceiver must be set up to allow as wide a possible band of frequencies through to WSJT-X (tip o’ the hat to Josh KI6NAZ for the help getting that right.) The FT8 algorithm decodes every 50-Hz wide FT8 signal in the passband at once; that along with the fact that each transmission is 15 seconds long followed by 15 seconds idle results in the characteristic checkerboard appearance on the waterfall display.
The characteristic FT8 checkerboard pattern develops on the WSJT-X waterfall. The 40-meter band was pretty good tonight, but I couldn’t make any QSOs.
Decoded messages are displayed in the left window of WSJT-X, with operators generally looking for stations calling CQ. Clicking on an entry in the Band Activity window starts a series of automatic messages, with WSJT-X keying up the transmitter and sending a minimal QSO — basically just the two call signs, a grid square locator, and the received signal strength. It’s important to note that the two sides of the conversation don’t have to be, and in fact shouldn’t be, on the same frequency — the other operator’s copy of WSJT-X will decode the entire passband if it can. Once the acknowledgment of the CQ is received by the other station, the exchange of messages is entirely automatic, until the final 73s are sent and WSJT-X gives both sides a chance to log the QSO.
Since I’ve set up my end-fed half-wave antenna for the HF bands and gotten WSJT-X installed, I’ve made quite a few contacts. Most of them have been in the continental US and Canada, but I did manage to bag Japan on 30 meters last week, which was a treat. The fact that I could do all of this without once picking up the microphone, struggling to think of something to say, is a godsend to me, and the fact that WSJT-X is able to decode signals that are so far down into the noise floor is an intoxicating technical feat. It’s also really nice to sit down for a half-hour or so before dinner and bang out a couple of low-effort QSOs without having to invest too much in the process.
As mentioned, FT8 isn’t the only weak-signal mode that Joe Taylor and his collaborators built into WSJT-X. Next time on The $50 Ham, we’ll look at the equally addictive WSPR mode, and see how you can actually work HF bands for far less than $50, transmitter included.
As it is generally practiced, ham radio is a little like going to the grocery store and striking up a conversation with everyone you bump into as you ply the aisles. Except that the grocery store is the size of the planet, and everyone brings their own shopping cart, some of which are highly modified and really expensive. And pretty much every conversation is about said carts, or about the grocery store itself.
With that admittedly iffy analogy in mind, if you’re not the kind of person who would normally strike up a conversation with someone while shopping, you might think that you’d be a poor fit for amateur radio. But just because that’s the way that most people exercise their ham radio privileges doesn’t mean it’s the only way. Exploring a few of the more popular ways to leverage the high-frequency (HF) bands and see what can be done on a limited budget, in terms of both cost of equipment as well as the amount of power used, is the focus of this installment of The $50 Ham. Welcome to the world of microphone-optional ham radio: weak-signal digital modes.
Just a Regular Joe
First things first, let me make it clear that there are a ton of modes available to amateur radio service licensees that don’t require talking into a microphone, going right back to the beginning of radio with continuous wave (CW) modes. Banging out dits and dahs with a straight key is perhaps the original digital mode, if we stretch the meaning of the term just a wee bit from its current modern connotation of transmitting and receiving encoded messages using computers, either built into the radio or attached as a separate component. I’ll use that as my definition of “digital mode” for the purposes of this article.
But even with that stricter definition, there is still a huge ecosystem of digital modes that have cropped up over the history of ham radio; the desire for communications without the need to be a conversationalist goes way back, it seems. But for this article, I’ll be focusing on a couple of modes within the “weak signals” family of modes, mainly because I find them fascinating and incredibly useful, and I get a real kick out of seeing what kinds of contacts are possible using less power than it takes to light up an LED light bulb.
When you get into the weak-signal space, one name keeps popping up: Joe Taylor (K1JT). Joe is a ham based in New Jersey, and when you first start hearing about him, you figure he’s just a, well, regular Joe, an old school ham who has come up with some clever software to make low-power signals easier to pull out of a high-noise environment. And while that’s certainly true, it quickly becomes apparent that Joe is a lot more than that. Joseph Hooton Taylor, Jr. earned his Ph.D. in astronomy from Harvard in 1968. He joined the physics faculty at Princeton in 1980, and has won pretty much every major prize in physics and mathematics, including the Draper Medal, the Wolf Prize, and in 1993, the Nobel Prize in Physics.
The Magic of WSJT-X
For all these lofty achievements, in many ways Joe is very much a “ham’s ham”, and since his retirement in 2006 he has turned his considerable experience in digital signal processing toward an all-encompassing weak-signals package called “WSJT“, for “weak signals, Joe Taylor.” Actually first written in 2001, the program has undergone nearly constant revision and updating by Joe and a cadre of digital-modes enthusiasts, with the latest incarnation, WSJT-X, which implements ten different weak-signal digital modes.
Joseph H. Taylor, Jr. (K1JT), 1993 Nobel Prize in Physics. Source: Nobel.org.
We’ll skip a deep dive into the DSP techniques underpinning WSJT-X — although it’s fascinating stuff and probably worthy of an article all by itself — and suffice it to say that the package implements various multiple frequency-shift keying (MFSK) modulation methods, each of which is optimized to work under different propagation conditions. The ten modes currently implemented cover everything from high-noise ionospheric propagation to tropospheric scatter, with modes that support bouncing signals off meteor ionization trails or even listening to your own signals bouncing off the Moon.
Even though WSJT-X modes are separated into broad “fast” and “slow” categories, by modern networking standards, they’re all pretty slow. Typical bit-rates range from a dozen characters per second to 400 baud or so. The low-throughput nature of these modes is entirely by design; by not attempting to achieve blazing speeds, WSJT-X makes very efficient use of the spectrum. Some modes only need a few hertz of bandwidth, with the tradeoff being that even very short messages can take multiple minutes to transmit.
The mode that I’ve been playing with most lately, FT8, is a relatively recent addition to the WSJT-X suite. FT8 was written by Joe Taylor and Steve Franke (K9AN), hence the “FT” in the moniker. The “8” refers to “8-FSK”, which means that the modulation scheme uses eight different tones spaced 6.25 Hz apart. Each FT8 signal therefore occupies 50 Hz, a huge chunk of bandwidth when compared to other weak-signal modes, but still pretty compact. All that extra bandwidth means that FT8 transmissions can be much shorter than, say, a 30-minute transmission on JT9. That makes FT8 suitable for quick QSOs and contesting, which is sort of the contact sport of amateur radio.
Speed Dating for Hams
While FT8 is fast, the tradeoff is message length. Each FT8 transmission encodes only 75 bits, with a 12-bit cyclic-redundancy check (CRC). That and the rapid turnaround time means that most operators rely on automation built into WSJT-X, as well as standardized messages, to make their FT8 contacts.
Setting up WSJT-X and getting a transceiver ready for FT8 is highly dependent on your computer and your radio. In my case, I built a dedicated Raspberry Pi 4 to run my ham radio operation, using the excellent Ham Pi image by Dave Slotter (W3DJS). I also attempted to use KM4ACK’s equally excellent Build-a-Pi image, but I had trouble getting my Icom IC-7200 transceiver talking to WSJT-X, and rather than devote a lot of time to troubleshooting I just tried the Ham Pi build. Both images have outstanding communities that will help you get spun up, as does WSJT-X, which has a forum where you’ll often see Joe Taylor pop in to answer questions. A community that has a Nobel laureate as a frequent contributor is a strong community indeed.
The video above shows why I call FT8 “the speed dating of ham radio.” The waterfall display at the top shows about 2,500 Hz of passband — the transceiver must be set up to allow as wide a possible band of frequencies through to WSJT-X (tip o’ the hat to Josh KI6NAZ for the help getting that right.) The FT8 algorithm decodes every 50-Hz wide FT8 signal in the passband at once; that along with the fact that each transmission is 15 seconds long followed by 15 seconds idle results in the characteristic checkerboard appearance on the waterfall display.
The characteristic FT8 checkerboard pattern develops on the WSJT-X waterfall. The 40-meter band was pretty good tonight, but I couldn’t make any QSOs.
Decoded messages are displayed in the left window of WSJT-X, with operators generally looking for stations calling CQ. Clicking on an entry in the Band Activity window starts a series of automatic messages, with WSJT-X keying up the transmitter and sending a minimal QSO — basically just the two call signs, a grid square locator, and the received signal strength. It’s important to note that the two sides of the conversation don’t have to be, and in fact shouldn’t be, on the same frequency — the other operator’s copy of WSJT-X will decode the entire passband if it can. Once the acknowledgment of the CQ is received by the other station, the exchange of messages is entirely automatic, until the final 73s are sent and WSJT-X gives both sides a chance to log the QSO.
Since I’ve set up my end-fed half-wave antenna for the HF bands and gotten WSJT-X installed, I’ve made quite a few contacts. Most of them have been in the continental US and Canada, but I did manage to bag Japan on 30 meters last week, which was a treat. The fact that I could do all of this without once picking up the microphone, struggling to think of something to say, is a godsend to me, and the fact that WSJT-X is able to decode signals that are so far down into the noise floor is an intoxicating technical feat. It’s also really nice to sit down for a half-hour or so before dinner and bang out a couple of low-effort QSOs without having to invest too much in the process.
As mentioned, FT8 isn’t the only weak-signal mode that Joe Taylor and his collaborators built into WSJT-X. Next time on The $50 Ham, we’ll look at the equally addictive WSPR mode, and see how you can actually work HF bands for far less than $50, transmitter included.
As it is generally practiced, ham radio is a little like going to the grocery store and striking up a conversation with everyone you bump into as you ply the aisles. Except that the grocery store is the size of the planet, and everyone brings their own shopping cart, some of which are highly modified and really expensive. And pretty much every conversation is about said carts, or about the grocery store itself.
With that admittedly iffy analogy in mind, if you’re not the kind of person who would normally strike up a conversation with someone while shopping, you might think that you’d be a poor fit for amateur radio. But just because that’s the way that most people exercise their ham radio privileges doesn’t mean it’s the only way. Exploring a few of the more popular ways to leverage the high-frequency (HF) bands and see what can be done on a limited budget, in terms of both cost of equipment as well as the amount of power used, is the focus of this installment of The $50 Ham. Welcome to the world of microphone-optional ham radio: weak-signal digital modes.
Just a Regular Joe
First things first, let me make it clear that there are a ton of modes available to amateur radio service licensees that don’t require talking into a microphone, going right back to the beginning of radio with continuous wave (CW) modes. Banging out dits and dahs with a straight key is perhaps the original digital mode, if we stretch the meaning of the term just a wee bit from its current modern connotation of transmitting and receiving encoded messages using computers, either built into the radio or attached as a separate component. I’ll use that as my definition of “digital mode” for the purposes of this article.
But even with that stricter definition, there is still a huge ecosystem of digital modes that have cropped up over the history of ham radio; the desire for communications without the need to be a conversationalist goes way back, it seems. But for this article, I’ll be focusing on a couple of modes within the “weak signals” family of modes, mainly because I find them fascinating and incredibly useful, and I get a real kick out of seeing what kinds of contacts are possible using less power than it takes to light up an LED light bulb.
When you get into the weak-signal space, one name keeps popping up: Joe Taylor (K1JT). Joe is a ham based in New Jersey, and when you first start hearing about him, you figure he’s just a, well, regular Joe, an old school ham who has come up with some clever software to make low-power signals easier to pull out of a high-noise environment. And while that’s certainly true, it quickly becomes apparent that Joe is a lot more than that. Joseph Hooton Taylor, Jr. earned his Ph.D. in astronomy from Harvard in 1968. He joined the physics faculty at Princeton in 1980, and has won pretty much every major prize in physics and mathematics, including the Draper Medal, the Wolf Prize, and in 1993, the Nobel Prize in Physics.
The Magic of WSJT-X
For all these lofty achievements, in many ways Joe is very much a “ham’s ham”, and since his retirement in 2006 he has turned his considerable experience in digital signal processing toward an all-encompassing weak-signals package called “WSJT“, for “weak signals, Joe Taylor.” Actually first written in 2001, the program has undergone nearly constant revision and updating by Joe and a cadre of digital-modes enthusiasts, with the latest incarnation, WSJT-X, which implements ten different weak-signal digital modes.
Joseph H. Taylor, Jr. (K1JT), 1993 Nobel Prize in Physics. Source: Nobel.org.
We’ll skip a deep dive into the DSP techniques underpinning WSJT-X — although it’s fascinating stuff and probably worthy of an article all by itself — and suffice it to say that the package implements various multiple frequency-shift keying (MFSK) modulation methods, each of which is optimized to work under different propagation conditions. The ten modes currently implemented cover everything from high-noise ionospheric propagation to tropospheric scatter, with modes that support bouncing signals off meteor ionization trails or even listening to your own signals bouncing off the Moon.
Even though WSJT-X modes are separated into broad “fast” and “slow” categories, by modern networking standards, they’re all pretty slow. Typical bit-rates range from a dozen characters per second to 400 baud or so. The low-throughput nature of these modes is entirely by design; by not attempting to achieve blazing speeds, WSJT-X makes very efficient use of the spectrum. Some modes only need a few hertz of bandwidth, with the tradeoff being that even very short messages can take multiple minutes to transmit.
The mode that I’ve been playing with most lately, FT8, is a relatively recent addition to the WSJT-X suite. FT8 was written by Joe Taylor and Steve Franke (K9AN), hence the “FT” in the moniker. The “8” refers to “8-FSK”, which means that the modulation scheme uses eight different tones spaced 6.25 Hz apart. Each FT8 signal therefore occupies 50 Hz, a huge chunk of bandwidth when compared to other weak-signal modes, but still pretty compact. All that extra bandwidth means that FT8 transmissions can be much shorter than, say, a 30-minute transmission on JT9. That makes FT8 suitable for quick QSOs and contesting, which is sort of the contact sport of amateur radio.
Speed Dating for Hams
While FT8 is fast, the tradeoff is message length. Each FT8 transmission encodes only 75 bits, with a 12-bit cyclic-redundancy check (CRC). That and the rapid turnaround time means that most operators rely on automation built into WSJT-X, as well as standardized messages, to make their FT8 contacts.
Setting up WSJT-X and getting a transceiver ready for FT8 is highly dependent on your computer and your radio. In my case, I built a dedicated Raspberry Pi 4 to run my ham radio operation, using the excellent Ham Pi image by Dave Slotter (W3DJS). I also attempted to use KM4ACK’s equally excellent Build-a-Pi image, but I had trouble getting my Icom IC-7200 transceiver talking to WSJT-X, and rather than devote a lot of time to troubleshooting I just tried the Ham Pi build. Both images have outstanding communities that will help you get spun up, as does WSJT-X, which has a forum where you’ll often see Joe Taylor pop in to answer questions. A community that has a Nobel laureate as a frequent contributor is a strong community indeed.
The video above shows why I call FT8 “the speed dating of ham radio.” The waterfall display at the top shows about 2,500 Hz of passband — the transceiver must be set up to allow as wide a possible band of frequencies through to WSJT-X (tip o’ the hat to Josh KI6NAZ for the help getting that right.) The FT8 algorithm decodes every 50-Hz wide FT8 signal in the passband at once; that along with the fact that each transmission is 15 seconds long followed by 15 seconds idle results in the characteristic checkerboard appearance on the waterfall display.
The characteristic FT8 checkerboard pattern develops on the WSJT-X waterfall. The 40-meter band was pretty good tonight, but I couldn’t make any QSOs.
Decoded messages are displayed in the left window of WSJT-X, with operators generally looking for stations calling CQ. Clicking on an entry in the Band Activity window starts a series of automatic messages, with WSJT-X keying up the transmitter and sending a minimal QSO — basically just the two call signs, a grid square locator, and the received signal strength. It’s important to note that the two sides of the conversation don’t have to be, and in fact shouldn’t be, on the same frequency — the other operator’s copy of WSJT-X will decode the entire passband if it can. Once the acknowledgment of the CQ is received by the other station, the exchange of messages is entirely automatic, until the final 73s are sent and WSJT-X gives both sides a chance to log the QSO.
Since I’ve set up my end-fed half-wave antenna for the HF bands and gotten WSJT-X installed, I’ve made quite a few contacts. Most of them have been in the continental US and Canada, but I did manage to bag Japan on 30 meters last week, which was a treat. The fact that I could do all of this without once picking up the microphone, struggling to think of something to say, is a godsend to me, and the fact that WSJT-X is able to decode signals that are so far down into the noise floor is an intoxicating technical feat. It’s also really nice to sit down for a half-hour or so before dinner and bang out a couple of low-effort QSOs without having to invest too much in the process.
As mentioned, FT8 isn’t the only weak-signal mode that Joe Taylor and his collaborators built into WSJT-X. Next time on The $50 Ham, we’ll look at the equally addictive WSPR mode, and see how you can actually work HF bands for far less than $50, transmitter included.
For the last 11 years [Gunnar Kanold] has run the annual BASIC 10 Liner contest, and the rules for the 2021 edition are now available. There are four categories and each category has specific definitions of what constitutes a line. All entries must run on an 8-bit computer system that can be emulated.
The first three categories are for games but differ in the line length allowed. You can elect to compete with 80 character lines, 120 character lines, or 256 character lines. There’s also a category for demos, tools, and other applications that must constrain lines to 256 characters.
There are some common-sense rules, of course. You can’t load other programs or data from mass storage. You can’t use machine language or self-modifying code.
If you want to participate, you’ll need to submit your entry by March 27th and the results will be revealed on April 10th. If you need inspiration, look at some of the entries from last year, including Bomb Catcher, Ainvader, and Asteroid.
This is a good excuse to dust off your last retrocomputer project or replica. Seems like you’d want a BASIC that at least let you put multiple statements on a line, though, so probably don’t want to go back too far. Of course, you can always work on your favorite emulator, if you don’t have any hardware.
A trip to a supermarket is a rare luxury in a pandemic lockdown, but were I to cruise the aisles with my basket today I’d probably come away with a healthy pile of fruit and veg, a bit of meat and fish, and maybe some cheese. My shopping basket in 2031 though might have a few extras, and perhaps surprisingly some of them might be derived from insects. That’s a future made a little closer, by EU scientists declaring that farmed insect products are safe for humans and animals to eat.
Is meat consumption at this level sustainable? Our World In Data, CC BY 3.0.
We humans, like some of our fellow great ape cousins, are omnivores. We can eat anything, even if we might not always want to eat some things twice. As such, the diets of individual populations would in the past have varied hugely depending on the conditions that existed wherever they lived, giving us the ability to spread to almost anywhere on the planet — and we have.
Over the past few hundred years this need to subsist only on foods locally available has been marginalized by advances in agriculture. For those of us in developed countries, any foodstuff that takes our fancy can be ours for a trivial effort. This has meant an explosion of meat consumption as what was once a luxury food has become affordable to the masses, and in turn a corresponding agricultural expansion to meet demand that has placed intolerable stresses on ecosystems and is contributing significantly to global warming. It’s very clear that a mass conversion to veganism is unlikely to take place, so could farmed insects be the answer to our cravings for meat protein? It’s likely to be a tough sell to consumers, but it’s a subject that bears more examination.
Your Tasty, Nutritious, And Wriggy Friend!
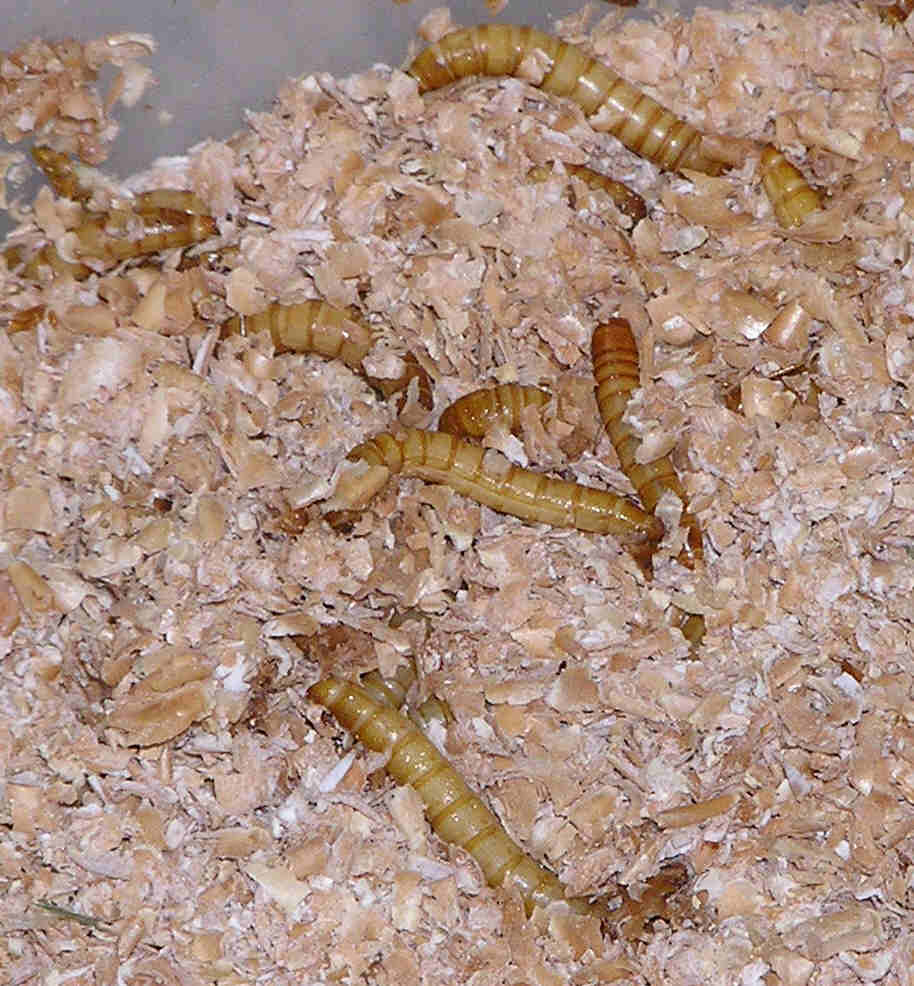
Mealworms thrive on a diet of bran. Richard Chambers, (CC BY-SA 3.0).
Before any reader imagines chowing down on a creepy-crawly, it’s worth pointing out that the insects in question are likely not to be winged and legged adults staring back at would-be diners. Instead this is a story of an alternative protein source. These would almost certainly be larvae, the earlier stage in an insect lifecycle, dried and processed into other foodstuffs. So we may eventually eat a hamburger made from insect protein, for example.
The species most often named as a candidate is the mealworm, a beetle larva that is particularly easy to breed and which can be fed on readily available by-products of the cereal industry such as wheat bran. They are so straightforward to farm that it can be done at home, but even when scaled up to a commercial size facility they take up a fraction of the land and water resources required to farm the equivalent volume of livestock protein.
Don’t Get EU Scientists Started
The research paper from the EU scientists presents a detailed analysis of dried mealworm larvae, both whole and ground to a powder. For a non-food-scientist it’s an eye-opener how much detail they go into when doing this work, but as consumers it’s important for us to know that levels of bacteria, toxic heavy metals, or other poisonous compounds are kept in check. After a detailed examination of the farming procedure, they conclude that properly treated mealworm products fed on appropriate food that doesn’t contain any such nasties present no risks when eaten. Of the batches they tested, some had as high as 58.9% protein and 27.6% fat, with the majority of the rest being dietary fibre in the form of chitin. Anecdotal evidence from the online research for this piece suggests they have a pleasant flavour, described by some as slightly nutty.
I grew up surrounded by farmland on a heavy clay soil that had traditionally been dairy land but which transitioned over the 1970s and 1980s to arable with the introduction of more efficient soil management tillage techniques. Today it grows acres and acres of cereal crops, but they are by and large not destined for your plate. Instead huge swathes of countryside provide the feed for indoor livestock rearing operations, a vast quantity of land produces a surprisingly small quantity of foodstuff. Growing up in a British farming community as I did I enjoy eating good-quality meat, but it’s a view I’ve progressively arrived at over the years that farming it in this way is by no means the most efficient way to make food from land, nor is it the most environmentally friendly. I’d prefer to eat smaller quantities of higher-standard beef than expect daily to eat beef that has been intensively farmed in this manner. The prospect of farmed insect protein fed on the by-products from food crops grown on that land is thus one that can only be a positive step, and I welcome the EU move as an early step in our making that change. The question is, who will be first to pop a bug-burger in their shopping basket?
Nintendo’s Switch is perhaps most famous for blurring the lines between handheld consoles and those you plug into a TV. However, the tablet-esque device can also run Android if you’re so inclined, and it recently got an upgrade to version 10.
It’s an upgrade that brings many new features to the table, most of which you might consider must haves for regular use. The newer port brings support for USB Power Delivery, as well as deep sleep modes that enable the unit’s battery to last for several weeks. There’s also support for over-the-air updates which should ease ongoing maintenance, and improvements for Bluetooth compatibility and the touch screen as well.
Like most console hacks to run custom code, you’ve got to have the right hardware version with the right firmware, as Nintendo have been regularly iterating to try and lock out hacks where possible. The install has a few hurdles to jump through, but nothing too strenuous that would scare away the average Hackaday reader. Just be sure to not attempt this on a cherished console, as there’s always the chance that it all ends in tears. If you pull it off, you can then go about turning your Nintendo Switch into a networking switch. Net…tendo… Switch? Come up with a better pun in the comments.
Most of us have, or, would like to have a 3D printer, a laser engraver, and a CNC machine. However, if you think about it naively, these machines are not too different. You need some way to move in the XY plane and, usually, on the Z axis, as well.
Sure, people mount extruders on CNCs, or even lasers or Dremel tools on 3D printers. However, each machine has its own peculiarities. CNCs need rigidity. 3D printers should be fast. Laser engravers and CNCs don’t typically need much Z motion. So common sense would tell you that it would be tough to make a machine to do all three functions work well in each use case. [Stefan] thought that, too, until he got his hands on a Snapmaker 2.0.
As you can see in the video below, the machine uses different tool heads for each function. The motion system stays the same and, curiously, there are three identical linear motion modules, one for each axis.
In addition to the interchangeable heads, you also have to swap out the beds for different functions. That means changing over quickly isn’t really an option. [Stefan] reports there are 22 bolts to attach the heated bed for 3D printing, for example.
This isn’t cheap, of course, but if you had to buy all three devices, you’d probably spend as much, especially for all aluminum framed machines. There are some compromises. The linear modules use a leadscrew, which is an unusual choice on X and Y axis for 3D printers because they are slow and have more backlash than belts. However, [Stefan] found the quality was good, even though printing speed was slow and noisy.
Of course, when machining with the CNC head, the rigid leadscrews are a plus, even though the 50 W spindle isn’t going to replace a larger CNC machine. He was even able to machine some aluminum slowly. The laser head is modestly powered, but it does have a camera and low-tech air assist, although it isn’t a proper air system. Overall, [Stefan] felt like the machine was usable in all three phases. He did miss a prominent emergency stop button on the machine or even on the graphical user interface.
Overall, the Snapmaker looks like a good concept with some implementation problems, but no show stoppers. Like most amateur builds, the machine is basically a small CNC with accessories to do laser cutting and 3D printing. Could you build better? Maybe. But it wouldn’t be trivial to match the build quality and software integration of the device.
We’ve seen conversions of 3D printers to a laser or CNC more than once. Results vary, of course, but it is doable.
Most of us have, or, would like to have a 3D printer, a laser engraver, and a CNC machine. However, if you think about it naively, these machines are not too different. You need some way to move in the XY plane and, usually, on the Z axis, as well.
Sure, people mount extruders on CNCs, or even lasers or Dremel tools on 3D printers. However, each machine has its own peculiarities. CNCs need rigidity. 3D printers should be fast. Laser engravers and CNCs don’t typically need much Z motion. So common sense would tell you that it would be tough to make a machine to do all three functions work well in each use case. [Stefan] thought that, too, until he got his hands on a Snapmaker 2.0.
As you can see in the video below, the machine uses different tool heads for each function. The motion system stays the same and, curiously, there are three identical linear motion modules, one for each axis.
In addition to the interchangeable heads, you also have to swap out the beds for different functions. That means changing over quickly isn’t really an option. [Stefan] reports there are 22 bolts to attach the heated bed for 3D printing, for example.
This isn’t cheap, of course, but if you had to buy all three devices, you’d probably spend as much, especially for all aluminum framed machines. There are some compromises. The linear modules use a leadscrew, which is an unusual choice on X and Y axis for 3D printers because they are slow and have more backlash than belts. However, [Stefan] found the quality was good, even though printing speed was slow and noisy.
Of course, when machining with the CNC head, the rigid leadscrews are a plus, even though the 50 W spindle isn’t going to replace a larger CNC machine. He was even able to machine some aluminum slowly. The laser head is modestly powered, but it does have a camera and low-tech air assist, although it isn’t a proper air system. Overall, [Stefan] felt like the machine was usable in all three phases. He did miss a prominent emergency stop button on the machine or even on the graphical user interface.
Overall, the Snapmaker looks like a good concept with some implementation problems, but no show stoppers. Like most amateur builds, the machine is basically a small CNC with accessories to do laser cutting and 3D printing. Could you build better? Maybe. But it wouldn’t be trivial to match the build quality and software integration of the device.
We’ve seen conversions of 3D printers to a laser or CNC more than once. Results vary, of course, but it is doable.
In the six decades or so of human space exploration, depending on whose definition you take, only 562 people have flown in to space. We haven’t quite reached the state of holidaying in space that science fiction once promised us even though the prospect of sub-orbital spaceflight for the exceedingly well-heeled is very close, so that cadre of astronauts remains an elite group whose entry is not for the average person. Some readers might have an opportunity to change that though, as the European Space Agency have announced a fresh round of astronaut recruitment that will open at the end of March.
Sadly for our American readers the successful applicants have to hail from ESA member states, but since that covers a swathe of European countries we’re guessing that a lot of you might have your long-held dreams of spaceflight revived by it. You can learn more at a press conference to be held on the 16th of February, and streamed via ESA Web TV. Meanwhile whoever is recruited will be likely not only to participate in missions to the ISS, but maybe also more ambitious planned missions such as those to the planned Lunar Gateway space station in Lunar orbit. If you think you’ve got the Euro version of The Right Stuff, you’ll have the 8 weeks from the end of March until the 28th of May to get your application in. Good Luck!
In the six decades or so of human space exploration, depending on whose definition you take, only 562 people have flown in to space. We haven’t quite reached the state of holidaying in space that science fiction once promised us even though the prospect of sub-orbital spaceflight for the exceedingly well-heeled is very close, so that cadre of astronauts remains an elite group whose entry is not for the average person. Some readers might have an opportunity to change that though, as the European Space Agency have announced a fresh round of astronaut recruitment that will open at the end of March.
Sadly for our American readers the successful applicants have to hail from ESA member states, but since that covers a swathe of European countries we’re guessing that a lot of you might have your long-held dreams of spaceflight revived by it. You can learn more at a press conference to be held on the 16th of February, and streamed via ESA Web TV. Meanwhile whoever is recruited will be likely not only to participate in missions to the ISS, but maybe also more ambitious planned missions such as those to the planned Lunar Gateway space station in Lunar orbit. If you think you’ve got the Euro version of The Right Stuff, you’ll have the 8 weeks from the end of March until the 28th of May to get your application in. Good Luck!
You don’t normally think of a 3D printer as a necessity for an antenna project. However, if you are interested in making a handy portable antenna, you might want to melt some plastic. [N2MXX] has an end fed antenna winder design that also contains the necessary matching toroid. This would be just the thing to throw in your backpack for portable operation.
The end-fed configuration is handy for portability too, because you can easily secure one end and feed the other end. Compare that to a dipole where you have to feed a high point and secure both ends.
Of course, you also need wire and some other components — we don’t know how to 3D print a usable ferrite toroid. Honestly, there is some controversy about how these antennas actually work, but people swear that they work well.
There are quite a few ways to operate a portable station, depending on your definition of convenient is. Verticals are popular, although laying out ground wires can be painful. A dipole isn’t that hard to erect, especially if you are staying in one place for a while. However, we really like how small this design is and it should be easy to clip one end and just play out the wire to operate. Our only concern is how plastics will fare in the elements over the long term. Then again, if it wears out, you can just print a new one.
While on the surface they might seem like little more than cosplay accessories, there are perfectly valid and practical reasons for building a custom cyberdeck. For one thing, a hand-built deck is going to be easier to upgrade and modify down the line. A bespoke rig can also be made to fit your exacting specifications, with each and every design choice made specifically to support your personal style and workflow.
For [Conrad Barski], that meant a computer that would stay out of his way and allow him to take notes and write code while keeping distractions to the absolute minimum. All he wanted in his dream machine was a nice mechanical keyboard, a widescreen display, and enough battery power to go mobile should the need arise. Anything else would be gilding the lily. For those who want to distill personal computing down to its simplest form, this build is really the high water mark.
[Conrad] is currently in the early stages of turning his Lisperati1000 into a kit others can build for themselves, so details are a bit sparse at the moment. But we do know there’s a Raspberry Pi Zero W, a Vortex Core 40% keyboard, and 4,400 mAh worth of battery power wrapped up in that slick 3D printed enclosure. Readers may recognize the 1920×480 ultra-wide LCD from the modernized TRS-80 Model 100 we covered recently, or perhaps the gorgeously reimagined retro terminals of [Oriol Ferrer Mesià]. If you’ve got retro-futurism on the brain, this seems to be the display to beat.
When working with test equipment such as oscilloscopes and function generators, it can be useful to take a screen capture. Historically this was done with Polaroid cameras that were bolted in place, but these days it can be done over a simple USB connection. [Majenko] didn’t like the Windows-only software that shipped with their Tenma 72-14110 function generator, however, and set about reverse engineering the USB protocol to create their own.
The hack was pulled off by running the original software in a Windows VM, while running Wireshark in the host Linux OS to capture the USB traffic. Once enough data had been captured, [Majenko] set about figuring out how the function generator formatted the screen data when sending it to the PC. Based on the fact that the data changed in length depending on what was on the display, it was surmised that the data was not raw, but compressed somehow. A hunch suggested it was probably some form of Run-Length Encoding, and this proved to be correct. With a little more digging and experimentation, [Majenko] was able to put together some code that netted a clear image from the device.
It’s a useful guide for reverse engineering image data, one that could prove useful if you’re tackling a similar problem on other hardware. We’ve seen some great reverse engineering efforts over the years, on everything from old video hardware to the Sega Saturn. If you’ve been diving deep into the secrets of software or hardware yourself, be sure to drop us a line.
Free and open-source software (FOSS) doesn’t have to be entirely separate from the concept of bringing in money, but the path to monetizing is maybe less clear than it could be. To help address this, [Drew DeVault] has shared some concise thoughts on different ways to monetize FOSS work and projects. [Drew] observes that monetizing one’s own projects is one approach, but that it is entirely possible, and less difficult, to make money by participating in open source work in a more general sense.
There are companies and organizations out there who may make their money otherwise, but are nevertheless involved in or reliant upon open source software for running their business. Such companies are a good starting point for anyone looking to work in FOSS, and [Drew] shares a clever tip for finding them: use git to clone the software repositories of large projects that are of interest to you, then run this command:
This will extract the domain names from the last 100,000 commits to the repository in question; a good set of leads to companies and organizations that are invested enough in FOSS to contribute, and who may be willing to pay for such work.
There is also the option of monetizing one’s own projects, which [Drew] says is the more difficult approach. He shares tips on monetization options, but cautions that fundamentally one is building a business when going this route. One should therefore be prepared to face the attendant non-software-related problems in the process.

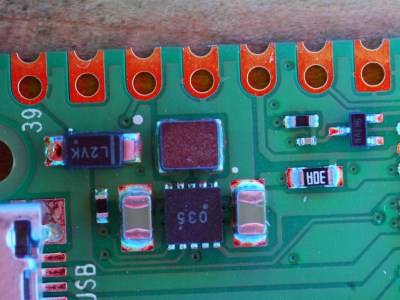 The principle behind this tool is as unexpected and simple as it is clever; by having different colours of light from different elevations of the dome it ensures that each different angle of the solder joint surface reflects a different colour. Thus a colour photograph shot from directly above the board allows visual inspection of the quality of the solder joints by the rainbow of colours that appears around their edges. This process can even be automated with OpenCV or similar, hence the process is referred to as Automated Optical Inspection, or AOI.