Explore the Cosmos with this DIY Digital Telescope

Getting a closer look at the Moon isn’t particularly difficult; even an absolute beginner can point a cheap telescope towards our nearest celestial neighbor and get some impressive views. But if you’re looking to explore a bit farther, and especially if you want to photograph what you find out there amongst the black, things can get complicated (and expensive) pretty quick.

While building this 3D printed automated telescope designed [Greg Holloway] isn’t necessarily cheap, especially once you factor in what your time is worth, the final product certainly looks to be considerably streamlined compared to most of what’s available in the commercial space. Rather than having to lug around a separate telescope, tripod, motorized tracker, and camera, you just need this relatively compact all-in-one unit.

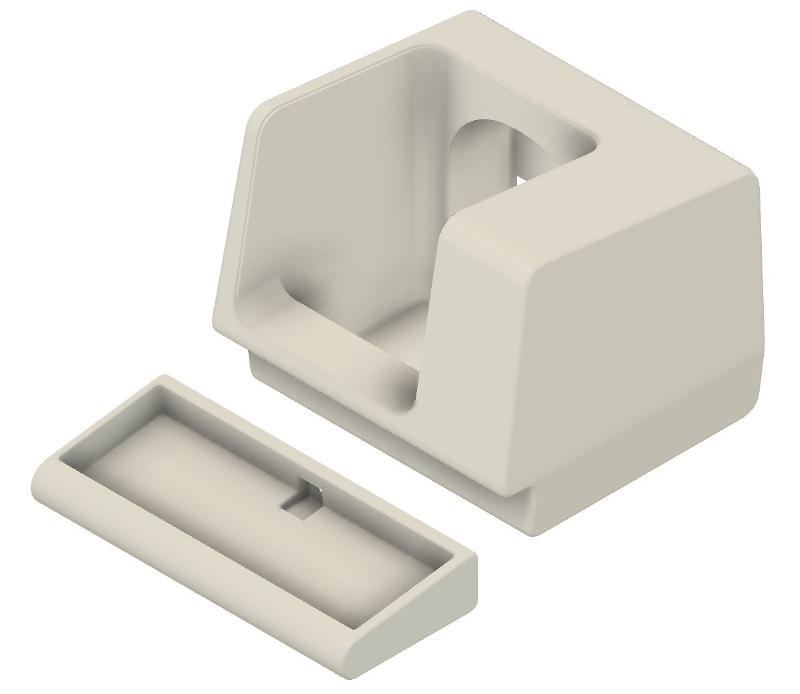
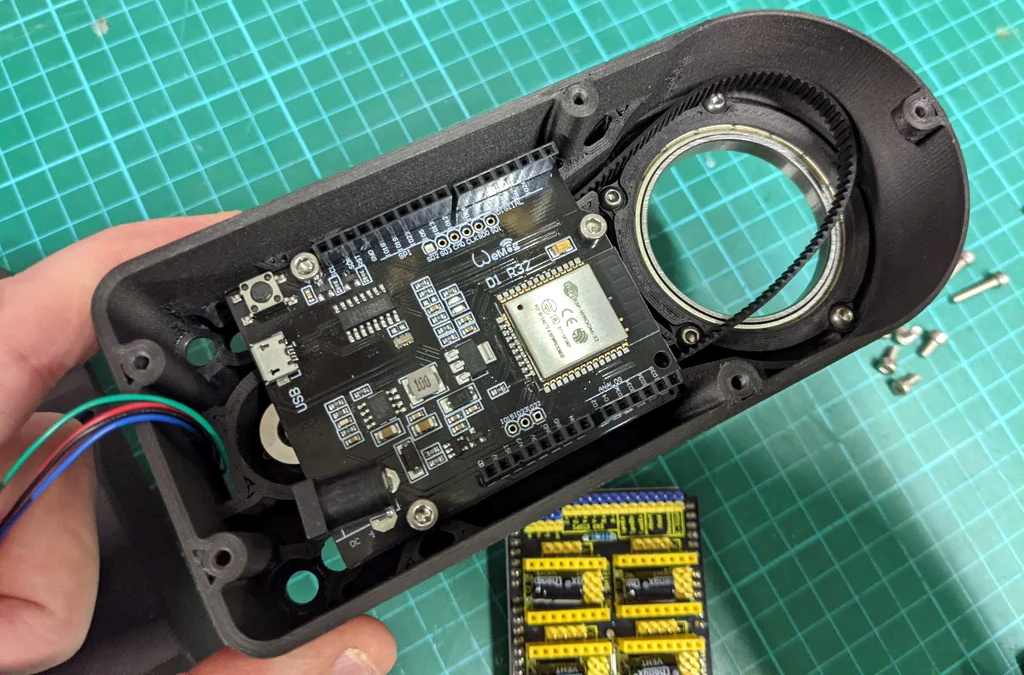
It’s taken [Greg] six months to develop his miniature observatory, and it shows. The CAD work is phenomenal, as is the documentation in general. Even if you’re not interested in peering into the heavens, perusing the Instructables page for this project is well worth your time. From his tips on designing for 3D printing to information about selecting the appropriate lens and getting it mated to the Raspberry Pi HQ Camera, there’s a little something for everyone.

Of course if you are looking to build your own motorized “GOTO” telescope, then this is must-read stuff. [Greg] has really done his homework, and the project is a fantastic source of information about motor controllers, wiring, hand controllers, and the open source firmware you need to tie it all together. Many of the ideas he’s outlined here could be applicable to other telescope projects, or really, anything that needs to be accurately pointed to the sky. If you’d like to get started with night sky photography and aren’t picky about what kind of things you capture, we’ve seen a number of projects that simply point a camera towards the stars and wait for something to happen.

[Thanks to Eugene for the tip.]

source https://hackaday.com/2021/03/05/explore-the-cosmos-with-this-diy-digital-telescope/

Open-DIP Surgery Cuts Retro Chips Down to Size

At least by today’s standards, some of the early chips were really, really big. They may have been revolutionary and they certainly did shrink the size of electronic devices, but integrating a 40-pin DIP into a modern design can be problematic. The solution: cut off all the extra plastic and just work with the die within.

When [Redherring32] alerted us to this innovation, he didn’t include much information — just a couple of photos of the mod and a few brief words about the target chip, an RP2A03 from the glorious NES 8-bit days. Living as it does within the relatively enormous DIP-40 package, it stood to take up far too much space in compact, more modern designs. So the hapless chip fell under the knife, or rather the Dremel tool diamond cutoff wheel. [Redherring32] left a generous boundary around the die. Cutting through the package left the lead frame of the die exposed enough to solder 34AWG (0.02 mm²) magnet wire to bring the leads out for connection. We’d have worried that vibration from the cutting process would have damaged the silicon, but the video in the tweet tells otherwise.

For now, the liberated die is connected to a piece of perfboard, which ironically enough actually makes it larger than the original chip. But this is a proof-of-concept, and given that the operation shrunk the footprint of the chip by about 93%, it should enable some interesting applications. Perhaps a smaller, better version of [Redherring32]’s OpenTendo is in the works.

source https://hackaday.com/2021/03/05/open-dip-surgery-cuts-retro-chips-down-to-size/

Get Apple to Track Your Bluetooth Devices For You

Apple’s “Find My” service allows users to track their missing devices by leveraging a worldwide network of location-aware iGadgets. With millions of iPhones and Macs out in the wild listening for the missing device’s Bluetooth advertisements and relaying their findings to the Cupertino Mothership, it’s a highly effective way of tracking hardware so long as it stays in relatively urban areas. Unfortunately, the system is completely proprietary and non-Apple devices aren’t invited to play.

Or at least, that used to be the case. A project recently released by the [Secure Mobile Networking Lab] called OpenHaystack demonstrates how generic devices can utilize Apple’s Find My network by mimicking the appropriate Bluetooth Low Energy (BLE) broadcasts. Currently they have a firmware image for the BBC micro:bit, as well as a Python script for Linux, that will allow you to spin up an impromptu Find My target. But the team has also published all the information required to implement similar functionality on other BLE-capable devices and microcontrollers, so expect the list of supported hardware to grow shortly.

Diagram showing how the Apple Find My system works
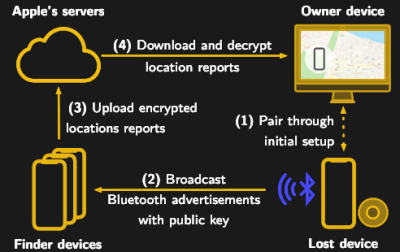
Somewhat ironically, while OpenHaystack allows you to track non-Apple devices on the Find Me tracking network, you will need a Mac computer to actually see where your device is. The team’s software requires a computer running macOS 11 (Big Sur) to run, and judging by the fact it integrates with Apple Mail to pull the tracking data through a private API, we’re going to assume this isn’t something that can easily be recreated in a platform-agnostic way. Beyond the occasional Hackintosh that might sneak in there, it looks like Tim Cook might have the last laugh after all.

It’s not immediately clear how difficult it will be for Apple to close this loophole, but the talk of utilizing a private API makes us think there might be a built-in time limit on how long this project will be viable. After all, Big Tech doesn’t generally approve of us peons poking around inside their machinations for long. Though even if Apple finds a way to block OpenHaystack, it’s expected the company will be releasing “AirTags” sometime this year which will allow users to track whatever objects they like through the system.

source https://hackaday.com/2021/03/05/get-apple-to-track-your-bluetooth-devices-for-you/

Eyesight Guardian Polices Your Poor Pupils

Don’t know about you, but over the last year or so, we have gone from spending ten or twelve hours a day at this computer to upwards of sixteen or eighteen. Fortunately there’s a window behind the monitor for taking those 20/20/20 breaks that are supposed to prevent eye strain, but it’s so hard to remember (and boring) to do it. And nobody needs yet another thing to remember in the name of self-care.

[Daniel Hingston] certainly agrees. As you’ll see in the delightful video after the break, [Daniel] has made a game out of the whole process of stopping every twenty minutes to spend twenty seconds looking at a point that’s at least twenty feet away. Once the break is over, [Daniel] uses the dual-purpose start button to acknowledge having looked away for 20 seconds. The device is meant to clip onto the corner of any monitor, and [Daniel] has provided several sizes of the bridge piece so that everyone can find their fit.

The Guardian’s guts are pretty simple — an Arduino Pro Mini runs the stop watch and a TFT display to show the graphics that live on an SD card. This is a great way to preserve your eyesight by gamifying something we all know we should be doing. It might be nice to add a break timer that counts up to 25 or thereabouts so you have time to stand up and come back. If you press the button too soon, it scolds you and you have to start your eye break over.

Need some more self-care lately? Our own [Jenny List] has your back in these interesting times.

source https://hackaday.com/2021/03/05/eyesight-guardian-polices-your-poor-pupils/

Elegant and Portable DIY Nightlight Becomes a Fixture for Hacker’s Kids

When [itzikdiy]’s kids asked for a night light for their room, he got the bright idea to build something that straddles the line between portable and permanent. This fixture-less fixture plugs directly into a wall socket and is turned on and off with a handsome rocker switch on the bottom.

This lovely little lamp is mostly made from scrap — the oak on the front appears to have come from an old cabinet door, and the other two ring-shaped pieces are made from pine. [itzikdiy] even took the acrylic from broken panel lamps. Everything was cut with a Dremel and a circle-cutter attachment except the oak, which required a jigsaw. We think it looks great, especially with the different grain directions — call it art deco woodworking.

When it was all said and done, [itzikdiy] found it was too heavy to hang by the plug alone, so he added an L-shaped support beneath the power supply that holds it more evenly against the wall. [itzikdiy] also made a pair of hooks that snap into a pair of slots on the sides of the outlet itself. The solution is simple, sturdy, and effective without disrupting the lines of the lamp at all. Carve out a little bit of time to watch the build video after the break.

We know that someone of your hulking intelligence has no fear of the dark. But if you think you could use a nightlight in the bathroom for those 2 AM trips, look no further.

source https://hackaday.com/2021/03/05/elegant-and-portable-diy-nightlight-becomes-a-fixture-for-hackers-kids/

This Week in Security: Text Rendering on Windows, GNU Poke, and Bitsquatting

Project Zero just unrestricted the details on CVE-2021-24093, a potentially nasty vulnerability in Windows 10’s DirectWrite, a text rendering library. The flaw got fixed in this month’s patch Tuesday roundup. The flaw is accessible in all the major browsers on Windows 10, as they use DirectWrite for font rendering. The trick here is to use a malicious font that uses some nonsense values. Those values result in a buffer allocation that is too small for complex characters such as Æ.

Because the vulnerability is a Windows library, it’s possible that an exploit would automatically work as a sandbox escape, but I haven’t seen confirmation either way. Let us know if you have some insight there.

Via Bleeping Computer

GNU Poke

The good folks at GNU have minted the 1.0 release of poke, a new binary editing tool. The real killer feature of poke is that it can interpret binary data, decoding it back into readable data structures. If you’re familiar with the way Wireshark can decode packets and give useful, organized output, it seems that poke will provide a similar function, but not limited to network traffic.

It looks like it could become a useful tool for getting a look inside otherwise opaque binaries. What poke brings is a system where you can write pretty-printing templates on the fly, which should be very useful when mapping out an unfamiliar binary. Distros will likely pick up and start packaging poke in the coming weeks, making it even easier to get and play with.

Legitimate Malware Makers?

The chickens may be coming home to roost for The NSO Group. So quick review, NSO makes complex spyware. NSO produced malware targeting Whatsapp users around the world. NSO makes the case that they simply make the tools and sell them legally to governments, and can’t be held liable for what those governments do with those tools. Well, the US Department of Justice isn’t convinced, and has slowly been working on a case against NSO.

The case has the potential to be an important one, as it will set precedent for whether a malware maker is liable for how that malware is used. Some very big names, like Google and Microsoft, have thrown their weight behind the potential prosecution. Their stance is that immunity granted to a spyware maker will result in poorer security for everyone. I do wonder what such a ruling would mean for a security researcher releasing a proof-of-concept for a vulnerability. If a malware campaign went on to adapt and use research code, is that a liability?

Cisco Vulnerabilities

Cisco just recently released a set of patches and vulnerabilities, and a handful of them are really serious. First up is CVE-2021-1393, a bug in the Cisco Application Services Engine. The vulnerability is described as “insufficient access control” on a specific service. An unauthenticated attacker can connect to the service over TCP and make system changes. The description is quite vague, but this could be something like a debug port that was accidentally enabled in production. A very jaded and cynical guess would be that they simply left a telnet port wide open.

Next up is CVE-2021-1388, a similar bug in Cisco’s ACI Multi-Site Orchestrator. In this case, it’s an API that can be fooled into providing a administrator token. Once in possession of this token, one can access the entire API as an administrator, all without having a login at all.

And finally, CVE-2021-1361 is a file system management service that was unintentionally exposed to the outside network on port 9075. A vulnerability in that service means that an attacker can make arbitrary file creation, deletion, or modification.

Exchange 0-days

Microsoft Exchange just got patched for a set of vulnerabilities that were discovered because of active exploitation. Microsoft has attributed attacks to Hafnium, a group believed to be in the employ of the Chinese government.

Volexity seems to have been the firm that first discovered the attack. They have network monitoring services in place for various customers, and that service detected mass data exfiltration on two seperate customer networks. After tracking down the odd traffic, they discovered compromised Exchange servers, and were able to identify the 0-day that was used to compromise the machines.

Xerox

If you happen to discover a vulnerability in something made by Xerox, the appropriate response is apparently to release it anonymously online, as Xerox will send you a cease-and-desist order for anything else. [Raphaël Rigo] was scheduled to give a talk February 18th on a set of Xerox printer vulnerabilities, as part of the Infiltrate security conference. The day the talk was scheduled, Infiltrate announced that it had been canceled due to a legal threat from Xerox. The vulnerabilities were disclosed to Xerox back in 2020, so it’s not as if they didn’t have sufficient time to fix the problems.

Bitsquatting

Cosmic rays get blamed for the occasional computer problem. The theory is that a cosmic ray can hit a memory location and actually cause individual bits to flip. I don’t know whether cosmic rays are always to blame, but I do know that RAM problems are fairly common, and can cause hard-to-troubleshoot problems. We’ve talked about Rowhammer and associated attacks, where manipulating certain ram bits can cause changes in physically nearby bits. One of the security talks about unintentional bit flips suggested that the world’s computers see something like 600,000 mis-flips every day.

Now, bitsquatting is essentially a form of typosquatting. Typosquatting is picking a name a human is likely to accidentally mis-type, like “goggle.com”. Bitsquatting is selecting names likely to be reached through a bit flip. I was introduced to this idea through the work of [remy], who decided to finally test the theory of bitsquatting using the windows.com domain. I’ll use his research to demonstrate how this works. The string “windows” translates into binary as 01110111 01101001 01101110 01100100 01101111 01110111 01110011. A single bit flip can change that second character from 01101001, an “i”, to 01101000, an “h”. Suddenly your computer is looking for “whndows.com” for updates, or to get the current time, etc.

How often do connections intended for the windows domain end up at a bitsquatted domain instead? [remy] calculated that there are 32 such valid domains, and was able to purchase 14 of them — just under half. He set up wildcard DNS so that “*.whndows.com” would also resolve to the IP address where he was listening for traffic. On his 14 domains, in a two week period, he received 199,180 NTP requests. Those came from 626 discrete addresses.

There was one event that was of particular interest. A computer on a Chinese IP address made an HTTP request to time.wiodows.com, which may have been a typo made by a human, as this wasn’t actually an NTP request. The odd thing is that soon after this request came in, a second request arrived from the Baidu search spider, to the same bogus domain. [remy] found it odd, but I believe I know exactly what this is. The “Great Firewall of China” is known to detect HTTP connections to unknown domains, and follow with a connection of its own, scraping the new site’s content. This unexpected connection was almost certainly the GFW’s probing.

An earlier experiment ran for much longer, on a different set of bitsquatting domains. In this case, [Artem Dinaburg] observed the domains for just over seven months, and averaged 59 different IP addresses per day, trying to connect to the bogus domains. He points out that some of these connections are likely typos rather than bit flips. One other observation is that he found mobile devices to be overrepresented in connections to his bitsquatted domains. I can think of two possible explanations for this. First, it’s possible that mobile devices are more susceptible to bit flips, possibly because they are used outside so often. Alternatively, I suspect that mobile on-screen keyboards are just easier to typo on. In any case, bitsquatting is a very clever technique that really does have real-world impact.

source https://hackaday.com/2021/03/05/this-week-in-security-text-rendering-on-windows-gnu-poke-and-bitsquatting/

A New Open-Source Farming Robot Takes Shape

The world of automated farming may be an unglamorous one to those not invested in its attractions, but like the robots themselves that quietly get on in the background with tending crops, those who follow that path spend many seasons refining their designs. The Acorn is a newly-open-sourced robot from Twisted Fields, a Californian research farm, and it provides a fascinating look at the progress of a farming robot design from germination onwards.

The Acorn is not a CNC gantry for small intensive gardens in the manner of designs such as the Farmbot, instead it’s an autonomous solar-powered rover intended for larger farms which will cruise the fields continuously tending to the plants in its patch. It’s a work in progress, so what we see is the completed rover with the tools and machine vision to follow. It pursues the course of a low-cost lightweight platform, an aluminium chassis surmounted by the solar panel, with mountain bike front fork derived wheels at each corner. It has four wheel drive and four wheel steering, meaning that it can traverse the roughest of farmland. We can see its progress since a 2019 prototype, and while it seems as slow as the seasons themselves to mature, we can see that the final version could be a significantly useful machine on a small farm.

It’s not the first autonomous farming robot we’ve seen over the years, as for example this slightly more robust Australian model. We’re guessing that this is the direction autonomous farming is likely to take, with the more traditional tractor-based machinery projected by some manufacturers taking on repetitive loading and hauling roles.

source https://hackaday.com/2021/03/05/a-new-open-source-farming-robot-takes-shape/

Magnetic Angle Sensor Mods Make Encoder Better for Blasting

Most of the hacks we see around these parts have to do with taking existing components and cobbling them together in interesting new ways. It’s less often that we see existing components gutted and repurposed, but when it happens, like with this reimagined rotary encoder, it certainly grabs our attention.

You may recall [Chris G] from his recent laser-based Asteroids game. If not you should really check it out — the build was pretty sweet. One small problem with the build was in the controls, where the off-the-shelf rotary encoder he was using didn’t have nearly enough resolution for the job. Rather than choosing a commodity replacement part, [Chris] rolled his own from the mechanical parts of the original encoder, like the shaft and panel bushing, and an AS5048A sensor board. The magnetic angle sensor has 14 bits of resolution, and with a small neodymium ring magnet glued to the bottom of the original shaft, the modified encoder offers far greater resolution than the original contact-based encoder.

The sensor breakout board is just the right size for this job; all that [Chris] needed to do to get the two pieces together was to 3D-print a small adapter. We have to admit that when we first saw this on Hackaday.io, we failed to see what the hack was — the modified part looks pretty much like a run-of-the-mill encoder. The video below shows the design and build process with a little precision rock blasting.

source https://hackaday.com/2021/03/05/magnetic-angle-sensor-mods-make-encoder-better-for-blasting/

RetroArch Open Hardware Aims for Plug-and-Play

At its core, the RetroArch project exists to make it easier to play classic games on more modern hardware. The streamlined front-end with its tailored collection of emulators helps take the confusion out of getting your favorite game from decades past running on whatever gadget you please, from your smartphone to the venerable Raspberry Pi. But there’s always room for improvement.

In a recent blog post, the folks behind RetroArch took the wraps off of an exciting hardware project that’s been in the works for about a year now. Referred to simply as “RetroArch Open Hardware”, the goal is to develop a fully open source cartridge adapter that will integrate seamlessly with the RetroArch software. Just plug in your original cartridge, and the game fires right up like back in the good old days.

Now to be clear, this isn’t exactly a new idea. But the team at RetroArch explain that previous devices that blurred the line between hardware and emulation have been expensive, hard to find, and worst of all, proprietary. By creating an open hardware project, they hope to truly unleash this capability on the community. Instead of having to deal with one vendor, multiple companies will be free to spin up their own clones and potentially even improve the core design. Should none of the ones on the market fit your particular needs, you’d even be free to build your own version,

What’s more, the gadget will also make it easier to create your own ROMs from cartridges you own. By appearing to the operating system as a USB Mass Storage device, users can literally drag and drop a game ROM to their computer’s desktop. No arcane software fired off from the command line; as much as we might enjoy such things, it’s not exactly intuitive for the gaming community at large. The same technique will also allow users to backup their saved progress before it’s inevitably lost to the ravages of time. The device demonstrated by the team currently only works on Nintendo 64 games, but presumably compatibility with be expanded to other cartridges in the future.

Over the years, we’ve seen a number of hombrew devices designed to read and copy game cartridges. We’ve even seen some rather polished examples that were released as open hardware. But those devices never had the public backing of such a well known group in the emulation scene, and we’re excited to see what kind of development and adoption can be spurred on by this level of legitimacy.

[Thanks to Nick for the tip.]

source https://hackaday.com/2021/03/04/retroarch-open-hardware-aims-for-plug-and-play/

Smart Lid Spies On Sourdough Starter, Sends Data Wirelessly

[Justin Lam] created a wonderfully-detailed writeup of his Smart Sourdough Lid project, which was created out of a desire to get better data on the progress and health of his sourdough starters, and to do so more efficiently. The result is a tidy, one-piece lid that constantly measures temperature, humidity, and height of the starter in the jar. Data is sent wirelessly for analysis, but there is also a handy OLED display on the top of the lid that shows immediately useful data like how much the starter has peaked, and how much time has passed since it did so.

The PCB was optimized for size, and not designed with mounting in mind, so a hot-glued machine screw serves as a “button extender”. Issues like this can happen when enclosures are designed after the fact; it’s something to which we can all relate.

We really like how focused the design is, and the level of detail [Justin] goes into to explain his design decisions and describe how well they worked out. This isn’t [Justin]’s first kick at the can when it comes to getting data on his sourdough, after all. We remember his earlier work using computer vision to analyze sourdough starters, and he used what he learned to inform this new design; the smart lid is easier to use and handles data much more efficiently.

The project’s GitHub repository has all the information needed to build your own. The lid is ESP8266-based and integrates a VL6180X time-of-flight (ToF) distance sensor, DHT22 to sense temperature and humidity, and a small SSD1306 OLED display for data. A small custom PCB keeps the modules tidy, and a 3D-printed custom enclosure makes it one tidy package.

[Justin] also analyzes the results he obtained and talks about what they mean in the last part of his writeup, so if you’re into baking and interested in his findings, be sure to give that a look.

source https://hackaday.com/2021/03/04/smart-lid-spies-on-sourdough-starter-sends-data-wirelessly/

Homebrew Espresso Machine Has Closed-Loop Control

[Ben Katz] is in the process of building a compact, closed-loop espresso machine, and really seems to be pulling it off in the first shot. Though it may not be the final product, we’re in awe of the beautiful guts and would love to taste-test the early results.

This machine will hit a sweet spot between lever-type espresso machines that are like driving a manual without power steering, and those fully automated machines that squeeze all the fun out of playing barista but are easier on the joints.

Here’s how it works so far: a motor drives an electric gear pump that pumps the water through a heater. It’s a closed-loop system, so there’s a 3-way valve after the heater that keeps sending the water back until it’s deemed hot enough. Once that happens, the valve switches functions and begins to pump water through the group head and on to the coffee grounds.

[Ben] designed and milled a beautiful group head that’s designed to fit a La Pavoni portafilter and some other parts he already had on hand. Grab a coffee and watch it pull the first shot after the break, then stick around to see the milling and the drilling.

Ready to kick that Keurig to the curb and get an espresso machine? Don’t just throw it out or take it to a field and smash it with a baseball bat — turn that thing into an automatic drip for a small houseplant.

Thanks for the tip, [tokol0sh].

source https://hackaday.com/2021/03/04/homebrew-espresso-machine-has-closed-loop-control/

Inspire Dev Kit Drops Price Of MSLA Printer To Just $30

Over the last couple of years, we’ve seen massive price reductions on consumer 3D printers based on masked stereolithography (MSLA) technology. As the name implies, these machines use a standard LCD panel to selectively mask off the ultraviolet light coming from an array of LEDs. Add in a motorized Z stage, and you’ve got a simple and cheap way of coaxing UV resin into three dimensional shapes. These days, $200 USD can get you a turn-key MSLA printer with resolution far beyond the capabilities of filament-based FDM machines.

But [JD] still thinks we can do better. His project aims to produce a fully-functional MSLA printer for $30, and perhaps as low as $15 if manufactured in sufficient quality. He believes that by making high-resolution 3D printing more accessible, it will allow users all over the globe to bring their ideas to life. It’s no wonder he’s calling his machine the Inspire 3D Printer.

A test fixture for the LCD module.

This isn’t just some pie in the sky concept rolling around in [JD]’s head, either. You can order the Inspire Development Kit right now for just $30, though he makes it clear what you’ll receive isn’t quite a functional MSLA printer. By leveraging a common LCD module, the ESP32, and several 3D printed parts, he’s proven his price point for the kit is achievable; but there’s still plenty of work that needs to be done before the machine is ready for the general public.

For one thing, he’s still working the kinks out of the Z movement. The current design is 3D printed, but [JD] says he’s not quite happy with the amount of slop in the movement and is considering replacing the entire thing with the linear actuator from an optical drive. We’ve already seen these parts reused for accurately positioning lasers, so there’s certainly precedent for it. The firmware for the ESP32 is also in its infancy, and currently only allows the user to print from a selection of simplistic hard-coded shapes as a proof of concept.

We’ve seen DIY attempts at resin printers in the past, but they’ve often been based on more complex techniques involving projectors or UV lasers. Masked stereolithography is much more approachable for the home gamer, and projects like the Inspire 3D Printer show just how little it really takes to pull solid objects out of a puddle of goo.

source https://hackaday.com/2021/03/04/inspire-dev-kit-drops-price-of-msla-printer-to-just-30/

Serene Snowdecahedrons

It’s no secret that many parts of the United States saw quite a bit of snow that past few weeks. Even snowed in, hackers and engineers continue to do what they do and invent crazy wonderful things. Spurred on by a grand vision of complex polyhedron snowballs, [Jacob] created a clever 3D printed mold that can create Rhombic Dodecahedrons. It has some rather unusual properties as it can be stacked perfectly (no gaps in between the snowdechedrons) and all opposing sides are parallel so it can be held easily in a mitten or glove. Additionally, since the faces are parallel, it unmolds easily and without marring the beautiful snow you just crafted.

Premade STL’s of three different sizes are provided under creative commons with some helpful instructions on how best to print them. Perhaps next time your area gets some good snow, you can be prepared to show off with your high-performance ski-sled as your fly by throwing molded snowballs. That is until you get roped into a friendly debate about whether your snowdechedrons are in fact snow “balls”.

Thanks [Jacob] for sending this one in!

source https://hackaday.com/2021/03/04/serene-snowdecahedrons/

We’re Cloning Animals From the “Frozen Zoo”; Like A Seed Bank But For Animals

Seed banks are facilities of great value to biodiversity and agriculture around the world. These facilities are used to house stocks of seeds of a wide variety, helping to maintain genetic diversity and avoid the permanent loss of various plant species. While there are some challenges, the basic requirements to run a simple seed bank are to keep a selection of seeds at low temperature and humidity to maximise their viable lifespan.

When it comes to animals, things become more difficult — one can’t simply plant an old seed in the ground and grow a fresh new meerkat, for example. Preservation of animal genetic material poses its own unique set of challenges — ones that the San Diego “Frozen Zoo” don’t shy away from. They’ve recently shown the viability of the program with the healthy birth of a ferret cloned from an animal that died in 1988.

Long-Term Storage

There are less than a dozen frozen zoos around the world, with the first being established at San Diego Zoo by Kurt Benirschke in 1972. While the available biological technology was limited at the time, it was hoped that by cryopreserving samples of animal tissues and reproductive material, they might later be used for research or reproduction purposes. The idea has since spread, with a smattering of other facilities opening up around the world. Such facilities necessarily store a wide variety of material, depending on the species in question. Obviously, viable gametes, or reproductive cells, are of high priority. Eggs and sperm cells from sexually mature animals can readily be secured from both live and deceased specimens, and used to produce embryos for implantation.

Alternatively, fluids such as blood or milk may be saved, as well as muscle tissue, bone, hair or skin samples. With cloning techniques pioneered in the 1990s, DNA extracted from these non-reproductive cells can be inserted into an egg with its nucleus removed. This egg can then be implanted in a surrogate mother like any other embryo, and the pregnancy carried to term. With in vitro fertilization (IVF) techniques in their infancy in the 1970s and cloning a distant blip on the horizon, Dr. Benirschke’s decision to establish the first frozen zoo at the time shows considerable foresight.

Elizabeth Ann was born in late 2020 – the first clone of a US endangered species. This is a screenshot from a video from the US Fish and Wildlife Service.

With decades of advancements in genetic sequencing and techniques like in vitro fertilization now available, these libraries of genetic material are starting to bear fruit. Although other species have already been successfully cloned, this is the first clone of a US endangered species — a black-footed ferret by the name of Elizabeth Ann. Born to a domestic ferret serving as a foster mother on December 10th of last year, her genes are a duplicate of a ferret named Willa who passed away in 1988 and was frozen at the San Diego facility.

The black-footed ferret has long been a focus of conservationists, who have been working to re-establish the species since it was thought to be extinct in the mid-20th century. When a dead specimen was found on a ranch in the 1980s, breeding work began in earnest, with thousands of ferrets reintroduced into the wild. As for Elizabeth Ann and any potential future clones, however, there aren’t yet plans to release them from captivity.

The Challenge of Genetic Diversity

Both breeding programs and cloning experiments highlight a limitation of this work, however. Genetic diversity is key to maintaining a thriving population over many generations, but the ferrets bred as part of the program all trace their lineage to just 7 individuals. Similarly, a cloning program can produce theoretically unlimited offspring from a single DNA sample, but inbreeding depression will make such a cohort unlikely to thrive in the long term. Thus, any frozen zoo aiming to serve as a potential backup against possible extinctions needs to collect as broad a spectrum of genetic samples as possible.

Kurt is the world’s first Przewalski’s horse clone, born to a domestic horse surrogate mother. It’s hoped that Kurt will grow up to breed with others of his species, increasing the genetic diversity of the herd.

The San Diego facility has had other success stories, too. In partnership with Viagen, a company perhaps best known for offering cloning services for domestic pets, scientists were able to clone Kurt, a Przewalski’s Horse, from forty-year old frozen skin samples. Similarly to the methods used to create Elizabeth Ann, Kurt’s genetic material was used to fertilise an egg which was then implanted into a domestic horse serving as a surrogate mother. Sequencing revealed the donor tissue featured many unique genes not found in the currently-alive population, all of which come from lines of just 12 former individuals. It’s hoped that when Kurt comes of age, breeding with others will significantly increase the genetic diversity of the endangered species.

The need for similar species to carry pregnancies means that it’s unlikely we’ll see frozen zoos churning out wooly mammoths or Tasmanian tigers for some time yet. Having the genetic material alone isn’t enough; a suitably close living relation is key, along with the aforementioned need for genetic diversity if repopulation is the goal. However, the technologies and techniques that have been developed will be crucial to maintaining biodiversity of existing species well into the future, especially given that habitat destruction and other existential threats remain around the world. And, as science continues to progress, it’s likely that frozen zoos will be the first to invite you to see their new dodo exhibit in the future!

source https://hackaday.com/2021/03/04/were-cloning-animals-from-the-frozen-zoo-like-a-seed-bank-but-for-animals/

Arduboy FX Mod-Chip: Now You’re Playing with Power

Traditionally, a forum full of technical users trying integrate their own hardware into a game system for the purposes of gaining unfettered access to its entire software library was the kind of thing that would keep engineers at Sony and Nintendo up at night. The development and proliferation of so called “mod chips” were an existential threat to companies that made their money selling video games, and as such, sniffing out these console hackers and keeping their findings from going public for as long as possible was a top priority.

But the Arduboy is no traditional game system. Its games are distributed for free, so a chip that allows users to cram hundreds of them onto the handheld at once isn’t some shady attempt to pull a fast one on the developers, it’s a substantial usability improvement over the stock hardware. So when Arduboy creator Kevin Bates found out about the grassroots effort to expand the system’s internal storage on the official forums, he didn’t try to put a stop to it. Instead, he asked how he could help make it a reality for as many Arduboy owners as possible.

Now, a little less than three years after forum member Mr.Blinky posted his initial concept for hanging an external SPI flash chip on the system’s test pads, the official Arduboy FX Mod-Chip has arrived. Whether you go the DIY route and build your own version or buy the ready-to-go module, one thing is for sure: it’s a must-have upgrade for the Arduboy that will completely change how you use the diminutive handheld system.

Freedom of Choice

Originally I was going to roll my own upgrade, which involves dead-bug soldering a SPI flash chip such as the W25Q128 to the Arduboy’s PCB with some thin wires and flashing the system’s ATmega32U4 microcontroller with a new bootloader using an ICSP like the USBasp. While it’s hardly a user-friendly operation, the procedure is well within the capabilities of the average Hackaday reader and potentially even something you can do with parts bin finds.

But in the end I decided to go with the pre-programmed FX Mod-Chip directly from Kevin. I’d been curious about the official upgrade since writing about it last year, and wanted to see what the top-of-the-line experience would be like. With a flexible PCB and an onboard ATtiny85 that can flash the system’s bootloader automatically, it’s a considerably more streamlined experience. Plus at just $15 USD, it’s hardly breaking the bank. Though if you want to save a few bucks, you can buy the blank version for $9 and load on your own games onto it.

In either event, the end result is the same. Rather than being stuck with a single game and having to connect your handheld up to the Arduino IDE each time you want to try out a new title, you’ll now have enough flash to store essentially the entire library of completed Arduboy games at once. You can quickly and easily navigate through them by genre using a very slick visual menu, and by holding the Up and Down keys simultaneously, you can even back out of the currently running game and select something else to play without having to power off the system.

As far as the Arduboy goes, this update is nothing short of revolutionary. Frankly, the fact that the device could only hold one game at a time always made it far more of a hassle to use than it should have been. But now that you can quickly skip around and try out all the games without being tethered to a computer, the Arduboy is far more practical for quick gaming sessions.

Installation

As mentioned before, the official upgrade kit has been designed with ease of installation in mind. If you know which way the pointy end of the soldering iron goes, you should be fine. For anyone who needs a little more guidance, there’s a written step-by-step installation guide and even a video you can watch.

Don’t blame me for that speaker wire.

With the back cover removed, you just need to slip the flex PCB under the battery and tack down the eight points that line up with the test pads on the board. You can remove the piezo speaker temporarily to make the installation a bit easier, but it’s not strictly necessary.

Once the flex PCB is securely attached, you need to turn the Arduboy back on and then short the GND and RST pads for approximately five seconds (a pair of tweezers works well for this). This will trigger the ATtiny85 to begin the bootloader flashing process, and pretty soon you should see the new Arduboy FX startup screen. Once you’ve confirmed the bootloader has been replaced, you can button the system back up.

Library Management

If you buy the pre-programmed FX Mod-Chip, you’ll immediately have access to 233 different Arduboy games and applications which take up roughly 5 MB of the 16 MB available on the W25Q128 chip. While this doesn’t represent all of the software ever written for the platform, it’s a fairly comprehensive collection. Making this sort of prediction is usually a good way to make yourself look like a fool in the future, but in this case, it’s probably safe to say that 16 MB ought to be enough for anybody.

But what about adding future titles? After all, the Arduboy enjoys an active developer scene, and there’s always something new to check out. Well, this is where things get a little tricky. As of this writing, the official tools to actually build a new image for the chip are still in their infancy. The current method relies on a handful of Python scripts and a manually curated CSV file that links nested directories of categories to individual game binaries and banner images. It’s not exactly difficult, but it’s just as unpleasant as it sounds.

There are some promising projects in the works though, such as ArduManFX by Justin Davis. This multi-platform tool allows the user to search for, download, and ultimately install Arduboy software. As of right now it can only flash single binaries to the system, but the next release is set to include the ability to create chip images from within its drag-and-drop GUI interface.

For now, the flash builder interface is grayed out and can’t be selected.

This is the Way

It’s honestly difficult to overstate just how much this upgrade improves the Arduboy experience, and it’s no surprise that expanded flash storage is slated to be a standard feature going forward. For me personally, the ability to quickly select from between hundreds of games has given new life to a device that was starting to get a bit dustier than I’d like to admit. It’s now a gadget I’ll make sure to toss in my bag before going on a trip, once there’s somewhere to go on a trip to, anyway.

But perhaps more importantly, the Arduboy FX Mod-Chip is a shining example of what can happen when a company doesn’t treat its customers like they’re the enemy. Not only was Kevin Bates supportive of users attempting to modify the hardware they purchased, but he had the forethought to turn their experiments into an official product and even roll the improvements into the next generation of Arduboy. The tech world would be a whole lot nicer if this sort of community collaboration could become the norm and not the exception.

source https://hackaday.com/2021/03/04/arduboy-fx-mod-chip-now-youre-playing-with-power/

Volumetric OLED Display Shows Bladerunner Vibe, Curious Screen Tech

[Sean Hodgins] is out with his latest video and it’s a piece of art in itself. Beyond a traditional project show and tell, he’s spun together a cyberpunk vibe to premiere the volumetric display he built from an OLED stackup.

The trick of a volumetric display is the ability to add a third dimension for positioning pixels. Here [Sean] delivered that ability with a stack up of ten screens to add a depth element. This is not such an easy trick. These small OLED displays are all over the place but they share a common element: a dark background over which the pixels appear. [Sean] has gotten his hands on some transparent OLED panels and with some Duck-Duck-Go-Fu we think it’s probably a Crystalfontz 128×56 display. Why is it we don’t see more of these? Anyone know if it’s possible to remove the backing from other OLED displays to get here. (Let us know in the comments.)

The rest of the built is fairly straight-forward with a Feather M4 board driving the ten screens via SPI, and an MPU-6050 IMU for motion input. The form factor lends an aesthetic of an augmented reality device and the production approach for the video puts this in a Bladerunner or Johnny Mneumonic universe. Kudos for expanding the awesome of the build with an implied backstory!

If you can’t find your own transparent displays, spinning things are a popular trend in this area. We just saw one last week that spun an LED matrix to form cylindrical display. Another favorite of ours is a volumetric display that spins a helix-shaped projection screen.

source https://hackaday.com/2021/03/04/volumetric-oled-display-shows-bladerunner-vibe-curious-screen-tech/

2:3 Scale VT100 is a Perfect Pairing for PDP-8/I Replica

When he went shopping for a vintage serial terminal to go along with his reproduction PDP-8/I computer, [Michael Gardi] came down with a bad case of sticker shock. But rather than be discouraged, he reasoned that if his “retro” computer could stand to have modern components at its heart, so could the terminal he used to talk to it. Leaning on his considerable experience in designing 3D printed replica hardware, he’s built an absolutely gorgeous scaled down DEC VT100 terminal that any classic computer aficionado would be happy to have on their desk.

Now to be clear, [Michael] hasn’t created a true serial terminal. Since the faux PDP-8/I is running on a Raspberry Pi, all he needed to do was come up with something that could connect to its HDMI and USB ports. Put simply, he’s essentially just made a 3D printed enclosure for the Pi’s monitor and keyboard. Oh, but what a gorgeous enclosure it is.

Recreating the VT100 in CAD was made more difficult by the fact that [Michael] couldn’t get his hands on the authentic hardware. But of course, that’s never stopped him before. It turns out DEC provided some very detailed dimensions for the terminal in their original documentation, and while comparing them to photographs of the actual terminal did uncover a few key differences, the overall look is spot on. Once the design was done, he reports it took two rolls of filament and more than 200 hours to print out all the parts for the enclosure.

To help sell the authentic look [Michael] tracked down a 4:3 LCD of the appropriate size, and the use of an off-the-shelf portable mechanical keyboard should make text entry a pleasure. For a little fun, he even came up with a themed arcade controller for the VT100 that can be used with RetroPie. The printed logo plate is an especially nice touch, and we’re more than willing to forgive the fact that he had to print it at a larger scale than the rest of the terminal to get all the detail in with his printer’s 0.4 mm nozzle.

On a technical level, this is perhaps the most straightforward replica we’ve ever seen from [Michael]. But even on a relatively simple project like this, his signature attention to detail and craftsmanship is on full display. It’s always a good day when he’s got a new build to show off with, and we’re eager to see what he comes up with next.

source https://hackaday.com/2021/03/04/23-scale-vt100-is-a-perfect-pairing-for-pdp-8-i-replica/

Retrotechtacular: Philips Factory Tour, circa 1930s

If you’ve got a half-hour or so to spare, you could do worse than this video trip through a Philips factory in the 1930s.

The film is presented without narration, but from the Dutch title cards and the fact that it’s Philips, we gather that this factory of gigantic proportions was somewhere in the Netherlands. In any case, it looks like something right out of [Fritz Lang]’s Metropolis and turned the rawest of materials into finished consumer products.

Much of the film focuses on the making of vacuum tubes; the sheer physicality of the job is what really stands out here. The upper body strength that the glassblowers had to have boggles the mind. Check out the chops — and the soon-to-be very unfashionable mustache — on the glassblower at the 12:00 mark. And it wasn’t just the gents who had mad skills — the fine motor control needed for the delicate assembly of the innards of the tubes, which seems to be mostly staffed by women, is just as impressive. We were also surprised by the amount these manual crafts were assisted by automated systems.

Especially interesting is the section where they build the luidspreker. Without narration or captions, it’s a little hard to tell what’s going on, but it appears that they used an enormous press to form chips of Bakelite into sleek covers for the speakers, which themselves are super-chunky affairs made from scratch in the factory. We’re also treated to assembly of the radios, packaging of finished products, and a group of dockworkers who clearly didn’t read the “Fragile” labels pasted on the boxes.

One can’t help but wonder if these people had the slightest inkling of what was about to sweep over them and the rest of the world. And if they did, would they even begin to comprehend how much the very products that they were making would contribute to both the slaughter of the coming war as well as to the sparing of so many lives? Likely not, but the film is still an interesting glimpse into the creation of an industry, one that relied very much on craftsmanship to get it started.

[via SWLing.com]

source https://hackaday.com/2021/03/03/retrotechtacular-philips-factory-tour-circa-1930s/

Fueling with Ammonia

There’s a major push now to find energy sources with smaller carbon footprints. The maritime shipping industry, according to IEEE Spectrum, is going towards ammonia. Burning ammonia produces no CO2 and it isn’t hard to make. It doesn’t require special storage techniques as hydrogen does and it has ten times the energy density of a modern lithium-ion battery.

You can burn ammonia for internal combustion or use it in a fuel cell. However, there are two problems. First, no ships are currently using the fuel and second most ammonia today is made using a very carbon-intensive process. However it is possible to create “green” ammonia, and projects in Finland, Germany, and Norway are on schedule to start using ammonia-powered ships over the next couple of years.

Switching over, though, will be an infrastructure challenge. Ships consume about 300 million tons of fuel each year, and most of that is diesel which has twice the energy density of ammonia. Ports will need storage and filling equipment to make the switch practical.

To make ammonia takes hydrogen and nitrogen. Most commercial hydrogen is made by reacting methane which releases carbon as a byproduct. However, hydrogen can be split from water using green energy, too, and that will be another key factor in making ammonia fuel work for companies trying to reduce carbon emissions.

You might think this is a new idea, but Germany used ammonia in 1942 to fuel public buses in occupied Belgium. The buses used an internal combustion engine that ran on a combination of ammonia and coal gas. The X-15 aircraft also used ammonia as one component in the fuel that powered its rocket engines.

Storing ammonia is easy, but there are some easy ways to store hydrogen, too. We’ve seen some fuel cell drones, but nothing running on ammonia. At least, not yet.

source https://hackaday.com/2021/03/03/fueling-with-ammonia/