Cecilia Payne-Gaposchkin Saw Through the Stars

We as humans are limited in the ways we can look at things ourselves, and rely on on the different perspectives and insights of others to help make sense of things. All it takes is one person to look at a data set and find something completely different that changes our fundamental perception of the universe.

Cecilia Payne-Gaposchkin discovered that stars are primarily made of hydrogen and helium, at a time when astronomers thought that the Sun and the Earth had no significant elemental differences. She proposed that hydrogen wasn’t only more common, but that it was a million times more common.

This outlandish conclusion was roundly dismissed at the time, and she aquiesced to tone down some of the conclusions in her thesis, until her findings were widely confirmed a few years later. Truly groundbreaking, the discovery of the prevalence of hydrogen in stars paved the way for our current understanding of their role as the furnaces for the heavier elements that we know and love, and indeed are composed of.

Meteorites, Comets, and Bee Orchids

Cecilia Helena Payne was born May 10th, 1900 in Wendover, Buckinghamshire, England. She was one of three children born to Emma and Edward, a lawyer, historian, and musician. Her father died with she was four years old, leaving her mother to raise the family alone.

The Great Daylight Comet of 1910 as seen by Lowell Observatory. Image via Wikipedia

When she was only a few years old, Cecilia saw a meteorite blazing across the sky and was completely fascinated. She continued to show interest in science after discovering a bee orchid growing in an orchard when she was eight. This was exciting because the bee orchid is native to the Mediterranean and not to England. A few years later, she witnessed both the Great Daylight Comet of 1910 and Halley’s Comet in the same year.

Cecilia’s mother moved them to London when she was twelve for the sake of her brother Humfry’s education. Cecilia’s education focused on languages, but she was more interested in botany and other sciences. She studied botany and math on her own, and one of her teachers took her to museums and lent her books to read.

At 17, Cecilia was finally able to study science. She transferred to St. Paul’s Girls’ School and spent two years there before earning a scholarship to Newnham College at Cambridge University. She majored in botany, physics, and chemistry, but her interest shifted solidly to astronomy after she attended a lecture about solar eclipses and relativity by Sir Arthur Eddington that transformed her world picture.

Cecilia works at the observatory. Harvard College Observatory via Brain Pickings

The Stuff of Stars

Cecilia’s options in the UK were limited to teaching, so she looked for grants that would get her to the States. After graduating Newnham in 1923, she won a National Research Fellowship which she used to pursue graduate studies at Radcliffe, a women’s college associated with Harvard, which was then restricted to men.

Her academic advisor persuaded her to write a doctoral thesis even though there was no astronomy program at Radcliffe or Harvard. The common belief at the time was that the Earth and the Sun were composed of the same elements. By studying tens of thousands of spectroscopic images, Cecilia determined instead that the Sun and other stars are mostly made of hydrogen and helium. She established a stellar temperature scale and accurately related the spectral classes of stars to their temperatures by applying astronomer Meghnad Saha’s ionization theory. Her thesis was published in 1925, and she was granted the first PhD in astronomy from both Harvard University and Radcliffe College.

Several faculty members and astronomers including Henry Norris Russell found her thesis problematic because it was so unorthodox. They went as far as forcing her to add a statement saying that the presence of hydrogen in the Sun was highly unlikely. Within four years, Cecilia’s findings were independently verified by others, including Henry Norris Russell. Ironically, Russell is often credited for this discovery, though he credited Cecilia in his own paper.

Cecilia at the blink microscope. Image via Harvard Square Library

Professor Payne-Gasposchkin

After receiving her doctorate, Cecilia studied high-luminosity stars in order to better understand the structure of the Milky Way. In 1933, she met astrophysicist Sergei I. Gaposchkin in Germany. They married the following year and settled in a small town near Harvard, eventually raising three children. Cecilia had become an American citizen in 1931 and helped Sergei obtain his citizenship a few years later.

Cecilia and Sergei worked together to survey all of the stars brighter than the tenth magnitude. Together with Sergei and her assistants, Cecilia made over 3,000,000 observations of variable stars. She published several books, including The Stars of High Luminosity (1930), Variable Stars (1938) and Variable Stars and Galactic Structure (1954). Cecilia retired from teaching in 1966, but continued doing research and editing books and journals that came out of Harvard Observatory. Various people did what they could over the years to elevate her standing at Harvard. She was the first woman promoted to full professor, and the first woman to head a department. She fought for equal pay, but spent much of her teaching career earning the same wage as an entry-level male professor.

Still, Cecilia was influential in many ways. Several of her students such as Helen Sawyer Hogg went on to make their own important contributions to astronomy. When Joan Feynman found Cecilia’s name in an astronomy textbook, it renewed her confidence enough to study science against her mother and grandmother’s wishes.

Cecilia won plenty of awards in her lifetime, and was the first recipient of the Annie Jump Cannon award in astronomy. She died December 7th, 1979 in Cambridge, Massachusetts, but will always be remembered for her huge contribution to science.

Thanks to [Keith Olson] for the tip.

source https://hackaday.com/2020/12/15/cecilia-payne-gaposchkin-saw-through-the-stars/
PS2 Emulation On The Xbox Series S: A Story Of Walled Gardens

It’s hardly a secret any more at this point that today’s game consoles from Microsoft and Sony are essentially AMD gaming rigs packed up into a custom package and with tweaked system software. So it’s not too surprising that enterprising hackers got the Playstation 2 emulator of RetroArch running on an Xbox Series X|S game console despite Microsoft’s attempts to stop them. (Video, embedded below.)

It’s possible to sneak the RetroArch app past Microsoft’s security checkpoints by shelling out $19 for a Microsoft Developer Account, setting up Developer Mode on the XBox console, and getting the Universal Windows Platform (UWP) port of RetroArch from the official website. This has the advantage of it being a blessed-by-the-Redmond-gods approach. But one cannot play retail games in Developer Mode and large games due to a 2 GB limit.

More recently, a hacker by the name of [tunip3] found a flaw in the Xbox app distribution system which allows one to download a ‘retail’ version of RetroArch. This involves marking the RetroArch app as ‘private’, allowing it to skip a review by Microsoft. People whose email address is on a whitelist are then granted download permission for that app on their Xbox console. The advantage of this ‘retail’ approach is that it does not feature the 2 GB filesize limits. The disadvantage is that Microsoft is free to take the app down and ban [tunip3]’s developer account.

My Way Versus the Highway

A lot about this comes down to a simple question of ‘why?’. Why even jump through these hoops to set up a limited, possibly ToS-breaking emulator on what is ultimately a gaming PC running Windows 10? Why not use that Raspberry Pi 4 or NUC system that’s been giving you sad eyes for the past months from where it’s been stuffed into a dusty corner?

The Playstation 5 should be more than capable of playing back any Playstation title from the original PSX up to the PS4 based on its hardware specifications, yet it only offers compatibility for the PS4. The XBox Series X|S on the other hand provides such backwards compatibility along the entire lineage of XBox games, though not encompassing every single title released for a Microsoft console.

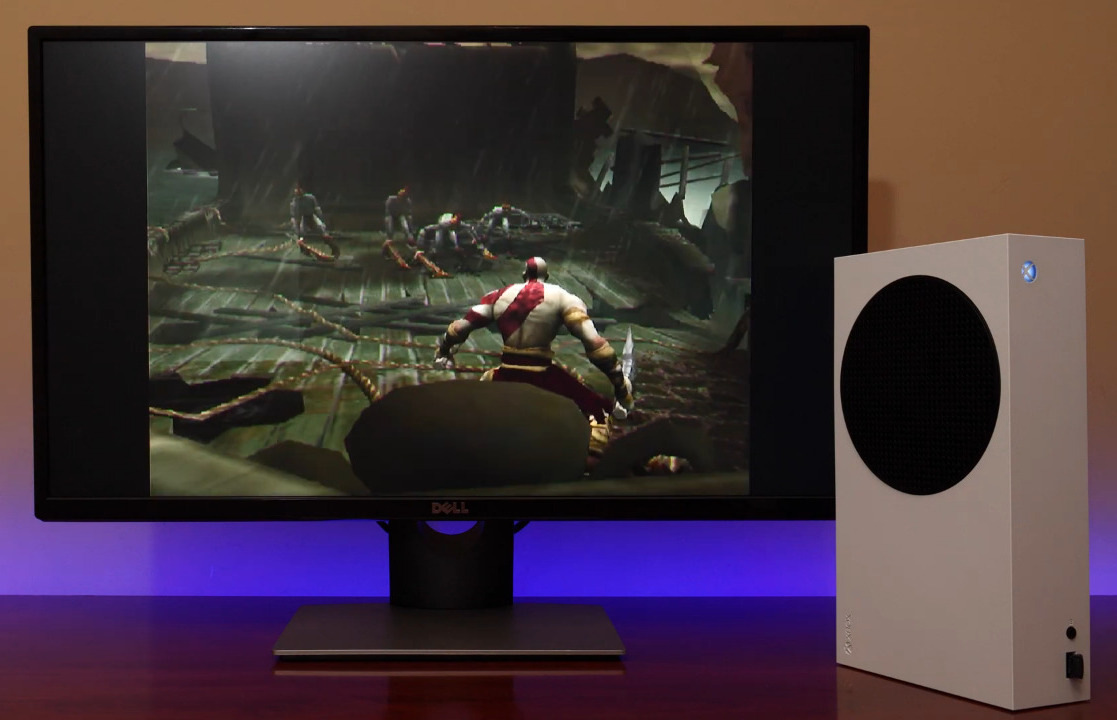
Xbox One S playing PS2 version of the original God of War

Nintendo has had an on/off relationship with running their own blessed emulator solution, such as the Virtual Console (VC) for the Wii, Wii U and 3DS which even offered access to games for non-Nintendo games. In early 2019 Nintendo began to phase out VC, however. In many ways the VC service was the closest to what RetroArch offers today, even if one could argue about the limited number of games on the VC and the per-game cost to purchase the right to play it.

All of this makes one wonder what would happen if a multi-system emulation service like the VC but with a much larger game library and lower cost (e.g. full access as part of a PSN subscription) were to be made available. Would this be enough to make people stop trying to get RetroArch on their brand-new gaming console?

It’s Called a PC

The skeptic’s view on this matter would probably be that with the lack of truly exclusive titles for video game consoles these days one might as well stick an SFF rig of one’s choosing underneath the TV, running one’s favorite OS and controlled by a controller of one’s choice. Using Steam’s Big Picture feature or equivalent, it’d be about as easy to control with a controller as if it was a dedicated game console.

Installing RetroArch and similar on this gaming rig would be a snap too, and would likely work better for more emulators as it’d be a standard Windows or Linux system for which RetroArch is actually optimized. Bringing us back again to why people try to do things the hard way instead.

A large appeal of game consoles and other walled gardens has often been the ‘it just works’ selling point. Buy it, set it up, turn it on, start playing games, stop worrying. Not everyone is into debugging obscure compatibility and driver issues on Windows, or figuring out why launching a game makes the Xserver crash on Linux. From there it is appealing to still make it do a bit more, at least to those who even as a child found ourselves staring at devices and feeling that familiar itch in one’s fingers.

In the end it’s essentially just about hobbies and interests. Even if Microsoft et al. would vehemently disagree, nobody is harmed if someone hacks their PS5 or XSX|S to run additional software on it that brings the owner of said hardware more pleasure. That’s after all how most interesting hacks are born.

Is it practical? No way. Is it fun? You bet.

source https://hackaday.com/2020/12/15/ps2-emulation-on-the-xbox-series-s-a-story-of-walled-gardens/

PS2 Emulation On The Xbox Series S: A Story Of Walled Gardens

It’s hardly a secret any more at this point that today’s game consoles from Microsoft and Sony are essentially AMD gaming rigs packed up into a custom package and with tweaked system software. So it’s not too surprising that enterprising hackers got the Playstation 2 emulator of RetroArch running on an Xbox Series X|S game console despite Microsoft’s attempts to stop them. (Video, embedded below.)

It’s possible to sneak the RetroArch app past Microsoft’s security checkpoints by shelling out $19 for a Microsoft Developer Account, setting up Developer Mode on the XBox console, and getting the Universal Windows Platform (UWP) port of RetroArch from the official website. This has the advantage of it being a blessed-by-the-Redmond-gods approach. But one cannot play retail games in Developer Mode and large games due to a 2 GB limit.

More recently, a hacker by the name of [tunip3] found a flaw in the Xbox app distribution system which allows one to download a ‘retail’ version of RetroArch. This involves marking the RetroArch app as ‘private’, allowing it to skip a review by Microsoft. People whose email address is on a whitelist are then granted download permission for that app on their Xbox console. The advantage of this ‘retail’ approach is that it does not feature the 2 GB filesize limits. The disadvantage is that Microsoft is free to take the app down and ban [tunip3]’s developer account.

My Way Versus the Highway

A lot about this comes down to a simple question of ‘why?’. Why even jump through these hoops to set up a limited, possibly ToS-breaking emulator on what is ultimately a gaming PC running Windows 10? Why not use that Raspberry Pi 4 or NUC system that’s been giving you sad eyes for the past months from where it’s been stuffed into a dusty corner?

The Playstation 5 should be more than capable of playing back any Playstation title from the original PSX up to the PS4 based on its hardware specifications, yet it only offers compatibility for the PS4. The XBox Series X|S on the other hand provides such backwards compatibility along the entire lineage of XBox games, though not encompassing every single title released for a Microsoft console.

Xbox One S playing PS2 version of the original God of War

Nintendo has had an on/off relationship with running their own blessed emulator solution, such as the Virtual Console (VC) for the Wii, Wii U and 3DS which even offered access to games for non-Nintendo games. In early 2019 Nintendo began to phase out VC, however. In many ways the VC service was the closest to what RetroArch offers today, even if one could argue about the limited number of games on the VC and the per-game cost to purchase the right to play it.

All of this makes one wonder what would happen if a multi-system emulation service like the VC but with a much larger game library and lower cost (e.g. full access as part of a PSN subscription) were to be made available. Would this be enough to make people stop trying to get RetroArch on their brand-new gaming console?

It’s Called a PC

The skeptic’s view on this matter would probably be that with the lack of truly exclusive titles for video game consoles these days one might as well stick an SFF rig of one’s choosing underneath the TV, running one’s favorite OS and controlled by a controller of one’s choice. Using Steam’s Big Picture feature or equivalent, it’d be about as easy to control with a controller as if it was a dedicated game console.

Installing RetroArch and similar on this gaming rig would be a snap too, and would likely work better for more emulators as it’d be a standard Windows or Linux system for which RetroArch is actually optimized. Bringing us back again to why people try to do things the hard way instead.

A large appeal of game consoles and other walled gardens has often been the ‘it just works’ selling point. Buy it, set it up, turn it on, start playing games, stop worrying. Not everyone is into debugging obscure compatibility and driver issues on Windows, or figuring out why launching a game makes the Xserver crash on Linux. From there it is appealing to still make it do a bit more, at least to those who even as a child found ourselves staring at devices and feeling that familiar itch in one’s fingers.

In the end it’s essentially just about hobbies and interests. Even if Microsoft et al. would vehemently disagree, nobody is harmed if someone hacks their PS5 or XSX|S to run additional software on it that brings the owner of said hardware more pleasure. That’s after all how most interesting hacks are born.

Is it practical? No way. Is it fun? You bet.

source https://hackaday.com/2020/12/15/ps2-emulation-on-the-xbox-series-s-a-story-of-walled-gardens/

PS2 Emulation On The Xbox Series S: A Story Of Walled Gardens

It’s hardly a secret any more at this point that today’s game consoles from Microsoft and Sony are essentially AMD gaming rigs packed up into a custom package and with tweaked system software. So it’s not too surprising that enterprising hackers got the Playstation 2 emulator of RetroArch running on an Xbox Series X|S game console despite Microsoft’s attempts to stop them. (Video, embedded below.)

It’s possible to sneak the RetroArch app past Microsoft’s security checkpoints by shelling out $19 for a Microsoft Developer Account, setting up Developer Mode on the XBox console, and getting the Universal Windows Platform (UWP) port of RetroArch from the official website. This has the advantage of it being a blessed-by-the-Redmond-gods approach. But one cannot play retail games in Developer Mode and large games due to a 2 GB limit.

More recently, a hacker by the name of [tunip3] found a flaw in the Xbox app distribution system which allows one to download a ‘retail’ version of RetroArch. This involves marking the RetroArch app as ‘private’, allowing it to skip a review by Microsoft. People whose email address is on a whitelist are then granted download permission for that app on their Xbox console. The advantage of this ‘retail’ approach is that it does not feature the 2 GB filesize limits. The disadvantage is that Microsoft is free to take the app down and ban [tunip3]’s developer account.

My Way Versus the Highway

A lot about this comes down to a simple question of ‘why?’. Why even jump through these hoops to set up a limited, possibly ToS-breaking emulator on what is ultimately a gaming PC running Windows 10? Why not use that Raspberry Pi 4 or NUC system that’s been giving you sad eyes for the past months from where it’s been stuffed into a dusty corner?

The Playstation 5 should be more than capable of playing back any Playstation title from the original PSX up to the PS4 based on its hardware specifications, yet it only offers compatibility for the PS4. The XBox Series X|S on the other hand provides such backwards compatibility along the entire lineage of XBox games, though not encompassing every single title released for a Microsoft console.

Xbox One S playing PS2 version of the original God of War

Nintendo has had an on/off relationship with running their own blessed emulator solution, such as the Virtual Console (VC) for the Wii, Wii U and 3DS which even offered access to games for non-Nintendo games. In early 2019 Nintendo began to phase out VC, however. In many ways the VC service was the closest to what RetroArch offers today, even if one could argue about the limited number of games on the VC and the per-game cost to purchase the right to play it.

All of this makes one wonder what would happen if a multi-system emulation service like the VC but with a much larger game library and lower cost (e.g. full access as part of a PSN subscription) were to be made available. Would this be enough to make people stop trying to get RetroArch on their brand-new gaming console?

It’s Called a PC

The skeptic’s view on this matter would probably be that with the lack of truly exclusive titles for video game consoles these days one might as well stick an SFF rig of one’s choosing underneath the TV, running one’s favorite OS and controlled by a controller of one’s choice. Using Steam’s Big Picture feature or equivalent, it’d be about as easy to control with a controller as if it was a dedicated game console.

Installing RetroArch and similar on this gaming rig would be a snap too, and would likely work better for more emulators as it’d be a standard Windows or Linux system for which RetroArch is actually optimized. Bringing us back again to why people try to do things the hard way instead.

A large appeal of game consoles and other walled gardens has often been the ‘it just works’ selling point. Buy it, set it up, turn it on, start playing games, stop worrying. Not everyone is into debugging obscure compatibility and driver issues on Windows, or figuring out why launching a game makes the Xserver crash on Linux. From there it is appealing to still make it do a bit more, at least to those who even as a child found ourselves staring at devices and feeling that familiar itch in one’s fingers.

In the end it’s essentially just about hobbies and interests. Even if Microsoft et al. would vehemently disagree, nobody is harmed if someone hacks their PS5 or XSX|S to run additional software on it that brings the owner of said hardware more pleasure. That’s after all how most interesting hacks are born.

Is it practical? No way. Is it fun? You bet.

source https://hackaday.com/2020/12/15/ps2-emulation-on-the-xbox-series-s-a-story-of-walled-gardens/

Mouse-Controller Hybrid Aims To Dominate in First-Person Shooters

The first person shooter genre found its feet in the PC world, relying on the holy combination of the keyboard and mouse for input. Over time, consoles have refined their own version of the experience, and the gamepad has become familiar territory for many FPS fans. [Tech Yesterday] was a die hard controller player, but after trying out  a mouse, didn’t want to go back. Instead, he built a truly impressive hybrid device.

The build begins with a standard Xbox 360 wired controller, somewhat of a defacto standard for PC gamepads. The left analog stick and triggers remain untouched, however the face buttons are all relocated using mechanical keyboard switches. The D-pad has been relocated to the left hand side with tactile switches, and the right analog stick removed entirely. In its place, a cut-down optical mouse is used on a flat 4″x4″ mousepad attached to the controller, strapped to the player’s thumb.

The resulting controller combines the benefit of analog stick movement and the precision aiming of a mouse. We’re amazed at how comfortable the controller looks to use, particularly in the improved second revision. While currently only used on PC, we can imagine such controllers shaking up the console FPS scene in a serious way.

We see some great controller hacks around these parts; the force-feedback mouse is a particularly amusing example. Video after the break.

[Thanks to Baldpower for the tip!]

source https://hackaday.com/2020/12/15/mouse-controller-hybrid-aims-to-dominate-in-first-person-shooters/

SpaceX Starship Replica Attempts The Bellyflop

SpaceX are perhaps most well known for their vertically-landing reusable rocket technology. The latest such effort is the Starship, which recently underwent a fiery test in the last month to attempt a bellyflop maneuver. [Nicholas Rehm] wanted to attempt a similar flight profile in the local park, and set to building an RC Starship of his own.

The build is like a few we’ve seen before, in which electric power is used to propel a rocket-like craft straight upwards using propellers and active stabilization. In this case, there’s a pair of twin motors with counter-rotating propellers which can pivot to direct their thrust, as well as four external control surfaces. These are all under the command of [Nicholas]’s custom flight controller.

Upon testing the rig, [Nicholas] was able to execute a smooth ascent, followed by a bellyflop, before a smooth return to vertical flight and descent. Landing vertically on the grass was out of the question, due to the rough surface, but we imagine it would be doable with the right landing gear attached.

While flight without wings in this manner isn’t particularly efficient, it’s great to see what can be achieved with smart use of control systems engineering to keep a craft stable. We look forward to seeing [Nicholas]’s next attempts, too. Video after the break.

source https://hackaday.com/2020/12/15/spacex-starship-replica-attempts-the-bellyflop/

Camping essentials to pack for your next camping trip

Are you planning a camping trip? Make sure that you take all the camping essentials with you on your next adventure. South Africa’s stunning scenery provides plenty of exciting destinations for you to explore with your loved ones. Whether you’re soaking up the sun near the ocean or enjoying the fresh mountain air, there’s nothing more relaxing than a family holiday spent outdoors. Find affordable camping equipment for sale on Junk Mail. 

Camping Essentials for your next camping trip | Junk Mail
Photo Source – www.pixabay.com

Here is a list of camping essentials: 

Tent  

A good quality tent is a must-have for any camping enthusiast. Choose wisely because your tent will be your home for the duration of your trip. You’ll need pegs and poles to put your tent up as well as ropes to secure the structure. A groundsheet comes in handy as it helps to keep the dirt out. Don’t forget to consider the size of the tent. Two, three, and six-man tents are popular options. It’s always a good idea to go for a bigger tent to ensure you have enough space. 

Remember to bring tent spare items like extra ropes, pegs, poles, etc. You can also pack your tent repair kit and some good old duct tape, just in case.  

Mattress 

Enjoy a good night’s rest on a comfortable camping mattress. An inflatable mattress takes up less space, but you’ll need a pump to inflate it. Foldable foam mattresses and stretchers are also good options. If you do bring your inflatable mattress, make sure you also pack the pump and your mattress repair kit.  

Bedding or sleeping bags 

Although sleeping bags have always been part of the camping essentials list, some campers prefer to just take everyday bedding with them, such as a pillow, comforters, sheets, etc. But because sleeping bags are so easy to use and to transport, it is still a popular option. At the end of the day, it is completely up to you to decide what you want to use since it will depend on your personal preference and the nature of the camping trip.  

Chairs and tables 

Whether you’re enjoying your morning coffee or swapping stories around the braai, you’ll need a comfy chair to sit on. Camping chairs are durable and they fold up so that transportation is easier. Add one or more small, foldable tables to the list that you can use to prepare food or put snacks out on. 

Camping Essentials for your next camping trip | Junk Mail
Photo Source – www.freepik.com

Clothes and towels 

The number one rule for camping is to pack light. You’ll need comfortable and practical clothing during your camping trip. Remember to include a swimming costume for the warm summer days and a jersey for those cooler evenings. Similarly, you’ll need to pack comfortable shoes. Remember to bring separate towels for swimming and bathing.  

First aid kit 

Be prepared for emergencies by taking a first aid kit with you. Along with the necessary medical supplies, you’ll need mosquito repellent and sunscreen. Also take a fire extinguisher with you. 

Lighting 

As the sun sets, you’ll need lighting to illuminate your campsite. A headlamp is a popular option if you plan to braai, but torches and lanterns (newer LED versions) will definitely come in handy during your camping trip, so don’t forget them at home. Also pack plug adaptors, extension cords, batteries, battery chargers (if applicable), and replacement bulbs.  

Pack your flashlight for your next camping trip | Junk Mail
Photo Source – www.pixabay.com

Utensils 

Don’t set off without all the necessary utensils, which should include the following: 

  • Knives and forks 
  • Plates and bowls 
  • Cups and glasses 
  • Pots and pans 
  • Can opener 
  • Braai tongs 
  • Grid brush  
  • Plastic containers 
  • Flasks  

Appliances may include a camp stove, kettle, mini-fridge/freezer and many more. Also, remember to pack cleaning aids such as cloths, sponges, soap, buckets, a broom and dustpan, etc. 

Food  

Learning to pack the right food is a skill that any camping enthusiast needs to learn in order to survive. Include non-perishable food items that will last for the duration of your trip and don’t forget the spices. The food needs to be easy and convenient to prepare as you won’t have the luxury of using a fully equipped kitchen. 

Remember to get enough ice/ice packs for your cooler box or keep the most important items like meat in your portable fridge/freezer.  

Toiletries 

Most campsites have bathroom facilities where you can enjoy a hot shower. Remember to pack the following toiletries: 

  • Soap or shower gel 
  • Toothpaste and toothbrush 
  • Shampoo and conditioner 
  • Deodorant 
  • Facewash and moisturiser 
  • Toilet paper 
Pack your toothbrush for your next camping trip | Junk Mail
Photo Source – www.pixabay.com

Prepare for your next big adventure by getting all your camping essentials ready. Missing something from our list? Find all the camping equipment you need on Junk Mail.

An Easy DIY Pedal Set For Racing Sims

The racing sim scene has always had a strong DIY subculture, as enthusiasts seeking the most realistic-feeling peripherals set out to modify off-the-shelf offerings for greater authenticity. Others go further and craft their own builds from the ground up. [ilge] has done just that, putting together his own set of pedals for sim racing.

The build relies primarily on 3D printed components, with a few springs and some nuts and bolts to hold everything together. Gear teeth on the pedal arms interface with matching gears mounted on potentiometers. These are then wired into an Arduino Pro Micro, which reads the individual pots via analog inputs and then acts as a USB Human Interface Device to the computer.

[ilge] tests the setup with a variety of games, including the popular Euro Truck Simulator and iRacing. It’s a great cheap way to get started with a pedal set for a sim rig. From here, the sky really is the limit; we’d love to see an upgraded version with a load-cell on the brake for better pedal feel. We’d be surprised if an H-shifter isn’t in the works, too. Video after the break.

source https://hackaday.com/2020/12/14/an-easy-diy-pedal-set-for-racing-sims/

Tunes You Can Eat

This week retro-gadget collector and video blogger [Techmoan] featured perhaps the most delicious audio recording format that we know of — a chocolate gramophone record. Compared to his typical media format explorations, the chocolate record is of quite recent vintage. He first heard of them back in 2015 when Tasmanian artist [Julia Drouhin] offered chocolate recordings as part of her art project. The one that [Techmoan] finally obtained was from a UK chocolatier who offers them with custom labelling and your choice of two songs. There are some pointers in the video about how to playback your chocolate disk without ruining it (use the lightest stylus tracking force as possible). These disks are recorded at 45 RPM on one side only, and are about the same size as a standard single. But being about five times thicker, they pack a lot more calories than your typical phonograph disk.

No reflection on the Tewkesbury Town Band, but this is probably the lowest fidelity recording media ever, but at least you can eat it when you’re done listening — label and all. We hope the Mission Impossible movie producers are paying attention so we can see the secret audio briefing being eaten instead of going up in smoke next film.

If you’re not familiar with [Techmoan], he often dredges up and reviews old media formats.  A while back we covered a review he did on a stainless steel wire recorder from the 1940s. If these things are of interest, you should definitely check out his channel.

source https://hackaday.com/2020/12/14/tunes-you-can-eat/

Dead Simple Time-Domain Reflectometry with Just a Battery and an Oscilloscope

“Time-domain reflectometry” sure sounds like something that needs racks of expensive equipment to accomplish. In reality, TDR is just measuring the time between injecting a pulse into a cable and receiving its echo, either from the other end of the cable or from some fault or defect along the way. It’s a useful technique, and as [Allen Wolke (W2AEW)] shows us, it can be accomplished with little more than a battery, a resistor, and an oscilloscope. And a little math, of course.

There are, of course, dedicated time-domain reflectometers, but all of them are really just elaborations of the basic principles [W2AEW] demonstrates with his simple setup. The oscilloscope is set up with a tee connector on one channel; one side of the tee is connected to the cable under test, while the shield conductor of the other side is connected to the negative terminal of a 9V battery. A resistor connected to the center conductor is used to complete the circuit, which sends a brief pulse down the test cable. The scope is set up to capture the outgoing pulse as well as the return pulse, allowing the time between the two to be measured. Some simple math gives the length of the cable, the distance to a fault, or with a little rearrangement, the velocity factor of the cable.

The video below shows the simple method at work on coax and Cat 5e Ethernet cable. It even worked on a roll of zip cable, which was a little surprising. If this technique is too simple, you can always elaborate a bit and roll your own TDR tester. Googly eyes optional, of course, but recommended.

source https://hackaday.com/2020/12/14/dead-simple-time-domain-reflectometry-with-just-a-battery-and-an-oscilloscope/

15 Volts to 110,000 Volts

There’s something satisfying about creating high voltages. Sure, there are practical uses like neon signs or doing certain experiments, but be honest — you really just want to see some giant arcs lighting up your dark mad scientist lair. [Mircemk] has just the prescription for what ails you. Using a two-stage approach, he shows a simple setup that generates about 110KV from a pretty tame 15V supply.

From the 15V, there is a stage that uses a flyback transformer and a switch to generate a reasonably high voltage. The final stage is a Cockroft-Walton voltage multiplier that can produce quite a bit of voltage. You can see the impressive arcs in the video below.

The multiplier circuit found fame with experiments by Cockroft and Walton, obviously, but was actually originated in the early 1900s with a physicist named Greinacher. The circuit uses diodes as switches and charges a bank of capacitors in parallel. The discharge, however, puts the capacitors in series. Neglecting losses and loads, the output voltage is equal to the peak-to-peak input voltage times the number of stages present. Real-world considerations mean you won’t quite get that voltage out of it, but it can still provide a potent punch. Click through the break for a video of the circuit in action!

There are lots of ways to generate high voltages. Just be careful making measurements.

source https://hackaday.com/2020/12/14/15-volts-to-110000-volts/

Building A Tiny Finger Plane For Detailed Work

A plane is a tool familiar to all woodworkers, used to shape a workpiece by hand by shaving away material. Regular planes are two-handed tools available at all good hardware stores. For finer work, a finger plane can be useful, though harder to find. Thankfully, [Daniel] put together a video showing how to make your own.

[Daniel]’s build relies on stabilized wood, useful for its density and consistent quality, though other woods work too. A 6″ pen blank is enough to make a pair of matching finger planes. A block and two side panels are cut out from the material, with attention paid to making sure everything remains square for easy assembly. The parts are glued together with a block set at the desired cutting angle for the plane. With the assembly then tidied up on the bandsaw and sander, [Daniel] installs the cutting blade. This can be made from a larger standard plane blade, or a cutdown chisel can be pressed into service. The blade is held in place with a wooden wedge beneath a metal pin. The pin itself is crafted from an old drill bit, cut down to size.

It’s a useful tool for doing fine plane work, for which a full-size tool would be ungainly. We can imagine it proving particularly useful in producing accurate scale models in smaller sizes. If you’re big into woodworking, consider giving your tools a good sharpen on the cheap, too. Video after the break.

source https://hackaday.com/2020/12/14/building-a-tiny-finger-plane-for-detailed-work/

Auto Tuning For A Vintage Stereo

In 1984 there weren’t many ways to listen to high-quality music, so an FM tuner was an essential part of any home hi-fi system. The Pioneer TX-950 picked up by [The Curious Lorenz] would have been someone’s pride and joy, with its then-cutting-edge microprocessor control, digital PLL tuning, and seven-segment displays. Astoundingly it doesn’t have an auto-tuning function though, so some work to implement the feature using an ATtiny85 was called for.

A modern FM tuner would be quite likely to use an all-in-one tuner chip using SDR technology under the hood, but this device from another era appears to be a very conventional analog tuner to which the PLL and microprocessor have been grafted. There are simple “Up” and “Down” buttons and a “Station tuned” light. One might imagine that given these the original processor could have done autotune. At least the original designers were kind enough to provide the ATtiny with the interfaces it needs. Pressing either button causes it to keep strobing its line until the “Station tuned” line goes high, at which point it stops. It’s an extremely simple yet effective upgrade, and since the ATtiny is so small it’s easily placed on top of the original PCB. The result is an ultra-modern tuner from 1984, that’s just that little bit more modern than it used to be.

If you don’t have a vintage FM radio, you can always build its modern equivalent.

source https://hackaday.com/2020/12/13/auto-tuning-for-a-vintage-stereo/

Little Red Night Light is Just Right

Don’t you hate getting up in the middle of the night to use the bathroom? The worst part is not being able to see what you’re doing, but if you turn on a light, you’ll lose your night vision. Nightlights are supposed to be the best solution, but are usually too bright for 3 AM excursions and can end up leaking light into the bedroom. What the bathroom needs is a purpose-built nightlight that uses red light so you don’t lose your night vision.

This simple, wall-mounted night light is just the thing. All it takes is two AA batteries, a resistor, a red LED, and an SPST push button. [Vchaney] even made their own battery contacts. The genius part of this build is in the adjustable LED, which is fitted into a ball that moves around in a socket so you can aim it wherever you need to see. All the files are available if you want to print one for yourself.

Those who sit might prefer to shine the light on the toilet paper roll. Here’s a smart roll holder that doubles as a night light, albeit a terribly bright one.

source https://hackaday.com/2020/12/13/little-red-night-light-is-just-right/

A Pair of Steppers are Put to Work in This Automatic Instrument Pickup Winder

For something that’s basically a coil of wire around some magnetic pole pieces, an electric guitar pickup is a complicated bit of tech. So much about the tone of the instrument is dictated by how the pickup is wound that controlling the winding process is something best accomplished with a machine. This automatic pickup winder isn’t exactly a high-end machine, but it’s enough for the job at hand, and has some interesting possibilities for refinements.

First off, as [The Mixed Signal] points out, his pickups aren’t intended for use on a guitar. As we’ve seen before, the musical projects he has tackled are somewhat offbeat, and this single-pole pickup is destined for another unusual instrument. That’s not to say a guitar pickup couldn’t be wound on this machine, of course, as could inductors, solenoids, or Tesla coils. The running gear is built around two NEMA-17 stepper motors, one for the coil spindle and one for the winding carriage. The carriage runs on a short Acme lead screw and linear bearings, moving back and forth to wind the coil more or less evenly. An Arduino topped with a CNC shield runs the show, allowing for walk-away coil winding.

We do notice that the coil wire seems to bunch up at the ends of the coil form. We wonder if that could be cured by speeding up the carriage motor as it nears the end of the spool to spread the wire spacing out a bit. The nice thing about builds like these is the ease with which changes can be made — at the end of the day, it’s just code.

source https://hackaday.com/2020/12/13/a-pair-of-steppers-are-put-to-work-in-this-automatic-instrument-pickup-winder/

RC Starship Perfects its Skydiving Routine

There’s a good chance you already saw SpaceX’s towering Starship prototype make its impressive twelve kilometer test flight. While the attempt ended with a spectacular fireball, it was still a phenomenal success as it demonstrated a number of concepts that to this point had never been attempted in the real world. Most importantly, the “Belly Flop” maneuver which sees the 50 meter (160 foot) long rocket transition from vertical flight to a horizontal semi-glide using electrically actuated flight surfaces.

Finding himself inspired by this futuristic spacecraft, [Nicholas Rehm] has designed his own radio controlled Starship that’s capable of all the same aerobatic tricks as the real-thing. It swaps the rocket engines for a pair of electric brushless motors, but otherwise, it’s a fairly accurate recreation of SpaceX’s current test program vehicle. As you can see in the video after the break, it’s even able to stick the landing. Well, sometimes anyway.

Just like the real Starship, vectored thrust is used to both stabilize the vehicle during vertical ascent and help transition it into and out of horizontal flight. Of course, there are no rocket nozzles to slew around, so [Nicholas] is using servo-controlled vanes in the bottom of the rocket to divert the airflow from the motors. Servos are also used to control the external control surfaces, which provide stability and a bit of control authority as the vehicle is falling.

As an interesting aside, Internet sleuths looking through pictures of the Starship’s wreckage have noted that SpaceX appears to be actuating the flaps with gearboxes driven by Tesla motors. The vehicle is reportedly using Tesla battery packs as well. So while moving the control surfaces on model aircraft with battery-powered servos might historically have been a compromise to minimize internal complexity, here it’s actually quite close to the real thing.

Unfortunately, the RC Starship made a hard landing of its own on a recent test flight, so [Nicholas] currently has to rebuild the craft before he can continue with further development. We’re confident he’ll get it back in the air, though it will be interesting to see whether or not he’s flying before SpaceX fires off their next prototype.

source https://hackaday.com/2020/12/13/rc-starship-perfects-its-skydiving-routine/

RC Starship Perfects its Skydiving Routine

There’s a good chance you already saw SpaceX’s towering Starship prototype make its impressive twelve kilometer test flight. While the attempt ended with a spectacular fireball, it was still a phenomenal success as it demonstrated a number of concepts that to this point had never been attempted in the real world. Most importantly, the “Belly Flop” maneuver which sees the 50 meter (160 foot) long rocket transition from vertical flight to a horizontal semi-glide using electrically actuated flight surfaces.

Finding himself inspired by this futuristic spacecraft, [Nicholas Rehm] has designed his own radio controlled Starship that’s capable of all the same aerobatic tricks as the real-thing. It swaps the rocket engines for a pair of electric brushless motors, but otherwise, it’s a fairly accurate recreation of SpaceX’s current test program vehicle. As you can see in the video after the break, it’s even able to stick the landing. Well, sometimes anyway.

Just like the real Starship, vectored thrust is used to both stabilize the vehicle during vertical ascent and help transition it into and out of horizontal flight. Of course, there are no rocket nozzles to slew around, so [Nicholas] is using servo-controlled vanes in the bottom of the rocket to divert the airflow from the motors. Servos are also used to control the external control surfaces, which provide stability and a bit of control authority as the vehicle is falling.

As an interesting aside, Internet sleuths looking through pictures of the Starship’s wreckage have noted that SpaceX appears to be actuating the flaps with gearboxes driven by Tesla motors. The vehicle is reportedly using Tesla battery packs as well. So while moving the control surfaces on model aircraft with battery-powered servos might historically have been a compromise to minimize internal complexity, here it’s actually quite close to the real thing.

Unfortunately, the RC Starship made a hard landing of its own on a recent test flight, so [Nicholas] currently has to rebuild the craft before he can continue with further development. We’re confident he’ll get it back in the air, though it will be interesting to see whether or not he’s flying before SpaceX fires off their next prototype.

source https://hackaday.com/2020/12/13/rc-starship-perfects-its-skydiving-routine/

RC Starship Perfects its Skydiving Routine

There’s a good chance you already saw SpaceX’s towering Starship prototype make its impressive twelve kilometer test flight. While the attempt ended with a spectacular fireball, it was still a phenomenal success as it demonstrated a number of concepts that to this point had never been attempted in the real world. Most importantly, the “Belly Flop” maneuver which sees the 50 meter (160 foot) long rocket transition from vertical flight to a horizontal semi-glide using electrically actuated flight surfaces.

Finding himself inspired by this futuristic spacecraft, [Nicholas Rehm] has designed his own radio controlled Starship that’s capable of all the same aerobatic tricks as the real-thing. It swaps the rocket engines for a pair of electric brushless motors, but otherwise, it’s a fairly accurate recreation of SpaceX’s current test program vehicle. As you can see in the video after the break, it’s even able to stick the landing. Well, sometimes anyway.

Just like the real Starship, vectored thrust is used to both stabilize the vehicle during vertical ascent and help transition it into and out of horizontal flight. Of course, there are no rocket nozzles to slew around, so [Nicholas] is using servo-controlled vanes in the bottom of the rocket to divert the airflow from the motors. Servos are also used to control the external control surfaces, which provide stability and a bit of control authority as the vehicle is falling.

As an interesting aside, Internet sleuths looking through pictures of the Starship’s wreckage have noted that SpaceX appears to be actuating the flaps with gearboxes driven by Tesla motors. The vehicle is reportedly using Tesla battery packs as well. So while moving the control surfaces on model aircraft with battery-powered servos might historically have been a compromise to minimize internal complexity, here it’s actually quite close to the real thing.

Unfortunately, the RC Starship made a hard landing of its own on a recent test flight, so [Nicholas] currently has to rebuild the craft before he can continue with further development. We’re confident he’ll get it back in the air, though it will be interesting to see whether or not he’s flying before SpaceX fires off their next prototype.

source https://hackaday.com/2020/12/13/rc-starship-perfects-its-skydiving-routine/

Creality WiFi Takes on Octoprint

A very common hack to a 3D printer is to connect a Raspberry Pi to your printer and then load Octoprint or a similar program and send your files to the printer via the network. [Teaching Tech] noticed that Creality now has an inexpensive WiFi interface that promises to replace Octoprint and decided to give it a quick review.

You might wonder why you’d want this system when Octoprint exists? Mainly, the value proposition is the price. You can buy the Creality box for about $20. A Raspberry Pi with a similar case would be at least twice that price. In addition, the box integrates with a Thingiverse-like library and does cloud slicing, which is attractive when you have a very small computer connected to your printer.

However, [Teaching Tech] found some issues. The box was pretty picky about connecting to printers and there were many other problems. The 3D model library wasn’t very comprehensive, although that could change if the thing got very popular. Worse, the slicer didn’t really produce stellar results.

We have to admit, an attractive network interface for $20 would be of interest. But it is hard to see how this would be a better value than Octoprint unless you were very short on cash and had no Raspberry Pi surplus laying around. You still need an SD card and a power supply, so those extras are a wash.

On the other hand, if Creality fixes the problems and expands the 3D model library, we’d buy one. But it remains to be seen if either of those things will happen, much less both of them. We do wish [Teaching Tech] had opened the thing up for us. Maybe next time.

We like Octoprint (and the similar Repetier Server). We also like that there are many plugins for it, something that is not likely to happen with a closed-source box like the Creality. If you really want to have fun with a Raspberry Pi and a 3D printer, consider Klipper. That’s a very different approach to using the Pi with a printer, but it does have some advantages.

source https://hackaday.com/2020/12/13/creality-wifi-takes-on-octoprint/

Can You Use an Easy-Bake Oven for Reflow Soldering?

The answer is yes, yes you can. As long as you have one made after about 2011, at least. In the video after the break, [Blitz City DIY] takes us briefly through the history of the venerable Easy-Bake Oven and into the future by reflow soldering a handful of small blinky boards with it.

You’re right, these things once used special light bulbs to cook pint-sized foods, but now they are legit ovens with heating elements that reach 350°F and a little above. The only trouble is that there’s no temperature controller, so you have to use low-temperature solder paste and an oven thermometer to know when to pull the little tray out. Other than that, it looked like smooth sailing.

If you’re only doing a board every once in a while, $40 for a reflow oven isn’t too shabby. And yeah, as with all ovens, once you’ve reflowed a board in it, don’t use it for food.

If you’d rather build an oven, high-powered light bulbs will still do the trick.

Thanks for the tip, [foamyguy].

source https://hackaday.com/2020/12/13/can-you-use-an-easy-bake-oven-for-reflow-soldering/

IRC over LoRa, For When Things Really Go South

As a society, we’ve become accustomed to always-on high-speed data connections, whether we’re at home on the computer or out and about with a mobile device. But what happens if a natural disaster knocks out the local infrastructure? Sure some people will be able to fire up their radio if they need to reach out and touch someone, but even among hackers, hams are a minority. What we really need is a backup Internet.

The team behind the CellSol project hopes to show that building a volunteer-operated distributed communications network is not only within the capabilities of the hacker community but probably much easier and cheaper to do than you might think. Each node in the network, known as a Pylon in CellSol parlance, can shuttle data between the LoRa backbone and WiFi-enabled devices like smartphones and computers. Once the network is up and running, users don’t need any special hardware or software to use it.

Now to be clear, nobody is talking about surfing the web here. When a user connects to one of the ESP32 Pylons, they’ll be able to access a simplistic chat system through their browser. If the Pylon has an active Internet connection the chat can be bridged to an IRC channel. Without Internet connectivity, the pylon will simply give users on the CellSol network a means to communicate among each other. To keep things simple there’s no user names, private messages, or encryption. This is bare-bones, end-of-the-world style communication.

Want to join the CellSol revolution? All you really need is an ESP32, a LoRa radio, and the open-source firmware. If you get something like the Heltec LoRa 32 development board, you don’t even need to solder anything together. Just flash the board and go. Once you have a few Pylons going, you can also put together a cheap repeater node using a LoRa equipped Arduino. Both devices are small and energy efficient enough that they could easily be battery or solar powered. As you can see in the video after the break, the team even envisions a future where they could be dropped off in public areas via drone.

This isn’t the first time we’ve seen the ESP32 used to establish an off-grid LoRa communications network, and like those previous attempts, it’s usefulness will largely depend on how many people you can convince to set up their own nodes and repeaters. But if you’ve got some open minded friends who live relatively close by, this could be a great way to have a little chat.


source https://hackaday.com/2020/12/12/irc-over-lora-for-when-things-really-go-south/

A Beeping Toy Helps a Blind Dog Play Fetch

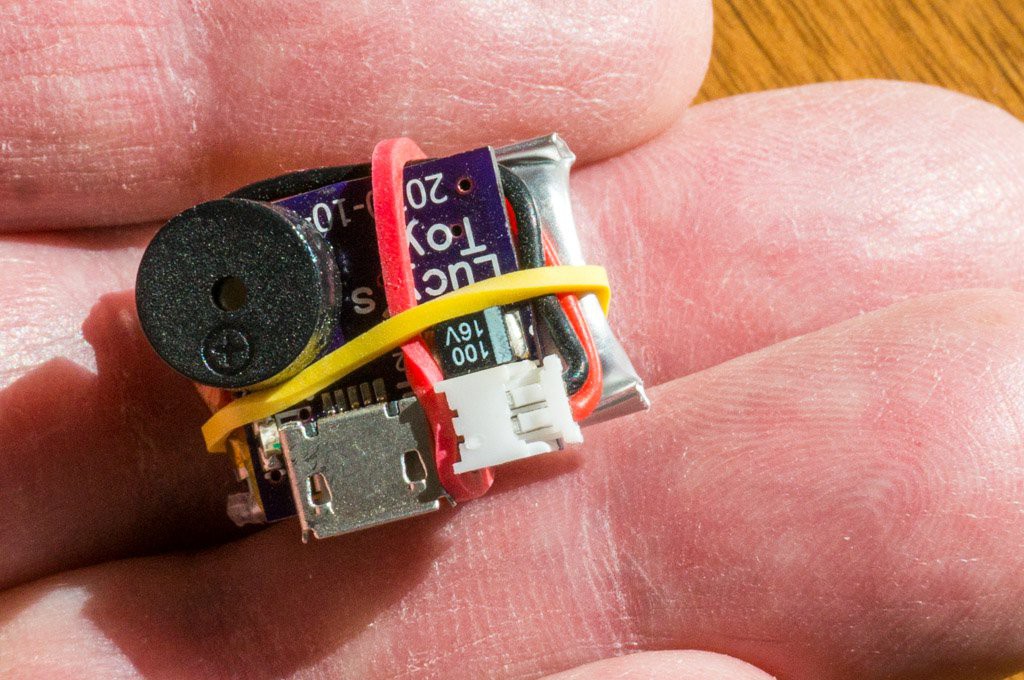
When a beloved pet goes blind, it doesn’t mean they can’t or don’t want to play fetch anymore, only that the game must change a bit. [Bud Bennett]’s dog Lucy has slowly lost her sight to progressive renal atrophy but is still up for playing with toys, so [Bud] decided to make a beeper that can go inside various stuffed toys to help Lucy locate them. Lucy doesn’t care for commercial toys that chime constantly, especially once she’s got it in her mouth.

This tiny package is centered around an LIS3DH accelerometer and programmed with a PIC16F18313. When the toy is thrown up in the air, the accelerometer determines that it’s in free fall and triggers an interrupt on the PIC. The piezo buzzer starts beeping so Lucy can find it, then stops a short while later and waits for the next free fall. The power dissipation is so low that [Bud] expects to charge the 120 mAh LiPo battery about once a year.

We bet that communication between [Bud] and Lucy is already pretty good, but maybe she could be more expressive with a doggy soundboard.

source https://hackaday.com/2020/12/12/a-beeping-toy-helps-a-blind-dog-play-fetch/

A Beeping Toy Helps a Blind Dog Play Fetch

When a beloved pet goes blind, it doesn’t mean they can’t or don’t want to play fetch anymore, only that the game must change a bit. [Bud Bennett]’s dog Lucy has slowly lost her sight to progressive renal atrophy but is still up for playing with toys, so [Bud] decided to make a beeper that can go inside various stuffed toys to help Lucy locate them. Lucy doesn’t care for commercial toys that chime constantly, especially once she’s got it in her mouth.

This tiny package is centered around an LIS3DH accelerometer and programmed with a PIC16F18313. When the toy is thrown up in the air, the accelerometer determines that it’s in free fall and triggers an interrupt on the PIC. The piezo buzzer starts beeping so Lucy can find it, then stops a short while later and waits for the next free fall. The power dissipation is so low that [Bud] expects to charge the 120 mAh LiPo battery about once a year.

We bet that communication between [Bud] and Lucy is already pretty good, but maybe she could be more expressive with a doggy soundboard.

source https://hackaday.com/2020/12/12/a-beeping-toy-helps-a-blind-dog-play-fetch/

A Beeping Toy Helps a Blind Dog Play Fetch

When a beloved pet goes blind, it doesn’t mean they can’t or don’t want to play fetch anymore, only that the game must change a bit. [Bud Bennett]’s dog Lucy has slowly lost her sight to progressive renal atrophy but is still up for playing with toys, so [Bud] decided to make a beeper that can go inside various stuffed toys to help Lucy locate them. Lucy doesn’t care for commercial toys that chime constantly, especially once she’s got it in her mouth.

This tiny package is centered around an LIS3DH accelerometer and programmed with a PIC16F18313. When the toy is thrown up in the air, the accelerometer determines that it’s in free fall and triggers an interrupt on the PIC. The piezo buzzer starts beeping so Lucy can find it, then stops a short while later and waits for the next free fall. The power dissipation is so low that [Bud] expects to charge the 120 mAh LiPo battery about once a year.

We bet that communication between [Bud] and Lucy is already pretty good, but maybe she could be more expressive with a doggy soundboard.

source https://hackaday.com/2020/12/12/a-beeping-toy-helps-a-blind-dog-play-fetch/

Homebuilt Racing Sim Does Almost Everything From Scratch

If you desire a sim gaming rig, there are off-the-shelf options up and down the market that stretch as high as your budget can afford. Some choose to eschew this route, however and build their own from scratch. Few people go quite so far as [Popicasa POPStuDio], however.

The first version of the rig is about as hacked as you can possibly get, and it’s a joy to see it built from scrap. The wheel itself and the pedals are all built out of old PVC pipe, with a bunch of old wood screwed together for the frame. A cheap USB gamepad serves to handle input to the PC for the pedals and H-shifter. The H-shifter uses simple power switches, repurposed in an ingenious way to sense gear position. The knob itself is cast out of what appears to be hot glue. Steering is done by connecting the wheel to a flexible shaft that tips a smartphone back and forth, using its internal accelerometers and gyros to sense rotation. It’s not clear how this is tied into the PC running Project CARS, but it’s impressive nonetheless.

Version 2 of the build takes things up a notch, using an Arduino Leonardo to handle steering and pedal functions as a Human Interface Device. There’s also force feedback, via a hefty motor attached to the steering shaft via a belt drive. This version implements an H-shifter as well as paddle shifters too for a more modern experience.

Both builds are unique in the modern era for eschewing CNC or 3D printed parts. It’s all done by hand, taking days of effort, and using only basic tools. It’s refreshing to see such a complex build done with nothing but simple materials and sheer commitment. We’re sure [Popicasa POPStuDio] enjoys the rig, and we can’t wait to see where it goes next. Perhaps the next iteration will even feature a motion platform, perhaps built out of old forklift parts? Only time will tell. Video after the break.


source https://hackaday.com/2020/12/12/homebuilt-racing-sim-does-almost-everything-from-scratch/