GTA V Mod Shows (And Cheats) Those Stunt Jump Hoops

While the recent announcement of Grand Theft Auto V for the upcoming next-generation game consoles was a disappointment for those fervently waiting for a successor in the infamous video game series, it shows that after almost seven years of its initial release, the epic title is still going strong — and rightfully so. But a game as varied and complex as GTA V isn’t without some quirks, especially if you’re going for 100% completeness.

The stunt jumps seem a particular pesky nut to crack here, so [Anthony Som] made it his mission to shed some light on what qualifies as a successful jump by reverse engineering the system and writing both a mod for displaying the landing zone and a cheat to instant success.

If you’re not familiar with the game, its vast open world map features a variety of side quests, one of them being stunt jumps, where certain locations allow you to launch the vehicle you’re driving into the air in hopes to land on an adjacent road or area — whether to evade the people chasing you, or just for fun. There’s no telling how to actually succeed though, the game just tells you if you did or not afterwards, causing some degree of frustration. As an avid speedrunner (as in finishing a game in the shortest possible time), [Anthony] was looking for a way to increase the success rate for those stunt jumps, and decided to dig into the code to find out how to get there. Of course, being a proprietary game, he had to resort to reverse engineering and utilizing GTA’s vivid modding scene to do so.

His initial outcome was a mod that displays the launch and landing area as rectangles inside the game itself, which was a great help. But well, after already getting that far, [Anthony] figured he might as well continue and add a cheat mode to teleport the car right inside that expected landing area and be done with second-guessing his attempts once and for all.

If you’re curious about modding GTA yourself, his write-up has a few good pointers for that, and of course features some real examples of it. Whether this is a good idea for the self-driving AI that uses GTA as learning environment is probably a different story though.

source https://hackaday.com/2020/08/21/gta-v-mod-shows-and-cheats-those-stunt-jump-hoops/
GTA V Mod Shows (And Cheats) Those Stunt Jump Hoops

While the recent announcement of Grand Theft Auto V for the upcoming next-generation game consoles was a disappointment for those fervently waiting for a successor in the infamous video game series, it shows that after almost seven years of its initial release, the epic title is still going strong — and rightfully so. But a game as varied and complex as GTA V isn’t without some quirks, especially if you’re going for 100% completeness.

The stunt jumps seem a particular pesky nut to crack here, so [Anthony Som] made it his mission to shed some light on what qualifies as a successful jump by reverse engineering the system and writing both a mod for displaying the landing zone and a cheat to instant success.

If you’re not familiar with the game, its vast open world map features a variety of side quests, one of them being stunt jumps, where certain locations allow you to launch the vehicle you’re driving into the air in hopes to land on an adjacent road or area — whether to evade the people chasing you, or just for fun. There’s no telling how to actually succeed though, the game just tells you if you did or not afterwards, causing some degree of frustration. As an avid speedrunner (as in finishing a game in the shortest possible time), [Anthony] was looking for a way to increase the success rate for those stunt jumps, and decided to dig into the code to find out how to get there. Of course, being a proprietary game, he had to resort to reverse engineering and utilizing GTA’s vivid modding scene to do so.

His initial outcome was a mod that displays the launch and landing area as rectangles inside the game itself, which was a great help. But well, after already getting that far, [Anthony] figured he might as well continue and add a cheat mode to teleport the car right inside that expected landing area and be done with second-guessing his attempts once and for all.

If you’re curious about modding GTA yourself, his write-up has a few good pointers for that, and of course features some real examples of it. Whether this is a good idea for the self-driving AI that uses GTA as learning environment is probably a different story though.

source https://hackaday.com/2020/08/21/gta-v-mod-shows-and-cheats-those-stunt-jump-hoops/
GTA V Mod Shows (And Cheats) Those Stunt Jump Hoops

While the recent announcement of Grand Theft Auto V for the upcoming next-generation game consoles was a disappointment for those fervently waiting for a successor in the infamous video game series, it shows that after almost seven years of its initial release, the epic title is still going strong — and rightfully so. But a game as varied and complex as GTA V isn’t without some quirks, especially if you’re going for 100% completeness.

The stunt jumps seem a particular pesky nut to crack here, so [Anthony Som] made it his mission to shed some light on what qualifies as a successful jump by reverse engineering the system and writing both a mod for displaying the landing zone and a cheat to instant success.

If you’re not familiar with the game, its vast open world map features a variety of side quests, one of them being stunt jumps, where certain locations allow you to launch the vehicle you’re driving into the air in hopes to land on an adjacent road or area — whether to evade the people chasing you, or just for fun. There’s no telling how to actually succeed though, the game just tells you if you did or not afterwards, causing some degree of frustration. As an avid speedrunner (as in finishing a game in the shortest possible time), [Anthony] was looking for a way to increase the success rate for those stunt jumps, and decided to dig into the code to find out how to get there. Of course, being a proprietary game, he had to resort to reverse engineering and utilizing GTA’s vivid modding scene to do so.

His initial outcome was a mod that displays the launch and landing area as rectangles inside the game itself, which was a great help. But well, after already getting that far, [Anthony] figured he might as well continue and add a cheat mode to teleport the car right inside that expected landing area and be done with second-guessing his attempts once and for all.

If you’re curious about modding GTA yourself, his write-up has a few good pointers for that, and of course features some real examples of it. Whether this is a good idea for the self-driving AI that uses GTA as learning environment is probably a different story though.

source https://hackaday.com/2020/08/21/gta-v-mod-shows-and-cheats-those-stunt-jump-hoops/

Transparent OLED Hitting The Market With Xiaomi’s Mi TV LUX Transparent Edition

One of the major advantages of OLED over LCD panels is that the former can be made using far fewer layers as the pixels themselves are emitting the light instead of manipulating the light from a backlight. This led some to ask the question of whether it’s possible to make an OLED panel that is transparent or at least translucent. As Xiaomi’s new Mi TV LUX OLED Transparent Edition shows, the answer there is a resounding ‘yes’. Better yet, for a low-low price of about $7,200 you can own one of these 55″ marvels.

Transparent OLED technology is not new, of course. Back in 2018 LG was showing off a prototype TV that used one of the early transparent OLED panels. In the video that is embedded after the break, [Linus] from Linus Tech Tips goes hands-on with that LG prototype while at LG in South Korea, while including a number of crucial details from an interview from one of the engineers behind that panel.

As it turns out, merely removing the opaque backing from an OLED panel isn’t enough to make it transparent. In order for an OLED panel to become transparent, the circuitry in the pixel layer and TFT layer need to be aligned as best as possible to allow for many, many tiny holes to be punched through the display.

Looking at [Linus]’s experiences with the LG prototype, it does appear that this kind of technology would be highly suitable for signage purposes, while also allowing for something like an invisible television or display in a room that could be placed in front of a painting or other decoration. Once displaying an image, the screen is bright enough that you can comfortably make out the image. Just don’t put any bright lights behind the TV.

Anyone else anxious waiting for sub-10″ versions of these panels?

[Thanks, Qes]

source https://hackaday.com/2020/08/21/transparent-oled-hitting-the-market-with-xiaomis-mi-tv-lux-transparent-edition/

Mixing Up Your Own Supersized Sidewalk Chalk

When folks started quarantining, chalk art spilled onto driveways and sidewalks to remind us that there’s still beauty and creative people doing what they always do. Now it’s time to strut your stuff and show your neighbors that things are greener on your slab of concrete. [friedpotatoes] has shared their giant sidewalk recipe with the world so you can paint the town red. With chalk.

Name brand sidewalk chalk is expensive considering how easy it is to make. What Big Chalk doesn’t want you to know is that the ingredients are just water, plaster of Paris, and tempera paint; meaning this project should be safe enough for the junior hackers to get some hands-on time. Some folks use food coloring instead of paint, but we know what happens to clothing when kids get their mitts on food coloring. [friedpotatoes] also includes extensive repurposing of recyclables, which is commendable.

The instructions suggest filling potato chip (crisp) tubes through a milk jug funnel to make giant pieces, but you can use any mold you like. If you have a CNC machine, it should be no trouble to make stamp-like pieces of chalk for tagging on the go, or shapes like arrows when you have to direct a miniature parade.

For permanent and precise sidewalk decorations, you can check out a graffiti paint machine and for totally temporary messages there is a water-dispensing writer.

source https://hackaday.com/2020/08/20/mixing-up-your-own-supersized-sidewalk-chalk/

Fire Pit Burns to the Beat with Bluetooth

Humans have several primal fascinations and perhaps two of the biggest ones are fire and music. While you can picture some cavemen and cavewomen sitting around a fire beating on sticks for rhythm, we think they’d be impressed if the fire danced along with the music. Through the power of Bluetooth, that’s exactly what [Random Tech DIY’s] new fire pit does.

Technically, this is called a Rubens tube, and while it’s an old technology, the Bluetooth is a certainly a modern touch. As you might expect, most of this project is workshop time, cutting MDF and plastic. The audio system is off-the-shelf and drives some car stereo speakers. The results looked good, and although it always makes us nervous building things that carry propane gas, it seems to work well enough from where we’re sitting.

We had to wonder what things you could change that would affect the display. Changing the number of holes, the diameter of the holes, or the gas pressure, for example, would certainly change how the flames look and react to the sound waves.

We have seen other Rubens tube projects, of course. However, we were really interested in the use of these as crude oscilloscopes before the availability of cathode ray tubes. We’ve seen a modern take on that, too.

source https://hackaday.com/2020/08/20/fire-pit-burns-to-the-beat-with-bluetooth/

Exotic Device Gets Linux Support via Wireshark And Rust

What can you do if you have a nice piece of hardware that kinda works out of the box, but doesn’t have support for your operating system to get the full functionality out of it? [Harry Gill] found himself in such a situation with a new all-in-one (AIO) water cooling system. It didn’t technically require any operating system interaction to perform its main task, but things like settings adjustments or reading back statistics were only possible with Windows. He thought it would be nice to have those features in Linux as well, and as the communication is done via USB, figured the obvious solution is to reverse engineer the protocol and simply replicate it.

His first step was to set up a dual boot system (his attempts at running the software in a VM didn’t go very well) which allowed him to capture the USB traffic with Wireshark and USBPcap. Then it would simply be a matter of analyzing the captures and writing some Linux software to make sense of the data. The go-to library for USB tasks would be libusb, which has bindings for plenty of languages, but as an avid Rust user, that choice was never really an issue anyway.

How to actually make use of the captured data was an entirely different story though, and without documentation or much help from the vendor, [Harry] resorted to good old trial and error to find out which byte does what. Eventually he succeeded and was able to get the additional features he wanted supported in Linux — check out the final code in the GitHub repository if you’re curious what this looks like in Rust.

Capturing the USB communication with Wireshark seems generally a great way to port unsupported features to Linux, as we’ve seen earlier with an RGB keyboard and the VGA frame grabber that inspired it. If you want to dig deeper into the subject, [Harry] listed a few resources regarding USB in general, but there’s plenty more to explore with reverse engineering USB.

source https://hackaday.com/2020/08/20/exotic-device-gets-linux-support-via-wireshark-and-rust/

Want to Support Hacker-friendly Hardware Design? Follow Valve’s Example

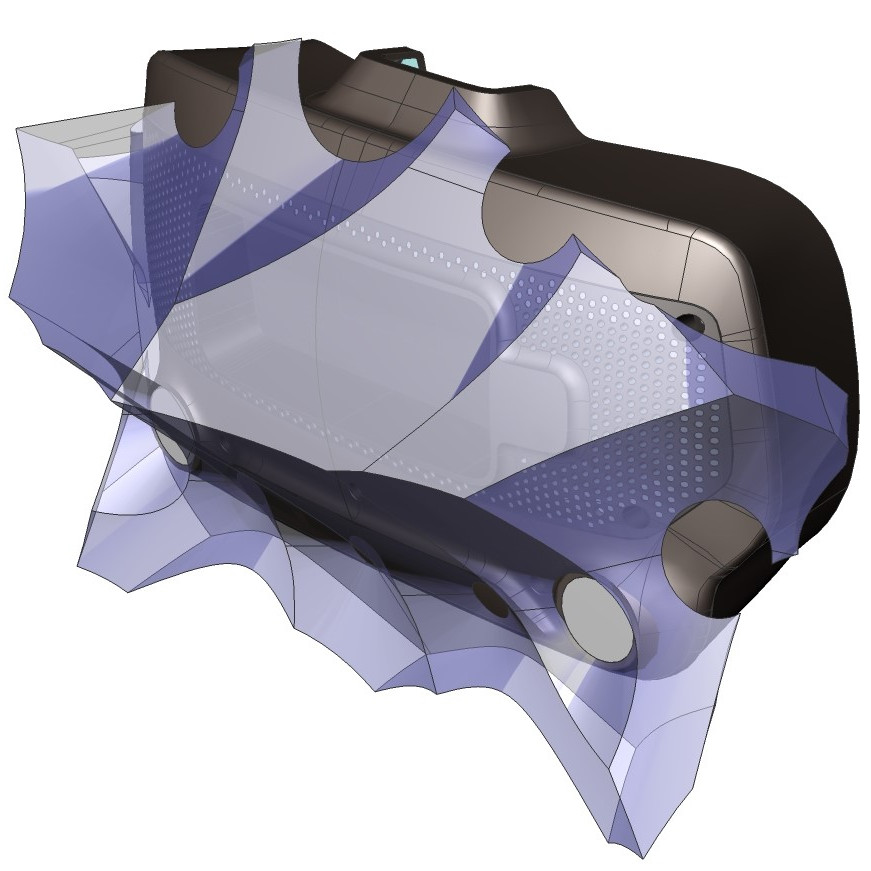
It’s been just over a year since Valve released Index, their flagship VR system, and it’s worth looking back at this GitHub repository as a fine example of how to provide supporting materials to a hacker-friendly hardware design. The image above shows off one of the hacker-friendly design elements: an empty space behind the visor, with a USB port off to the right, that exists for no reason other than to make it easier to mount and plug in whatever one might come up with. There’s more to it than that, however. If one wishes to provide supporting materials for a hardware design, one could certainly do worse than emulate Valve’s example.

The violet 3D model shows the area that modifications can occupy without getting in the way of any sensors.

The hardware repository contains not just CAD models of mod-friendly hardware pieces (both in high-resolution STEP models as well as STL files) but also 3D models of the sensor zones, so modders can ensure they avoid occluding any sensors with their creations. Examples are great, and one provided by Valve is the Booster; a hand controller add-on providing extra comfort for people with large hands or long thumbs. The model also doubles as a reference for designing attachments that will not interfere with any of the tracking or touch-sensitive surfaces of the controllers.

Being hacker-friendly doesn’t mean the hardware has no warranty, but it does mean that there is concrete guidance on what does or doesn’t risk voiding it. In the case of the Index hardware, the guidance is simple: “Anything that requires a T5 or smaller is not user serviceable.”

To us, the whole attitude of being hacker-friendly is exemplified by a statement about the headstrap, found about half-way down the page. The words “removing the headstrap is not recommended” are followed immediately by clear directions on how to do exactly that, demonstrating the kind of trust necessary to reduce barriers for add-ons and modifications. That is a great way to help foster experimentation, like this project for 1:1 mapping of physical elements to their VR counterparts, to make awesome spaceship cockpits.

source https://hackaday.com/2020/08/20/want-to-support-hacker-friendly-hardware-design-follow-valves-example/

Eavesdropping on Satellites for Fun and Profit

Geosynchronous satellites, girdling the Earth from their perches 36,000 km above the equator, are remarkably useful devices. Depending on where they’re parked, they command views of perhaps a third of the globe at a time, making them perfect communications relays. But as [James Pavur] points out in his DEF CON Safe Mode talk, “Whispers Among the Stars”, geosynchronous satellite communication links are often far from secure.

[James], a D. Phil. student in Systems Security at Oxford University, relates that his exploits rely on the wide areas covered by the downlink signals from the satellites, coupled with security as an afterthought, if it was even thought of at all by satellite service providers. This lackadaisical approach let him use little more than a regular digital satellite TV dish and a tuner card for a PC — off-the-shelf stuff that you’d really have to try hard to spend more than $300 on — to tap into sensitive information.

While decoding the digital signals from satellites into something parseable can be done with commercial applications, [James] and his colleagues built a custom tool, GSExtract, to pull data from the often noisy signals coming down from on high. The setup returned an amazing bounty of information, like maritime operators relaying the passport information of crew members from ship to shore, point-of-sale terminal information from cruise ships in the Mediterranean, and in-flight entertainment systems in jet airliners. The last example proved particularly alarming, as it revealed an exploitable connection between the systems dedicated to keeping passengers content and those in the cockpit, which clearly should not be the case.

We found [James’] insights on these weaknesses in satellite communications fascinating, and it’s well worth the 45 minutes to watch the video below and perhaps try these exploits, which amount to side-channel attacks, for yourself.

source https://hackaday.com/2020/08/20/eavesdropping-on-satellites-for-fun-and-profit/

Palm-Sized Sixteen Segments Light the Way to Our Hearts

It’s no secret that we here at the Hackaday are suckers for cool display. LEDs, OLEDs, incandescent, nixie or neon, you name it and we want to see it flash. So it fills us with joy to discover a new way to build large, daisy-chainable 16-segment digits, and even more excited to learn how easy they are to fab and assemble.

A cousin of the familiar 7 segment display, the 16 segment gives so many more possibilities (128% more possibilities to be exact) for digit display. To be specific, those extra segments unlock the ability to display upper and lowercase latin characters as well as scads of punctuation.

But where the character set is complex, the assembly is anything but thanks to a great design from [Kolibri] called klais-16. They’re available fully assembled if you want to jump straight to code, but thanks to thorough documentation (seriously, check this out) assembly is a snap.

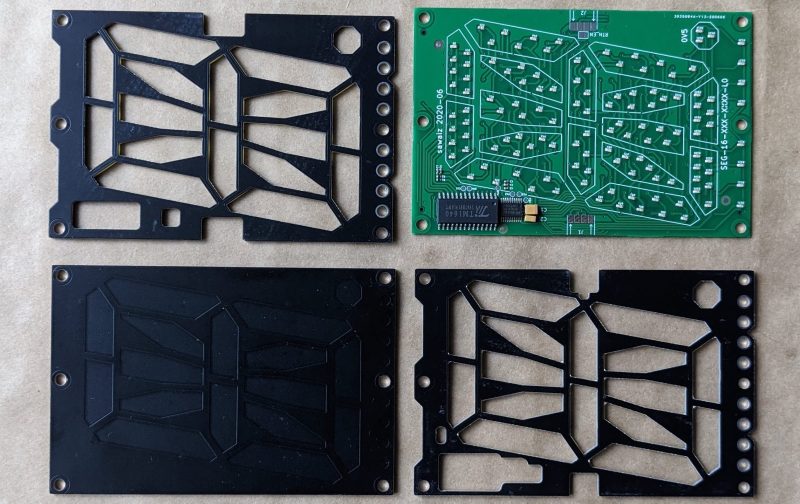
Each module is composed a very boring PCBA base layer which should be inexpensive from the usual sources, even when ordering one fully assembled. A stackup of three more PCBs are used for spacing and diffusion with plans for die-cut or injection mold layers if a larger production run ends up happening. Board dimensions for each character are 100 mm x 66.66 mm (about 4″ x 2.5″). Put together, each module can stand on its own or be easily daisy-chained together to make a longer single display.

Addressing all those bits with an elaborate, ugly control scheme would be a drag but fortunately the firmware for the onboard STM8 microcontroller exposes a nice boring serial interface which can be used without configuration to display strings. There’s even an example Windows Batch script!

source https://hackaday.com/2020/08/20/palm-sized-sixteen-segments-light-the-way-to-our-hearts/

Palm-Sized Sixteen Segments Light the Way to Our Hearts

It’s no secret that we here at the Hackaday are suckers for cool display. LEDs, OLEDs, incandescent, nixie or neon, you name it and we want to see it flash. So it fills us with joy to discover a new way to build large, daisy-chainable 16-segment digits, and even more excited to learn how easy they are to fab and assemble.

A cousin of the familiar 7 segment display, the 16 segment gives so many more possibilities (128% more possibilities to be exact) for digit display. To be specific, those extra segments unlock the ability to display upper and lowercase latin characters as well as scads of punctuation.

But where the character set is complex, the assembly is anything but thanks to a great design from [Kolibri] called klais-16. They’re available fully assembled if you want to jump straight to code, but thanks to thorough documentation (seriously, check this out) assembly is a snap.

Each module is composed a very boring PCBA base layer which should be inexpensive from the usual sources, even when ordering one fully assembled. A stackup of three more PCBs are used for spacing and diffusion with plans for die-cut or injection mold layers if a larger production run ends up happening. Board dimensions for each character are 100 mm x 66.66 mm (about 4″ x 2.5″). Put together, each module can stand on its own or be easily daisy-chained together to make a longer single display.

Addressing all those bits with an elaborate, ugly control scheme would be a drag but fortunately the firmware for the onboard STM8 microcontroller exposes a nice boring serial interface which can be used without configuration to display strings. There’s even an example Windows Batch script!

source https://hackaday.com/2020/08/20/palm-sized-sixteen-segments-light-the-way-to-our-hearts/

Palm-Sized Sixteen Segments Light the Way to Our Hearts

It’s no secret that we here at the Hackaday are suckers for cool display. LEDs, OLEDs, incandescent, nixie or neon, you name it and we want to see it flash. So it fills us with joy to discover a new way to build large, daisy-chainable 16-segment digits, and even more excited to learn how easy they are to fab and assemble.

A cousin of the familiar 7 segment display, the 16 segment gives so many more possibilities (128% more possibilities to be exact) for digit display. To be specific, those extra segments unlock the ability to display upper and lowercase latin characters as well as scads of punctuation.

But where the character set is complex, the assembly is anything but thanks to a great design from [Kolibri] called klais-16. They’re available fully assembled if you want to jump straight to code, but thanks to thorough documentation (seriously, check this out) assembly is a snap.

Each module is composed a very boring PCBA base layer which should be inexpensive from the usual sources, even when ordering one fully assembled. A stackup of three more PCBs are used for spacing and diffusion with plans for die-cut or injection mold layers if a larger production run ends up happening. Board dimensions for each character are 100 mm x 66.66 mm (about 4″ x 2.5″). Put together, each module can stand on its own or be easily daisy-chained together to make a longer single display.

Addressing all those bits with an elaborate, ugly control scheme would be a drag but fortunately the firmware for the onboard STM8 microcontroller exposes a nice boring serial interface which can be used without configuration to display strings. There’s even an example Windows Batch script!

source https://hackaday.com/2020/08/20/palm-sized-sixteen-segments-light-the-way-to-our-hearts/

Antenna Pulls in AM Stations

While we can’t argue that FM has superior audio quality and digital streaming allows even higher quality in addition to worldwide access, there’s still something magic about hearing a weak and fading AM signal from thousands of miles away with nothing between the broadcaster’s antenna and yours. If you can’t have a big antenna — or even if you can — a loop antenna can help your big antenna fit in less space. In the video after the break, [TheOffsetVolt] covers an AM loop and shows how it can pull in distant AM stations.

Continuing with the educational radio he’s talked about before,  he adds a loop antenna that is two feet on each side of a square, making it four square feet in area. Although he calls it an amplifier, it’s really just a passive tuned circuit that couples to the radio’s built-in antenna. There’s no actual connection between the antenna and the radio.

We aren’t sure if the reradiation explanation is really what’s happening, or if it is just transformer coupled to the main antenna. But either way, it seems to work well. You can think of this as adding a preselector to the existing radio. Loop antennas are directional, so this design could work as a direction finder.

We have seen many loop antennas, some with novel construction methods.  Some even tune themselves.

source https://hackaday.com/2020/08/19/antenna-pulls-in-am-stations/

IBM Reveals POWER10 CPU Based On The OpenPOWER ISA 3.1 Specification

This week, IBM revealed their POWER10 CPU, which may not seem too exciting since it’s primarily aimed at big iron like mainframes and servers. The real news for most is that it is the first processor to be released that is based on the open Power ISA specification v3.1. This new version of the Power ISA adds a number of new instructions as well as the notion of optionality. It updates the v3.0 specification that was released in 2015, right after the founding of the OpenPOWER Foundation.

Currently, a number of open source designs for the Power ISA exists, including MicroWatt (Power v3.0, VHDL) and the similar ChiselWatt (written in Scala-based Chisel).  In June of this year, IBM also released the VHDL code for the IBM A2 processor on Github. This is a multi-core capable, 4-way multithreaded 64-bit design, with silicon-implementations running at up to 2.3 GHz and using the Power ISA v2.06 specification.

The ISA specifications and other relevant technical documentation can be obtained from the OpenPOWER website, such as for example the Power ISA v3.0B specification from 2017. The website also lists the current cores and communities around the Power ISA.

(Main image: POWER10 CPU, credit IBM)

source https://hackaday.com/2020/08/19/ibm-reveals-power10-cpu-based-on-the-openpower-isa-3-1-specification/

Re-imagining the Crossed Gantry 3D Printer

Simply having a few go-to 3D printer motion system designs is no reason to stop exploring them, as even small iterations on an existing architecture can yield some tremendous improvements. In the last few months, both [Annex_Engineering] and [wesc23] have been piloting a rail-derived crossed gantry architecture, a “CroXY” as it’s come to be known. Borrowing concepts from Ultimaker’s crossed gantry using rods, the Hypercube Overkill project, and perhaps even each other, the results are two compact machine frames capable of beautiful prints at extremely high speeds–upwards of 400 mm/sec in [Annex_Engineering’s] case!

Both gantry designs take a rotated MGN12 rail (a la the Railcore) and cross two of them, mounting the carriage at the intersection point much like an Ultimaker. Each crossed rail controls a degree of freedom with vanilla Cartesian kinematics, but each degree of freedom also has a redundant motor for added torque. Like the CoreXY design, this setup is tailored for clean prints at high speeds since the motion-related motors have been removed from the moving mass. However the overall belt length has been reduced tremendously, resulting in a much stiffer setup.

But the innovation doesn’t stop there. Both gantries also feature a unique take on a removable Z probe. When the machine needs to level the bed, it travels to a corner to “quickdraw” a magnetically attached limit switch from a holster. Once mounted, this probe becomes the lowest point on the carriage, allowing the carriage to travel around the bed probing points. When finished, the probe simply slots back into its holster, and the print can begin.

Both [wesc23’s] CroXY and a variant of [Annex_Engineering’s] K2 are up on Github complete with bills of materials if you’re curious to poke into the finer details. With commercial 3D printer manufacturers spending the last few years in a race to the bottom, it’s exciting to still see new design pattern contributions that push for quality and performance. For more design patterns contributions, have a look at [Mark Rehorst’s] Kinematically coupled bed design.

source https://hackaday.com/2020/08/19/re-imagining-the-crossed-gantry-3d-printer/

Printing, Plating, and Baking Makes DIY Microlattices Possible

To be honest, we originally considered throwing [Zachary Tong]’s experiments with ultralight metallic microlattices into the “Fail of the Week” bucket. But after watching the video below for a second time, it’s just not fair to call this a fail, so maybe we’ll come up with a new category — “Qualified Success of the Week”, perhaps?

[Zachary]’s foray into the strange world of microlattices began when he happened upon a 2011 paper on the subject in Science. By using a special photocurable resin, the researchers were able to use light shining through a mask with fine holes to create a plastic lattice, which was then plated with nickel using the electroless process, similar to the first half of the electroless nickel immersion gold (ENIG) process used for PCBs. After removing the resin with a concentrated base solution, the resulting microlattice is strong, stiff, and incredibly light.

Lacking access to the advanced materials and methods originally used, [Zachary] did the best he could with what he had. An SLA printer with off-the-shelf resin was used to print the skeleton using the same algorithms used in the original paper. Those actually turned out pretty decent, but rather than electroless plating, he had to go with standard electroplating after a coat of graphite paint. The plated skeletons looked great — until he tried to dissolve the resin. When chemical approaches failed, into the oven went the plated prints. Sadly, it turns out that the polymers in the resin expand when heated, which blew the plating apart. A skeleton in PLA printed on an FDM printer fared little better; when heated to drive out the plastic, it became clear that the tortuous interior of the lattice didn’t plate very well.

From aerogels to graphene, we love these DIY explorations of new and exotic materials, so hats off to [Zachary] for giving it a try in the first place.

source https://hackaday.com/2020/08/19/printing-plating-and-baking-makes-diy-microlattices-possible/

Model Railroad Engine Gets A Tiny OLED Rollsign While Showing off Tidy Protoboard Skills

When catching public transport, it’s very helpful if the bus or train in question has a large display indicating the route or destination. While many transit lines now rely on flipdot or LED displays, the classic rollsign still gets the job done. [diorama111] wanted to emulate this on a model railroad, and set about building a simulacrum at tiny scale.

Intended to suit an HO-scale model train, the build makes use of a tiny 0.6 inch NHD-0.6-6464G OLED display. It’s wired up with a boost converter for power and hooked up to a tiny circuit consisting of an ATMEGA328p and an infrared receiver. The microcontroller is responsible for receiving commands from the remote control, and displaying the appropriate image on the screen. The hidden beauty of this one is well shown in the video below as [diorama111] cleanly and meticulously assembles the circuit on protoboard with just an iron and tweezers.

What makes this project great is how neatly it’s integrated into the body of the train. Nestled inside the locomotive, it almost looks like a stock part of the model. While the nature of the OLED display does come across a touch anachronistic, implementing the vertical scroll really does add a lot to the final effect.

We love to see creative scale modelling projects, and we’ve seen some great work from [diorama111] in the past, too. Video after the break.

source https://hackaday.com/2020/08/19/model-railroad-engine-gets-a-tiny-oled-rollsign-while-showing-off-tidy-protoboard-skills/

Model Railroad Engine Gets A Tiny OLED Rollsign While Showing off Tidy Protoboard Skills

When catching public transport, it’s very helpful if the bus or train in question has a large display indicating the route or destination. While many transit lines now rely on flipdot or LED displays, the classic rollsign still gets the job done. [diorama111] wanted to emulate this on a model railroad, and set about building a simulacrum at tiny scale.

Intended to suit an HO-scale model train, the build makes use of a tiny 0.6 inch NHD-0.6-6464G OLED display. It’s wired up with a boost converter for power and hooked up to a tiny circuit consisting of an ATMEGA328p and an infrared receiver. The microcontroller is responsible for receiving commands from the remote control, and displaying the appropriate image on the screen. The hidden beauty of this one is well shown in the video below as [diorama111] cleanly and meticulously assembles the circuit on protoboard with just an iron and tweezers.

What makes this project great is how neatly it’s integrated into the body of the train. Nestled inside the locomotive, it almost looks like a stock part of the model. While the nature of the OLED display does come across a touch anachronistic, implementing the vertical scroll really does add a lot to the final effect.

We love to see creative scale modelling projects, and we’ve seen some great work from [diorama111] in the past, too. Video after the break.

source https://hackaday.com/2020/08/19/model-railroad-engine-gets-a-tiny-oled-rollsign-while-showing-off-tidy-protoboard-skills/

Restoring Commodore’s Unloved Plus/4

The Commodore Plus/4 was not loved by the marketplace after its launch in 1984. Despite its namesake feature of having productivity programs built in, its lack of compatibility with Commodore 64 software and oddball status meant that it struggled to find acceptance. However, like so many retro computers, it maintains a following to this day. [Drygol] had collected a total of eight neglected units, and set to giving them a full workover.

First on the docket is cleaning, and [Drygol] makes short work of disassembling the computers and removing decades of dirt and dust. Keycaps are treated with Retrobright to restore their original color. The black styling of the case means it gets a simple wash down instead, and then a rub with thin oil to restore the plastic’s original sheen.

[Drygol] steps through various popular hacks for the platform too, from 6510 CPU replacements for the often-failing 7501 and 8501, to SD2IEC card interfaces to replace the much-maligned storage original storage options. Damaged keyboard studs are replaced with hacked-up Amiga parts, while LEDs that are long out of production are swapped out for cut-down modern parts.

The impressive thing is just how much community support there is for an also-ran Commodore that never truly caught the public’s eye. Efforts are ongoing, too, with projects like THED aiming to reproduce some of the custom chips used on the platform.

We’ve featured posts on the engineering that goes into Commodore’s 8-bit computers as well, like this excellent piece from [Bil Herd] on the story of the Commodore 128. Of course, if you’re working your own wonders with retro hardware, you know who to call.

source https://hackaday.com/2020/08/18/restoring-commodores-unloved-plus-4/

dropController Sets the Bar For Documentation

dropController has the kind of documentation we wish would spontaneously generate itself whenever we build something. [Martyn Currey] built a robust rig for water droplet photography, and we don’t want to dismiss the hardware, but the most impressive part might be the website. It might not be very fancy, but it’s thorough and logically organized. You can find parts lists, assembly manuals, tutorials, sketches, and schematics. If only all the projects that came our way were so well detailed.

Water droplet photography is pretty cool, although freehanding it will make your patience fall faster than 9.81 m/s². The concept is that a solenoid valve will flicker open to release a drop of water, wait for a certain number of microseconds, and then trigger your DSLR via a wired remote cable. The tricky part comes from controlling as many as six valves and three flashes. We don’t have enough fingers and toes to press all those buttons.

The bill of materials contains many commonly available parts like an Arduino Nano, an LM2596 voltage regulator, some MOSFETS, an HC-06 Bluetooth module, plus standard audio connectors to hook everything up. Nothing should break the bank, but if money is not an issue, [Martyn] sells kits and complete units.

Waterdrop controllers are not the newest kids on the block, and strobe photography is a time-honored tradition.

All pictures credits are to [Martyn Currey].

source https://hackaday.com/2020/08/18/dropcontroller-sets-the-bar-for-documentation/