When you think of a shooting gallery, you might envision a line of tin cans set up along a split-rail fence, or a few rows of ducks or bottles lined up at a carnival. But what do these have in common? You, standing in one spot, and shooting in the same general direction. You’re exposed! If those targets could shoot back, you’d be dead within seconds. Wouldn’t it be more fun if the targets were all around you in 360°? We think so, too.
So how could you possibly set up a shooting gallery this way? [Another Maker] already solved that problem for you with ESP32s and Node-RED (YouTube). Each target has an ESP32, a laser sensor, and an LED that lights up when the target is ready, and turns off once it’s been hit. They all make an enticing ‘shoot me’ sound that goes with their graphics, and a second mp3 plays upon direct hit.
The PVC gun houses an ESP8266, a laser module at the end of the barrel, and runs on a cylindrical USB battery slipped down in the secondary grip. [Another Maker] can spread the targets out far and wide, as long as they all stay in range of the localized WiFi access point.
The best part is that the Node-RED system is target-agnostic — it doesn’t care how many you have or how they’re made, and it can juggle up to 250 of them. Because of the way the target objects are programmed, it would be quite easy to add actuators that make them drop down or fall backward when hit. You could also implement [Another Maker]’s fantastic suggestion of hitting arcade buttons with NERF darts instead. Charge those lasers and fire at the break button to see the demo and walk-through video.
We can imagine that the origin of the doorbell is truly ancient. if you lived in a cave, you probably had a stick and a rock nearby for people to get your attention without invading your cave. In 1817 a Scot named William Murdoch had a bell in the house that visitors rang via a compressed air system, but the electric doorbell had to wait until 1831. Since then, little has changed with the basic idea. [Erientes] — who lives in the Netherlands, not Russia — wanted a smarter doorbell. In particular, he’s read about older people being victimized by people who ring the doorbell for entry. So [Erientes] used a Raspberry Pi to make a doorbell that supports facial recognition.
The exercise is really more of an operations challenge than a technical one thanks to a high-quality Python library for face recognition powered by DLib. However, we did like the user interface aimed at non-technical users. The metaphor is a traffic light in which a red light means do not allow entry. The lights are buttons, so you can use them to whitelist or blacklist a particular person.
We could see this being coupled with a keypad to make a two-factor access control system. To unlock the door, you have to present your face and enter a code number. While it is true that the facial recognition system isn’t perfect, the chances that someone would learn your code and be able to duplicate your face well enough to fool the algorithm seems pretty slim.
Make your own knee-high stockings with this simple sock sewing pattern. Learn to make your own sewing patterns with this step by step guide On cold nights, there’s nothing quite like thigh high knit stockings, a cup of chamomile tea and a good book. Right? I love wearing them with booty shorts for sexier, yet […] Read more…
In the modern world, we take certain tools for granted. High-level programming languages such as C or Python haven’t been around that long in the grand scheme of things, and Java has only existed since the ’90s. Getting these tools working on machines that predate them is more of a challenge than anything, and [Michael Kohn] was more than willing to tackle this one. He recently got Java running on a Commodore Amiga.
The Amgia predates Java itself by almost a decade, so this process wasn’t exactly straightforward. The platform has a number of coprocessors that were novel for their time but aren’t as commonplace now, taking care of such tasks such as graphics, sound, and memory handling. Any psoftware running on the Amiga needs to be in a specially formatted program as well, so that needed to be taken care of, even loading Java on the computer in the first place took some special work using a null modem cable rather than the floppy disk an Amiga would have used back in the day.
Loading Java on an antique Amiga is certainly a badge of honor, but [Michael] isn’t a stranger to Java and the Motorola 68000s found in Amigas. There’s a 68000 in the Sega Genesis as well, and we’ve seen how [Michael] was able to run Java on that too.
When you’re a kid, remote control cars are totally awesome. Even if you can’t go anywhere by yourself, it’s much easier to imagine a nice getaway from the daily grind of elementary school if you have some wheels. And yeah, R/C cars are still awesome once you’re an adult, but actual car-driving experience will probably make you yearn for more realism.
What could be more realistic and fun than an active suspension? Plenty of adults will never get the chance to hit the switches in real car, but after a year of hard work, [snoopybg] is ready to go front and back, side to side, and even drift in this super scale ’63 Oldsmobile Dynamic 88 wagon. We think you’ll agree that [snoopybg] didn’t miss a detail — this thing makes engine noises, and there are LEDs in the dual exhaust pipes to simulate flames.
An Arduino reads data from a triple-axis accelerometer in real time, and adjusts a servo on each wheel accordingly, also in real time, to mimic a real car throwing its weight around on a real suspension system. If that weren’t cool enough, most of the car is printed, including the tires. [snoopybg] started with a drift car chassis, but even that has been hacked and drilled out as needed.
There are a ton of nice pictures on [snoopybg]’s site if you want to see what’s under the hood. We don’t see the code anywhere, but [snoopybg] seems quite open to publishing more details if there is interest out there. Strap yourself in and hold on tight, because we’re gonna take this baby for a spin after the break.
The Gamecube may not have sold as many units as its competitors in its day, but it maintains a cult fanbase to this day. Due largely to the Smash Bros. community, its controllers are still highly sought after. After the release of the Nintendo Switch, with plenty of fan renders around the place [Shank Mods] figured someone would create a set of Joycons with Gamecube controls. After waiting almost four years, he decided instead to do it himself.
The build begins with a Wavebird controller shell, chosen for its larger body, which is coincidentally the same height as the Switch. The shell was cut down the middle, and 3D printed components were created to attach Joycon mounting rails to the two halves of the controller. The large controller also has plenty of space inside, making it easy to fit all the Joycon components inside. Compatibility was a key aim of this build, so much attention was paid to make the Gamecube Joycons function properly with all Switch features. Extra buttons were added where necessary, and the formerly analog triggers were modified with plugs to match the solely digital operation of the Switch components.
It’s a project that had to overcome many hurdles, from mechanical redesigns to make everything fit, to figuring out the arcane electrical design of the Joycon hardware. The hard work paid off however, and [Shank Mods], along with a couple of talented community members, was able to create a beautiful piece of hardware. We’ve seen Gamecube-themed Joycons before, but this build really does take the cake. If you’ve instead modified the original Xbox controller to work with the Switch, be sure to let us know. Video after the break.
Getting your own PCBs made is a rite of passage for the hardware hacker. Oftentimes, it’s a proud moment, and many of us choose to immortalise the achievement with a self-aggrandizing credit on the silk screen, or perhaps a joke or personal logo. However, as far as artistically customized PCBs go, the sky really is the limit, and this is the specialty of [TwinkleTwinkie], whose Supercon talk covers some of the pitfalls you can run into when working at the edges of conventional PCB processes.
[TwinkleTwinkie]’s creations are usually badges of one type or other — they’re meant to be worn on a lanyard around your neck, as a pin, or as a decoration added to another badge. The whole point is the aesthetic, and style is just as important as functionality. With diverse inspirations like Futurama, Alice in Wonderland and the shenanigans of the GIF community, his badges blend brightly colored boards with a big helping of LEDs and artistic silkscreening to create electronic works of art.
Keeping PCB Fab Houses from Upsetting the Artwork
These days, PCB fab houses offer more choice than ever, in terms of silkscreens, soldermask colors, and other options. However, fundamentally, their primary concern is to produce reliable, accurate, electronically functional boards — and it’s something that can cause problems for #badgelife hackers designing for more aesthetic reasons.
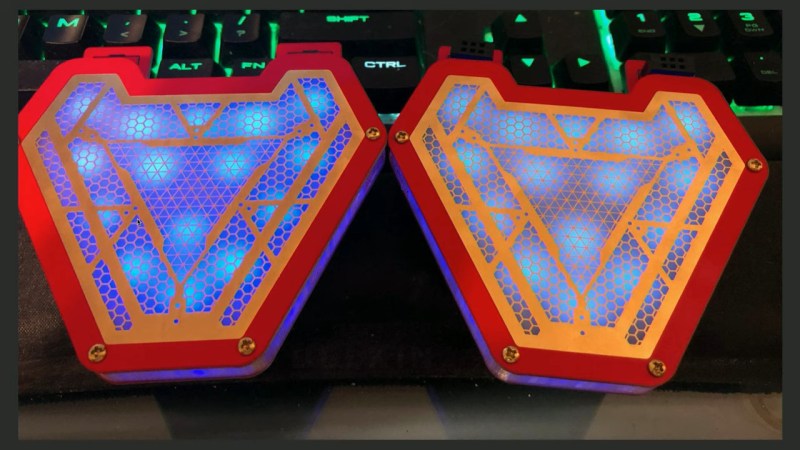
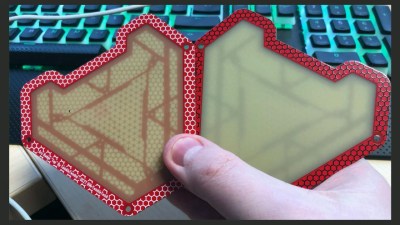
On the left, a prototype, and on the right, a model with the black silkscreen part, showing how the LEDs appear dimmer.
[TwinkleTwinkie] ran into this very problem during the development of the Arc Badge, a piece designed to replicate the famous arc reactor from the Iron Man and Avengers films. The basic idea of the badge was to have a base PCB which carries all the hardware, along with a spacer, and then a third top layer consisting of a PCB which the LEDs were intended to shine through. The prototype board worked well, with the fab house producing it on 1.6mm thick FR4 with white silkscreen and red soldermask. For the final product, wanting something a little fancier, black silkscreen was chosen instead. Ordered through PCBWay, this necessitated using their “Advanced Production Fab”, and a longer lead time, but after a few weeks the boards were ready.
A comparison with the final, fixed part on the left and the black silkscreen part on the right. The final design allows much more light to pass through.
Unfortunately, despite looking great with the black silkscreen contrasting with the rich red soldermask, there was a problem. When [TwinkleTwinkie] asked for black soldermask, this also led to a change in FR4 material, to a different grade which was more opaque than the prototype board. This led to the LEDs showing up very dim, and spoiled the visual effect that was desired for the ArcBadge. The dimming was so significant that users would no longer get the glow-through effect when wearing the badge under a T-shirt, a la Tony Stark. It took comparison with the prototype to figure out what had happened. PCBWay had simply used a higher-grade material when switching to the black silkscreen. Given that PCBs are sold as electronic products, and not for their optical qualities, they hadn’t done anything wrong, per se – but regardless, the new boards weren’t fit for purpose.
Order, and Order, and Order Again
The solution was simple – the boards would need to be reordered. In order to guarantee the LEDs would shine through and be truly resplendent, precautions were taken. The final board switched back to white silkscreen. As an additional precaution, in case PCBWay kept using the new material, the new part was instead 0.8mm thick, allowing it to block less light.
The redesign left [TwinkleTwinkie] with 250 coasters to give out, but his commitment to giving his customers a quality product is commendable. Despite nobody outright making a mistake, the final product would have been a little disappointing had the redesign not taken place. The Arc Badge, as delivered, glows with the best of them, and we’re sure everyone involved is wiser for the experience!
Many of the major scientific achievements of the last 100 years or so have boiled down to problems of picking out a signal from the noise. Think about analyzing the human genome, for instance: we each have something like two meters of DNA coiled up inside each cell in our body, and yet teasing out the information in a single gene had to wait until we developed sufficiently sophisticated methods like PCR and CRISPR.
Similarly, albeit on the other end of the scale, the search for planets beyond our solar system wasn’t practical until methods and instruments that could measure the infinitesimal affect a planet’s orbit on its star were developed. Once that door was unlocked, reports of exoplanets came flooding in, and Earth went from being a unique place in the galaxy to just one of many, many places life could possibly have gotten a foothold. And now, the barrier for entry to the club of planet hunters has dropped low enough that amateur astronomers are getting in on the action.
Alberto Caballero is one such stargazer, and he has turned his passion for astronomy into an organized project that is taking a good, hard look at some of our nearest stellar neighbors in the hope of finding exoplanets in the habitable zone. The Habitable Exoplanet Hunting Project is training the instruments in 33 observatories around the globe on ten stars within 100 light-years, hoping to detect the faint signal that indicates an orbiting planet. They hope to add to the list of places worthy of exploration, both from Earth via optical and radio telescopes, and perhaps, someday, in person.
Join us on the Hack Chat with Alberto as we discuss the search for habitable exoplanets. We’ll explore the project’s goals, its successes thus far, and where it’s going in the future. We’ll also find out just what the amateur astronomer needs to get in on the action, and maybe even talk a little about why the search for “Earth 2.0” is so important.
Click that speech bubble to the right, and you’ll be taken directly to the Hack Chat group on Hackaday.io. You don’t have to wait until Wednesday; join whenever you want and you can see what the community is talking about.
The wrap can be applied to things temporarily, much like that stuff you wrestle from the box and stretch over your leftovers. It can also be shrink-wrapped to any compatible surface without losing effectiveness. The ability to cover surfaces with bacteria-shielding armor could have an incredible impact on superbug populations inside hospitals. It could be shrink-wrapped to all kinds of things, from door handles to railings to waiting room chair armrests to the pens that everyone uses to sign off on receiving care.
Everything bounces right off the surface, including that classic blue testing liquid. Image via SciTech Daily
According to the CDC, there are more than 2.8 million antibiotic-resistant infections reported in the United States each year, resulting in over 35,000 deaths. These superbugs are most prevalent and dangerous in hospitals and other medical settings like nursing homes, and they’re especially threatening to the weakened immune systems of chemo patients, dialysis patients and anyone undergoing surgery.
The superbug crisis pivots on the point that antibiotics are a double-edged sword. As they fight infection, they also weaken immune systems, which allows antibiotic-resistant bugs to proliferate in easily-won battlegrounds. Doctors have little choice but to use more toxic and potentially ineffective types of antibiotics to treat antibiotic-resistant infections. On top of everything else, these drugs are often more expensive.
One of the first lines of defense for avoiding large-scale superbug threats in the first place is protecting the food supply. This fantastic plastic could really beef up sanitation practices at food-packaging plants where salmonella and E. coli lurk.
The key to this antibacterial trampoline is in the surface topography. It’s made of of microscopic wrinkles meant to mimic the lotus effect — that repellent property of lotus leaves that makes water bead on their surface.
Lotus leaves are covered with tiny pointed bumps that disrupt the surface so much that water is unable to settle and spread out. The tips of these bumps are coated in a wax secreted by the plant that furthers its hydrophobic properties. They are often described as self-cleaning, because the beaded water droplets carry dirt particles away with them.
The researchers say they also treated their plastic wrap chemically “to further enhance its repellent properties”, though it’s unclear what chemical they’re talking about. Hopefully, it’s something innocuous that acts like wax.
Door knob on the Ribe Cathedral in Denmark. Image credit: Wolfgang Sauber CC BY-SA 3.0
Where Did All the Brass Door Knobs Go?
Our more experienced readers might recall that we already have a kind of antibacterial door knob technology, and it’s been around for quite a long time.
Copper, brass, and silver all exhibit the oligodynamic effect, which means they are slowly poisonous to bacteria. Many door knobs and public surfaces used to be made of brass to take advantage of the biocidal effect. This would only go so far in the hospital setting, because the effect takes several hours.
So why aren’t all door knobs still made of brass? Who can really say? Tastes change, brass tarnishes, and people forget about the oligodynamic effect. C’est la vie.
At first blush, this special wrap sounds like something we’d want to put absolutely everywhere, like all public surfaces and our phones. MRSA and other antibiotic-resistant superbugs don’t exist solely within hospital walls, after all. But not all forms of bacteria are bad — in fact, plenty of good bacteria called gut flora lives in our intestines. It’s an important part of our immune system that keeps us from getting sick every single time we encounter a new pathogen. If every public surface was covered in this stuff, we couldn’t pick up germs nearly as well because they wouldn’t stick anywhere.
From a practical standpoint, this stuff is only going to be useful if that special surface can stand up to the wear and tear of hospital environments without being crushed or worn away. It would also have to survive the frequent, rigorous, and probably bleach-based cleaning routines. One little scratch or ding in the armor, and you have a disgusting little critter crevice crawling with superbugs.
Let’s say this stuff is everywhere ten or fifteen years from now. Is there a downside to repelling so much bacteria? Where will it all go? Will it gang up? Would it mean an increase in airborne bacteria? And what about that secret sauce chemical they treated the plastic wrap with to make it more repellent? Will we regret exposing ourselves to it?
That said, the researchers don’t intend for this stuff to be the answer to the superbug problem, just a weapon in the arsenal. It seems to us to be worth a shot to use it in medical facilities, but of course, time will tell.
If you wanted to learn about creating modern computer games, 3DBuzz had some of the best tutorials around. In fact, some of the tutorials about C#, C++, Android, and math would be useful for anyone, while the ones about game art and modeling in Maya are probably mostly for game developers. While these were once available only by subscription, the company — now defunct — has left them available for download at no cost.
We don’t know enough about things like Blender and Maya to evaluate the material, but it is well regarded and the ones we do know something about seem very high quality. There are, for example, many videos about C++ and C# that are very professional and cover quite a few topics.
Topics include: AI programming, ASP.net, Blender, iPhone and Android apps, C#, C++, Objective C, Python, OpenGL, HTML and JavaScript, Solidworks, Photoshop, GIMP, Unity, and several game engines like Unreal 4 and Doom 3. There are also quite a few classes on 2D and 3D art as well as related math like trig and vectors.
We don’t know how long the page will remain up, and it has an SSL issue, but to save you some time, here’s a quick way to grab all the ZIP files on a page:
wget -nc -r -np --span-host -l 1 -A zip --no-check-certificate https://3dbuzz.com/index.html
However, as you might expect, the site is overloaded, so expect to not get them all in one swoop. We were surprised they didn’t make them available as torrents. (Update: the site now says downloads are temporarily disabled, but a Reddit user did start a torrent that is missing two small files and a corrected torrent with all the files, but it may not have as many seeds.)
If you want to build games with less fuss, try this tool. Or, maybe you’d rather go old school.
One of the first things you learn in electronics is how to identify a resistor’s value. Through-hole resistors have color codes, and that’s generally where beginners begin. But why are they marked like this? Like red stop signs and yellow lines down the middle of the road, it just seems like it has always been that way when, in fact, it hasn’t.
Before the 1920s, components were marked any old way the manufacturer felt like marking them. Then in 1924, 50 radio manufacturers in Chicago formed a trade group. The idea was to share patents among the members. Almost immediately the name changed from “Associated Radio Manufacturers” to the “Radio Manufacturer’s Association” or RMA. There would be several more name changes over the years until finally, it became the EIA or the Electronic Industries Alliance. The EIA doesn’t actually exist anymore. It exploded into several specific divisions, but that’s another story.
This is the tale of how color bands made their way onto every through-hole resistor from every manufacturer in the world.
By the late 1920s, the RMA was setting standards and one of them was the RMA standard for color-coding. The problem was that marking small components is difficult, especially back in the 1920s.
The solution was color bands, but not quite as we know them today. The standard for colors was the same, but the body of the resistor acted as the first band. Then there would be two or three other bands to show the rest of the value. In some cases, the third band was actually a dot. So the bulk of the resistor would be the first band color. The “tip” of the resistor would be the 2nd band and a dot would be the multiplier. Radios using this scheme started to appear in 1930. Here’s the color code chart from the 1941 Radio Today yearbook:
Ads in that magazine promoting resistors were careful to note that they were RMA color-coded. The code soon extended to capacitors (condensers, in the contemporary parlance).
The dot, as with printed piece of text on the cylindrical, might be hidden from view depending on the position of the resistor. So eventually, everyone switched to bands.
The colors are meant to follow the visible spectrum (remember ROY G BIV?). However, the RMA omitted indigo because apparently many people don’t distinguish blue, indigo, and violet as three different colors; indigo is really a tertiary color, anyway and Newton included it because of his interest in the occult, apparently. That leaves four slots, so dark colors represent the low end (black and brown) and bright colors the high end (gray and white).
Of course, none of this was funny if you were color blind. Reading a resistor with a meter or a bridge out of the circuit was certainly an answer. Reading one in a circuit, though, was another matter.
The Origin of E-Series Values
In 1952 the International Electrotechnical Commission (IEC, another standards group) defined the E-series which dictates what values resistors come in so that you get equal spacing on a log scale for resistors. If that sounds confusing, consider an example.
The E12 series is for 10% resistors and the values on it give you 12 values per decade. The base values are
That’s why you can get, say a 4.7 K or 47 K resistor but not a 40K resistor.
However, consider the tolerance. A 10% 39 K resistor could be off by 3.9 K. If the error pushed the resistance up that would be 42.9K, making a 40 K resistor unnecessary. That is, a 39 K resistor might well be a 40 K resistor, anyway. A low 47K resistor, on the other hand, could be 42.3 K, which is less than a high-value 39 K unit.
As you might expect, the number of values goes up as the tolerance goes down. At 2%, for example, you’ll use E48 which has 48 values per decade (if you’d guess E96 — the standard used for 1% has 96 values, you’d be right). Using E48, the values near 40 K are 38.3 K and 40.2 K. That’s 39.06 on the high side and 39.2 on the low side.
Next Time
Next time you pick up a resistor and read the code from it, you can recall the history behind it all. The legacy of color bands carries over into the surface mount realm, not as color but as three digits representing the first two numbers and multiplier for the resistor’s value. These days many electronics like wireless modules and lithium batteries include a datamatrix (something like a QR code) on them. Honestly, I’m surprised that all components — through hole and surface mount — don’t have some form of micro data matrix on it that lets you point your phone at them and see their complete datasheet. Maybe one day.
A common project category on this site is “put a Raspberry Pi in it”. For people who wrench on their cars, a similarly popular project is the “LS Swap”. Over the past few years, the world of electronics and automotive hacking started to converge in the form of electric car conversions, and [Jalopnik] proclaims the electric counterpart to “LS Swap” is to put a Telsa Model S motor and a Chevy Volt battery into a project car.
The General Motors LS engine lineup is popular with petro heads for basically the same reasons Raspberry Pi are popular with the digital minded. They are both compact, very powerful for the money, have a large body of existing projects to learn from, and an equally large ecosystem of accessories to help turn ideas into reality. So if someone desired more power than is practical from a car’s original engine, the obvious next step is to swap it out for a LS.
Things may not be quite as obvious in the electric world, but that’s changing. Tesla Model S and Chevrolet Volt have been produced in volume long enough for components to show up at salvage yards. And while not up to the levels of LS swaps or Pi mods, there’s a decent sized body of knowledge for powerful garage-built electric cars thanks to pioneers like [Jim Belosic] and a budding industry catering to those who want to build their own. While the decision to use Tesla’s powerful motor is fairly obvious, the choice of Volt battery may be surprising. It’s a matter of using the right tool for the job: most of these projects are not concerned about long range offered by Tesla’s battery. A Volt battery pack costs less while still deliver enough peak power, and as it was originally developed to fit into an existing chassis, its smaller size also benefits garage tinkerers fitting it into project cars.
While Pi SBCs and LS engines are likely to dominate their respective fields for the foreseeable future, the quickly growing and evolving world of electric vehicles means this winning combo of today are likely to be replaced by some other combination in the future. But even though the parts may change, the spirit of hacking will not.










 Next time you pick up a resistor and read the code from it, you can recall the history behind it all. The legacy of color bands carries over into the surface mount realm, not as color but as three digits representing the first two numbers and multiplier for the resistor’s value. These days many electronics like wireless modules and lithium batteries include a datamatrix (something like a QR code) on them. Honestly, I’m surprised that all components — through hole and surface mount — don’t have some form of micro data matrix on it that lets you point your phone at them and see their complete datasheet. Maybe one day.