Giving Recalled Fitness Trackers a Second Chance

When it was released back in 2012, the Basis B1 fitness tracker was in many ways ahead of its time. In fact, the early smartwatch was so impressive that Intel quickly snapped up the company and made it the cornerstone of their wearable division. Unfortunately a flaw in their next watch, the Basis Peak, ended up literally burning some wearers. Intel was forced to recall the whole product line, and a year later dissolved their entire wearable division.

Given their rocky history, it’s probably no surprise that these gadgets can be had quite cheaply on the second hand market. But can you do anything with them? That’s what [Ben Jabituya] recently decided to find out, and the results of his experiments certainly look very promising. So far he hasn’t found a way to activate a brand-new Basis watch, but assuming you can get your hands on one that was actively being used when Intel pulled the plug, his hacks can be used to get it back up and running.

Examining the downloaded sensor logs.

The Basis Android application has long since been removed from the Play Store, but [Ben] said it wasn’t too hard to find an old version floating around on the web. After decompiling the application he discovered the developers included a backdoor that lets you configure advanced options that would normally be hidden.

How do you access it? As a reminder of the era in which the product was developed, you simply need to log into the application using Jersey and Shore as the username and password, respectively.

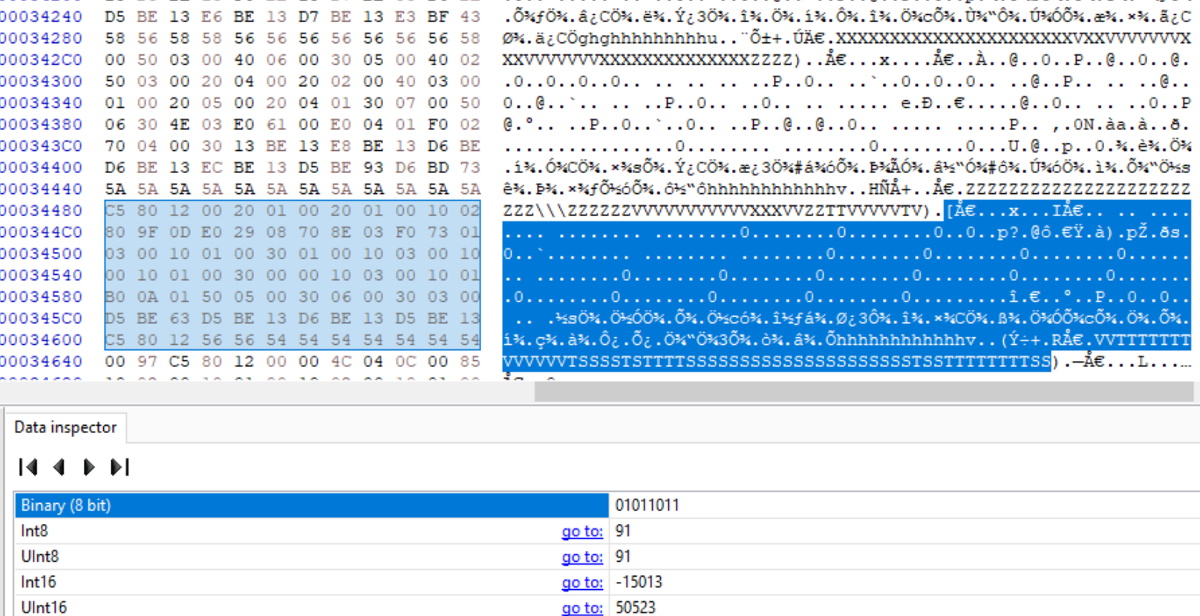
Between the developer options and API information he gleaned from the decompiled code, [Ben] was able to create a faux Basis authentication server and point the application to it. That let him get past the login screen, after which he was able to sync with the watch and download its stored data. Between examinations with a hex editor and some open source code that was already available online, he was able to write a Python script for parsing the data which he’s been kind enough to share with the world.

We’re very pleased to see an open source solution that not only gets these “bricked” smartwatches back online, but allows the user to keep all of the generated data under their own control. If you’d like to do something similar with a device that doesn’t have a history of releasing the Magic Smoke, the development of an open source firmware for more modern fitness trackers might be of interest.

source https://hackaday.com/2020/11/18/giving-recalled-fitness-trackers-a-second-chance/

Actuator Opens the Door to Drier Dishes

Dishwashers are great at washing dishes and even rinsing them, most of the time. Where they tend to fail is in the drying part. Somehow these things dry hot enough to warp stoneware dishes, but not so well that things are actually dry when you open the door. Blame it on the lack of air movement.

Ideally, the dishwasher cycle is started soon after dinner time so it can be finished and opened up before it’s time for bed. But if you do that, then you miss all the dishes from late-night snacking and the occasional wine glass. Wait until bedtime to start it, and it has to sit several hours with moisture inside. Obviously, the answer is to listen for the victory beeps at the end of the cycle, and use a slow but forceful actuator to push the door open.

[Ivan Stepaniuk] is listening for the dishwasher’s frequencies with a microphone, amplifying them with a trusty LM386, and using an STM32 blue pill to crunch the audio. [Ivan] has plans to incorporate an ESP8266 board for IoT, presumably to get a notification when the door has been opened successfully. Check out the demo after the break.

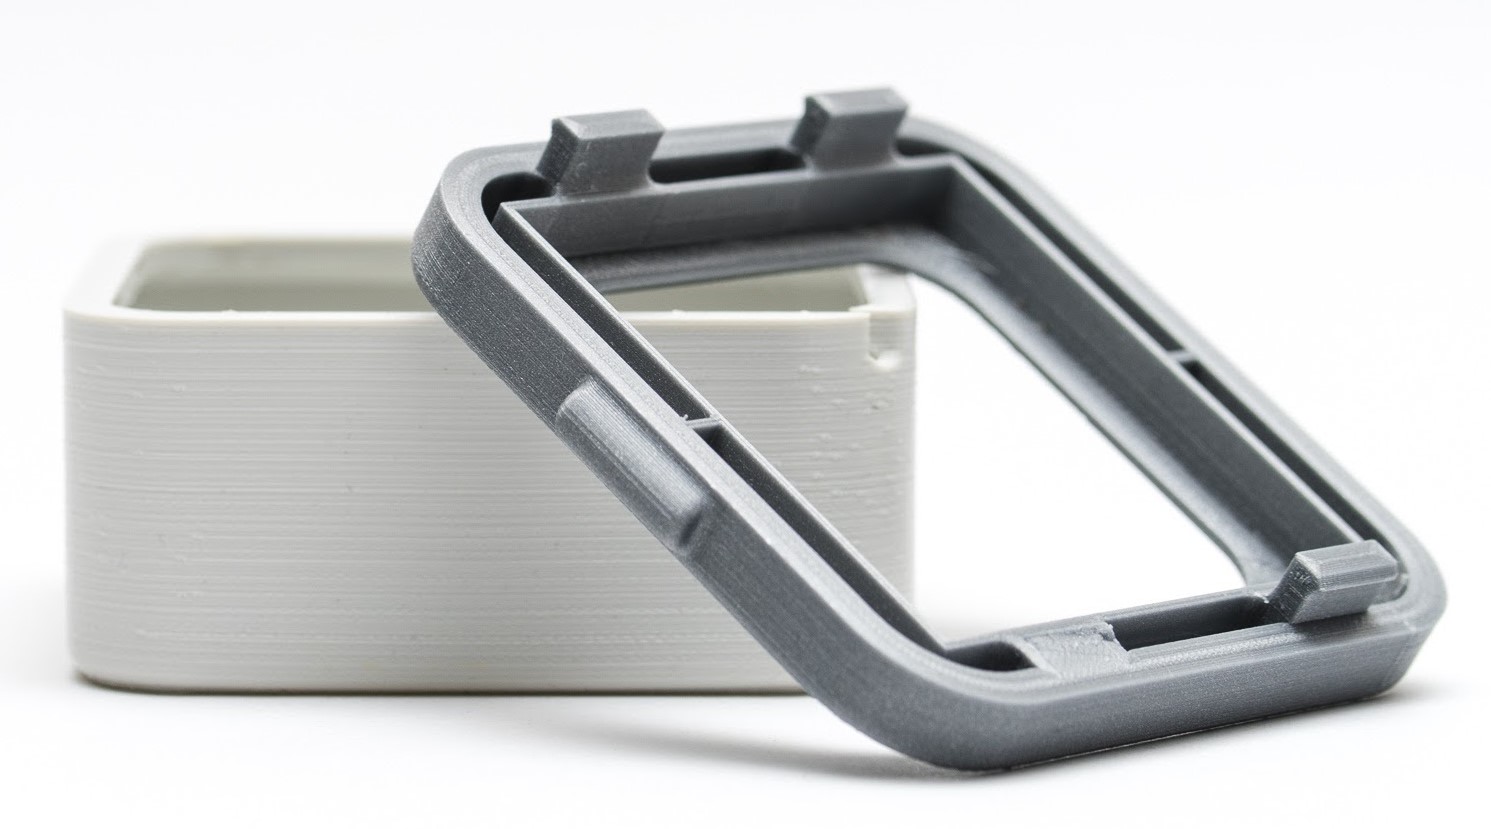
Yes, dishwashers are great until they aren’t, and some little part breaks. But why pay for a new detergent compartment cover when you can just print one?

source https://hackaday.com/2020/11/18/actuator-opens-the-door-to-drier-dishes/

Easy Device Configuration For Your Pi Projects

We’re all familiar with a typical configuration sequence for a new mass-market IoT device. Turn it on for the first time and it exposes a temporary Wi-Fi network, connect to that network and open a Web page for device configuration. Wouldn’t it be useful to be able to incorporate that functionality into your own projects without having to write it yourself! Happily now thanks to [Peter Walsh] you can, with his AppDaemon project for the Raspberry Pi.

At its heart is  a set of Perl scripts that run whatever your software is, then monitor a GPIO. A button press toggling the GPIO stops the application and fires up the access point and web server. Handily the code can all be found in a GitHub repository, and there is a run-through of the features in a video that we’ve placed below the break. It’s not something that will appeal to everybody, but for anyone who has to pass their work onto people who can’t dive into a config file and break out the editor, it should be a particularly useful addition to the armoury.

source https://hackaday.com/2020/11/18/easy-device-configuration-for-your-pi-projects/

Hacking the FPGA Control Board from a Bitcoin Miner

For anyone serious about mining cryptocurrency such as Bitcoin, we’re well past the point where a standard desktop computer is of much use. While an array of high-end GPUs is still viable for some currencies, the real heavy hitters are using custom mining hardware that makes use of application-specific integrated circuits (ASICs) to crunch the numbers. But eventually even the most powerful mining farm will start to show its age, and many end up selling on the second hand market for pennies on the dollar.

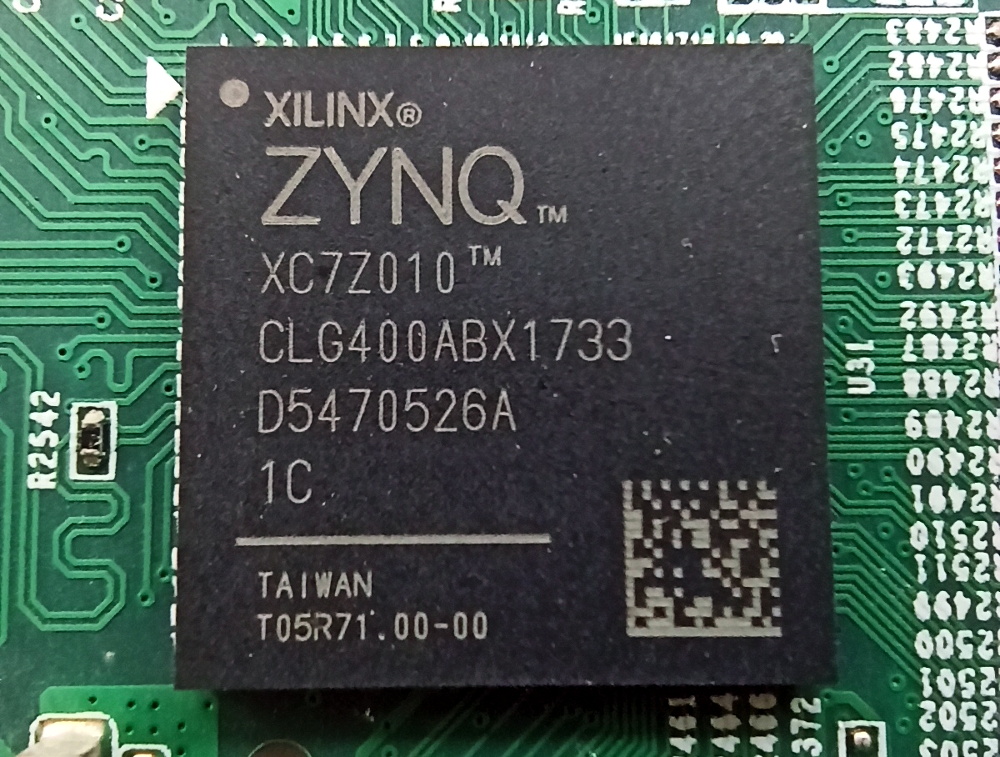
Naturally, hackers are hard at work trying to find alternate uses for these computational powerhouses. While it won’t teach an old ASIC a new trick, [xjtuecho] has documented some very interesting details on the FPGA control board of the Ebit E9+ Bitcoin miner. Known as the EBAZ4205, this board can be purchased for around $20 USD from online importers and even less if you can find one used. Since it’s just the controller it won’t help you build a budget super computer, but there’s always interest in cheap FPGA development boards.

The Zynq SoC combines an FPGA and ARM CPU.

According to [xjtuecho], it takes a little bit of work to get the EBAZ4205 ready for experimentation. For one thing, you may have to solder on your own micro SD slot depending on where you got the board from. You’ll also need to add a couple diodes to configure which storage device to boot from and to select where the board pulls power from.

Once your done, you’ll have a dual core Cortex A9 Linux board with 256 MB DDR3 and a Artix-7 FPGA featuring 28K logic elements to play with. Where you go from there is up to you.

This isn’t the first time we’ve seen FPGA boards hit the surplus market at rock bottom prices. When IT departments started dumping their stock of Pano Logic thin clients back in 2013, a whole community of dedicated FPGA hackers sprouted up around it. We’re not sure the if the EBAZ4205 will enjoy the same kind of popularity in its second life, but the price is certainly right.

[Thanks to Rog77 for the tip.]

source https://hackaday.com/2020/11/18/hacking-the-fpga-control-board-from-a-bitcoin-miner/

Sorting Thousands of Drill Bits

[Austin Adee] came into some drill bits. A lot of them actually. But when thousands of assorted sizes are delivered in one disorganized box, are they actually useful? Not unless you’re drilling holes where diameter doesn’t matter.

So two projects were at hand: finding a place to store a few hundred different sizes of bits, and tackling the actual sorting itself. In the end, he used input from a digital caliper alongside a Python script that showed him where to put them.

The start of the tray design process was a bit of a research project, establishing the common sizes and how many would fit into a given space. This data was used to spin up the layout for trays with 244 different pockets to hold the bits. The pockets were CNC milled, but getting labels for each to work with the laser engraver was a bit of a hack. In the end, filling in the letters with white crayon really makes them pop, despite [Austin’s] dissatisfaction with the level of contrast.

But wait, we promised you an epic sorting hack! Unfortunately there’s no hopper, vibration feed, and sorting gantry that did this for him (now if it were perler beads he’d have been all set). Still, the solution was still quite a clever one.

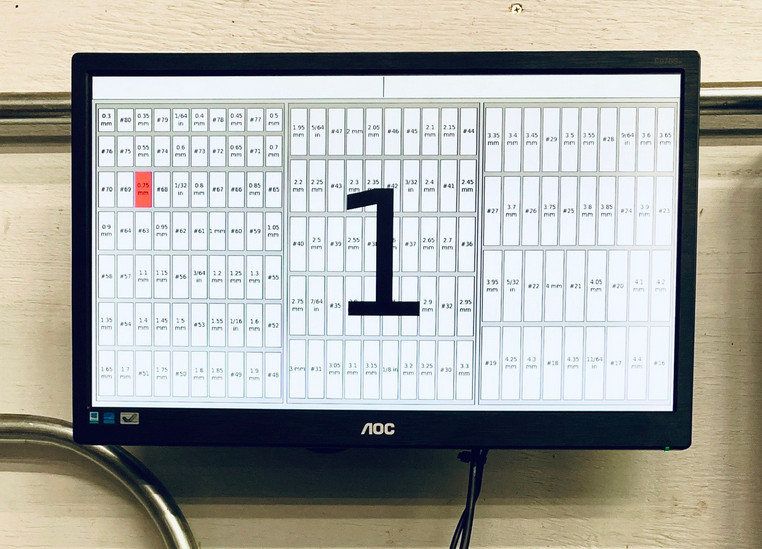
A set of digital calipers with a Bluetooth connection sends the dimension back to a python script every time you press the capture button. That script find the pocket for the nearest size and then highlights it on a map of the drill bit drawer displayed on the computer monitor. In the end the trays fit into a wide tool chest drawer, and are likely to keep things organized through exactly one project before everything is once again in disarray.

[Austin] mentions a lag of up to one second for the Bluetooth calipers to do their thing. For assembly-line style work, that adds up. We remember seeing a really snappy reaction time on these digital calipers hacked for wireless entry.

source https://hackaday.com/2020/11/17/sorting-thousands-of-drill-bits/

Sorting Thousands of Drill Bits

[Austin Adee] came into some drill bits. A lot of them actually. But when thousands of assorted sizes are delivered in one disorganized box, are they actually useful? Not unless you’re drilling holes where diameter doesn’t matter.

So two projects were at hand: finding a place to store a few hundred different sizes of bits, and tackling the actual sorting itself. In the end, he used input from a digital caliper alongside a Python script that showed him where to put them.

The start of the tray design process was a bit of a research project, establishing the common sizes and how many would fit into a given space. This data was used to spin up the layout for trays with 244 different pockets to hold the bits. The pockets were CNC milled, but getting labels for each to work with the laser engraver was a bit of a hack. In the end, filling in the letters with white crayon really makes them pop, despite [Austin’s] dissatisfaction with the level of contrast.

But wait, we promised you an epic sorting hack! Unfortunately there’s no hopper, vibration feed, and sorting gantry that did this for him (now if it were perler beads he’d have been all set). Still, the solution was still quite a clever one.

A set of digital calipers with a Bluetooth connection sends the dimension back to a python script every time you press the capture button. That script find the pocket for the nearest size and then highlights it on a map of the drill bit drawer displayed on the computer monitor. In the end the trays fit into a wide tool chest drawer, and are likely to keep things organized through exactly one project before everything is once again in disarray.

[Austin] mentions a lag of up to one second for the Bluetooth calipers to do their thing. For assembly-line style work, that adds up. We remember seeing a really snappy reaction time on these digital calipers hacked for wireless entry.

source https://hackaday.com/2020/11/17/sorting-thousands-of-drill-bits/

Sorting Thousands of Drill Bits

[Austin Adee] came into some drill bits. A lot of them actually. But when thousands of assorted sizes are delivered in one disorganized box, are they actually useful? Not unless you’re drilling holes where diameter doesn’t matter.

So two projects were at hand: finding a place to store a few hundred different sizes of bits, and tackling the actual sorting itself. In the end, he used input from a digital caliper alongside a Python script that showed him where to put them.

The start of the tray design process was a bit of a research project, establishing the common sizes and how many would fit into a given space. This data was used to spin up the layout for trays with 244 different pockets to hold the bits. The pockets were CNC milled, but getting labels for each to work with the laser engraver was a bit of a hack. In the end, filling in the letters with white crayon really makes them pop, despite [Austin’s] dissatisfaction with the level of contrast.

But wait, we promised you an epic sorting hack! Unfortunately there’s no hopper, vibration feed, and sorting gantry that did this for him (now if it were perler beads he’d have been all set). Still, the solution was still quite a clever one.

A set of digital calipers with a Bluetooth connection sends the dimension back to a python script every time you press the capture button. That script find the pocket for the nearest size and then highlights it on a map of the drill bit drawer displayed on the computer monitor. In the end the trays fit into a wide tool chest drawer, and are likely to keep things organized through exactly one project before everything is once again in disarray.

[Austin] mentions a lag of up to one second for the Bluetooth calipers to do their thing. For assembly-line style work, that adds up. We remember seeing a really snappy reaction time on these digital calipers hacked for wireless entry.

source https://hackaday.com/2020/11/17/sorting-thousands-of-drill-bits/

Kipp Bradford Discusses the Entanglement of Politics and Technology

Kipp Bradford wrapped up his keynote talk at the Hackaday Remoticon with a small piece of advice: don’t built bridges in the middle of the ocean. The point is that a bridge must connect two pieces of land to be useful and if technology isn’t useful to humanity, does it matter at all?

In reality we build bridges in the middle of the ocean all the time as each of us finds nonsensical reasons to learn new skills and try things out. But when it comes time to sit down and make an organized end goal, Kipp wisely asks us to consider the impact we’d like that work to have on the world. Equally importantly, how will we make sure completed work actually gets used? This is where the idea of politics in technology comes to play, in the sense that politics is a major mechanism for collective decision-making within a society.

Currently the CTO of Treau, and a Lecturer and Researcher at Yale, Kipp delivered this keynote live on November 7th. Kipp was an expert judge for the Hackaday Prize in 2017 and 2018. The video of his talk, and a deeper look at the topics, are found below.

Engineering is Change

Kipp shares Melvin Kranzberg’s laws of technology, the first of which is that “Technology is neither good nor bad; nor is it neutral”. That’s because new technology represents a change in how something is done, it seeks to exert change on a system merely by getting people to use it. Further, Lance Strate writes that because technology is a form of change it has an inherent bias.

In watching his talk my mind immediately leapt to current challenges for technology, like the advances in automation that are sweeping the world. Automation is making goods and services more affordable while optimizing away the jobs that used to perform those tasks. At this point the engineers might be thinking: we just wanted to build some cool robots and it got political very quickly!

Now where you land on the issues like automation is a product of the biases that shape all of our opinions in different ways. That’s an oversimplification to be certain, but these issues are all around us and this is nothing new, although the rate at which they affect our lives has accelerated immensely. Kipp has several interesting historical examples to get you thinking, from the slow adoption of new voting technology and the policy choices that shaped LED lighting manufacturing, to a bridge collapse in the 17th century that led its replacement to be designed to instill public trust in addition to just carrying a load.

Technology is Human Evolution

The talk tips into transhumansim as Kipp calls engineering our special super power. The idea is that evolution could make us better at living in warm or cold climates, but we sped that up by building heating and cooling systems for our buildings. He calls it our “extra-corporeal DNA” — the evolutionary traits that are outside of our body yet still augment our existence, shape who we are, and can be passed on to our progeny, while discarding the less useful ideas along the way.

Watching this talk provided a perfect analogy. How far can you shout? I was able to hear Kipp’s voice from 1,200 miles away, his words traveling faster than the speed of sound. That sounds very much like a super-power, and if you’re reading this you have the same power at your disposal this very moment.

The great Stan Lee popularized the Peter Parker principle that with great power comes great responsibility and it certainly applies here. Kipp is asking us all to put our work into context, to think about the impact we’d like to see in the world from the projects we work on. Take the time to educate the public on the benefits and drawbacks of utilizing technology and share the agency of what you’ve built. This is the other half of the work that makes hard-won technical solutions worth it.

Check out Some of Kipp Bradford’s Work:

source https://hackaday.com/2020/11/17/kipp-bradford-discusses-the-entanglement-of-politics-and-technology/

Another Kind of “Bare Metal”: 6502 Computer Powers RPN Calculator

[Mitsuru Yamada] states that one of the goals for this 6502 computer build was to make it strong enough to survive real-world usage. In that regard alone we’d call this a success; the die-cast aluminum enclosures used a little blast from the past and lend a nice retro industrial look to the project. The main chassis of the computer fairly bristles with LEDs and chunky toggle switches for setting the data and address busses. The interior is no less tidy, with the 6502 microprocessor — date code from 1995 — and associated support chips neatly arranged on perf board. The construction method is wire wrapping, in keeping with the old-school look and feel. Even the hand-drawn schematic is a work of art — shades of [Forrest Mims].

As for programming, this machine is as low-level as it gets. Nothing but 6502 machine language here, entered manually with the toggle switches, or via an externally programmed ROM. The machine can only address 1k of memory, a limit which the code to support the RPN calculator add-on [Yamada] also built brushes up against, at 992 bytes. The calculator keypad has a 20-key matrix pad and an eight-digit dot-matrix LED display, and can do the four basic operations on fixed-point binary-coded decimal inputs. The brief video below shows the calculator in action.

We love the look of this build and we’re eager to see more like it. We’ve seen a ton of 6502 builds from discrete chips lately, and while we love those too, it’s nice to see one of the big old DIPs put back in action for a change.

source https://hackaday.com/2020/11/17/another-kind-of-bare-metal-6502-computer-powers-rpn-calculator/

Prusa Mini Gets Custom Heavy Duty Enclosure

Still waiting on your Prusa Mini to arrive? Join the club. Between the incredible amount of interest in the inexpensive 3D printer and the COVID-19 pandemic, it can take months for the machine to arrive at your doorstep. But patient makers are finally taking delivery of their new printers, and as such the hacks and modifications are starting to trickle their way in.

First up is this gloriously over-engineered enclosure from [Build Comics]. While PLA and PETG usually print fine with nothing more exotic than a heated bed, trickier materials like ABS work best when the printer is enclosed as it helps maintain a consistent temperature. Plus it keeps any curious hands and paws a safe distance from the hot moving bits, and if things go really pear-shaped, can help contain smoke and flames.

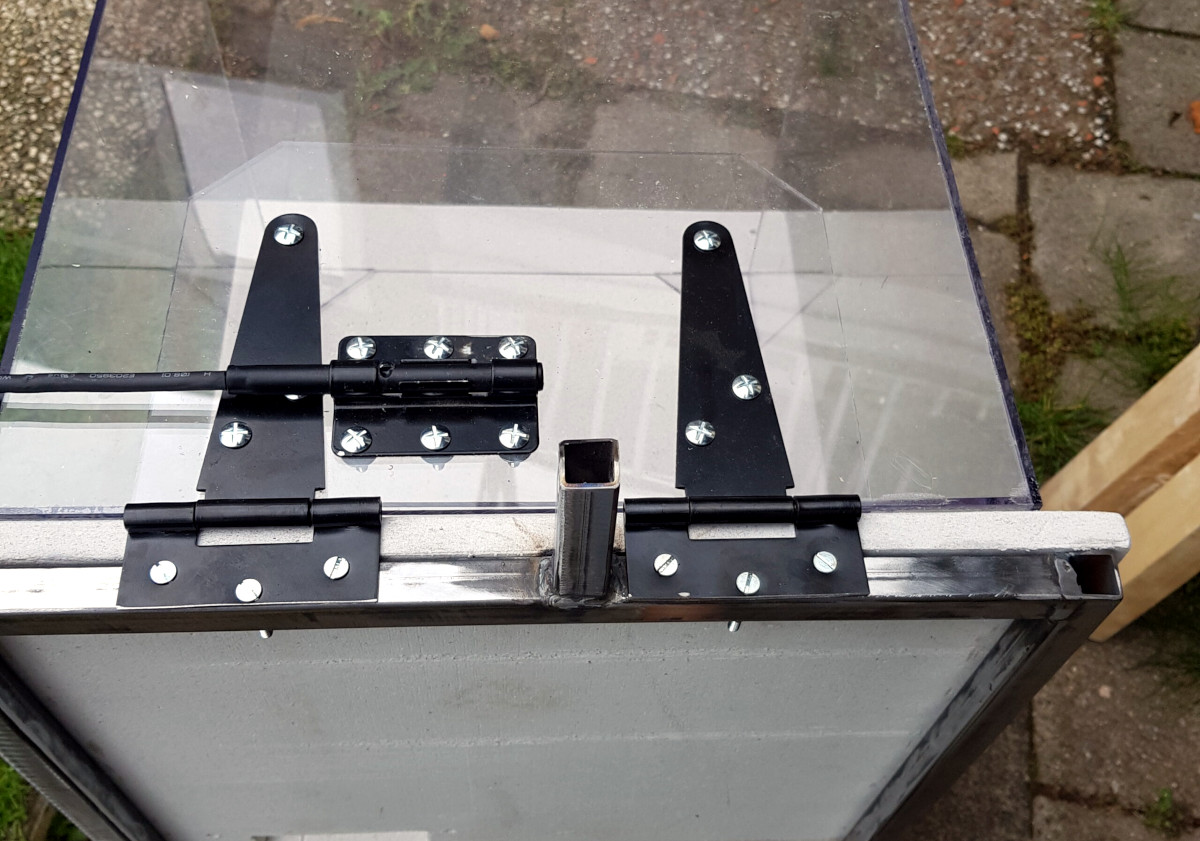
The enclosure is made from welded steel square tube, wood, and fire-retardant fiber board. A hinged polycarbonate cover, taking the form of a four-sided cube, is lowered over the printer with some heavy-duty hinges that look like they were intended for a fence. To keep the cover from slamming back down, [Build Comics] came up with a simple locking mechanism that can easily be operated from the front or side of the enclosure. With the addition of a small temperature and humidity display, the conditions inside the chamber can easily be monitored.

But [Build Comics] didn’t stop there. He also rigged up a relay box that will cut power to the printer should the smoke detector mounted above it trip. While there’s no reason to think the Prusa Mini would suffer the same fate of earlier budget desktop 3D printers, but there’s certainly no harm in taking precautions.

Will you need to build a similar enclosure whenever your Prusa Mini shows up? Maybe not. But if you felt so inclined, at least now you’ve got plenty of images and details that can help you spin up your own solution.

source https://hackaday.com/2020/11/17/prusa-mini-gets-custom-heavy-duty-enclosure/

3D Print Your Way to a Modular MIDI Playset

Have you ever wanted to experiment with MIDI, but didn’t know where to start? Or perhaps you didn’t think you could afford to properly outfit your digital beat laboratory, especially given the average hacker’s penchant for blinkenlights? Well worry no more, as [Johan von Konow] has unveiled a collection of DIY MIDI devices that anyone with a 3D printer can build on the cheap.

The LEET modular synthesizer is made up of a keyboard, drum pad, chord keyboard, arpeggiator and a step sequencer that plug into your computer and interface with industry standard digital audio workstation (DAW) programs. The down side is that they don’t do anything on their own, but this simplification allowed [Johan] to really streamline the design and bring the cost of the build down to the bare minimum.

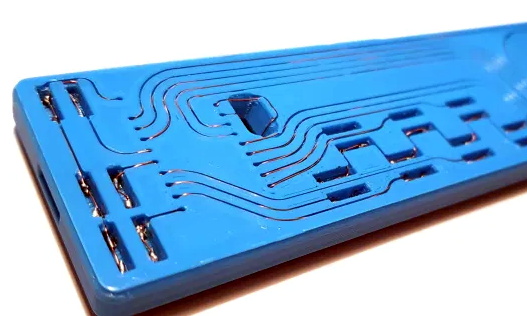
Integrated wire channels mean no PCB is required.

You don’t need to build all the components either, especially if you’re just testing the waters. The keyboard is a great starting point, and even if you have to buy all the components new from eBay, [Johan] says it shouldn’t cost you more than $10 USD to build. You just need an Arduino Pro Micro, some tact switches, and a section of WS2812 RGB LED strip. There’s an excellent chance you’ve already got some of that in the parts bin, which will make it even cheaper.

There is one missing element though: the PCB. But not because you have to source it yourself. Like his clever Arduboy clone we covered earlier in the year, the 3D printed bodies for all of the LEET devices have integrated wiring channels that serve as a stand-in for a traditional circuit board. Simply place all your components, push some stiff 0.3 mm diameter wire down into the channels, and solder the ends. It’s a very neat approach, and something we could see becoming more popular as desktop 3D printers become an increasingly common sight in the home workshop.

source https://hackaday.com/2020/11/16/3d-print-your-way-to-a-modular-midi-playset/

3D Print Your Way to a Modular MIDI Playset

Have you ever wanted to experiment with MIDI, but didn’t know where to start? Or perhaps you didn’t think you could afford to properly outfit your digital beat laboratory, especially given the average hacker’s penchant for blinkenlights? Well worry no more, as [Johan von Konow] has unveiled a collection of DIY MIDI devices that anyone with a 3D printer can build on the cheap.

The LEET modular synthesizer is made up of a keyboard, drum pad, chord keyboard, arpeggiator and a step sequencer that plug into your computer and interface with industry standard digital audio workstation (DAW) programs. The down side is that they don’t do anything on their own, but this simplification allowed [Johan] to really streamline the design and bring the cost of the build down to the bare minimum.

Integrated wire channels mean no PCB is required.

You don’t need to build all the components either, especially if you’re just testing the waters. The keyboard is a great starting point, and even if you have to buy all the components new from eBay, [Johan] says it shouldn’t cost you more than $10 USD to build. You just need an Arduino Pro Micro, some tact switches, and a section of WS2812 RGB LED strip. There’s an excellent chance you’ve already got some of that in the parts bin, which will make it even cheaper.

There is one missing element though: the PCB. But not because you have to source it yourself. Like his clever Arduboy clone we covered earlier in the year, the 3D printed bodies for all of the LEET devices have integrated wiring channels that serve as a stand-in for a traditional circuit board. Simply place all your components, push some stiff 0.3 mm diameter wire down into the channels, and solder the ends. It’s a very neat approach, and something we could see becoming more popular as desktop 3D printers become an increasingly common sight in the home workshop.

source https://hackaday.com/2020/11/16/3d-print-your-way-to-a-modular-midi-playset/

FreeCAD Debugging

Powerful software programs often have macro programming languages that you can use, and if you know how to program, you probably appreciate them. However, sometimes the program’s built-in debugging facilities are lacking or even nonexistent If it were just the language, that wouldn’t be such a problem, but you can’t just grab a, for example, VBA macro from Microsoft Word and run it in a normal Basic interpreter. Your program will depend on all sorts of facilities provided by Word and its supporting libraries. [CrazyRobMiles] was frustrated with trying to debug Python running inside FreeCAD, so he decided to do something about it.

[Rob’s] simple library, FakeFreeCad, gives enough support that you can run a FreeCAD script in your normal Python development environment. It only provides a rude view of what you are drawing, but it lets you explore the flow of the macro, examine variables, and more.

You can read more about it on the GitHub page, but essentially, you wrap your Python code into a function, import FakeFreeCAD, and then add a little boilerplate code and call the function. Here’s a partial example of a test function:


from FakeFreeCad import *

### code from FreeCad starts here
### Make it into a function that can be called to make the part

def makePlate():

plate = Part.makeBox(800,600,100)
hole = Part.makeCylinder(200,200,Base.Vector(400,300,0))
plate = plate.cut(hole)

Part.show(plate)
Gui.SendMsgToActiveView("ViewFit")
Gui.activeDocument().activeView().viewAxometric()

### End of the FreeCad code

You’ll have to dig through the code to see how many things are supported, but it would probably be pretty easy to add anything that’s missing. Naturally, having debugging support in FreeCAD would be better, but this is a pretty handy hack to get you most of the way there.

FreeCAD has gotten a lot better in recent years. We’ve seen a lot of talk about its parametric capabilities. If you want a basic tutorial, we’ve had those, too.

source https://hackaday.com/2020/11/16/freecad-debugging/

youtube-dl Makes Their Case, Returns to GitHub

Last month, the GitHub repository for the popular program youtube-dl was taken down in response to a DMCA takedown notice filed by the Recording Industry Association of America (RIAA). The crux of the RIAA complaint was that the tool could be used to download local copies of music streamed from various platforms, a claim they said was supported by the fact that several copyrighted music files were listed as unit tests in the repository.

While many believed this to be an egregious misrepresentation of what the powerful Python program was really used for, the RIAA’s argument was not completely without merit. As such, GitHub was forced to comply with the DMCA takedown until the situation could be clarified. Today we’re happy to report that has happened, and the youtube-dl repository has officially been reinstated.

Represented by the Electronic Frontier Foundation, the current maintainers of youtube-dl made their case to GitHub’s DMCA agent in a letter this afternoon which explained how the tool worked and directly addressed the issue of copyrighted videos being used as test cases in the source code. They maintain that their program does not circumvent any DRM, and that the exchange between the client and server is the same as it would be if the user had viewed the resource with a web browser. Further, they believe that downloading a few seconds worth of copyrighted material for the purpose of testing the software’s functionality is covered under fair use. Even still, they’ve decided to remove all references to the songs in question to avoid any hint at impropriety.

Having worked closely with the youtube-dl developers during this period, GitHub released their own statement to coincide with the EFF letter. They explained that the nature of the RIAA’s original complaint forced their hand, but that they never believed taking down the repository was the right decision. Specifically, they point out the myriad of legitimate reasons that users might want to maintain local copies of streamed media. While GitHub says they are glad that this situation was resolved quickly, they’ll be making several changes to their internal review process to help prevent further frivolous takedowns. Specifically the company says they will work with technical and legal experts to review the source code in question before escalating any further, and that if there’s any ambiguity as to the validity of the claim, they’ll side with the developers.

The Internet was quick to defend youtube-dl after the takedown, and we’re happy to see that GitHub made good on their promises to work with the developers to quickly get the repository back online. While the nature of open source code meant that the community was never in any real danger of losing this important tool, it’s in everyone’s best interest that development of the project can continue in the open.

source https://hackaday.com/2020/11/16/youtube-dl-makes-their-case-returns-to-github/

Promote your Junk Mail ad with easy online payments

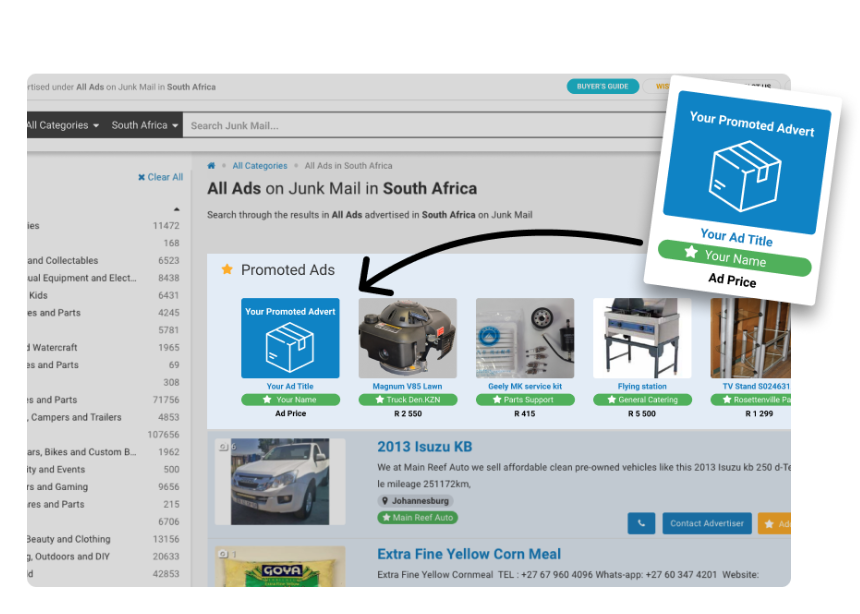
Sell your goods and services faster by promoting your ads on Junk Mail. From home page ads to top ads, there are plenty of opportunities to get extra exposure. Online payments make it easy to give your listing a boost. Post a FREE ad on Junk Mail and promote it to get more exposure.


Quick Links:


Junk Mail | Your one-stop online marketplace

Junk Mail advert promotion options:

Homepage Ads

The location of your ad is important since it has a huge impact on how many users are exposed to your goods or services. When your listing is featured on the Junk Mail homepage, it will be visible to hundreds of thousands of users and you’ll benefit from five times the visibility. Choose how long you want to promote your ad (up to a maximum of one month). Your listing will be part of a rotation that features in the homepage gallery.

Promote your ads on the Junk Mail home page

Top Ads

Make
your listing stand out from the crowd by promoting it as part of the top ads
section. Your ad will be rotated in the top five slots above the normal search
results so that it grabs the attention of users right from the start. This
means that users are on average 19.43% more likely to take a closer look at
your products or services. Top ads are also category, region, and keyword
specific. You can select how long you want to promote your ad (a maximum of one month). When you
promote your
products in top ads, potential buyers will see what you have to offer first before
looking at other listings.

Get more exposure by promoting your advert as a top ad on Junk Mail

Gallery Ads

Feature
your listing in the gallery section on the search results page, above the top
ads section. Similar to top ads, the gallery ads are category, region, and
keyword specific and will rotate with other adverts. You can choose how long
you would want to promote
your ad for (up to one month at a time).

Get more exposure by promoting your advert as a gallery ad on Junk Mail

How to Promote Your Ads through Online Payments:

The great news is that promoting your listing is easy. In a few simple steps, you’ll be able to showcase your products and services to buyers across South Africa. You’ll need to have an advert on Junk Mail in order to promote it through online payments. If you haven’t created an ad yet, you can start by placing a new ad. Once you’ve created an ad, you can follow the steps below to promote it.

Junk Mail Advert Promotion Payment Process:

  1. Log in to your account:

    Visit Junk Mail and log in to your account.
    Junk Mail Login

  2. Choose an advert to promote:

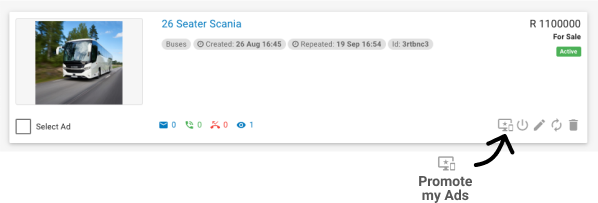
    Once you have logged in, go to the “My Ads” section and select the adverts you want to promote by clicking on the promote advert icon at the bottom of every advert.

    Please note that you can only promote adverts that have an image and have been approved by our moderation team.

    If you do not have any adverts, please visit the Ad Placement page.
    Ad Promotion Button On Adverts | Junk Mail

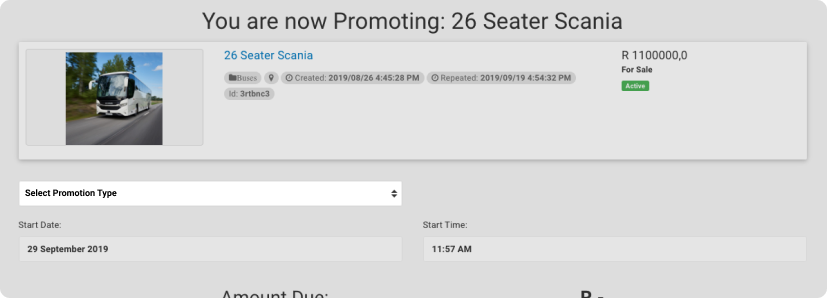
  3. Select a promotion type:

    Your options include home page promotions, top adverts, and gallery adverts.

    Select Promotion Type | Junk Mail

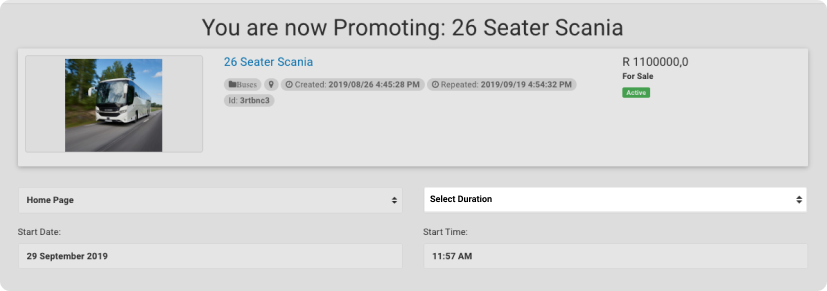
  4. Select the duration of the promotion:

    Choose how long you would like to run your promotion (up to one month at a time).

    Select Duration | Junk Mail

  5. Select a date:

    Choose when the promotion should start running.

    Select Date | Junk Mail

  6. Select a time:

    Choose what time the promotion should start running.

    Select Time | Junk Mail

  7. Proceed to Payment:

    Once you have selected all the fields, you may proceed to payment. Fill in all your payment information in the fields provided and complete the process.

    Proceed To Payment | Junk Mail

With so many easy opportunities to promote your ad on Junk Mail, it’s easy to see why this option is so popular. Visit Junk Mail and showcase your products and services today!

Gorgeous Mini-Lathe Makes the Most Out of Wood and Metal

It’s a cliche that the only machine tool that can make copies of itself is the lathe. It’s not exactly true, but it’s a useful adage in that it points out that the ability to make big round things into smaller round things, and to make unround things into round things, is a critical process in so many precision operations. That said, making a lathe primarily out of wood presents some unique challenges in the precision department

This isn’t [Uri Tuchman]’s first foray into lathe-building. Readers may recall the quirky creator’s hybrid treadle-powered and electric lathe, also primarily an exercise in woodworking. That lathe has seen plenty of use in [Uri]’s projects, turning both wood and metal stock into parts for his builds. It wasn’t really optimal for traditional metal turning, though, so Mini-Lathe 2 was undertaken. While the bed, headstock, and tailstock “castings” are wood — gorgeously hand-detailed and finished, of course — the important bits, like the linear slides for the carriage and the bearings in the headstock, are all metal. There’s a cross-slide, a quick-change tool post, and a manual lead screw for the carriage. We love the finely detailed brass handcranks, which were made on the old lathe, and all of the lovely details [Uri] always builds into his projects.

Sadly, at the end of the video below we see that the lathe suffers from a fair amount of chatter when turning brass. That’s probably not unexpected — there’s not much substitute for sheer mass whenit comes to dampening vibration. We expect that [Uri] will be making improvements to the lathe in the coming months — he’s not exactly one to leave a job unfinished.

[DainBramage] sent this tip in. Thanks!

source https://hackaday.com/2020/11/16/gorgeous-mini-lathe-makes-the-most-out-of-wood-and-metal/

Simple Tips For Better 3D-Printed Enclosures

3D printing can be great for making enclosures, and following some simple guidelines can help the whole process go much smoother. 3D Hubs has an article on designing printed enclosures that has clear steps and tips to get enclosures coming out right the first time. 3D Hubs offers 3D printing and other services, and the article starts with a short roundup of fabrication methods but the rest is a solid set of tips applicable to anyone.

The first recommendation is to model the contents of the enclosure as a way to help ensure everything fits as it should, and try to discover problems as early as possible during the design phase, before anything gets actually printed. We’ve seen how a PCB that doesn’t take the enclosure into account risks needing a redesign, because there are some issues an enclosure just can’t fix.

The rest of their advice boils down to concrete design guidelines about wall thickness (they recommend 2 mm or more), clearances (allow a minimum of 0.5 mm between internal components and enclosure), and how to size holes for fasteners, clips, or ports. These numbers aren’t absolute minimums, but good baseline values to avoid surprises.

One final useful tip is that using a uniform wall thickness throughout the enclosure is general good practice. While this isn’t strictly necessary for successful 3D printing, it will make life easier if the enclosure ever moves to injection molding. Want to know more? Our own Bob Baddeley has an excellent primer on injection molding, and his been-there-done-that perspective is invaluable.

source https://hackaday.com/2020/11/16/simple-tips-for-better-3d-printed-enclosures/

3D Printering: The Things Printers Don’t Do

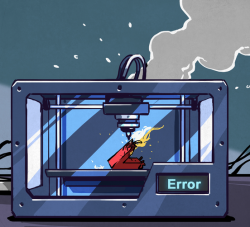
3D printers are amazing things, but if one judges solely by the successes that get showcased online, it can look as through anything at all is possible. Yet in many ways, 3D printers are actually quite limited. Because success looks easy and no one showcases failure, people can end up with lopsided ideas of what is realistic. This isn’t surprising; behind every shining 3D print that pushes the boundaries of the technology, there are misprints and test pieces piled just out of sight.

If you have ever considered getting into 3D printing, or are wondering what kinds of expectations are realistic, read on because I am going to explain where objects come from, and how to recognize whether something is a good (or bad) fit for 3D printing. The important thing to understand is that printers have limitations, and to get a working idea of what those limitations are. The result will be a better understanding of what they can do, and what problems they can reliably solve.

3D Printers Have Limits

I recently had a talk with someone who wanted to know if a 3D printer could help with a problem they had. As I listened to them describe their needs, I realized I had in a way heard it all before many times.

My colleague actually had a fairly good idea of what printers could do, in theory. But they had very little grasp of what printers did not do, and that disconnect left them a bit adrift when it came to practical applications. To help address this gap, here are some tips that can give anyone a working understanding of the things 3D printers do not do well.

They Do Not Create Objects Effortlessly

Repairing household items is a common use case, but 3D printers do not work like photocopiers for objects, nor do they magic up replacements for missing or broken things. There is currently no practical way to take a few pictures of a broken part and have someone print a new one, nor is there a quick and easy way to make copies of existing objects.

Ideally, if someone required a replacement part to repair a household item, the process would begin with looking the part up online by manufacturer and model number. Then a user would download a 3D model of the missing or broken part, and print a replacement at the press of a button. We’re not there yet. There are plenty of 3D models available online, but we are far from having libraries of user-serviceable parts for manufactured products readily available for download and printing.

3D printers can only create objects from 3D models, and 3D models get made by someone using a CAD program. Creating a 3D model needs to happen first, because without a model a 3D printer is useless.

Making a Thing Means CAD Work

If an object doesn’t already exist as a 3D model, one must be created. Fortunately, the internet is already home to a staggering number of models for useful gadgets, tools, and knickknacks, ready to be downloaded from places like Thingiverse, PrusaPrinters, MyMiniFactory, and others. These models already exist and are — for the most part — ready to be 3D printed.

However, if one needs an object to interface with something else (for example, a replacement part for an appliance) then a 3D model for that object most likely does not already exist. It will need to be carefully designed from scratch, and reverse-engineering of a mechanical design is a process that will involve a lot of careful measuring and testing in addition to the CAD work. Access to both the thing being fixed, as well as the broken part being replaced, will probably be needed. The job could be anywhere between an afternoon’s work, to a multi-day effort.

3D scanning techniques, like photogrammetry, can be useful, but scanning is only a tool to aid other design work; it doesn’t yet remove the need to choose a CAD package and start designing. A good example of how 3D scanning can assist the design process is showcased nicely by this project to 3D print a custom control panel to fit onto a complex shape.

Some Things Do Not 3D Print Well

To print reliably, a 3D model must be designed with a 3D printer’s strengths and weaknesses in mind. One must always play to a tool’s strengths, and 3D printers are no different. Just as a table saw is the wrong tool for cutting curves, so too are some shapes and part geometries not easily 3D printed.

The two types of 3D printing that are most accessible to hobbyists are filament-based (FDM) and resin-based (SLA). Both work by building an object layer by layer, starting from a flat build platform, with each new layer being laid upon the foundation of the one before it. Because of this, some things print more easily and reliably than others.

How can one know whether an object will be troublesome to 3D print without having a lot of experience? Below is a simple checklist of potentially troublesome features. The more items in this list an object matches, the more likely the object will have challenges.

  • Does the object lack a flat surface to use as a base, or does it have a very small base relative to the rest of the model? Such models are often more complex to print than those with stable, flat bases.
  • Is the object very large, or very small? Object size can be an issue, and may depend on the printer and material type.
  • Does the model have thin walls or fine details? Thin walls are often weak points.
  • Does the model depend on tight tolerances and exact dimensions? If so, it may require experimentation to get right.
  • Are there protruding features that are not well connected to the rest of the model? The more parts stick out, the more challenging it will be to print.

For people who work with their hands, here is an evaluation method that is as intuitive as it is simple: Would the object be easy to build out of wet sand, as if one were building a sandcastle? If so, then it will probably 3D print just fine.

3D Printers Are Great, So Long As You Play By Their Rules

3D printers do not run flawlessly every time, nor do they operate in a foolproof manner. Operating and maintaining a 3D printer is not difficult, but it is a skill acquired through experience. It is entirely possible to damage a printer by running it carelessly. Ideally, one would simply press a button then sip a margarita until the machine spits out a perfectly-finished part. Unfortunately, this isn’t true of 3D printers any more than it is for any other power tool.

To be clear, 3D printing is one of the best things to have happened to hobbyists over the last decade, and the benefits are not limited to those who design objects from scratch. For example, printing miniatures for tabletop gaming is a niche that has probably single-handedly propelled hobbyist SLA printing to where it is today. As a result, hackers around the world have reaped the benefits, making it easier than ever to add an SLA printer to the workbench.

Successes are great, but knowing what 3D printers are not good at is also important. With a better idea of what printers do poorly, a thoughtful hacker is not only in a much better position to decide whether buying a 3D printer is a good idea, but will also have a better idea of how many beers that friendly printing favor might be worth.

source https://hackaday.com/2020/11/16/3d-printering-the-things-printers-dont-do/

3D Printering: The Things Printers Don’t Do

3D printers are amazing things, but if one judges solely by the successes that get showcased online, it can look as through anything at all is possible. Yet in many ways, 3D printers are actually quite limited. Because success looks easy and no one showcases failure, people can end up with lopsided ideas of what is realistic. This isn’t surprising; behind every shining 3D print that pushes the boundaries of the technology, there are misprints and test pieces piled just out of sight.

If you have ever considered getting into 3D printing, or are wondering what kinds of expectations are realistic, read on because I am going to explain where objects come from, and how to recognize whether something is a good (or bad) fit for 3D printing. The important thing to understand is that printers have limitations, and to get a working idea of what those limitations are. The result will be a better understanding of what they can do, and what problems they can reliably solve.

3D Printers Have Limits

I recently had a talk with someone who wanted to know if a 3D printer could help with a problem they had. As I listened to them describe their needs, I realized I had in a way heard it all before many times.

My colleague actually had a fairly good idea of what printers could do, in theory. But they had very little grasp of what printers did not do, and that disconnect left them a bit adrift when it came to practical applications. To help address this gap, here are some tips that can give anyone a working understanding of the things 3D printers do not do well.

They Do Not Create Objects Effortlessly

Repairing household items is a common use case, but 3D printers do not work like photocopiers for objects, nor do they magic up replacements for missing or broken things. There is currently no practical way to take a few pictures of a broken part and have someone print a new one, nor is there a quick and easy way to make copies of existing objects.

Ideally, if someone required a replacement part to repair a household item, the process would begin with looking the part up online by manufacturer and model number. Then a user would download a 3D model of the missing or broken part, and print a replacement at the press of a button. We’re not there yet. There are plenty of 3D models available online, but we are far from having libraries of user-serviceable parts for manufactured products readily available for download and printing.

3D printers can only create objects from 3D models, and 3D models get made by someone using a CAD program. Creating a 3D model needs to happen first, because without a model a 3D printer is useless.

Making a Thing Means CAD Work

If an object doesn’t already exist as a 3D model, one must be created. Fortunately, the internet is already home to a staggering number of models for useful gadgets, tools, and knickknacks, ready to be downloaded from places like Thingiverse, PrusaPrinters, MyMiniFactory, and others. These models already exist and are — for the most part — ready to be 3D printed.

However, if one needs an object to interface with something else (for example, a replacement part for an appliance) then a 3D model for that object most likely does not already exist. It will need to be carefully designed from scratch, and reverse-engineering of a mechanical design is a process that will involve a lot of careful measuring and testing in addition to the CAD work. Access to both the thing being fixed, as well as the broken part being replaced, will probably be needed. The job could be anywhere between an afternoon’s work, to a multi-day effort.

3D scanning techniques, like photogrammetry, can be useful, but scanning is only a tool to aid other design work; it doesn’t yet remove the need to choose a CAD package and start designing. A good example of how 3D scanning can assist the design process is showcased nicely by this project to 3D print a custom control panel to fit onto a complex shape.

Some Things Do Not 3D Print Well

To print reliably, a 3D model must be designed with a 3D printer’s strengths and weaknesses in mind. One must always play to a tool’s strengths, and 3D printers are no different. Just as a table saw is the wrong tool for cutting curves, so too are some shapes and part geometries not easily 3D printed.

The two types of 3D printing that are most accessible to hobbyists are filament-based (FDM) and resin-based (SLA). Both work by building an object layer by layer, starting from a flat build platform, with each new layer being laid upon the foundation of the one before it. Because of this, some things print more easily and reliably than others.

How can one know whether an object will be troublesome to 3D print without having a lot of experience? Below is a simple checklist of potentially troublesome features. The more items in this list an object matches, the more likely the object will have challenges.

  • Does the object lack a flat surface to use as a base, or does it have a very small base relative to the rest of the model? Such models are often more complex to print than those with stable, flat bases.
  • Is the object very large, or very small? Object size can be an issue, and may depend on the printer and material type.
  • Does the model have thin walls or fine details? Thin walls are often weak points.
  • Does the model depend on tight tolerances and exact dimensions? If so, it may require experimentation to get right.
  • Are there protruding features that are not well connected to the rest of the model? The more parts stick out, the more challenging it will be to print.

For people who work with their hands, here is an evaluation method that is as intuitive as it is simple: Would the object be easy to build out of wet sand, as if one were building a sandcastle? If so, then it will probably 3D print just fine.

3D Printers Are Great, So Long As You Play By Their Rules

3D printers do not run flawlessly every time, nor do they operate in a foolproof manner. Operating and maintaining a 3D printer is not difficult, but it is a skill acquired through experience. It is entirely possible to damage a printer by running it carelessly. Ideally, one would simply press a button then sip a margarita until the machine spits out a perfectly-finished part. Unfortunately, this isn’t true of 3D printers any more than it is for any other power tool.

To be clear, 3D printing is one of the best things to have happened to hobbyists over the last decade, and the benefits are not limited to those who design objects from scratch. For example, printing miniatures for tabletop gaming is a niche that has probably single-handedly propelled hobbyist SLA printing to where it is today. As a result, hackers around the world have reaped the benefits, making it easier than ever to add an SLA printer to the workbench.

Successes are great, but knowing what 3D printers are not good at is also important. With a better idea of what printers do poorly, a thoughtful hacker is not only in a much better position to decide whether buying a 3D printer is a good idea, but will also have a better idea of how many beers that friendly printing favor might be worth.

source https://hackaday.com/2020/11/16/3d-printering-the-things-printers-dont-do/
3D Printering: The Things Printers Don’t Do

3D printers are amazing things, but if one judges solely by the successes that get showcased online, it can look as through anything at all is possible. Yet in many ways, 3D printers are actually quite limited. Because success looks easy and no one showcases failure, people can end up with lopsided ideas of what is realistic. This isn’t surprising; behind every shining 3D print that pushes the boundaries of the technology, there are misprints and test pieces piled just out of sight.

If you have ever considered getting into 3D printing, or are wondering what kinds of expectations are realistic, read on because I am going to explain where objects come from, and how to recognize whether something is a good (or bad) fit for 3D printing. The important thing to understand is that printers have limitations, and to get a working idea of what those limitations are. The result will be a better understanding of what they can do, and what problems they can reliably solve.

3D Printers Have Limits

I recently had a talk with someone who wanted to know if a 3D printer could help with a problem they had. As I listened to them describe their needs, I realized I had in a way heard it all before many times.

My colleague actually had a fairly good idea of what printers could do, in theory. But they had very little grasp of what printers did not do, and that disconnect left them a bit adrift when it came to practical applications. To help address this gap, here are some tips that can give anyone a working understanding of the things 3D printers do not do well.

They Do Not Create Objects Effortlessly

Repairing household items is a common use case, but 3D printers do not work like photocopiers for objects, nor do they magic up replacements for missing or broken things. There is currently no practical way to take a few pictures of a broken part and have someone print a new one, nor is there a quick and easy way to make copies of existing objects.

Ideally, if someone required a replacement part to repair a household item, the process would begin with looking the part up online by manufacturer and model number. Then a user would download a 3D model of the missing or broken part, and print a replacement at the press of a button. We’re not there yet. There are plenty of 3D models available online, but we are far from having libraries of user-serviceable parts for manufactured products readily available for download and printing.

3D printers can only create objects from 3D models, and 3D models get made by someone using a CAD program. Creating a 3D model needs to happen first, because without a model a 3D printer is useless.

Making a Thing Means CAD Work

If an object doesn’t already exist as a 3D model, one must be created. Fortunately, the internet is already home to a staggering number of models for useful gadgets, tools, and knickknacks, ready to be downloaded from places like Thingiverse, PrusaPrinters, MyMiniFactory, and others. These models already exist and are — for the most part — ready to be 3D printed.

However, if one needs an object to interface with something else (for example, a replacement part for an appliance) then a 3D model for that object most likely does not already exist. It will need to be carefully designed from scratch, and reverse-engineering of a mechanical design is a process that will involve a lot of careful measuring and testing in addition to the CAD work. Access to both the thing being fixed, as well as the broken part being replaced, will probably be needed. The job could be anywhere between an afternoon’s work, to a multi-day effort.

3D scanning techniques, like photogrammetry, can be useful, but scanning is only a tool to aid other design work; it doesn’t yet remove the need to choose a CAD package and start designing. A good example of how 3D scanning can assist the design process is showcased nicely by this project to 3D print a custom control panel to fit onto a complex shape.

Some Things Do Not 3D Print Well

To print reliably, a 3D model must be designed with a 3D printer’s strengths and weaknesses in mind. One must always play to a tool’s strengths, and 3D printers are no different. Just as a table saw is the wrong tool for cutting curves, so too are some shapes and part geometries not easily 3D printed.

The two types of 3D printing that are most accessible to hobbyists are filament-based (FDM) and resin-based (SLA). Both work by building an object layer by layer, starting from a flat build platform, with each new layer being laid upon the foundation of the one before it. Because of this, some things print more easily and reliably than others.

How can one know whether an object will be troublesome to 3D print without having a lot of experience? Below is a simple checklist of potentially troublesome features. The more items in this list an object matches, the more likely the object will have challenges.

  • Does the object lack a flat surface to use as a base, or does it have a very small base relative to the rest of the model? Such models are often more complex to print than those with stable, flat bases.
  • Is the object very large, or very small? Object size can be an issue, and may depend on the printer and material type.
  • Does the model have thin walls or fine details? Thin walls are often weak points.
  • Does the model depend on tight tolerances and exact dimensions? If so, it may require experimentation to get right.
  • Are there protruding features that are not well connected to the rest of the model? The more parts stick out, the more challenging it will be to print.

For people who work with their hands, here is an evaluation method that is as intuitive as it is simple: Would the object be easy to build out of wet sand, as if one were building a sandcastle? If so, then it will probably 3D print just fine.

3D Printers Are Great, So Long As You Play By Their Rules

3D printers do not run flawlessly every time, nor do they operate in a foolproof manner. Operating and maintaining a 3D printer is not difficult, but it is a skill acquired through experience. It is entirely possible to damage a printer by running it carelessly. Ideally, one would simply press a button then sip a margarita until the machine spits out a perfectly-finished part. Unfortunately, this isn’t true of 3D printers any more than it is for any other power tool.

To be clear, 3D printing is one of the best things to have happened to hobbyists over the last decade, and the benefits are not limited to those who design objects from scratch. For example, printing miniatures for tabletop gaming is a niche that has probably single-handedly propelled hobbyist SLA printing to where it is today. As a result, hackers around the world have reaped the benefits, making it easier than ever to add an SLA printer to the workbench.

Successes are great, but knowing what 3D printers are not good at is also important. With a better idea of what printers do poorly, a thoughtful hacker is not only in a much better position to decide whether buying a 3D printer is a good idea, but will also have a better idea of how many beers that friendly printing favor might be worth.

source https://hackaday.com/2020/11/16/3d-printering-the-things-printers-dont-do/
Automatic Winder Takes the Drudgery Out of Tesla Coil Builds

What is it about coil winding automation projects that’s just so captivating? Maybe it’s knowing what a labor saver they can be once you’ve got a few manually wound coils under your belt. Or perhaps it’s just the generally satisfying nature of any machine that does an exacting task smoothly and precisely. Whatever it is, this automatic Tesla coil winder has it in abundance.

According to [aa-epilectrik]’s account, the back story of this build is that while musical Tesla coils are a big part of the performance of musical group ArcAttack, they’re also cool enough in their own right to offer DIY kits for sale. This rig takes on the job of producing the coils, which at least takes some of the drudgery out of the build. There’s no build log, but there are enough details on reddit and Instagram to work out the basics. The main spindle is driven by a gearmotor while the winding carriage translates along a linear slide thanks to a stepper-driven lead screw. The spool holding the fine magnet wire needs to hold proper tension to prevent tangling; this is achieved through by applying some torque to the spool with a small DC motor.

There are some great design elements in this one, not least being the way tension is controlled by measuring the movement of an idler pulley using a linear pot. At top speed, the machine looks like it complete a coil in just about three minutes, which seems pretty reasonable with such neat results. Another interesting point: ArcAttack numbers [Anouk Wipprecht], whom we’ve featured a couple of times on these pages, among its collaborators. Small world.


source https://hackaday.com/2020/11/16/automatic-winder-takes-the-drudgery-out-of-tesla-coil-builds/

Vectron Adds Basic and Christmas Tree Control

Not content to leave things alone, [Nick Bild] has updated his nearly practical breadboard 6502 Vectron project once again by adding Tiny Basic and home tree automation. Instead of using an LCD module like last time, or his custom-built VGA output using 7400-series logic, [Nick] chose to go modern this time and implemented a VGO output using a TinyFPGA BX.

Tiny Basic was one of the first versions of Basic released after Bill Gates famous open letter to hobbyists in 1976. While Altair Basic was selling for $150, Tim Pittman wrote Tiny Basic for the 6800 and sold it for only $5 (don’t worry, Tom has since made it free to use). We got a kick out of browsing the Tiny Basic manual and learning that our serial number can be found on the paper tape leader, and that a Teletype will generally receive one more character, at least, after getting the X-OFF control signal.

In the video, you can see [Nick] running a short Basic program and operating his Christmas tree lights from the Vectron, although it’s only on-off control. He suggests that a PCB version is in the works, but he’s having trouble deciding when to quit adding features.  That’s a conundrum we know all too well.

source https://hackaday.com/2020/11/16/vectron-adds-basic-and-christmas-tree-control/

Gyroscope Level is Digital

A spirit level, you know the kind of level with a little bubble in a tube of fluid, is a basic construction tool. [DesignBuildDestroy] took an Arduino, a gyroscope chip, and an OLED, and made a 3D printed level with no bubble, but it does have a nice digital display.

It is funny when you realize that at one time a gyroscope was a high tech item reserved for missiles and aircraft. Now you can grab a six-axis sensor for pennies. Even, better, the code used in the project can offload the Arduino for a lot of processing.

Initially, the device lived on a breadboard, which is always a good idea to get the kinks out of things. Thanks to the OLED, the Arduino can calibrate itself without a PC and do other tricks. The display is easy to read, but we thought there should be a mode that shows a little bubble made with an O character. Seems like that would be a fun rainy day project. We did like the automatic screen rotation, though.

We’ve seen a nice level done with a Raspberry Pi before. If you need something smaller, how about something the size of a dime?

source https://hackaday.com/2020/11/15/gyroscope-level-is-digital/

DIY High Voltage Kirlian Photography Rig

High voltage is a fun, if dangerous, thing to play with. [Mirko] is an enthusiast in this space, and built a high-voltage Kirlian photography device that’s capable of creating some stunning images.

The construction of the device itself is basic. High-frequency, high-voltage electricity is connected to a metal object placed on one side of a glass plate. On the other side, salt water is pooled, and connected to a second electrode. This creates a transparent window through which the electrical discharge can be viewed either by eye or with a digital camera. Historically, this was done with photographic film in place of the transparent window, but the principle is the same.

Popular in the paranormal and alternative medicine spaces, the actual scientific application of Kirlian photography is minimal. Rather, it’s an interesting way to explore high voltages that creates some pretty results! If you find yourself becoming a fan of high voltage, you might also consider your own Tesla coil build, too. Video after the break.

source https://hackaday.com/2020/11/15/diy-high-voltage-kirlian-photography-rig/

Hackaday Links: November 15, 2020

Now that we drive around cars that are more like mobile data centers than simple transportation, there’s a wealth of data to be harvested when the inevitable crashes occur. After a recent Tesla crash on a California highway, a security researcher got a hold of the car’s “black box” and extracted some terrifying insights into just how bad a car crash can be. The interesting bit is the view of the crash from the Tesla’s forward-facing cameras with object detection overlays. Putting aside the fact that the driver of this car was accelerating up to the moment it rear-ended the hapless Honda with a closing speed of 63 MPH (101 km/h), the update speeds on the bounding boxes and lane sensing are incredible. The author of the article uses this as an object lesson in why Level 2 self-driving is a bad idea, and while I agree with that premise, the fact that self-driving had been disabled 40 seconds before the driver plowed into the Honda seems to make that argument moot. Tech or not, someone this unskilled or impaired was going to have an accident eventually, and it was just bad luck for the other driver.

Last week I shared a link to Scan the World, an effort to 3D-scan and preserve culturally significant artifacts and create a virtual museum. Shortly after the article ran we got an email from Elisa at Scan the World announcing their “Unlocking Lockdown” competition, which encourages people to scan cultural artifacts and treasures directly from their home. You may not have a Ming Dynasty vase or a Grecian urn on display in your parlor, but you’ve probably got family heirlooms, knick-knacks, and other tchotchkes that should be preserved. Take a look around and scan something for posterity. And I want to thank Elisa for the link to the Pompeiian bread that I mentioned.

The Defense Advanced Research Projects Agency (DARPA)has been running an interesting challenge for the last couple of years: The Subterranean (SubT) Challenge. The goal is to discover new ways to operate autonomously below the surface of the Earth, whether for mining, search and rescue, or warfare applications. They’ve been running different circuits to simulate various underground environments, with the most recent circuit being a cave course back in October. On Tuesday November 17, DARPA will webcast the competition, which features 16 teams and their autonomous search for artifacts in a virtual cave. It could make for interesting viewing.

If underground adventures don’t do it for you, how about going upstairs? LeoLabs, a California-based company that specializes in providing information about satellites, has a fascinating visualization of the planet’s satellite constellation. It’s sort of Google Earth but with the details focused on low-earth orbit. You can fly around the planet and watch the satellites whiz by or even pick out the hundreds of spent upper-stage rockets still up there. You can lock onto a specific satellite, watch for near-misses, or even turn on a layer for space debris, which honestly just turns the display into a purple miasma of orbiting junk. The best bit, though, is the easily discerned samba-lines of newly launched Starlink satellites.

A doorbell used to be a pretty simple device, but like many things, they’ve taken on added complexity. And danger, it appears, as Amazon Ring doorbell users are reporting their new gadgets going up in flame upon installation. The problem stems from installers confusing the screws supplied with the unit. The longer wood screws are intended to mount the device to the wall, while a shorter security screw secures the battery cover. Mix the two up for whatever reason, and the sharp point of the mounting screw can find the LiPo battery within, with predictable results.

And finally, it may be the shittiest of shitty robots: a monstrous robotic wolf intended to scare away wild bears. It seems the Japanese town of Takikawa has been having a problem with bears lately, so they deployed a pair of these improbable looking creatures to protect themselves. It’s hard to say what’s the best feature: the flashing LED eyes, the strobe light tail, the fact that the whole thing floats in the air atop a pole. Whatever it is, it seems to work on bears, which is probably good enough. Take a look in the video below the break.

source https://hackaday.com/2020/11/15/hackaday-links-november-15-2020/