He’s the Operator of His Pocket Arduino

The band Kraftwerk hit the music scene with its unique electronic sound in the 70s in Germany, opening the door for the electronic music revolution of the following decade. If you’re not familiar with the band, they often had songs with a technology theme as well, and thanks to modern microcontroller technology it’s possible to replicate the Kraftwerk sound with microcontrollers as [Steven] aka [Marquis de Geek] demonstrates in his melodic build.

While the music is played on a Stylophone and a Korg synthesizer, it is fed through five separate Arduinos, four of which have various synths and looping samplers installed on them (and presumably represent each of the four members of Kraftwerk). Samplers like this allow pieces of music to be repeated continuously once recorded, which means that [Steven] can play entire songs on his own. The fifth Arduino functions as a controller, handling MIDI and pattern sequencing over I2C, and everything is finally channeled through a homemade mixer.

[Marquis] also dressed in Kraftwerk-appropriate attire for the video demonstration below, which really sells the tribute to the famous and groundbreaking band. While it’s a great build in its own right and is a great recreation of the Kraftwerk sound, we can think of one more way to really put this project over the top — a Kraftwerk-inspired LED tie.

source https://hackaday.com/2020/11/27/hes-the-operator-of-his-pocket-arduino/

Finally! The ROM You Wished Your Sinclair Spectrum Had!

If there is one thing that Sir Clive SInclair was famous for, it was producing electronic devices that somehow managed to squeeze near-impossible performance out of relatively meagre components. This gave us some impressive products, but it’s fair to say that sometimes this philosophy pushed the envelope a little too far. Thus even some of the most fondly remembered Sinclair products concealed significant flaws, and this extended to both their hardware and their software.

Sir Clive never gave us this!

The SInclair ZX spectrum’s ROM for example had more than its fair share of bugs, and its BASIC programming experience with single keypress was unique but also slow to run. It’s something [Jonathan Cauldwell] has addressed with his Arcade Game Designer ROM, a complete and ready to run replacement for the original Spectrum ROM that contains a scripting language, a compiler, editors for in-game assets, and a game engine upon which to run your games. It’s the ROM you wanted back in 1983, when you were struggling to fit a bit of Z80 code in a Sinclair Basic REM statement.

If you’re a Spectrum enthusiast and think this sounds a little familiar then you are of course correct. It builds upon his past work with his Arcade Game Designer, with the distribution by ROM allowing the developer to use the full 48k available on all but a very few early 16k machines. You’ll need your own EPROM on which to burn it, but we suspect that if you’re the kind of person who has a Spectrum and has writing these games in mind, you already have access to the relevant equipment.

If you’re new to all this Spectrum stuff and where its ROM came from, then maybe it’s time for a trip down memory lane.

source https://hackaday.com/2020/11/27/finally-the-rom-you-wished-your-sinclair-spectrum-had/

Finally! The ROM You Wished Your Sinclair Spectrum Had!

If there is one thing that Sir Clive SInclair was famous for, it was producing electronic devices that somehow managed to squeeze near-impossible performance out of relatively meagre components. This gave us some impressive products, but it’s fair to say that sometimes this philosophy pushed the envelope a little too far. Thus even some of the most fondly remembered Sinclair products concealed significant flaws, and this extended to both their hardware and their software.

Sir Clive never gave us this!

The SInclair ZX spectrum’s ROM for example had more than its fair share of bugs, and its BASIC programming experience with single keypress was unique but also slow to run. It’s something [Jonathan Cauldwell] has addressed with his Arcade Game Designer ROM, a complete and ready to run replacement for the original Spectrum ROM that contains a scripting language, a compiler, editors for in-game assets, and a game engine upon which to run your games. It’s the ROM you wanted back in 1983, when you were struggling to fit a bit of Z80 code in a Sinclair Basic REM statement.

If you’re a Spectrum enthusiast and think this sounds a little familiar then you are of course correct. It builds upon his past work with his Arcade Game Designer, with the distribution by ROM allowing the developer to use the full 48k available on all but a very few early 16k machines. You’ll need your own EPROM on which to burn it, but we suspect that if you’re the kind of person who has a Spectrum and has writing these games in mind, you already have access to the relevant equipment.

If you’re new to all this Spectrum stuff and where its ROM came from, then maybe it’s time for a trip down memory lane.

source https://hackaday.com/2020/11/27/finally-the-rom-you-wished-your-sinclair-spectrum-had/

Finally! The ROM You Wished Your Sinclair Spectrum Had!

If there is one thing that Sir Clive SInclair was famous for, it was producing electronic devices that somehow managed to squeeze near-impossible performance out of relatively meagre components. This gave us some impressive products, but it’s fair to say that sometimes this philosophy pushed the envelope a little too far. Thus even some of the most fondly remembered Sinclair products concealed significant flaws, and this extended to both their hardware and their software.

Sir Clive never gave us this!

The SInclair ZX spectrum’s ROM for example had more than its fair share of bugs, and its BASIC programming experience with single keypress was unique but also slow to run. It’s something [Jonathan Cauldwell] has addressed with his Arcade Game Designer ROM, a complete and ready to run replacement for the original Spectrum ROM that contains a scripting language, a compiler, editors for in-game assets, and a game engine upon which to run your games. It’s the ROM you wanted back in 1983, when you were struggling to fit a bit of Z80 code in a Sinclair Basic REM statement.

If you’re a Spectrum enthusiast and think this sounds a little familiar then you are of course correct. It builds upon his past work with his Arcade Game Designer, with the distribution by ROM allowing the developer to use the full 48k available on all but a very few early 16k machines. You’ll need your own EPROM on which to burn it, but we suspect that if you’re the kind of person who has a Spectrum and has writing these games in mind, you already have access to the relevant equipment.

If you’re new to all this Spectrum stuff and where its ROM came from, then maybe it’s time for a trip down memory lane.

source https://hackaday.com/2020/11/27/finally-the-rom-you-wished-your-sinclair-spectrum-had/

Atreus Gets a TrackPoint and Layer LEDs

Fancy, split keyboards are cool and all, and they can really help with repetitive strain injury issues depending on a lot of different factors. But the big, glaring problem is that they often lack nice features that regular keyboards have — things like a number pad, media buttons, or in [discordia]’s case, a ThinkPad-style pointing stick. Fortunately, there’s a perfect spot for one between the two halves of the Keyboardio Atreus.

[discordia] is happy with the Atreus, but the whole layers thing can take some getting used to. Since Atreus only has 44 keys, it utilizes a layering system to change their function to cover all the keys you’d find on a full keyboard. After getting stuck in one rarely-used layer for a while, they decided to remedy the situation with some RGB LEDs to indicate the active layer. If you’ve got an Atreus that could use a few upgrades, check out [discordia]’s step-by-step instructions for adding a trackpoint and one-wire RGB LEDs.

If you have an old enough ThinkPad on your hands, then you may want to liberate the clicky keyboard, too.

source https://hackaday.com/2020/11/27/atreus-gets-a-trackpoint-and-layer-leds/

Hackaday Podcast 095: Booting FreeDOS from a Vinyl Record, Floating on Mushrooms, and Tunneling Through a Living Room

Hackaday editors Mike Szczys and Elliot Williams are talking turkey about the world of hardware hacking. This short episode brings news updates about the Nintendo Game and Watch hacking progress, the sad farewell to Areceibo, the new chip from Espressif, and the awesome circuit sculptures from our recent contest. We wrap up the show with a lightning round of quick hacks.

Take a look at the links below if you want to follow along, and as always, tell us what you think about this episode in the comments!

Direct download (17 MB)

Places to follow Hackaday podcasts:

Episode 095 Show Notes:

New This Week:

Quick Hacks:

source https://hackaday.com/2020/11/27/hackaday-podcast-095-booting-freedos-from-a-vinyl-record-floating-on-mushrooms-and-tunneling-through-a-living-room/

Repurposing Large Electronic Price Tags

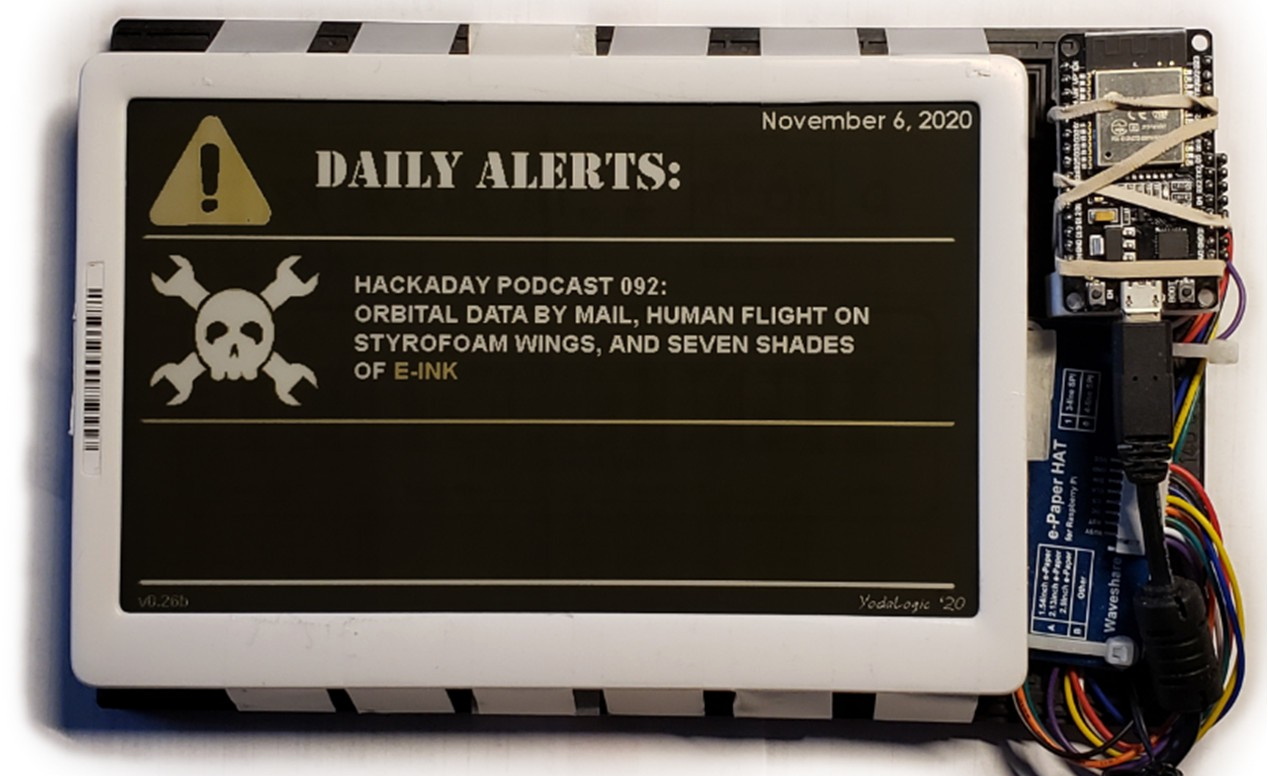
If you’ve recently braved the pandemic long enough to make a trip to a big box retailer, you may have spotted a few massive e-paper price tags affixed to large items like appliances. These seven inch displays were likely designed to be used in e-readers such as the Kindle, but through some surplus deal, are now shouting out clearance savings on last year’s washing machine. After checking out a particularly good price for a Samsung refrigerator at the local Home Depot, [YodaLogic] got to wondering if they could be bent to the hacker’s will.

Now to be clear, [YodaLogic] didn’t steal any of these tags. It turns out you can pick them up on eBay for less than $15 a pop, or at least that’s what they cost before this article went out. It’s an exceptionally good price when you realize that these displays are actually capable of color…albeit only two. Apparently when the retailer orders the so-called “Chroma 74” tags, they can pick between either yellow or red as the secondary color. While not quite as exciting as a full-color display, it certainly sets them apart from most of the e-paper panels we’ve seen used in DIY projects thus far.

The panel gets mighty close to the HaD color scheme

We’d like to tell you that [YodaLogic] cracked one of these things open and was able to wire it right up to a Pi or microcontroller, but the truth is a bit more complicated. Connecting the Chroma 74’s panel to the control board intended for a similar Waveshare 7.5 inch display didn’t seem to do anything. After some poking and prodding, it became clear that the WFD0750BF19 e-paper panel used in the Chroma needed a custom software profile to bring it to life. Unfortunately, there doesn’t seem to be a datasheet available for this particular panel.

By combining what could be gleaned from the datasheets of similar displays with a bit of experimentation, [YodaLogic] came up with a configuration profile that mostly works. It doesn’t seem like the yellow is as vibrant as it should be, and a refresh can take as long as 20 seconds, but it’s certainly a start. Perhaps the code can be tightened up with some input from the community, or even better, maybe somebody out there knows where we can get our hands on the datasheet for this panel.

While we’ve started to see more projects use e-paper displays, their high price still keeps many hackers away. Being able to repurpose cheap hardware like this could really spur some interesting development, so we’re excited to see [YodaLogic] put the finishing touches on this project and opened it up to a wider audience.

source https://hackaday.com/2020/11/27/repurposing-large-electronic-price-tags/

So Close to Landing a Model Rocket on Its Tail

We’ve become so used to seeing SpaceX boosters land themselves back on the pad with clockwork reliability, that it’s easy to forget it took them a good number of attempts to get right. Inspired by SpaceX’s work, [Joe Barnard] of [BPS.Space] started working to replicate it at the model scale five years ago, with no engineering education or experience. On the latest attempt with a brand-new thrust vectoring Scout E rocket, he has gotten tantalizingly close to doing a controlled propulsive landing with a solid-fuel rocket motor.

We’ve all been thrilled to see the SpaceX rockets return to earth, landing elegantly on a floating pad. But those are liquid-fueled. The trick with a solid-fuel rocket motor is it can’t be throttled directly, which is a challenge when you need precision control to land. Thanks to [Joe]’s custom AVA flight computer and the remarkably consistent thrust curve of the Estes F15 black powder motors he used, it becomes a matter of igniting the descent motor at the right moment to make the vertical velocity zero at touchdown. However, [Joe] found that the time between sending the ignition signal and when peak thrust is reached was inconsistent, so he had to work around that. He did this by controlling how much of the thrust is spent in the vertical direction, by vectoring the motor side to side to spend some trust horizontally.

View from rocket of the ascent motor falling away immediately after being ejected

In this attempt, the rocket tipped over on landing due to excessive horizontal movement at touchdown. Joe tracked the cause down to a weak GPS signal caused by antenna position and a possible bug in the Kalman filter that fuses all the sensor data for position and velocity estimation. Thanks to incredibly detailed telemetry and logging done by the flight computer, data from every launch are used for future improvements. We are looking forward to the next flight in a few weeks, during which [Joe] plans to tune and test the control software, among other minor improvements.

Almost every single part of this rocket is a display of engineering ingenuity. The landing struts are designed to absorb as much impact as possible without bouncing while being light and quick to deploy. The ascent motor is ejected simply by moving the thrust vectoring mount to one of its extremes, allowing the descent motor to drop into place. The rocket also features a complete emergency abort system with a parachute, which can be activated manually, or by the flight computer if it calculates that landing isn’t feasible. We already covered [Joe]’s latest launch pad, which is a very interesting project all by itself.

source https://hackaday.com/2020/11/27/so-close-to-landing-a-model-rocket-on-its-tail/

So Close to Landing a Model Rocket on Its Tail

We’ve become so used to seeing SpaceX boosters land themselves back on the pad with clockwork reliability, that it’s easy to forget it took them a good number of attempts to get right. Inspired by SpaceX’s work, [Joe Barnard] of [BPS.Space] started working to replicate it at the model scale five years ago, with no engineering education or experience. On the latest attempt with a brand-new thrust vectoring Scout E rocket, he has gotten tantalizingly close to doing a controlled propulsive landing with a solid-fuel rocket motor.

We’ve all been thrilled to see the SpaceX rockets return to earth, landing elegantly on a floating pad. But those are liquid-fueled. The trick with a solid-fuel rocket motor is it can’t be throttled directly, which is a challenge when you need precision control to land. Thanks to [Joe]’s custom AVA flight computer and the remarkably consistent thrust curve of the Estes F15 black powder motors he used, it becomes a matter of igniting the descent motor at the right moment to make the vertical velocity zero at touchdown. However, [Joe] found that the time between sending the ignition signal and when peak thrust is reached was inconsistent, so he had to work around that. He did this by controlling how much of the thrust is spent in the vertical direction, by vectoring the motor side to side to spend some trust horizontally.

View from rocket of the ascent motor falling away immediately after being ejected

In this attempt, the rocket tipped over on landing due to excessive horizontal movement at touchdown. Joe tracked the cause down to a weak GPS signal caused by antenna position and a possible bug in the Kalman filter that fuses all the sensor data for position and velocity estimation. Thanks to incredibly detailed telemetry and logging done by the flight computer, data from every launch are used for future improvements. We are looking forward to the next flight in a few weeks, during which [Joe] plans to tune and test the control software, among other minor improvements.

Almost every single part of this rocket is a display of engineering ingenuity. The landing struts are designed to absorb as much impact as possible without bouncing while being light and quick to deploy. The ascent motor is ejected simply by moving the thrust vectoring mount to one of its extremes, allowing the descent motor to drop into place. The rocket also features a complete emergency abort system with a parachute, which can be activated manually, or by the flight computer if it calculates that landing isn’t feasible. We already covered [Joe]’s latest launch pad, which is a very interesting project all by itself.

source https://hackaday.com/2020/11/27/so-close-to-landing-a-model-rocket-on-its-tail/

Shhh… Robot Vacuum Lidar is Listening

There are millions of IoT devices out there in the wild and though not conventional computers, they can be hacked by alternative methods. From firmware hacks to social engineering, there are tons of ways to break into these little devices. Now, researchers at University of Maryland have published a new hack to allows audio capture using lidar reflective measurements.

The hack revolves around the fact that audio waves or mechanical waves in a room cause objects inside a room to vibrate slightly. When a lidar device impacts a beam off an object, the accuracy of the receiving system allows for measurement of the slight vibrations cause by the sound in the room. The experiment used human voice transmitted from a simple speaker as well as a sound bar and the surface for reflections were common household items such as a trash can, cardboard box, takeout container, and polypropylene bags. Robot vacuum cleaners will usually be facing such objects on a day to day basis.

The bigger issue is writing the filtering algorithm that is able to extract the relevant information and separate the noise, and this is where the bulk of the research paper is focused (PDF). Current developments in Deep Learning assist in making the hack easier to implement. Commercial lidar is designed for mapping, and therefore optimized for reflecting off of non-reflective surface. This is the opposite of what you want for laser microphone which usually targets a reflective surface like a window to pick up latent vibrations from sound inside of a room.

Deep Learning algorithms are employed to get around this shortfall, identifying speech as well as audio sequences despite the sensor itself being less than ideal, and the team reports achieving an accuracy of 90%. This lidar based spying is even possible when the robot in question is docked since the system can be configured to turn on specific sensors, but the exploit depends on the ability to alter the firmware, something the team accomplished using the Dustcloud exploit which was presented at DEF CON in 2018.

You don’t need to tear down a Roomba for this experiment since there are a lot of lidar-based rovers out there. We’ve even seen open source lidar sensors that are even better for experimental purposes.

Thanks for the tip [Qes]

source https://hackaday.com/2020/11/27/shhh-robot-vacuum-lidar-is-listening/

Chess Computer Retires to Play Jazz

Years ago, [Leo Neumann]’s girlfriend gave him a 1970s chess computer game that was missing almost everything but the super cool clicky keyboard. Noting the similarity of chess move labeling to chord notation, [Leo] decided to turn it into something even nerdier — a jazz chord game where you jam with the computer.

To play the game, you and the computer take turns entering jazz chords that progress musically from the last one played. The hardware is simple — a Raspberry Pi Zero and a WM8960 audio hat with amplifier in speakers. [Leo] also put in a slightly larger display than the original and printed a new bottom half for the case. We love the look of this build, especially the groovy custom line font [Leo] designed.

On the software side, [Leo] made a Python prototyping environment using PYO Module and Kivy UI. Not content with other approaches to tonal consonance, [Leo] played a couple thousand chords and rated them according to their progressive harmony. Shake out those jazz hands and check it out after the break.

Want to play chess with computers? Make Alexa your go-between.

source https://hackaday.com/2020/11/26/chess-computer-retires-to-play-jazz/

TinyTacho: Rotational Speed Measurement Without The Bulk

An electronic tachometer is a straightforward enough device, in which the light reflections from a white spot on a rotating object are detected and counted over time, measuring the revolutions per minute (RPM). It’s a technique that has its roots in analogue electronics where the resulting pulses would have fed a charge pump, and it’s a task well suited to a microcontroller that simply counts them. But do you need an all-singing, all-dancing chip to do the job? [Stefan Wagner] has done it with a humble ATtiny13.

His TinyTacho is a small PCB with an IR LED and photodiode on one end, a small OLED display on its front, and a coin cell holder on its rear. The electronics may be extremely simple, but there’s still quite some effort to get it within the ATtiny’s meagre resources. Counting the revolutions is easy enough, but the chip has no I2C interface of its own and some bitbanging code is required. You can find all the design files and software you need in a GitHub repository, and he’s put up a video of the device in action that you can see below the break.

Tachometers are a popular project hereabouts, and we’ve featured a lot of them over the years. Perhaps the best place to direct readers then is not to another project, but to how to use a tachometer.

source https://hackaday.com/2020/11/26/tinytacho-rotational-speed-measurement-without-the-bulk/

Building a Workshop Crane From Scratch

Buying tools is all well and good, but it doesn’t suit the ethos of Youtube channel [Workshop From Scratch]. Building what you need is much more the go, and that’s demonstrated ably with this home-built electric workshop crane.

The crane is put together in a straightforward manner using basic steelworking techniques. Plates and bars are machined with a drill press, bandsaw and grinder, though we could imagine you could use hand tools if you were so inclined. An ATV winch is pressed into service to do the heavy lifting, powered by a set of 12V lead acid batteries placed in the base. This design choice does double duty as both a mobile power supply for the crane, and acts as a counterweight in the base.

The final result looks sharp in its orange paint finish, and does a good job of moving heavy equipment around the workshop. The legs are reconfigurable, so that even very heavy loads can be lifted with appropriate counterweight placed on the back. It’s a significant upgrade on the earlier version we featured last year, which was hydraulic in operation. Video after the break.

source https://hackaday.com/2020/11/26/building-a-workshop-crane-from-scratch/

Alfa Romeo Gauge Cluster Gets a Fresh Set of LEDs

On older vehicles, if you noticed that the lights had gone out behind one of your gauges, you knew it was time to snake your hand back there and replace the little incandescent bulb that had given up the ghost. But what are you supposed to do if you’re seeing the same problem on a modern vehicle that’s already made the leap to LED dash lighting? That’s what [Tysonpower] recently had to find out when the fuel indicator on his Alfa Romeo Giuletta QV went dark.

In the video after the break, [Tysonpower] details how to remove the instrument cluster from the Giuletta’s dash, which we imagine would be a useful little tutorial for anyone who owns the same vehicle. Once he has it out on the bench, he strips it down to the bare PCB and starts (literally) poking around.

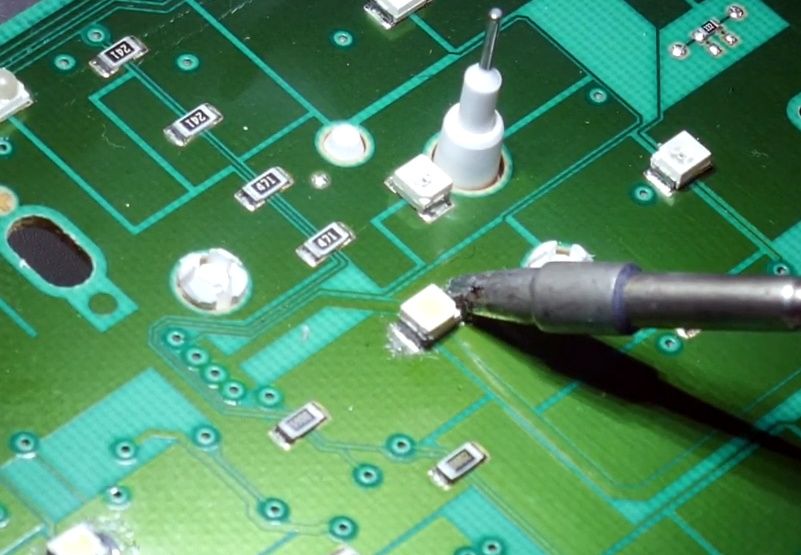
He eventually noticed that if he pushed on the board near the fuel indicator he could get the appropriate 3528 SMD LED to light up, but touching up the solder joints didn’t seem to fix the issue. Assuming the LED must be defective internally, he simply replaced it and all was good again.

Well, not exactly. The light produced by the new part didn’t match the color or brightness of the other dozen or so white LEDs that were installed on the board, so [Tysonpower] decided to just dive in and replace them all. While it obviously took a lot more time and effort, he says the end result is that the instrument cluster looks noticeably brighter and crisper when driving at night. Not bad for an afternoon’s work and a couple bucks worth of LEDs.

Most of the time, when we see somebody messing around behind the dash it’s because they intend on replacing the original instruments with something more capable. But projects like this, which add just a touch of refinement to the existing hardware, prove that stock components aren’t always a disappointment.

source https://hackaday.com/2020/11/26/alfa-romeo-gauge-cluster-gets-a-fresh-set-of-leds/

Alfa Romeo Gauge Cluster Gets a Fresh Set of LEDs

On older vehicles, if you noticed that the lights had gone out behind one of your gauges, you knew it was time to snake your hand back there and replace the little incandescent bulb that had given up the ghost. But what are you supposed to do if you’re seeing the same problem on a modern vehicle that’s already made the leap to LED dash lighting? That’s what [Tysonpower] recently had to find out when the fuel indicator on his Alfa Romeo Giuletta QV went dark.

In the video after the break, [Tysonpower] details how to remove the instrument cluster from the Giuletta’s dash, which we imagine would be a useful little tutorial for anyone who owns the same vehicle. Once he has it out on the bench, he strips it down to the bare PCB and starts (literally) poking around.

He eventually noticed that if he pushed on the board near the fuel indicator he could get the appropriate 3528 SMD LED to light up, but touching up the solder joints didn’t seem to fix the issue. Assuming the LED must be defective internally, he simply replaced it and all was good again.

Well, not exactly. The light produced by the new part didn’t match the color or brightness of the other dozen or so white LEDs that were installed on the board, so [Tysonpower] decided to just dive in and replace them all. While it obviously took a lot more time and effort, he says the end result is that the instrument cluster looks noticeably brighter and crisper when driving at night. Not bad for an afternoon’s work and a couple bucks worth of LEDs.

Most of the time, when we see somebody messing around behind the dash it’s because they intend on replacing the original instruments with something more capable. But projects like this, which add just a touch of refinement to the existing hardware, prove that stock components aren’t always a disappointment.

source https://hackaday.com/2020/11/26/alfa-romeo-gauge-cluster-gets-a-fresh-set-of-leds/

Alfa Romeo Gauge Cluster Gets a Fresh Set of LEDs

On older vehicles, if you noticed that the lights had gone out behind one of your gauges, you knew it was time to snake your hand back there and replace the little incandescent bulb that had given up the ghost. But what are you supposed to do if you’re seeing the same problem on a modern vehicle that’s already made the leap to LED dash lighting? That’s what [Tysonpower] recently had to find out when the fuel indicator on his Alfa Romeo Giuletta QV went dark.

In the video after the break, [Tysonpower] details how to remove the instrument cluster from the Giuletta’s dash, which we imagine would be a useful little tutorial for anyone who owns the same vehicle. Once he has it out on the bench, he strips it down to the bare PCB and starts (literally) poking around.

He eventually noticed that if he pushed on the board near the fuel indicator he could get the appropriate 3528 SMD LED to light up, but touching up the solder joints didn’t seem to fix the issue. Assuming the LED must be defective internally, he simply replaced it and all was good again.

Well, not exactly. The light produced by the new part didn’t match the color or brightness of the other dozen or so white LEDs that were installed on the board, so [Tysonpower] decided to just dive in and replace them all. While it obviously took a lot more time and effort, he says the end result is that the instrument cluster looks noticeably brighter and crisper when driving at night. Not bad for an afternoon’s work and a couple bucks worth of LEDs.

Most of the time, when we see somebody messing around behind the dash it’s because they intend on replacing the original instruments with something more capable. But projects like this, which add just a touch of refinement to the existing hardware, prove that stock components aren’t always a disappointment.

source https://hackaday.com/2020/11/26/alfa-romeo-gauge-cluster-gets-a-fresh-set-of-leds/

Tiny Ethernet Routers Now Available In Gigabit Speeds

If you need to move a lot of data, and fast, Gigabit Ethernet is a great way to do it. However, most network hardware outside of datacenters is fairly space inefficient, a headache if you’re building a robot or drone. Enter the Gigablox, a super-compact Gigabit router for just these applications.

The Gigablox takes its mission seriously, with its compact size the ultimate design goal. The entire switch fits on a tiny 45 mm x 45 mm PCB. To this end, it eschews the common RJ45 connector, which is bulkier than necessary. Instead, thin Molex PicoBlade connectors are used for the five ports on board. Cables are included to convert between the two connectors, and obviously crimping ones own is easy to do, too. For those who need to connect more devices, several Gigablox can be hooked up in the same way as any other Ethernet switch. The Gigablox is a non-blocking switch, too – meaning all five ports can run at full speed simultaneously.

The design is the sequel to the SwitchBlox, and the later SwitchBlox Nano, both designed by [Josh Elijah] earlier this year. The pace of development is impressive, and it’s great to see [Josh] bring Gigabit speeds to the compact form factor. We can imagine a few good uses for these boards; share your best ideas in the comments below! Video after the break.

source https://hackaday.com/2020/11/26/tiny-ethernet-routers-now-available-in-gigabit-speeds/

Cornhole Boards Play Victory Songs

How do you instantly make any game better? By lighting it up and playing at night. We would normally say ‘drinking’, but we’re pretty sure that drinking is already a prerequisite for cornhole — that’s the game where you toss bean bags at holes in angled boards.

[Hardware Unknown] loves cornhole, and was gifted a set of portable, folding boards that light up around the ring for nighttime action. These turned out to be the perfect basis for reactive boards that light up and play sound whenever points are scored. Both boards have a vibration sensor to detect bags hitting the top, and an IR break-beam sensor pair across the hole. An Arduino Nano reads from the sensors and controls an amplifier and a DF Player for sound.

Players get a point and a song for landing a bag on top of the board, and three points and a different song for making it in the hole. We love the Easter egg — anyone who manages to trip both the vibration sensor and the break-beam detector at the same time will be treated to the sound of a flock of honking geese. Check out the build journey after the break.

No good at cornhole? This one doesn’t let you miss.

source https://hackaday.com/2020/11/26/cornhole-boards-play-victory-songs/

Electric BMX with Friction Drive

Electric bikes have increased in popularity dramatically over the past few years, and while you can easily buy one from a reputable bicycle manufacturer, most of us around here might be inclined to at least buy a kit and strap it to a bike we already have. There aren’t kits available for every bike geometry, though, so if you want an electric BMX bike you might want to try out something custom like [Shea Nyquist] did with his latest build. (Video, embedded below.)

BMX frames have a smaller front triangle than most bikes, so his build needed to be extremely compact. To that end, it uses two small-sized motors connected together with a belt, which together power a friction drive which clamps against the rear tire to spin it directly. This keeps the weight distribution of the bike more balanced as well when compared to a hub drive, where the motor is installed in the rear wheel. It also uses a more compact lithium polymer battery pack instead of the typical 18650 lithium ion packs most e-bikes use, and although it only has a range of around three miles it’s more than enough charge to propel it around a skate park.

The build boasts impressive numbers too, at 2.5 kW peak power per motor. This puts it in electric motorcycle territory, and it’s indeed fast despite its small stature. For a true high speed e-bike experience, though, you’ll need a slightly larger frame and motor even if it means tossing safety out of the window.

source https://hackaday.com/2020/11/26/electric-bmx-with-friction-drive/

Adding USB To A Keyboard The Way It Used To Be Done

The world of custom keyboards has over the years developed its work into an art form, as mechanical key switches meet USB-HID capable microcontrollers for a plethora of designs as individual as their creators. This was however not always the case, and from the days of 8-bit home computers onwards making a custom keyboard often meant taking a surplus one from elsewhere and adapting its matrix to suit whatever controller interface was at hand. [Julian Calaby]’s USB conversion of an Apple Extended keyboard may be unusual in this day and age and was probably a late example even 15 years ago when he made it, but it remains a glorious piece of bodge-wire hardware hacking at its finest.

The task at hand with this type of conversion is to cut the matrix PCB tracks and replace them with soldered wires to create the new matrix required. This can then be wired to the controller, which in [Julian]’s case came from a cheap USB keyboard. He added a small USB hub to allow for a pair of USB sockets where Apple had put an ADB socket, making for quite a decent older keyboard with an unexpected USB interface.

Now older and wiser, he has plans to revisit his old keyboard with a modern microcontroller board, and needs to revisit the matrix again and give the peripheral new life. We still like the original though, as it captures a moment in time when keyboard matrix hacking made sense, and reminds us of our own youthful hardware follies.

Paging through Hackaday past it’s a testament to the old-school nature of this board that all we can find are microcontroller-based conversions. That’s not to say that cutting up old ‘boards is out of the question though.

source https://hackaday.com/2020/11/26/adding-usb-to-a-keyboard-the-way-it-used-to-be-done/

Zoombombing the EU Foreign Affairs Council

Those with security clearance are capable of making foolish mistakes, just like the rest of us. So is the story of how a Dutch journalist made an appearance on video meeting of the European Union’s Foreign Affairs Council (Dutch language, Google Translate link).

Ank Bijleveld's Tweeted picture, with the access details blacked out by Daniël Verlaan.
Netherlands Defence MInister Ank Bijleveld’s Tweeted picture, with the access details blacked out by Daniël Verlaan.

Like any other video call, if you had the link you could enter the meeting. So when Netherlands Defence Minister Ank Bijleveld Tweeted a photo of a video call last Friday, the address bar of the browser gave away the secret to anyone with a keen eye. Dutch journalist Daniël Verlaan working for the broadcaster RTL saw the URL on the screen and deduced the login credentials for the meeting.

We say “deduced”, but in fact there were five of the six digits in the PIN in the clear in the URL, leaving him with the difficult task of performing a one-digit brute-force attack and joining with the username “admin”. He joined and revealed his presence, then was admonished for committing a criminal offence before he left.

On one level it’s an opportunity for a good laugh at the expense of the defence ministers, and we certainly wouldn’t want to be Ank Bijleveld or probably the EU’s online security people once the inevitable investigation into this gets under way. It seems scarcely credible that the secrecy on such a high-security meeting could have sat upon such a shaky foundation without for example some form of two-factor authentication using the kind of hardware available only to governments.

EU policy is decided not by individual ministries but by delicate round-table summits of all 27 countries. In a pandemic these have shifted to being half-online and half in-real-life, so this EU defence ministers’ meeting had the usual mosaic video feed of politicians and national flags. And one Zoom-bombing journalist.

source https://hackaday.com/2020/11/25/zoombombing-the-eu-foreign-affairs-council/

Cleaner Laser Cutting With a 3D-Printed Nozzle

[Nervous System] does a lot of laser cutting, and [Jesse] shared a fascinating experimental improvement to their laser cutter that consists of a 3D-printed nozzle for cleaner cuts. You can see the results for yourself above, where the difference between the two cuts is striking.

[Jesse]’s modification doesn’t affect the laser beam itself; it is an improvement on the air assist, which is the name for a constant stream of air that blows away smoke and debris as the laser burns and vaporizes material. An efficient air assist is one of the keys to getting nice clean laser cuts, but [Jesse] points out that a good quality air assist isn’t just about how hard the air blows, it’s also about how smoothly it does so. A turbulent air assist can make scorch marks worse, not better.

3D-printed nozzle to promote laminar air flow on the left, stock nozzle on the right.

As an experiment to improve the quality of the air flowing out the laser nozzle, [Jesse] researched ways to avoid turbulence by creating laminar flow. Laminar flow is the quality of a liquid having layers flowing past one another with little or no mixing. One way to do this is to force liquid through individual, parallel channels as it progresses towards a sharply-defined exit nozzle. While [Jesse] found no reference designs of laminar flow nozzles for air assists, there were definitely resources on making laminar flow nozzles for water. It turns out that interest in such a nozzle exists mainly as a means of modifying Lonnie Johnson’s brilliant invention, the Super Soaker.

Working from such a design, [Jesse] created a custom nozzle to help promote laminar flow. Sadly, a laser cutter head carries design constraints that make some compromises unavoidable; one is limited space, and another is the need to keep the laser’s path unobstructed. Still, after 3D printing it in rigid heat-resistant resin, [Jesse] found a dramatic improvement in the feel of the air exiting the nozzle. Some test cuts confirmed a difference in performance, which results in a noticeably cleaner kerf without scorching around the edges.

One of the things [Nervous System] does is make their own custom puzzles, so any improvement to laser cutting helps reliability and quality. When production is involved, just about everything matters; a lesson [Nervous System] shared when they discussed making the best plywood for creating their puzzles.

source https://hackaday.com/2020/11/25/cleaner-laser-cutting-with-a-3d-printed-nozzle/

Literally Tearing Apart a SpaceX Starlink Antenna

While SpaceX’s constellation of Starlink satellites is nowhere near its projected final size, the company has enough of the birds zipping around in low Earth orbit to start a limited testing period they call the Better Than Nothing Beta. If you’re lucky enough to get selected, you have to cough up $500 for the hardware and another $100 a month for the service. Despite the fairly high bar for getting your hands on one, [Kenneth Keiter] decided to sacrifice his Starlink dish to the teardown Gods.

We say sacrifice because [Kenneth] had to literally destroy the dish to get a look inside. It doesn’t appear that you can realistically get into the exceptionally thin antenna array without pulling it all apart, thanks in part to preposterous amount of adhesive that holds the structural back plate onto the PCB. The sky-facing side of the phased array, the key element that allows the antenna to track the rapidly moving Starlink satellites as they pass overhead, is also laminated to a stack-up comprised of plastic hexagonal mesh layers, passive antenna elements, and the outer fiberglass skin. In short, there are definitely no user-serviceable parts inside.

The dish hides many secrets under its skin.

Beyond attempting to analyze the RF magic that’s happening inside the antenna, [Kenneth] also takes viewers through a tour of some of the more recognizable components of the PCB; picking out things like the Power over Ethernet magnetics, a GPS receiver, some flash storage, and the H-Bridge drivers used to control the pan and tilt motors in the base of the dish.

It also appears that the antenna is a self-contained computer of sorts, complete with ARM processor and RAM to run the software that aims the phased array. Speaking of which, it should come as no surprise to find that not only are the ICs that drive the dizzying array of antenna elements the most numerous components on the PCB, but that they appear to be some kind of custom silicon designed specifically for SpaceX.

In short, there’s still plenty we don’t know about how this high-tech receiver actually works. While [Kenneth] does a respectable job of trying to make sense of it all, and we respect his dedication to rip apart such a rare and expensive piece of kit, it’s still going to be awhile before the hacker community truly masters the tech that SpaceX is putting into their ambitions global Internet service.

[Thanks to Alex for the tip.]

source https://hackaday.com/2020/11/25/literally-tearing-apart-a-spacex-starlink-antenna/

Literally Tearing Apart a SpaceX Starlink Antenna

While SpaceX’s constellation of Starlink satellites is nowhere near its projected final size, the company has enough of the birds zipping around in low Earth orbit to start a limited testing period they call the Better Than Nothing Beta. If you’re lucky enough to get selected, you have to cough up $500 for the hardware and another $100 a month for the service. Despite the fairly high bar for getting your hands on one, [Kenneth Keiter] decided to sacrifice his Starlink dish to the teardown Gods.

We say sacrifice because [Kenneth] had to literally destroy the dish to get a look inside. It doesn’t appear that you can realistically get into the exceptionally thin antenna array without pulling it all apart, thanks in part to preposterous amount of adhesive that holds the structural back plate onto the PCB. The sky-facing side of the phased array, the key element that allows the antenna to track the rapidly moving Starlink satellites as they pass overhead, is also laminated to a stack-up comprised of plastic hexagonal mesh layers, passive antenna elements, and the outer fiberglass skin. In short, there are definitely no user-serviceable parts inside.

The dish hides many secrets under its skin.

Beyond attempting to analyze the RF magic that’s happening inside the antenna, [Kenneth] also takes viewers through a tour of some of the more recognizable components of the PCB; picking out things like the Power over Ethernet magnetics, a GPS receiver, some flash storage, and the H-Bridge drivers used to control the pan and tilt motors in the base of the dish.

It also appears that the antenna is a self-contained computer of sorts, complete with ARM processor and RAM to run the software that aims the phased array. Speaking of which, it should come as no surprise to find that not only are the ICs that drive the dizzying array of antenna elements the most numerous components on the PCB, but that they appear to be some kind of custom silicon designed specifically for SpaceX.

In short, there’s still plenty we don’t know about how this high-tech receiver actually works. While [Kenneth] does a respectable job of trying to make sense of it all, and we respect his dedication to rip apart such a rare and expensive piece of kit, it’s still going to be awhile before the hacker community truly masters the tech that SpaceX is putting into their ambitions global Internet service.

[Thanks to Alex for the tip.]

source https://hackaday.com/2020/11/25/literally-tearing-apart-a-spacex-starlink-antenna/

TV Head Is Great Replacement For Your Real Head

The head is one of the few parts of the body that it seems impossible to live without. Many people are, of course, not happy with the one they’ve been given. For those dreaming of a more digital replacement, [Vivian’s] TV Head might be just the accessory to meet those needs.

The build starts with an old CRT, which [Vivian] promptly gutted to make room for her head. In place of the original tube, a thin polycarbonate sheet was installed with window tint applied. Behind this, rows of WS2812B are set up in a grid, spaced apart just enough to allow the wearer to see through.  The setup is controlled by a Circuit Playground Express. A small PS/2 keyboard is used to control the light show, and the onboard accelerometer can be used for gravity reactive animations.

For some reason, screens as heads are remarkably emotive, and we kind of want one for daily wear. We can imagine it making a great Halloween costume, too. If you’ve always wanted to cosplay as one of those colorful robots from the Opening Ceremony of the 2002 World Cup, here’s your chance. You will not be surprised that this isn’t the first TV head we’ve featured. Video after the break.

source https://hackaday.com/2020/11/25/tv-head-is-great-replacement-for-your-real-head/