The Hacker History of Music Technologies

Music throughout history has been inspired and changed by hackers and makers, and never moreso than in the 20th century. Helen Leigh is one such hacker, who brought a talk to Supercon to give us a crash course in the history of recording, electronics and music, and what the maker movement is doing in the music world today.

The tape recorder was an invention that kicked off a golden period of exploration in sound. Beginning in World War II, the Nazi propaganda machine cut and spliced recorded materials and disseminated them across broadcasting stations in Europe. To the astonishment of the Allies, certain German officials appeared to be making broadcasts from different studios at the same time, due to the high quality of the recording hardware. After the war, this technology was discovered by a group of Parisian recording artists who began to experiment with an art that became known as musique concrète, using tape hardware in weird and wonderful ways to create new sounds heretofore unheard in nature.

Daphne Oram was an early proponent of advanced recording techniques, and founded the BBC Radiophonic Workshop.

Helen’s talk explores this movement as an excellent example of the hacker ethos applied to musical creation. While much of the artistic output was amelodic and somewhat challenging to listen to, it nevertheless had a great impact on recording technology and techniques.

Helen recounts the work of Daphne Oram, who, inspired by musique concrète, went on to perform her own experiments, and eventually founded the BBC Radiophonic Workshop. This hallowed organisation became a hotbed of electronic and musical experimentation, developing innovative techniques in foley and laying the foundations for modern electronic music.

Particularly note worthy is the work done in the creation of the original Doctor Who theme song. Produced in the BBC Radiophonic Workshop by Delia Derbyshire, it was created entirely electronically from a score by Ron Grainer. In 1963, synthesizers weren’t readily available; instead, the whole composition was brought to life with signal generators, test equipment, tape loops, and recordings of white noise. Lengths of tape were cut and stuck back together with tape to produce the various parts of the track, with recordings sped up and slowed down to create the necessary pitch changes. Multitrack tape recording was not yet available, and thus the final mix was created by playing back several tapes all at the same time, with some necessary fussing required to get them all in sync. The cutting-edge production foreshadowed many innovations to come in recording technology.

[Helen]’s own mini.mu product helps educate children in hardware hacking and musical expression.

With plenty of focus on the dawn of the art, Helen then moves on to discuss the current state of play. A hat tip is given to [LOOK MUM NO COMPUTER] and his famous Furby Organ; just one of many creations that have come out of the lab, some of which we’ve featured before.

Helen is prolific as a creative technologist, producing many builds that experiment with sound and music in their own way. Building hardware as diverse as musical ferns and choker-mounted vocoders, she’s pushed the envelope in what’s possible. Having produced a series of interactive sound sculptures, Helen has found that capacitive touch and gesture interactions are a key technology in this space, creating a natural and intuitive interface with the hardware. It’s a technique that can have pitfalls, particularly with wearable designs, but Helen’s perseverance and skill has overcome such challenges. Other works involve creating commercial products like the Mi.Mu advanced glove interface, and pushing cheap microcontrollers to do “more than just chiptunes”. With a passion for education as well as experimentation, there’s also a strong discussion of how community leads to ever greater creative output.

Helen’s Supercon talks serves as a great lesson on the history of hacking and music, as well as a tantalising primer for those keen to get involved today. It’s certainly opened our eyes to new possibilities, and we can’t wait to see what comes next!

source https://hackaday.com/2020/01/06/the-hacker-history-of-music-technologies/

Organic Audio: Putting Carrots as Audio Couplers To The Test

[Boltz999]'s carrot interconnect.
[Boltz999]’s carrot interconnect.

If there’s one thing that gives us joy here at Hackaday it’s a story of audio silliness. There is a rich vein of dubious products aimed at audiophiles which just beg to be made fun of, and once in a while we oblige. But sometimes an odd piece of audio equipment emerges with another purpose. Take [Boltz999]’s interconnects for example, which were born of necessity when there were no female-to-female phono adapters to connect a set of cables. Taking a baby carrot and simply plugging the phonos into its flesh delivered an audio connectivity solution that worked.

Does this mean that our gold-nanoparticle-plated oxygen-free directional audio cables are junk, and we should be heading for the supermarket to pick up a bag of root vegetables instead? I set out to test this new material in the secret Hackaday audio lab, located on an anonymous 1970s industrial estate in Milton Keynes, UK.

Characterising A Root Vegetable

The high point of an engineer's life comes as they measure the electrical properties of a root vegetable.
The high point of an engineer’s life comes as they measure the electrical properties of a root vegetable.

A quick search on the composition of a carrot reveals an 88% water content, with the other 12% being mostly carbohydrates, followed by small quantities of fat, protein, and a cocktail of those vitamins and minerals that caused our parents to be so enthusiastic about our younger selves eating them. In particular about 0.4% of a carrot is comprised of potassium, sodium, and calcium ions in solution, making the vegetable analagous to a sponge soaked in a weak electrolyte solution. Thus you’d expect it to be conductive, and to pass a line-level audio signal into a high-impedance load such as an audio amplifier. A quick DC resistance measurement of our test carrot showed a resistance that started at about 50K for distances up to about 10mm, rising slowly to near 100K across its roughly 80mm length. It’s probably beyond the scope of this piece, to characterise the complex impedance of a carrot.

Attenuator Π-section circuit by SpinningSpark CC-BY-SA 3.0. R2 represents the width of the carrot, R1 and R3 each represent the carrot distance between pin and outer of a phono plug.

The hack that prompted all this though didn’t simply replace the pair of copper wires with ones made of carrot. By plugging the phono into the tap root an extra 50K resistance is created between its two conductors as well as between it and the other phono, and the result is a resistor network. Because it’s not an unreasonable assumption the two pieces of hi-fi equipment in the same rack could share an earth, rather than disappear down the rabbit hole of infinite meshes of resistors  it’s probably safe instead to think of it as something closer to the familiar Pi network attenuator. There are plenty of online calculators that could give you a performance figure for a given network, but in this case with so many approximations and carrot-related guesses their results would be rather meaningless. All that we need to know is that there will be some attenuation of any audio fed into the carrot.

Crisp Treble, and a Crunchy Midrange

The square wave performance of a carrot

Having discussed the theory, it’s time to move onto the practice. Standing in for a high-end audio source was my phone playing YouTube videos, and for a high-end hi-fi a set of amplified computer speakers. Surprisingly it worked, but unsurprisingly in doing so there was a noticeable attenuation that cut the volume by around half. Exactly as expected, but there was a further step of taking a look at it with a ‘scope.

Applying a handy 1kHz squarewave a 30% attenuation was immediately obvious (as well as that maybe the secret lab’s ‘scope probes needed adjusting). We lacked an audio analyser to measure the harmonic distortion of the coupling, but there has to come a point at which characterising a vegetable comes to an end.

So, we’ve proved the original story to be true, you can use a carrot in an audio interconnect. But how would we describe its sound? The answer if you are fond of audiophile reviews is that it adds an organic feel to the broader soundstage, with crisp treble notes, a crunchy midrange, and deep, earthy bass tones. Meanwhile if you are simply looking for something to connect two cables, we’d suggest a carrot sounds better in the roasting pan.

Header image: Sajetpa [CC BY-SA 3.0]

source https://hackaday.com/2020/01/06/organic-audio-putting-carrots-as-audio-couplers-to-the-test/

3D-Printed Tools Turn Bench Vise into Expedient Press Brake

Chances are pretty good that most of us have used a bench vise to do things far beyond its intended use. That’s understandable, as the vise may be the most powerful hand tool in many shops, capable of exerting tons of pressure with the twist of your wrist. Not taking advantage of that power wouldn’t make any sense, would it?

Still, the clamping power of the vise could sometimes use a little finesse, which is the thinking behind these 3D-printed press brake tools.  [Brauns CNC] came up with these tools, which consist of a punch and a die with mating profiles. Mounted to the jaws of the vise with magnetic flanges, the punch is driven into the die using the vise, forming neat bends in the metal. [Braun] goes into useful detail on punch geometry and managing springback of the workpiece, and handling workpieces wider than the vise jaws. The tools are printed in standard PLA or PETG and are plenty strong, although he does mention using his steel-reinforced 3D-printing method for gooseneck punches and other tools that might need reinforcement. We’d imagine carbon-fiber reinforced filament would add to the strength as well.

To be sure, no matter what tooling you throw at it, a bench vise is a poor substitute for a real press brake. Such machine tools are capable of working sheet metal and other stock into intricate shapes with as few setups as possible, and bring a level of power and precision that can’t be matched by an improvised setup. But the ability to make small bends in lighter materials with homemade tooling and elbow grease is a powerful tool in itself.

Thanks to [Keith Fulkerson] for the tip.

source https://hackaday.com/2020/01/06/3d-printed-tools-turn-bench-vise-into-expedient-press-brake/

Continuous Integration: What It Is And Why You Need It

If you write software, chances are you’ve come across Continuous Integration, or CI. You might never have heard of it – but you wonder what all the ticks, badges and mysterious status icons are on open-source repositories you find online. You might hear friends waxing lyrical about the merits of CI, or grumbling about how their pipeline has broken again.

Want to know what all the fuss is about? This article will explain the basic concepts of CI, but will focus on an example, since that’s the best way to understand it. Let’s dive in.

What is CI anyway?

The precise definition of Continuous Integration refers to the practice of software developers frequently checking in their code, usually multiple times a day in a commercial setting, to a central repository. When the code is checked in, automated tests and builds are run, to verify the small changes which have been made. This is in preference to working on a ginormous slab of code for a week, checking it in, and finding out it fails a large number of tests, and breaks other people’s code.

Whilst this is a valid definition, colloquially CI has become synonymous with the automation part of this process; when people refer to CI, they are often referring to the tests, builds, and code coverage reports which run automatically on check-in.

Additionally, CI is often lumped together with its sister, Continuous Deployment (CD). CD is the practice of deploying your application automatically: as soon as your code has been pushed to the correct branch and tests have passed. We’ll talk more about this soon.

Case study – a simple API

I’m going to save any more explanation or discussion of the merits of CI until after we’ve seen an example, because this will make it easier to picture what’s going on.

The aim of this example is to make a very simple Python application, then use CI to automatically test it, and CD to automatically deploy it. We’re going to use GitLab CI, because it’s a neat, integrated solution that is easy to setup. You can view the finished repository containing all the files here.

Let’s start by creating a Python file containing our main application logic. In this case, it’s some string processing functions.

""" web/logic.py. Contains main application code. """

def capitalise(input_str):
    """Return upper case version of string."""
    return input_str.upper()

def reverse(input_str):
    """Return reversed string."""
    return input_str[::-1]
    

Let’s also add some extremely basic tests for this code:

""" test_logic.py. Tests for main application code. """

from web import logic

def test_capitalise():
    """Test the `capitalise` function logic."""
    assert logic.capitalise("hackaday") == "HACKADAY"

def test_reverse():
    """Test the `reverse` function logic."""
    assert logic.reverse("fresh hacks") == "skcah hserf"
    assert logic.reverse("racecar") == "racecar"

Ok, now that we’ve made our main application code, let’s expose it over an API. We’ll use Flask for this. Don’t worry about meticulously reading this, it’s just here to serve as an example, and is shown here for context.

""" web/api.py. Expose logic functions as API using Flask. """
from flask import Flask, jsonify

import web.logic as logic

app = Flask(__name__)


@app.route('/api/capitalise/<string:input_str>', methods=['GET'])
def capitalise(input_str):
    """ Return capitalised version of string. """
    return jsonify({'result': logic.capitalise(input_str)})


@app.route('/api/reverse/<string:input_str>', methods=['GET'])
def reverse(input_str):
    """ Return reversed string. """
    return jsonify({'result': logic.reverse(input_str)})


if __name__ == '__main__':
    app.run()

Note that we should test the API as well (and Flask has some nice ways to do this), but for conciseness, we won’t do this here.

Now that we have an example application setup, let’s do the part we’re all here for and add a CI/CD pipeline to GitLab. We do this by simply adding a .gitlab-ci.yml file to the repository.

In this explanation we’re going to walk through the file section by section, but you can view the full file here. Here’s the first few lines:

image: python:3

stages:
    - analyse
    - test
    - deploy

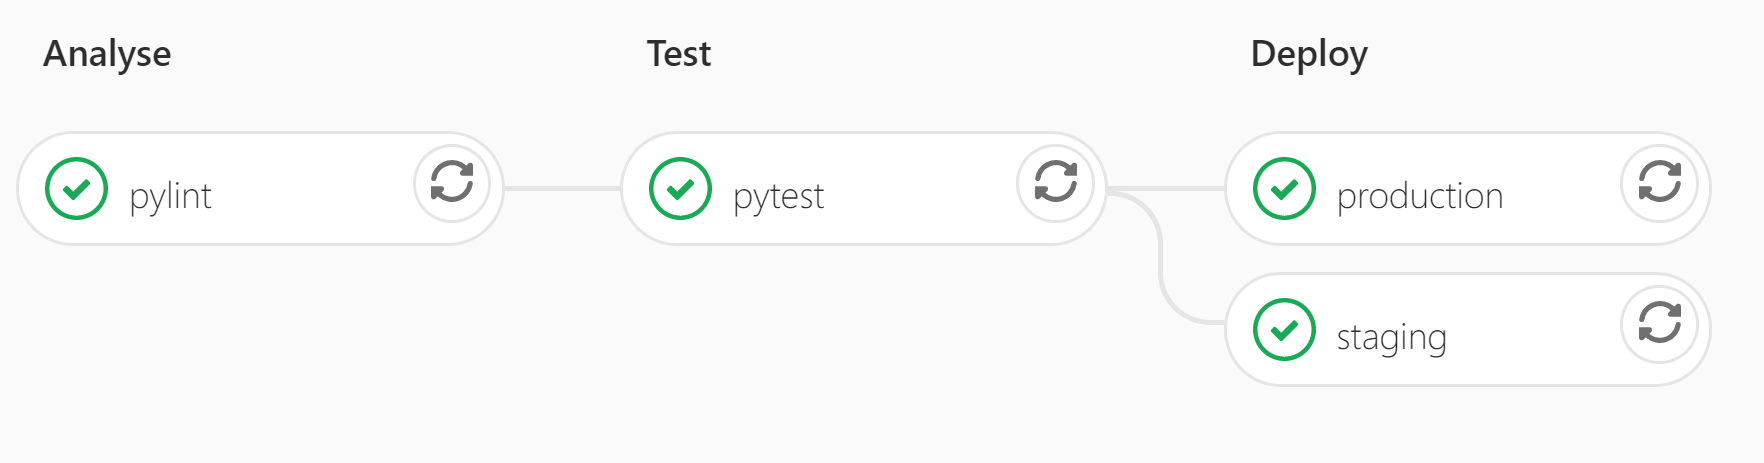
This sets the default Docker image to run jobs in (Python 3 in this case), and defines the three stages of our pipeline. By default, each stage will only run once the previous stage has passed.

pylint:
    stage: analyse
    script:
        - pip install -r requirements.txt
        - pylint web/ test_logic.py

This is the job for our first stage. We run pylint as an initial static analyser on the code to ensure correct code formatting and style. This is a useful way to enforce a style guide and statically check for errors.

pytest:
    stage: test
    script:
        - pip install -r requirements.txt
        - pytest

This is our second stage, where we run the tests we wrote earlier, using pytest. If they pass, we continue to our final stage: deployment.

staging:
    stage: deploy
    script:
        - apt-get update -qy && apt-get install -y ruby-dev
        - gem install dpl
        - dpl --provider=heroku --app=hackaday-ci-staging --api-key=$HEROKU_API_KEY  

production:
    stage: deploy
    only:
    - master
    script:
        - apt-get update -qy && apt-get install -y ruby-dev
        - gem install dpl
        - dpl --provider=heroku --app=hackaday-ci-prod --api-key=$HEROKU_API_KEY

Our aim here is to deploy the API onto some kind of server, so I’ve used Heroku as the platform, authorised with an API key.

This last stage is slightly different from the others because it contains two jobs that deploy to two places: staging and production. Note that we deploy to staging on any commit, but we only deploy to production when we push to or merge into master. This means that we can check, test and use our live app in staging after any code change, but the production app isn’t affected until our code is merged into master. (In a larger project, it often makes more sense to deploy to staging on master and only deploy to production when a commit is tagged.)

And that’s it! In less than 40 lines we’ve defined a completely automated system to check and deploy our code. We are rewarded by our pipeline showing up in GitLab as below:

Additionally, the .gitlab-ci.yml configuration file which specifies what to automate is usually also version-controlled, so that if the CI pipeline evolves, it evolves alongside the relevant version of your code.

Why it’s useful

All manner of tasks can be automated using CI, and can allow you to catch errors early and fix them before they propagate technical debt in the codebase.

Common tasks for larger Python projects might be to test our code for compatibility with different Python versions, build a Python module as a wheel, and/or push it to PyPi. For projects using compiled languages, you could automatically build your binaries for all your target platforms. For web development, it’s easy to see the benefit of automatically deploying new code on a server once certain conditions have been met.

Furthermore, part of the reason that CI is so powerful is its close relation to version control. Every time that code is pushed to any branch in a repository, tests and analysis can run, which means that people who control master or protected branches can easily see if code is safe to merge in.

Indeed, whilst CI is most satisfying when the pipeline is full of ticks, it is most useful when it looks like this:

This means that the tests failed, and as a result, the broken code was not deployed. People can clearly see not to merge this code into important branches.

Conclusions: do you need CI?

CI/CD is definitely more useful in some cases than others. But if you’re writing any code at all, you can save yourself time by writing tests for it. And if you have tests, why not run them automatically on every commit?

I can personally say that every time I’ve set up a CI pipeline, not only has it saved me time, but at some point or another it got me out of a scrape by catching broken code. I’d wager it will do the same for you.

source https://hackaday.com/2020/01/06/continuous-integration-what-it-is-and-why-you-need-it/

Hackaday Belgrade: Call for Proposals

Join Hackaday in Belgrade, Serbia on May 9th, 2020 for the Hackaday Belgrade conference! The biennial hardware conference is just seventeen weeks from now. Early Bird tickets will go on sale shortly, but beginning right now you can hack your way into the conference by submitting a talk proposal. Accepted speakers receive free admission, plus everyone who submits a quality talk proposal will be given priority when tickets go on sale.

Yes, I’m talking to you. Hackaday strives to include first-time speakers in the slate of presenters at our conferences. We’re looking for unique, cutting-edge, whimsical, crazy, formidable, or world-changing topics revolving around hardware creation. From learning new tools or techniques to fabrication adventures, from code-wrangling that firmware project to pulling off an art installation, and from forgotten hardware history to the impossible made possible on your own workbench, we need to hear your stories!

That project for which you went into the deep weeds and worked your way back out again? Everyone at a Hackaday conference wants to hear about it and in the greatest detail possible. After all, we’re your fellow hackers. In fact, you should probably bring the hardware along for the ride.

We Need You

None of this happens in a vacuum. This is the third Hackaday Belgrade conference, which have now settled into a tick-tock cadence of even-numbered years. The first two both sold out, this one will as well, and the result is always an action-packed, nearly 24-hour marathon sprint of talks, workshops, and hardware hacking. But the only reason this works is because amazing people just like you make it a priority in their life to be there.

Badge hacking at 2018 Hackaday Belgrade

So take the plunge, put together your talk proposal and submit it before March 2nd. But don’t stop there, pester your friends and your heros to do the same. Block out May 9th on your schedule (roughly 9 am-2 am) and take the day before off of work. While you’re at it, convince your boss and coworkers to come along with you. See you in Belgrade!

source https://hackaday.com/2020/01/06/hackaday-belgrade-call-for-proposals/

Steampunk Motorcycle Runs On Compressed Air, Is Pure Hacking Art

Sometimes it’s ok to sacrifice some practicality for aesthetics, especially for passion projects. Falling solidly in this category is [Peter Forsberg]’s beautiful, barely functional steam punk motorcycle. If this isn’t hacker art, then we don’t know what is.

The most eye-catching part of the motorcycle is the engine and drive train, with most of the mechanical components visible. The cylinders are clear glass tubes with custom pistons, seals, valves and push rods. The crank mechanism is from an old Harley and is mounted inside a piece of stainless steel pipe. Because it runs on compressed air it cools down instead of heating up, so an oil system is not needed.

For steering, the entire front of the bike swings side to side on hinges in the middle of the frame, which is quite tricky to ride with a top speed that’s just above walking speed. It can run for about 3-5 minutes on a tank, so the [Peter] mounted a big three-minute hour glass in the frame. The engine is fed from an external air tank, which he wears on his back; he admits it’s borderline torture to carry the thing for any length of time. He plans to build a side-car to house a much larger tank to extend range and improve riding comfort.

[Peter] admits that it isn’t very good as a motorcycle, but the amount of creativity and resourcefulness required to make it functional at all is the mark of a true mechanical hacker. We look forward to seeing it in its final form.

For more inspiration check out the DIY electric motorcycle, and the flying motorcycle that the Dubai police is testing.

source https://hackaday.com/2020/01/06/steampunk-motorcycle-runs-on-compressed-air-is-pure-hacking-art/

Embedding a Smart Switch in a Java Factory

When you need coffee, you don’t need any hassles standing between you and caffeination. Especially ironic hassles, like having to do more to turn on appliances inside of home automation schemes than you did without them.

[Maurice Makaay] bought a smart plug to add this beautiful drip coffee machine to his Z-Wave setup, but it isn’t all that smart. Starting the brew remotely means making sure that both the machine’s power switch and the smart plug switch are on. Some members of the household still like making their coffee the old-fashioned way, so [Maurice] came up with a smart, single switch solution to satisfy both cases.

The answer comes in the form of a Z-Wave switch that takes dual inputs and is small enough to fit inside the machine. After a lot of searching around for compatible, splash-proof parts, [Maurice] replaced the existing on/off rocker with a momentary rocker for making coffee manually. That switch labeled ‘extra heet’ used to turn the warming burner on and off. Since he never uses the burner, the switch receptacle now houses a power indicator light.

[Maurice] went about this mains appliance hack the right way — he used extra thick wires connected with lever nuts, and kept the machine’s equally beautiful spare parts and safety documentation by his side the whole time. A person could probably become a lot more comfortable with the idea of installing these by looking over [Maurice]’s pictures of the process.

You know how coffee makes everything better? Turns out ‘everything’ includes printer filament.

source https://hackaday.com/2020/01/06/embedding-a-smart-switch-in-a-java-factory/

Creating a Custom Engagement Ring with 3D-Printing

Even if you’re pretty sure what the answer will be, a marriage proposal is attended by a great deal of stress to make the event as memorable and romantic as possible. You’ve got a lot of details to look after, not least of which is the ring. So why not take some of the pressure off and just 3D-print the thing?

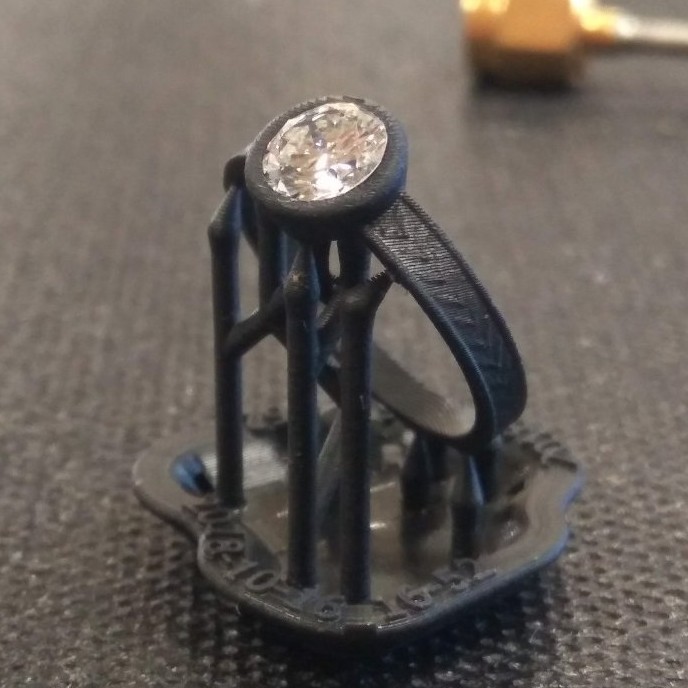
No, a cheesy PLA ring is probably not going to cut it with even the most understanding of fiancees, and that’s not at all what [Justin Lam] did with this DIY engagement ring. He took an engineer’s approach to the problem – gathering specs, making iterative design changes in Fusion 360, and having a prototype ring SLA printed by a friend. That allowed him to tweak the design before sending it off to Shapeways for production. We were surprised to learn that jewelry printing is a big deal, and Shapeways uses a lost-wax process for it. First a high-resolution wax SLA printer is used to make a detailed positive, which is then used to make a plaster mold. The mold is fired to melt the wax, and molten gold is poured in to make the rough casting, which is cleaned and polished before shipping.

Once he had the ring, [Justin] watched a few jewelry-making videos to learn how to set the family heirloom stone into the bezel setting; we admit we cringed a bit when he said he used the blade of a screwdriver to crimp the edge of the bezel to the stone. But it came out great, even if it needed a bit of resizing. The details of the proposal are left to the romantically inclined, but TL;DR – she said yes.

Congratulations to the happy couple, and to [Justin] for pulling off a beautiful build. Most of our jewelry hacks are of the blinkenlight variety rather than fine jewelry, although we have featured a machinist’s take on the subject before.

source https://hackaday.com/2020/01/05/creating-a-custom-engagement-ring-with-3d-printing/

AirBass Lets You Jam Wherever

If you play an instrument, you know how rewarding it is to watch and hear yourself reproduce your favorite songs and make new melodies. But you also know how steep the learning curve can be, how difficult it is to learn positions and notes while your body adjusts to the physical side. For stringed instruments, that means gaining muscle memory, growing fingertip calluses, and getting used to awkward arm positions.

For their final project in [Bruce Land]’s class on designing with microcontrollers, [Caitlin, Jackson, and Peter] decided to make a more accessible bass guitar. For starters, it can be placed flat on a table similar to a pedal steel guitar to get around those awkward arm positions. Instead of plucking or slapping the strings, the player wears a glove with a flex resistor on each finger, and plays the string by curling and uncurling their finger.

We think the team’s implementation of the left hand duties and fretboard is pretty clever. Each of the four strings has a break-beam detection circuit, and a single distance sensor decides where the finger is along the fretboard. Another great thing about this backpack-sized bass is that it never needs tuning. If you stay tuned, you can hear [Peter] play “Smoke On the Water” after the break.

There’s more than one way to make an air guitar — this one that does it with LIDAR.

source https://hackaday.com/2020/01/05/airbass-lets-you-jam-wherever/

Hackaday Links: January 5, 2020

It looks like the third decade of the 21st century is off to a bit of a weird start, at least in the middle of the United States. There, for the past several weeks, mysterious squads of enormous multicopters have taken to the night sky for reasons unknown. Witnesses on the ground report seeing both solo aircraft and packs of the them, mostly just hovering in the night sky. In mid-December when the nightly airshow started, the drones seemed to be moving in a regular pattern that reminded law enforcement personnel of a grid search used for ground searches, but that pattern seems to have changed since then. These are not racing drones, nor are they DJI Mavics; witnesses report them to be 6′ (2 meters) in diameter and capable of staying aloft for 90 minutes. These are serious machines, not kiddies on a lark. So far, none of the usual suspects have taken responsibility for the flights, so speculation is all anyone has as to their nature. We’d also imagine someone from our community will get out there with radio direction finding gear to locate the operators.

We all know that water and electricity don’t mix terribly well, but thanks to the seminal work of White, Pinkman et al (2009), we also know that magnets and hard drives are a bad combination. But that didn’t stop Luigo Rizzo from using a magnet to recover data from a hard drive. He reports that the SATA drive had been in continuous use for more than 11 years when it failed to recover after a power outage. The spindle would turn but the heads wouldn’t move, despite several rounds of percussive maintenance. Reasoning that the moving coil head mechanism might need a magnetic jump-start, he probed the hard drive case with a magnetic parts holder until the head started moving again. He was then able to recover the data and retire the drive. Seems like a great tip to file away for a bad day.

It seems like we’re getting closer to a Star Trek future every day. No, we probably won’t get warp drives or transporters anytime soon, and if we’re lucky velour tunics and Spandex unitards won’t be making a fashion statement either. But we may get something like Dr. McCoy’s medical scanner thanks to work out of MIT using lasers to conduct a non-contact medical ultrasound study. Ultrasound exams usually require a transducer to send sound waves into the body and pick up the echoes from different structures, with the sound coupled to the body through an impedance-matching gel. The non-contact method uses pulsed IR lasers to penetrate the skin and interact with blood vessels. The pulses rapidly heat and expand the blood vessels, effectively turning them into ultrasonic transducers. The sound waves bounce off of other structures and head back to the surface, where it causes vibrations that can be detected by a second laser that’s essentially a sophisticated motion sensor. There’s still plenty of work to do to refine the technique, but it’s an exciting development in medical imaging.

And finally, it may actually be that the future is less Star Trek more WALL-E in the unlikely event that Segway’s new S-Pod personal vehicle becomes popular. The two-wheel self-balancing personal mobility device is somewhat like a sitting Segway, except that instead of leaning to steer it, the operator uses a joystick. Said to be inspired by the decidedly not Tyrannosaurus rex-proof “Gyrosphere” from Jurassic World, the vehicle is said to top out at 24 miles per hour (39 km/h). We’re not sure what potential market for these things would need performance like that – it seems a bit fast for the getting around the supermarket and a bit slow for keeping up with city traffic. So it’s a little puzzling, although it’s clearly easier to fully automate than a stand-up Segway.

source https://hackaday.com/2020/01/05/hackaday-links-january-5-2020/

Converting a Drill Press Into a Milling Machine

Mills are a huge investment, and for hobbyists without the space to install their own personal mill, it can sometimes be a pain to have to find a facility with a mill to complete your project.

What if you could convert your drill press into a mill instead? YouTuber [Small Metalworking Machines] explores this in his video, where he takes a small Central Machinery drill press and adds a few mods. He took some steps to improve the quill, spindle, and bearings — boring down the quill, replacing the bearings, and finally turning and re-threading the spindle it at 1/2-20.

With the adjustments, he was able to add in a cheap drill chuck, which fit in quite nicely with just a slight wobble of 5 thousandths on either side. To introduce some control, he added in a worm gear to engage a gear on the spindle. A pivot point disengages the worm gear, while bearings provide it controlled movement from the worm wheel.

He also added a cheap milling table from eBay, attached to the base of the drill press, all for a total of $120. While it’s not perfect, it’s still significantly less expensive than buying a mill!

[Thanks to jafinch78 for the tip!]

source https://hackaday.com/2020/01/05/converting-a-drill-press-into-a-milling-machine/

3D Pens Can Make Ugly Drone Parts That Almost Work

Small hobby aircraft and light plastic parts go hand in hand, and a 3D printing pen makes lightweight plastic things without the overhead of CAD work and running a 3D printer. So could a 3D pen create useful plastic bits for small quadcopters? [Michael Niggel] decided to find out by building his drone parts with a 3D pen loaded with ABS plastic. He mostly discovered that the created objects could politely be said to look like they were sketched by a toddler, but that’s not all he learned.

He found that in general creating an object was harder than the marketing materials implied. As soon as the filament exits the pen’s nozzle, the thin little molten line of plastic cools rapidly and does two things: it has a tendency to curl, and loses its desire to stick to things. [Michael] found the whole affair worked much less like ‘drawing in thin air’ and rather more like piping frosting, or caulking.

An almost functional micro quad frame. The arms aren’t rigid enough to hold the motors vertical when under power.

Nevertheless, [Michael] sought to discover whether a 3D pen could be used to make quick and dirty parts of any use. He created two antenna brackets and one micro quad frame. All three are chaotic messes, but one antenna bracket was perfectly serviceable. The 3D pen was indeed able to create a strangely-shaped part that would have been a nightmare to CAD up. The other antenna part worked, but didn’t do anything a zip tie wouldn’t have done better. The rapid cooling of the plastic from the 3D pen has an advantage: extrusions don’t “droop” like a glob of hot glue does before it hardens.

By now, [Michael] agreed that the best way to create a plastic part of any complexity whatsoever seemed to be to draw sections flat, build them up in layers, then use the pen to weld the pieces together and add bulk. The micro quad frame he made in this way doesn’t look any nicer than the other attempts, but it did hold the parts correctly. Sadly, it would not fly. Once the motors powered up, the arms would twist and the flight controller was unable to compensate for motors that wouldn’t stay straight. This could probably be overcome, but while the end result was dirty it certainly wasn’t quick. The 3D pen’s niche seems restricted to simple, unstressed parts that aren’t permitted to gaze up themselves in a mirror.

If you have a 3D pen, we’d like to remind you of this mini spool design whose parts are welded together with the pen itself. For bigger jobs, a high-temperature hot glue gun can be used to dispense PLA instead.

source https://hackaday.com/2020/01/05/3d-pens-can-make-ugly-drone-parts-that-almost-work/

Space-Saving Servo Tester Console Looks Space-Worthy

You know how it goes — sometimes you just have to stop in the middle of a project and build yourself a tool that vastly improves your workflow as soon as it’s completed. [Ikkalebob] aka [Will Cogley] on YouTube is working on some super secret project that requires a whole bunch of servos. And since all of them have to be tested and set, he built this adorable servo tester as a time-saving gift to himself.

This tester revolves around an Adafruit 16-channel servo driver and an Arduino Uno. The servos show up on the screen in groups of four, and can be tested four at a time with the pots. The buttons let [Ikkalebob] move up and down between the groups. The SainSmart LCD proved to be more difficult to set up than others, but [Ikkalebob] did you a solid and tweaked the library. It’s available along with his code and STLs.

Speaking of STLs, we really dig the mini NASA console look and the folding enclosure. Leveraging the print process to build hinges and other things is awesome, and so is getting away with using fewer fasteners. You can see a bit of how [Ikkalebob] designed it in the video after the break.

Depending on what you’re doing with servos, you might want a different kind of testing suite. Here’s one that’s geared toward RC pilots.

source https://hackaday.com/2020/01/05/space-saving-servo-tester-console-looks-space-worthy/

All You’ve Ever Wanted to Know about Compilers

They say that in order to understand recursion, you must first understand recursion. Once you master that concept, you might decide that it’s time to write your own compiler that can compile itself as a fun side project. According to [Warren] aka [DoctorWkt], who documented every step of writing this C compiler from scratch, a true compiler will be able to do that.

Some of the goals for the project included self-compiling, focusing on a real hardware platform, practicality, and simplicity. [Warren] outlines a lot of the theory of compilers as well, including all the lexical, grammar, and semantic analysis and then the final translation into assembly language, but really focuses on making this compiler one for practical use rather than just a theoretical implementation. He focuses on Intel x86-64 and 32-bit ARM platforms too, which are widely available.

This project is a long read and very thoroughly documented at around 100,000 words, so if you’ve ever been interested in compilers this is a great place to start. There are a lot of other great compiler tools floating around too, like the Compiler Explorer which shows you generated code as you write in a higher level language.

[via Hackaday.io]

source https://hackaday.com/2020/01/05/all-youve-ever-wanted-to-know-about-compilers/