
Monthly Archives: December 2019
The Bees Are Back In Town! – Skyblock In Minecraft 1.15: Episode #9
Getting Diamonds In Skyblock! – Skyblock In Minecraft 1.15: Episode #8
Ramping Up Production! – Skyblock In Minecraft 1.15: Episode #6
r/entitledparents “Karen visits my Pizza Restaurant!”
BEST CUBE #166
Bee Powered Crop Farm Tutorial! | Fastest Crop Growth, Honeycomb Farm
Amazing Science Toys/Gadgets/Inventions 2
Complete LiFePO4 Solar Battery System Design
FET based Motor Driver is Better than L298N
If you want to build a small robot with a motor, you are likely to reach for an L298N to interface your microcontroller to the motor, probably in an H-bridge configuration. [Dronebot] has used L298N chips like this many times. In the video below, he uses a TB6612FNG instead, taking advantage of the device’s use of MOSFETs. The TB6612 may be a little more expensive, but it’s clearly worth it.
You can get breakout boards for the tiny chips. [DroneBot] looks at several ready-to-go breakout boards. They are not drop-in compatible, though. For example, the L298N can operate motors from 4.5 to 46V while the TB6612 can go from 2.5 to 13.5V on the motor voltage. The L298N also handles more current. However, because of its relatively low efficiency, it needs a heat sink. The TB6612 boasts up to 95% efficiency and also has a low current standby mode. Of course, the TB6612 drops much less voltage which is great if you are using low voltage motor.
Assuming the new device is suitable for your hardware, the software isn’t really very different from L298N programs. If you know how to use the L298N, you can probably just snag a break out board, download the library, and be off to the races — no pun intended.
If you want more basics on the h-bridge, we’ve covered it many times. Of course, you can always use relays if you want real old school.
source https://hackaday.com/2019/12/29/fet-based-motor-driver-is-better-than-l298n/
Stock Price Prediction Using Python & Machine Learning
SodaStream CO2 Refill – No Special Gizmos!
Scorkl: BUSTED!
When Christopher Hitchens gets furious – compiliation
Top 3 Ideas With Arduino | 3 Awesome Arduino Projects
Pedal To The Metal! – Skyblock In Minecraft 1.15: Episode #5
Curing Zombies! – Skyblock In Minecraft 1.15: Episode #4
Building A Spinning Moiré Effect Lamp
Subterranean Uses for LIDAR: Cave Surveys
LIDAR has gained much popularity as a means for self-driving cars to survey the space around them. At their most basic, LIDAR is a surveying method that uses lasers to paints the space around the sensors and assembles the distances measured from reflected light into a digital three-dimensional representation. That’s something that has quite a number of other applications, from surveying ancient ruins and rainforests from a bird’s eye view to developing 3D models of indoor spaces.
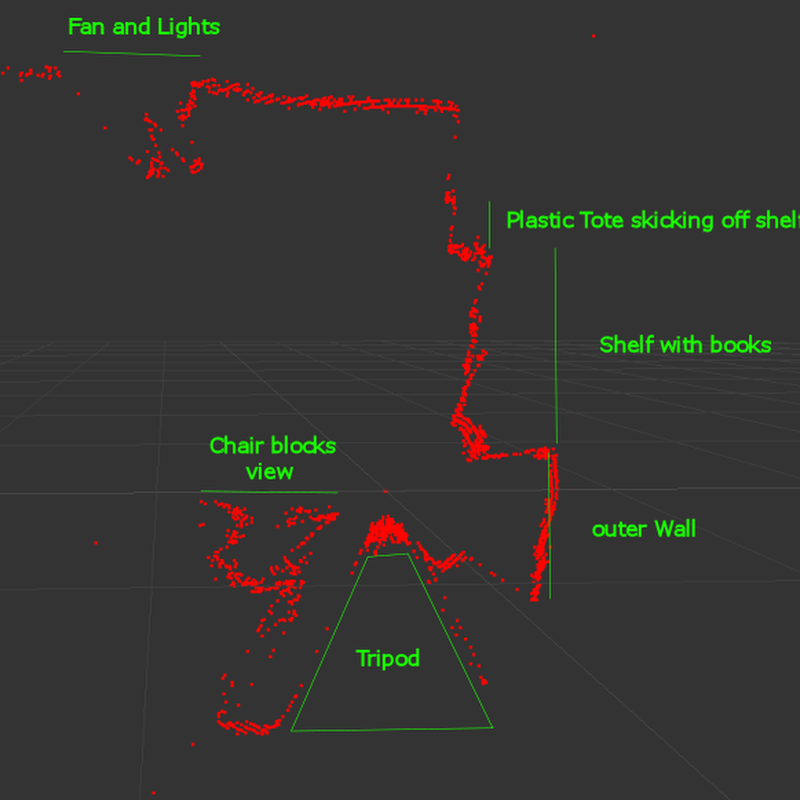 One fascinating use of LIDAR technology is to map out the routes inside caves, subterranean spaces that are seldom accessed by humans apart from those with specialized equipment and knowledge of how to safely traverse the underground terrain. [caver.adam] has been working on his Open LIDAR project for a few years using an SF30-B High Speed Rangefinder and laser device for a dual-system atop a gimbal with stepper motors for cave scanning.
Originally an entry in the 2016 Hackaday Prize, [Adam] has continued to work on the project. The result shown in the video below is a cheaper 3D LIDAR setup that works by rotating the laser distance module on 2 axes with a sensor centered at the center of rotation. It works for volumetric calculations, detects change over time, and identifies various water patterns and rocks on a surface map. Compared to notebooks, tape measures, and compasses, it’s certainly a step up in cave surveying technology.
Check out some other past underground surveying projects, such as Iowa City’s beer caves scanning projects and National Geographic’s 2014 expedition of the Titan Chamber in southern Guizhou Province in China.
source https://hackaday.com/2019/12/28/subterranean-uses-for-lidar-cave-surveys/
LED Flame Illuminates the Beauty of Noise
A Pocket-Sized Terminal for Mobile Python Hacking
Inspired by the good old days when your computer would boot directly into BASIC, [Le Roux Bodenstein] has created a handheld device he calls “DumbDumb” that can drop you into a MicroPython environment at a moment’s notice. If that doesn’t interest you, think of it this way: it’s a (relatively) VT100 compatible serial terminal with a physical keyboard that can fit in your pocket.
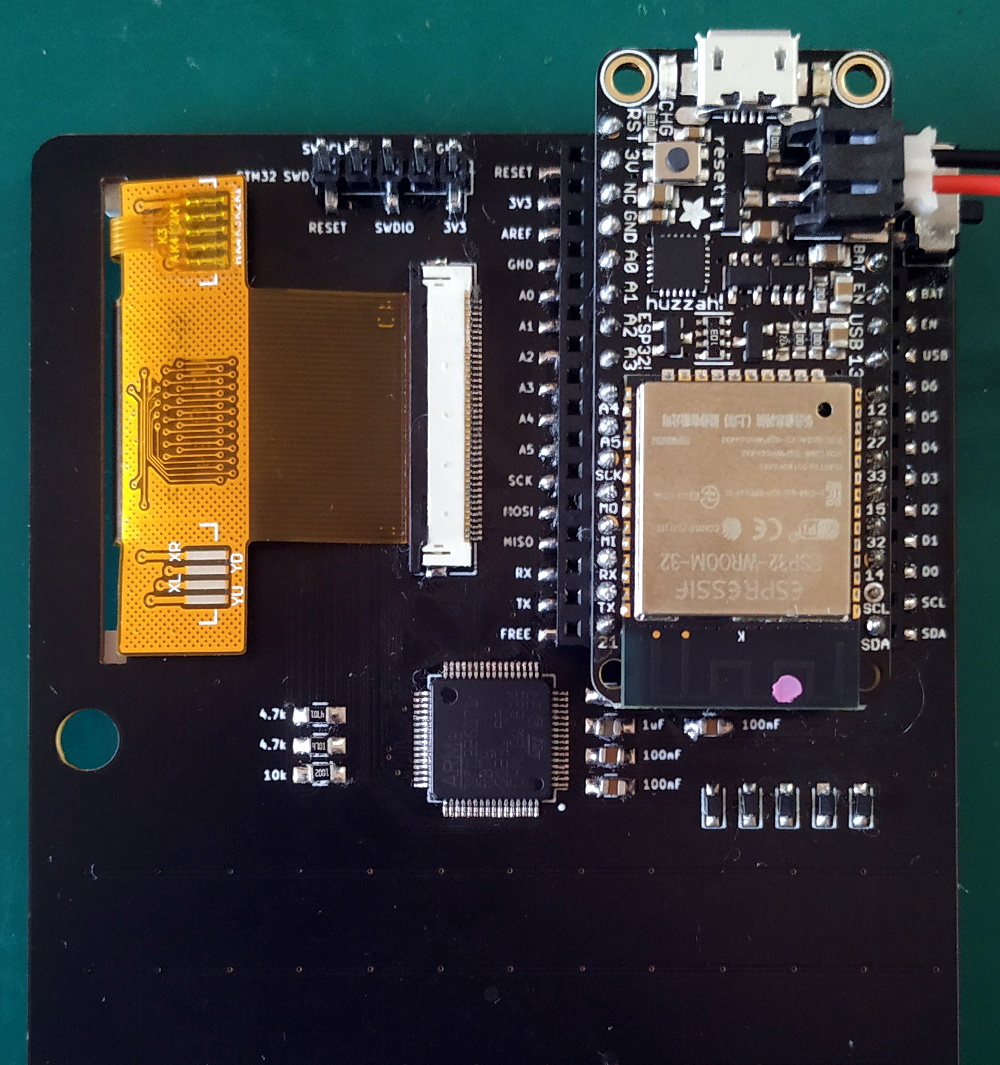 Being essentially just a dumb terminal (hence the name), there’s actually not a lot of hardware on the board. Beyond the 320×240 NewHaven 2.4 inch LCD, there’s just an STM32G071R8 microcontroller and a handful of passives. Plus the 57 tactile buttons that make up the keyboard, of course.
The MicroPython part comes in thanks to the spot on the back of the board that accepts an Adafruit Feather Wing. In this case, it’s the HUZZAH32 with an ESP32 on board, but it could work with other variants as well. With the wide array of Feather boards available, this terminal could actually be used for an array of applications.
So even if fiddling around with MicroPython isn’t your idea of a good time, there’s almost certainly some interesting software you could come up with for a tiny network-attached terminal like this. For example, it might be just what you need to start working on that LoRa pager system.
source https://hackaday.com/2019/12/28/a-pocket-sized-terminal-for-mobile-python-hacking/
Engineering with Origami
How a Harvard Professor Makes Transforming Toys & Designs | WIRED
Peek Inside These Same-But-Different Power Supplies
When [Kerry Wong] found an Amrel PPS 35-2 Programmable Power Supply from the late 90s on eBay, he recognized it as the single-channel version of another unit he owned, the dual-channel Amrel PPS-2322. Naturally, he purchased it and did a compare and contrast of the two models.
 From the outside, they look fairly different but weigh about the same. But the similarities on the inside make it quite clear that they share a common design. There are a few things that grab your eye and the 35-2 doesn’t seem quite as well thought out, with some components being soldered into awkward-looking places. Capacitors bristle like barnacles where they are soldered directly to a connector, and a blob of hot glue anchors two resistors that rise up out of the board like a couple of weeds.
The link above shows some high resolution side-by-side photos between the two models, and [Kerry] thoughtfully provides a link to the manual for the PPS series as well as a dump of the firmware (.zip) for the 35-2. A teardown video is embedded below.
Benchtop power supplies are important tools, but we’ve also seen how modern breadboard power supplies are remarkably full-featured.
source https://hackaday.com/2019/12/28/peek-inside-these-same-but-different-power-supplies/
Stronger 3D Prints — Glue or Carbon Fiber?
[CNCKitchen], like many others, is looking to make strong 3D prints. Using a high tech PLA bio copolyester compound, he printed a bunch of hooks in two different orientations. He used several different types of glue including epoxy and superglue. You can see the video of his results, below.
In addition to the glue, he used epoxy and bulk carbon fiber, again, in two different orientations. After several days of curing, he was ready to test.
Untreated parts managed about 53 kg or not quite 25 kg, depending on their orientation. The thin superglue part got up to 58 kg. VIscious superglue didn’t do much better than the thin glue. Since the epoxy cracked before the plastic, there wasn’t much difference and in one orientation it was even weaker than the reference part.
You can get carbon fiber enhanced PLA, but you get short fibers. [Stefan] glued long pieces of carbon fiber exactly where he wanted them using epoxy. This method did provide some benefits.
Unfortunately, at least with the plastic used, none of the results were amazing. The carbon fiber technique bears more investigation, but even so, the results were — so far — not astonishing. However, this is a great application of the scientific method. Intuitively, adding some glue ought to make parts better, right? Testing like this shows that it doesn’t in this particular circumstance.
By the same token, you’d think getting superglue in your eyes would be a life-changing event. Apparently, not so much, although we still don’t recommend it. If you want to know more about glue — maybe more than you want to know — we deconstructed glue awhile ago.
source https://hackaday.com/2019/12/28/stronger-3d-prints-glue-or-carbon-fiber/